
|
|
|
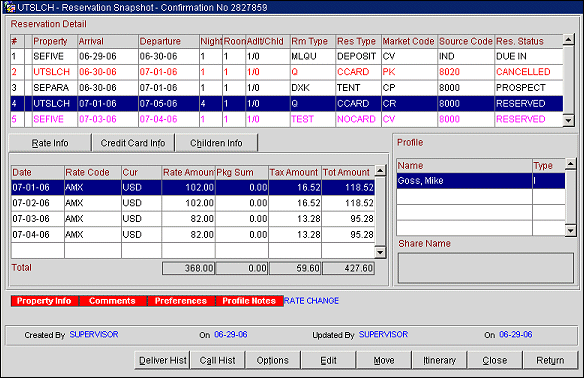
Reservation Snapshot Screen
When you make a Cross Selling reservation in PMS (Reservation>Cross Selling), the Reservation Snapshot screen appears automatically after the confirmation number is assigned and before the closing script displays. (The Cross Selling option is available with the OPERA multi-property (OPP MHT2) add on license code.) In ORS (when the OPR<version number>ORS license code is active), this screen also appears automatically after the confirmation number is assigned and before the closing script displays (after you save your changes).
You can access the Reservation Snapshot screen to view existing reservations too. At the ORS Sales screen select the Lookup button. At the ORS Reservation Lookup screen, highlight the reservation and select the Select button.
Use the Reservation Snapshot screen to review a summary of a guest's complete itinerary. The screen lists each reservation (sometimes referred to as a "leg") of the itinerary. The Reservation Snapshot screen allows you to quickly view or make changes to existing reservations.
Note: The itinerary feature is very flexible. For example, itinerary reservations may have legs at different properties; legs at the same property, but for different stay dates; or legs at the same property and for the same stay dates, but for different profiles. There can also be gaps in the stay dates. For example, leg one might reserve stay dates in January and leg two might reserve stay dates in March. When booking an itinerary from the Snapshot screen, and a potential gap or overlap (stay dates overlapping another reservation) occur for the same profile, a prompt appears asking the user if they wish to continue. If the user continues to make the reservation (creating either a gap or overlap) this reservation appears as the color 'magenta' in the Reservation Detail grid for easy identification. This message prompt can be hidden with a default value selected, see Popup Messages for details.
Note: When the OPR<version number>ORS and OPI<version number>OCIS license codes are active and the Award Redemption functionality has been set up, the Rate Info tab is replaced by the Award Info tab. See ORS/OCIS Sales Screen Award Redemption for more information.
The confirmation number displays at the title bar of the Reservation Snapshot screen. The following source details are provided in the lower part of the screen.
Created By. User name who made the reservation.
Created On. Date the reservation was created.
Updated By. User name who performed the last update actions.
Updated On. Date on which the reservation was last updated.
The Reservation Snapshot screen is divided into sections for quick viewing.
This grid displays a list of reservations that make up the itinerary. When a user lacks access rights to the property for which the stay is booked, the reservation will be displayed in gray. This indicates the user lacks permission to modify the details of the reservation. In addition, the Options, Edit and Move buttons will be disabled for the reservation.
Note: Double-click on a leg to open the Reservation Details screen for that booking.
# (Leg number). The leg number of the reservation.
Box. Indicate if this is a shared reservation by placing an asterisk (*) in the box.
Property. The property code where the stay is reserved.
Reservation Type. The reservation type or guarantee method.
Arrival. The guest arrival date for this leg of the reservation.
Departure. The guest departure date for this leg.
Nights. The number of nights reserved for this leg.
Rooms. Displays the number of rooms reserved for this leg.
Adults/Children. The number of adults and children for this leg.
Room Type. The room type for this leg.
Rate Code. The rate code attached to this leg.
Amount. The nightly rate charged for this reservation. If the rate is considered a confidential rate and configured as a suppress rate, an amount will not be displayed, but will be replaced by the letters SR (suppressed rate).
Reservation Status. The reservation status (e.g., Reserved, Waitlisted, Cancelled) for this leg.
Total Active. Total number of reserved legs. (Displays only if one or more legs is inactive (Checked out or Cancelled).
Total Cancelled. Total number of cancelled legs. A Share With prompt displays if the reservation is shared. (Displays only if one or more legs are cancelled.)
The following rate information is displayed for each night of the booking highlighted in the Reservation Detail.
Date. The date of the guest's stay.
Rate Amount. The nightly room rate.
Package Sum. The total cost of package inclusions or add-on packages, if any.
Tax Amount. The amount of nightly tax charged for the room and package products.
Total Room. The total room plus tax associated with the room.
Total Amount. Total for room, packages, and taxes.
Total. Totals for all nights of the stay included in the highlighted leg.
If the payment method for the reservation highlighted in the Reservation Detail section is credit card, the credit card information is displayed in these fields. The information shown is view only. To change credit card information or payment method, edit the reservation (select the Edit button).
Credit Card Type. The credit card type (e.g., Visa, American Express, Discover).
Credit Card Number. The credit card number associated to the reservation. The credit card number is masked. Double-click in the area to bring up the Reservation screen where the credit card number can be viewed (when the user has permission). See Credit Cards for more information.
Credit Card Expire Date. The credit card expiration date. When credit card information is masked and if the card has expired, and the user does not have the permission of Reservations>Credit Card Information Edit, the word EXP appears in this field. See Credit Cards for more information.
Attached to Profile. If checked, the credit card information is available from the guest profile.
The profile(s) attached to the highlighted reservation are listed in this grid. Double click on an entry in this grid to display the Profile screen for viewing and editing. The following information is shown in the grid.
Name. The attached profile name. A Share With reservation is indicated by an asterisk (*) next to the name. The Share With name appears directly below the Profile grid.
Type. Displays the profile type (I = individual, G = group, C = company, T = travel agent, or S = source).
Delivery History. (Visible in ORS) Display the Reservation Delivery History screen that tracks and identifies when and how the reservation was delivered to the property, such as by Fax or Email, and the interface used.
Call History. Display the Call History screen, listing each phone call taken by the agent related to this reservation.
Options. (Only available to users who have access rights to the property for which the reservation is booked.) Display the Reservations Options screen. Some of the options are inactive until a guest arrives at a property or dependent on a parameter setting.
Note: When the General> Enhanced Options Management application parameter is set to Y, you have another way of quickly accessing options without selecting the Options button to open the Options menu itself. You can press Ctrl+T to display the blue Option field.
![]()
To view all the available options in alphabetical order, scroll through the options list by selecting the Up and Down arrow keys. Press Enter to select the displayed option and open the corresponding option screen. Or, instead of scrolling through the options list, type the first three letters of the desired option. The corresponding options screen appears. (For example, type c-a-n for Cancel.)
You may also enter the first letter of the desired option and all options beginning with that letter will appear in alphabetical order as you scroll. To scroll, use the arrow keys or repeatedly press the beginning letter key. For example, if you typed a-a-a-a you might scroll through the options of Accompanying, Add on, Agent/Company, Alerts. Press Enter to open the desired option.
Cancel. Cancel the highlighted reservation.
Itinerary. Select this button to begin creating a new itinerary leg reservation. In ORS and PMS, when the Selling Screen>Full Search for Itinerary Reservation application parameter is set to Y, the Define Search Screen appears. When the Selling Screen>Full Search for Itinerary Reservation application parameter is set to N, the Itinerary booking lookup screen appears.
Note: If an overlap occurs when adding a new leg to a reservation (e.g., the user selects the same property and selects arrival/departure dates that overlap with the arrival/departure dates of the first leg), the following message will open prompting the user to continue or cancel. 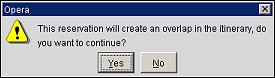
If the user selects Yes to continue, the reservation record will display in the color "pink" in the Reservation Snapshot and Detail grids.
In ORS, this message screen will open after the user selects a rate code on the Rate Availability screen and selects OK on the Reservation screen. In PMS, it will open after OK is selected on the Itinerary screen.
Edit. (Only available to users who have access rights to the property for which the reservation is booked.) Display the Reservation screen for the highlighted leg; you may then make changes to that reservation. If the reservation is part of an itinerary and the newly edited dates cause a gap or overlap, a prompt appears asking the user if they want to proceed.
Move. (Only available to users who have access rights to the property for which the reservation is booked.) Display the Move Reservation screen. Move the highlighted leg of the itinerary to an alternative property.
Close. Display the Closing Script screen.
See Also