
|
|
|
Track It Dashboard
The Track It function is available when the General>Track It application function is set to Y.
Select Miscellaneous>Track It>Dashboard to display the Track It Dashboard screen. You may also access the Track It Dashboard from the Reservation Options menu available from the Reservation screen or the Reservation Search screen.
This screen brings together the most-used features of Track It and can be used as a jumping off point for other related activities. Extensive search criteria help you locate the ticket numbers you are interested in. In addition, you can create and edit tickets, associate or un-associate reservations with tickets, and access reservation details and options. The Log Book and Events features let you display information about property events and internal "pass-along" notes.
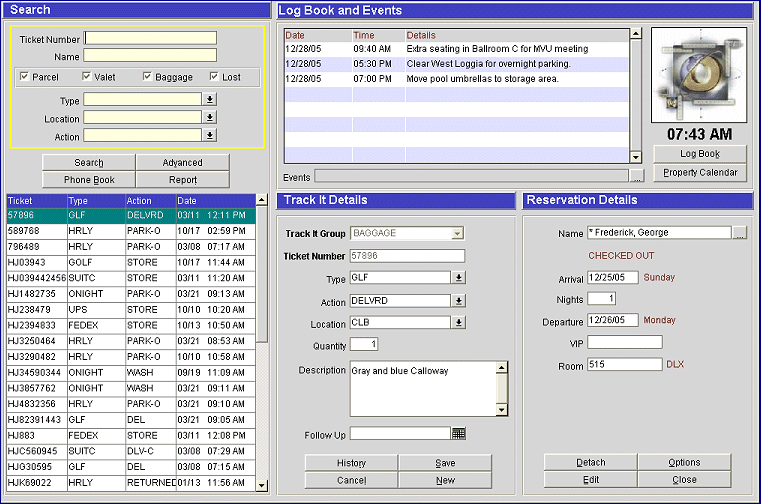
The following sections describe the functional areas of the dashboard.
Search for a list of Track It tickets that match your search criteria. Tickets that match your search criteria appear in the search results grid. When you highlight a ticket entry in this grid, the details are displayed in the Track It Details area to the right.
If no search criteria are entered and the Search button is selected, you will see all tickets with an open action status whose follow up date is blank or equal to the property's current business date.
Note: When the Track It Dashboard is accessed for a specific reservation by using the Reservation Options menu, by default the search results grid displays all ticket numbers attached to that reservation. Selecting the Search button displays all Track It tickets which do not have a reservation attached (and which match any filter criteria you have selected).
If a value is defined in an advanced search field, the Search button will conduct the advanced search. By selecting the Search button again, the advanced search field(s) are automatically cleared.
Enter one or more of the search criteria and select the Search button to display the search results in the grid.
Ticket Number. Enter the exact and complete ticket number.
Note: Partial ticket number searches are not supported.
Name. If the ticket is associated with a reservation, enter the guest's last name.
Parcel/Baggage/Valet/Lost. Select the check box(es) that correspond to the Track It group(s) you wish to search.
Note: The Lost check box is not available for selection when the General>TrackIt Lost and Found permission is not granted.
Type. Select the down arrow to choose the Track It type. Track It types identify the kinds of Parcel, Baggage, or Lost items or Valet-managed vehicles or services. The displayed list of options corresponds to the selected Track It group(s) — the user will see only those types that correspond to the group(s) selected.
Location. Select the down arrow to choose the location for the Track It location. Track It locations identify the places where Parcel, Baggage, or Lost items, or Valet-managed vehicles are being held. The displayed list of options corresponds to the selected Track It group(s) — the user will see only those locations that correspond to the group(s) selected.
Action. Select the down arrow to choose the track It action. Track It actions identify what response is expected from staff or other parties relative to a Track It ticket. The displayed list of options corresponds to the selected Track It group(s) — the user will see only those actions that correspond to the group(s) selected.
Select the Advanced button to display additional search criteria.
Room. If the ticket is associated with a reservation, enter the guest's room number. The message "Room number xxx is invalid" appears if the room number you searched on does not exist.
Follow Up. Follow-up date for the ticket.
First Name. If the ticket is associated with a reservation, enter the guest's first name.
Created On. Date when the ticket was created.
Created By. User ID of the staff member who created the ticket.
Arrival. If the ticket is associated with a reservation, enter the arrival date.
Departure. If the ticket is associated with a reservation, enter the departure date.
Description. Enter all or part of the Description text associated with the ticket. Searching is not case sensitive. For example, to find "golf bag" you may enter terms like "Golf bag", "golf BAG", "GOLF BAG", "bAg", "golf", etc.)
Note: Searches by description may take several minutes. It is suggested that you use this field in conjunction with additional search criteria to narrow the search.
Time Submitted From/To. Start time and end time that define the time range when the ticket was created. For example, if you want to find only tickets created in the morning, enter 12:00 AM and 11:59 AM. To find tickets created in the afternoon/evening, enter 12:00 PM and 11:59 PM.
Select the Phone Book button to display the Telephone Book screen. Use this screen to look up phone numbers and Web addresses.
Select the Report button to prepare a copy of the search results grid entries that are currently displayed. From the Track It Report options you may choose one of the following:
Preview. Preview the report in PDF format (you may also save the PDF).
Print. Print the current grid display on the local printer.
File. Create an RTF file that can be opened in most word processors for editing.
The search results grid shows the tickets that match your search criteria. Highlight an entry to see the related details displayed in the Track It Details area to the right.
Note: When the Track It Dashboard is accessed from the Reservation Options menu, by default the search results grid displays any Track It items that belong to the current reservation.
Ticket. Track It ticket number.
Type. Track It types identify the kinds of Parcel, Baggage, or Lost items, or Valet-managed vehicles or services.
Action. Track It actions identify what response is expected from staff or other parties relative to a Track It ticket.
Date. The system date and time when the ticket was created or last updated; the date and time are shown in the default format for the property. Click in the column header to sort by date and time.
The Track It Details area displays the details associated with the ticket record highlighted in the search results grid. You may make changes to this information except as noted. This area may also be used to create new Track It tickets.
Track It Group. (May not be edited once the ticket is saved.) The Track It group: PARCEL, BAGGAGE, LOST, or VALET.
Ticket Number. (May not be edited once the ticket is saved.) The Track It ticket number. A ticket number is required for tickets belonging to all Track It groups except LOST.
Type. Track It types identify the kinds of Parcel, Baggage, or Lost items, or Valet-managed vehicles or services. If a Web address is configured for this Track It type, a link appears to the right of the field for direct access to that Web site. (See Track It Types for details.)
Action. Track It actions identify what response is expected from staff or other parties relative to a Track It ticket. A Track It ticket is considered completed when an Action that has been configured with a Status of CLOSED has been reached.
Location. Track It locations identify the places where Parcel, Baggage, or Lost items or Valet-managed vehicles are being held.
Quantity. For Parcel, Baggage, or Lost Track It group tickets, the number of items associated with the ticket. The default is 1. (Not available for Valet Track It items.)
Description. Text description associated with the ticket. For example, you might wish to describe the package for a Parcel, Baggage, or Lost ticket, or the vehicle for a Valet ticket.
Reference. For Valet Track It group tickets, an additional number or other qualifier attached to the ticket. You may, for example, wish to use this field for a vehicle license tag number or for a key rack number. (Not available for Parcel, Baggage, or Lost group tickets.)
Follow Up. Date when an action will be required on this Track It item if it has not been assigned an action that has a CLOSED status. The follow up date that is specified for the track it item is displayed on the Track It Items Detail Report as notification. the appropriate person should complete a follow up with the guest to make sure that the Track It item is received. (Not available for Valet group tickets.)
If the Track It ticket is associated with a reservation, the following information is available.
Name. Guest's name.
Arrival. Arrival date.
Nights. Number of nights included in the stay.
Departure. Departure date.
VIP. The VIP status, if applicable, for the profile attached to the reservation. Available when the Profiles>VIP Status application function is set to Y.
Room. Room number.
Room Status. Housekeeping room status. This field is visible for those reservations that are due in today (if a room number is assigned), are currently in house, or are due out today.
The current reservation status appears below the Name field.
Select the New button to create a new Track It ticket. The Track It Details fields are cleared for you to make your entries. Defaults are automatically populated to the appropriate fields. Select the Save button to save your ticket information.
Select the Cancel button to remove the highlighted Track It ticket record from Track It monitoring. It is un attached from the reservation (if it was attached to a reservation) and is no longer accessed via search.
The following reservation feature buttons are available when working from the Track It Dashboard.
Attach. Select this button to attach a reservation to the Track It ticket currently displayed in the Track It Details area. This button is available only when the highlighted ticket is not already attached to a reservation. The Reservation Search screen appears, allowing you to select the reservation
Note: When the Track It Dashboard is accessed from the Reservation Options menu, the Attach Reservation button automatically attaches the highlighted Track It ticket to the currently selected reservation.
Detach. Select this button to un-attach the reservation from the Track It ticket currently displayed in the Track It Details area. (Available only when a reservation is attached to the Track It ticket displayed in the Track It Details area.)
Edit. Select this button to edit a reservation that is attached to the Track It ticket. (Available only when a reservation is attached to the Track It ticket displayed in the Track It Details area.)
Options. Display the Reservation Options screen for the reservation attached to the Track It ticket currently displayed in the Track It Details area. (Available only when a reservation is attached to the Track It ticket displayed in the Track It Details area.)
You may use the Alert Printing feature to automatically notify responsible departments or staff members concerning Track-It related issues. The alerts can be triggered by reservation activity. For example, if a package was received at the property ahead of the guest's arrival, you might attach an alert to the reservation that will be triggered by guest check in. You could specify that the alert be printed at the storage location where the package is being held. When the guest checks in, the alert will be automatically sent to a printer at the appropriate storage location. A custom report can be output. For example, the report could be customized to read: "Guest Paul Hemmings arrived June 13, 2006 at 3:45 PM. Please deliver Track It Ticket Number HJ00213 to Room 2311." See Alerts and Global Alerts for details.
Depending on the setting of the General>Log Book application function, you may access property calendar and event information and/or log book information in this section of the Track It Dashboard.
When the log book feature is available (the General>Log Book application function must be set to Y), both log book and property calendar and event information are accessible from this section of the dashboard. The Log Book and Property Calendar buttons may be used to display the Log Book screen or the Property Calendar. Log book information for the current date displays in the grid by default. If you wish to see log book information for a past or future date, click in the Date column to display the calendar tool from which you may choose another date. If the details are too long to fit in the Details column, click in the Date, Time, or Details column to display the Log Book Details screen.
The Track It Dashboard will not display those log book entries for a past time; only those entries that are still relevant based on the current time are shown. To see all log entries for the current date, select the Log Book button. The Log Book screen displays, showing entries for all the departments that have been selected in Configuration>Setup>Track It>Defaults. (See Track It Defaults for details.) To see log book entries for any other date, you may use the Log Date search field on the Log Book screen.
The display-only Events field (below the Log Book and Events grid) shows the events scheduled for the current date on the property calendar. Select the ellipsis button to display the Edit Property Calendar screen. The Events field is not available if the log book feature is not active (that is, if the General>Log Book application function is set to N).
When the log book feature is not available (i.e., when the General>Log Book application function is set to N), property calendar events for the current date display in this grid section by default. If you wish to see property calendar event information for a past or future date, click in the Date column to display the calendar tool from which you may choose another date. The Property Calendar button may be used to display the full Property Calendar.
For convenient reference, the current time displays on the Track It Dashboard beneath the OPERA logo.
Note: In situations where the property and the database server are in different time zones, the General>Database Timezone application setting must be set to the time zone where the database server is located and the Property Details screen (Configuration>Property> Property Details) Time Zone Region field must be set to the time zone where the property is located.
Select the History button to display the Track It History screen for the ticket currently displayed in the Track It Details area. This screen is a log of all activities related to the ticket, from most recent to earliest.

Date. The system date and time when the ticket was created or modified.
User. User ID of the user who created or modified the ticket.
Details. Ticket number and actions taken.
Double click on an item to display the full details if they do not fit in the grid.
Show Me
See Also