| Oracle® Thesaurus Management System User's Guide Release 5.1 E53658-02 |
|
|
PDF · Mobi · ePub |
| Oracle® Thesaurus Management System User's Guide Release 5.1 E53658-02 |
|
|
PDF · Mobi · ePub |
This section introduces the basics of launching and using Oracle Thesaurus Management System (TMS), including the tasks that you perform in more than one TMS window. These topics include:
TMS runs in a Java-based window that you initiate from the launch page. To start a session:
Open a browser window and connect to the following URL:
http://server.domain/path_variable/launch.htm
where server.domain is the TMS application server and path_variable is the configuration variable that you set during the TMS front end installation; for example, opa50. (See the Oracle Thesaurus Management System Installation Guide.)
Your browser window loads the Oracle Health Sciences Applications launch page.
Click Login. The browser launches two windows: an Oracle Developer Forms Runtime window, and a small browser window containing the warning not to close the window.
In the Forms Runtime window, enter your user name, password, and the TMS database to which you want to connect, then click OK. If you have an account on the selected database and have entered the correct password, the Forms Runtime window displays the TMS Navigator window.
Note for Internet Explorer Users:
Do not open another Thesaurus Management System session from this session. To start another Thesaurus Management System session, open it from the Windows Start menu or from the Internet Explorer desktop icon. If you instead start a new session by selecting New from the File menu or by using the shortcut combination Ctrl+N, the new session may be unstable and unpredictable.This section describes how to change your own password in the TMS database. You can only change your password for the database to which you are connected; you must repeat these steps for every database in which you want to update your password.
There are three methods of changing your password, depending on your privileges and on whether Oracle Clinical is integrated with TMS:
If You Have Administrator Privileges in This Database
If you have privileges equivalent to the SYSTEM user in this database, you can change your own password (and update the passwords of other users in the database) from a SQL*Plus prompt. This process is an administrator-level activity, so see "Changing a User's Password".
If Oracle Clinical Is Not Installed in This Database
If you are running TMS in a standalone configuration, follow the procedure in this section to update your database password.
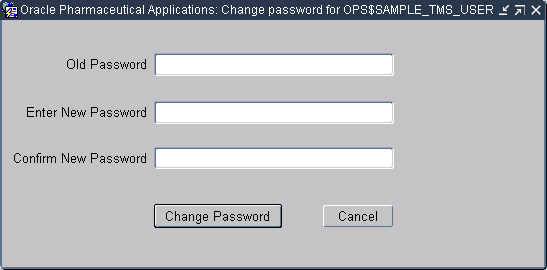
From the TMS main window, select File, then choose Change DB Password. The Change Password for User_Name window opens (Figure 2-1).
Enter your old password, then enter and confirm your new password.
Click Change Password. The system validates your old and new password entries. The system returns "Password changed" if all entries are correct, or a descriptive error message if the old password is incorrect or the two new password entries do not match.
If you click Cancel, the system retains your old database password and closes the Change Password window.
If Your Database is Integrated With Oracle Clinical
If you are connected to a database that is integrated with Oracle Clinical, you can change your own password either by selecting Options, then Change DB Password from the Navigator window or from the Change Database Password window in Oracle Clinical (From Oracle Clinical's Admin menu, select Users, then Database Password). However, once you launch the Change Database Password window, the system deactivates the Change DB Password selection under the File menu for the rest of your session.
|
Note: When you use the Oracle Clinical Change Database Password window to change your password in an integrated database, the system disables TMS windows for the rest of your session. You must exit and reenter TMS before you can open any windows. |
All TMS windows, except those used for creating reports and other batch jobs, provide the same set of icons, keystrokes, and menu options to perform common functions. Windows used for reports and batch jobs provide another set. Appendix C, "GUI Quick Reference" contains a complete set of icons, keystrokes, and menu options for functions in both types of windows.
This section contains additional information on the following tasks in the GUI.
TMS conveys some information using color cues.
Table 2-1 Color Indicators in the User Interface
| Function | Color Displayed | What is Colored |
|---|---|---|
|
Current record |
Blue |
Area to left of record |
|
Query mode |
Light blue |
Field background |
|
Mandatory field (batch jobs and reports) |
Red |
Text in field |
|
Drill-down information available |
Blue |
Text in field |
|
Read-only information |
Gray |
Field background |
You can change the way data is displayed by selecting single- or multi-record display. You can change which data is displayed by using the tree structure and querying. See "Using the Tree Structure" and "Querying in Windows".
In general, the single-record display is more useful when you are modifying data because it allows you to see all the information for a record at once, without scrolling. The multi-record display is useful when you are querying; you can scroll up and down to quickly see all the records retrieved, and scroll across to see the complete information for each record.
You can sort records on any active column label (column labels that appear three-dimensional, with the column heading in boldface). Click once to sort on a column in ascending order. Click again to sort in descending order. Click a third time to return to the default unsorted state. A sort icon appears in the label after you use it to sort. The system sorts numbers by the first digits, no matter how many digits the number contains, so that 12345 comes before 543 in ascending order.
The tree structure that appears on the left of many windows serves different purposes depending on the window, but its behavior is consistent throughout TMS:
Nodes, or branches, of the tree structure expand and collapse when you click the boxed + or - icons in the tree structure, use the +, -, ++, or -- icons in the toolbar, or use the menu options in the Navigation menu.
The system populates the right side of the window according to what you highlight in the tree structure.
The display of the tree structure changes according to changes you make on the right side of the window.
In some windows you highlight a level in the tree structure and execute a query in the current-level block (usually the middle text block on the right side of the screen) to display data.
When a tree structure node is the active field, dotted white lines appear along the top and bottom of the blue background, highlighting it. When no dotted white lines are displayed in the highlighted node, the active field is on the right side of the window.
The system uses the tree structure for two purposes: the menu and dictionary hierarchy.
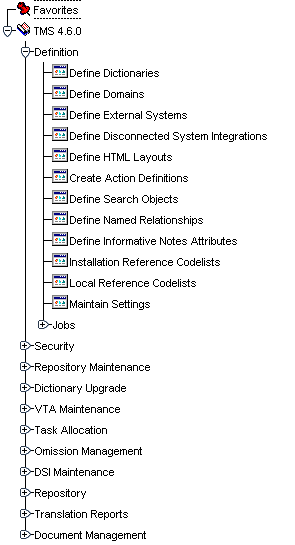
When you first open TMS, the Navigator window opens. This window displays the main menu tree and, if you have it installed, Oracle Clinical as well. Each item under the TMS node represents a TMS subsystem; for example, from the Repository Maintenance menu you can open windows for updating term and relation data in the TMS repository. See Figure 2-2 for an overview of the menus that appear in the Navigator.
In some cases the objects you create also appear in the navigator tree: dictionaries, levels, and Activation Groups that you have already defined appear in the tree structure; if you click them, the system displays the definition you created. To create a new object, highlight the menu option above it in the tree structure and select Insert Record.
To open a window or run a batch job or report, click either the icon or the text.
The menu items in the navigator are covered in TMS documentation as follows:
Favorites. Save shortcuts for commonly used windows in the Favorites menu. See "Using the Favorites Menu".
Oracle Clinical. If you integrate TMS with Oracle Clinical, the OCL menu options appear above the TMS node. See Chapter 4 for TMS/Oracle Clinical integration information.
Define Dictionaries and Domains. Define base and virtual dictionaries from the Define Dictionaries window, and link dictionaries together. The Define Domains window allows you to create domains and assign dictionaries to them. See Chapter 6.
Defining External System Integration. Chapter 4 covers integration with Oracle Clinical. Chapter 5 covers integrating with external systems other than Oracle Clinical, including Disconnected System Integration.
Other Definitional Tasks. Chapter 7 explains the other Definition windows, where you define elements for use in assigning VTs, attributes of the external systems with which TMS exchanges data, and reference codelists.
Security and Administration. Chapter 3 covers reference codelists, other settings, and security.
Repository Maintenance. Chapter 12 describes how you can modify data in the TMS repository within a single dictionary or between multiple dictionaries, and how to view dictionary loading error logs.
Dictionary Upgrade. Chapter 8 describes how to use TMS features to control the impact of upgrading to a new version of a vendor-supplied dictionary on your repository.
Verbatim Term Assignment Maintenance. The windows and jobs under VTA Maintenance enable you to promote and demote VTAs, maintain Actions, reclassify verbatim terms, perform High-Level Reclassification, and copy domains. You can also run reports about VTA data, such as the Nonapproved VTAs Report, the Classification to a New Domain Report, and the three Classification Changes reports. See Chapter 11.
Task Allocation. Chapter 9 describes how to set up task allocation and how to allocate tasks—approving actions and VTAs and classifying omissions—to users.
Omission Management. Chapter 10 describes how to classify VT Omissions, approve VTAs, and run Omission-related reports.
Disconnected System Integration Maintenance (DSI). Chapter 5 describes how to use DSI to exchange information with disconnected systems.
Repository. Users without data modification privileges may still view repository data using the windows under the Repository node. These selections are covered in Chapter 13.
Translation Reports help you identify which term and relation data are not consistent between two dictionaries in a Translation Derivation Link. For background on translation derivation, see "Defining a Translation Derivation Link". For specific information on the three translation reports, see "Translation Reports to Identify Inconsistent Data".
HTML Browser. Chapter 14 describes how to use the HTML Browser, which has a separate login and user interface.
Dictionary levels, and the relations between them, are displayed in many windows through the tree structure (Figure 2-3, "Hierarchical Structure in the Maintain Repository Data Window").
Figure 2-3 Hierarchical Structure in the Maintain Repository Data Window
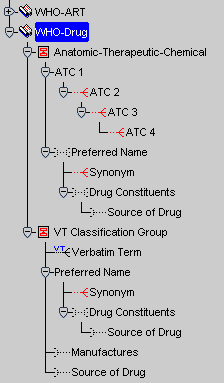
The Maintain Repository Data window includes a dictionary's tree structure on the left side and three blocks on the right. To view data in the blocks of fields, highlight a level in the tree structure and then execute a query on the right. TMS displays terms that you queried for in the level you highlighted. After TMS populates the text block(s), you can highlight a different level in the tree structure and TMS will make that level the current level, with only terms related to the former current term displayed.
In order to show all relations between levels, sometimes TMS displays a level more than once. For example, levels within a group are shown once within the group level, with the relation between the group level and the level above it displayed, and once with the relation between the top sublevel and the level above it displayed. Similarly, if a level has more than one parent level, it is displayed once for each parent. All its child, grandchild, and other levels also appear below it each time.
In the sample WHO-Drug dictionary shown in Figure 2-3, "Hierarchical Structure in the Maintain Repository Data Window", the Source of Drug level is shown twice in the Verbatim Term Classification Group level. TMS does this because Source of Drug has two parent levels: the Drug Constituents level and the Preferred Name level, and because it is also linked to the ATC group.
In the tree structure, select the level display that you prefer. Some levels may be displayed twice or more because they have a relation to more than one parent level. To see terms in a parent level as well as the current level, you choose the display of the current level that is linked to the parent level you want to see.
TMS uses small icons to convey information about the hierarchy:
Table 2-2 Tree Structure Icons
| Icon | Information |
|---|---|
|
VT |
Indicates that TMS has created this level to hold verbatim terms and their VTAs. |
|
p |
Indicates that a Primary Link is required in a parent level where many cardinality is allowed; that is, more than one term in the parent level can be linked to a single term in the child level, and one of them must be designated as the Primary Link. |
|
pp |
Indicates that a Primary Path Link is required in a parent level where many cardinality is allowed. |
|
Indicates that this level is a group level. Levels within the group (except for the topmost level) are displayed with their end of the relation shown in red. They appear on the same branch in the tree structure. |
|
|
__ |
Mandatory relation; terms in the related level must have a relation to a term in the level with a solid relation line. |
|
- - |
Optional relation; terms in the related level may or may not have a relation to a term in the level with a dotted relation line. |
|
Many cardinality relation; terms in the related level may be related to more than one term in the level with a branched (crow's foot) relation line. |
|
|
__ |
Single cardinality relation; terms in the related level may not be related to more than one term in the level with a single relation line. |
To refresh the tree structure display, select Navigate, then choose Refresh Tree.
Many windows enable you to sort records by clicking one of the column headings. Click an active column head—one that looks like a button, and displays the column heading in boldface—once to indicate that you want to sort on it (alphabetically for character fields, numerically for numeric fields). Click again to sort in the opposite order.
Note:
TMS sorts numbers by the first digits, no matter how many digits the number contains, so that 12345 comes before 543 in ascending order.The options included in the Options menu change for each window. Common selections under the Options menu include Change Domain, Filter, and Informative Notes. Any tasks you can perform using a button are also available in the Options menu and keystroke combinations. See Appendix C for a complete list of keyboard shortcuts.
TMS displays the current TMS version number and the current database in the title bar. Select Help, then Show Environment to display the following information:
User and Instance
Current Window Name, Module, Block, and Field
Several windows in TMS enable you to select more than one record using the standard Windows behavior of Shift+Click for adjacent records and Ctrl+Click for separated records. The windows are High-Level Reclassification, Demote VTAs, and the Assign/Revoke Role subwindow of Define Users.
Under some conditions, you can change the database to which you are connected without logging out by selecting the Connect option from the File menu. If your database is integrated with Oracle Clinical, however, TMS disables this feature upon your first visit to an Oracle Clinical window.
You can print a hard copy of any window in TMS by selecting File, then Print from the TMS menu bar. The generated printout displays the TMS window as it appears on your screen, showing the data that appears in the TMS interface for that window.
Note:
The other menu bar option, selecting File and then Print Contents, has no effect in TMS.TMS follows standard Oracle querying procedures in every window of the user interface. In addition, in many TMS windows you can take advantage of the advanced text retrieval capabilities of Oracle's interMedia Text software (formerly known as the Context Server Cartridge), which is integrated into the RDBMS in an Oracle9i platform.
You are in Query mode when you have entered but not yet successfully executed or canceled a query. When you are in Query mode:
TMS changes the background color for all fields in the block to light blue.
You cannot change the Query Type (Standard or Context).
You cannot modify data in any window.
You cannot select another level in the tree structure.
You cannot change domains.
To end Query mode, either execute or cancel the query. If you execute the query and no records are retrieved, TMS stays in Query mode. If the query does retrieve records, TMS displays the records and exits Query mode.
Do one of the following:
Press F7.
Choose Query, then select Open Query.
Click the Open Query icon (see Appendix C).
Enter the alphanumeric text you want TMS to search for. You can always enter a standard Oracle query. If there is a Query list in the TMS window where you are working, you can choose to enter either a Standard Oracle query or a Context query, which requires the interMedia Text software.
Standard Oracle queries recognize the following:
Wildcards There are two wildcards that standard Oracle queries recognize:
The underscore (_) character is a single character wildcard, which can represent exactly one character in your search. Thus, the query no_e returns records with Nose and Note, but not Noise.
The percent sign (%) is a multi-character wildcard, which can match one or more characters in your search, or even none. A query on %bite% in the Term field would retrieve the terms Human Bite, Bite, and Bite on Nose.
SQL Advanced Queries Enter :letter to define a variable in a queryable field, then press F8. In the pop-up box, write a SQL statement. For example, in the ID field, enter :a and press F8. In the pop-up box, enter:
:a in (ID_number_1, ID_number_2)
Context queries use the interMedia Text software, which enables more flexible searches of TMS terms and relations. The Browse Repository Data window and the advanced search pages in the HTML Browser allow you to switch between standard and context queries; see Chapter 14, "Using the HTML Browser"
The Context Server Index is language-specific and configured for English language searches by default. You can change the language preference for the index by running the tmscincontextinx.sql script. See "Enabling Context Searches for Non-English Dictionaries".
The following table lists four types of operators that context queries use to expand or change the scope of a search.
Table 2-3 Context Query Operators
| Name | Operator | Function | Example |
|---|---|---|---|
|
Fuzzy |
? |
Finds words with a similar form; checks for common spelling, keyboard, and OCR errors. |
|
|
Stem |
$ |
Finds words with the same linguistic stem (root). |
|
|
Soundex |
! |
Finds words that sound similar. |
|
|
About |
( ) |
Finds terms that contain concepts that are related to your query parameter. |
|
Note:
Two attributes are available to make fuzzy searches more precise. You can set fuzzy_numresults to n where n is the maximum number of results you want. You can also set fuzzy_score to a number between 1 and 80 to retrieve only terms that score n in nearness to the original term.Because context queries are driven by the interMedia text software, you may require a different syntax for these searches than in the rest of the TMS user interface. For example, TMS forms and interMedia handle hyphenated terms differently. When you enter a query for a term such as 'musculo-skeletal system' in a TMS form, TMS returns all of the terms that contain that text. The interMedia text option, however, treats the hyphen character ('-') as an operator between two terms in a search. To search for the same term in the HTML Browser, you must precede the hyphen with a slash ('\'). The search becomes:
musculo\-skeletal system
For more information on using special characters in context searches, see the Oracle interMedia User's Guide and Reference (part number A88786).
Do one of the following:
Press Shift+F2.
Select Query, then Count Hits.
Click the Count Hits icon (see Appendix C, "GUI Quick Reference").
TMS displays the count at the bottom of the window.
Do one of the following:
Press F8.
Select Query, then choose Execute Query.
Click the Execute Query icon (see Appendix C, "GUI Quick Reference").
To execute the same query again, press F7 F7 F8, in sequence.
Do one of the following:
Press Ctrl+Q.
Select Query, then choose Cancel Query.
Click the Cancel Query icon (see Appendix C, "GUI Quick Reference").
You can add shortcuts to the TMS Navigator window for quicker access to commonly used forms and jobs. TMS displays these shortcuts under the Favorites node, at the top of the Navigator menu tree.
Favorites are private and database-specific: your choices appear only when you are logged into this TMS database.
To add a shortcut to the Favorites menu:
Select File, then Save as Favorite. TMS prompts you to select a form or batch job.
Click OK, and click the form or job you want to add to the Favorites. The Save as Favorite window appears.
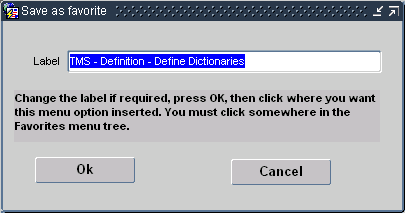
Enter a name for the shortcut, and click OK.
In the Favorites menu, click the selection under which you want the new shortcut to appear. To save the new shortcut at the top of the Favorites, or if this is the first shortcut for this system, click the Favorites node itself.
TMS saves the new shortcut under the Favorites node in the navigator tree.
To remove a shortcut from the Favorites menu:
Select File, then choose Delete Favorite. TMS prompts you to select a form or batch job to remove from the Favorites menu.
Click OK, and click the Favorites shortcut you want to remove. TMS prompts you to confirm this deletion.
Click OK to delete the shortcut. TMS removes this Favorite from the navigator tree.
TMS contains online help for every field and window except batch jobs.
To launch online help:
Place your cursor in the field for which you want help; if you wish to read online help for the entire window, the cursor can be placed in any field.
Note:
The cursor must be active in a field; you must actually click in a field or enter text. It is not enough to have the window open; you will see help for the last window in which you were active.Click the question mark icon at the right of the toolbar, press F1, or select Help, and then choose Help from the menu. TMS displays the field help pop-up box for the field your cursor is in. Figure 2-4 shows the help box for the Short Name field in the Define Dictionaries window.
Figure 2-4 Field Help for Short Name Field in Define Dictionaries
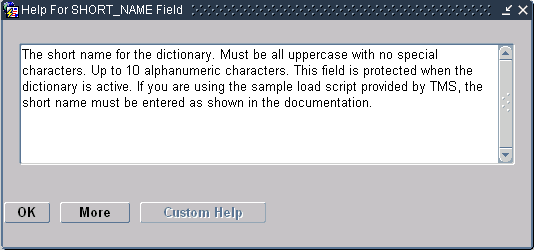
If this help is sufficient, click OK to close the window. If you want help for the window in general, click More in the field help pop-up box. A new browser window opens and loads the appropriate topic in a help file. You can scroll along the file or use hot links to navigate to other topics.
You can also write your own company-specific online help and access it through the Custom Help button in the field help window.
The parameters that appear for particular reports vary; this section lists all possible parameters in the General and Schedule sections of the Batch Job module.
The batch job submission and execution includes:
Setting Parameters. See also Using Parameter Sets to Populate Job Parameters
Stopping Job Execution, if necessary
TMS populates some parameter fields with default values. After the first time the report is executed, the parameters entered when you last ran the report become the default values. You can save your parameters for future use. See "Retrieving a Parameter Set".
The column of boxes on the right indicates if you can enter a wildcard (%) to search for a valid value for the field. If a box is selected, you can use wildcards.
Fields displayed in red are mandatory; you must enter a value in them.
Many reports include, under General Parameters:
Output: Select a format. Options include PDF, RTF, XML, HTML, and XLS.
Display Parameters: Select Yes to display the values of the report-specific parameters in the report output.
Many reports or batch jobs have parameters that are unique to the report, and that you can use to customize the report output to suit your needs more closely.
If there are job-specific parameters for your report or batch job, they appear under the Job Specific heading in the Report Submission window.
Context-sensitive online help is not available directly from Report or Batch Job Submission windows. However, you can get information about job-specific parameters as follows.
Online Help To get job-specific information online, do the following:
Go to any window that is not a Report or Batch Job Submission window.
Click Help, choose Help, then select More. The TMS online help window opens, displaying information about the window you are on.
If you cannot see the Contents, Index, and Search buttons, click the navigation icon:
![]()
Use the Table of Contents, Index, or Search to find the report.
Click the report's hyperlink.
Report Template is a job-specific parameter in many reports. If your company has created a custom template, it appears in the list of values. The Oracle Template is the default template. See "Customizing Report Templates." for information on creating and setting up templates.
Some jobs have parameters that allow you to schedule the job to run in the future:
Frequency. To schedule a single job execution, leave this field blank. To schedule execution on a regular basis, select one of the following from the list: Hourly, Daily, Weekly, Monthly or Every.
If you choose Every, you can define the interval at which you want the job to run. Two additional fields appear:
Frequency Length. Enter the interval you want to have pass between job executions. For example, if you want the job to run every week, enter 1 here and enter Week in the Unit field below. A list of values is available; press F9.
Unit. From the list select one of the following: Hour(s), Day(s), Week(s), or Month(s). A list of values is available; press F9.
Clock. From the list, select one of the following: Midnight, Noon, Now. Enter the time of day you want the job to run.
Date. From the list, select one of the following: Today, Tomorrow, Monday…Sunday.
Report Server Name. The system displays the name of the report server that last ran the report. You can use the same one or enter a different one. If you are running the report or other job for the first time, you may need to click in the line below to make the other parameters appear.
You must then select Job, then choose Submit or click the Submit icon.
To save time and ensure consistency in the batch jobs you submit, you can save the parameters you enter for a particular batch job and use them again at any time. You can save a parameter set so that it is only available for your use, or make it available for all TMS users of this database.
You need to save and retrieve parameter sets from the same window, Save/Retrieve Parameter Sets. This section discusses each of these operations. You cannot delete parameter sets from TMS.
To save a parameter set for a batch job, start by selecting that batch job in the TMS navigator. Then follow the steps below:
Choose Job, then select Save Parameter Set, or click the Save Parameter Set button (see Appendix C). The Save/Retrieve Parameter Sets window opens. If you entered any settings in the batch job fields, TMS copies these into the fields in the Save/Retrieve Parameter Sets window as well.
Enter values for each field you want to include in this parameter set for this batch job.
Enter a name and description for the parameter set.
Select the box on the right if you want other TMS users to be able to use this parameter set. Clear the box to be the only person with access to this parameter set. Shared parameter sets are available to all users with access to this batch job at this TMS database instance.
Save. TMS saves the parameter set for this batch job.
Retrieving a parameter set populates the selected batch job with a list of settings for each field in the batch job. You can retrieve a parameter set for a particular batch job once you have selected that batch job in the main TMS window. To retrieve a saved parameter set:
Choose Job, then select Retrieve Parameter Set, or click the Retrieve Parameter Set button (see Appendix C). The Save/Retrieve Parameter Sets window opens.
Query for the parameter set you want. You can query for the name or description of the parameter set itself, or for one of the specific parameters in it.
Click the Retrieve button. TMS populates the batch job window with the saved parameters. You can still change any of these parameters before executing the job.
To run the job immediately, select Job, then Submit, or click the Submit icon (see Appendix C for a listing of all icons and their purpose).
To schedule a job to run in the future, see "Scheduling Parameters."
TMS provides information about the status of submitted batch jobs in two places: the main Submission window displays an icon that shows the status of the most recently submitted job, and the Job Status window provides more information about each batch job you have submitted from this TMS database.
TMS enables you to determine the status of the current job by examining the Gear icon, which appears in the lower right corner of the Job Submission window once you submit the job. This icon changes with a job's status according to the selections in the table below.
Displayed while the most recently submitted job is still running.
Displayed when the most recent job is completed successfully.
Displayed when the most recent job fails. Check the error messages in the Job Status window to see why a job failed.
The Job Status window displays more information about every batch job you have submitted using this data from this instance. Figure 2-5 shows a sample row from this window.
Figure 2-5 One Row in the Job Status Window

Choose Job, then Status or click the Status button (see Appendix C) to open the Job Status window. The window displays the most recently submitted jobs first, but you can query by any of the fields that appear in the window:
Label – The name of the batch job as it appears in the TMS user interface. For example, Activate Preliminary Data.
Job Status – ENTERED (while the job is still running), SUCCESS, or FAILED.
Module – Module of the batch job.
Server Job ID – The Reports service you used to run the job.
Execution ID – The unique identifier for this job execution in this database.
You can stop a batch job in process (that is, one with Job Status ENTERED) by selecting its row and clicking the Stop Job button.
To stop TMS from executing a job, either before a scheduled execution or during execution:
Select Status from the Job menu or the Status icon (see Appendix C) to open the Job Status window.
Highlight the job you want to stop.
Click Stop Job.
|
Copyright © 1999, 2015, Oracle and/or its affiliates. All rights reserved. Legal Notices |
|