Adding New Prospects and Applications with Quick Admit
Recruiting and Admissions can take information concerning people enrolled from the Student Records Quick Admit process and at your discretion, create a prospect record and an application, or an application only for those people.
This section provides an overview of quick enroll and quick admit and discusses how to:
Enter biographical details.
Enter regional data.
Enter or view academic program data.
Select your criteria for quick admit batch apps.
Assign criteria for quick admit.
The Quick Admit a Student component, Quick Enroll and Student component, and Quick Admit Batch Apps component are a variation on the fuller processes of admitting students and enrolling them into classes. Typically, you will use these components in conjunction with each other to accelerate admissions and enrollment procedures where immediate formal processing is not required or is unavailable for students. In addition, collecting admissions information on students who have been quick admitted might be useful for various funnel reports.
The Quick Admit a Student component and Quick Enroll a Student component, when used together, enable you to rapidly add or update a student's personal data in your system; activate the student in an academic career, academic program, or term; and enroll the student in classes.
The Quick Admit a Student component works concurrently with the Quick Admit Batch Apps component. Whenever you admit a student through the Quick Admit a Student component, the system flags the student's record to indicate that the student has been admitted by this method. The system then places these records into a temporary table awaiting your action. Using the Quick Admit Batch Apps component, you can then run the Quick Admit Process (ADQCKADM) to create prospect records and applications for these flagged records in the temporary table. The Quick Admit Batch Apps component and Quick Admit a Student component are not a replacement for the regular Recruiting and Admissions functionality. You must use the Application Data pages for regular admissions.
You can use the Quick Admit a Student component to add a new student's personal data record to your system, to activate a student into an academic career and an academic program within that academic career, and to activate a student into a specific term. By completing and saving the Quick Admit a Student component, a student quickly becomes eligible for class enrollment. You can also use the Quick Admit a Student component to update a new or continuing student's personal data record after the student already has an existing personal data record stored in the system. If you are entering new students into the system through the Quick Admit a Student component and you click the Save button after entering the student's biographical data and program data, the system assigns the student a unique ID that remains associated with the individual in your database until you change or delete it. Remember that each user has access to specific edit modes based on her or his security profile.
Important! To avoid creating duplicate IDs in your system, you should use the search/match function to determine if an individual with the same data already exists in your database before adding the new individual.
For new students, you can use the Quick Admit a Student component to enter the biographic, demographic, address, and program data about the student. When you save the component, the system:
Assigns the new student an ID and creates a row for the student in the person tables.
Activates the new student in the academic program that you select within the specific academic institution and academic career that you specify.
Activates the new student in the term that you select, creating a row in the student term table (STDNT_CAR_TERM) for the student.
For continuing students, you can use the Quick Admit a Student component to activate the student into a subsequent term; or to activate the student into a new academic career. When you save the component, the system:
Updates the data for the student in the person tables.
Verifies whether the student has already been activated for the term, and if not, activates the student in the term, creating a new row in the student term table (STDNT_CAR_TERM) for the student.
Activates the continuing student in the new academic program that you select within the specific academic institution and career that you specify when you are adding the student to a new academic career.
After you have saved the student's biographical data and activated the student into the term, the student is eligible for class enrollment. You can then use the Quick Enroll a Student component to rapidly enroll students into the term. The system carries forward the key information (ID, academic institution, academic career, and term) and automatically opens the Quick Enroll a Student component for the given student.
When you access the Quick Admit a Student component, a dialog box prompts you to enter the key values of the admissions transaction. The key values are:
|
Field or Control |
Definition |
|---|---|
| ID |
In add mode, the system defaults the student's ID to New. For a student new to your system, you can use the default value to have the system assign the ID, or you can enter a new ID of your choice provided that it does not belong to another individual already in the system , or you can enter a student's existing ID. In other modes, the system prompts you to search for an existing ID. If you enter a new ID of your choice, you run the risk of disrupting the auto-numbering sequence that is included with the system. If you disrupt the auto-numbering sequence, a system administrator must correct the situation. |
| Academic Institution |
Enter the academic institution to which you want to quickly admit the student. |
| Academic Career |
Enter the academic career to which you want to quickly admit the student. Remember that academic careers are parents of academic programs. Therefore, when you enter an academic program on the Program/Plan page within this component, the system displays academic programs based only on the academic career you enter here. |
| Term |
Enter the term for which you want to activate the student. After you enter the required data for a student into the Quick Admit a Student component and click the Save button, the system activates the student into the term that you specify. This functionality works for both new and continuing students. To use the Quick Admit feature for a specific term, you must already have defined your academic term calendar for the academic programs within that term. Note: Quick Admit uses the Max Program Effective Date for Term field from the Term/Session Table when populating the Effective Date on Student Program/Plan. If the current date is less than or equal to the Max Program Effective Date for the activation term, the Effective Date field on Student Program/Plan will be set to current date. If the current date is greater than the Max Program Effective Date for the activation term, the Effective Date field on Student Program/Plan will be set to the Max Program Effective Date defined for activation term. |
| Add |
Click to open the component with the specified key values. |
The Quick Admit Batch Apps process is a two-step, two-page process. Use the first page in the Quick Admit Batch Apps component, the Selection Criteria page, to select a group of students who have been admitted through the Quick Admit a Student component. Use the second page in the Quick Admit Batch Apps component, the Assignment Criteria page, to specify whether to create historical prospect and application records or new prospect and application records, or both.
|
Page Name |
Definition Name |
Navigation |
Usage |
|---|---|---|---|
|
Quick Admit - Biographical Details |
SCC_BIO_DEMO_PERS |
|
Enter or update a student's biographic and demographic information. |
|
Quick Admit - Regional |
SCC_BIO_DEMO_REG |
|
Enter or update a student's information according to regional data requirements. |
|
Quick Admit - Program/Plan |
PROGRAM_PLAN |
|
For new students, select the primary academic program for which you want to activate the student in a term and enter other program stack information. For continuing students, view the student's career number and primary academic program or add the student to a new academic career. If you want make any changes to a new or continuing student's program stack information after you save the student to your system, you must use the Student Program/Plan component. |
|
Quick Admit - Selection Criteria |
QUICK_ADMIT_SELECT |
|
Enroll students into classes without going through a formal admissions process. |
|
Quick Admit - Assignment Criteria |
QUICK_ADMIT_CREATE |
|
Create applications for the group of quick-admitted students that you selected in the first page of this component. |
Access the Quick Admit - Biographical Details page ().
This page is part of the Quick Admit a Person feature, which enables you to rapidly admit students into your institution. The system saves any biographic and demographic data that you add or change to the person tables. You can maintain a student's biographical data through either the Quick Admit component or the Add/Update a Person component found in PeopleSoft Campus Community.
Access the Quick Admit - Regional page ().
This page is part of the Quick Admit a Student feature, which enables you to rapidly admit students into your institution. The system saves the regional data that you add or change to the person tables. You can maintain a student's biographical data through either the Quick Admit component or the Add/Update a Person component found in PeopleSoft Campus Community.
Access the Quick Admit - Program/Plan page ().
Image: Quick Admit - Program/Plan page
This example illustrates the fields and controls on the Quick Admit - Program/Plan page. You can find definitions for the fields and controls later on this page.
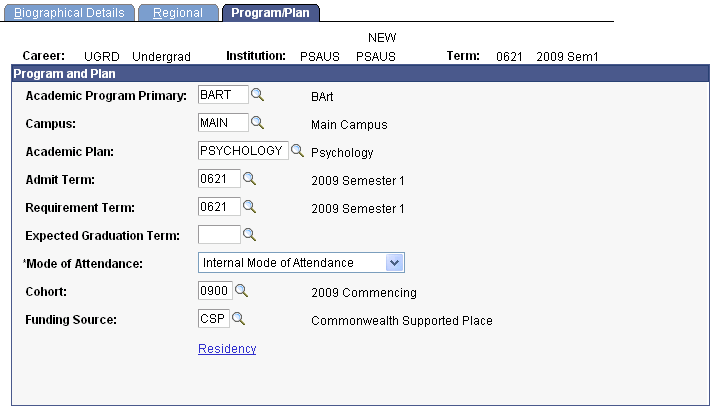
Note: Admissions application records use the Last Admit Term to determine if the program, plan, or subplan should appear in the prompt. If the Last Admit Term is populated on the Academic Program Table (ACAD_PROG_TBL), Academic Plan Table (ACAD_PLAN_TBL), or Academic SubPlan Table (ACAD_SBPLN_TBL) and the term is less than or equal to the term selected for the ID, the system does not display the value in the prompt.
Entering Program Stack Data for New Students
When you add a new student to your system, the following fields appear:
|
Field or Control |
Definition |
|---|---|
| Academic Program Primary (academic program primary) |
Enter the primary academic program into which you want to matriculate and activate the student. The system prompts you with academic career values specific to the academic career that you selected as a key upon entering the component. |
| Campus |
Enter the campus where the student is going to take the primary academic program. |
| Academic Plan |
Enter the student's primary academic plan within the primary academic program. If a student requests multiple academic plans within the academic program, you must enter the additional academic plans through the Student Program/Plan component. |
| Admit Term |
The term in which you are matriculating the student into the academic program. The admit term usually defaults from the Recruiting and Admissions matriculation process. However, because you are performing a quick activation and are going to matriculate the student through this Quick Admit a Student component, you must enter the admit term for the primary academic program that you have specified. |
| Requirement Term |
The requirement term indicates to the system which term's degree progress requirements apply to the student for the primary academic program that you have specified. The system, by default, sets this value to the Admit Term value. |
| Expected Graduation Term |
Enter the term in which you expect the student to graduate. Define term values on the Term Table page. |
| (NZL) Funding Source |
This field is used by New Zealand institutions. |
| (AUS) Mode of Attendance |
The Mode of Attendance field is a required field that is populated on each student's application. This data is required for reporting admissions data to the TACs via the Enrollment Feedback process as well as reporting element 329 Mode of Attendance code in DEEWR Data Collections. The Mode of Attendance field resides on Application Entry, Application Maintenance, and Program Addition pages. It is a required field when you enter an application. After the student is matriculated, the mode of attendance is carried forward to the student program. |
| (AUS) Cohort |
(Optional) Select a cohort for the student that the system will use as the default value when you enroll the student. The system populates this value by default on the Australian regional enrollment data and the field is available to tuition calculation for HECS or tuition fees if the Australian Regional Installation Settings are selected. After the student is matriculated, the cohort is carried forward to the student program. |
| (AUS) Funding Source |
(Optional) Select a funding source for the applicant to represent the type of place being offered. The funding source can be mapped to the code reportable as element 724 in the DEEWR Applications & Offers Collection. |
| Residency |
Click to display the Residency Official page and record residency information that has been verified by your institution. |
| Quick Enrollment |
Click to access the Quick Enroll component, where you can process enrollment transactions for the student. |
| Enrollment Appointments |
Click to access the Appointments component, where you can add and update enrollment appointments for the student. |
| Student Program Plan |
Click to access the Student Program/Plan component and make any changes to a new or continuing student's program stack information after the student data has been saved to your system. |
Viewing Program Stack Data After Saving the Component
When you are updating a new or continuing student's records, only the following fields appear:
|
Field or Control |
Definition |
|---|---|
| Student Career Nbr (student career number) |
The system uses the student career number to differentiate between academic programs within the same academic career. For students with multiple academic programs within the same academic career, you must enter the student career number for which you want to activate the student into the term you have specified. If the student has only one student career number in a specific academic career, the field is unavailable for edit. |
| Prim Prog (primary program) |
The system displays the primary academic program associated with the student career number. The primary academic program that appears is the academic program into which the system activates the student for the term that you have specified. |
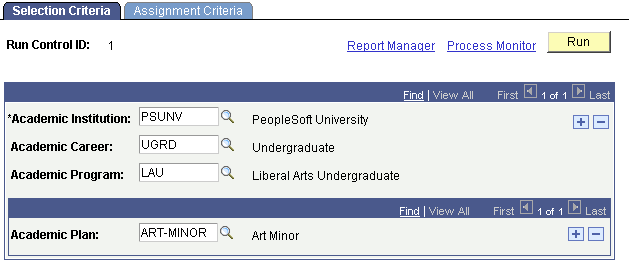
Access the Quick Admit - Selection Criteria page ().
Image: Quick Admit - Selection Criteria page
This example illustrates the fields and controls on the Quick Admit - Selection Criteria page. You can find definitions for the fields and controls later on this page.
|
Field or Control |
Definition |
|---|---|
| Academic Institution |
Enter the academic institution from which you want to select quick-admitted students. You can enter multiple academic institutions. You must enter at least one academic institution. |
| Academic Career |
Enter the academic career from which you want to select quick-admitted students. You can enter multiple academic careers. |
| Academic Program |
Enter the academic program from which you want to select quick-admitted students. You can enter multiple academic programs. |
| Academic Plan |
Enter the academic plan from which you want to select quick-admitted students. You can enter multiple academic plans. |
Access the Quick Admit - Assignment Criteria page ().
Image: Quick Admit - Assignment Criteria page (1 of 2)
This example illustrates the fields and controls on the Quick Admit - Assignment Criteria page (1 of 2). You can find definitions for the fields and controls later on this page.
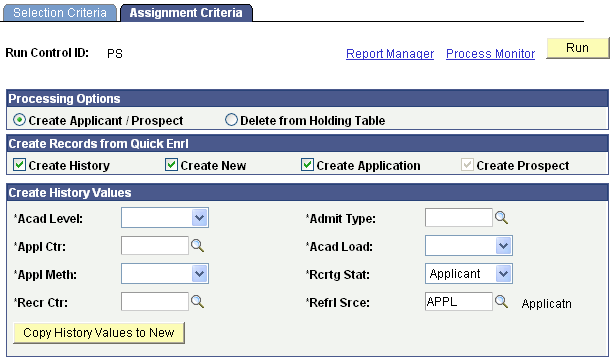
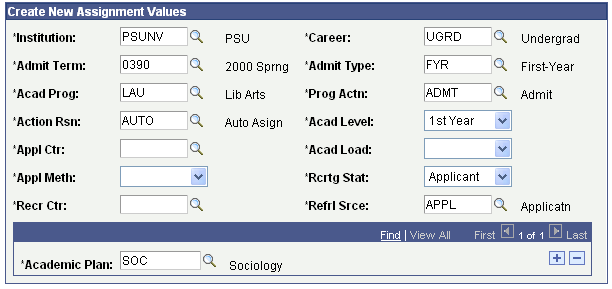
Image: Quick Admit - Assignment Criteria page (2 of 2)
This example illustrates the fields and controls on the Quick Admit - Assignment Criteria page (2 of 2). You can find definitions for the fields and controls later on this page.
|
Field or Control |
Definition |
|---|---|
| Create Applicant/Prospect |
Select this option to create prospect and application records for the selected group of students. |
| Delete From Holding Table |
Select this option to take the selected group of students and delete them from the temporary table. Selecting this option will disable the remaining fields on the page. If this is the desired option, click the Run button to initiate this process. If you use the Quick Admit a Student feature but do not create applications for quick admitted students, you should run this process to clean out the temporary table. |
| Create History |
Select this check box to create history records for the group of students you have selected. The system adds the students to the prospect and applicant tables even though they bypassed the normal admissions process. The data created is based on the data entered on the Quick Admit pages. Selecting this check box ensures that admissions information is available for these people for your admissions reporting purposes. |
| Create New |
Select this check box to create a new set of prospect and application records for the selected group of students. Prospect and application records will be created based on the parameters in the Assignment Values group box. |
| Create Application |
Select this check box to create applications for the selected group of students. This field is available if you select the Create New check box. |
| Create Prospect |
Select this check box to create prospect records for the selected group of students specified on the Selection Criteria page. If the Create Application check box is selected, the availability of this field is determined by the settings on the Installation Defaults - AD page. |
The following fields appear, regardless of whether you choose Create History or Create New:
|
Field or Control |
Definition |
|---|---|
| Acad Level (academic level) |
Select the academic level that you want to assign to the selected group. |
| Admit Type |
Enter the admit type that you want to assign to selected group. |
| Appl Ctr (application center) |
Enter the application center that is populated for each application. This information helps you track what office is handling specific applications. Define application centers on the Application Center Table page. |
| Acad Load (academic load) |
Select the academic load that the applicants will carry. Values for this field are delivered with your system as translate values. You can modify these translate values. Values are Full-Time and Part-Time. |
| Appl Meth (application method) |
Select a value to indicate how or in what form the application was received. Values for this field are delivered with your system as translate values. You can modify these translate values. Values are (none), Application Service, Diskette, Hard Copy, Web Application, EDI, and OUAC. |
| Rcrtg Stat (recruiting status) |
Select the recruiting status that will be populated on the prospect record of this applicant. Values for this field are delivered with your system as translate values. You can modify these translate values. Values are Applicant, Inactive, Inquiry,Pre-Appl, Prospect,and Suspect. This field appears only if the Create Prospects field on the Installation – AD page is set to Yes. |
| Recr Ctr (recruiting center) |
Enter the recruiting center that is responsible for this particular program on the prospect record. Define recruiting centers on the Recruiting Center Table page. This field appears only if the Create Prospects field on the Installation – AD page is set to Yes. |
| Refrl Srce (referral source) |
Enter the appropriate referral source that will be populated on the prospect record. A referral source indicates how this person became a prospect. In other words, it is a high-level indicator of how your institution came into contact with the person. For example, a referral source could be Drop-In, Campus Event, or College Fair. Define referral sources on the Referral Source Table page. This field appears only if the Create Prospects field on the Installation – AD page is set to Yes. |
| Copy History Values to New |
Click to transfer values entered for Create History to the corresponding fields in the Create New section. This minimizes data entry. |
The following fields are associated solely with the Create New option:
|
Field or Control |
Definition |
|---|---|
| Institution |
Enter the academic institution that you want to assign to the selected group. |
| Career |
Enter the academic career that you want to assign to the selected group. |
| Academic Plan |
Enter the academic plan that you want to assign to the selected group of students. |
| Acad Prog (academic program) |
Enter the academic program that you want to assign to the selected group. |
| Prog Actn (program action) |
Enter the program action that you want to assign to the selected group. |
| Action Rsn (action reason) |
Enter the action reason that you want to assign to the selected group. |
| Admit Term |
Enter the admit term that you want to assign to the selected group. |
| Academic Plan |
Enter the academic plan that you want to assign to the selected group of students. |
Click the Run button to run this request at user-defined intervals.
Student records that were processed are automatically deleted from the temporary record, so it is not necessary to run the Delete from Holding Table process.