Importing UCAS and UTT Applications and Applicant Data
This section provides an overview of importing applications and applicant data into your database, and discusses how to:
View the transaction setup.
Define the search/match criteria.
Enter the applicant import parameters.
Import new applicants.
Import HESA data.
Review and edit the suspense data.
View, update, and delete application staging data.
Define a timestamp for re-importing data.
When you import applicant data from UCAS, the system creates new person records in your database or updates details about existing person records. First, you must ensure that you are not going to create any duplicate data by setting up the search/match parameters. Then, you run the Import Applicant Data process to load the application and applicant data into your database. The search/match process determines if the person might already exist in your database. The purpose of the search/match is to prevent duplicate records. You can specify what you want the post process to do when search/match finds a match or multiple matches. It is recommended that you set the status as Suspend when you set up the search/match criteria for multiple matches. Based on the results of the search/match process, the import process can update the record in your database that matches the UCAS data if you are sure that the person in your database is the same person to whom the UCAS data relates.
If you selected the UCAS check box on the UCAS Configuration page, the Import Applicant Data process imports data from the UCAS iv views. If you selected the UTT check box on the UCAS Configuration page, the Import Applicant Data process imports data from the UTT iv views. If you selected both the UCAS and UTT check boxes, the Import Applicant Data process imports data from both the UCAS and UTT iv views.
If you selected the Import Live check box on the UCAS configuration page, the system loads the data from UCAS into the Campus Solutions tables through the staging tables.
If you did not select the Import Live check box because you have data in the staging tables, the system loads the data from the staging tables into the Campus Solutions tables. You can then use the Campus Solutions pages to review the data in the Campus Solutions tables.
The Import Applicant Data process imports data from the ivContextual view only if the Contextual check box is selected and the UCAS Cycle is 2012 or greater on the UCAS Configuration page. Also, the process imports data from the Unicode version of views, only if the Unicode check box is selected on the UCAS Configuration page. For example, if you have selected the Unicode check box, the process imports data from the Unicode views, such as ivStarAU and ivStarJU. Conversely, if you have not selected the Unicode check box, the process imports data from the standard views, such as ivStarA and ivStarJ.
You can view, update, or delete the suspended UCAS and UTT application data in the staging tables using the Staging Data pages. You can search for the suspended data based on various search parameters including import status, application code and personal ID.
The import process creates a corresponding Campus Solutions application record for each imported application choice. If an applicant has more than one ChoiceNo for an AppCode at your institution, the import process creates a separate Campus Solutions application record for each AppCode and ChoiceNo combination. You can use the Maintain Applications component to access the Campus Solutions application record. Each application record will have an effective date that indicates the date when you imported the application. If you import updates to the same application on different days, the system creates new application records with the different effective dates. If you import updates to the same application multiple times on a particular day, the system updates the Campus Solutions application record for that particular date. In addition to creating (or updating) the Campus Solutions application for an imported choice matching the local institution code that you have defined on the UCAS Configuration page, the process also creates (or updates) the Campus Solutions application for an imported UTT choice whose Accrediting Provider value matches the local institution code.
The import process also creates an application choice record in Campus Solutions for the imported UCAS application choice. You can use the UCAS Applications and UTT Applications components to view the imported application choice.
For more information about these two components, see Reviewing Imported UCAS and UTT Applications and Applicant Data
Suppose you are importing a UCAS or UTT choice and its decision value already exists in ivStarC or ivgStarG. For such a choice, when you run the import process for the first time, the process creates the Campus Solutions application and populates the Program Action and Action Reason of the Application Program Data record based on the following mappings set up on the program action page of the UCAS Configuration component:
UCAS processing - ivStarC:
If Decision = I, use action/reason for Interview
If Decision = F, use action/reason for Course Full
If Decision = R, use action/reason for Rejection
If Decision = W, use action/reason for Withdrawal
If Decision = C or D and Reply = F, use action/reason for Conditional Firm
If Decision = C or D and Reply = I, use action/reason for Conditional Insurance
If Decision = C or D and Reply = D, use action/reason for Conditional Decline
If Decision = C or D and Reply = blank, use action/reason for Conditional Offer
If Decision = U and Reply = F, use action/reason for Unconditional Firm
If Decision = U and Reply = I, use action/reason for Unconditional Insurance
If Decision = U and Reply = D, use action/reason for Unconditional Decline
If Decision = U and Reply = blank, use action/reason for Unconditional Offer
Else set program action = APPL and reason = default value (if defined) from the UCAS Application Import page of the UCAS Configuration component.
UTT processing - ivgStarG:
If Decision = I, use action/reason for Interview
If Decision = G, use action/reason for Course Closed
If Decision = R, E, M, or S, use action/reasons for Rejection, Rejection - English, Rejection - Maths, Rejection - Science
If Decision = W, use action/reason for Withdrawal
If Decision = C or D and Reply = F, use action/reason for Conditional Firm
If Decision = C or D and Reply = D, use action/reason for Conditional Decline
If Decision = C or D and Reply = blank, use action/reason for Conditional Offer
If Decision = U and Reply = F, use action/reason for Unconditional Firm
If Decision = U and Reply = D, use action/reason for Unconditional Decline
If Decision = U and Reply = blank, use action/reason for Unconditional Offer
Else set program action = APPL, reason = default value (if defined) from the UTT Application Import page of the UCAS Configuration component.
The Import Applicant Data process uses the Nationality page mapping to import the passport field values from StarK and create the citizenship and passport records. If the nationality value in an imported record does not have a corresponding country code mapping, then the process does not create a citizenship and passport record. The process logs an error message and the record is retained in the staging tables.
Suppose, you have mapped a nationality with a country code but did not map the same nationality with a citizenship status. In this case, if a citizenship record does not exist in Campus Solutions for the imported record, the process creates a new blank citizenship record. That is, the process enters only the Country value and leaves the Citizenship Status value as blank on the Citizenship Detail page (Add/Update a Person component).
Suppose, you have mapped a nationality 610 with a country code CHN and citizenship status 1 (Citizen). The citizenship record for a person named Eric with the same nationality exists in Campus Solutions with a different citizenship status 2 (Naturalized). In this case, when the process again imports Eric's record that has a nationality of 610, it updates Eric's citizenship record in Campus Solutions with the mapped citizenship status 1.
The Import Applicant Data process processes an incoming passport record if you have mapped the Nationality and Country values and if UCAS has provided a passport number. The process creates or updates a passport record for the applicant in the following ways:
If the applicant's passport record with the Country and Passport Number combination exists in Campus Solutions, then the process updates that record with the incoming passport issue date, expiry date and place issued values.
If the applicant's passport record with the Country and Passport Number combination does not exist in Campus Solutions, then the process creates a new record using the incoming values.
The import process uses the Forenames and Surname values from StarN to create or update a Primary and Preferred Name record in Campus Solutions. However, if Preferred First Name value from StarK exists, then the import process uses this StarK value to create or update the Preferred Name record for the applicant.
If the LastEducation value exists in the ivStarK view and the school code is mapped to a Campus Solutions External Org in the imported School reference data, the process populates this mapped External Org value in the Application School/Recruiting page for the Campus Solutions application record. If the LastEducation value does not exist, but the School value exists in the ivStarK view and the school code is mapped to a Campus Solutions External Org in the imported School reference data, the process populates this mapped External Org value in the Application School/Recruiting page.
|
Page Name |
Definition Name |
Navigation |
Usage |
|---|---|---|---|
|
Transaction Setup |
SCC_TRANSAC_DTLS |
|
View the delivered UCAS transaction that you can use in the Transaction Search/Match Setup page. Do not modify any values for this delivered UCAS transaction or create a new UCAS transaction. |
|
Search/Match Setup |
SCC_SEARCH_PARMS |
|
Define search and match parameters for the delivered UCAS transaction, which specify what UCAS data the system will append to existing records in your database and which UCAS data the system will suspend or ignore. |
|
Import Applicant Data |
SAD_UC_RUN_CNTL |
|
Import the UCAS and UTT applications and applicant data into your system. Before you import the data, set up the search/match parameters on the Search/Match Processing pages. |
|
Transaction Data |
SCC_TRANSAC_DATA |
|
After you run the Import Applicant Data process, use this page to review the status of a UCAS record with regard to loading, searching/matching, and posting processing. For example, determine if a record is waiting to be processed or if a record caused a new person to be added to your database. |
|
UCAS Contextual Staging Data |
SAD_UC_I_IVCONTXT |
|
View, update, or delete the suspended ivContextual data stored in the staging tables. |
|
UCAS Education Staging Data |
SAD_UC_I_EDUCAT |
|
View, update, or delete the suspended ivEducation data stored in the staging tables. |
|
UCAS Employment Staging Data |
SAD_UC_I_IVEMPL |
|
View, update, or delete the suspended ivEmployment data stored in the staging tables. |
|
UCAS Form Quals Staging Data |
SAD_UC_I_IVFMQ |
|
View, update, or delete the suspended ivFormQuals data stored in the staging tables. |
|
UCAS Offer Staging Data |
SAD_UC_I_OFFER |
|
View, update, or delete the suspended ivOffer data stored in the staging tables. |
|
UCAS Prep Activities Staging Data |
SAD_UC_I_IVPREP |
|
View, update, or delete the suspended ivPrepActivities data stored in the staging tables. |
|
UCAS Qualification Staging Data |
SAD_UC_I_IVQUAL |
|
View, update, or delete the suspended ivQualification data stored in the staging tables. |
|
UCAS Reference Staging Data |
SAD_UC_I_IVREF |
|
View, update, or delete the suspended ivReference data stored in the staging tables. |
|
UCAS StarA Staging Data |
SAD_UC_I_STARA |
|
View, update, or delete the suspended ivStarA data stored in the staging tables. |
|
UCAS StarC Staging Data |
SAD_UC_I_IVSTRC |
|
View, update, or delete the suspended ivStarC data stored in the staging tables. |
|
UCAS StarH Staging Data |
SAD_UC_I_IVSTH |
|
View, update, or delete the suspended ivStarH data stored in the staging tables. |
|
UCAS StarJ Staging Data |
SAD_UC_I_IVSTJ |
|
View, update, or delete the suspended ivStarJ data stored in the staging tables. |
|
UCAS StarK Staging Data |
SAD_UC_I_IVSTK |
|
View, update, or delete the suspended ivStarK data stored in the staging tables. |
|
UCAS StarN Staging Data |
SAD_UC_I_STARN |
|
View, update, or delete the suspended ivStarN data stored in the staging tables. |
|
UCAS StarPQR Staging Data |
SAD_UC_I_IVPQR |
|
View, update, or delete the suspended ivStarPQR data stored in the staging tables. |
|
UCAS StarW Staging Data |
SAD_UC_I_STARW |
|
View, update, or delete the suspended ivStarW data stored in the staging tables. |
|
UCAS StarX Staging Data |
SAD_UC_I_IVSTX |
|
View, update, or delete the suspended ivStarX data stored in the staging tables. |
|
UCAS StarZ1 Staging Data |
SAD_UC_I_STARZ1 |
|
View, update, or delete the suspended ivStarZ1 data stored in the staging tables. |
|
UCAS Statement Staging Data |
SAD_UC_I_IVSTAT |
|
View, update, or delete the suspended ivStatement data stored in the staging tables. |
|
UCAS Unit Results Staging Data |
SAD_UC_I_IVUNRS |
|
View, update, or delete the suspended ivUnitResults data stored in the staging tables. |
|
UTT Degree Contents Staging Data |
SAD_UC_I_IVGDGC |
|
View, update, or delete the suspended ivgDegreeContents data stored in the staging tables. |
|
UTT Education Staging Data |
SAD_UC_I_IVGDGC |
|
View, update, or delete the suspended ivgEducation data stored in the staging tables. |
|
UTT First Degree Staging Data |
SAD_UC_I_IVGFDG |
|
View, update, or delete the suspended ivgFirstDegree data stored in the staging tables. |
|
UTT Form Quals Staging Data |
SAD_UC_I_IVGFMQ |
|
View, update, or delete the suspended ivGFormQuals data stored in the staging tables. |
|
UTT Offer Staging Data |
SAD_UC_I_GOFFER |
|
View, update, or delete the suspended ivgOffer data stored in the staging tables. |
|
UTT Other Languages Staging Data |
SAD_UC_I_IVGOLN |
|
View, update, or delete the suspended ivgOtherLanguages data stored in the staging tables. |
|
UTT Reference Staging Data |
SAD_UC_I_IVGREF |
|
View, update, or delete the suspended ivgReference data stored in the staging tables. |
|
UTT StarA Staging Data |
SAD_UC_I_GSTARA |
|
View, update, or delete the suspended ivGStarA data stored in the staging tables. |
|
UTT StarG Staging Data |
SAD_UC_I_IVSTRG |
|
View, update, or delete the suspended ivgStarG data stored in the staging tables. |
|
UTT StarH Staging Data |
SAD_UC_I_IVGSTH |
|
View, update, or delete the suspended ivgStarH data stored in the staging tables. |
|
UTT StarJ Staging Data |
SAD_UC_I_IVGSTJ |
|
View, update, or delete the suspended ivGStarJ data stored in the staging tables. |
|
UTT StarK Staging Data |
SAD_UC_I_IVGSTK |
|
View, update, or delete the suspended ivgStarK data stored in the staging tables. |
|
UTT StarN Staging Data |
SAD_UC_I_GSTARN |
|
View, update, or delete the suspended ivgStarN data stored in the staging tables. |
|
UTT StarW Staging Data |
SAD_UC_I_GSTARW |
|
View, update, or delete the suspended ivgStarW data stored in the staging tables. |
|
UTT StarX Staging Data |
SAD_UC_I_GSTARX |
|
View, update, or delete the suspended ivgStarX data stored in the staging tables. |
|
UTT Statement Staging Data |
SAD_UC_I_IVGSTA |
|
View, update, or delete the suspended ivgStatement data stored in the staging tables. |
|
UTT Experience Staging Data |
SAD_UC_I_IVGEXP |
|
View, update, or delete the suspended ivgExperience and ivgExperienceU data stored in the staging tables. |
|
Internal Timestamps |
SAD_UC_TIMESTMP |
|
For an institution, reset a timestamp to a previous date if you want to re-import UCAS records. See the highest UCAS timestamp when the view was last imported. Additionally, see the number of records that were added, deleted, or amended when the view was last imported. |
Access the Transaction Setup page ().
Image: Transaction Setup page (1 of 2)
This example illustrates the fields and controls on the Transaction Setup page (1 of 2).
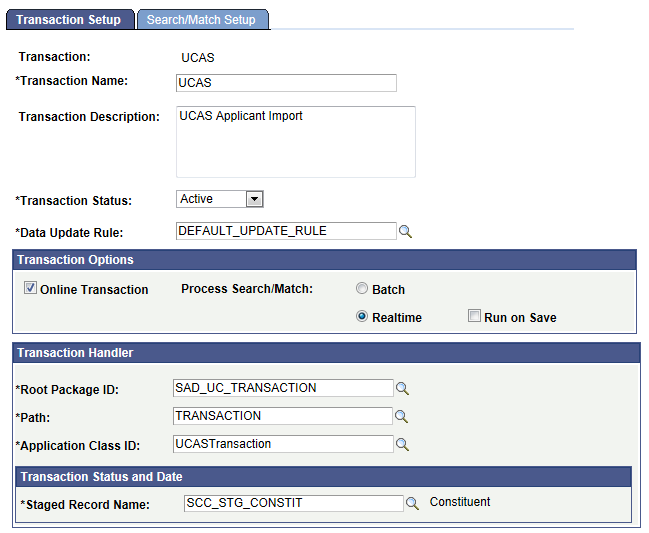
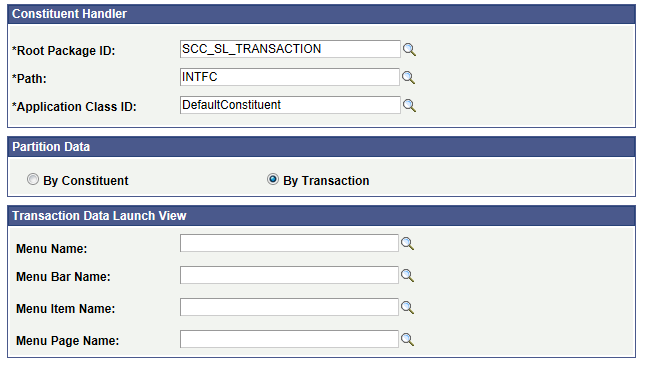
Image: Transaction Setup page (2 of 2)
This example illustrates the fields and controls on the Transaction Setup page (2 of 2).
The system uses this delivered UCAS transaction to process the incoming UCAS and UTT data. Do not change any values for this transaction.
Access the Search/Match Setup page ().
Image: Search/Match Setup page
This example illustrates the fields and controls on the Search/Match Setup page. You can find definitions for the fields and controls later on this page.
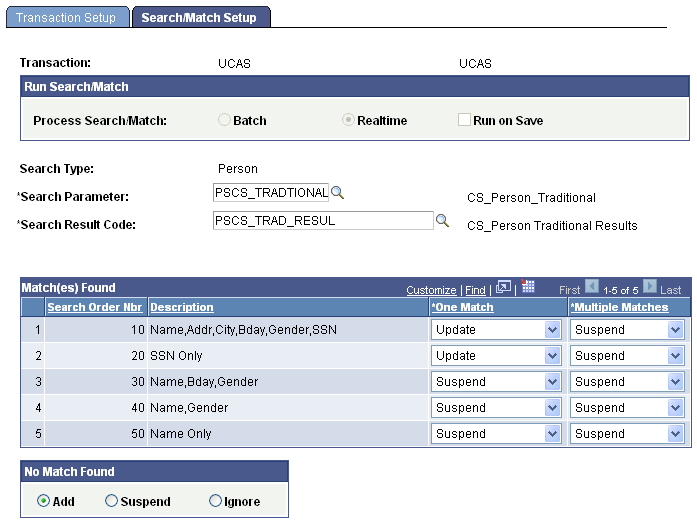
The system uses this delivered UCAS transaction to process the incoming UCAS and UTT data. Therefore, you will need to define search match parameters for the UCAS transaction.
Use the Search Parameter field to select the group of predefined search parameters that you want to use for the Import Applicant Data process.
Use the Search Result Field field to select a search result value that you defined in the Search Result page.
It is recommended that you change the Number of Characters of FirstNameSrchRule and LastNameSrchRule to 7 for PSCS_10, PSCS_30, PSCS_40 and PSCS_50 in the Search/Match Rules page. Select to navigate to the Search/Match Rules page.
For information about setting up search/match rules, search parameters and results, see Understanding Search/Match and Setting Up Search/Match
Note: You must define at least one Suffix value in the Name Suffix table (Set Up HRMS, Foundation Tables, Personal, Name Suffix)
Match(es) Found
This group box contains one row for each search/match criteria order defined by your institution. Define search/match orders on the Search/Match Criteria page.
|
Field or Control |
Definition |
|---|---|
| Search Order Nbr (search order number) |
For each order number, select what you want to do with the record if the search/match/post process discovers one or more matching records. |
| One Match and Multiple Matches |
Select whether you want to add, update, suspend, or ignore matching records: Add: Add a new record to your database using the staging table record. Update: Update the existing record with the data in the staging table record. Suspend: Keep the suspense record back in the staging table. Determine manually whether or not this record matches a record in your database. Ignore: Ignore the staging table record that matched a record in your database. The process marks the record to be purged. |
No Match Found
Select one of the following options to specify what the search/match/post process should do when it does not find a matching record in your database:
Add: Add the unmatched record, including personal data, to your database.
Suspend: Keep the unmatched record in the staging tables to be looked at manually.
Ignore: Ignore the unmatched record completely. The process marks the record to be purged.
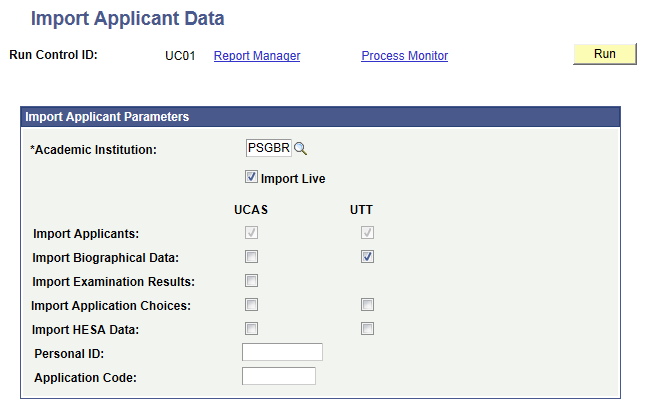
Access the Import Applicant Data page ().
Image: Import Applicant Data page
This example illustrates the fields and controls on the Import Applicant Data page. You can find definitions for the fields and controls later on this page.
|
Field or Control |
Definition |
|---|---|
| Academic Institution |
Enter the academic institution for which you want to import data. |
| Import Live |
Select if you want the import process to load the data into the staging tables and then into the Campus Solutions tables. If you do not select this check box, the import process loads the data from the staging tables into the Campus Solutions tables. By default, the system selects this check box if the Import Live check box on the UCAS Configuration page is selected. |
| Import Applicants |
Indicates whether the process imports applicant data from UCAS, UTT, or both. You cannot select or clear these check boxes. The system selects the check boxes if you have selected the UCAS and UTT check boxes on the UCAS Configuration page. If the system selects the UTT check box, the process imports applicant data from UTT ivgStarN, ivgStarA, and ivgStarK views. If the system selects the UCAS check box, the process imports applicant data from UCAS ivStarN, ivStarA, and ivStarK views. Note: Either the UCAS check box or the UTT check box for Import Applicants must appear as selected for the Import Applicant Data process to run successfully. |
| Import Biographical Data |
Select the UCAS check box if you want to import application biographical data from the following UCAS views:
Select the UTT check box if you want to import application biographical data from the following UTT views:
Select both check boxes if you want to import application biographical data from the UTT and UCAS views. |
| Import Examination Results |
Select the UCAS check box if you want to import data from ivStarPQR and ivUnitResults views. |
| Import Application Choices |
Select the UCAS check box if you want to import application choices from these UCAS views:
Select the UTT check box if you want to import application choices from the following UTT views:
Select both check boxes if you want to import application choices from UTT and UCAS. |
| Import HESA Data |
Select the UCAS check box if you want to import ivStarj data. Select the UTT check box if you want to import ivgStarj data. |
| Personal ID and Application Code |
Specify the UCAS or UTT personal ID and application code, if you want to re-import all the records of a particular applicant (that has previously been incorrectly matched and then deleted). If you specify the personal ID and application code here, then during the selection from applicant views, the import process will select only records for that applicant, irrespective of the Earliest Application Year that you configured and timestamp values. If you leave these two fields blank, the process will select records for all applicants based on the timestamp in the views and updates the internal timestamp with the highest imported timestamp value. For more information on the internal timestamp settings: Defining a Timestamp for Re-importing Data The Personal ID and Application Code fields are available only when you select the Import Live check box on the Import Applicant Data page. Note: By using the Personal ID and Application Code fields, you can specify only one applicant for a single run of the Import Applicant Data process and you will need to ensure that the correct UCAS or UTT import check boxes are selected on the Import Applicant Data page. Also, note that if you specify a personal ID, then the application code is required. Personal ID must be a 10-digit numeric value and application code must be a 4-character value (for example, UC01, UC02, GT01 and GT02). |
If you have installed CRM for Higher Education, you can run an EIP batch replay process following the main Import Applicant Data process. The following example shows the options available on the Process Scheduler Request page when CRM for HE is installed.
Image: Process Scheduler Request page for the Import Applicant Data process
This example illustrates the fields and controls on the Process Scheduler Request page for the Import Applicant Data process. You can find definitions for the fields and controls later on this page.
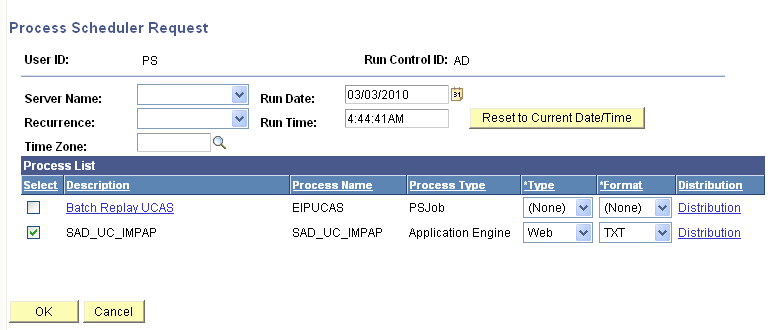
If you select the Batch Replay UCAS option, the Import Applicant Data process (SAD_UC_IMPAP) runs first and then the EIP Batch Replay (SCC_BAT_RPLY) runs. If you select the SAD_UC_IMPAP option, only the Import Applicant Data process runs.
For more information about the EIP Batch Replay process see CRM for Higher Education Developer's Guide.
To process the ivStarN and ivgStarN staging records, the Import Applicant Data process performs the following initial processing steps to determine if the applicant already exists in the system. The steps are followed until an EMPLID is found. If an EMPLID is not found, then the Import Applicant Data process invokes the search/match processing.
Check if there is a matching applicant record for the local institution in SAD_UC_APPLREC. This check is made by matching the applicant's Institution, Personal ID and App Code.
Check if there is a matching applicant record for the other institution in SAD_UC_APPLREC. This check is made by matching the applicant's Personal ID and App Code.
Check if there is a matching applicant record from previous cycle or other system (UCAS or UTT) in SAD_UC_APPLREC. This check is made by matching only the Personal ID of either:
Applicant record for the same system (that is, UCAS for UCAS applicants and UTT for UTT applicants) for a previous cycle with a different App Code.
Applicant record for the other system (that is, UTT for UCAS applicants and UCAS for UTT applicants).
Check the External System ID of the same system. This check is made by matching Personal ID to External System ID of the same system, that is, UC for UCAS applicants and GT for UTT applicants.
Check the External System ID of other system. This check is made by matching Personal ID to External System ID of the other system, that is, GT for UCAS applicants and UC for UTT applicants.
Check the Legacy External System ID. This check is made by matching Personal ID to the UP External System ID. This check is for legacy records that your institution may have imported using a localisation provided by a vendor.
Check the ULN External System ID. This check is made by matching the UniqueLearnerNumber value that is imported from ivStarN and ivgStarN and held in SAD_UC_ULN to the ULN External System ID.
A subprocess is called by the Import Applicant Data process that imports StarJ (HESA) data from UCAS and UTT when the UCAS and UTT check boxes for Import HESA Data is selected on the Import Applicant Data page.
See previous subsection “Entering the Applicant Import Parameters” for more information about the Import Applicant Data page.
Business Rules
If you select the UCAS check box for the Import HESA Data sub-process, the UCAS view ivStarJ is imported to the staging table then processed.
The following tables are loaded if this subprocess is selected for the UCAS view:
|
UCAS View |
Staging Table |
Base Table |
|---|---|---|
|
IVSTARJ |
PS_SAD_UC_I_IVSTJ |
|
If you select the UTT check box for the Import HESA Data sub-process, the UTT view ivgStarJ is imported to the staging table and then processed.
The following tables are loaded if this subprocess is selected for the UTT view:
|
UCAS View |
Staging Table |
Base Table |
|---|---|---|
|
IVGSTARJ |
PS_SAD_UC_I_IVGSTJ |
|
General Process Logic
The following is the logic for the Import HESA Data subprocess:
The subprocess considers the Update Matriculated Students check box setting on the UCAS Configuration page for processing External System ID records.
The subprocess updates HESA-specific records regardless of the Update Matriculated Students check box setting to ensure that the records are synchronized with the corresponding UCAS view. Updates to HESA records are controlled by the HESA Data Import field on the UCAS Configuration page. If the Add HESA Person fields check box is selected on the UCAS Configuration page, then the subprocess creates new Disability, Nation, Ethnicity and Domicile fields. If the Add HESA Person fields check box is not selected, then the subprocess updates the existing fields but does not add new fields.
The subprocess considers the Process Mismatched Applicants check box setting on the UCAS Configuration page.
For more information about the UCAS Configuration page, see Setting Up UCAS and UTT Options
Prerequisites
The following are the prerequisites for a successful run of Import HESA Data sub-process:
The Person HESA Data and HESA Instance Data records must have been created for each applicant whose details you want to import.
See Creating HESA Instance and Person HESA Data Records for Students
A UCAS configuration record must be defined on the UCAS Configuration page. Refer to the above topic General Process Logic
Import Records to Staging Table
If you have selected the Import Live Data from UCAS check box on the UCAS configuration page, then records are imported from the StarJ views into the relevant staging table based on the timestamp value of each record. If the timestamp is greater than the internal timestamp for the view, then the record is imported. At the end of the Import Applicant Data process, the internal timestamp is updated with the highest timestamp of the records that have been imported.
Processing of Staging Table Records
For each staging table record with status of New, Pending or Error:
The record is matched to an existing UCAS applicant record in PS_SAD_UC_APPLREC using UCAS Personal ID and Application Code to find the EMPLID, or if applicant record is not found, then the EMPLID is selected from matching External System ID records with ID type UC or GT (depending on whether UTT or UCAS is selected on the UCAS Configuration page).
The imported Surname, Fnames, Birthdate and Gender values are compared with the values in the Campus Solutions primary person record. If the values are different then a message is logged. If a Surname, Fnames, Birthdate or Gender value is different and the Process Mismatched Applicants check box is selected, then the system adds a warning message to the log file (for example, “Warning: Personal ID: 0035697369, AppCode:UC01, ID:0278 - SURNAME value does not match person record”) and the subprocess continues to process the staging record. If a Surname, Fnames, Birthdate or Gender value is different and the Process Mismatched Applicants check box is not selected, the system sets the staging record status to Error. does not process the record and adds a message to the log file (for example, “Processing skipped for Personal ID: 0035697369, AppCode:UC01, ID:0278 - SURNAME value does not match person record”).
Person HESA Data Update: If a Person HESA Data record exists, then fields are added or updated using the incoming IVSTARJ values (see table below). The inserts/updates are done depending on the value of the HESA Data Import field on the UCAS configuration page.
External System ID (SCN):
External System ID records are created or updated based on the imported value.
Default values of 999999999 are skipped
For matriculated students, updates/inserts are done only if the Update Matriculated Students check box is selected.
HESA Instance – Entry Profile Data Update:
HESA Instance records are selected by matching from existing UCAS application choice records via the related Student Program records
Fields are added/updated using the incoming StarJ values (see table below) and inserts/updates are done depending on the value of the HESA Data Import field.
Imported entry qualifications are matched to existing records (in PS_SSR_HE_QUAL_ENR) based on TYPE, SUBJECT, YEAR and SITTING and if a record already exists, then the GRADE value is updated, otherwise a new record is created
Records with errors (E) and pending records (P) are retained in the staging table and can be reprocessed once errors are corrected.
Data Mapping for ivStarJ / ivgStarJ
Note that ULN, SBJQA1, SBJPCT1, SBJQA2, SBJPCT2, SBJQA3 and SBJPCT3 are not imported.
The following table shows the Person Data mapping:
|
StarJ Column: IVSTARJ IVGSTARJ |
Comment/Format |
Staging Table Column: PS_SAD_UC_I_IVSTJ PS_SAD_UC_I_IVGSTJ |
Compared with (Page name - Field name) |
|---|---|---|---|
|
Surname |
Surname |
SAD_UC_SURNAME |
Names - Last Name (for primary name record) |
|
Fnames |
Forenames |
SAD_UC_FORNAME |
Names - First Name, Middle Name (for primary name record) |
|
Birthdte |
Date of Birth |
SAD_UC_BIRTHDTE |
Biographical Details - Date of Birth |
|
Gender |
Gender (1 = Male or 2 = Female) |
SAD_UC_GENDER |
Biographical Details – Gender |
The following table shows the HESA Person Data mapping:
|
StarJ Column: IVSTARJ IVGSTARJ |
Comment/Format |
Staging Table Column: PS_SAD_UC_I_IVSTJ PS_SAD_UC_I_IVGSTJ |
PS_SCC_HE_PER_FLD |
|---|---|---|---|
|
Disable |
HESA Disability code (cvRefDis). Validated against imported HESA codes for DISABLE (To view the codes that you have imported, select Records and Enrollment, HESA Reporting, Codes and Mappings, Codes). Your institution may have already imported Disability values from StarK which the system will have used to create person Disability/Impairment records. |
SAD_UC_DISABLE |
DISABLE |
|
Ethnic |
HESA Ethnicity code (cvRefEthnic). Validated against imported HESA codes for ETHNIC. Your institution may have already imported Ethnic values from StarH which the system will have used to create person Ethnicity records. |
SAD_UC_ETHNIC |
ETHNIC |
|
Nation |
HESA country code (cvRefNationality). Validated against imported HESA codes for NATION. Your institution may have already imported Nationality values from StarK which the system will have used to create person Citizenship records. |
SAD_UC_NATIONALITY |
NATION |
|
NationD |
2-digit code. Validated against imported HESA codes for NATIOND. |
SAD_UC_NATIONALD |
NATIOND |
The following table shows the External System ID mapping:
|
StarJ Column: IVSTARJ IVGSTARJ |
Comment/Format |
Staging Table Column: PS_SAD_UC_I_IVSTJ PS_SAD_UC_I_IVGSTJ |
Base Table — Column |
|---|---|---|---|
|
SCN |
Scottish Candidate Number (default is 999999999). Your institution may have already imported SCN values from StarK which the system will have used to create SCN external system ID records. The system does not use the default value 999999999 for processing StarK records. |
SAD_UC_ SCN |
External System ID – SCN |
|
ULN |
Not currently processed – The system creates ULN external system ID as part of the initial STARN import. |
SAD_UC_ULN |
External System ID – ULN |
The following table shows the data mapping for HESA Entry Profile:
|
StarJ Column: IVSTARJ IVGSTARJ |
Comment/Format |
Staging Table Column: PS_SAD_UC_I_IVSTJ PS_SAD_UC_I_IVGSTJ |
HESA Base Table: PS_SSR_HE_INST_FLD |
|---|---|---|---|
|
Domicile |
HESA country code (cvRefAPR) Validated against imported HESA codes for DOMICILE. Your institution may have already imported APR from StarK which the system will have used to create person Residency Self-Report records. |
SAD_UC_APR |
DOMICILE |
|
ParEd |
1-character code. Validated against imported HESA codes for PARED. |
SAD_UC_PARENTINHE |
PARED |
|
PGCEclss (UTT only) |
2-digit code. Validated against imported HESA codes for PGCECLSS. |
SAD_UC_PGCECLSS |
PGCECLSS |
|
Postcode |
Text. No validation applied. |
SAD_UC_POSTCODE |
POSTCODE |
|
Previnstz |
Up to 8-digit code, default is U00000. No validation applied. |
SAD_UC_PRVINST |
PREVINST |
|
Qualent3 |
3-character code - default is X06. Validated against imported HESA codes for QUALENT3. |
SAD_UC_QUALENT2 |
QUALENT3 |
|
SEC |
1-digit code (cvRefSocioEconomic). Validated against imported HESA codes for SEC. |
SAD_UC_SOCIOECON |
SEC |
|
SOC2000 |
4-digit code (cvRefPocc). Validated against imported HESA codes for SOC2000. |
SAD_UC_POCC |
SOC2000 |
|
WelBacc |
1-digit code (1, 2, or 3). Validated against imported HESA codes for WELBACC. |
SAD_UC_WELBACC |
WELBACC |
|
Yrllinst |
Year of leaving school in YYYY format – default is 9999. No validation applied. |
SAD_UC_YRLLINST |
YRLLINST |
The following table shows the data mapping for Entry Qualifications:
|
StarJ Column: IVSTARJ IVGSTARJ |
Comment/Format |
Staging Table Column: PS_SAD_UC_I_IVSTJ PS_SAD_UC_I_IVGSTJ |
HESA Base Table: PS_SSR_HE_QUAL_ENT |
|---|---|---|---|
|
QualType1 – 30 |
Text (max 6 characters). Validated against imported HESA codes for QUALTYPE. |
SAD_UC_QUALTYPE1 to 30 |
SSR_HE_QUAL_TYPE |
|
QualSbj1 – 30 |
ABL Subject Code (EBL_SUBJ in cvRefSubj). Validated against imported HESA codes for QUALSBJ. |
SAD_UC_QUALSBJ1 to 30 |
SSR_HE_QUAL_SUBJ |
|
QualSit1 – 30 |
S (Summer) or W (Winter). Validated against imported HESA codes for QUALSIT. |
SAD_UC_QUALSIT1 to 30 |
SSR_HE_QUAL_SIT |
|
QualGrade1 – 30 |
Text (max 6 characters). Validated against imported HESA codes for QUALGRADE. |
SAD_UC_QUALGRADE1 to 30 |
SSR_HE_QUAL_GRADE |
|
QualYear1 – 30 |
4-digit Year value. No validation applied. |
SAD_UC_QUALYEAR1 to 30 |
SSR_HE_QUAL_YEAR |
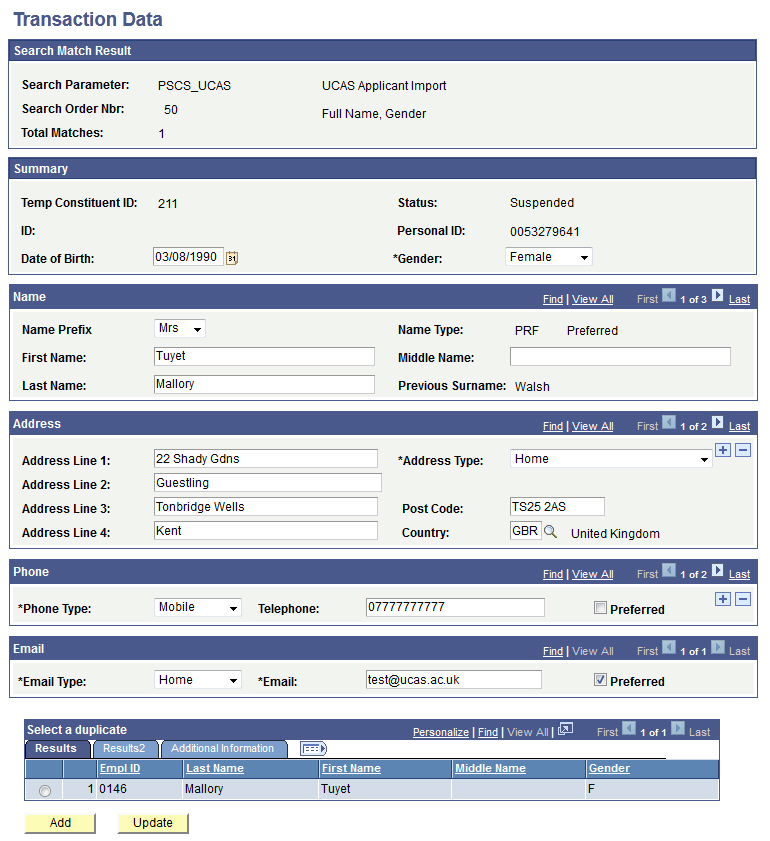
Access the Transaction Data page ().
Image: Transaction Data page
This example illustrates the fields and controls on the Transaction Data page. You can find definitions for the fields and controls later on this page.
|
Field or Control |
Definition |
|---|---|
| Personal ID |
Displays the value imported from the StarN staging record for suspended records and from PS_SAD_UC_APPLREC for updated or added records. |
| Previous Surname |
Displays the value from the StarN staging record for suspended records. This field does not display a Previous Surname value for updated or added records. |
Possible values for the Status field include:
New ID Created: The import process added a record with a new ID to your database when the post process was run. Or the system added a record with a new ID to your database when you clicked the Add button.
ID Updated: The import process updated an existing ID record with the data from the UCAS record. Or the system updated an existing ID record with the data from the UCAS record when you selected the existing ID in the Results region and then clicked the Update button.
Suspended: The import process has completed running the search/match process and indicated that the record should be held for later processing.
Ignore: The import process has completed running the search/match process and indicated that the record should be ignored for any processing.
Error: The import process suspends error records. The Error Messages region indicates which value is invalid. You must correct the invalid data specified by each error message before selecting the Add button or the Update button to process the record.
Other staging statuses that you can see on the Transaction Data search page are not currently used in UCAS.
You define the logic to determine the status values in the Search/Match Setup page. For example, to give the ID Updated status to a record, you may have specified that if the import process does not find a matching record, then add the imported record to the tables.
The Select a Duplicate region displays the single or multiple matching records. The system disables the Add and Update buttons and hides the Select a Duplicate region if the data has been posted. Also, all the fields appear as read-only when the status is New ID Created or ID Updated.
Select a duplicate
Displays a single or multiple matching records for the imported UCAS record where the status is suspended or error.
Click the Detail link to navigate to the Add/Update a Person component.
|
Field or Control |
Definition |
|---|---|
| Add |
Click to ignore any potential duplicates, manually add a new ID, and post the imported UCAS record to your database. When you click this button, the system posts the record and assigns an ID to the person. |
| Update |
Click to match to an existing record and update the person record selected in the Select a Duplicate region with data from the UCAS record. |
Use the Staging Data pages to view, update, or delete the suspense data in the staging tables. The following is an example of a Staging Data page.
Image: Example of a Staging Data page
This example illustrates the fields and controls of a Staging Data page.
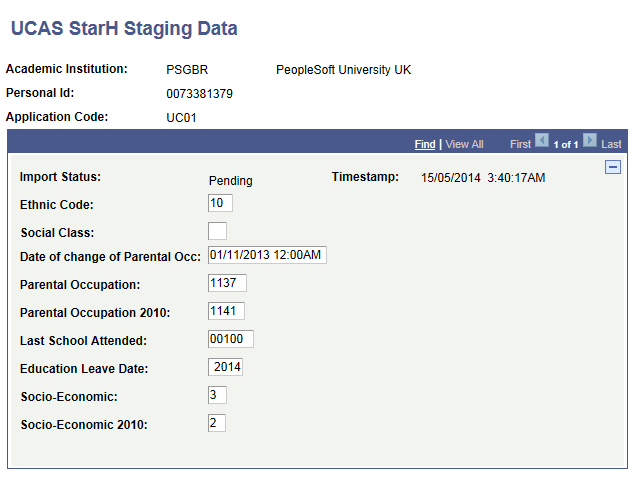
The Import Status field displays any one of the following values:
Error: If the Import Applicant Data process cannot load the record into the Campus Solutions tables.
Imported: If the Import Applicant Data process has loaded the record into the Campus Solutions tables.
New: If the Import Applicant Data process has not loaded the record into the Campus Solutions tables.
Pending: If the Import Applicant Data process load is waiting for the creation of a new person ID for the applicant.
In the UCAS and UTT StarA Staging Data search pages, the Country Code search field searches both the Correspondence Country and the Home Country values loaded from the StarA views. The search results therefore display records that have a matched search value in either the Correspondence Country field or Home Country field or both fields. For example, if you enter NLD in the Country Code search field, the system displays records that have NLD as either the Home Country or Correspondence Country or both. It is recommended that you use the Contains option when searching using this field.
The staging data pages can display data from either the Unicode views or the standard views. For example, if you have selected the Unicode check box on the UCAS Configuration page, the StarA Staging Data page displays the ivStarAU data. Conversely, if you have not selected the Unicode check box on the UCAS Configuration page, the StarA Staging Data page displays the ivStarA data.
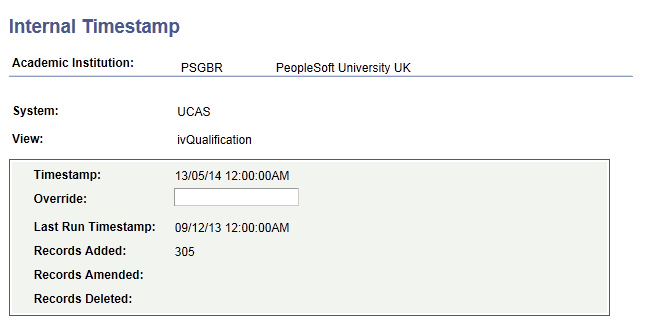
Access the Internal Timestamp page ().
Image: Internal Timestamp page
This example illustrates the fields and controls on the Internal Timestamp page. You can find definitions for the fields and controls later on this page.
|
Field or Control |
Definition |
|---|---|
| Timestamp |
Displays the highest UCAS timestamp for the view when it was last imported. |
| Override |
Specify an override date if you want to reload a particular view. After specifying the override date, run the import process. The import process then imports the UCAS view records that have a timestamp of on and after the specified override date. The default system time for the specified override date is 00:00:00. After the import process finishes, the system sets the Override field value to blank. |
| Last Run Timestamp |
Displays the latest timestamp used by the import process when it was last run. |
| Records Added |
Displays the number of records that the import process added when the process last ran. |
| Records Amended |
Displays the number of records that the import process modified when the process last ran. |
| Records Deleted |
Displays the number of records that the import process deleted when the process last ran. |
The following scenario describes how the Internal Timestamp page displays its field values:
You have already imported records for a view that has UCAS timestamps up to and including July 31, 2008. Therefore, the Timestamp field on the Internal Timestamp page displays the date July 31, 2008.
You now want to re-import data for the view that UCAS has modified and added on or after May 31, 2008, 12 AM.
On August 4, 2008 enter an override date of May 31, 2008 in the Internal Timestamp page and run the Import Applicant Data process.
After the Import Applicant Data process completes importing the data, the system sets the Override date field as blank and sets the Last Run Timestamp field as May 31, 2008 because May 31,2008 was the override timestamp date that the system used when the process was run.
The Internal Timestamp page displays the number of records that the import process added, amended, and deleted on August 4, 2008.
The Timestamp field on the Internal Timestamp page still displays the date July 31, 2008 if no records were found in the UCAS view with timestamps greater than July 31. If the import process imported records in the UCAS view that had a timestamp of August 1, 2008, then the Timestamp field displays the date August 1, 2008.