Managing Relationships Data
This section lists prerequisites and discusses how to:
Relate one individual to another.
Identify an individual's legacy relationship to the institution.
Specify communications for the communication recipient relationship.
Create joint communications relationships.
Enter relationship addresses.
Enter relationship detail data.
View a list of relationships.
Identify an individual's relationship with the institution.
Before you can enter relationship data, you must define the relationship types for which you want to collect information. To use full relationship functionality, you must also define legacy affiliations, create institutions and academic programs, and create letter codes to identify communications to send to related individuals and set up salutation types to use.
|
Page Name |
Definition Name |
Navigation |
Usage |
|---|---|---|---|
|
Relationships |
RELATIONSHIPS |
|
Enter data to associate one individual with another individual inside or outside of your database. |
|
Legacy Information |
LEGACY_SEC |
Click the Legacy button on the Relationships page. |
Identify a related person's legacy relation with your institution. |
|
Communication Recipient |
REL_MLT_RECPNT_SEC |
Click the Communication Recipients button on the Relationships page. |
Specify the communications for which a copy should also be sent to the related person. |
|
Joint Communication Management |
RELATION_SALU_SEC |
Click the Joint Communication Management button on the Relationships page. |
Create joint communications between two related individuals and establish how their names should appear in the address and salutation. You can also use this page to dissolve joint communications for these individuals. |
|
Relationship Address |
REL_ADDR_DTL |
|
Review addresses for the primary individual and for the related individual. If the related person does not have an ID in your system, the Edit Address link is available for you to enter an address for this person. If you use the communication recipient feature, this is also where you select the related individual's address to send a copy letter. Also, if you use the joint communication feature, this is where you select which address (either from the primary or from the related ID's addresses) to which you want to send the joint communications. |
|
Relationship Detail |
RELATIONSHIP_DTL |
|
Enter information about the related person that is of interest to your institution. |
|
Person-to-Person Summary |
RELATIONSHIP_SUMRY |
|
View a list of relationships for an individual. |
|
Relations with Institution |
PERS_INST_REL |
|
Specify or review an individual's relations to your institution. |
Access the Relationships page ().
Image: Relationships page
This example illustrates the fields and controls on the Relationships page. You can find definitions for the fields and controls later on this page.
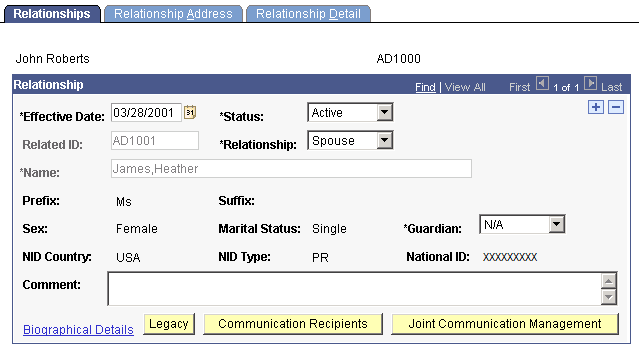
You can create the same relationship between the same two people on this page. The system validates the Effective Date and Status of the relationships. As long as the new relationship is not concurrent with the existing, the system does not return an error, allowing you to track remarriages, for example.
Relationship
|
Field or Control |
Definition |
|---|---|
| Related ID |
If the related person is in your database, select the related person's ID. When you select the ID, the system displays the related person's biographical data, including the person's name, prefix, suffix, sex, marital status, and primary NID information. If the related person is not in your database, the name and biographical data fields are available so that you can enter the related person's name and data. Note: The Related ID field is available when you are creating the relationship between these individuals for the first time. After you create and save the relationship, when you return to the Relationships page, the system continues to display the related ID and biographical data, but you cannot edit or update it from here. If you need to edit or update the related person's biographical data, click the Biographical Details link at the bottom of the page. You then determine if you need to update information on the Biographical Details page or reconsider the relationship that you are creating. |
| Relationship |
Specify the related person's relationship, such as mother, neighbor, employer, or loan reference to this individual. Values for this field are delivered with your system as translate values. Do not modify these values in any way. Any modifications to these values could require substantial programming effort. Note: If you set up marital status verification on the Relationship / Marital Status page, the system verifies the marital status on the Biographical Details page for each individual against the relationship that you select here. If the marital status of either individual is not the appropriate status for the specified relationship, the system displays a warning message suggesting that you update the marital status for the individuals on the Biographical Details page. |
| Guardian |
Select the legal guardianship that describes the status of the related person to the primary individual. Values are: Guardian N/A Other Parent Self Values for this field are delivered with your system as translate values. Do not modify these values in any way. Any modifications to these values could require substantial programming effort. |
| Comment |
Enter comments to further identify or describe the related person or the relationship between the two individuals. |
| Biographical Details |
Click to access the Biographical Details page, on which you can view or update the related person's biographical data. |
| Legacy |
Click to access the Legacy Information page, on which you can identify the related person's legacy relation with your institution. |
| Communication Recipients |
Click to access the Communication Recipient page, on which you can specify the communications for which a copy should also be sent to the related person. |
| Joint Communication Management |
Click to access the Joint Communication Management page, on which you can create or dissolve joint communications for these two individuals. |
Warning! Individuals can have several relationships in your database; however they can have joint communications with only one of those relationships. For example, you can create a relationship between Gloria Wilson and her husband, Mark Gonzalez, and you can create a relationship between Gloria Wilson and her mother, Maria Wilson. You can then create joint communications with either Gloria and her husband or Gloria and her mother, but you cannot create joint communications for both.
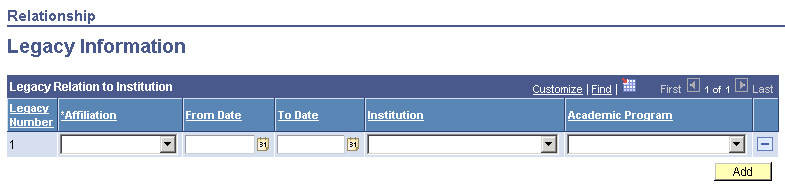
Access the Legacy Information page (click the Legacy button on the Relationships page).
Image: Legacy Information page
This example illustrates the fields and controls on the Legacy Information page. You can find definitions for the fields and controls later on this page.
Access the Communication Recipient page (click the Communication Recipients button on the Relationships page).
Image: Communication Recipient page
This example illustrates the fields and controls on the Communication Recipient page. You can find definitions for the fields and controls later on this page.
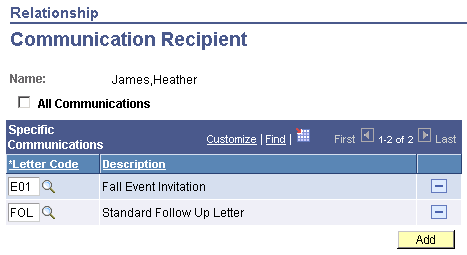
You can create letter copies to send to an individual's related IDs. You can create copies of all communications generated for the primary ID or select specific communications to copy. To create the copy letter, you must set up a template with the related ID's name and address. When the letter generation data extract process encounters a letter code that is set to include a copy to the individual's related ID, it extracts the related person's address data from the Relationship Address page.
Note: For confidentiality purposes, the communication recipients that you set here will not receive copies of communications set to allow joint communications for a relationship, even when you select All Communications. This preserves information communicated to Mr. and Mrs. Smith, for example.
|
Field or Control |
Definition |
|---|---|
| All Communications |
Select to generate a copy for this related individual of all communications to the primary individual. |
| Letter Code |
Enter the letter codes for the communication to copy. Available letter codes are from the Standard Letter Codes page. |
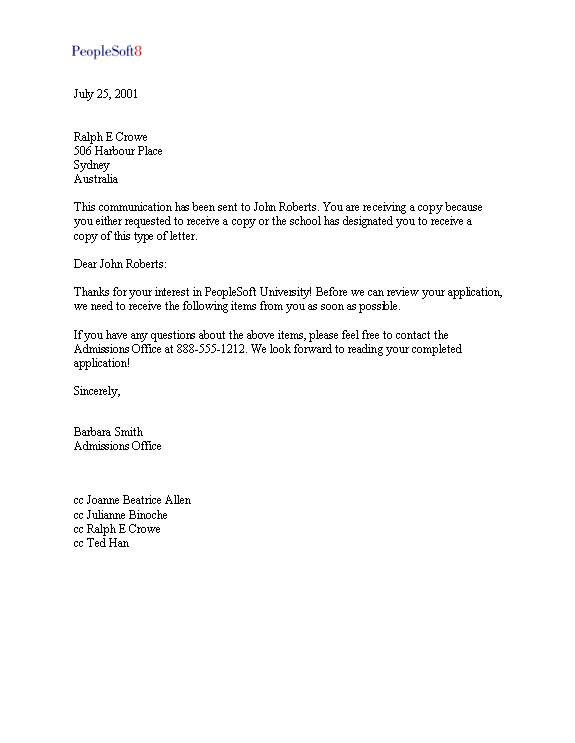
Warning! When an individual has multiple relationships set up with communication recipients, the process extracts data for all of the related IDs. When merging the data into the template, the process lists a maximum of five recipients as receiving a copy. You can create and send copies to more than five recipients, but the letter can list only five, as shown in the following sample letter.
The following graphic provides an example of the CCLTRREC.doc letter that is created for recipients set on the Communication Recipient page:
Image: Example of the CCLTRREC.doc letter that is created for recipients set on the Communication Recipient page
example of the CCLTRREC.doc letter that is created for recipients set on the Communication Recipient page
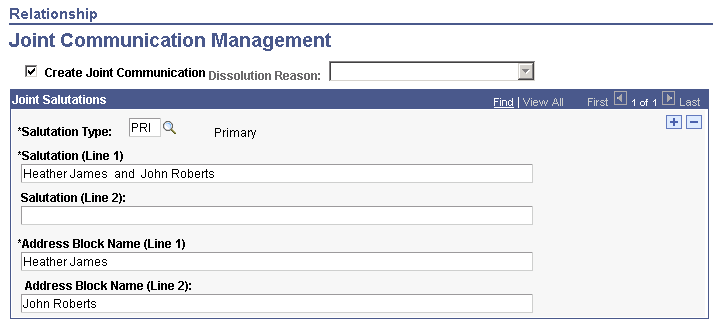
Access the Joint Communication Management page (click the Joint Communication Management button on the Relationships page).
Image: Joint Communication Management page
This example illustrates the fields and controls on the Joint Communication Management page. You can find definitions for the fields and controls later on this page.
|
Field or Control |
Definition |
|---|---|
| Create Joint Communication |
Select to address joint communications to both the primary and related individuals, using the salutation that you specify on this page. |
| Dissolution Reason |
When you clear the Create Joint Communication check box, or when you inactivate the relationship to stop joint communications for these two individuals, the Dissolution Reason field becomes available, enabling you to enter the reason for dissolving the joint communications. Values include: Deceased Partner Divorce Per Request Values for this field are delivered with your system as translate values. You can modify these translate values. |
Joint Salutations
|
Field or Control |
Definition |
|---|---|
| Salutation Type |
Specify the type of salutation, from the Joint Salutation Type Table page, to use for joint communications to these IDs. When you enter a salutation type, the system displays the individual's names in the Salutation and Address Block Name fields, based on the default formats associated with that salutation type. The default formats are designed to reduce data entry; however always validate that the information is correct. Note: When you select the Create Joint Communication check box, the system displays the default salutation type from the Installation Default – CC page, if you entered one. You can add salutation types, but do not delete the one that you defined as the default value. Use the default value as the lowest level joint usage on the Name Usage page so that when you run the letter generation process, it does not fail due to a lack of salutation type. |
| Salutation (Line 1), Salutation (Line 2) |
The system displays the names of the two individuals as they will appear in the greeting of the letter according to the default salutation format for the salutation type defined on the Joint Salutation Type Table page. Example values include: Mr. and Mrs. Smith or, using two lines: John Smith Mary Fletcher |
| Address Block Name (Line 1) Address Block Name (Line 2) |
The system displays the names of the two individuals as they will appear in the address of the letter (and envelope or label if applicable) according to the default address block format for the salutation type defined on the Joint Salutation Type Table page. Example values include: Mr. and Mrs. Smith or, using two lines: John Smith Mary Fletcher |
Access the Relationship Address page ().
Image: Relationship Address page (1 of 2)
This example illustrates the fields and controls on the Relationship Address page (1 of 2). You can find definitions for the fields and controls later on this page.
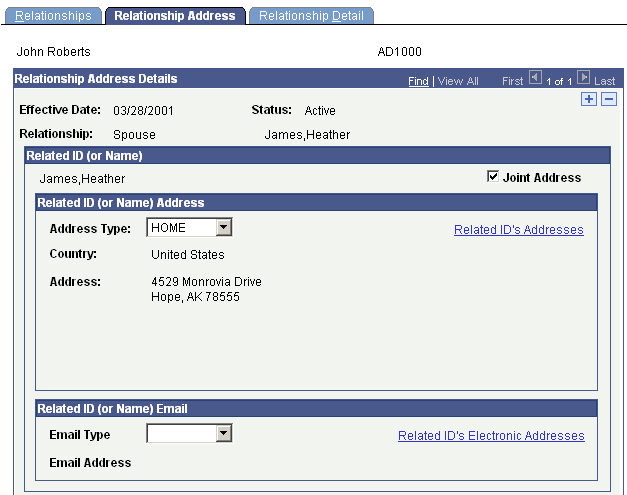
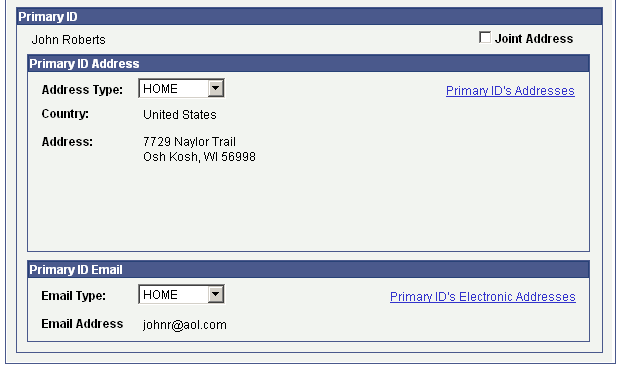
Image: Relationship Address page (2 of 2)
This example illustrates the fields and controls on the Relationship Address page (2 of 2). You can find definitions for the fields and controls later on this page.
Related ID (or Name)
|
Field or Control |
Definition |
|---|---|
| Joint Address |
Select to send joint communications for these two individuals to this address. If the related person does not have an ID in your database, this check box is unavailable. For the system to generate a joint communication, the address must be associated with an ID in your system. For joint communications, you must select either the related individual's address or the primary individual's address as the joint address to use. You cannot select both. |
Related ID (or Name) Address
|
Field or Control |
Definition |
|---|---|
| Address Type |
Select the address type to use for the related individual in association with this relationship. If the related person does not have an ID in your database, the Edit Address link becomes available. Click the link to enter the related person's address data. If the individual has an ID in your database, the system automatically displays the address data for the address type that you select. Only address types that contain data are available. If you do not select an address type, the default value is the address type selected in the Address For Related ID field on the Installation Default - CC page. |
| Related ID's Addresses |
If the related person has an ID in your database, you can click this link to access the Addresses page where you can view or update the related person's address data. If the related person does not have an ID in your database, this link is not available. |
Related ID (or Name) Email
|
Field or Control |
Definition |
|---|---|
| Email Type |
Select the related individual's email address type to associate with this relationship. |
| Email Address |
Enter the related individual's email address. If the related person has an ID in your database, the email address for the specified email type appears. If the related person does not have an ID in your database, the field is not available. |
| Related ID's Electronic Addresses |
If the related person has an ID in your database, click this link to access the Electronic Addresses page where you can view or update the related person's email address data. If the related person does not have an ID in your database, this link is not available. |
Primary ID
|
Field or Control |
Definition |
|---|---|
| Joint Address |
Select to send joint communications for this relationship to this address. For joint communications, you must select either the related individual's address or the primary individual's address as the joint address to use. You cannot select both. |
Primary ID Address
|
Field or Control |
Definition |
|---|---|
| Address Type |
Select the primary individual's address type to associate with this relationship. Because the primary individual has an ID in your database, the system automatically displays the address data for the address type that you select. Only address types that contain data are available. If you do not select an address type, the default value is the address type selected in the Address For Primary ID field on the Installation Default - CC page. |
| Joint Address |
Select to send joint communications for these two individuals to this address. If you are creating joint communications for this relationship, you can select either the related individual's address or the primary individual's address as the joint address, but you must select one of them. You cannot select both. |
| Primary ID's Addresses |
Click this link to access the Addresses page, on which you can edit or update the primary person's address data. |
Primary ID Email
|
Field or Control |
Definition |
|---|---|
| Email Type |
Select the primary individual's email address type to associate with this relationship. |
| Email Address |
Displays the email address for the email type selected. |
| Primary ID's Electronic Addresses |
Click this link to access the Electronic Addresses page, on which you can view or update the primary person's email address data. |
Note: The email addresses that you enter on the Relationship Addresses page are used by the Communication Generation process to send emails to the communication recipients. When no email address is entered, intended recipients will not receive a copy of the communication.
Access the Relationship Detail page ().
Image: Relationship Detail page
This example illustrates the fields and controls on the Relationship Detail page. You can find definitions for the fields and controls later on this page.
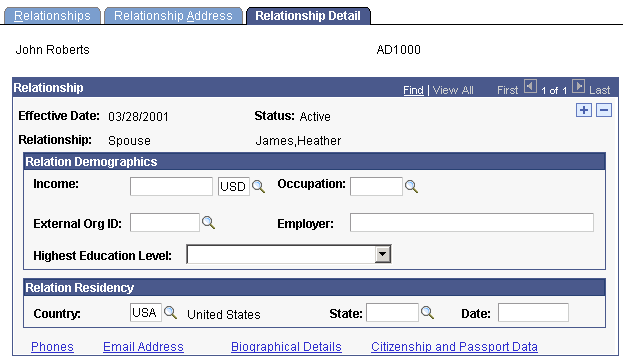
Relation Demographics
For related individuals with or without an ID in your database, enter data in the fields in this area. For a related individual with an ID in your database, you can click the Biographical Details link at the bottom of the page, to review additional information.
|
Field or Control |
Definition |
|---|---|
| Income |
Enter the amount of the related individual's income and the currency in which it is expressed. The amount is usually expressed annually, but it can be expressed hourly or monthly. |
| Occupation |
Enter the related individual's occupation, from the Standard Occupation Classification Code page. |
| External Org ID |
If the related person is associated with or employed by an organization that is in your database, identify that organization here. |
| Employer |
The system automatically displays the name of the related person's employer if you selected an employer ID. If the employer does not have an organization ID in your database, you can manually enter the employer's name here. |
| Highest Education Level |
Specify the highest level of education that the related person has achieved. Values for this field are delivered with your system as translate values. Do not modify these values in any way. Any modifications to these values could require substantial programming effort. |
Relation Residency
|
Field or Control |
Definition |
|---|---|
| Country, State, and Date |
For related individuals with or without an ID in your database, you must enter the related individual's country, state and date of residency information. |
Daytime Telephone
When the related person does not have an ID in your database, the system displays this group box with fields available for you to enter the related person's daytime, evening, and fax telephone numbers.
Email ID
When the related person does not have an ID in your database, the system displays this group box with fields available for you to enter the related person's email ID and URL.
Country of Citizenship
When the related person does not have an ID in your database, the system displays this group box with fields available for you to enter the related person's country of citizenship and citizenship status based on the Citizen Status Table page.
Links
|
Field or Control |
Definition |
|---|---|
| Phones |
Click this link to access the Phone Numbers page, on which you can review or change telephone numbers for the related ID. For a related individual with no ID in your database, manually enter the individual's phone data in the Daytime Telephone section. |
| Email Address |
Click this link to access the Electronic Addresses page, on which you can review or change URLs and email addresses for the related ID. For a related individual with no ID in your database, manually enter the individual's email data in the Email ID section. |
| Biographical Details |
If this related individual has an ID in your database, click this link to access the Biographical Details page, on which you can review or change additional basic data for the related ID. |
| Citizenship and Passport Date |
Click this link to access the Citizenship/Passport page, on which you can review or change additional citizenship and passport data for the related ID. For related individuals without an ID in your database, you must manually enter the related individual's Citizen Country and Citizenship Status. |
Access the Person-to-Person Summary page () to view a list of an individual's relationships.
Image: Person-to-Person Summary page
This example illustrates the fields and controls on the Person-to-Person Summary page . You can find definitions for the fields and controls later on this page.
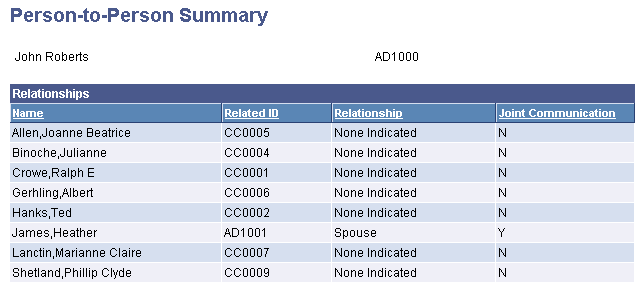
The Person-to-Person Summary page is for viewing only. You cannot enter or edit data here. Data that appears here is entered on pages in the Relationships component.
Important! Mass Change is a deprecated product. Support will be maintained for this product, but no new development will be produced for Mass Change. It is strongly recommended that you use Application Engine instead. For more information on PeopleSoft Application Engine, see PeopleTools: Application Engine.
Access the Relations with Institution page ().
Image: Relations with Institution page
This example illustrates the fields and controls on the Relations with Institution page. You can find definitions for the fields and controls later on this page.

Note: PeopleSoft Contributor Relations Solutions uses the abbreviations on this page in the contributor relations search.
See Using Search/Match.
|
Field or Control |
Definition |
|---|---|
| Currently Is A(n) |
Select to indicate that the individual is currently related in this way to your institution. |
| Has Been A(n) |
Select to indicate that the individual has previously been related in this way to your institution. |
| Manual Maintenance |
Select to indicate that this relationship (current or past as appropriate) should be maintained manually and not used or changed by mass change or any other automatic process. |