Generating a HESA Return and Creating a Return File
This section provides an overview of generating a HESA return and creating a return file and discusses how to:
Import the HIN Target List.
Generate a HESA extract.
Review the extract data.
Create a XML return file.
Validate a XML return file.
After entering the data that you want to report to HESA at the various data capture levels, use the Create Extract process to generate the HESA return data. The return data is composed of extracts of various entities.
Before you generate the return data file, you can use the Extract Data pages to review and edit the HESA extracts that the Create Extract process generates.
After reviewing the data for the Student, Offshore, ITT, KIS or DLHE return, use the Create XML Application Engine (SSR_HE_GXML) process to generate the XML file for the return. After the process generates the XML file, validate the file against the schema (not including the HESA business rules) using the Validate XML Application Engine (SSR_HE_VXML) process. You can review the errors reported by the Validate XML process, correct the errors, and rerun the extract process using the same or revised extract criteria.
You can validate the XML files both against the schema and the HESA business rules using the HESA Validation Kit. The HESA Validation Kit generates an error file that you can import into a Campus Solutions staging table. Once the records are imported, re-run the Create Extract process just for those records with validation errors. You can review these error records using the Extract Data pages, correct the errors, and rerun the extract process using the same or revised extract criteria.
When the full return passes the HESA validation, submit the XML file to HESA.
Note: You must run the Create HESA Instance process before running the Create Extract process.
After the academic institution has submitted the Student return, HESA provides a target list for the next reporting period. This target list includes all instances that are incomplete or not reported as dormant in the current reporting period. HESA requires that an Instance entity be reported for all these students in the next reporting period. Use the Import HIN Target List Application Engine (SSR_HE_IMPHI) process to import the target list and select the HESA Instance records that must be included in the next year's Student return.
|
Page Name |
Definition Name |
Navigation |
Usage |
|---|---|---|---|
|
Import HIN Target List |
SR_HE_HIN_RC |
|
Import the target list and select the HESA Instance records that the institution must include in the next year's Student return. |
|
Create Extract Data |
SSR_HE_EXT_PRC_RC |
|
Generate return data. |
|
Institution Extract Data |
SSR_HE_INSTITU_EXT |
|
Review the Institution entity data that the Create Extract process generates. You can review the Institution entity data for Aggregate Offshore, Student, DLHE, KIS and ITT returns. |
|
DLHE Extract Data |
SSR_HE_DLHE_EXT |
|
Review the Survey entity data that the Create Extract process generates. |
|
Module Extract Data |
SSR_HE_MOD_EXT |
|
Review the Module and Module Subject entity data that the Create Extract process generates. |
|
Course Extract Data |
SSR_HE_CRS_EXT |
|
Review the Course and Course Subject entity data and the KISCourse entity data that the Create Extract process generates. |
|
Student Extract Data |
SSR_HE_STUD_EXT |
|
Review the data that the Create Extract process generates for a student. |
|
Instance Extract Data |
SSR_HE_INST_EXT |
|
Review the Instance, Student On Module, Entry Profile, Qualifications On Entry, Qualifications Awarded, and RAE entity data that the Create Extract process generates for a student. |
|
Provision Extract Data |
SSR_HE_PROV_EXT |
|
Review the Provision entity data that the Create Extract process generates for a student's Aggregate Offshore return. |
|
ITT Extract Data |
SR_HE_ISTUD_EX |
|
Review the Student and Course Subject entity data that the Create Extract process generates for a student's ITT return. |
|
Create XML |
SSR_HE_GXML_RC |
|
Create the XML file for HESA submission. |
|
HESA Validate XML |
SSR_HE_VXML_RC |
|
Validate the XML file generated by the Create XML process. |
Access the Import HIN Target List page ().
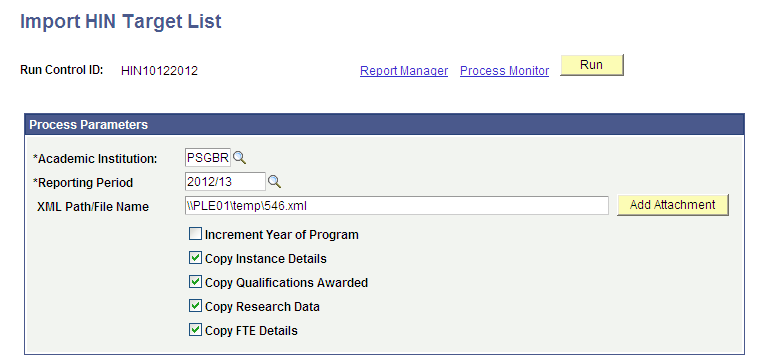
Image: Import HIN Target List page
This example illustrates the fields and controls on the Import HIN Target List page. You can find definitions for the fields and controls later on this page.
Before you run the process, ensure the following exist:
HESA Instance records. These record contain the HIN Population Year field to store the reporting year value.
Instance Identifier values in the HESA Instance records must match the NUMHUS values in the target list file.
EMPLID values must match the OWNSTU values in the target list.
|
Field or Control |
Definition |
|---|---|
| Increment Year of Program |
Select to increment the Year of Program value by one when the Import HIN Target List process creates a new effective dated HESA Instance record for the reporting period. |
The Add Attachment button and XML Path/File Name field are similar to the same button and field on the Import Survey Target Population page.
See “Importing POPDLHE Survey Target List” subsection in the Understanding Preparing for Generating DLHE Return section.
The four check boxes (other than the Increment Year of Program check box) are similar to the check boxes on the Calculate Year of Student page.
See “Calculating Year of Student Values for Students” subsection of the Setting Up and Entering Data for HESA Reporting section.
The Import HIN Target List process sets the HIN Population Year of the instance records to the reporting year value of the reporting period parameter. This enables the Create Extract process to identify the instance records for the next reporting year. For example, when you run the Import HIN Target List process with a reporting period parameter set to 2009/10, the process sets a student's HIN Population Year to 2009. Subsequently, when you run the Create Extract process for the reporting period 2009/10, the HIN Population Year of the student matches the reporting year of the reporting period, and therefore the Create Extract process automatically includes the Instance entity of the student regardless of other criteria.
The following steps describe the Import HIN Target List process:
The Import HIN Target List process imports the target list into the staging tables.
For each staging record, the process finds HESA Instance records in Campus Solutions database by matching the academic institution (provided as the run parameter), EMPLID (provided as OWNSTU in the target list record), and Instance Identifier (provided as NUMHUS in the target list record). This may mean multiple records are picked up for the same Instance Identifier.
The process logs messages for those records that do not have a matching HESA Instance record. The process retains the unmatched record in the staging table.
If the most recent effective dated HESA Instance record has an effective date before the reporting period start date:
The Import HIN Target List process creates a new effective dated record using the reporting period start date. It copies all the data from the following records to the new effective dated record: Header record (SSR_HE_INSTANCE), Entry Profile fields (SSR_HE_INST_FLD where SSR_HE_ENTR_FLAG = Y), Entry Qualifications (SSR_HE_QUAL_ENT), Employment Status (SSR_HE_INST_EST), Employment Monitoring (SSR_HE_INST_MON), Learner (SSR_HE_INST_LRN), and Learning Delivery (SSR_HE_INST_LDL).
The Instance Details fields (SSR_HE_INST_FLD where SSR_HE_ENTR_FLAG = N), including the Further Education Instance fields, are copied only if you have selected the Copy Instance Details check box.
The Qualifications Awarded (SSR_HE_QUAL_AWD) records are copied only if you have selected the Copy Qualifications Awarded check box.
The Research Data (SSR_HE_INST_RES) records are copied only if you have selected the Copy Research Data check box.
The FTE Details (SSR_HE_INST_FTE) records are copied only if you have selected the Copy FTE Details check box.
The process sets the HIN Population Year to the reporting year value of the reporting period parameter.
If the Increment Year of Program run parameter is selected and the existing record has a Year of Program value greater than zero, then the process increments the year of program by one in the new record.
If a HESA Instance record starts within the reporting period, the process sets the HIN Population Year of the existing record to the reporting year value of the reporting period parameter.
Access the Create Extract Data page ().
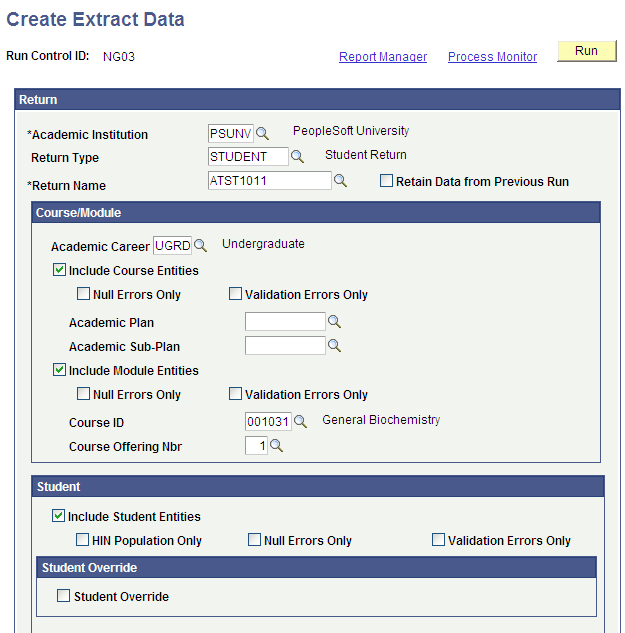
Image: Create Extract Data page
This example illustrates the fields and controls on the Create Extract Data page. You can find definitions for the fields and controls later on this page.
|
Field or Control |
Definition |
|---|---|
| Return Type |
Enter a return type to filter the list of available returns in the Return Name field. |
| Return Name |
Enter the return for which the process should generate the reporting data. You set up a return using the Returns Setup component. |
| Retain Data from Previous Run |
Select to have the Create Extract process delete the existing inactive data, update the existing active data to inactive, and to extract new data. If the check box is cleared, then the process deletes all the existing data (both active and inactive) records and extracts the new data. |
The fields on this page are available for entry depending on the return you select. For example, the system disables the Course/Module, Student, and Student Override regions for an Aggregate Offshore return. If the return is DLHE, only the Null Errors Only and Validation Errors Only check boxes in the Student region and the Student Override region are available.
Course/Module
Use this region to include or exclude the Course and Module entity data in the Student return. Also, you can use the region to restrict the Course and Module entity data in the Student return. For example, you can specify that the process should create Course data for all the courses in the undergraduate career and Module data for a Biochemistry course offering in the undergraduate career.
Also, use this region to include or exclude the KISCourse entity data in the KIS return.
You can use this region for only Student and KIS returns. This region is not applicable for ITT, Offshore, and DLHE returns.
|
Field or Control |
Definition |
|---|---|
| Academic Career |
Select to restrict the Course and Module extracts of the Student return to a particular career. This check box is not applicable for KIS return. Note: If you select an academic career, the process will restrict the Instance extract in the Student return based on the selected career because the process creates Instance records only if the plan or subplan is already included in the Course extract. The system enables the Academic Career field only if you select either the Include Course Entities check box or the Include Module Entities check box. However, if you select either the Null Errors Only check box or the Validation Errors Only check box, the system disables this field. |
| Include Course Entities |
Select to include the Course and Course Subject extracts in the Student return. Select to include KISCourse extract in the KIS return. |
| Null Errors Only |
Select to restrict the Course or KISCourse extract to those records where a NULL ERROR value has been derived in the previous run of the process. You cannot select both the Null Errors Only and Validation Errors Only check boxes for the Course entity. |
| Validation Errors Only |
Select to restrict the Course or KISCourse extract to those records where the HESA Validation Kit has identified a validation error and the error details have been imported to the validation staging table. |
| Academic Plan |
Select to restrict Course or KISCourse extract to a particular plan. The system enables this field only if the Include Course Entities check box is selected and both the Null Errors Only and Validation Errors Only check boxes are cleared. All active academic plans are available for selection. Ensure that the Report to HESA check box is selected on the Plan HESA Data page for the plan you have selected. |
| Academic Sub-Plan |
Select to restrict Course or KISCourse extract to a particular subplan. The system enables this field only if the Include Course Entities check box is selected and both the Null Errors Only and Validation Errors Only check boxes are cleared. All active academic subplans are available for selection. Ensure that the Report to HESA check box is selected on the Sub-Plan HESA Data page for the subplan you have selected. Also, select the Enable Sub-Plan Reporting check box on the HESA Returns page if you want to report subplan data. |
| Include Module Entities |
Select to include the Module and Module Subject extracts. This check box is not applicable for KIS return. |
| Null Errors Only |
Select to restrict the Module extract to those records where a NULL ERROR value has been derived in the previous run of the process. You cannot select both the Null Errors Only and Validation Errors Only check boxes for the Module entity. |
| Validation Errors Only |
Select to restrict the Module extract to those records where the HESA Validation Kit has identified a validation error and the error details have been imported to the validation staging table. |
| Course ID and Course Offering Nbr |
Select to restrict the Course entity data to a particular course. If you select a Course ID or Course Offering Number, the process creates Module and StudentOnModule data for only the selected values. All active courses are available for selection. Ensure that the Report to HESA check box is selected on the HESA Module Data page for the course ID and course offering number you have selected. The system enables this field only if the Include Module Entities check box is selected and both the Null Errors Only and Validation Errors Only check boxes are cleared. |
Student
Use this region to include or exclude the student-related entity data in the return. Also, you can use the region to restrict the student-related entity data. Examples of student-related entities include Instance, Student, and Entry Profile entities.
This region is not applicable for KIS return.
|
Field or Control |
Definition |
|---|---|
| Include Student Entities |
Select to include the student-related extracts. The system enables this check box for only Student returns. For DLHE and ITT, the Create Extract process automatically includes the student-related entity data. |
| HIN Population Only |
Select to restrict the Instance extract to only those continuing students whose HIN Population Year value in the HESA Instance record matches the Reporting Period Year. The system enables this check box for only Student returns. Note that this check box affects only continuing students and does not affect new students. |
| Null Errors Only |
Select to restrict returns to those students where a NULL ERROR value has been derived in one of the student-related entities during a previous run of the process. You cannot select all three check boxes — Null Errors Only, Validation Errors Only, and Student Overrides — for the student-related entities. Only one check box can be selected. The system enables this check box for only Student, ITT, and DLHE returns. |
| Validation Errors Only |
Select to restrict the student-related entities in the extract to those records where the HESA Validation Kit has identified a validation error and the error details have been imported to the validation staging table. You cannot select all three check boxes — Null Errors Only, Validation Errors Only, and Student Overrides — for the student-related entities. Only one check box can be selected. The system enables this check box for only Student and ITT returns. |
Student Override
Use this region to specify a single or multiple students for whom the process should generate the return data.
The system enables the Student Override check box for only Student, ITT, and DLHE returns.
Processing Diagram
Image: Process for Creating Student Return Entities
The following diagram describes how the Create Extract process creates the entities for a student return:
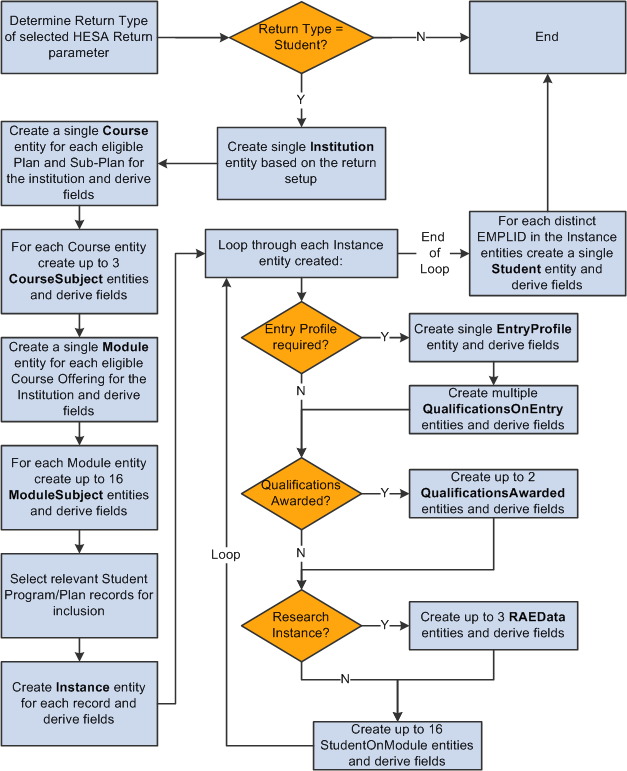
When the process creates an entity record, it sets the record to active. The records it created previously are set to inactive or deleted depending on whether or not the Retain Data from Previous Run check box is selected. The process deletes the records it created before the previous run.
Refer to the documentation sections of each entity (for example, the “Student Record Return: Course Entity” section), for information about how the system includes records for each entity.
Also, specifically, refer to the following documentation sections for information about how the entities are processed when you select the validation only and null only check boxes:
HESA Validation Errors
To run the Create Extract process for records with validation errors:
Use the File Parser utility to import the errors, reported by the HESA Validation Kit, into a staging table (PS_SSR_HE_VAL_STG)
Run the Create Extract process just for those records with validation errors. You must select at least one of the Validation Errors Only check boxes for the process to select error records from the PS_SSR_HE_VAL_STG table.
Use the Extract Data page to review the extract records with errors.
Note: You should ensure that all previous validation error records, including the header record, have been processed and deleted from the validation staging table before importing a new validation errors file to the staging table using the File Parser process.
Using File Parser to import HESA Validation Kit errors
When you use the HESA Validation Kit to process an XML file, the kit reports errors with an option to save the error details as a text (.txt) file. To import the records from the text file into the PS_SSR_HE_VAL_STG staging table, you can use File Parser process. For more information about setting up and running the File Parser process, refer to the File Parser documentation:
See Understanding the File Parser Process
SeeRunning the File Parser Process
Note that the Field Conversion Definition setup is required only if the file data needs to be converted before inserting into the staging table. Therefore, this setup is not required for HESA validation error processing.
The following is an example of the context definition setup for HESA Validation error processing:
Image: Context Definition setup for HESA error processing (1 of 2)
This example illustrates Context Definition setup for HESA error processing (1 of 2). You can find definitions for the fields and controls later on this page.
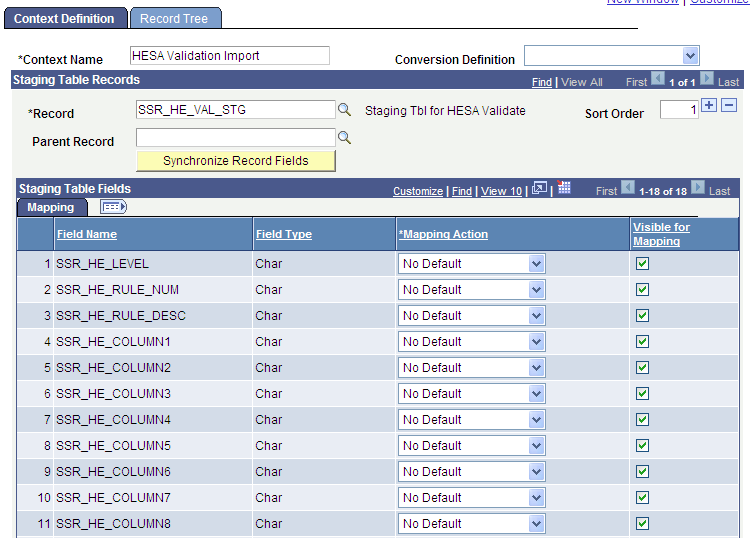
Image: Context Definition setup for HESA error processing (2 of 2)
This example illustrates Context Definition setup for HESA error processing (2 of 2). You can find definitions for the fields and controls later on this page.
Click the Refresh Layout Tree link on the Record Tree page to view the staging table (SSR_HE_VAL_STG) that holds the imported validation errors.
Image: Record Tree page for SSR_HE_VAL_STG
The following is an example of the Record Tree page for SSR_HE_VAL_STG:
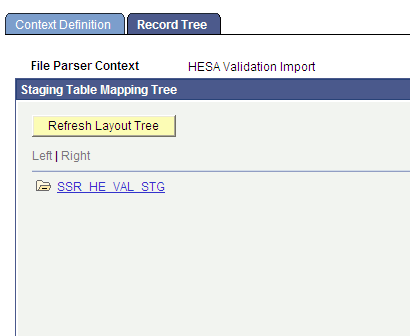
Image: Example of a File Definition page
The PeopleSoft system delivers an example definition that includes the possible validation error values that you can import:

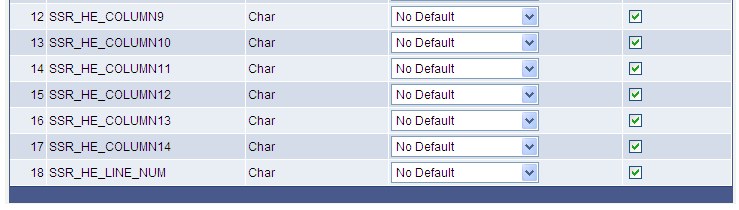
Image: An example of the error file structure set up on the File Layout page
The delivered definition is based on an assumed error file structure:
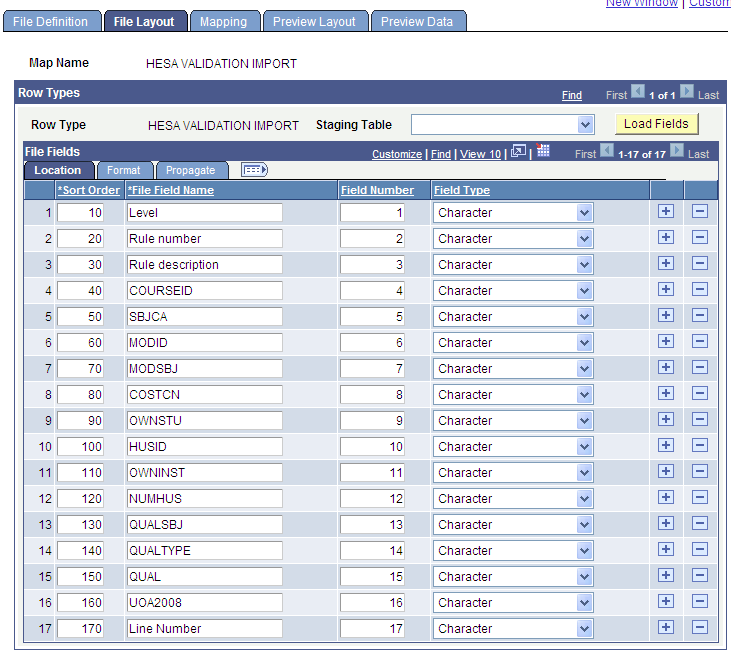
The header row for the file would contain the field names, indicated in the preceding example, without the Line Number.
You can copy an existing File Mapping Definition (Set Up SACR, System Administration, Utilities, File Parser, Copy File Map Definition ) and then edit the copied version to create different mappings that match the fields in the error file.
Map the key fields of COURSEID, MODID, and OWNSTU to a staging table column if the values for the fields are provided in the errors file. Also, map the Level, Rule Number, and Rule Description values.
Image: Mapping for the minimum fields (1 of 2)
The following is an example of the Mapping page with the mappings for these fields:
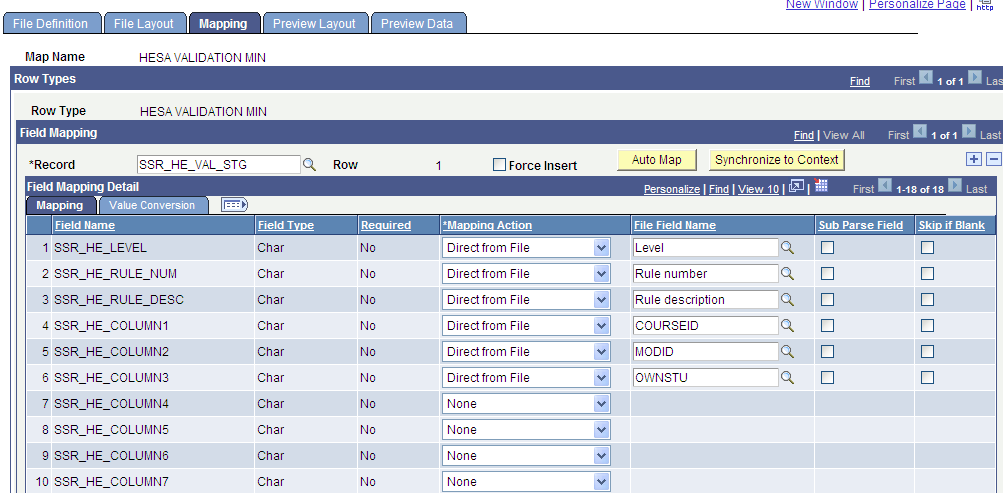
Image: Mapping for the minimum fields (2 of 2)
Example of mapping for the minimum fields (continued):
To process the staging table records, the Create Extract process does not rely on values existing in a particular column but the process will select the key COURSEID, MODID and OWNSTU values based on the header row value for the column in the error file. Therefore, you must include the header row in the error file being imported.
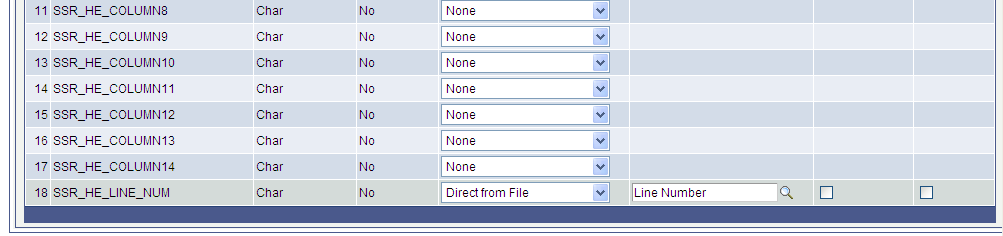
Other than the key and Level, Rule Number and Rule Description values, you can map the remaining fields to import the full details of the errors into the staging table record. This step is optional because the non-key values are not required for the subsequent processing of the staging table records by the Create Extract process.
Image: Mapping for the full error file (1 of 2)
This is the mapping for the full Student return error file:
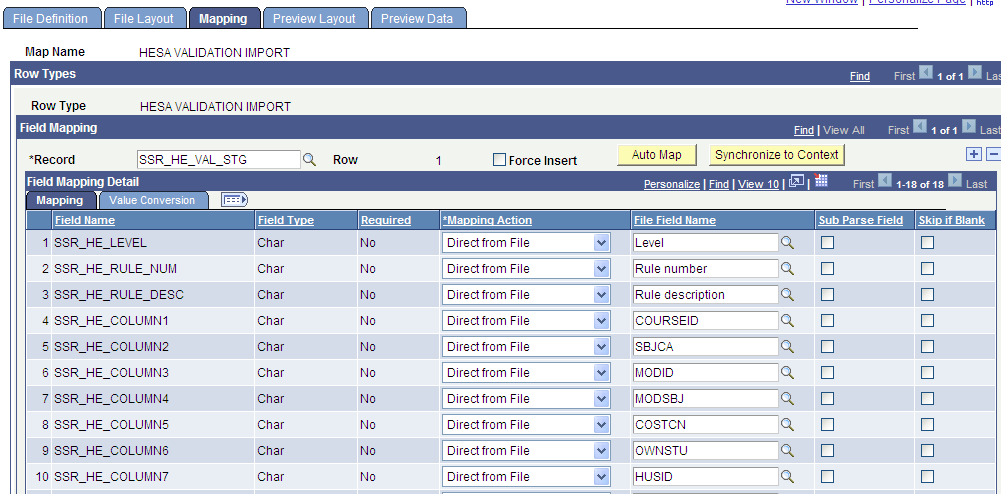
Image: Mapping for the full error file (2 of 2)
Mapping for the full Student return error file (continued):
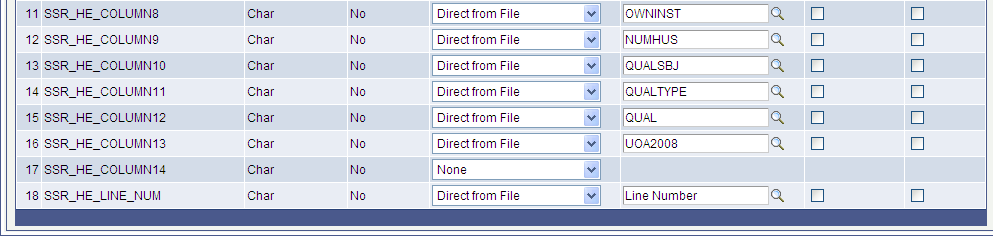
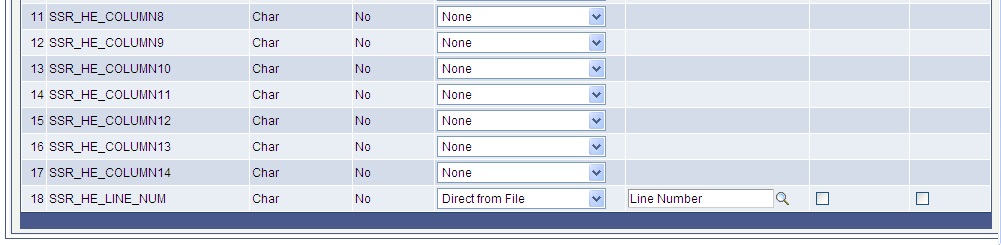
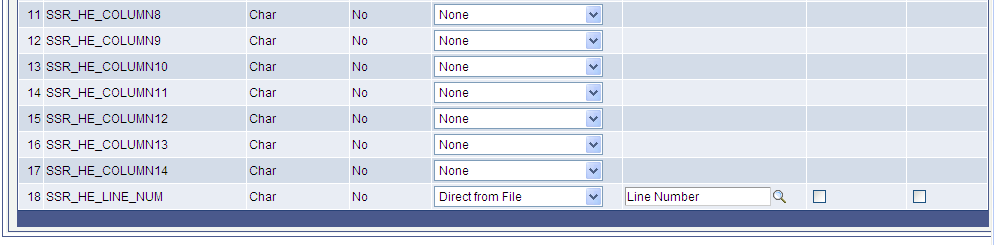
As with the Student return, for the ITT return, you must map the Level, Rule Number and Rule Description values along with the key OWNSTU value. The File Parser process uses these mappings to identify the extract records that are to be re-processed by the Create Extract process.
Image: Mapping for the minimum fields — ITT (1 of 2)
This example illustrates the mapping for the minimum fields — ITT.
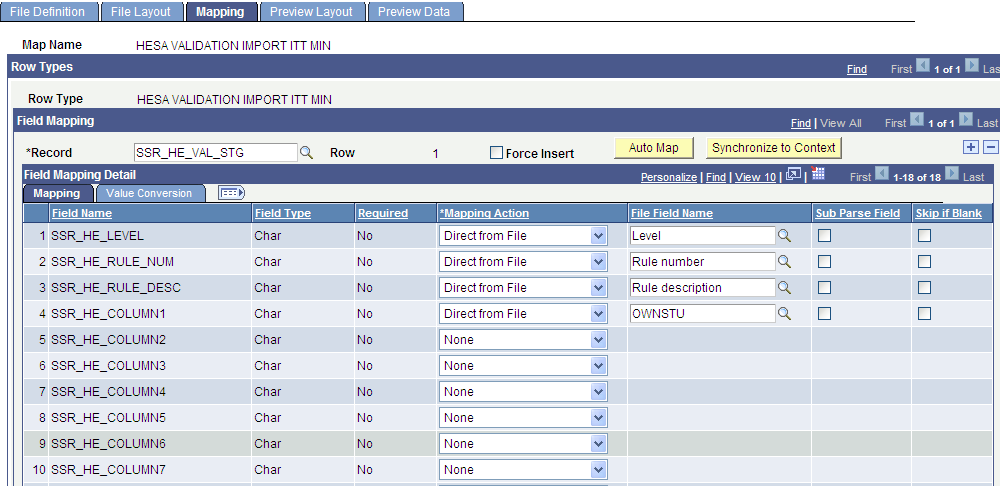
Image: Mapping for the minimum fields — ITT (2 of 2)
Mapping for the minimum fields — ITT (continued).
This is the mapping for the full ITT error file:
Image: Mapping for the full error file — ITT (1 of 2)
This example illustrates the mapping for the full error file — ITT.
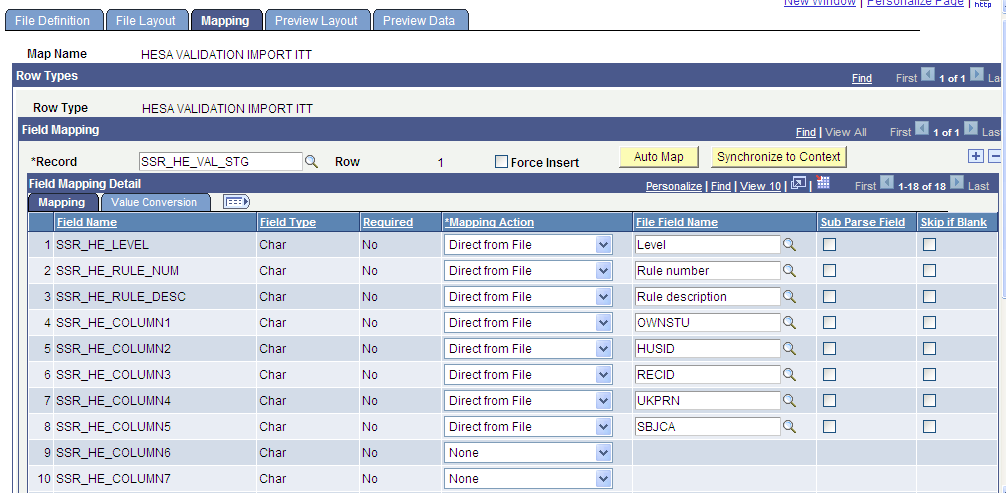
Image: Mapping for the full error file — ITT (2 of 2)
Mapping for the full error file — ITT (continued).
On the Preview Data page, you can attach an error file and generate a preview based on the first row in the error file. This lets you check whether the values will populate the correct columns in the staging table.
Image: Example of the Preview Data page
The following is an example of the Preview Data page:
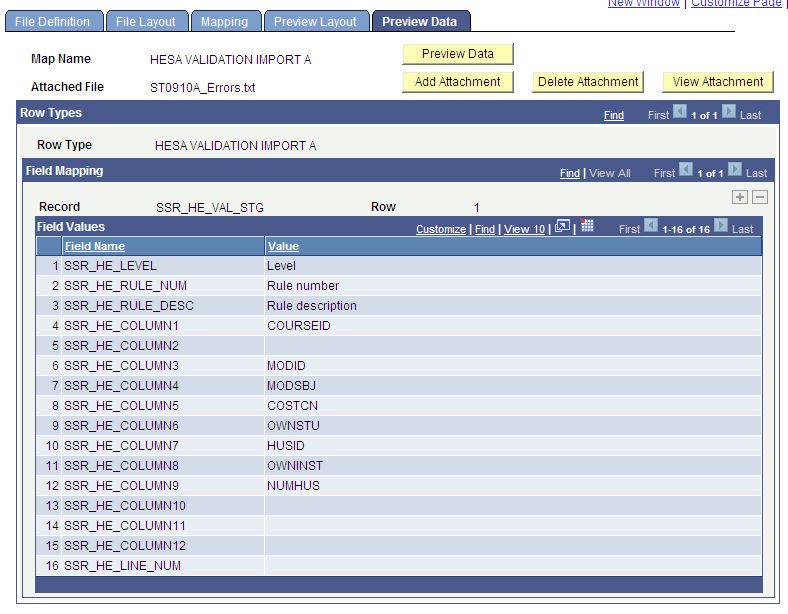
In the preceding example, note that because the header row does not included a label for Line Number that value is blank in the preview.
Access the extract data pages ().
Use the Institution Extract Data, Module Extract Data, Course Extract Data, Student Extract Data, and Instance Extract Data pages to review the Student return extract data.
Use the Institution Extract Data and Provision Extract Data pages to review the Aggregate Offshore return data.
Use the Institution Extract Data and ITT Extract Data pages to review the ITT return data.
Use the DLHE Extract Data page to review the DLHE return data.
For the KIS return, use the Institution Extract Data page to review institution level fields and fields of Location entities. Use the Course Extract Data page to review the KIS Course records.
Image: Example of an extract data page
The following example shows an extract data page:

You can use the Extract Data pages to override the derived field value. For example, you can enter a different value for ModuleSubject.COSTCN in the Reported Value field and click the Save button. When you click the Save button, the Derived Value Overridden check box appears as selected for ModuleSubject.COSTCN. The Extract Data pages also display the sequence number of the step that derives the field value.
The documentation sections for entities list the derivation steps for each field. For an example of such a section:
See Student Record Return: Course Entity
You can review only the most recent data for a particular return. When you run the Create Extract process, the system automatically deletes any data previously generated for a return.
Null Error check box on the Instance Extract Data page
The Create Extract process selects this check box if any field in the student's extract data has a NULL ERROR value. The Null Error check box is applicable for only Student return.
Access the Create XML page ().
Image: Create XML page
This example illustrates the fields and controls on the Create XML page. You can find definitions for the fields and controls later on this page.
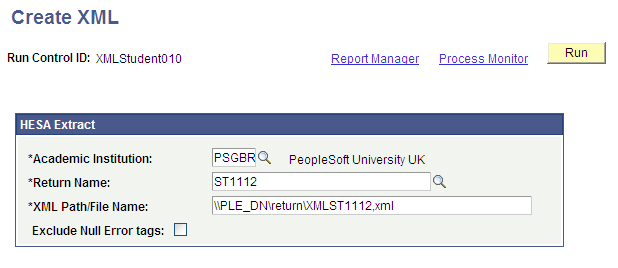
After you review the return data using the Extract Data pages, use the Create XML page to run the Create XML File process.
|
Field or Control |
Definition |
|---|---|
| Return Name |
Enter the return that you want to process. |
| XML Path/File Name |
Enter the file path and file name that you want the system to use to save the XML file. You must enter a valid directory path that maps to a folder with appropriate Read/Write permission. If you cannot locate such a folder, consult your system administrator. |
| Exclude Null Error tags |
Select this check box if you want the process to exclude fields with a Reported Value of NULL ERROR from the XML file. If you do not select this check box, then the process includes the fields with Reported Value of NULL ERROR. |
The Create XML process automatically excludes from the XML file:
A field that does not have a value (null).
An entity in which all fields have no values.
After running the process, you can use the View Log/Trace page to download the generated XML file to your local machine.
Note for Student return
The Create XML File process includes the RAEData element as <REFData> in the XML file. The MOBTYPE2 and MOBTYPE3 fields are included in the XML as <MOBTYPE>.
Note for KIS return
The Create XML File process converts the tags for the following field names:
OTHERINST2 to OTHERINST9 converted to <OTHERINST>
SSR_HE_COURSEID converted to <KISCOURSEID>
SSR_HE_CTITLE is converted to <TITLE> and a value is only included in the XML if KISTYPE = 1 or 2
JACSA, JACSB and JACSC converted to <JACS>
LEVELK converted to <LEVEL>
LOCID2 and LOCID3 converted to <LOCID>
RELATEDKIS2 and RELATEDKIS3 converted to <RELATEDKIS>
TEACHUKPRN2 and TEACHUKPRN3 converted to <TEACHUKPRN>
Note: The conversion of LOCID2 and LOCID3 to <LOCID> is for the old KIS Course fields (for 2013–14 and before). LOCID is derived for each of the new CourseLocation entities so no conversion of the tags is required for Course Location.
Note for DLHE return
The Create XML File process includes the PREVEMP field as <PREVEM> in the XML file.
Access the HESA Validate XML page ().
Image: HESA Validate XML page
This example illustrates the fields and controls on the HESA Validate XML page. You can find definitions for the fields and controls later on this page.
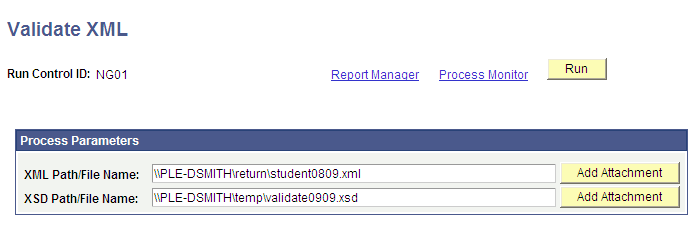
Run the HESA Validate XML process to validate the XML file generated by the Create XML File process. The HESA Validate XML process validates against the schema, it does not validate against the HESA business rules. You can validate the XML file against both the schema and the HESA business rules by using the HESA Validation Kit. After you run the HESA Validate XML process, refer to the log file to check for any validation errors.
|
Field or Control |
Definition |
|---|---|
| XML Path/File Name |
Enter the path and file name of the XML file that you want to validate. |
| Add Attachment |
Click to browse to the XML file that you want to validate. You can browse your local drive and select a file. Note: The upload process creates a files subdirectory to store and process the XML file. This subdirectory is created in the server directory location that is specified in the PS_SERVDIR system parameter in the Application Server/Process Scheduler configuration file psappsrv.cfg/psprcs.cfg. Ensure that PS_SERVDIR is set up with an appropriate value in the configuration file and that users have the correct permission to access the files subdirectory. |
| XSD Path/File Name |
Enter the complete path and file name of the XSD file. The process uses the XSD file to validate your XML file. The XSD file is available from the HESA website. Note: You must place the two related XSD files for CodeLists and DataTypes in the same directory as the XSD file being used for the XML validation. For example, if C08051.xsd is being used to validate the XML file and you have stored the C08051.xsd in /bur/hesa/psoft/shared/, then you must place C08051DataTypes.xsd and C08051CodeLists.xsd in the same directory /bur/hesa/psoft/shared/ because C08051.xsd references these two files. |
| Add Attachment |
Click to browse to the XSD file. You can browse your local drive and select a file. Note: The upload process creates a files subdirectory to store and process the XSD file. This subdirectory is created in the server directory location that is specified in the PS_SERVDIR system parameter in the Application Server/Process Scheduler configuration file psappsrv.cfg/psprcs.cfg. Ensure that PS_SERVDIR is set up with an appropriate value in the configuration file and that users have the correct permission to access the files subdirectory. Note: If you are adding an XSD file using the Add Attachment button you must also ensure that any related XSD files (for example, Code Lists and Data Types) have also been added to the same location using the Add Attachment button. |