Managing Wait Lists
This section provides an overview of wait list management and discusses how to:
View a student's wait list position.
Move students from wait lists to enrollment.
Purge students from wait lists.
The wait list management functionality in Student Records enables you to set processing parameters that define the groups of students to move from wait lists to enrollment into classes within a specific enrollment period. This section discusses:
Waitlist position numbers.
Automatic enroll from waitlist.
Waitlist Position Numbers
When a student enrolls or is waitlisted into a class the Enrollment process assigns the next available student position number to the student. For instance, the first student to enroll in a class would get a student position number of 10, the second 20, the third 30, and so on. Student position numbers identify the order in which students enroll into a class. In addition, student position numbers determine the position students hold on the waitlist: the student with the wait list position number of 1 is the student who has the lowest student position number and an enrollment status of waiting.
For example, suppose Mia is the 31st student to try to enroll into a class with an enrollment capacity of 30. She is put on the wait list (has an enrollment status of waiting) and the Enrollment process gives her a student position number of 310. Her waitlist position number is 1, because she is the only student in the class with an enrollment status of waiting. Then a second student, Mitch, puts himself on the waitlist. The system gives him a student position number of 320. Because Mia has a lower student position number than Mitch, the system gives Mitch a waitlist position number of 2. If there is one seat available when you run the Waitlist process, Mia, the student with the lowest waitlist position number, is enrolled (the Enrollment process changes her enrollment status from waiting to enrolled). Mitch then has the lowest position number with an enrollment status of waiting. Therefore, his waitlist position number changes to 1.
In multiple component classes, the Enrollment process assigns students the next available student position number for each component. For this reason, a single student often has different waitlist position numbers for each component. For example, a student could have a student position number of 130 and a wait list position number of 1 for one component, and a student position number of 60 and a waitlist position number of 3 for the related component (depending on how many students were already enrolled and were on the waitlist for each component at the time the student received a student position number).
When the process runs on a class section, it creates an enrollment request. The enrollment request includes all related components of the class. For the enrollment engine to process an enrollment request successfully, all related components must have a seat available for that request. If all related components have a seat available for that request, the enrollment engine enrolls the student into all of the related components. If at least one related component is full, the enrollment engine would produce an error for the request, and the student would not be enrolled into any of the related components.
Note: The Waitlist process runs on non enrollment components as well as on enrollment components. The process creates enrollment requests for students based on their positions on the waitlist in the section on which the process is running (which is not necessarily the enrollment component). Thus, the order in which the process runs on class sections is important, because the process might not enroll students in the order that they would expect, if they expect to be enrolled based on their waitlist position number in a section that was run after a related section.
You can run the Wait List process on a term, session, subject area, course, or class. The process runs on classes in sequential order based on the criteria on which you run the process, and on the key structure of the CLASS_TBL (course ID, course offering number, term, session code, and class section). For example, when you run the process on a term, the process first runs in order of course ID: 000001, 000002, and so on. If two courses have course ID 000001, it runs by course offering number: course 000001, course offering number 1, course 000001, course offering number 2, and so on. In the same way, the process would then use session code (unless you select session as one of your criteria on the Wait List Process page), and then class number. So within a course, course offering number, and session, the process would run on class section 1, class section 2, and so on. Because the Wait List process runs by class section, it would run on a multiple component class that has two lectures (sections 1 and 2) and two labs (sections 1A and 1B), in the following order: section 1, 1A, 1B, 2.
As you can see, the order of your classes and sections in the schedule of classes determine the order in which students are moved from the waitlist into the class for multiple component classes. Suppose you had two multiple component classes that shared a component, such as two biology lectures that share a lab, which have the following class sections: 1 (lecture), 1A (lab), and 2 (lecture). When you run the waitlist process on this class, the process creates enrollment requests for waitlisted students for section 1 and for its related class, section 1A. If seats are available in section 1 and 1A, the process moves students from the waitlist into both components. Then the process runs on section 1A (because section 1A is sequentially next based on the key structure of the CLASS_TBL). If students are still on the waitlist in section 1A (because they are on the waitlist for section 2, which has not yet been run), the process creates enrollment requests for those students. Again, if seats are available in section 1A and section 2, the enrollment engine processes the requests successfully. Finally, the process runs on section 2.
For example, Mia has a waitlist position number of 1 in section 2, and a waitlist position number of 5 in the related section 1A. Additionally, Mitch has a waitlist position number of 3 in section 1A. Because the Wait List process runs on section 1A first, Mia is put into the class after Mitch. The Wait List process evaluates Mia based on her position on the waitlist in section 1A, even though section 2 is the enrollment component.
Automatic Enroll from Waitlist Feature
The Wait List feature is controlled by the Auto Enroll From Wait List and Wait List Capacity options (on the Enrollment Control page of the schedule of classes) and the Last Day For Wait List date (on the Session Table page for classes with traditional academic calendars and on the Dynamic Class Dates page for classes with dynamic academic calendars). In addition, students have a wait list unit limit defined by academic load for terms and sessions within their primary academic programs on the Enrollment page and Session page of the Academic Program Table component.
If you select the Auto Enroll From Wait List option for a class, you can use the wait list process to move qualified students from the class wait list to enrollment into that class as space becomes available. If you do not select this option, you can manually move students from the wait list to enrollment into a class by selecting Override Class Limit on the enrollment processing component. The manual process is best monitored by the instructor of the class.
As you manage your wait lists, you can use the Class Roster page to view students on the wait list for a particular class section. The system performs corequisite and prerequisite checking before placing a student on the waitlist. However, the system does not check for a scheduling time conflict before it places a student on a wait list. Scheduling time conflicts and all of the other enrollment edits are performed when the system attempts to move a student from the wait list to enrollment in a class. You can view an individual student's position and status on the wait list for a class by clicking the Wait List Position link. This link appears only for applicable enrollment requests on the enrollment request processing pages.
Enabling the Wait List Process
To enable the wait list process:
Set the last date for wait list for sessions on the Session Table page of the Term/Session Table component.
Define the maximum wait list units for terms within academic programs on the Enrollment page of the Academic Program Table component.
Define the maximum wait list units for sessions within academic programs on the Session page of the Academic Program Table component.
Select the Auto Enroll From Wait List check box for classes on the Enrollment Control page of the schedule of classes.
|
Page Name |
Definition Name |
Navigation |
Usage |
|---|---|---|---|
|
Wait List Position |
ENRL_REQ_WL |
Click the Wait List Position link on the corresponding enrollment processing page. |
View a student's status and position on the wait list for a class section. |
|
Wait List Process |
RUNCTL_SRWTLST |
|
Move groups of students from class wait lists to enrollment into classes. If you need to manually move students from the wait list to enrollment into a class, you must drop the student from the wait listed class then add the student into the class with the appropriate overrides selected. |
|
Wait List Purge |
RUNCTL_SRWTLSTPURG |
|
Run the Wait List Purge process to delete groups of students in waiting status based on the run parameters that you specify. The Wait List Purge process enables you purge the wait list for more than just one class. You can use the process to purge the wait list for all classes in an entire term, academic career, session, subject area, or campus based on your run parameters. Run the purge process on past terms when information about a student being waitlisted is no longer pertinent. |
If your institution has licensed PeopleSoft Campus Self Service, your students can also view their statuses and positions directly over the web. Wait list position numbers appear on the class schedule.
Access the Wait List Process page ().
|
Field or Control |
Definition |
|---|---|
| Institution |
Select the academic institution for which you want to move groups of students from class wait lists to enrollment into a class. |
| Term |
Select the term for which you want to move groups of students from class wait lists to enrollment into a class. |
| Session |
If you want to limit wait list processing to a specific session, select a value. |
| Subject Area |
If you want to limit wait list processing to a specific subject area, select a value. If you select a value for this field, the Course ID field and Class Nbr field become unavailable for edit. |
| Course ID |
If you want to limit wait list processing to a specific course, select a value. If you select a value for this field, the Subject Area field and Class Nbr field become unavailable for edit. |
| Class Nbr (class number) |
If you want to limit wait list processing to a specific class, select a value. If you select a value for this field, the Subject Area field and Course ID field become unavailable for edit. |
| Wait List Process Switch |
The wait list process switch instructs the process how to evaluate wait list candidates. Select Y to process all new wait list candidates eligible for wait list evaluation. Select A to process all wait list candidates eligible for wait list evaluation. For example, a class has five students on the wait list and three spaces become open in the class. When you run the wait list process, it fills the three spaces, and two students remain on the wait list. At this point the class is no longer new to the wait list process. The only way it would be evaluated again is if space opened in the class and you selected A as the wait list process switch value. |
| Run |
Based on the Campus Solutions features that you are using, run either the Wait List COBOL/SQL process (SRPCWAIT) or the Wait List PSJob process (SRWAITJB). |
SRPCWAIT Process
Run the Wait List COBOL/SQL process (SRPCWAIT) if you are not using Program Enrollment or Activity Management, or have not set up wait list notifications via Campus Mobile.
The process generates a new enrollment request for the student and displays one of the following enrollment status reasons on the new request: RCAP (reserve slots full), FULL (section is full), CREQ (corequisite enrollment), ALIM (appointment limit exceeded), TLIM (term limit exceeded), SLIM (session limit exceeded), TIME (time conflict exists), RCMP (related component), TIMR (time conflict resolved), or EWAT (enrolled from wait list). You can view these enrollment requests through the Block Enroll component.
If a class has reserve capacity rules and space opens in a reserve capacity group, the process evaluates whether students on the wait list meet these reserve capacity rules. If no students meet the rules, then the process moves no one from the class wait list to enrollment into the class. If a class has multiple reserve capacity groups and space opens in more than one group and a student matches the criteria of more than one reserve capacity group, the system enrolls the student into the first reserve capacity group it finds where the student meets the reserve capacity rules.
SRWAITJB Process
You must run the Wait List PSJob process (SRWAITJB) if you have set up wait list notifications via Campus Mobile.
See Setting Up Campus Mobile Within Campus Solutions
See Accessing Campus Mobile Functionality
See Setting Up and Consuming the Notifications Framework
You must also run the Wait List PSJob process if you are using Program Enrollment or Activity Management.
See the ‘Student Enrollment Event’ document in the Program Enrollment Additional Documentation pdf package on My Oracle Support Doc ID 1400723.1.
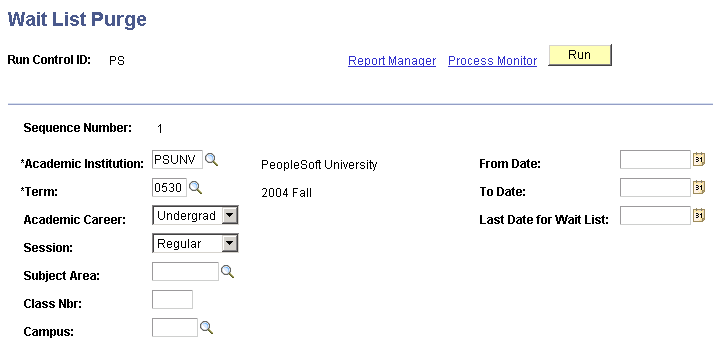
Access the Wait List Purge page ().
Image: Wait List Purge page
This example illustrates the fields and controls on the Wait List Purge page. You can find definitions for the fields and controls later on this page.
|
Field or Control |
Definition |
|---|---|
| Sequence Number |
The system displays a default sequence number. It is for internal processing purposes only. |
| Academic Institution |
Select the academic institution for which you want to purge students from wait lists. |
| Term |
Select the term for which you want to purge students from wait lists. |
| Academic Career |
If you want to purge students from wait lists for classes within a specific academic career, select a value for this field. Note: This field and the remaining fields on this page are optional. They provide the means of searching for wait lists by various parameters. |
| Session |
If you want to purge students from wait lists for classes within a specific session, select a value for this field. |
| Subject Area |
If you want to purge students from wait lists for a specific class subject area, select a value for this field. |
| Class Nbr (class number) |
If you want to purge students from wait lists for a specific class, select a value for this field. |
| Campus |
If you want to purge students from wait lists for classes at a specific campus, select a value for this field. |
| From Date |
If you want to purge from wait lists the students in waiting status with a class start date greater than or equal to a certain date, enter the date in this field. |
| To Date |
If you want to purge from wait lists the students in waiting status with a class start date less than or equal to a certain date, enter the date in this field. The system displays, by default, the value in the From Date field. |
| Last Date for Wait List |
Enter a value in this field to have the process search for active wait lists in which the class last date for wait list value is less than or equal to the value that you specify here. Define last date for wait list values on the Session Table page for classes with traditional academic calendars. |