Setting Up Campus Mobile Within Campus Solutions
This section provides an overview of Campus Mobile setup and discusses how to:
Set up Integration Broker for Campus Mobile.
Activate Campus Mobile service operations, handlers, and routings.
Manually generate routings for service operations.
Set up logging for troubleshooting.
Set up Campus Mobile security.
Secure List of Values services.
Add security access to Campus Mobile service operations
Set up instructor contact information.
Set up finances.
Set up contributions.
Set up applications.
Customize and brand Campus Mobile.
Deploy Campus Mobile.
Campus Mobile is a smartphone app that uses delivered Campus Solutions web services to provide data directly to the user's phone that will then be rendered by the Campus Mobile screens. To enable the web services that Campus Mobile requires, you will need to configure Integration Broker as well as the appropriate security for your web services. To enable building mapping (a feature accessed in Campus Mobile through the Class Section Details), you will need to populate the latitude and longitude for each building.
|
Page Name |
Definition Name |
Navigation |
Usage |
|---|---|---|---|
|
Instructor Contact Information |
SCC_INSTR_CT |
|
Define which address, phone and email types will be used for display of instructor contact information to students. |
We assume that you have performed and validated all the basic Integration Broker setup. Refer to the Integration Broker for information on Integration Broker gateway setup and service configuration.
Note: Because Campus Mobile uses the RESTful versions of the delivered web services, it is important to ensure that even if you have previously set up Integration Broker, you have entered the appropriate URL in the Target Location field of the REST Services Target Locations.
See PeopleTools PeopleSoft Integration Broker Administration, “Configuring PeopleSoft Integration Broker for Handling Services”
Service operations for the Campus Mobile are delivered with a status of Inactive to prevent the accidental transmission of data. In order to make use of these key elements of the Campus Mobile at the time of implementation, you need to set each of them to a status of Active.
To activate service operations:
Log into the PeopleSoft application in a browser.
Select .
Select each of the service operations from the Campus Mobile Service Operations tables.
On the General page, select the Active check box in the Default Service Operation Version group.
Select the Handlers page and select the Active option from the drop-down list for the Status column.
Save the page.
Select the Routings tab, select the check box against the routing name, and click the Activate Selected Routings button.
Campus Mobile Service Operations Table
The following web service operations, handlers, and routings must be activated for Campus Mobile:
|
Service Operation |
Handler |
Routing |
|---|---|---|
|
SCC_GET_LOV_R_POST |
REQUESTHDLR |
SCC_GET_LOV_R_POST |
|
SCC_GET_USERPREF_R_GET |
REQUESTHDLR |
SCC_GET_USERPREF_R_GET |
|
SCC_SC_ADDITEM_R_POST |
REQUESTHDLR |
SCC_SC_ADDITEM_R_POST |
|
SCC_SC_CHECKOUT_R_POST |
REQUESTHDLR |
SCC_SC_CHECKOUT_R_POST |
|
SCC_SC_CLEARCART_R_POST |
REQUESTHDLR |
SCC_SC_CLEARCART_R_POST |
|
SCC_SC_GETCART_R_POST |
REQUESTHDLR |
SCC_SC_GETCART_R_POST |
|
SCC_SC_GETITEM_R_POST |
REQUESTHDLR |
SCC_SC_GETITEM_R_POST |
|
SCC_SC_REMOVEITEM_R_POST |
REQUESTHDLR |
SCC_SC_REMOVEITEM_R_POST |
|
SCC_SC_SAVECART_R_POST |
REQUESTHDLR |
SCC_SC_SAVECART_R_POST |
|
SCC_SC_VALIDATE_R_POST |
REQUESTHDLR |
SCC_SC_VALIDATE_R_POST |
|
SCC_SUBMIT_USERPREF_R_POST |
REQUESTHDLR |
SCC_SUBMIT_USERPREF_R_POST |
|
SCC_USERREG_AUTHORIZE_POST |
REQUESTHDLR |
SCC_USERREG_AUTHORIZE_POST |
|
SCC_USERREG_AUTH_GET |
REQUESTHDLR |
SCC_USERREG_AUTH_GET |
|
SSR_ADD_ENROLLMENT_R_POST |
REQUESTHDLR |
SSR_ADD_ENROLLMENT_R_POST |
|
SSR_DROP_ENROLLMENT_R_POST |
REQUESTHDLR |
SSR_DROP_ENROLLMENT_R_POST |
|
SSR_EDIT_ENROLLMENT_R_POST |
REQUESTHDLR |
SSR_EDIT_ENROLLMENT_R_POST |
|
SSR_ENR_VALIDATE_R_POST |
REQUESTHDLR |
SSR_ENR_VALIDATE_R_POST |
|
SSR_GET_CLASSES_R_POST |
REQUESTHDLR |
SSR_GET_CLASSES_R_POST |
|
SSR_GET_CLASS_SECTION_R_POST |
REQUESTHDLR |
SSR_GET_CLASS_SECTION_R_POST |
|
SSR_GET_COURSES_R_POST |
REQUESTHDLR |
SSR_GET_COURSES_R_POST |
|
SSR_GET_COURSE_OFFERING_R_POST |
REQUESTHDLR |
SSR_GET_COURSE_OFFERING_R_POST |
|
SSR_GET_ENROLLMENT_R_POST |
REQUESTHDLR |
SSR_GET_ENROLLMENT_R_POST |
|
SSR_STDNT_ENRL_OPTIONS_R_POST |
REQUESTHDLR |
SSR_STDNT_ENRL_OPTIONS_R_POST |
|
SSR_STUDYLIST_DEADLINES_R_POST |
REQUESTHDLR |
SSR_STUDYLIST_DEADLINES_R_POST |
|
SSR_SWAP_ENROLLMENT_R_POST |
REQUESTHDLR |
SSR_SWAP_ENROLLMENT_R_POST |
|
SSR_ENROLLMENT_SYNC |
ONNOTIFY |
-- |
|
SCC_USERREG_AUTHENTICATE* |
REQUESTHDLR |
-- |
|
SCC_GET_CHECKLIST_R_POST |
REQUESTHDLR |
-- |
|
SCC_GET_SERVICE_INDICATORS_R_G |
REQUESTHDLR |
-- |
|
SFA_GET_STUDENT_AWARDS_R_POST |
REQUESTHDLR |
-- |
|
SSF_GET_STUDENT_ACCOUNT_R_POST |
REQUESTHDLR |
-- |
|
SCC_LOOKUP_DIRECTORY_R_POST |
REQUESTHDLR |
SCC_LOOKUP_DIRECTORY_R_POST |
|
SCC_GETPHOTO_R_GET |
REQUESTHDLR |
SCC_GETPHOTO_R_GET |
|
SAV_CREATE_INV_R_GET |
REQUESTHDLR |
SAV_CREATE_INV_R_GET |
|
SAV_SAVE_INV_R_POST |
REQUESTHDLR |
SAV_SAVE_INV_R_POST |
|
SSF_INIT_EPAY_R_POST |
REQUESTHDLR |
SSF_INIT_EPAY_R_POST |
|
SSF_CMPLT_EPAY_R_POST |
REQUESTHDLR |
SSF_CMPLT_EPAY_R_POST |
|
SAD_GET_APPL_STS_R_GET |
REQUESTHDLR |
SAD_GET_APPL_STS_R_GET |
|
SAD_GET_APPL_TODO_R_GET |
REQUESTHDLR |
SAD_GET_APPL_TODO_R_GET |
|
SCC_GETCONST_R_GET |
REQUESTHDLR |
SCC_GETCONST_R_GET |
* SCC_USERREG_AUTHENTICATE is used only in Campus Mobile 4.0 and earlier.
Some service operations do not have routings generated by default so you will need to generate routings for them separately.
Follow these steps to generate routings for the User Registration Service:
Log into the PeopleSoft application in a browser.
Select
Search for SCC_USERREG_AUTHENTICATE Service Operation.
On the General page, select the Generate Any-to-Local check box.
Save the page.
Follow these steps to generate routings for the Enrollment Sync Service:
Log into the PeopleSoft application in a browser.
Select
Search for SSR_ENROLLMENT_SYNC Service Operation.
On the General page, select the Generate Local-to-Local check box.
Save the page.
Follow the same steps to Generate Any-to-Local routings for the following service operations:
SCC_GET_CHECKLIST_R_POST
SCC_GET_SERVICE_INDICATORS_R_G
SFA_GET_STUDENT_AWARDS_R_POST
SSF_GET_STUDENT_ACCOUNT_R_POST.
By default, only error messages appear on the Integration Broker Synchronous Service Monitor screen. During testing, it may be helpful to increase the logging detail of the web service messages in order to detect all messaging activity through the Integration Broker Synchronous Service Monitor screen. Increasing the log detail to “Header and Detail” will enable synchronous message header information and XML message content to appear in the Service Operations Monitor.
The following steps enable logging in greater detail of the web service messages for Campus Mobile:
Navigate to
Enter each of the service operation names from the list of service operations used in Campus Mobile, such as SSR_ADD_ENROLLMENT_R_POST.
Click Search.
Select the Routings tab.
On the Routing Definitions page, change Log Detail from No Logging to Header and Detail.
For more information, access the Configuring Routing Definitions page ().
Note: We do not recommended that you turn on logging in production environments; however it can be useful in QA and development environments.
Users log into Campus Mobile using the same credentials that they use for Campus Self Service access through PIA. These credentials pass to PeopleTools using the Authentication and Authorization web services (Service operations SCC_USERREG_AUTH_GET and SCC_USERREG_AUTHORIZE_POST in the Campus Mobile Service Operations chart above).
The delivered authorization model is different for V3.1 (and earlier versions) and V4 as outlined below.
Campus Mobile V3.1 and earlier:
For Campus Mobile V3.1 and earlier, the permission list HCCPCSSA3000 determines whether a user is authorized to access the Campus Mobile features. The security role, CS Mobile Student, is delivered by default with the HCCPCSSA3000 permission list added to it. You have the flexibility to deploy security for Campus Mobile in the way that fits your institution’s requirements. Your options include:
Assign the delivered CS Mobile Student role to students who need access to Campus Mobile.
Assign the delivered HCCPCSSA3000 PL to a role that is (already) assigned to students who need access to Campus Mobile.
Customize the Campus Mobile application to use a different permission list as described in the Campus Mobile Implementation Guide.
Campus Mobile V4:
Beginning with V4 of Campus Mobile, a more granular security model is delivered. Each Campus Mobile feature is assigned its own permission list that is checked to determine whether a user is authorized for access to that feature. With this security model, access to features can be readily controlled with security configuration. For example, with the delivered security roles, students that do not participate in Financial Aid can simply not have the CS Mobile Financial Aid role added to their user profile. Then they will not see the Financial Aid feature on their springboard.
The following table contains the delivered roles and permission lists. You may use these as delivered or deploy security in the way that meets your institution’s requirements. The Campus Mobile application can be configured to use different permission lists if needed, see the Campus Mobile Implementation Guide, section 3.3.2.3.
|
Role |
Permission List Description |
|
|---|---|---|
|
CS Mobile Student |
CS Mobile – Schedule |
HCCPCSSA3010 |
|
CS Mobile Student |
CS Mobile – Class Search |
HCCPCSSA3020 |
|
CS Mobile Student |
CS Mobile – Grades |
HCCPCSSA3030 |
|
CS Mobile Student |
CS Mobile – Profile |
HCCPCSSA3040 |
|
CS Mobile Student |
CS Mobile – Cart |
HCCPCSSA3050 |
|
CS Mobile Student |
CS Mobile – Todo |
HCCPCSSA3070 |
|
CS Mobile Student |
CS Mobile – Holds |
HCCPCSSA3080 |
|
CS Mobile Applicant |
CS Mobile – Applications |
HCCPCSSA3100 |
|
CS Mobile Contributor |
CS Mobile – Contributions |
HCCPCSSA3090 |
|
CS Mobile Finances |
CS Mobile – Finances |
HCCPCSSA3060 |
|
CS Mobile Financial Aid |
CS Mobile – Financial Aid |
HCCPCSSA3110 |
Campus Mobile makes extensive use of the LOV web services throughout the features of Campus Mobile. In order to limit the data that can be queried using the LOV service operations, there are delivered LOV configurations to enable web service access to the specific LOV data used in Campus Mobile. In the LOV setup all of the following use the ‘DEFAULT’ context except for the ‘SSC_SUBJECT_CLS’ noted with the (*) which uses the ‘CM’ context. This configuration is delivered as is provided here for informational purposes.
|
Record |
Field |
Usage |
|---|---|---|
|
ACAD_PLAN_TBL |
ACAD_CAREER |
Class Search Term Selection - Career, Profile - Career |
|
AID_YEAR_SRCH |
AID_YEAR |
Profile - Aid year |
|
AV_INV_LOV_WRK |
AV_SEQNO_LOV1 |
Contributions – Source |
|
AV_INV_LOV_WRK |
INTV_CD |
Contributions – Campaigns |
|
AV_INV_LOV_WRK |
AV_MTVTN_LOV1 |
Contributions – Fund |
|
AV_INV_LOV_WRK |
INSTITUTION |
Contributions – Institution |
|
SSR_CLSSRCH_REQ |
STRM |
Class Search Term Selection, Profile |
|
SSR_CLSSRCH_REQ |
INSTRUCTION_MODE |
Class Search filter - Instruction mode |
|
SSR_CLSSRCH_REQ |
INSTITUTION |
Class Search Term Selection - Institution, Profile - Institution |
|
SSR_CLSSRCH_REQ |
CAMPUS |
Class Search filter – Campus |
|
SSR_LOV_WRK |
ACAD_ORG1 |
Enrollment Options - To get the acad org to retrieve the instructors in edit class from cart use case |
|
SSR_LOV_WRK |
ACAD_PROG1 |
Enrollment Options - Acad Program Selection |
|
SSR_LOV_WRK |
SSR_INSTR_LOV10 |
Enrollment Options - Instructor Selection |
|
SSR_LOV_WRK |
SSR_INSTR_LOV9 |
Enrollment Options - Instructor Selection |
|
SSR_LOV_WRK |
SSR_INSTR_LOV8 |
Enrollment Options - Instructor Selection |
|
SSR_LOV_WRK |
SSR_INSTR_LOV7 |
Enrollment Options - Instructor Selection |
|
SSR_LOV_WRK |
SSR_INSTR_LOV6 |
Enrollment Options - Instructor Selection |
|
SSR_LOV_WRK |
SSR_INSTR_LOV5 |
Enrollment Options - Instructor Selection |
|
SSR_LOV_WRK |
SSR_INSTR_LOV4 |
Enrollment Options - Instructor Selection |
|
SSR_LOV_WRK |
SSR_INSTR_LOV3 |
Enrollment Options - Instructor Selection |
|
SSR_LOV_WRK |
SSR_INSTR_LOV2 |
Enrollment Options - Instructor Selection |
|
SSR_LOV_WRK |
SSR_INSTR_LOV1 |
Enrollment Options - Instructor Selection |
|
SSR_LOV_WRK |
SSR_GRD_BASE_LOV3 |
Enrollment Options - Grading base Selection |
|
SSR_LOV_WRK |
SSR_GRD_BASE_LOV2 |
Enrollment Options - Grading base Selection |
|
SSR_LOV_WRK |
SSR_GRD_BASE_LOV1 |
Enrollment Options - Grading base Selection |
|
SSR_LOV_WRK |
SCC_SUBJECT_CLS |
Class Search Subjects (If acad career exists) |
|
SSR_LOV_WRK |
SCC_SUBJECT_CLS |
Class Search Subjects (If acad career does not exist)* |
|
SSR_CLSSRCH_REQ |
SUBJECT |
Class Search Subjects - V3 & V2 back port support |
|
SSR_LOV_WRK |
STRM |
Class Search Course selection- V2 back port support |
In addition to feature-level access in Campus Mobile, users must be granted access to the web service operations that provide the data and business logic between Campus Mobile and Campus Solutions itself. A permission list must be defined that includes all of the necessary service operations to be deployed to users. That permission list must then be attached to a role assigned to Campus Mobile student users.
PeopleTools provides granular-level control to allow you to define relationships between permission lists and roles that best fit your institutional policies. You may want to encapsulate both feature-level access (see above) and web service-level access within a single permission list (such as HCCPCSSA3000), or you may want to define feature and web service access independently and pull them together within a single role. As long as users have access to both the Campus Mobile features and required service operations, Campus Mobile transactions will be available to them.
Follow these steps to add the permission list to each service operation listed in the Campus Mobile Service Operations table above:
Navigate to
Search each Service Operation Name listed in the Campus Mobile Service Operations tables.
On the General Tab, click the Service Operation Security link.
The Web Service Access page opens in a new window. On this page, select the appropriate permission list that you want to attach to this service operation.
Select Full Access from the Access drop-down list.
Click Save.
Note: As delivered, the service operations are configured to require basic authentication with the exception of: SCC_GET_LOV_R_POST, SSR_GET_CLASSES_R_POST, SSR_GET_CLASS_SECTION_R_POST, and SSR_GET_COURSE_OFFERING_R_POST. These service operations are set to require no authentication. This design is intended to support a future "public" unauthenticated role for class search. If these four services are set to require basic authentication, errors will occur in the Campus Mobile application. To check the status of a service operation's required authentication, navigate to the Service Operations Page, General tab.
However, should your institution want to require basic authentication on these services, security can be enabled. First, follow the same steps above to enable security for these service operations; then, follow the instructions in the Campus Mobile Implementation Guide section "Securing Class Search Feature".
Access the Instructor Contact Information page ().
Image: Instructor Contact Setup page
This example illustrates the fields and controls on the Instructor Contact Setup page. You can find definitions for the fields and controls later on this page.
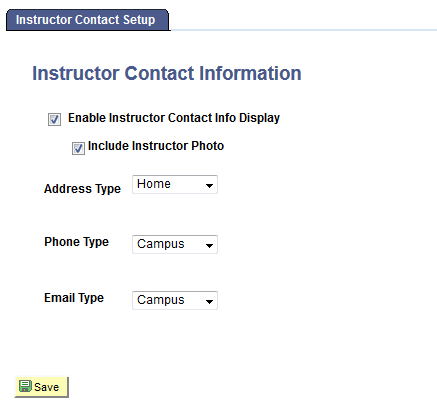
Campus Mobile includes the ability for a student to view information on instructors assigned to a class either in their Class Schedule or through Class Search. Details can include the contact information (address, phone number, email address, and photo) for instructors, if institutions have chosen to share those details.
|
Field or Control |
Definition |
|---|---|
| Enable Instructor Contact Info Display |
Click the check box to enable or disable the display of instructor contact info. Disabling instructor contractor information prevents the web service from publishing any information. The Campus Mobile application will simply display the instructor name without any ability to drill down for additional contact information. |
| Address Type, Phone Type, and Email Type |
Select the desired contact information source for each. You are not required to map all three attributes to enable the instructor contact information. If no value is selected for a particular attribute (a <blank> option is provided), then no value passes to Campus Mobile for that attribute. |
Note: To ensure that data for individuals covered under FERPA regulations (such as student instructors) is not released contrary to elected FERPA restrictions, the system queries the FERPA flag before sending information. If the FERPA flag is set to Yes/True, the system does not display data for that instructor, regardless of whether or not the data defined on this page corresponds to FERPA elections.
Note: The service operation must be secured such that only Campus Mobile can retrieve contact information values from the directory service. For more information on securing the service, refer to PeopleTools documentation.
See PeopleTools: Security Administration
The service operations that deliver the financial information are dependent on settings on the General Options page (). For your Institution Set, ensure that the Allow Use in Service check box is selected and you have entered a value in the Maximum Payments in Service field.
There are several areas of configuration needed to enable contributions along with the service operations described here. In the Campus Mobile Contributions feature, each institution that is configured for Involvement has a dynamic message associated with it that appears on the Contributions page. This message is set on the Involvement Setup page (). You can change the Message field and it will dynamically update in Campus Mobile. For more information about involvement setup, see Setting Up Self-Service Online Giving and Pledges.
In the Contributions feature, Make a Gift allows for direct integration with payment providers for credit card gifts. For this integration to work, you must configure the Hosted Payment Framework; see the ePayment Developer's Guide for instructions. Once the Hosted Payment merchant setup is complete, select the Hosted Payment to use with Contributions on the Business Unit CR component (). For more information on CR business unit setup, see Defining and Securing PeopleSoft Contributor Relations Business Units and SetIDs.
Further, there is a required servlet that provides the integration between the Campus Mobile app and the third-party payment provider through the Hosted Payment Framework. See the Campus Mobile Implementation Guide posted to My Oracle Support, for instructions on configuring the servlet.
The service operations that deliver the Applications information are dependent on display settings for Application Status, Checklist Item Due Dates and Checklist Contacts.
For more information on customizing the features of Campus Mobile, please see the Campus Mobile Implementation Guide posted to My Oracle Support. There you will find details around branding the application with your institution's logo and colors as well as icons and labels. Further, you will find information on the potential for customizing or extending the Campus Mobile application.
Campus Mobile can be deployed to both Android (.apk) and iOS (.ipa) devices. Campus Mobile is built on the Oracle ADF Mobile framework. You will open the Campus Mobile application archive in Oracle Jdeveloper, apply your branding, sign the application for your Institution and deploy it to Apple and Android application files to be distributed to your students. The Campus Mobile Implementation Guide contains details on deploying and distributing the Campus Mobile Application.
See Campus Mobile Implementation Guide, posted to My Oracle Support.