Setting Up Your System for Grading
To set up your system for grading, use the Grading Scheme Table component (GRADE_SCHEME) and the Grading Basis Exception Rule component (GRD_BASE_EXCEPTION).
This section provides an overview of grading setup and discusses how to:
Define grading schemes.
Define grading basis exception rules.
Run the Grade Basis Exception report.
Create grade rosters for a single class.
Create grade rosters for multiple classes.
Complete these steps to set up grading:
Define grade basis values:
Select PeopleTools, Utilities, Translate Values to add or change translate values.
Search on the GRADING_BASIS field name, which takes you to the table where you define grade basis values.
Define grading schemes on the Grading Scheme Table page.
(Optional) Define grade basis exceptions on the Grading Basis Exception Rule page.
(Optional) Run the Grade Basis Exception Report to review active grade basis exception mapping rules and their details.
Generate grade rosters on either the Grade Roster Type page or the Create Grade Rosters page.
|
Page Name |
Definition Name |
Navigation |
Usage |
|---|---|---|---|
|
Grading Scheme Table |
GRADING_SCHEME_TBL |
|
Define all valid grading schemes. Enter each grading scheme and the associated grades on this page. |
|
Grading Basis Exception Rule |
GRD_BASE_EXCEPTION |
|
Map typical student-requested grade bases to existing grading basis rules. |
|
Grade Basis Exception |
RUNCTL_SRGBEXCPT |
|
Run reports that display active grade basis exception mapping rules and their details. |
|
Grade Roster Type |
GRADE_ROSTER_TYPE |
|
Define grade rosters on a class-by-class basis. To print the grade roster, use the Grade Roster Print page. Prerequisite: If you want to use blind grading for this class, select the Use Blind Grading check box on the Class Associations page or select the Use Blind Grading check box on the Course Catalog Offerings page. Then, the system populates the Use Blind Grading check box each time that you create a class association. |
|
Create Grade Rosters |
RUNCTL_GRD_ROSTER |
|
Create grade rosters for each term and session by subject area or by academic organization. To print the grade rosters, use the Grade Roster Print page. If you want to use blind grading for this class, select the Use Blind Grading check box on the Class Associations page or select the Use Blind Grading check box on the Course Catalog Offerings page so that the system uses blind grading each time that you schedule the class. The system then populates the Use Blind Grading check box each time that you create a class association. |
|
Complete Grade Flag |
SSR_GRADE_FLAG_TBL |
|
Define complete grade flag values to be used on the Grading Scheme Table page. In New Zealand, these values are used for reporting purposes. |
Access the Grading Scheme Table page ().
Image: Grading Scheme Table page
This example illustrates the fields and controls on the Grading Scheme Table page. You can find definitions for the fields and controls later on this page.
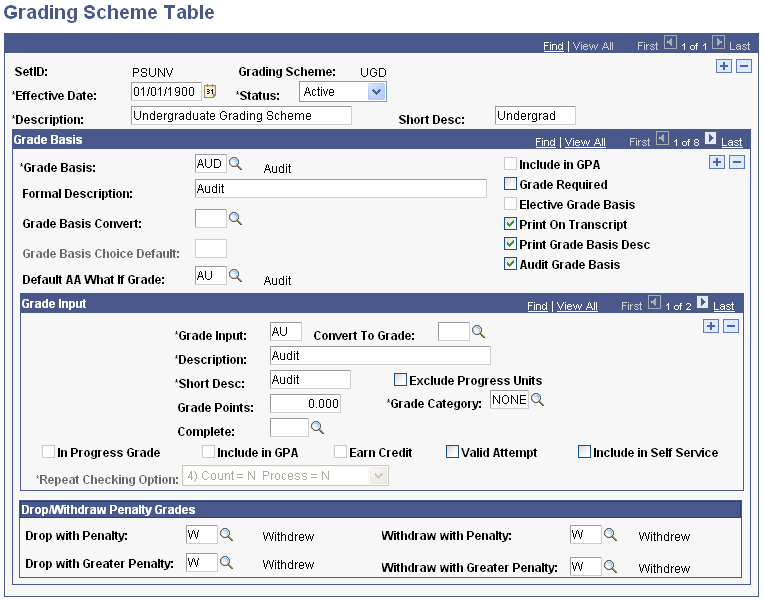
Grading schemes are linked to academic careers and academic programs.
|
Field or Control |
Definition |
|---|---|
| Status |
Enter a status for this grading scheme. Enter Active when adding a new grading scheme. Enter Inactive only if your institution no longer uses this grading scheme. |
| Description |
Enter a description for the grading scheme. |
| Short Desc (short description) |
Enter a short description for the grading scheme. |
| Grade Basis |
Enter a grade basis. Grade basis values are entered into your system as translate values, which you can modify. |
| Formal Description |
Enter a formal description of the grading basis. |
| Grade Basis Convert |
Enter a grade basis convert value to use grades that are associated with another grading basis. If you enter a value in this field, the Grade Input group box becomes unavailable because the grade basis references the grade input data of another grade basis. |
| Grade Basis Choice Default |
If you select the Elective Grade Basis check box, you can enter a grade basis choice default to specify the default grade basis for this grading scheme. In addition, you can enter all of the possible grading basis choices in the fields that become available in the bottom third of the page. The system uses the default value during enrollment. If students have the option to select other grade bases, they can do so at enrollment time. |
| Include in GPA (include in grade point average) |
Select to include grades from this grading scheme in grade point average (GPA) calculations. |
| Grade Required |
Select to specify this grade basis as required, for the purposes of the Grade Review - Transcript Release process. When you evaluate students using the Grade Review process, those classes in which the students are enrolled with a required grade basis must have all of their grades; otherwise, a transcript is not generated for the student. Selecting this option can prevent transcripts from printing until all of a student's term grades are posted. |
| Elective Grade Basis |
Select to enter the grading bases from which the student may select during enrollment. |
| Print on Transcript |
Select to display, on the transcript, classes that are graded with this grade basis. If you do not select this option, all class data for courses that have grades that are from this grade basis do not appear on the transcript. |
| Print Grade Basis Desc (print grade basis description) |
Select to have the formal description of the grade basis appear on the transcript. |
| Audit Grade Basis |
Select to indicate that the grading scheme is audit-only. If you select this check box, the following check boxes in the Grade Input group box become unavailable: In Progress Grade, Include in GPA, and Earn Credit. |
| Grade Input |
If you enter a grade basis and clear the Elective Grade Basis check box, or if you do not enter a value in the Grade Basis Convert field, the Grade Input field becomes available. Enter all of the valid grade values for the grading scheme in the Grade Input field. Add rows as necessary. |
| Convert To Grade |
When you post grades, the system converts the originally entered grade to the convert to grade if a value exists in the Convert to Grade field. This field is optional. The convert to grade must be within the grading scheme that you are currently defining. |
| Description |
Enter a description for the grade input. |
| Short Desc (short description) |
Enter a short description for the grade input. |
| Exclude Progress Units |
Select to have the system exclude this grade from progress units. For example, you would select this check box for a W or withdrawal grade. |
| Grade Points |
Enter the grade points for the grade input. The system uses these grade points, in conjunction with the units attempted for the class, when it calculates GPA. |
| Complete |
This field is user-defined. Define complete values on the Complete Grade Flag page. In New Zealand, this field is used for reporting purposes. |
| Grade Category |
Use this field to give a grade additional identity. You can assign a grade category to a particular grade or a group of grades, and then use these assignments for advanced advising analysis purposes, such as requisite checking or academic advising limits. By default, the system populates the Grade Category field with None. A typical example of a grade category is Pass or Transfer Pass. You can use academic advising to limit the number of classes with grade categories of Transfer Pass that count toward degree requirements. Select from a list of grade categories that are defined by your institution. Grade categories are defined on the Grade Category Table page. |
| In Progress Grade |
Select to indicate that this is an in-progress type of grade. A typical example of an in-progress grade would be an incomplete grade. |
| Include in GPA (include in grade point average) |
Select to include the grade that you specify in GPA calculations. An example of when you would not select this check box is for a Pass grade. |
| Earn Credit |
Select to specify that the grade can be counted toward course and academic advising credit. |
| Valid Attempt |
Select to mark each grade value as representing a valid course attempt. PeopleSoft Academic Advisement uses this setting to distinguish between grades for valid course attempts (A, B, C, D, F, and so forth) and grades for invalid course attempts (AU, W, and so forth). If you select this check box, Academic Advisement can distinguish between valid and invalid course attempts when the values in the Units Attempted, Earned Credit, and GPA fields are the same. |
| Include in Self Service |
Select to enable the grade input value to be assigned and edited on the Faculty Center Grade roster. If you clear this check box, instructors cannot assign or edit this grade on the self-service grade roster. A typical example is to clear the check box for a W, an administrative withdrawal grade. |
| Repeat Checking Option |
Select an option to indicate whether a class with this grade should be counted as a repeat candidate and whether the class should be processed by the Repeat Checking process. Values are:
|
This table shows an example:
|
Course |
Grade |
Units Attempted |
Earned Credit |
GPA |
Valid Attempt |
|---|---|---|---|---|---|
|
English 101 |
W (user defined) |
3.00 |
0.00 |
0.00 |
No |
|
English 101 |
F |
3.00 |
0.00 |
0.00 |
Yes |
Note: The PeopleSoft Academic Advisement application considers class attempts that have no grade as valid attempts.
Drop/Withdraw Penalty Grades
When processing drops during the penalty periods, the enrollment engine uses the penalty grades specific to the student's grading basis, as defined on the Grading Scheme Table page. If you do not define penalty grades for the student's grading basis, the enrollment engine instead uses the grading bases and grades that you define on the Session Calendar1 page (for withdraw grades) and the Session Calendar 2 page (for drop grades). We strongly suggest that you define penalty grades at the grade basis level to ensure that students receive penalty grades specific to their intended grade basis for the class, and not the penalty grade that is assigned to all students in the session, regardless of whether the penalty grade is from the student's original grade basis.
For example, when you drop a student from a class for which the stdnt_enrl.grading_basis_enrl = AUD during Drop With Greater Penalty and a drop with greater penalty grade exists in the GRADE_TBL for AUD, the system assigns the drop with greater penalty grade to the student. If no drop with greater penalty grade exists at the grade table level for an AUD grade basis, the system instead uses the grading basis and grade from the ACAD_CALSES_TBL, as defined on the Session Calendar2 page.
See Setting Up Session Cancellation and Withdrawal Dates.
See Setting Up Session Drop Dates.
|
Field or Control |
Definition |
|---|---|
| Drop with Penalty |
Enter the penalty grade that students who are enrolled with this grade basis receive for a class if they drop the class after the drop-and-retain-record deadline but on or before the drop-with-penalty deadline. The grade for the class appears on students' transcripts and affect their GPA accordingly. Grade values are defined on the Grading Scheme Table page. |
| Drop with Greater Penalty |
Enter the grade that students who are enrolled with this grade basis receive for a class if they drop the class after the drop-with-penalty deadline but on or before the drop-with-greater-penalty deadline. The grade for the class appears on students' transcripts and affect their GPA accordingly. Grade values are defined on the Grading Scheme Table page. |
| Withdraw with Penalty |
Enter the grade that students who are enrolled with this grade basis receive for a class if they withdraw after the withdraw-without-penalty deadline but on or before the withdraw-with-penalty deadline. The grade for the class appears on students' transcripts and affect their GPA accordingly. Grade values are defined on the Grading Scheme Table page. |
| Withdraw with Greater Penalty |
Enter the grade that students who are enrolled with this grade basis receive for a class if they withdraw after the withdraw-with-penalty deadline but on or before the withdraw-with-greater penalty deadline. The grade for the class appears on students' transcripts and affect their GPA accordingly. Grade values are defined on the Grading Scheme Table page. |
Grade Scheme Example: Using an Elective Grading Basis
Image: Example of elective grade basis, Grading Scheme Table page
Select the Elective Grade Basis check box for grade bases that permit students to choose different modes of grading for a class. Before you select this check box, define all of your grading basis choices
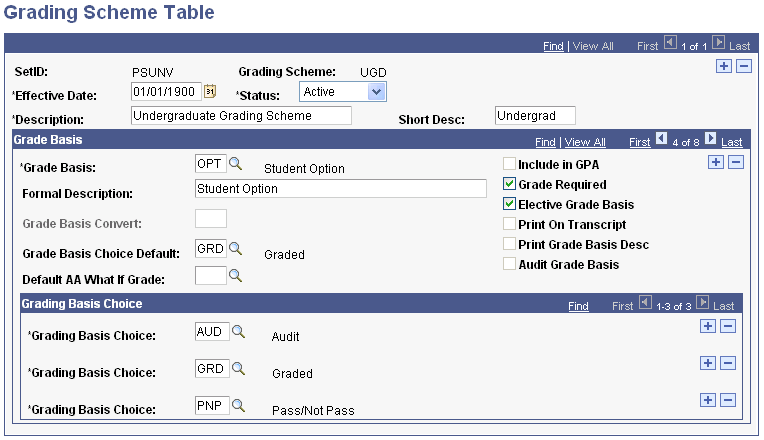
On this page, select:
The Elective Grade Basis check box.
The system displays the Grading Basis Choice scroll area.
All valid possible grading basis choices from which a student can choose for a class that is offered with this grade basis of OPT.
Grade Scheme Example: Converting Grade Basis
Image: Example of converting grade bases, Grading Scheme Table page
Enter a grade basis in the Grade Basis Convert field for Satisfactory/Unsatisfactory (SUS) grades to convert to your new and preferred grade basis of Pass/Not Pass (PNP).
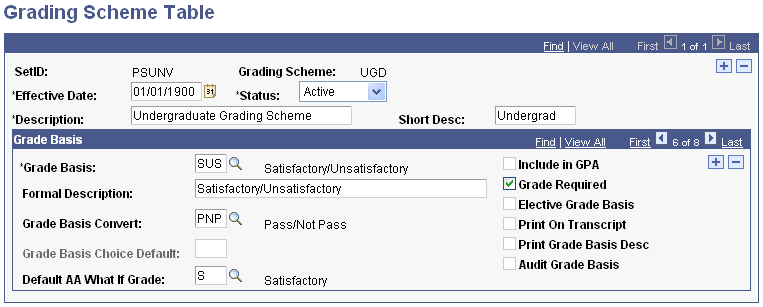
On this page, select the grade basis value in the Grade Basis Convert field. All courses that have a grade basis of SUS convert to a grade basis of PNP.
Grade Scheme Example: Setting Up a Requirement That References a Grade Category
At PSUNV, the maximum number of pass grades that can apply towards a Bachelor's degree is 24 units. From these 24 units, no more than six units can be from another institution. To establish this academic advising limit on pass grades, create two grade categories on the Grade Category Table page: PASS for Internal Pass and TXFR for Transfer Pass. Then, on the Grading Scheme Table page, assign to the grade P the grade category of PASS and assign to the grade T the grade category of TXFR.
In PeopleSoft Academic Advisement, create an academic requirement that is a global limit. Its first requirement line points to a derived list of all courses on a student's transcript with a grade that has a grade category of PASS unioned with a derived list of all courses on a student's transcript with a grade category of TXFR. The requirement line limit allows a maximum of 24 units and maximum of 999 courses (the system enforces the lower of these). Create a second requirement line (in the same academic requirement) that is also a global limit. It points to a derived list of all courses on a student's transcript with a grade that has a grade category of TXFR. The requirement line limit allows a maximum of six units. Attach this academic requirement to a requirement group at the career level, with a low reporting sequence number, so that the degree audit system evaluates it first during an advising evaluation. Any courses over the limit of allowed credits are excluded from the evaluation and are not counted towards the remaining career, program, plan, or subplan degree requirements.
Access the Grading Basis Exception Rule page ().
Image: Grading Basis Exception Rule page
This example illustrates the fields and controls on the Grading Basis Exception Rule page. You can find definitions for the fields and controls later on this page.
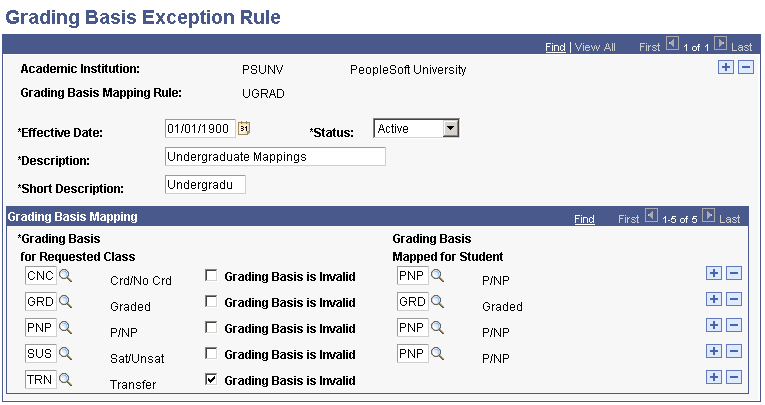
If grade bases are variable at your institution, you should define grade basis mapping rules. When students in one academic program or career enroll in classes in another program or career (that have a different grade basis), the system uses your grade basis mapping rules to convert grade basis values to those that are appropriate for the students' careers and programs.
Grading basis rules designate any and all schemes for grading, including the grade points for each grade.
You link grading basis exception rules to career pointer exception rules. Career pointer exceptions are linked to academic programs.
Grading basis exception rules are keyed by academic institution.
|
Field or Control |
Definition |
|---|---|
| Effective Date |
Enter an effective date for this mapping rule. |
| Status |
Enter a status for this mapping rule. Enter Active when adding a new mapping rule. Enter Inactive only if your institution no longer uses the mapping rule. Note: If you inactivate the grading basis mapping rule, you must also remove it from the Career Pointer Exception page. |
| Description |
Enter a description for the mapping rule. |
| Short Description |
Enter a short description for the mapping rule. |
| Grading Basis for Requested Class |
The grading basis from which you are mapping. Grading basis values are defined on the Grading Scheme Table page. Warning! If a student attempts to enroll in a mapped cross-career course and the student selects a grade basis that you did not specify in the Grading Basis for Requested Class field as eligible for remapping, then the system considers their request invalid and denies the enrollment request. |
| Grading Basis is Invalid |
Select to invalidate the grading basis. In the preceding example, the Transfer grading basis is invalid. Students cannot select the Transfer grading basis for classes with this mapping rule. |
| Grading Basis Mapped for Student |
The grading basis to which you are mapping. In our example, when an undergraduate student enrolls in a graduate class with a grading basis of Satisfactory/Unsatisfactory, the system converts their grade basis to Pass/No Pass. Grading basis values are defined on the Grading Scheme Table page. Note: When a student enrolls, the mapped values appear prior to posting the enrollment, regardless of whether the student is using PeopleSoft Enrollment Request, Enrollment, Quick Enroll, or Student Self Service Enrollment. |
Grade Basis Mapping Example
To understand how the enrollment engine determines the grade basis for a particular enrollment, look at how the system determines whether a student can enroll in a class that is not in the student's career. For example, Michael Holt, an undergraduate, wants to enroll in Marketing 500 in the Graduate Business career.
|
Michael's Career and Program |
Requested Class |
Course's Career |
Grading Basis of Course |
Expected Grading Basis |
|---|---|---|---|---|
|
Undergraduate/liberal arts undergraduate (LAU) program |
Marketing 500 |
Graduate Business |
Satisfactory/Unsatisfactory (SUS) |
Pass/No Pass (PNP) |
Image: Viewing career pointer exception rules on the Academic Program page (ACADEMIC_PROG_TBL)
When Michael tries to enroll in Marketing 500, the system first looks at the Career Pointer Exception Rule field on the Academic Program page for Michael's academic program (LAU).
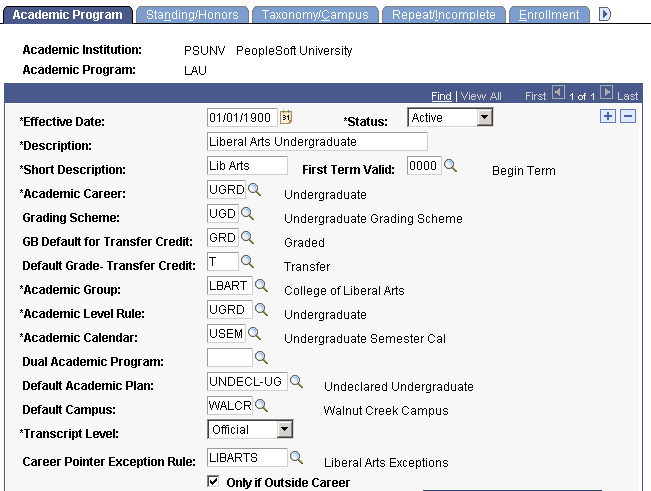
If the field is cleared, grading basis mapping does not occur. Instead, the system looks at the Academic Career Pointers page to determine whether the student is eligible to enroll in the class. If enrollment is allowed, the system pulls from the course grading scheme as determined by the academic career that is noted on the Course Catalog - Offerings page. However, in our example,LIBARTS is selected in the Career Pointer Exception Rule field. Therefore, the system uses the LIBARTS exception rule on the Career Pointer Exception Rule page.
Image: Viewing grading basis mapping rules on the Career Pointer Exception Rule page (CAR_PTR_EXCEPTIONS)
This example illustrates the Career Pointer Exception Rule page as explained above.
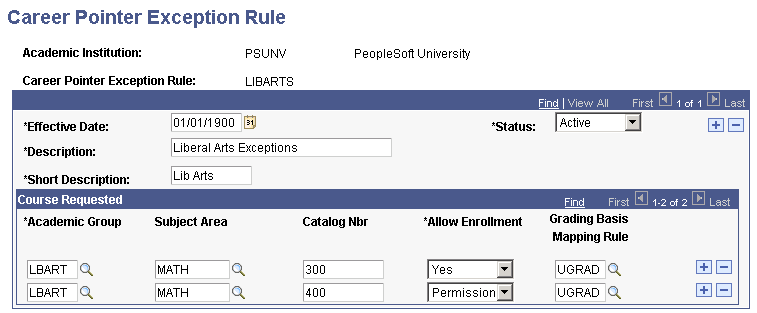
The system searches the Course Requested group box for rows that match the class in which the student is enrolling. In our example, Michael Holt is trying to enroll in Marketing 500. The system looks at the Academic Group, Subject Area, and Catalog Nbr (catalog number) fields. The catalog number of the requested course must be equal to or greater than the catalog number on this page. Because Marketing 500 is in the MGMT academic group and the Marketing subject area, and it is greater than or equal to 500, the system allows Michael to enroll in the class with permission. The system then maps the grading basis to the student's career or program using the value in the Grading Basis Mapping Rule field (UGRAD). Grading basis mapping rules are defined on the Grading Basis Exception Rule page.
Image: Viewing grading basis mapping rules on the Grading Basis Exception Rule page (GRD_BASE_EXCEPTION)
This example illustrates the Grading Basis Exception Rule page as explained above.
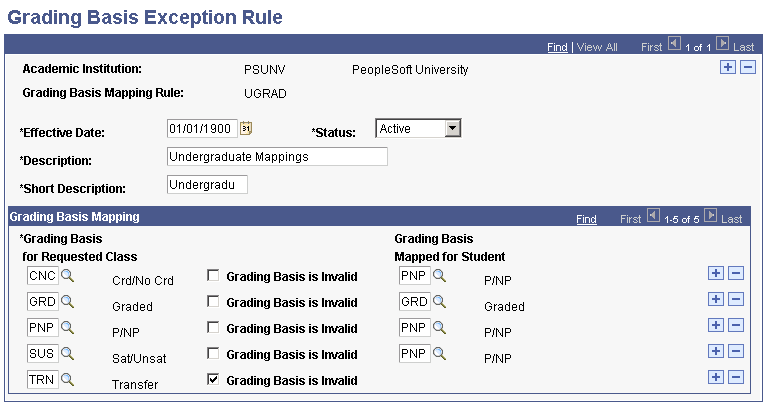
The system uses the values on this page to determine how to map each grading basis. Because the grading basis for the requested class is SUS (satisfied/unsatisfied), the system maps to PNP (pass/no pass). Therefore, Michael's grading basis appears as PNP on enrollment pages.
The system maps the grading basis when you exit the Class Input field.
Special Note About the Elective Grading Basis
When a student attempts to enroll in a class outside of the student's career and the class is offered with a grade basis for which the Elective Grade Basis check box is selected, the system presents the student with the student's grading basis choice and a corresponding grade basis convert to value. Each of the pre-mapped choices is set up in the Grade Scheme table under the career of the class and under the elective grade basis. Because students in this cross-career enrollment situation can be exposed to grade bases that are outside of their career, it is essential that you set up remapping rules that accommodate each of the possible grade bases from which a student may choose. Insert rows to accommodate all possibilities in the grading basis for the Requested Class field on the Grading Basis Exception Rules page. You do not need to insert rows for grade bases that are invalid, but you can do so. In these situations, select the Grading Basis is Invalid check box. For elective grading bases, you must add a row for the elective basis (for example, if OPT, then convert to OPT), for individual grade bases that make up the elective (OPT) grading basis (for example, if SUS, then convert to PNP), and so on.
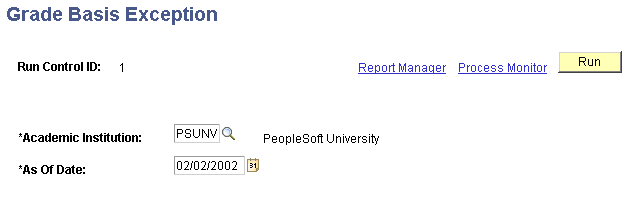
Access the Grade Basis Exception page ().
Image: Grade Basis Exception page
This example illustrates the fields and controls on the Grade Basis Exception page. You can find definitions for the fields and controls later on this page.
|
Field or Control |
Definition |
|---|---|
| Academic Institution |
The academic institution for which you are reporting. The system populates this field. You can change the value. |
| As Of Date |
Enter an as of date to report on all grade basis exception rules that are active as of this date. Normally, you enter a date that is the start of the term or term enrollment period. |
Access the Grade Roster Type page ().
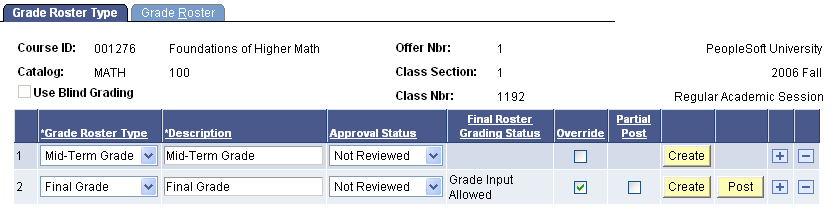
Image: Grade Roster Type page
This example illustrates the fields and controls on the Grade Roster Type page. You can find definitions for the fields and controls later on this page.
|
Field or Control |
Definition |
|---|---|
| Grade Roster Type |
Enter the type of grade roster that you want to generate. Grade roster type values are delivered with your system as translate values. While you should not change the Final Grade value, you can add as many nonfinal grade values as you want. |
| Description |
The system provides the grade roster type description, taking it from the translate table. You can change this value. |
| Approval Status |
Values for this field are delivered with your system as translate values. Do not modify these values in any way. Any modifications to these values require substantial programming. Values for approval status are Not Reviewed, Ready for Review, and Approved. The system does not permit you to post grade rosters that have an approval status of Not Reviewed or Ready for Review unless you select the Partial Post check box. Note: You can save the data and make changes to the grades. After you approve and post, however, you must make any grade revisions on a student-by-student basis using one of the enrollment pages. |
| Final Roster Grading Status |
The system populates the Final Roster Grading Status field based on the approval status for the class. |
| Override |
Select this check box and click the Create button to delete the previous grade roster and generate a new one for the class. If you do not select this check box and just click the Create button, the system appends any new students to the existing grade roster. |
| Partial Post |
Select to manually enter and post grades for a class section, save it, and return later to finish entering and posting grades. Note: Although you cannot approve the entire grade roster until you enter all grades, if you select the Partial Post check box, the system posts all grades that you entered to those students' records. |
| Posting Date |
The system displays the posting date when the grade roster post process finishes. |
| Create |
Click to create the grade roster. Go to the Grade Roster page to enter grades. |
| Post |
Click to post the final grades to the grade roster after you enter them. The system changes the status on the Grade Roster 1 page to Posted. The system does not permit you to post grade rosters that have an approval status of Not Reviewed or Ready for Review unless you select the Partial Post check box. |
Access the Create Grade Rosters page ().
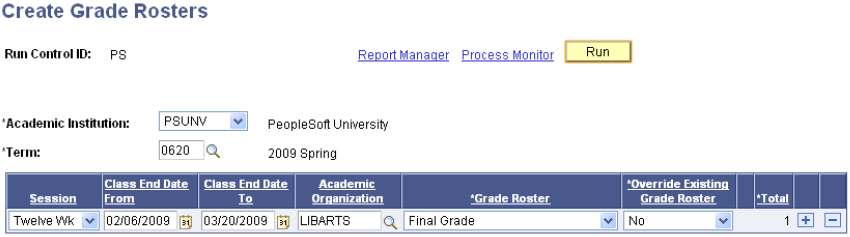
Image: Create Grade Rosters
This example illustrates the fields and controls on the Create Grade Rosters. You can find definitions for the fields and controls later on this page.
|
Field or Control |
Definition |
|---|---|
| Academic Institution |
Enter the academic institution for the grade roster process. This value controls the type of data that is available in the remaining fields. |
| Term |
Enter the term for the grade roster. Term values are defined on the Term Table page. |
| Session |
Enter the session for the grade roster. The session value is optional. Use it to limit your roster production to a single session within the specified term. Session values are defined on the Session Table page. |
| Class End Date From and Class End Date To |
Select the class end date from and to dates. The system selects rosters to create for classes with an end date that is greater than or equal to the value in the Class End Date From field and less than or equal to the value in the Class End Date To field. Both fields are optional and one may be entered without the other. |
| Academic Organization and Subject Area |
Enter the academic organization or subject area for which to produce the rosters. You can enter the academic organization or subject area, but not both. If you enter an academic organization, the Subject Area field is unavailable for entry. Conversely, if you enter a subject area, the Academic Organization field is unavailable for entry. Academic organization values are defined on the Academic Organization Table page. Subject area values are defined on the Academic Subject Table page. |
| Grade Roster |
Enter the type of grade roster that you want to generate. Grade roster values are delivered with your system as translate values. While you should not change the Final Grade value, you can add as many nonfinal grade values as you want. |
| Override Existing Grade Roster |
Available values are: Yes: Enter to delete and override any preexisting grade rosters when you run the Create Grade Roster process, regardless of whether you selected the Override Grade Roster check box on the Grade Roster Type page. No: Enter to retain all prior grade rosters when you run the Create Grade Roster process, regardless of whether you selected the Override Grade Roster check box on the Grade Roster Type page. The system produces rosters only for those classes for which rosters have not yet been generated and appends any currently enrolled students who are not on the original roster. |
| Total |
If you selected a grade roster type of MidTerm, this field becomes available. The system enables you to create as many rosters as you need for each class, as long as it is not a Final Grade roster type. Enter the total number of non-final grade rosters that are needed for each class in the Total field. |
Run the PSJob SRPCGPR. Results of the Create Grade Rosters process appear on the Grade Roster page.