7 Set Up Segments
This chapter contains these topics:
7.1 Setting Up Segments
A segment is a feature of a configured item, such as color, size, fabric, or power type. You assign segments for the configured item in a numeric sequence. This sequence determines the order in which you provide information about each configured item during sales order entry.
For example, FORKLIFT-A contains the following segments:
-
10 Lift Rating
-
20 Power Type
-
30 Boom Height
-
40 Paint
-
50 Propane Tank
-
60 Calculated Counterweight
During sales order entry you can enter a value for each segment. This value can be restricted by:
-
Numeric or alphabetic checking
-
Range checking
-
User defined code table containing all valid answers
You use segments to define cross-segment editing rules that ensure valid configurations. During sales order entry, the system checks the combination of features and options to ensure that the item can be manufactured.
You use segments to define assembly inclusion rules that determine configuration-specific prices, components, calculated values, and routing steps.
You can define three types of segments:
|
Note: The segment information for a configured item should be the same across branch/plants to allow transfers to other branches. |
Setting up segments is the starting point for Configuration Management. You must know information about each segment to determine the configured item's price and to manufacture the item.
7.2 Defining a Segment
From Configurator (G32), enter 29
From Configurator Setup (G3241), choose Configured Item Segments
To begin using the Configuration Management system, you must define the segments of each configured item. Both cross-segment editing rules and assembly inclusion rules use segments within logic statements.
On Configured Item Segments
Figure 7-1 Configured Item Segments screen
Description of "Figure 7-1 Configured Item Segments screen"
-
Complete the following fields:
-
Branch/Plant
-
Configured Item
-
Text String
-
Display Item
-
Segment
-
Description
-
Required
-
Numeric Y/N
-
-
Complete the following optional fields:
-
User Codes
-
Default Value
-
-
Access More Details.
Figure 7-2 Configured Item Segments (Details) screen

Description of "Figure 7-2 Configured Item Segments (Details) screen"
-
Complete the following optional fields:
-
Lower Value
-
Upper Value
-
Number of Spaces Before
-
Number of Spaces After
-
Print Segment Number
-
Print Segment Description
-
Print Value
-
Print Value Description
-
Save Segment
-
Return to New Line
-
Derived Calculation Rounding
-
Update Category Code
-
| Field | Explanation |
|---|---|
| Num | Valid values are:
Y – Indicates that the answer is numeric and therefore, should be right-justified. N – Indicates that the answer is alphanumeric and, therefore, should be left-justified. |
| Required or Optional | Indicates whether a segment is required or optional in a configuration, or whether it must be calculated to specification when entering a sales order.
Valid codes are: R – Segment answer is required during sales order entry. O– Segment answer is optional during sales order entry. C – Segment is calculated during sales order entry. You define the calculation with assembly inclusion rules. |
| Description | A brief description of an item, a remark, or an explanation.
Form-specific information On this screen, the description is of one of the segments for that product family. You can enter a description of the segment, or you can leave the field blank and the system will insert the default description from the user defined codes. |
| Lower Value | The lower allowed value of this specific segment. If you enter a value here, then you must also enter an upper allowed value. |
| Upper Value | The upper allowed value of this specific segment. If you enter a value here, then you must also enter a lower allowed value. |
| No. of Spaces Before | The number of spaces that should print before the segment information in the user defined format. |
| After | The number of spaces that should print after the segment information in the user defined format. |
| Print Segment Number | This field determines if the segment number should print on the sales order (Pick Slip and Invoice Print) and work order (Print Parts List).
Valid values are: Y or 1 - Print on both sales and work order N or 0 - Do not print on sales and work order |
| Print Segment Description | This field determines if the segment description should print on the sales order (Pick Slip and Invoice Print) and work order (Print Parts List).
Valid values are: Y or 1 - Print on both sales and work order N or 0 - Do not print on sales and work order |
| Print Value | This field determines if the segment value should print on the sales order (Pick Slip and Invoice Print) and work order (Print Parts List).
Valid values are: Y or 1 - Print on both sales and work order N or 0 - Do not print on sales and work order |
| Return to New Line | This field will control whether or not a new line should be started after the segment information is printed. The Configurator Segment Delimiter from the Branch/Plant Constants will print if a new line is not started.
Y or 1 - Start new line after segment information N or 0 - Continue printing on same line |
| Configurator Print Segmt Value Descript | This field determines if the segment value description from an associated UDC table should print on the sales (Pick Slip and Invoice Print) and work order (Print Parts List).
Valid values are: Y or 1 - Print on both sales and work order. N or 0 - Do not print on sales and work order. |
| Derived Calc Rnd | This field will be used to indicate how many positions to the right of the decimal a derived calculation should be rounded.
For example, If the result of a derived calculation is 2190.123456789, enter 0 to round to the whole number 2190.
The system rounds up by one any digit followed by 5 through 9. The system does not round any digit followed by 0 through 4. |
7.2.1 What You Should Know About
| Topic | Description |
|---|---|
| Multi-level items | You can define multi-level configured items with up to 10 levels. You use assembly inclusion rules to define item levels, and associated work orders. |
| Setting up generic branch/plants | You can define segments, rules, and configured items that are specific to a branch/plant or generic across all branch/plants. A blank Branch/Plant field identifies a generic branch/plant.
If you define generic branch/plants segments, you must also define generic cross-segment editing and assembly inclusion rules. If you don't use the generic branch/plants, then segment information should be the same across branch/plants. |
| Sequence | You must enter configured item segments in the sequence that you want to prompt the user for information during sales order entry. |
| Configured item text | You can choose the format for displaying configured item text. You can display the configured string or use the detail area to create custom text that prints on sales orders, work orders, pick lists, and invoices. |
| Calculated segments | If you define a segment as calculated, you do not need to enter user defined codes or define range checking. Use assembly inclusion rules to define the calculation for that segment. Calculated segments can be numeric or alpha numeric. |
| Deleting segments | You cannot delete a configured item segment if cross-segment editing or assembly inclusion rules exist for that configured item. |
| Adding new segments | When you add new segments to an existing configured item, enter them at the end of the list of existing segments. |
| Updating category codes | You can specify which work order category code will be populated with the segment value during sales order entry. |
7.3 Setting Up User Defined Codes
From Configurator (G32), enter 29
From Configurator Setup (G3241), choose Configured Item Segments
From the Configurator Setup menu (G3241), choose Configured Item Segments.
You can create a user defined code table of segment values for a non-calculated segment. This task is optional. During sales order entry, if you have associated a required segment with a user defined code table, you must select a value from the table. If you have associated an optional segment with a user defined code table, you can enter either no value, or a value from the user defined code table.
-
Access User Defined Code Revisions.
Figure 7-3 User Defined Code Revisions screen
Description of "Figure 7-3 User Defined Code Revisions screen"
-
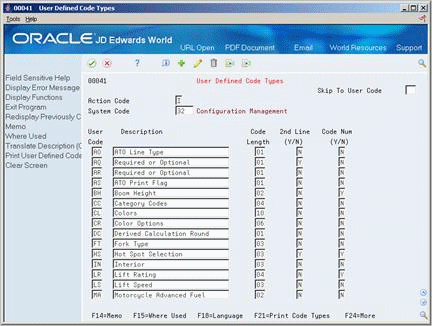
On User Defined Code Revisions, access User Defined Code Types.
Figure 7-4 User Defined Code Types screen
Description of "Figure 7-4 User Defined Code Types screen"
-
On User Defined Code Types, complete the following fields:
-
System Code
-
User Code
-
Description
-
Code Length
-
2nd Line
-
Code Numeric
You can use codes 55 through 59 for Configuration Management user defined code types.
-
-
Access User Defined Code Revisions.
-
On User Defined Code Revisions, complete the following fields:
-
Code
-
Description
-
| Field | Explanation |
|---|---|
| User Code | Identifies the table that contains user defined codes. The table is also referred to as a code type.
Form-specific information Identifies the table that contains values. |
| Description | This window will allow you to enter specific values for the segments making up a configured item. Segment values are separated by a special character, called the segment delimiter. |
| Code Length | The length of the user defined code. It cannot be greater than 10 characters.
Form-specific information The length of the user defined code. It cannot be greater than 10 characters. Do not change the code length without a program change. |
| 2nd Line (Y/N) | A response of Y or M will allow the entry of two lines of User Defined Codes in the revisions screen. A Y will also enable the User Defined Codes window to display a second line of description.
M is for maintenance only for second line display. This capability is seldom used, but has applicability in areas such as inventory product codes. The M value will not display the second line of description in the User Defined Codes window. |
7.4 Locating Segment Information
From Configurator (G32), enter 29
From Configurator Setup (G3241), choose Segment Where Used
For the user defined code table that you specify, you can locate all configured items and segments that reference the table. This is useful for reviewing the effect of table changes on configured items.
On Segment UDC Where Used
Complete the following fields:
-
Branch/Plant
-
System Code
-
User Defined Code
7.5 Comparing Segment Values
From Configurator (G32), enter 29
From Configurator Setup (G3241), choose Configured Item Segments
Sometimes you may need to compare the numeric value of two segments to determine which value to return. This can be accomplished by creating calculated inclusion rules with derived calculations that determine which segment will be selected.
To compare two segments, you set up two calculated segments. The first provides the calculations necessary for the comparison. The second segment is the value returned from those calculations. Segment calculations are set up as conditional rules in Assembly Inclusion rules. The actual calculation you use depends upon the values you want to compare and the type of comparison you want to make.
Set up the calculated segments as described in section Defining a Segment.
Set up the calculations as described in the chapter Set Up Assembly Inclusion Rules.
On Configured Item Segments
-
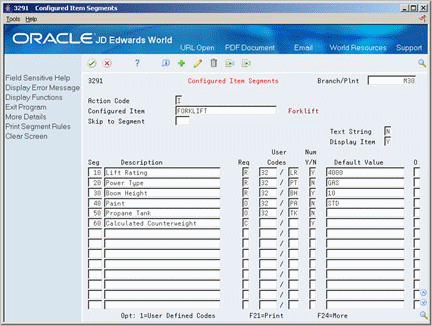
Set up item PM-CONFIG to contain numeric values for segments S30 and S40.
Figure 7-6 Configured Item Segments screen
Description of "Figure 7-6 Configured Item Segments screen"
-
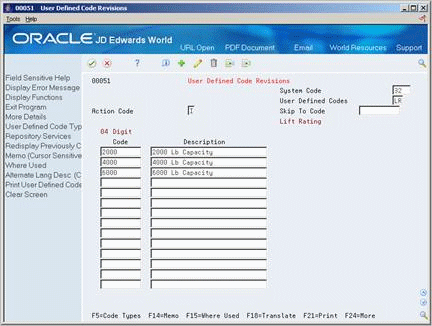
Access User Defined Code Revisions to set up the following possible values for segment 30:
-
100
-
200
-
300
Figure 7-7 User Defined Code Revisions (Segment 30 Values) screen

Description of "Figure 7-7 User Defined Code Revisions (Segment 30 Values) screen"
-
-
Set up segment 40 to return the following three possible values:
-
150
-
250
-
350
Figure 7-8 User Defined Code Revisions (Segment 40) screen

Description of "Figure 7-8 User Defined Code Revisions (Segment 40) screen"
After you have selected the desired values for both segments, you will want to select the greater of the two segments. To do this, write three Calculated ('C') Rules in the Assembly Inclusion screen (G3293).
-
-
On the Configured Item Segments screen (G3291), create a calculated segment to compare segments 30 and 40.
Figure 7-9 Configured Item Segments screen
Description of "Figure 7-9 Configured Item Segments screen"
-
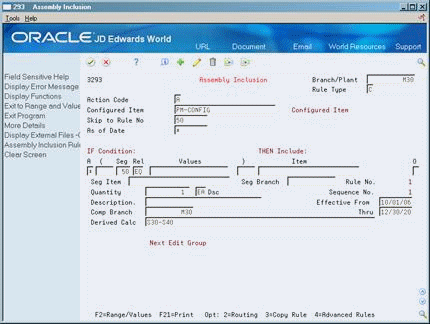
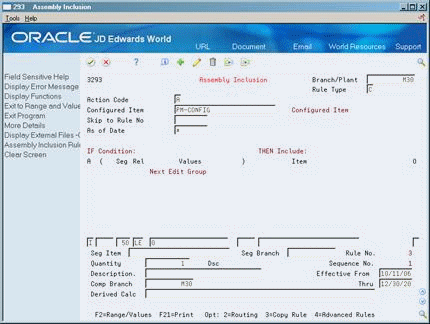
On Assembly Inclusion, create a calculation to designate Segment 50 as Segment 30 - Segment 40 (S30 - S40) in the Derived Calculation field.
The next step is to determine which segment (S30 or S40) that Segment 60 will return.
-
Create a calculation to determine that if Segment 50 is greater than zero, then Segment 60 is equal to Segment 30.
Figure 7-11 Assembly Inclusion (Segment 60) screen
Description of "Figure 7-11 Assembly Inclusion (Segment 60) screen"
-
Create a calculation to determine that if Segment 50 is less than zero, then Segment 60 is equal to Segment 40.
Figure 7-12 Assembly Inclusion (Segment 50) screen
Description of "Figure 7-12 Assembly Inclusion (Segment 50) screen"