34 Set Up General Information
This chapter contains these topics:
34.1 Setting Up General Information
Setting up general information allows you to enter specific information about how your organization accounts for labour or processes payroll. This information consists of:
Setting up general information consists of the following tasks:
-
Setting Up Company Constants
-
Setting Up Business Unit Constants
-
Setting Up Master Pay Cycles
-
Setting Up a Denomination Code
-
Setting Up Execution Control Parameters
-
Choosing Fields for Future Data Revisions
-
Reviewing the Business Unit Constants Report
-
Reviewing the Master Pay Cycles Report
34.2 Setting Up Company Constants
You set up Payroll company constants to control the payroll processing for the employees of each company. You must set up default company constants before you can process a payroll. JD Edwards World recommends that you enter Payroll company constants when significant changes occur, such as the addition of a new company.
When you set up Payroll company constants, you set up the default company and each individual company. You enter information for Company 00000, the default company, to define the overall operating environment. You set up company constants for each of your companies for which you run payroll. If you use the JD Edwards World General Accounting system, you must set up separate company constants for that system.
Setting up company constants includes the following tasks:
-
Setting up the default company
-
Setting up an individual company
34.2.2 Setting Up the Default Company
From Canadian Payroll Master (G77), enter 29
From Payroll Setup (G774), choose Payroll General Constants
From Payroll General Constants (G7741), choose Payroll Company Constants
You enter information for Company 00000, the default company, to define the overall operating environment. If you have multiple companies, the parameter settings for Company 00000 must include all of the possible variations that cover all of the companies you set up.
For instance, if one company requires integration with the Accounts Payable system, you must set up Company 00000 control parameters to reflect Accounts Payable integration. At the default company level, you can also indicate whether you want the Payroll or Time Accounting system to integrate with the JD Edwards World General Ledger system.
If you change the default company constants, the changes affect all other companies you set up.
Figure 34-1 Payroll Company Constants screen
Description of "Figure 34-1 Payroll Company Constants screen"
-
For Company 00000, complete the following fields and click Add:
-
Company Number
-
Company Name
-
Company Address
-
City
-
State
-
Zip Code
-
County
-
-
Complete the Company Number field and click Inquire.
Figure 34-2 Payroll Company Constants screen
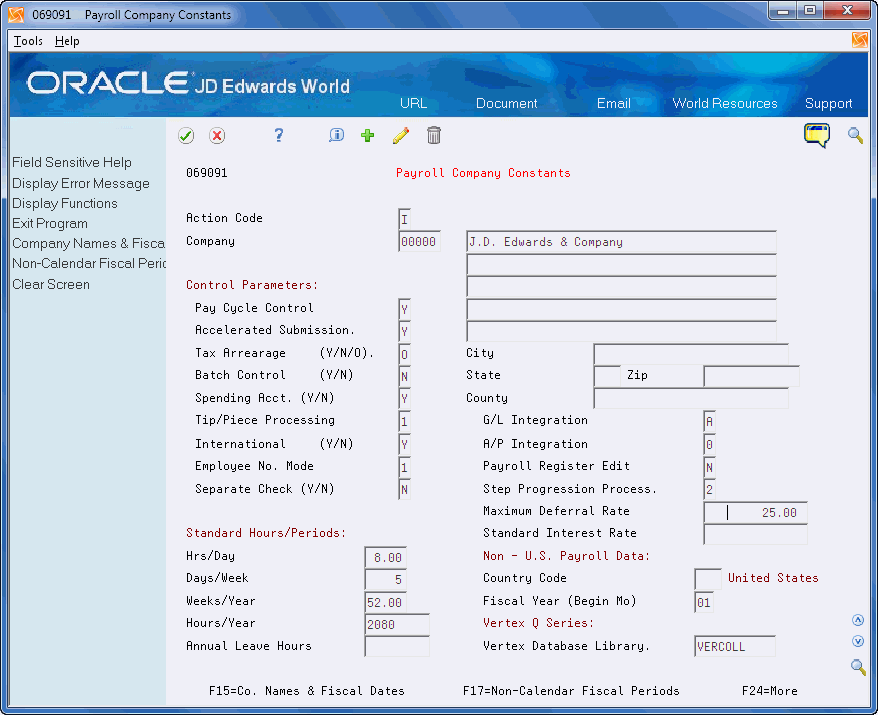
Description of "Figure 34-2 Payroll Company Constants screen"
-
Complete the following fields:
-
Pay Cycle Control
-
Accelerated Submission
-
Tax Arrearage
-
Batch Control
-
Spending Account
-
Tip/Piece Processing
-
G/L Integration
-
A/P Integration
-
Employee Number Mode
-
Payroll Register Edit
-
Separate Check
-
Step Progression Process
-
Maximum Deferral Rate
-
Fiscal Year (Begin Mo)
-
-
To identify the standard time and periods worked by salaried or auto employees, complete the following fields:
-
Hours/Day
-
Days/Week
-
Weeks/Year
-
Hours/Year
-
-
If you have employees based in more than one country, complete the following fields:
-
International
-
Country Code
-
-
If your company has employees based in Australia, complete the following field:
-
Annual Leave Hours
-
-
Compete the Vertex Database Library field and click Add.
The Standard Interest Rate field is for future use and is inactive for this release.
34.2.3 Setting Up an Individual Company
From Canadian Payroll Master (G77), enter 29
From Payroll Setup (G774), choose Payroll General Constants
From Payroll General Constants (G7741), choose Payroll Company Constants
You set up company constants for each of your companies for which you run payroll. When you set up an individual company or make changes to an existing company's name or address, the system automatically updates the Address Book system.
To set up an individual company
Figure 34-3 Payroll Company Constants screen
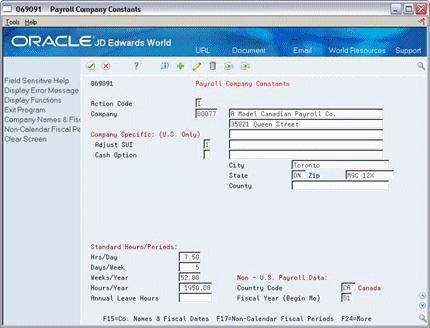
Description of "Figure 34-3 Payroll Company Constants screen"
-
Complete the following fields:
-
Company
-
Company Name
-
Company Address
-
Fiscal Year
-
-
To identify the standard time worked by salaried or auto employees, complete the following fields:
-
Hours/Day
-
Days/Week
-
Weeks/Year
-
Hours/Year
-
-
If you process Canadian or both U.S. and Canadian payroll, complete the following fields:
-
International
-
Country Code
-
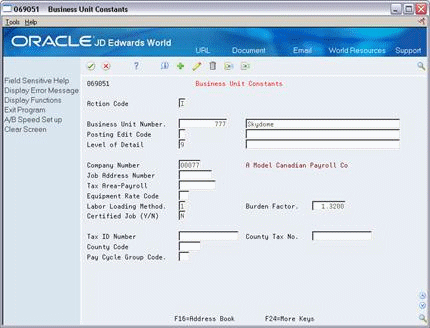
34.3 Setting Up Business Unit Constants
From Canadian Payroll Master (G77), enter 29
From Payroll Setup (G774), choose Payroll General Constants
From Payroll General Constants (G7741), choose Business Unit Constants
You set up business unit constants to define default information associated with a business unit to expedite time entry and automatically process payroll information, such as flat burden at the business unit level.
When you set up a business unit, the system adds it to the General Accounting Business Unit Master table (F0006) if the business unit does not already exist in that table. In many companies, business units are set up in the JD Edwards World General Accounting system by the Accounting department.
You must use the General Accounting System and not the Payroll system to change any of the following information:
-
Level of detail
-
Posting edit code
-
Company number
-
Equipment rate code
34.3.1 Before You Begin
-
Review any existing business unit information
To set up business unit constants
On Business Unit Constants
Figure 34-4 Business Unit Constants screen
Description of "Figure 34-4 Business Unit Constants screen"
-
Complete the following fields:
-
Business Unit Number
-
-
Complete the following optional fields:
-
Job Address Number
-
Tax Area
-
Labor Loading Method
-
Burden Factor
-
Pay Cycle Group Code
-
The County Tax Number, County Code, Job Type, and Denomination Minimum fields are for future use and are inactive for this release.
| Field | Explanation |
|---|---|
| Labor Load Method | A code indicating that flat burden is to be calculated. Valid codes are:
0 – Flat burden percentage will always be 1.000 and, therefore, the flat burden amount will equal zero. Basically, this means that there is no distribution. 1 – Flat burden percentage will always be greater than 1.000. Choose this option when distributing the percentage. There are various places within the Payroll system where flat burden rules and percentages can be defined, such as: Business Unit Pay Rates table Employee level |
| Burden Factor | A multiplier to load direct labour costs with burden. For example, a factor of 1.32 loads every dollar of labour cost with 32 cents worth of burden. |
| Pay Cycle Group Code | A user defined code (07/PG) that indicates a pay cycle group. If you enter a pay cycle group code here, the system processes only those timecards whose business unit has that pay cycle group assigned in the business unit constants. The type code explained below determines which business unit is used in the selection process.
This field and the accompanying Type field override the DREAM Writer home business unit selection. Employees must first be selected in the DREAM Writer Data Selection, then timecards for those employees are selected based on Pay Cycle Group Code and Type. |
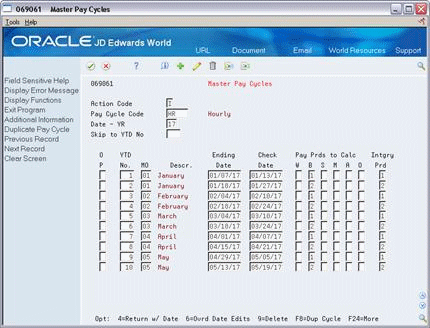
34.4 Setting Up Master Pay Cycles
From Canadian Payroll Master (G77), choose [Menu Selection]
From Payroll Setup (G774), choose Payroll General Constants
From Payroll General Constants (G7741), choose Master Pay Cycles
You set up master pay cycles to provide dates for each payroll of the year. The system uses these dates during the pre-payroll step of the payroll cycle and for interim cheque processing. When you set up master pay cycles, you also minimize the risk of keying errors during pre-payroll because certain values have already been entered. Within a master pay cycle, you define the length of the pay periods as well as corresponding payment dates.
Master pay cycles allow you to define the following information:
-
Pay period ending dates
-
Identifiers for the pay period
-
Payment dates for each pay period
-
Withholding period indicators to determine the calculation of DBAs
-
Integrity period numbers for storing tips history
-
Standard hours per pay period for autopay
Setting up master pay cycles includes:
-
Setting up a master pay cycle for the current year
-
Setting up a similar master pay cycle for the next year
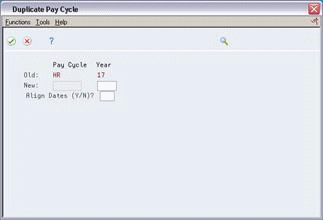
You set up a master pay cycle for the current year to run payroll cycles for the current year. You must set up a new master pay cycle each year. If you already have a master pay cycle for the current year, you can set up a pay cycle for the next year.
To simplify the setup process, you set up a master pay cycle for the next year that is similar to the current year's master pay cycle. You can duplicate a current cycle indicating whether you want to increment the pay period end dates for the new year. For example, if your company's pay period ends on the 15th of each month, you do not want to increment, or align dates. If your company always pays on the first and third Fridays of each month, you want to increment dates to account for the changed date in the new year.
34.4.1 Before You Begin
-
Set up user defined code 07/PY to define the names of the pay cycles.
-
Set up user defined code 07/PF. Ensure that the Special Handling Code field in the detail area (F4) of this UDC contains the default pay cycle code for each pay frequency.
To set up a master pay cycle for the current year
-
Complete the following fields:
-
Pay Cycle Code
-
Date - Year
-
Year to Date Pay Period Number
-
Month
-
Ending Date
-
Check Date
-
Integrity Period
-
-
Complete one of the following fields:
-
Pay Periods to Calculate Withholding - Weekly
-
Pay Periods to Calculate Withholding - Biweekly
-
Pay Periods to Calculate Withholding - Semimonthly
-
Pay Periods to Calculate Withholding - Monthly
-
Pay Periods to Calculate Withholding - Annually
-
Pay Periods to Calculate Withholding - Other
-
-
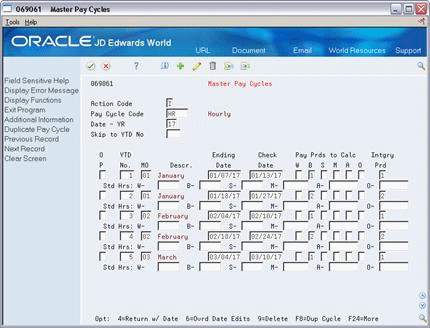
Figure 34-6 Master Pay Cycles screen (Detail area)
Description of "Figure 34-6 Master Pay Cycles screen (Detail area)"
-
To set up standard hours for automatic pay employees, enter a standard number of hours to use for each pay frequency in one of the following fields:
-
Standard Hours - Weekly
-
Standard Hours - Biweekly
-
Standard Hours - Semimonthly
-
Standard Hours - Monthly
-
Standard Hours - Annually
-
Standard Hours - Other
-
| Field | Explanation |
|---|---|
| Pay Cycle Code | A code that identifies the values for a master pay cycle. |
| Pay Period Number | The number of the pay period from the beginning of the year. For instance, a monthly payroll cycle beginning in January has a total of 12 periods, with October being the 10th period.
Typical values are: 001-052 (Weekly Payroll Cycle) 001-026 (Biweekly Payroll Cycle) 001-024 (Semimonthly Payroll Cycle) 001-012 (Monthly Payroll Cycle) 001-004 (Quarterly Payroll Cycle) 001-001 (Annual Payroll Cycle) |
| Check Date | The date associated with the various types of net pay instructions. This date can be related to a payroll cheque, a bank deposit advice, a payslip (cash), or a claim reimbursement.
Form-specific information The date the cheque will be issued. Unless you use the Override Date Edits option:
|
| Intgry | The meaning of this field depends on the program from which you access the field:
|
34.4.2 What You Should Know About
| Topic | Description |
|---|---|
| Determining rollover dates | In addition to scheduling pay cycles, the Fiscal Anniversary Rollover program uses the dates you enter on the master pay cycle to determine when a benefit or accrual rolls over to the next year. |
To set up a similar master pay cycle for the next year
On Master Pay Cycles
-
Locate the pay cycle for the current year.
-
On Duplicate Pay Cycle, complete the following fields:
-
Pay Cycle Code
-
Year
-
Align Dates
-
| Field | Explanation |
|---|---|
| Align Dates (Y/N)? | If you answer Y to Align Dates, the system increments the pay period ending dates by one day for the new cycle. If you enter N, the system creates the cycle with the same pay period ending dates as the current cycle.
The years must be only one apart in order for this function to work. Companies who pay on the same date each month, for example on the 15th and 30th of each month, should set this field to N. |
34.5 Setting Up a Denomination Code
From Payroll Master, enter 29
From Payroll Setup (G774), choose Payroll General Constants
From Payroll General Constants (G7741), choose Denomination Code Revisions
You set up denomination codes to define the various denominations used to pay employees who receive cash payments. The system uses the information you define to produce payslips in the correct denomination and for a bill count on a cash disbursement report.
34.5.1 Before You Begin
-
Set up each domination value (face value of a bill or note) in user defined codes list 07/DN.
On Denomination Code Revisions
Figure 34-8 Denomination Code Revisions screen
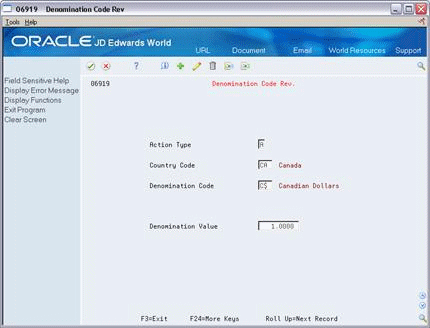
Description of "Figure 34-8 Denomination Code Revisions screen"
Complete the following fields:
-
Country Code
-
Denomination Code
-
Denomination Value
| Field | Explanation |
|---|---|
| Denomination Code | A code which identifies the type of currency to be processed. |
| Denomination Value | The face value of the denomination (for example, 10 for a ten dollar bill or 1000 for a 1000 peso note). Each country generally has a unique set of denomination codes and each code has its own value. |
34.6 Setting Up Execution Control Parameters
From Payroll Master, enter 29
From Payroll Setup (G774), choose Payroll General Constants
From Payroll General Constants (G7741), choose Execution Control Parameters
You set up execution control parameters to specify the users who have the authority to execute the various steps of the payroll cycle. You can also specify who has authority to execute the reset features on a payroll ID.
Each payroll ID can have a unique set of control parameters. If the system finds no parameters for a specific ID, the system uses the parameters for ID 000. If no parameters exist for a specific payroll ID or for ID 000, the system processes payroll as if the execution control parameters are not activated. In this case, the person who runs the first step of the payroll cycle must run all steps in the cycle and reset options.
34.6.1 Before You Begin
-
Enter Y in the Pay Cycle Control field on Payroll Company Constants for Company 00000 to activate the execution control parameters. If the code in this field is N (the default), the user who runs the first step of the payroll cycle must run all steps in the cycle.
To set up execution control parameters
On Execution Control Parameters
Figure 34-9 Execution Control Parameters screen
Description of "Figure 34-9 Execution Control Parameters screen"
-
Complete the following field:
-
Pre-Payroll
-
-
In the fields which correspond to payroll cycle steps, enter the user ID of a maximum of five individuals authorized to complete each step and reset option.
| Field | Explanation |
|---|---|
| 01 Payroll Cycle Steps: | The defined user identification for the individual who may have access to the Payroll Processing step "Pre-Payroll". Valid values are:
Any user ID - Only that user has authority to run the particular payroll or reset step. *All - All users have authority to run the particular payroll or reset step. *USER - Only the user who ran the step has the authority to execute the step defined by *USER. |
34.7 Choosing Fields for Future Data Revisions
From Canadian Payroll Master (G77), enter 29
From Payroll Setup (G774), choose Payroll General Constants
From Payroll General Constants (G7741), choose Specify Future Data Fields
You choose fields for future data revisions to activate data items in the employee master that can be updated using the future data functions. For example, you activate the Marital Status field so that you can change an employee's marital status in the employee master using the Future Data function.
You cannot change the activation value of some fields.
To choose fields for future data revisions
Figure 34-10 Specify Future Data Fields screen
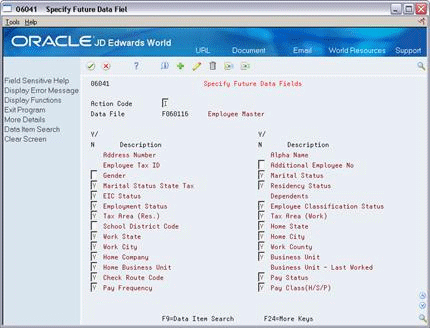
Description of "Figure 34-10 Specify Future Data Fields screen"
-
Next to the data item that you would like to activate, enter a Y in the following field:
-
Yes/No
-
-
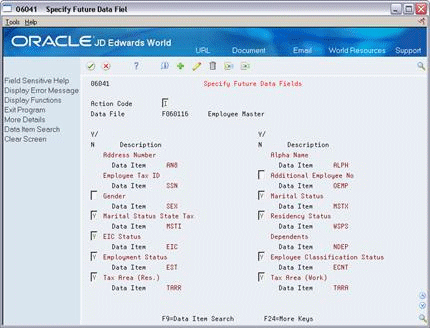
To review the data item code associated with the data item description, access the detail area.
Figure 34-11 Specify Future Data Fields screen
Description of "Figure 34-11 Specify Future Data Fields screen"
34.8 Reviewing the Business Unit Constants Report
From Canadian Payroll Master (G77), enter 29
From Payroll Setup (G774), choose Payroll General Constants
From Payroll General Constants (G7741), choose Business Unit Constants
You run the Business Unit Constants Print report to verify your entries on Business Unit Constants. The report lists detailed information about business units which is contained in both the Business Unit Master table and the Payroll Business Unit table. You can run this report any time.
Figure 34-12 Business Unit Constants report
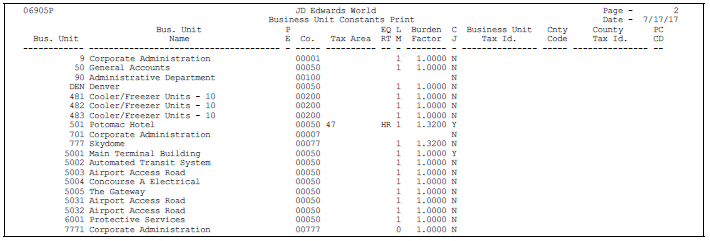
Description of "Figure 34-12 Business Unit Constants report"
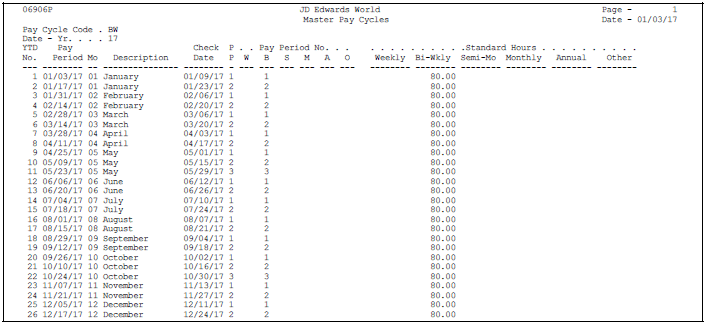
34.9 Reviewing the Master Pay Cycles Report
From Canadian Payroll Master (G77), enter 29
From Payroll Setup (G774), choose Payroll General Constants
From Payroll General Constants (G7741), choose Master Pay Cycles Report
The Master Pay Cycles report lists the information you entered on Master Pay Cycles. The report includes the following:
-
Year
-
Pay cycles by month and periods within each month
-
Standard number of hours included in each pay period
Review this report to verify that the information you entered during system setup is correct.