G Set Up Container Management
This appendix contains the following topics:
G.1 Setting Up Container Management
Before you can use Container Management, you must set up a number of features to define the information that the system uses to process container transactions. Setting up Container Management includes the following tasks:
This section contains the following:
-
Setting Up Container Item Cross-References
-
Setting Up Container Preferences
-
Setting Up Pricing Schedules
In addition to these tasks, you need to set up the following features:
-
Order line types
-
Order activity rules
-
Item types
-
Document types
-
User defined codes
-
Print messages
-
Automatic accounting instructions
-
Invoice cycle calculation
G.1.1 How Do I Set Up Container Order Line Types?
You set up order line types to define how the system will process a sales order detail line. The Container Management Extraction Server extracts information from the sales order by line types that identify containers. For example, the following line types allow for the correct processing of container transactions:
-
CT (Container Transactions) for full containers
-
A (Asset Movements) for empty containers
-
EC (Container Deposit/Refund) for deposit/refund sales order lines
In addition, JD Edwards World recommends that you set up each line type in the following ways to interface accurately with other systems:
| Line Type | Setup |
|---|---|
| Full container | You should set up full containers like basic stock items, to interface with the G/L and the Inventory Management, Accounts Receivable, and Accounts Payable systems. |
| Empty container | You should set up empty containers to interface only with the Inventory Management system, without writing to the G/L, the Accounts Receivable system, or the Accounts Payable system. You should also enter a Y in the Reverse Sign field, since all sales order entries containing empty containers will be credit entries for returns. |
| Deposit/refund sales order | You should set up the line type for container deposit sales order lines to interface only with the G/L and the Accounts Receivable system. |
G.1.2 How Do I Set Up Container Order Activity Rules?
You set up order activity rules to define a series of status codes that tells the system which processes each type of order must go through. You must create order activity rules for each order type and line type combination you use.
If you set up line types and order types for empty and full containers, you must set up order activity rules for the combination of each line type and order type. If you set up a different order type for container deposit sales orders, you use this order type. Otherwise, you use the regular order type for sales orders, such as SO.
JD Edwards World recommends that you set up order activity rules for each line type to be processed in the following ways:
| Line Type | Setup |
|---|---|
| Empty container | Empty containers should be processed through the following steps:
|
| Full container | Full containers should be processed through the following steps:
|
| Container deposit/refund sales order | Container deposit/refund sales order lines should be processed through the following steps:
|
G.1.3 How Do I Set Up Container Item Types?
You perform standard item entry to define the following three items for Container Management:
-
Empty containers
-
Full containers
-
Product, which can be a packaged item or, if you have installed the Bulk Stock Control system, a bulk item
You use the Item Master Information program to enter item information, such as the item number and description, price and costing methods, and availability and commitment rules. You also enter the line types for full and empty containers that you set up on the Order Line Type form.
When you define container units of measure, you should set up empty containers with a weight close to zero (for example, 1 EA = 0.00002 LT or 0.00002 KG) so the system will not factor in the weight of the container during unit of measure conversion to determine the price of the full container.
If you are an Energy and Chemical Solutions customer and have installed the Bulk Stock Control system, you can set up the following:
-
Bulk item
-
Tank
-
Default tank information
You follow the normal procedures for setting up a tank using the Tank Master Maintenance and Default Tank Information forms. You do this to specify structural information about the tanks that are used to store the bulk product. The system retrieves this information when processing transactions to calculate volume.
|
See Also:
|
G.1.4 How Do I Set Up Container User Defined Codes?
You can optionally set up user defined codes (UDCs) to customize several features of Container Management, such as the following:
-
Document types
-
Status codes
-
Line types
-
Item cross-reference types
Each system has its own UDC types. UDCs are referenced by the system number and type. For example, Container Management is coded to system 41, and the UDC type for document types is DT.
JD Edwards World has already set up some codes in the UDC table. When a UDC is referred to as hard-coded, you should not change it. Programming has been defined to work with hard-coded UDCs. If you change the UDC, the programming will not work correctly. You can, however, add UDCs to meet your own specific business needs.
You can define the following document types to simplify the tracking of container transactions:
-
Deposit, rental, and refund invoice types
-
Deposit, rental, and refund sales order types
You must enter the document types for deposit, rental, and refund sales orders in the 40/IU UDC table so that these orders update inventory when you confirm shipments.
G.1.5 How Do I Set Up Container Print Messages?
You set up print messages to produce customized messages on any documents that you print. For example, you might want to customize your invoice for container deposits and refunds. You can set up a print message to give this invoice a Container Deposit Invoice title. You might also want to set up different print messages for deposit and rental invoices.
To set up print messages, you must first add a code for the print message in UDC table 40/PM. You then create the print message and add it to the document on which you want it to appear.
If you have both deposit and rental customers and use different print messages for them, the best place to specify the appropriate print message to use is in the Print Message preference. This preference will give you the flexibility of printing different messages for different customers.
G.1.6 How Do I Set Up Container Automatic Accounting Instructions?
Automatic accounting instructions (AAIs) are the user defined bridge between your day-to-day functions, chart of accounts, and financial reports. The system uses AAIs to determine how to distribute G/L entries that it generates.
For distribution systems, you must create AAIs for each unique combination of company, document type, and G/L class that you anticipate using. Each AAI points to a specific G/L account consisting of a business unit, an object, and a subsidiary.
Once you define AAIs, the system knows how to record the transactions. When you run the Update Customer Sales program, the system creates entries in the appropriate accounts.
You should set up the document type you defined for container deposit/refund sales orders in combination with AAI number 4230 (Revenue). You should set up this AAI to create records in a separate liability account for customer deposits and rentals, rather than the revenue account. You draw against this account only for container refunds.
G.1.7 How Do I Set Up Container Invoice Cycle Calculation?
You set up invoice cycles to control how the Cycle Billing program calculates scheduled invoice dates. When you set up invoice cycles, you apply different invoice rules and schedules to different customer and item combinations. For example, one customer might prefer an invoice at the end of the month for all shipments made during that month, and another customer might want a weekly invoice for specific items.
You set up an invoice cycle calculation rule to define the type of calculation that the system uses to compute an invoice date. You can then enter test dates to review the calculated invoice dates and ensure that you have set up the calculation correctly. If the calculation rules are bi-weekly, semi-monthly, or at the end of each month, you must also set up scheduled invoice date ranges.
Once you set up invoice cycles, you can assign them to customer and item combinations with the Invoice Cycle preference. You can later revise scheduled invoice dates, if necessary.
G.2 Setting Up Container Item Cross-References
From Container Management (G4118), enter 29
From Container Management Setup (G41184), choose Item Cross-Reference Types
Container Management tracks only empty container types. You set up item cross-references so the system can track full containers in the same way as empty containers. This allows the Container Management Extraction Server to extract full container transactions along with empty container transactions and write this information to the Container Transaction table.
Complete the following tasks:
-
Define item cross-reference types
-
Set up item cross-reference relationships
You must first define the item cross-reference types in UDC table 41/DT. You set up the container type with a special handling code. You then use the Item Cross-Reference program to set up item cross-reference relationships. You first locate the item number of a full container, and then you create the cross-reference relationship to the item number of the empty container.
The special handling code in the UDC table instructs the system to validate the cross-referenced items against the Item Master (F4101) table. This allows the system to verify that the cross-referenced items exist as valid item numbers.
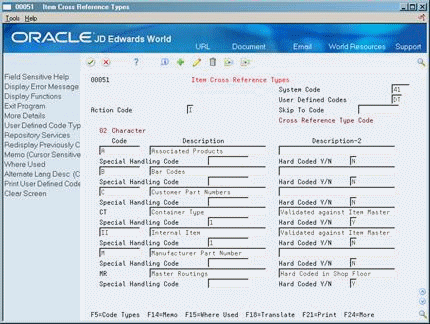
To define item cross-reference types
On Item Cross Reference Types
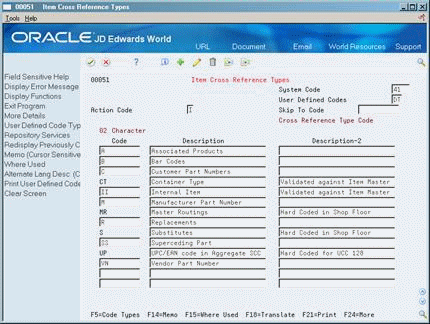
Description of the illustration image082.gif
-
Complete the following fields:
-
Character Code
-
Description
-
Description-2
-
-
Enter 1 in the following field:
-
Special Handling Code
-
| Field | Explanation |
|---|---|
| Code | This column contains a list of valid codes for a specific user defined code list. The number of characters that a code can contain appears in the column title. |
| Special Handling Code | A code that indicates special processing requirements for certain user defined code values. The particular value you enter in this field is unique for each user defined code record type.
The system uses the special handling code in many ways. For example, special handling codes defined for Language Preference specify if the language is double-byte or if the language does not have uppercase characters. Programming is required to activate this field. Form-specific information If a "P" is in the second position, the system identifies that unit of measure as a potent unit of measure. |
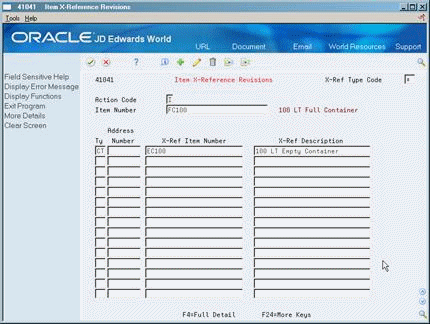
To set up item cross-reference relationships
From the Container Management Setup menu (G41184), choose Item Cross-Reference.
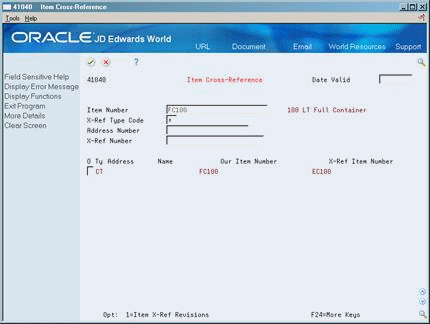
Description of the illustration image084.gif
-
Complete the following field:
-
Item Number
-
-
Enter 1 in the Option field to access Item X-Reference Revisions.
-
Complete the following fields:
-
Cross-Reference Type
-
X-Ref Item Number
-
X-Ref Description
-
| Field | Explanation |
|---|---|
| X-Ref Type Code | A code (UDC table 41\DT) that identifies the type of cross-reference you have set up for this customer. The system contains examples for:
|
| X-Ref Item Number | The cross-reference item number that the system assigns to an item number. A cross-reference number allows you to use a supplier's item number if it is different from your own item number when you are processing or printing an order. |
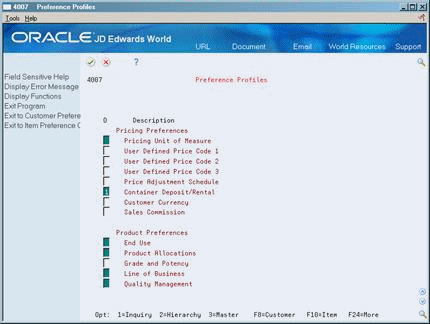
G.3 Setting Up Container Preferences
From Container Management (G4118), enter 29
From Container Management Setup (G41184), choose Preferences Profiles
You use preferences to customize the way sales orders are processed. For Container Management, you set up preferences for customers and customer and item combinations to define the following:
-
The type of container transactions, deposits or rentals, for which you will bill your customer
-
The type of invoice, summary or transaction, you will send your customer for container transactions
-
The billing cycle for the customer and container item combination
-
The pricing unit of measure
You must do the following to create preferences:
-
Activate preferences
-
Define the preference hierarchy
-
Create the specific preferences
Before you can create a preference, you must make sure it exists on the preference master. If it does not exist, you must add it to the preference master. Once the preferences exist in the preference master, you activate all of the preferences you need to use in Container Management. You then define the preference hierarchy to indicate the order in which you want the system to apply the preferences. You must also set the appropriate processing options for specific programs, such as Sales Order Entry, to use preference information.
Complete the following tasks to set up container preferences:
-
Create a Container Deposit/Rental preference
-
Create an Invoice Cycle preference
-
Create a Pricing Unit of Measure preference
-
Create a Print Messages preference
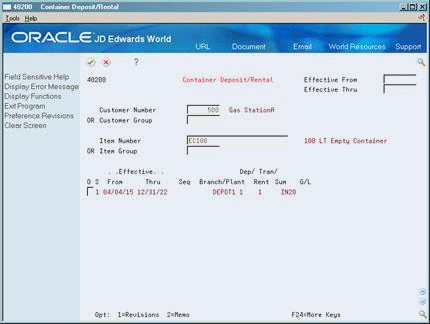
G.3.1 Creating a Container Deposit/Rental Preference
In the Container Deposit/Rental preference, you define the following three options for customer and item combinations:
-
Specify whether the customer should be charged deposit or rental fees for the use of containers
-
Specify whether the customer will be sent a summary or transaction type invoice for container deposits or rentals
-
Instruct the system to use the G/L offset defined in the preference rather than the one defined in the Item Master table, so that you can separate potential sales of empty containers from the actual deposits
|
Note: On the Preference Master form, you must instruct the system not to enable the effective quantities fields for the Container Deposit/Rental preferences. If the effective quantities fields are enabled, the system to does not process credit orders. |
G.3.2 Before You Begin
-
Verify that the G/L Offset account for container deposits or rentals has been created
To create a Container Deposit/Rental preference
Description of the illustration image087.gif
-
Access the preference inquiry for the Container Deposit/Rental preference.
-
On the Container Deposit/Rental preference inquiry form, access the Preference Revisions form.
-
On the Container Deposit/Rental preference revisions form, complete one or more of the following fields to define customer and item combinations:
-
Customer Number
-
Customer Group
-
Item Number
-
Item Group
-
-
To define specific preference information, complete the following fields:
-
Effective From
-
Effective Thru
-
Sequence Number
-
Branch/Plant
-
Deposit/Rental
-
Transaction/Summary
-
G/L Offset
-
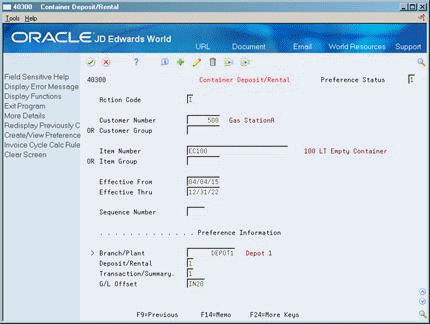
| Field | Explanation |
|---|---|
| Customer Group | Customer types that a customer can be grouped into for each of the different preference types. |
| Item Group | Item types that a item can be grouped into for each of the different preference types. |
| Sequence Number | A sequence or sort number that the system uses to process records in a user defined order.
Form-specific information Use this field when you have multiple preferences for the same customer/item combination, effective period, and quantity range. The sequence determines the order that the system searches for preference records with otherwise identical fields. The system searches records in ascending numerical order, that is, from lowest to highest. |
| Deposit/Rental | A code that indicates whether a customer pays a deposit fee or a rental charge for empty containers. Valid values are:
1 – Deposit Fee 2 – Rental Charge |
| Transaction/Summary | A code that indicates whether container deposits are charged/refunded for each transaction or summarized over a billing period. Valid values are:
1 – Transaction 2 – Summarized When you set this code, you do not affect rental transactions. |
| G/L Offset | The table of Automatic Accounting Instruction accounts that allows you to predefine classes of automatic offset accounts for Accounts Payable, Accounts Receivable, and other systems.
G/L offsets might be assigned as follows: blank or 1210- Trade Accounts Receivable RETN or 1220 - Retainages Receivable EMP or 1230 - Employee Accounts Receivable JIB or 1240 - JIB Receivable (See A/R Class Code - ARC) blank or 4110 - Trade Accounts Payable RETN or 4120 - Retainage Payable OTHR or 4230 - Other Accounts Payable (See A/R Class code - APC) If you leave this field blank during data entry, the system uses the default value from the Customer Master Information table (F0301) or the Supplier Master Information table (F0401). The post program uses the G/L Offset class to create automatic offset entries. Note: Do not use code 9999. It is reserved for the post program and indicates that offsets should not be created. |
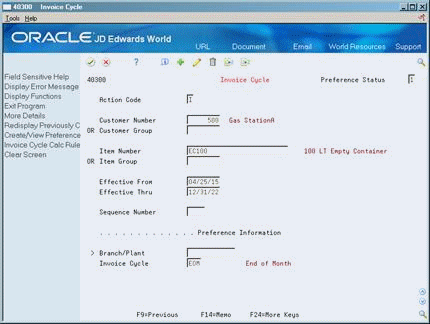
G.3.3 Creating an Invoice Cycle Preference
From Container Management (G4118), enter 29
From Container Management Setup (G41184), choose Preference Profiles
You create an Invoice Cycle preference for the customer and container item combination to define when invoices for deposit or rental fees are sent to the customer. For example, one customer might prefer a monthly invoice at the end of the month for all shipments made during that month. Another customer might want a daily invoice.
After orders are confirmed for delivery, they are processed by the Cycle Billing program. The program accesses the Invoice Cycle preference and calculates the scheduled invoice date based on the invoice cycle calculation rules and scheduled invoice date ranges. Generally, you set up invoice cycle calculation rules and scheduled invoice date ranges during the install process. At a minimum, you should revise scheduled invoice dates on an annual basis.
You can access the Invoice Cycle Calculation Rule program from the Invoice Cycle preference form. You do not have to set up invoice cycle calculation rules each time you add a preference.
G.3.4 Before You Begin
-
Verify that the invoice cycle calculation rule has been set up
To create an Invoice Cycle preference
-
For the Invoice Cycle preference, access the preference inquiry.
-
On the Invoice Cycle preference inquiry form, access the Preference Revisions form.
-
On the Invoice Cycle preference revisions form, complete one or more of the following fields to define customer and item combinations:
-
Customer Number
-
Customer Group
-
Item Number
-
Item Group
-
-
To define specific preference information, complete the following fields:
-
Effective From
-
Effective Thru
-
Quantity From
-
Quantity Thru
-
Sequence Number
-
Branch/Plant
-
Invoice Cycle
-
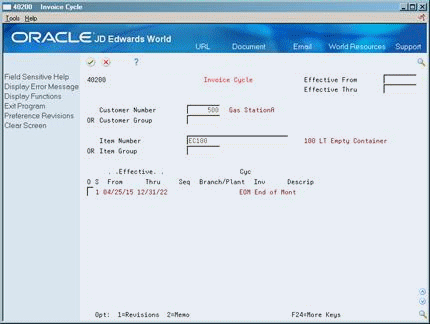
| Field | Explanation |
|---|---|
| Invoice Cycle | A code that defines the method of invoicing used by the Cycle Billing program. For example, the invoice cycle could be daily, weekly, monthly, and so on. This is a user defined code field.
Form-specific information For Invoice Cycle Preference: The system uses the value you enter in this field to load the Sales Order Detail Tag table (F49211). Do not use the Invoice Cycle preference if you want an invoice to accompany the delivery documents for a sales order. |
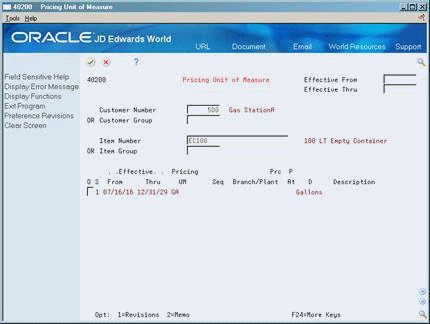
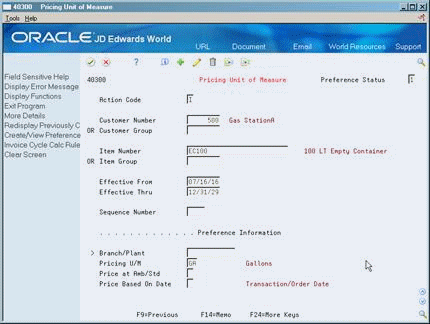
G.3.5 Creating a Pricing Unit of Measure Preference
From Container Management (G4118), enter 29
From Container Management Setup (G41184), choose Preference Profiles
You use the Pricing Unit of Measure preference to override the pricing unit of measure on the sales order. The system determines the pricing unit of measure for a sales order detail line based on the information you have entered on the Item Master and in the Sales Price Retrieval Unit of Measure field on the System Constants. You can use this preference to assign a different pricing unit of measure for customer and item combinations based on the branch/plant.
The Pricing Unit of Measure preference also overrides the Sales Price Based On Date in the System Constants. The Sales Price Based On Date determines how the Price Effective Date in the Sales Order Header and Sales Order Detail tables will be updated.
You can use the Pricing Unit of Measure preference to determine the daily rental rate for a specific customer and container combination. This allows the system to calculate either a deposit rate or a rental rate for a container. If you create a unit of measure UDC for a rental rate per day in the UDC table 00/UM, you can use this code in the Pricing Unit of Measure preference for a customer and container combination.
For example, you can set up an empty container with a deposit price of $30. If customer 502 pays a rental fee for this container, you can set up a unit of measure UDC for a rental rate of $2.00 per day and enter this code in the Pricing Unit of Measure preference for this customer and container combination. The preference will override the pricing unit of measure in the sales order for this customer. Customer 502 is charged $2.00 per day for the use of this container, while another customer is charged the usual deposit rate of $30.
G.3.6 Before You Begin
-
Set up the sales price retrieval unit of measure in System Constants.
-
Verify that a base price record exists for the pricing unit of measure to be entered in this preference.
To create a Pricing Unit of Measure preference
-
For the Pricing Unit of Measure preference, access the preference inquiry.
-
On the Pricing Unit of Measure inquiry form, access the Preference Revisions form.
-
On the Pricing Unit of Measure preference revisions form, complete one or more of the following fields to define customer and item combinations:
-
Customer Number
-
Customer Group
-
Item Number
-
Item Group
-
-
To define specific preference information, complete the following fields:
-
Effective From
-
Effective Thru
-
Quantity From
-
Quantity Thru
-
Unit of Measure
-
| Field | Explanation |
|---|---|
| Pricing U/M | A code (system 00/type UM) that indicates the unit of measure in which you usually price the item.
Form-specific information For Pricing Unit of Measure Preference: When you specify a unit of measure on the Pricing Unit of Measure preference, the system fills or overrides the pricing unit of measure attached to the item through the item master for the customers/items to which this preference applies. If you leave this field blank on the Pricing Unit of Measure (ECS) preference, the system does not override the default value supplied by the item master. This preference is applied in order entry. |
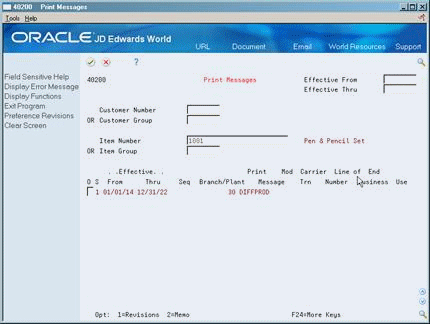
G.3.7 Creating a Print Messages Preference
From Container Management (G4118), enter 29
From Container Management Setup (G41184), choose Preference Profiles
Use the Print Messages preference to choose the messages you want to automatically print on documents for a particular customer and item combination.
The system applies this preference when a document is printed, not during order entry. The Print Messages preference does not override any other messages you set up in Customer Billing Instructions and Item Branch/Plant information.
|
Note: Leaving any of the key fields blank indicates you want to specify all valid values for that field. For example, a blank in the Business Unit field causes the system to apply the Print Messages (ECS) preference to all business units. |
G.3.8 Before You Begin
-
Verify that print messages have been created
To create a Print Messages preference
On Preference Profiles
-
For the Print Messages preference, access the preference inquiry.
-
On the Print Messages preference inquiry form, access the Preference Revisions form.
-
On the Print Messages preference revisions form, complete one or more of the following fields to define customer and item combinations:
-
Customer Number
-
Customer Group
-
Item Number
-
Item Group
-
-
To define specific preference information, complete the following fields:
-
Effective From
-
Effective Thru
-
Quantity From
-
Quantity Thru
-
Branch/Plant
-
Print Message
-
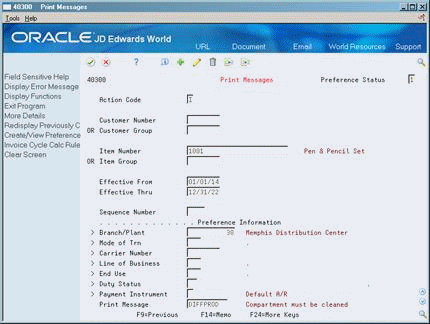
| Field | Explanation |
|---|---|
| Print Message | A code (table 40/PM) that represents a predefined message set up on Print Message Revisions. You can print the message on sales orders, purchase orders, and so forth.
Form-specific information Unlike other preferences, the system does not use the Print Message preference to override fields. The system adds the print message you enter here to any other print messages you have selected. |
G.4 Setting Up Pricing Schedules
You normally set up the deposit and rental rates a customer will pay for the use of containers before the start of business with that customer. You can use the standard method of setting up base pricing in the Sales Order Management system to define the deposit or rental rates for any combination of customers, customer groups, items (containers), or item groups.
If it is installed, you can also use the Advanced Pricing system to set up pricing schedules for deposits and rentals.
You can set up the base price of the empty container to equal the deposit or rental rate (if you are not using the Advanced Pricing system). The only time the system uses this price is when it processes deposit/refund sales order lines. You can set up the base price of the full container to equal the price of the product. This is the amount for which you invoice the customer for the sale of the product.