4 Create a Trip
This chapter contains these topics:
4.1 Creating a Trip
From Load and Delivery Management (G49), choose Dispatcher Activities
From Dispatcher Activities (G4911), choose Trip Creation/Maintenance
To create a trip, you assign the vehicle and staff, then assign the sales orders and the product quantities per compartment. Trip Creation/Maintenance provides a work area for dispatchers to create trips and optimize the day's deliveries. It allows you to assemble approved orders into manageable, economic, and timely product deliveries.
When you create a new trip, you assign a vehicle based on the dispatch group of the product. The system verifies that the vehicle is appropriate for the dispatch group and that a prohibited product mix conflict does not exist.
If you require product testing at load confirm, you can specify in a processing option of Trip Creation/Maintenance whether to require test results to be entered for each different customer or item or for every item in every compartment.
The Trip Creation/Maintenance program provides the functionality to make any necessary changes to the trips you have created. However, if you have changes to an approved trip, you must first unapprove it.
The program also allows you to use linear volume to weight conversions, rather than default tank temperature and density. This allows you to load product specifying both ambient and standard quantities without using temperatures and standard conversion routines.
You must create a trip if you are using an automated gantry, in order to download the sales order and loading information. You can specify in a processing option to download loading information to the gantry upon approving a trip.
You can create three types of trips:
This section contains the following:
-
Adding a Trip
-
Assigning Sales Orders
-
Assigning Product Quantities for a Trip
-
Approving a Trip
-
Assigning the Delivery Sequence
-
Changing Approved Trips
Figure 4-1 Trip Creation/Maintenance screen
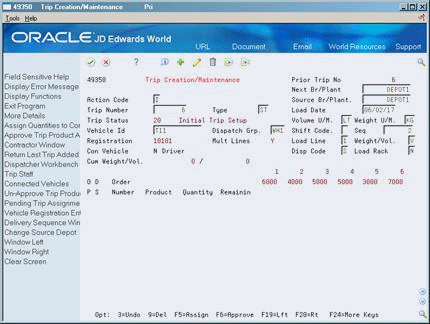
Description of "Figure 4-1 Trip Creation/Maintenance screen"
4.1.1 Before You Begin
-
Verify that you have sales orders entered in the system.
-
Set up vehicles. See Section 30.1, "Setting Up the Vehicle Master."
-
Set up depot staff. See Section 30.6, "Assigning Vehicle Staff."
-
Define the prohibited product mix for your depot. See Section 32.1, "Defining Prohibited Products."
4.2 Adding a Trip
To add a trip, you specify trip details, such as the trip type and load date, and assign the vehicle and staff for the trip.
The vehicle you assign determines whether a trip is for bulk or packaged products. If the vehicle has been set up in the Vehicle Master table (F49010) for bulk products, then the trip is designated as a bulk trip and you can assign product quantities by volume or weight to vehicle compartments. If the vehicle has been set up for packaged products, you can only assign packaged products, measured by weight.
If you use an automated gantry system, you can set a processing option to allow the download of approved and unapproved trips to the system. Trips are downloaded to the gantry unapproved so that necessary changes can be made at the gantry, such as changing the trip status or deleting a trip.
On Trip Creation/Maintenance
Complete the following fields or accept the default values:
-
Next Branch/Plant
-
Source Branch/Plant
-
Trip Type
-
Load Date
-
Volume Unit of Measure
-
Weight Unit of Measure
-
Vehicle ID
-
Shift Code
-
Sequence
-
Load Line
-
Weight/Volume
-
Disposition Code
-
Load Rack
| Field | Explanation |
|---|---|
| Next Br/Plant | This business unit represents the depot that is the next destination for this vehicle. |
| Depot - Trip | Indicates the depot from which a trip originates. The Trip Depot and the Trip Number fields identify the unique combination of vehicle, registration number, load date, and shift.
Form-specific information Indicates the depot where the trip originated. The system automatically uses this field as the default if the user profile for Default Location and Printers is defined. |
| Trip Type | Denotes the nature of this trip. You can choose to create trip type codes that represent the length of a trip, or that describe other aspects of the trip. |
| Scheduled Load Date | The date that the product from an order line is loaded onto a vehicle for delivery. |
| Volume U/M | Identifies the unit of measure for the cubic space occupied by an inventory item. Typical volume units of measure are:
ML – Milliliter PT – Pint LT – Liter When setting up a volume unit of measure user defined code, you must specify a V in the special handling code of the user defined code. |
| Weight U/M | The unit of measure that indicates the weight of an individual item. Typical weight units of measure are:
GM – Gram OZ – Ounce LB – Pound When setting up a user defined code for a weight unit of measure, you must specify W in the special handling code of the user defined code. |
| Vehicle Id | A unique identification number for a vehicle. This number serves as a primary identifier for a vehicle. |
| Shift Code | A user defined code (07/SH) that identifies daily work shifts. In payroll systems, you can use a shift code to add a percent or amount to the hourly rate on a timecard.
For payroll and time entry: If an employee always works a shift for which a shift rate differential is applicable, enter that shift code on the employee's master record. When you enter the shift on the employee's master record, you do not need to enter the code on the timecard when you enter time. If an employee occasionally works a different shift, you enter the shift code on each applicable timecard to override the default. |
| Seq | A number that is used to indicate the sequence of the trips for a vehicle. |
| Load Line | This is the number of load lines in a vehicle compartment.
Form-specific information You can specify which load line to use for a specific trip. The available quantity per compartment will be calculated based on the load line specified. |
| Weight/Vol | Indicates whether this vehicle uses a weight or a volume device to control and measure the loading of product to its compartments.
Form-specific information Valid values are: V – Indicates that the measurement method is by volume. W – Indicates that the measurement method is by weight. A bulk vehicle can have a V or W dispatch type. A packed vehicle can only have a W dispatch type. |
| Disp Code | Indicates the action to be taken on the quantity remaining on an order. Valid options are:
B – Backorder C – Cancel S – Leave amount shippable K – Cancel the entire remaining, including backorders |
| Load Rack | Indicates whether a gantry (loading rack) is used. Valid values are:
Y or 1 - Yes N or 0 - No If you leave this field blank, the system uses N (No). |
4.2.1 What You Should Know About
4.3 Assigning Sales Orders
After you add a trip, you assemble unassigned sales orders for a trip. You also assign the quantities to be loaded into vehicle compartments and establish the product quantities to deliver to the customer.
You can assign orders with different line types to a trip, such as stocking type, direct ship, and transfer order line types. The inventory relief flag for all lines in a compartment must be the same.
You can assign sales orders in one of the following ways, depending on whether you know the sales order numbers:
-
Assign sales orders for a trip
-
Search for and assign sales orders for a trip
If you are assigning orders to the trip from tanks containing commingled stock, the owner must be the same for all the order lines in a compartment.
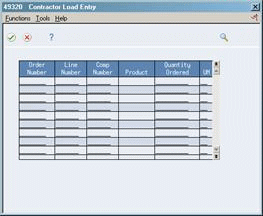
To assign sales orders for a trip
If you know the sales order numbers, you can assign sales orders to your trip using the Contractor Load Entry window. This method is used, typically, when the trip products are being loaded onto a contractor's vehicle. The driver of the vehicle provides a list of sales order numbers to the dispatcher, who assigns them to the trip.
When you assign sales orders, you indicate which order lines to load on the vehicle. The system verifies that a prohibited product mix conflict does not exist. If the system detects a prohibited product mix conflict, you must remove the sales order for the conflicting product before you can approve the trip.
On Trip Creation/Maintenance
-
On Contractor Load Entry, complete the following fields:
-
Order Number
-
Line Number
-
-
Accept the entries.
The system displays the product information.
| Field | Explanation |
|---|---|
| Order Number | The number that identifies an original document. This can be a voucher, an order number, an invoice, unapplied cash, a journal entry number, and so on. |
| Line Number | A number that identifies multiple occurrences, such as line numbers on a purchase order or other document. Generally, the system assigns this number, but in some cases, you can override it.
Form-specific information Use "*" to indicate all lines on an order. |
To search for and assign sales orders for a trip
If you do not know the sales order numbers, you can search for unassigned sales orders using the Dispatcher Workbench program. You can then assign them to trips.
A processing option controls whether the program displays the order or trip information when you access the form. You can toggle between the two modes on the form. You view sales order information to search for unassigned sales orders.
A number of features assist you in locating and identifying specific sales orders in Sales Order Criteria mode. While entering your selection criteria, you can display all records before or after a specific load date, as well as search by status, dispatch group, and many other criteria. You can access the detail area to review customer information, such as the customer name, street address, and city, state, and ZIP code. Additionally, you can review associated text messages that might have been assigned during sales order entry. The Option field next to the order will be highlighted if associated text messages exist. You can only return sales orders with positive quantity shipped values to Trip Creation/Maintenance.
If an order is assigned to a trip before the promised load date, the order information will indicate that the order has already been assigned to a trip and is scheduled to be delivered. Any backordered quantity is indicated for the sales order, and the quantity is displayed in the detail area.
On Trip Creation/Maintenance
-
On Dispatcher Workbench, complete the following fields or accept the default values:
-
Branch/Plant
-
Status Code - Next
-
Status Code - Thru
-
Mode of Transport
-
Volume Unit of Measure
-
Weight Unit of Measure
-
-
Type over the information in one or more of the following fields to narrow your search or accept the default value of "*":
-
Load Date
-
Dispatch Group
-
Zone Number
-
Item Number
-
Ship To
-
Carrier Number
-
Route/Stop Code
-
-
Accept the entries.
The system displays the sales order information.
-
Press F4 to access the detail area and view details of each sales order (optional).
Figure 4-4 Dispatcher Workbench screen (Detail area)
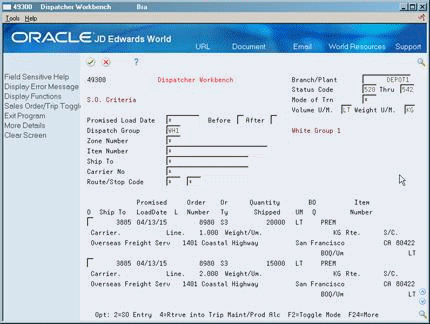
Description of "Figure 4-4 Dispatcher Workbench screen (Detail area)"
-
Choose each sales order you want to assign to the trip.
-
Accept the entries to return to Trip/Creation Maintenance.
The system completes the following fields with the sales order information:
-
Order Number
-
Product
-
Quantity
-
| Field | Explanation |
|---|---|
| Status Code - Next | A user defined code (40/AT) that indicates the next step in the order process. |
| Status Code - Thru | A user defined code (system 40/type AT) for the through status code. The system retrieves this code from the processing options or you can enter a code in this field. Orders displayed on this form have a status equal to or less than this status. |
| Promised Load Date | The promised shipment date for a sales order. This date represents the day that the item can be shipped from the warehouse. |
| Ship To | The address number of the location to which you want to ship this order. The address book provides default values for customer address, including street, city, state, zip code, and country. |
| Carrier Number | The address number for the preferred carrier of the item. The customer or your organization might prefer a certain carrier due to route or special handling requirements. |
| Route/Stop Code | The route field is a user defined code (system 42, type RT) that represents the delivery route on which the customer resides. This field is one of several factors used by the freight summary facility to calculate potential freight charges for an order.
For picking, use the route code with the stop and zone codes to group all of the items that are to be loaded onto a delivery vehicle for a specific route. You set up a default for each of these fields on the Customer Billing Instruction form. |
| Quantity Shipped | The number of units committed for shipment in Sales Order Entry, using either the entered or the primary unit of measure defined for this item.
In the Manufacturing system and Work Order Time Entry, this field can indicate completed or scrapped quantities. The quantity type is determined by the type code entered. |
| Item Number | A number that the system assigns to an item. It can be in short, long, or 3rd item number format. |
4.4 Assigning Product Quantities for a Trip
After you create a trip and assign the sales orders, you assign product quantities for a trip to specify the following:
-
Which quantities of bulk product to load into which compartments
-
Which quantities of packaged product to load onto a vehicle
Vehicles might be set up to not allow multiple orders per compartment. You can specify in a processing option whether to assign order quantities that exactly match the capacity of the compartments for these vehicles. Otherwise, on the Trip Creation/Maintenance form, you can choose to assign products to compartments from left to right as they are listed on the form.
To assign product quantities for a trip
Figure 4-5 Trip Creation/Maintenance screen
Description of "Figure 4-5 Trip Creation/Maintenance screen"
On Trip Creation/Maintenance. perform one of the following:
-
Complete the Units - On Board field for each sales order and compartment to assign specific quantities manually.
-
Choose the selection to distribute quantities among compartments.
| Field | Explanation |
|---|---|
| Units - On Board | The number of units that are on board in the vehicle compartment. |
4.5 Approving a Trip
You approve a trip to store all the trip creation information, such as vehicle and staff, sales orders, and product quantities. The system updates the trip status to approved, indicating that the loading process for the trip can begin.
You can set a processing option to automatically download approved trips to the gantry.
On Trip Creation/Maintenance, choose Approve (F6).
Figure 4-6 Approved Trip Creation/Maintenance screen

Description of "Figure 4-6 Approved Trip Creation/Maintenance screen"
4.6 Assigning the Delivery Sequence
When you have multiple Ship To addresses for sales orders on a trip, you must assign the delivery sequence of the ship to addresses on the trip. An example of multiple Ship To addresses is a trip with more than one sales order and each sales order has a different Ship To address.
When you approve a trip with more than one Ship To address on Trip/Creation Maintenance, the Delivery Sequence Entry window automatically displays. The window lists a system-generated delivery sequence. You can accept the system-generated delivery sequence or change it.
To assign the delivery sequence
On Trip Creation/Maintenance
-
Approve a trip with more than one Ship To address.
See Section 4.5, "Approving a Trip."
The Delivery Sequence Entry window displays.
Figure 4-7 Delivery Sequence Entry window
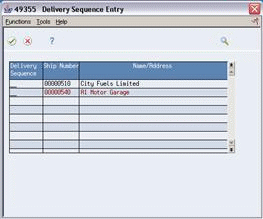
Description of "Figure 4-7 Delivery Sequence Entry window"
-
On Delivery Sequence Entry, complete the following field for each Ship To address or accept the system-generated delivery sequence:
-
Delivery Sequence
-
| Field | Explanation |
|---|---|
| Delivery | The sequence in which the product will be delivered. |
4.7 Changing Approved Trips
To accommodate your depot operations, you might need to make changes to the trips you have created, such as changing the driver or source depot. If the trip has been approved, you must first unapprove it before you can make changes. Otherwise, you can make changes as necessary. Unapproving a trip puts the trip in a pending status, allowing you to make changes. Then, you can approve the trip again.
On Trip Creation/Maintenance
-
Locate a trip.
-
Choose the Unapprove Trip Product Assignments option.
The trip status changes from Approved to Pending Trip.
-
Change the information as needed.