10 Work with EDD
This chapter contains these topics:
-
Section 10.6, "Maintaining Distribution Profiles and Email Lists,"
-
Section 10.7, "Distributing a DREAM Writer Report with EDD,"
-
Section 10.8, "Bursting a Report then Distributing it with EDD,"
-
Section 10.9, "Distributing Information Interactively with EDD,"
EDD allows you to create and customize email lists, templates, and distribution profiles that suit your business needs. After you set up the system, you can distribute reports and other forms of information using EDD.
Several of the EDD screens can display with an asterisk (wildcard) in each of the header fields, depending on the configuration of the program set up by your System Administrator. Your System Administrator can override these values using the Master Configuration Maintenance program (P00CFG). See Work with Configuration Master Records in the JD Edwards World Technical Foundation Guide for more information.
10.1 Working with Email Lists
You use email lists to maintain a group of email addresses. The email list does not contain the actual email addresses; it contains a connection to the record in the Address Book - Email / URL addresses (F01018) table.
When you change an email address in the F01018 table, that value reflects in all email lists with that address. You can use email lists in Distribution Profiles to deliver an email to all members of the list. Email lists can also contain other email lists. For example, a manager can have an email list containing the email addresses of their employees; a director can create an email list, which includes all of his manager's lists.
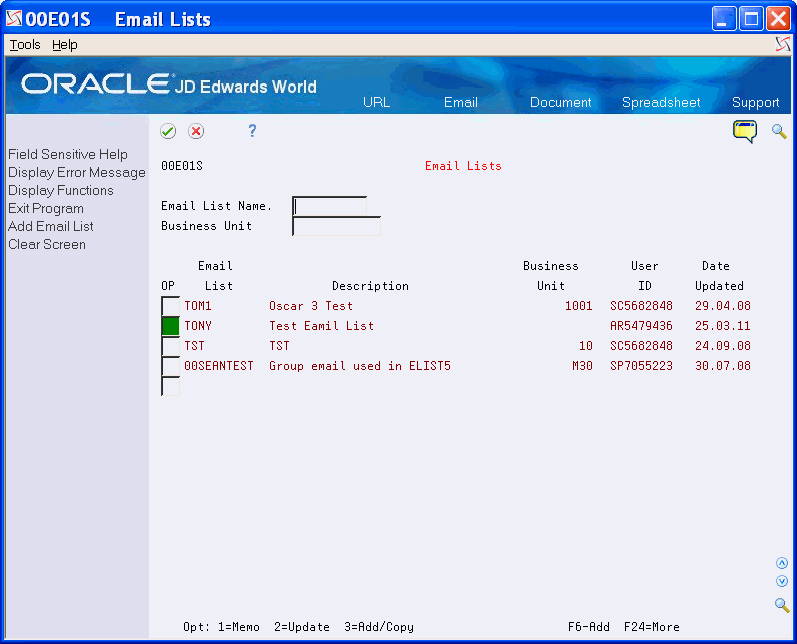
The EDD - Email List Selection screen (P00E01W) displays a list of existing email lists. You use the EDD - Email Lists - Maintenance program (P00E011) to create and copy lists, maintain lists, delete email lists, and addresses from a list. You can also choose Email Address Listing (F5) to access the Email Listing program (P00E012). To add email addresses or lists to an existing list, you must locate and choose the values; you cannot enter them in the program. The system stores the information in the Email List Detail (F00E011) table.
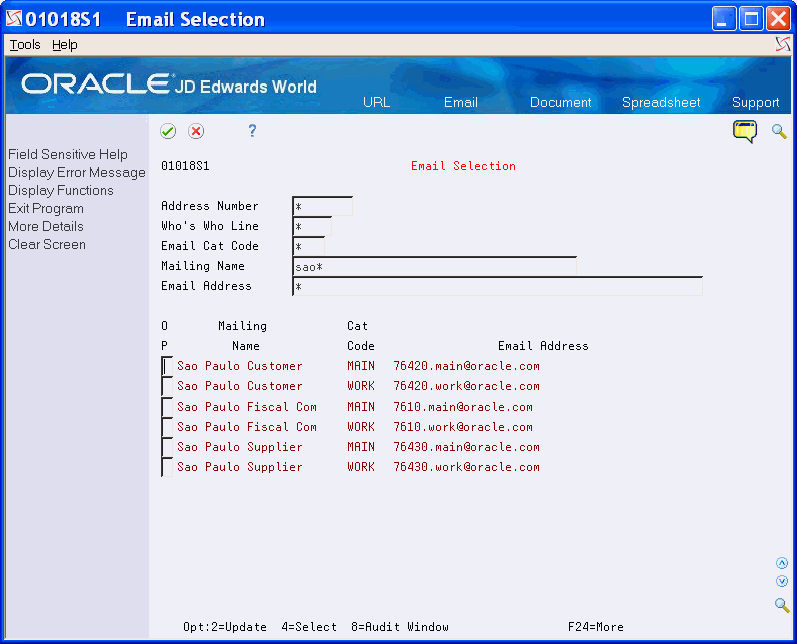
You use the Email Selection program P01018S1 to select individual email addresses for the email list. The Email Selection screen can display with an asterisk (wildcard) in each of the header fields. Use the wildcard, enter data, or both to change the values that display in the detail area of the screen. You can choose More Details (F4) to view more information about the email address. Additionally, you can enter 2 in the Option field to access the Email/URL Revisions (P01018) program and make changes to an email address.
Working with email lists includes the following tasks:
-
To create an email list
-
To copy an email list
-
To add email addresses to an email list
-
To add an email list to an email list
From Electronic Document Delivery Menu (G00E), choose Email Lists
-
On Email Lists, perform one of the following:
-
Choose Add Email List (F6)
-
Locate the last blank line and enter 3 in the Option field
-
-
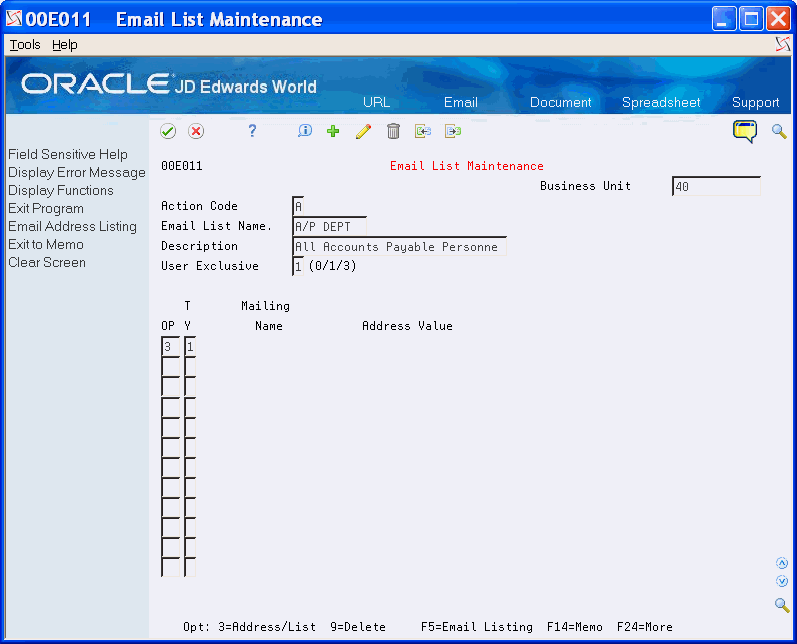
On Email List Maintenance, complete the following optional field:
-
Business Unit
Figure 10-2 Email List Maintenance screen
Description of "Figure 10-2 Email List Maintenance screen"
-
-
Complete the following fields and click Add.
-
Email List Name.
-
Description
-
User Exclusive
-
-
To add an email address, on the last blank line enter 3 in the Option field, 1 in the Type field and click Enter.
-
On Email Selection, to narrow your selection, complete any of the following fields and click Enter.
-
Address Number
-
Who's Who Line
-
Email Cat Code
-
Mailing Name
-
Email Address
-
-
Choose the email addresses you want to add to the email list and click Enter.
-
On Email List Maintenance, click Add.
-
To add an email list, on the last blank line, enter 3 in the Option field, 2 in the Type field, and click Enter.
-
On Email List Selection, choose the email lists and click Enter.
-
On Email List Maintenance, click Change.
| Field | Explanation |
|---|---|
| Business Unit | An alphanumeric field that identifies a separate entity within a business for which you want to track costs. For example, a business unit might be a warehouse location, job, project, work center, branch, or plant.
You can assign a business unit to a voucher, invoice, fixed asset, employee, and so on, for purposes of responsibility reporting. For example, the system provides reports of open accounts payable and accounts receivable by business units to track equipment by responsible department. Security for this field can prevent you from locating business units for which you have no authority. Note: The system uses the job number for journal entries if you do not enter a value in the AAI table. Screen-Specific information This is an optional field and the program uses it for search purposes only. Business Unit security does not exist for this field in EDD and you can view all records by business unit. |
| Email List Name. | This is the name of the Email List. In EDD, an Email List is used to store the keys to access Email addresses in the F01018 - Address Book Email/URL Addresses File. An Email list may also contain other Email List Names. |
| User Exclusive | This field allows you to restrict user access to an Email List or Distribution Profile in EDD. Valid values are:
0 – No security - Anyone can modify, copy, use or delete the item. This is the default when adding an item. 1 – Medium security - Only the current owner ("USER ID") can modify, or delete the item. Anyone can use or copy the item. 3 – Full security - Only the current owner ("USER ID") can modify, copy, use or delete the item. |
| Type | This flag indicates the type of Email entry.
Valid values include: 1 = Email Address 2 = Email List When accessing Email Client Addresses (P00E021) from the Email Client program (P00E101), only Type 1 is a valid option. |
| Who's Who Line | This field is used to identify the line ID number for a Who's Who record. |
| Email Category Code | A user defined code (01/UC) that provides a description of the Email Address or URL Address. |
| Mailing Name | The company or person to whom billing or correspondence is addressed. |
| Email Address | This is the actual Email or URL address.
Each Email address must have the prefix 'mailto:' appended to the actual Email address. Each URL address must have the prefix 'http://' appended to the actual URL address. You may type this in yourself or, if it is not found, the program will automatically insert it. In order for the Email and URL to function correctly, you must be using Client Access 5250 Emulation. In order to activate this feature, set the Emulator Type to '1' in User Display Preferences (Hidden Selection 85). |
-
On Email Lists, enter 3 in the Option field next to the email list you want to copy.
-
On EDD Email List Copy, complete the New Email List field and click Enter.
| Field | Explanation |
|---|---|
| New Email List | This is the name of the EDD Email List, Distribution Profile, Transformation Template or Email Template to be copied to.
Screen-Specific information Enter a new name for the copy of this email list. |
To add email addresses to an email list
-
On Email Lists, enter 2 in the Option field next to the email list to which you want to add email addresses.
-
On Email List Maintenance, on the last blank line enter 3 in the Option field, 1 in the Type field, and click Enter.
-
On Email Selection, complete any of the following fields and click Enter.
-
Address Number
-
Who's Who Line
-
Email Cat Code
-
Mailing Name
-
Email Address
-
-
Choose any of the email addresses and click Enter.
-
On Email List Maintenance, click Change.
To add an email list to an email list
-
On Email Lists, enter 2 in the Option field next to the email list to which you want to add an email list.
-
On Email List Maintenance, on the last blank line enter 3 in the Option field, 2 in the Type field and click Enter.
-
On Email List Selection, choose any of the email lists and click Enter.
-
On Email List Maintenance, and click Change.
10.2 Working with Distribution Profiles
You set up a distribution profile to define how you want to distribute a document and the individuals that receive the document. You select a method for distribution, such as email, FTP, or SFTP. You must specify the server to process the distribution of the document for FTP, SFTP, and direct print. If you leave the server blank for email, the system uses the default server from the xdodelivery.cfg file. As you can use BI Publisher API's to distribute documents for direct print and html, you can also include charts and graphs.
If you use email as the distribution method, you select the email addresses or lists for the distribution and where the email address or list appears on the email, such as the TO, CC, or BCC line. You can specify a distribution profile in the Email Client program or on the Import/Export screens to associate a distribution profile with the document or email.
The EDD - Email List Selection screen displays a list of existing distribution profiles. You use the EDD - Distribution Profiles - Selection program (P00E02S) to create and copy distribution profiles and the Distribution Profiles Maintenance program (P00E02) to maintain distribution profiles, delete email lists, and addresses from a distribution profile. To add email addresses or lists to an existing list, you must locate and choose the values; you cannot enter them in the program.
The system stores the header information in the Distribution Profile Master table (F00E02) and the email addresses associated with the distribution profile in the Distribution Profile Detail table (F00E021).
Working with distribution profiles includes the following tasks:
-
To create a distribution profile
-
To copy a distribution profile
-
To change distribution profile
From Electronic Document Delivery Menu (G00E), choose Distribution Profiles
To create a distribution profile
-
On Distribution Profiles, perform one of the following:
-
Choose Add Distribution Profile (F6)
-
Locate the last blank line and enter 3 in the Option field
-
-
On Distribution Profile Maintenance, complete the following optional field:
-
Business Unit
Figure 10-7 Distribution Profile Maintenance screen

Description of "Figure 10-7 Distribution Profile Maintenance screen"
-
-
Complete the following fields:
-
Profile Name
-
Description
-
User Exclusive
-
-
Complete the following appropriate fields and click Add:
-
Email Application Flag
-
Email Server Alias
-
Email Address Search
-
Email Category Code
-
Print Application Flag
-
Print Server
-
FTP Application Flag
-
FTP Server
-
Mode
-
Remote Path
-
SFTP Application Flag
-
SFTP Server
-
Remote Path
-
-
Choose Distribution Profile Detail (F10).
Figure 10-8 Distribution Profile Detail screen

Description of "Figure 10-8 Distribution Profile Detail screen"
-
On Distribution Profile Detail, to add email addresses, enter 3 in the Option field.
-
Complete the Delivery Type field.
-
Enter 1 in the Email Type field and click Enter.
-
On Email Selection, perform one of the following and click Enter.
-
Change any of the fields to narrow your selection
-
Leave the asterisks in the fields to display all email addresses
-
-
Choose any of the email addresses and click Enter.
-
On Distribution Profile Detail, to add email lists, enter 3 in the Option field.
-
Complete the Delivery Type field.
-
Enter 2 in the Email Type field and click Enter.
-
On Email List Selection, choose any of the email address lists and click Enter.
-
On Distribution Profile Detail, click Add.
-
On Distribution Profile Maintenance, click Add.
| Field | Explanation |
|---|---|
| Business Unit | An alphanumeric field that identifies a separate entity within a business for which you want to track costs. For example, a business unit might be a warehouse location, job, project, work center, branch, or plant.
You can assign a business unit to a voucher, invoice, fixed asset, employee, and so on, for purposes of responsibility reporting. For example, the system provides reports of open accounts payable and accounts receivable by business units to track equipment by responsible department. Security for this field can prevent you from locating business units for which you have no authority. Note: The system uses the job number for journal entries if you do not enter a value in the AAI table. Screen-Specific information This is an optional field and the program uses it for search purposes only. Business Unit security does not exist for this field in EDD and you can view all distribution profile records by business unit. |
| Profile Name | This is the name of the Distribution Profile. In EDD, a Distribution Profile is used to store format and distribution options for an Email. |
| Description | A user defined name or remark. |
| User Exclusive | This field allows you to restrict user access to an Email List or Distribution Profile in EDD. Valid values are:
0 No security - Anyone can modify, copy, use or delete the item. This is the default when adding an item. 1 Medium security - Only the current owner ("USER ID") can modify, or delete the item. Anyone can use or copy the item. 3 Full security - Only the current owner ("USER ID") can modify, copy, use or delete the item. |
| Email Application Flag | Flag indicating if Email is enabled for Electronic Document Delivery, and which API's to use when distributing a document using Email.
Valid values: ' ' - Disabled '1' - Use World API's '2' - Use BI Publisher API's Note: As of A9.3, all email transactions will default to use BI Publisher API's. |
| Email Server Alias | This is the name of the SMTP server specified in the EDD Server Configuration File (xdodelivery.cfg).
Screen-Specific information If the server name is blank, the system uses the default server for server type = "smtp_e-mail". |
| Email Address Search | This value indicates how the Distribution Profile will be used to search for an email address or addresses to send the document to. All searches are performed for the Address Number on the document. This search is active for batch distribution only.
Valid values: ' ' - Use only the Distribution Profile to find an email address. '1' - First, use the Distribution Profile to find an email address. If no email address is found in the Distribution Profile, look for an email address with the designated Email Category Code. '2' - Perform a search as in Value '1'. If no email address is found, look for an email address with a blank Email Category Code. |
| Email Category Code | A user defined code (01/UC) that provides a description of the Email Address or URL Address.
Screen-Specific information This is the Email Category Code that you use in the Email Address Search field for values 1 and 2. Use it to categorize email addresses in the Address Book - Email / URL addresses file (F01018). |
| Print Application Flag | Flag indicating if Direct Print is enabled for Electronic Document Delivery.
Valid values: 'Blank' - Disabled ' 2' - Use BI Publisher API's |
| Print Server | A user defined code (00E/PS) that is the name of the IPP Print server specified in the EDD Server Configuration file (xdodelivery.cfg). |
| FTP Application Flag | Flag indicating if FTP is enabled for Electronic Document Delivery, and which API's to use when distributing a document using FTP.
Valid values: ' ' - Disabled '1' - Use World API's '2' - Use BI Publisher API's |
| FTP Server | This is the name of the FTP server specified in the EDD Server Configuration File (xdodelivery.cfg).
Screen-Specific information If the server name is blank, the default server for server type = "FTP" is used. |
| Mode | This is the Flag to specify the FTP transfer mode.
Valid values: ' ' - ASCII 1 - Binary |
| Remote Path | This is the Remote Directory used for FTP file transfer.
Screen-Specific information This is the path on the remote server where the document resides. Use Long Path (Cursor Sensitive) (F2) to access the Long Remote Path screen that allows entries up to 255 characters in length. |
| SFTP Application Flag | A flag indicating if SFTP is enabled for Electronic Document Delivery, and which API's to use when distributing a document using Secure FTP.
Valid Values: ' ' - Disabled '2' - Use BI Publisher API's Screen-Specific information SFTP is currently available using only BIP APIs. Do not enter 1 in this field for SFTP Appl Flag or the system generates an error. |
| SFTP Server | This is the name of the Secure FTP server specified in the xdodelivery.cfg file.
Screen-Specific information If the server name is blank, the default server for server type = SFTP is used. |
| Delivery Type | This flag specifies the delivery type for an Email entry.
Valid values: 1 - From 2 - Reply-To 3 - To 4 - CC 5 - BCC 6 - From (Ovr) 7 - BCC (Burst) Screen-Specific information You can use the values from this UDC (00E/DT) for each email address or list to specify a delivery type for the email (TO, CC, BCC, etc.). Entering 2 in this field allows you to use any email address. For example, you want all replies to go to another corporate email address instead of your corporate email address. Your email address displays in the From field of the email. Entering 6 in this field allows you to override your email address in the From field of the email and use another email address that you set up in UDC 01/UC instead. For example, you might want to enter a general corporate address instead of your corporate email address. Entering 7 in this field allows you to use your email address so you can keep a copy of the email. This allows you to keep a copy of the documents that you send during the burst. |
| Email Type | This flag indicates the type of Email entry.
Valid values include: 1 = Email Address 2 = Email List When accessing Email Client Addresses (P00E021) from the Email Client program (P00E101), only Type 1 is a valid option. |
To copy a distribution profile
-
On Distribution Profiles, enter 3 in the Option field next to the distribution profile you want to copy.
-
On Distribution Profile Copy, complete the New Distribution Profile field and click Enter.
Figure 10-9 Distribution Profile Copy screen

Description of "Figure 10-9 Distribution Profile Copy screen"
| Field | Explanation |
|---|---|
| New Distribution Profile | This is the name of the Distribution Profile to be copied to. |
To change distribution profile
-
On Distribution Profiles, enter 2 in the Option field next to the distribution profile you want to change.
-
On Distribution Profile Maintenance, change any of the fields.
-
Choose Distribution Profile Detail (F10).
-
On Distribution Profile Detail, change the value in the Delivery Type field, as necessary.
-
Delete any of the email addresses and lists.
-
To add email addresses and lists, locate the last blank line and add the email addresses and lists.
-
Click Change.
-
On Distribution Profile Maintenance, click Change.
10.3 Working with Email Templates
You set up email templates to define the subject line and body of an email that you generate using EDD. You can store the body text for the email as part of the template using either of the following:
-
Generic Text (F14)
-
Body Text (F6)
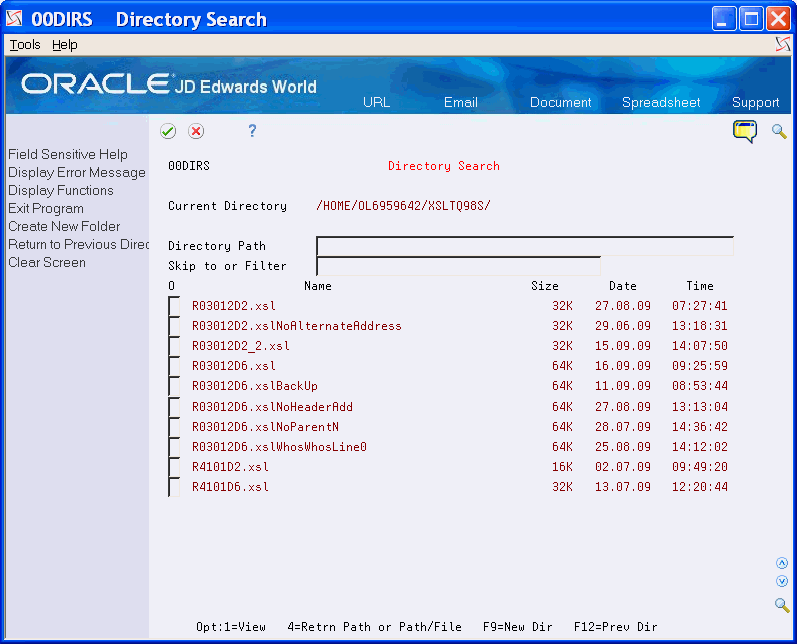
You can also link to external text or an html file. You use SearchPath/File (F4) to display the Directory Search window and select an existing file to use as the email body. You can specify an email template on the Email Client or on the Import/Export parameters to define the body of an email.
The Email Templates screen displays a list of existing templates. You use the EDD - Email Templates - Selection program (P00E04S) to create and copy templates and the Email Template Maintenance program (P00E04) to maintain templates.
The system stores the header information in the Email Template Master table (F00E04) and the email text in the Email Template Text table (F00E041).
Working with Email Templates includes the following tasks:
-
To create an email template
-
To copy an email template
-
To change an email template
From Electronic Document Delivery Menu (G00E), choose Email Templates
10.3.1 To create an email template
-
On Email Templates, perform one of the following:
-
Choose Add Email Template (F6)
-
Locate the last blank line and enter 3 in the Option field
-
-
On Email Template Maintenance, complete the following fields:
-
Template Name
-
Description
-
Email Subject Line
-
Body Type
-
-
To link to external text or an html file, complete the following fields:
-
Email Body File
-
Email Body Path
Figure 10-11 Email Template Maintenance screen

Description of "Figure 10-11 Email Template Maintenance screen"
-
-
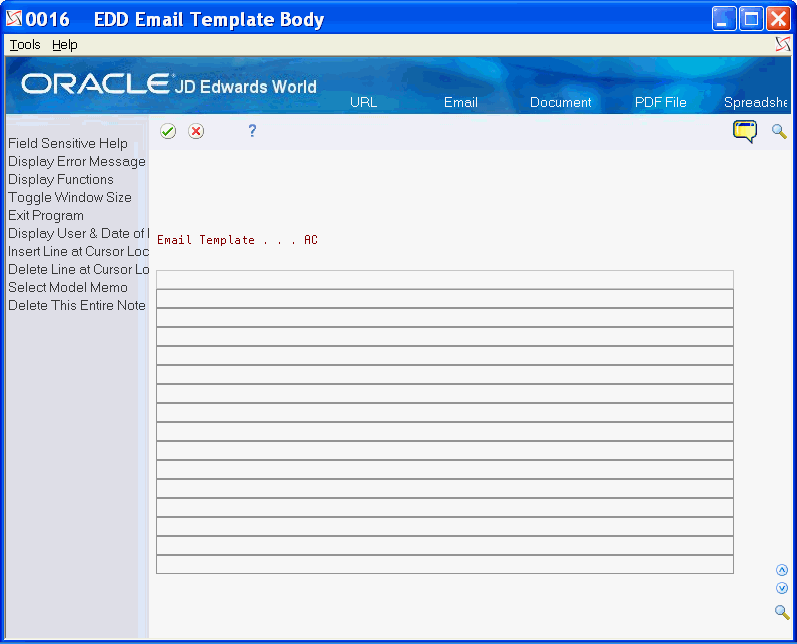
To enter body text for the email template, choose Exit to Email Body Text (F6).
Figure 10-12 EDD Email Template Body screen
Description of "Figure 10-12 EDD Email Template Body screen"
-
On EDD Email Template Body, enter the text, and click Enter.
-
On Email Template Maintenance click Add.
| Field | Explanation |
|---|---|
| Template Name | This is the name of the Email Template. An Email Template is used to define the subject line and body of an email that you generate using EDD. |
| Email Subject Line | This is the Subject Line for the Email. |
| Body Type | Specifies the MIME (Multipurpose Internet Mail Extensions) type for an Email body.
Screen-Specific information Enter a UDC (00E/BY) to identify the body type of the email. Valid values: TEXT - Text displays in the body of the email as you enter it. There are no substitution variables or line breaks. F-TEXT - Text file that allows users to specify line breaks. You can enter a <br/> tag to specify the location of the line breaks. You can use substitution variables and EDD replaces the values with text in the email when you run the program. HTML - HTML tags. You can format the email body using standard HTML tags. You cannot use substitution variables. F-HTML - HTML tags. You can format the email body using substitution variables and EDD replaces the values in the email when you run the program. |
| Email Body File | This specifies the file name of the external file to be used as the body of an Email. |
| Email Body Path | This specifies the file path of the external file to be used as the body of an Email.
Screen-Specific information You can enter values in the Email Body File and Email Body Path fields or enter the text for the body of the email in this field, not both. |
-
On Email Templates, enter 3 in the Option field next to the template you want to copy.
-
On Email Template Copy, complete the New Email Template field and click Enter.
| Field | Explanation |
|---|---|
| New Email Template | This is the name of the Email Template to be copied to. |
-
On Email Templates, enter 2 in the Option field next to the template you want to change.
-
On Email Template Maintenance, change any of the fields and click Change.
10.4 Working with Transformation Templates
You define transformation templates to translate XML output from Import/Export using an XSL or BIP template. You use an XSL template to transform an XML document from one form to another. You use a BIP template with XML input data to create an output report in various formats. Before you complete the Template File field in the transformation template, you must create the template file.
The Transformation Templates screen displays a list of existing templates. You use the EDD - Transformation Templates - Selection program (P00E03S) to create and copy templates and the Transformation Template Maintenance program (P00E03) to maintain templates. The system stores the information in the Transformation Template Master table (F00E03).
You can also link to an external file. You use Search Path/File (F4) to display the Directory Search window and select an existing file. You can use this function in any of the File or Path fields on the Transformation Template Maintenance screen.
You can use the following substitution variables in the Output File field:
-
@USER - The system replaces this text with the job's User ID.
-
@DATE - The system replaces this text with the job date in the YYYY-MM-DD format.
-
@TIME = The system replaces this text with the job time in the HH-MM-SS format.
Working with Transformation Templates includes the following tasks:
-
To create a transformation template
-
To copy a transformation template
-
To change a transformation template
From Electronic Document Delivery Menu (G00E), choose Transformation Templates
10.4.1 Before You Begin
Create the template files.
To create a transformation template
-
On Transformation Templates, perform one of the following:
-
Choose Add Transformation Template (F6)
-
Locate the last blank line and enter 3 in the Option field
Figure 10-14 Transformation Template screen

Description of "Figure 10-14 Transformation Template screen"
-
-
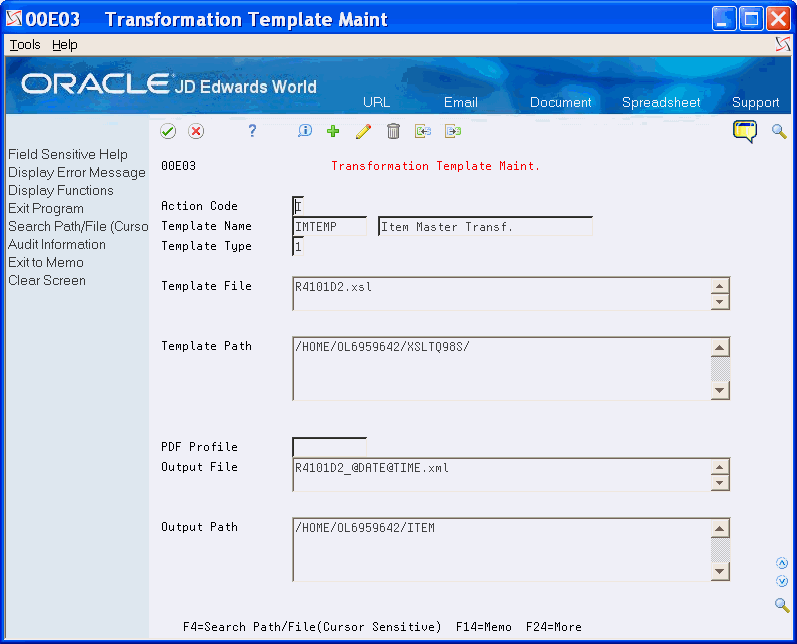
On Transformation Template Maintenance, complete the following fields:
-
Template Name
-
Description
-
Template Type
-
PDF Profile
-
Figure 10-15 Transformation Template Maintenance screen
Description of "Figure 10-15 Transformation Template Maintenance screen"
-
-
Perform one of the following for each of the following fields:
-
On Directory Search, choose a path or file.
-
On Transformation Template Maintenance click Add.
| Field | Explanation |
|---|---|
| Template Name | This is the name of the Transformation Template. You define transformation templates to translate XML output from Import/Export using an XSL or BIP template. |
| Description | A user defined name or remark. |
| Template Type | Indicates the type of template, such as XSL or BI Publisher.
Screen-Specific Information Value specifies the type of transformation that relates to this record. Valid values include: 1 - XSL Template 2 - BI Publisher Template |
| Template File | This is the Transformation Template File name. A Transformation Template File may be an XSL (Extensible Stylesheet Language) file used to accomplish XSL transformations (changing an XML document in one format to another), or a template file created in Microsoft Word or Adobe Acrobat for use in formatting documents in BI Publisher.
Screen-Specific Information Enter the name of the Template File. This file must exist and the program validates the file extension based on the template type. The program uses the following UDCs to validate the file: Template Type = 1 - UDC 00E/XT Template Type = 2 - UDC 00E/BT |
| Template Path | This is the Transformation Template directory path.
Screen-specific information You do not need to specify the root directory in this path. The directory must exist in the IFS. You must also have read/write authority to the directory. |
| PDF Profile | This is the name of the PDF Profile. A PDF Profile contains parameters used when creating a PDF document. |
| Output File | This is the transformation output file name. A transformation output file is the resulting file from some transformation process, such as an XSL transformation or a BI Publisher format transformation. This may be the end result of an EDD process or an interim file which will be further processed or distributed.
Screen-specific information You can append the following substitution variables to the output filename:
The program uses the following UDCs to validate the file: Template Type = 1 - UDC 00E/XO Template Type = 2 - UDC 00E/BO |
| Output Path | This is the Transformation Output file directory path.
Screen-specific information You do not need to specify the root directory in this path. The directory must exist in the IFS. You must also have read/write authority to the directory. World Burst Only- You can append the @AN8 variable to the output path to have the output directed to separate directories in the IFS. For example, if the following path is specified: /home/IFSUSER/EDD/INVOICES/@AN8 The IFS path ”/home/IFSUSER/EDD/INVOICES/” must exist. When EDD runs, the system creates directories for each AN8 burst field passed from Import/Export and contains the output file generated by EDD. Sample of the resulting IFS folder structure .root > IFSUSER >EDD >INVOICES >1001 Invoice.pdf >1002 Invoice.pdf Etc… |
To copy a transformation template
-
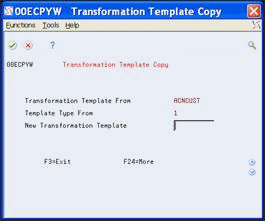
On Transformation Templates, enter 3 in the Option field next to the template you want to copy.
-
On Transformation Templates Copy, complete the New Transformation Template field and click Enter.
Figure 10-17 Transformation Template Copy screen
Description of "Figure 10-17 Transformation Template Copy screen"
| Field | Explanation |
|---|---|
| New Transformation Template | This is the name of the Transformation Template to be copied to. |
To change a transformation template
-
On Transformation Templates, enter 2 in the Option field next to the template you want to change.
-
On Transformation Template Maintenance, change any of the fields and click Change.
10.5 Working with PDF Profiles
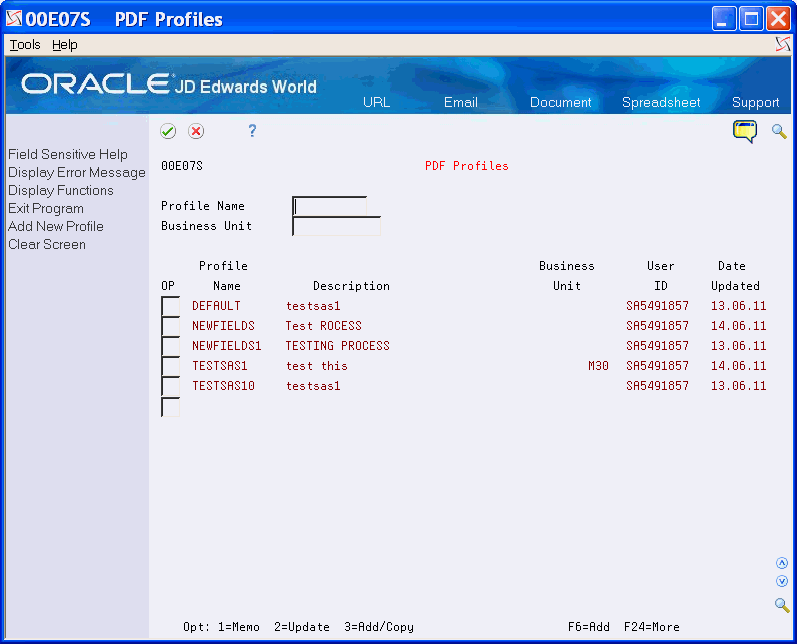
You use the PDF Profile (P00E07S) program to add, copy, view, and maintain summary information for PDF Profiles. The system saves the PDF profiles in the EDD PDF Parameters table (F00E07).
PDF Profiles includes the data that controls the security settings and output properties for a PDF file that you create for EDD. You can attach a PDF profile to a transformation template to apply security parameters to all PDF documents that you create using this template. You can also specify a PDF template in the EDD Configuration program, which the system uses if you do not specify a profile for the transformation template.
The PDF Profile screen displays a list of existing PDF profiles. You use the PDF Profile Properties screen to create, copy, maintain, and delete profiles.
Working with PDF Profiles includes the following tasks:
-
To create a PDF profile
-
To copy a PDF profile
-
To change a PDF profile
From Electronic Document Delivery Menu (G00E), choose PDF Profiles
-
On PDF Profiles, perform one of the following:
-
Choose Add New Profile (F6)
-
Locate the last blank line and enter 3 in the Option field
-
-
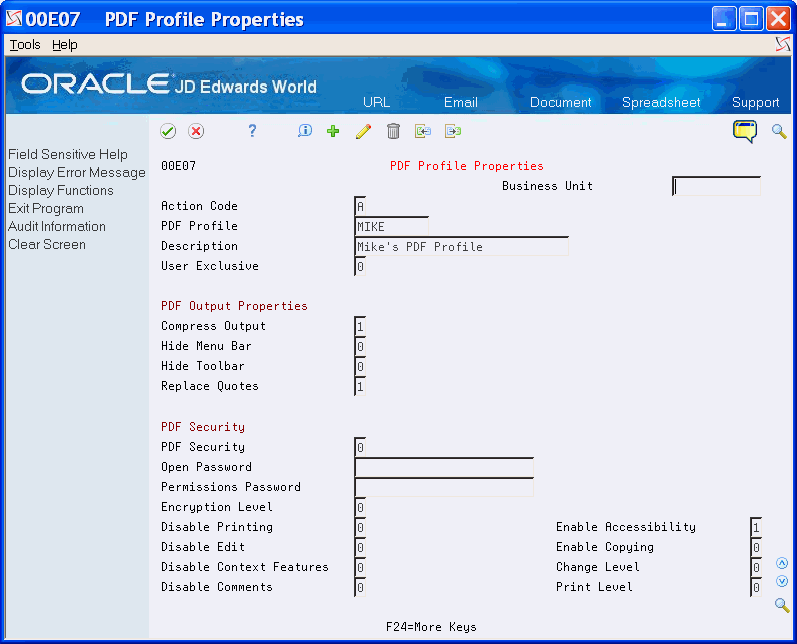
On PDF Profile Properties, complete the following optional field:
-
Business Unit
Figure 10-19 PDF Profile Properties screen
Description of "Figure 10-19 PDF Profile Properties screen"
-
-
Complete the following fields:
-
PDF Profile
-
Description
-
User Exclusive
-
-
Complete the following appropriate PDF Output Properties and Security fields and click Add:
-
Compress Output
-
Hide Menu Bar
-
Hide Toolbar
-
Replace Quotes
-
PDF Security
-
Open Password
-
Permissions Password
-
Encryption Level
-
Disable Printing
-
Enable Accessibility
-
Disable Edit
-
Enable Copying
-
Disable Context Features
-
Change Level
-
Disable Comments
-
Print Level
-
| Field | Explanation |
|---|---|
| Compress Output | Controls the compression on an output PDF file.
Valid Values: 0 - False, do not compress output 1 - True, compress output (default) |
| Hide Menu Bar | Controls the display of the menu bar when displaying a PDF file.
Valid Values: 0 - False, display menu bar 1 - True, hide menu bar |
| Hide Toolbar | Controls the display of the toolbar when displaying a PDF file.
Valid Values: 0 - False, display toolbar 1 - True, hide toolbar |
| Replace Quotes | Controls whether curly quotes are replaced with straight quotes in a PDF file.
Valid Values: 0 - False, do not convert 1 - True, convert quotes (default) |
| PDF Security | Controls whether PDF security is enabled or disabled.
Valid Values: 0 - False, security disabled 1 - True, security enabled If you specify a value of '1', the output file will be encrypted. You must also specify the following properties: -Open document Password -Modify permissions password -Encryption Level |
| Open Password | Password required for opening a PDF document. This property is effective only when PDF security is enabled.
World Burst Only The following variables can be specified as part of the Open Password.
|
| Permissions Password | Password enables users to override the security settings in a PDF document. This property is effective only when PDF security is enabled. |
| Encryption Level | Specifies the encryption level for an output PDF file.
Valid Values: 0 - Low (Acrobat 3.0 and later) 1 - High(Acrobat 5.0 and later) This property is effective only when "Enable PDF Security" is set to "True". When Encryption level is set to 0, you can also set the following properties: - Disable printing - Disable document modification - Disable context copying, extraction, and accessibility - Disable adding or changing comments and form fields When Encryption level is set to 1, the following properties are available: - Enable text access for screen readers - Enable copying of text, images, and other content - Allowed change level - Allowed printing level |
| Disable Printing | Enables/Disables printing for an output PDF file. This permission is available when Encryption Level is set to 0.
Valid Values: 0 - False, enable printing 1 - True, disable printing |
| Enable Accessibility | Enables/Disables text access for screen reader devices. This permission is available when Encryption Level is set to 1.
Valid Values: 0 - False, disable access 1 - True, enable access (default) |
| Disable Edit | Enables/Disables editing for an output PDF file. This permission is available when Encryption Level is set to 0.
Valid Values: 0 - False, allow editing 1 - True, disable editing |
| Enable Copying | Enables/Disables copying of text, images, and other content. This permission is available when Encryption Level is set to 1.
Valid Values: 0 - False, disable copying 1 - True, enable copying |
| Disable Context Features | Enables/Disables the context copying, extraction and accessibility features.
This permission is available when Encryption Level is set to 0. Valid Values: 0 - False, allow features 1 - True, disable features |
| Change Level | Sets Change level for PDF document. This permission is available when Encryption Level is set to 1.
Valid Values: 0 - None 1 - Allows inserting, deleting and rotating pages 2 - Allows filling in form fields and signing 3 - Allows commenting, filling in form fields, and signing 4 - Allows all changes except extracting pages |
| Disable Comments | Enables/Disables the ability to add or change comments and form fields.
This permission is available when Encryption Level is set to 0. Valid Values: 0 - False, allow changes 1 - True, disable changes |
| Print Level | Print level for PDF document. This permission is available when Encryption Level is set to 1.
Valid Values: 0 - None 1 - Low resolution(150 dpi) 2 - High resolution |
-
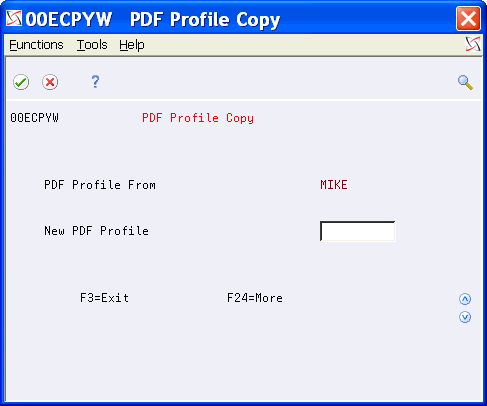
On PDF Profiles, enter 3 in the Option field next to the profile you want to copy.
-
On PDF Profile Copy, complete the New PDF Profile field and click Enter.
| Field | Explanation |
|---|---|
| New PDF Profile | This is the name of the PDF Profile to be copied to. |
-
On PDF Profiles, enter 2 in the Option field next to the PDF profile you want to change.
-
On PDF Profile Properties, change any of the fields and click Change.
10.6 Maintaining Distribution Profiles and Email Lists
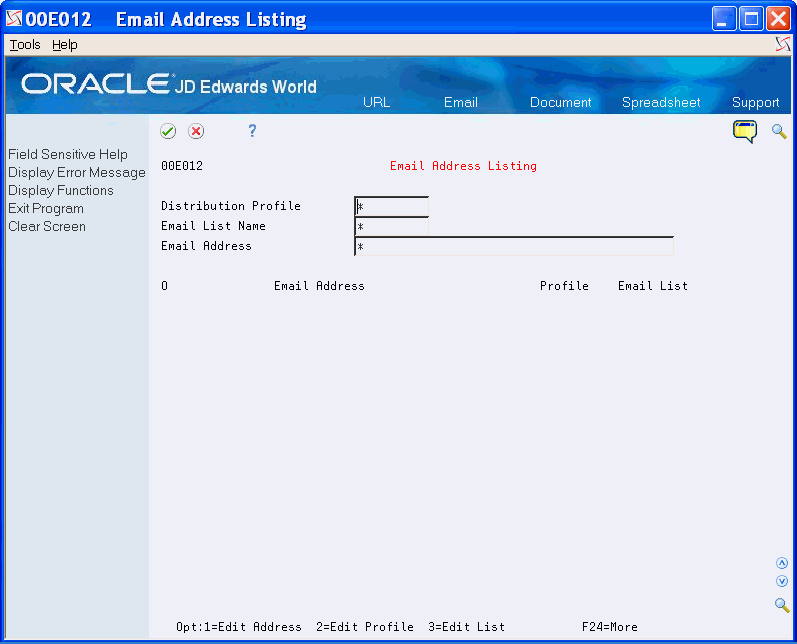
You use the EDD Email Selection program (P00E012) to display email addresses associated with a distribution profile or email list. In addition to the email address associated with the distribution profile, the listing also includes email addresses that are part of an email list or sublist.
The Email Address Listing screen can display with an asterisk (wildcard) in each of the header fields, depending on the configuration set up for this program.
Use the wildcard, enter data, or both to change the values that display in the detail area of the screen. You can choose More Details (F4) to view more information about the email address. You can then access various programs to change the address, distribution profile or email list.
You can also access the Email Address Listing screen from the following programs:
-
EDD - Distribution Profile / Email Client Detail (P00E021)
-
Email List Maintenance (P00E011)
-
Email/Print Client (P00E101)
When you access this program from the EDD Email/Print Client program, the Profile and Email List fields are blank for any email addresses that you manually add on the Email Client Addresses screen.
Use these options to access programs and screens to change the data:
| Option | Description |
|---|---|
| 1 | Edit Address. Accesses the Email/URL Revisions program (P01018) to update an email address. See Entering Address Book Email/URL Revisions in the JD Edwards World Address Book and Electronic Mail Guide for more information. |
| 2 | Edit Profile. Accesses the Distribution Profile Maintenance program(P00E02) to update a distribution profile. See Section 10.2, "Working with Distribution Profiles" for more information. |
| 3 | Edit List. Accesses the Email List Maintenance program (P00E011) to update an Email List. See Section 10.3, "Working with Email Templates" for more information. |
From Electronic Document Delivery Menu (G00E), choose Email Address Listing
-
On Email Address Listing, to narrow your search, complete any of the following optional fields and click Enter:
-
Distribution Profile
-
Email List Name
-
Email Address
Figure 10-21 Email Address Listing screen
Description of "Figure 10-21 Email Address Listing screen"
-
-
Complete the Option field.
10.7 Distributing a DREAM Writer Report with EDD
You can run the EDD process in batch mode to distribute a report that you create using the Import/Export process. By associating a Distribution Profile, Email Template, and Transformation Template, you can control the method of report distribution, email text, and the format of the report.
You can press F4 to browse the IFS directories and select a file and path in the following fields:
-
Import Export File
-
IFS Path
You should verify the distribution of the document when the process completes.
See Chapter 4, "Work with Import/Export" for more information.
From DREAM Writer (G81), choose Version List
10.8 Bursting a Report then Distributing it with EDD
You can burst a report using Import/Export functionality or BIP and then distribute it using EDD.
Any report can be set up for bursting using BIP. When you use BIP for bursting, you set up the burst and distribution specifications in BIP and EDD transfers the entire report to BIP for bursting and distribution.
After you create and burst a report using the Import/Export functionality, you can distribute each section of the report separately. In EDD, you can use reports that do not follow the JD Edwards World standard naming convention of Rnnnnn, where nnnnn is the program number. For example, you can use a report number such as S068110. When you use bursting, the report must contain an Address Number (such as AN8) field to determine the email address to use when distributing the report. If the system locates more than one email address for a specific Address Number, the Distribution Profile includes key fields to inform the system how to select an appropriate email address.
You must enable DREAM Writer reports for bursting before you can burst it using EDD. See Appendix B, "DREAM Writer Reports for World Bursting" for a list of enabled reports.
|
Note: JD Edwards recommends that you enter your email address in the BCC field to keep a copy of the reports that you burst. If the transmission of the email is not successful, it is not necessary to recreate the reports. You can locate the reason for the unsuccessful transmission and send the reports using the BCC copy. |
From DREAM Writer (G81), choose Version List
See Section 10.7, "Distributing a DREAM Writer Report with EDD" for more information.
10.9 Distributing Information Interactively with EDD
When you export data from an interactive or inquiry screen using the Import/Export functionality, you can configure the parameters to automatically distribute the output file using EDD.
See Chapter 4, "Work with Import/Export" for information about exporting data interactively.
10.10 Sending an Email using EDD
You can send an email using the EDD Email Client. You can:
-
Specify a combination of email addresses and distribution profile as the email recipients.
-
Include text for the body of the email or specify an email template to use for the email body and subject.
-
Include an attachment file name and path.
If you do not enter a distribution profile, the system uses the default SMTP server.
You cannot enter a value in the From field. The system determines the value of the From field in the following way:
-
If the User Information file (F0092) contains an Address Number, the system uses that number, with the Email Address Code in the EDD Configuration file (F00E05), to locate the email address in the Address Book - Email / URL addresses file (F01018). If there are multiple values for the Address Number/Email Address Code combination in the F01018, the system uses the first email type 1value. If the system does not locate a value in the F01018 for the Address Number/Email Address Code, it uses the default FROM address in the F00E05. If the Email Address Code in the F00E05 is blank and the system does not locate a record in the F01018, the system uses the first email address for the current user in the F01018.
-
If there is no Address Number in F0092, the system retrieves the default FROM address in the F00E05.
|
Note: JD Edwards recommends that you enter your email address in the BCC field to receive a copy of the email. If the transmission of the email is not successful to all recipients, it is not necessary to recreate the email. You can locate the reason for the unsuccessful transmission and send the email using the BCC copy. |
From Electronic Document Delivery Menu (G00E), choose EDD Email/Print Client
-
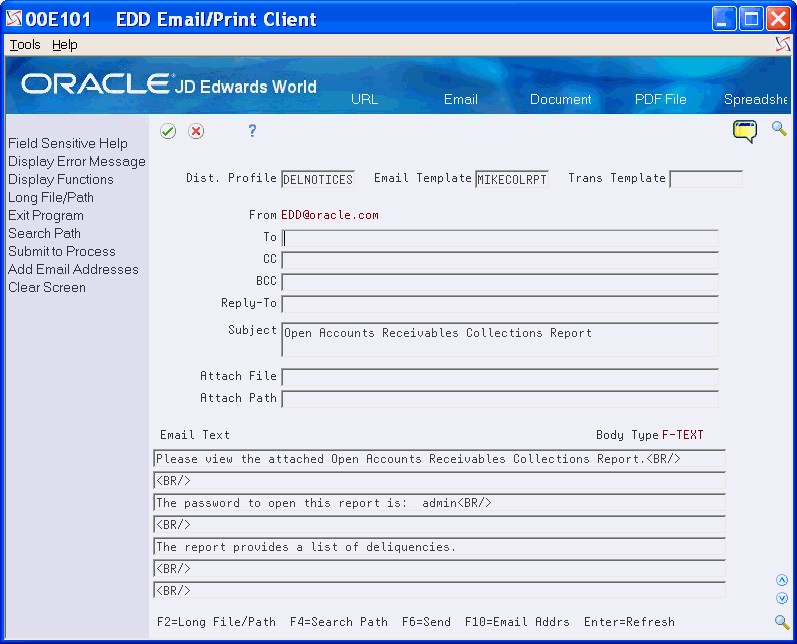
On EDD Email/Print Client, complete any of the following appropriate fields:
-
Dist. Profile
-
Email Template
-
Transformation Template
Figure 10-22 EDD Email/Print Client screen
Description of "Figure 10-22 EDD Email/Print Client screen"
-
-
Perform one of the following:
-
Complete the following fields:
-
To
-
CC
-
BCC
-
Reply-To
-
-
Choose Add Email Addresses (F10) to add email addresses.
-
-
On Email Client Addresses, on the last blank line, enter 3 in the Option field.
Figure 10-23 Email Client Addresses screen
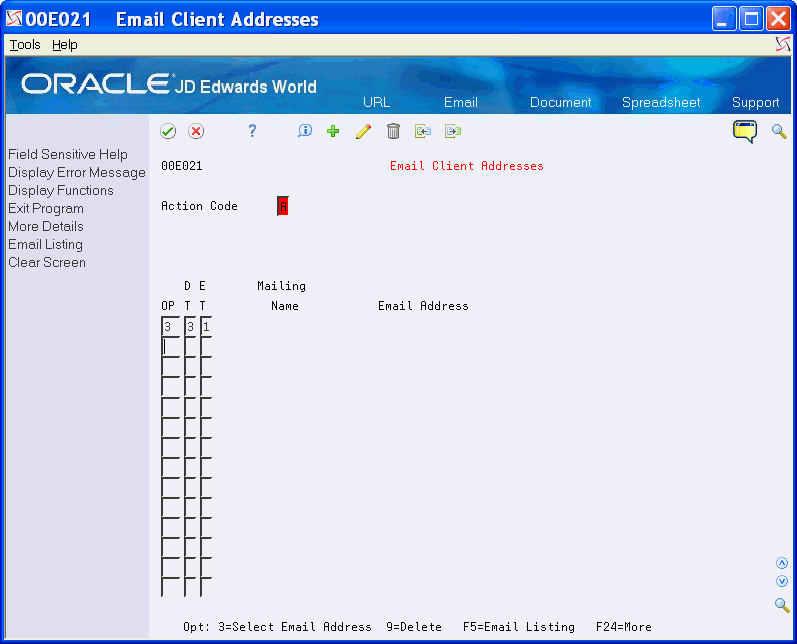
Description of "Figure 10-23 Email Client Addresses screen"
-
Complete the Delivery Type field.
-
On Email Selection, complete any of the following fields and click Enter.
-
Address Number
-
Who's Who Line
-
Email Cat Code
-
Mailing Name
-
Email Address
Figure 10-24 Email Selection (Sending) screen
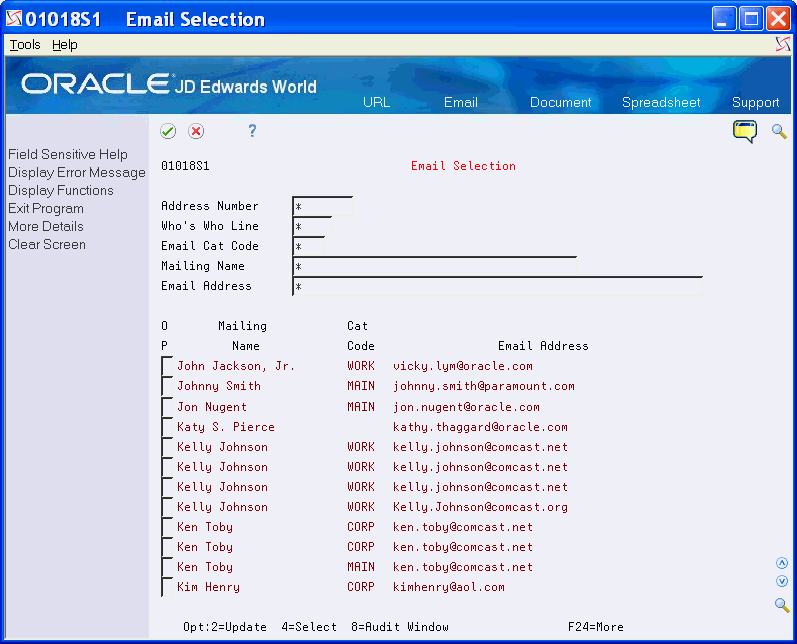
Description of "Figure 10-24 Email Selection (Sending) screen"
-
-
Choose any of the email addresses and click Enter.
-
On Email Client Addresses, click Add.
-
On EDD Email/Print Client, complete the following fields and click Enter.
-
Subject
-
Attach File
-
Attach Path
-
Email Text
-
| Field | Explanation |
|---|---|
| Dist. Profile | This is the name of the Distribution Profile. In EDD, a Distribution Profile is used to store format and distribution options for an Email. |
| Email Template | This is the Email template name. An Email template contains the Email subject line and/or the body text of an Email. The body text may be contained directly on the Email template, or may be contained in an HTML file which the template refers to.
Screen-Specific Information This is the name of the Email Template to be used for this email. When the Email Template is changed, the Subject, Body Type, and Email Text are reloaded from the selected template. |
| Trans Template | This is the name of the Transformation Template. A Transformation Template contains the file names and paths of a Transformation Template File and a Transformation Output File. |
| To | This is the actual Email address.
Screen-Specific Information If you enter a value in the Distribution Profile field the system can enter an email address in the To field and the field might not accept other values. You might still be able to enter a value manually, use Add Email Addresses (F10), or retrieve it from a Distribution Profile. If there are multiple To addresses, the field displays the message Multiple Values. You can enter email addresses directly into the CC or BCC fields. |
| CC | This is the actual Email address.
Screen-Specific Information You can enter this value manually, use Add Email Addresses (F10), or retrieve it from a Distribution Profile. If there are multiple CC addresses, the field displays the message Multiple Values. |
| BCC | This is the actual Email address.
Screen-Specific Information You can enter this value manually, use Add Email Addresses (F10), or retrieve it from a Distribution Profile. If there are multiple BCC addresses, the field displays the message Multiple Values. |
| Reply-To | This is the actual Email address.
Screen-Specific Information You can enter this value manually, use Add Email Addresses (F10), or retrieve it from a Distribution Profile. |
| Subject | This is the Subject Line for the Email.
Screen-Specific Information You can enter this value manually or retrieve it from an Email Template. |
| Attach File | This is the Transformation Template File name. A Transformation Template File may be an XSL (Extensible Stylesheet Language) file used to accomplish XSL transformations (changing an XML document in one format to another), or a template file created in Microsoft Word or Adobe Acrobat for use in formatting documents in BI Publisher.
Program-Specific Information In the Email Client program, this is the Attachment File that will be attached to the email. |
| Attach Path | Enter the directory path for the file you are attaching.
Program-Specific Information In the Email Client program, this is the Attachment Path for the file attached to the email. |
| Email Text | Text lines for the body of an Email.
Screen-Specific Information This is the text for the body of the email. You can manually enter the text or retrieve it from the Generic Text on an email Template. |
| Body Type | This is a display only field showing the body type of the email body. This value is from an Email Template or defaults to TEXT if you do not specify a template. |
| Delivery Type | This flag specifies the delivery type for an Email entry.
Valid values: 1 - From (System Controlled) 2 - Reply-To 3 - To 4 - CC 5 - BCC 6 - From (Override) 7 - BCC (Burst) |
| Email Type | This flag indicates the type of Email entry.
Valid values include: 1 = Email Address 2 = Email List When accessing Email Client Addresses (P00E021) from the Email Client program (P00E101), only Type 1 is a valid option. |
| Address Number | A number that identifies an entry in the Address Book system. Use this number to identify employees, applicants, participants, customers, suppliers, tenants, a location, and any other address book members. |
| Who's Who Line | This field is used to identify the line ID number for a Who's Who record. |
| Email Cat Code | A user defined code (01/UC) that provides a description of the Email Address or URL Address. |
| Mailing Name | The company or person to whom billing or correspondence is addressed. |
| Email Address | This is the actual Email or URL address.
Each Email address must have the prefix 'mailto:' appended to the actual Email address. Each URL address must have the prefix 'http://' appended to the actual URL address. You may type this in yourself or, if it is not found, the program will automatically insert it. In order for the Email and URL to function correctly, you must be using Client Access 5250 Emulation. In order to activate this feature, set the Emulator Type to '1' in User Display Preferences (Hidden Selection 85). |
