6 Set Up Mandates
This chapter contains the following topics:
6.1 About Mandates
A mandate is an authorization that a debtor gives to a creditor that enables the creditor to initiate a request for payment for a debt. The company that extends credit to a customer is the creditor. The customer is the debtor. To use the SEPA direct debit process, the debtor and creditor must each hold an account with a participating bank within the SEPA (single european payment area) region.
When you set up mandates, you set up information for both the creditor (company) and debtor (customer). You provide the bank with the mandate information to prove that the debtor has given you permission to initiate a bank transaction in which you request that the bank debits the customer's account and credits your account.
Much of the information that you need to set up for a mandate is included in the address book record or bank account record of the company and customer. When you set up a mandate, the system retrieves from the address book master (Address Book Master file - F0101) and bank account records (Bank Transit Number Master file - F0030) information required for the mandate if the information exists in the address book and bank account records. If required information is not present in the address book and bank account records, the system issues an error message when you attempt to enter a mandate.
The system allows you to set up only one active mandate for a customer.
You use these programs to enter mandate information:
-
Mandates List (P740320)
This program enables you to search for and select existing mandates. You can access this program by selecting selection 2 (Mandates List) on the SEPA Direct Debits menu (G740002). You can use the Mandates List screen to access the Mandate Debtor screen by entering option 1 (Maintenance), and to access the History Amendments screen by entering option 2 (History Amendments. You can also press F5 to access the Mandate Debtor program to enter a new mandate.
-
Mandate Debtor (P740322)
This program enables you to enter basic information for a mandate, such as the effective dates and status, and to enter a customer address book number that the system uses to retrieve the bank account information for the customer.
You can also access the Mandate Creditor screen (F8), the Mandate Ultimate Debtor screen (F9), and debtor's address book record (F11) from the Mandate Debtor program.
-
Mandate Creditor (P740324)
This program enables you to enter the creditor (company) address book number and other required information, such as the country code and national ID of the company. You access the Mandate Creditor program from the Mandate Debtor program.
You can also access the Ultimate Debtor screen (F9), the Mandate Debtor screen (F10), and the Creditor address book record (F11) from the Mandate Creditor program.
-
Mandate Ultimate Debtor (P740326)
This program enables you to enter the ultimate debtor's address book number, retrieve the ultimate debtor's identification code, and save the ultimate debtor information. You can access the Mandate Ultimate Debtor program from the Mandate Debtor or Mandate Creditor screens.
The system also provides programs that you use to amend mandates and view mandate history. See Chapter 7, "Amend Mandates"
The system saves mandate information to these files:
-
Mandates - SEPA Direct Debits (F740320)
-
History Amendment - SEPA Direct Debits (F740322)
The SEPA Direct Debits XML Generation program (P7403575) reads the data in the mandate tables, and updates certain fields in the files if the program runs with no errors. See Section 9.1.2, "P7403575 Program Output and File Updates"
6.1.1 Mandate Status
Before the system can include mandate information in a bank file, the mandate must:
-
Have a status of Y (yes, meaning that the mandate is active).
-
Be assigned one of these sequence types:
-
FRST (first collection)
You assign the FRST (first) sequence type when you want to use the mandate more than once. After the system reports the mandate information to the bank the first time that you run the P7403575 program for invoices for the customer for which you set up the mandate, the system changes the sequence type from FRST to RCUR (recurring). Recurring mandates can be used multiple times and remain at that sequence type until:
-
You manually change the sequence type.
-
You change the mandate status from active to inactive.
-
The mandate expires.
-
-
RCUR (recurrent collection)
The system assigns this sequence type to mandates after you use a mandate that has a sequence type of FRST.
-
OOFF (one-off)
Assign this sequence type when you intend to use a mandate once only. After you use a mandate with this sequence type, the system changes the sequence type to FNAL (final). You cannot use a mandate with a sequence type of FNAL.
-
FNAL
The system assigns this sequence type to mandates that cannot be used again. You cannot use a mandate with a sequence type of FNAL.
-
-
Have a valid date in the Mandate Date and Mandate Active date fields.
-
Have no value (blank) in the Cancellation Date field.
The process includes the mandate information in the XML file the first time that you generate SEPA direct debits for the customer. If you make changes to the bank or address book records, or to your creditor information after you have submitted a mandate, you must send mandate amendment information to the bank. The system automatically includes the updated information the next time that you generate the XML file and include invoices for the customer for which you set up the mandate.
6.1.2 Before You Begin
Before you begin the tasks in this section:
-
Verify that the value in the Country field in your user display preference specifies a country in the European Union.
-
Set up required UDCs.
-
Verify that address book and bank records for customers and your company are complete, and that the customer master is set up for SEPA direct debits.
See Chapter 5, "Set Up Address Book, Customer Master, and Bank Records for SEPA Direct Debits"
-
Verify that a next numbering scheme for SEPA direct debits is set up on line 06 in system 74 of the Next Numbers program.
6.2 Enter Debtor Information for a Mandate
From SEPA Direct Debits (G740002), choose Mandate Debtor.
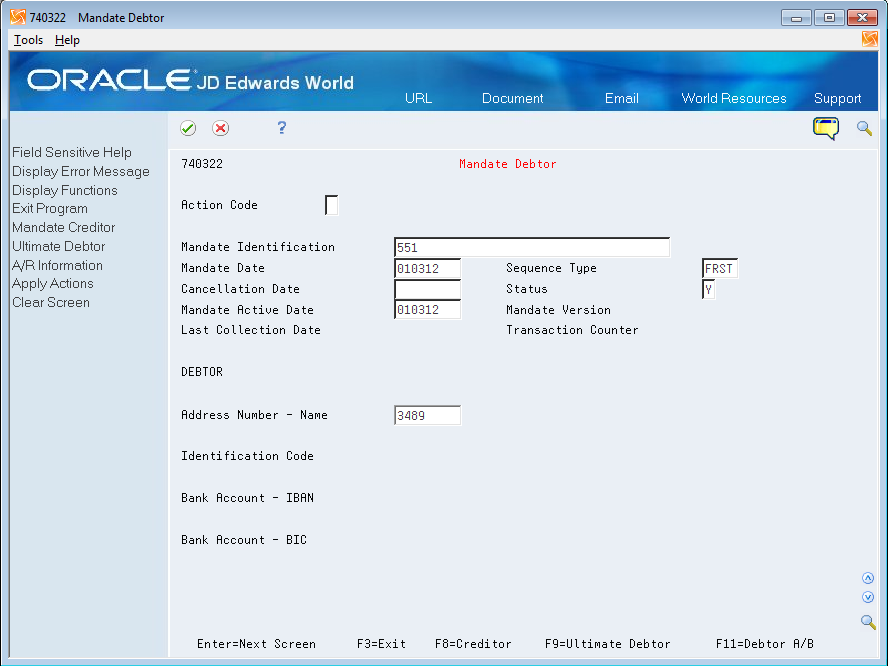
On Mandate Debtor
-
Complete the following fields:
-
Mandate Identification
-
Mandate Date
-
Sequence Type
-
Cancellation Date
-
Status
-
Mandate Active Date
-
Address Number
-
-
Review these fields that the system populates with address book and banking information. If valid values do not exist in the Address Book Master (F0101) and Bank Transit Master (F0030), then the system issues an error message.
-
Identification Code
-
Bank Account - IBAN
-
Bank Account - BIC
-
-
(Optional) Press Enter to move to the Mandate Creditor screen.
|
Note: The system populates the Last Collection Date and Transaction Counter fields only after the mandate is used, and populates the Mandate Version field only after the mandate is saved. |
- Mandate Identification
-
The date that you set up the mandate. You must complete this field.
- Sequence Type
-
A value from the 74/SQ UDC table that indicates whether the mandate is for the first or final submission, or whether the mandate is a one-time debit or a recurring debit.
- Cancellation Date
-
The date the mandate is cancelled. If you enter a date, then the date must be after the active date. If you enter a date in this field, you can no longer use the mandate.
- Status
-
Enter Y (yes) to make the mandate active, or enter N (no) to make the mandate inactive. The status must be Y for the system to include the mandate information in the bank file.
- Address Number
-
The address book number of the customer for which you set up the mandate. You must complete this field.
You can modify this field only when the value for the Last Collection Date field in the F740320 file is 0, meaning that the mandate has not been used.
- Debtor Identification Code
-
The system retrieves the value from the Tax ID field in the address book record that you specified in the Address Number field. If the address book record does not include a tax ID, then the system retrieves the value from the Additional Tax ID field of the address book record. If neither the Tax ID or Additional Tax ID field in the address book record includes a valid value, then the system issues an error message.
- Bank Account - IBAN
-
The system retrieves this value from the IBAN# field in the bank account record of the customer specified in the Address Number field. If no value for the IBAN (International Bank Account Number) exists in the F0030 field for the customer, then the system issues an error message.
- Bank Account BIC
-
The system retrieves this value from the SWIFT Co field in the bank account record of the customer specified in the Address Number field. This field is optional.
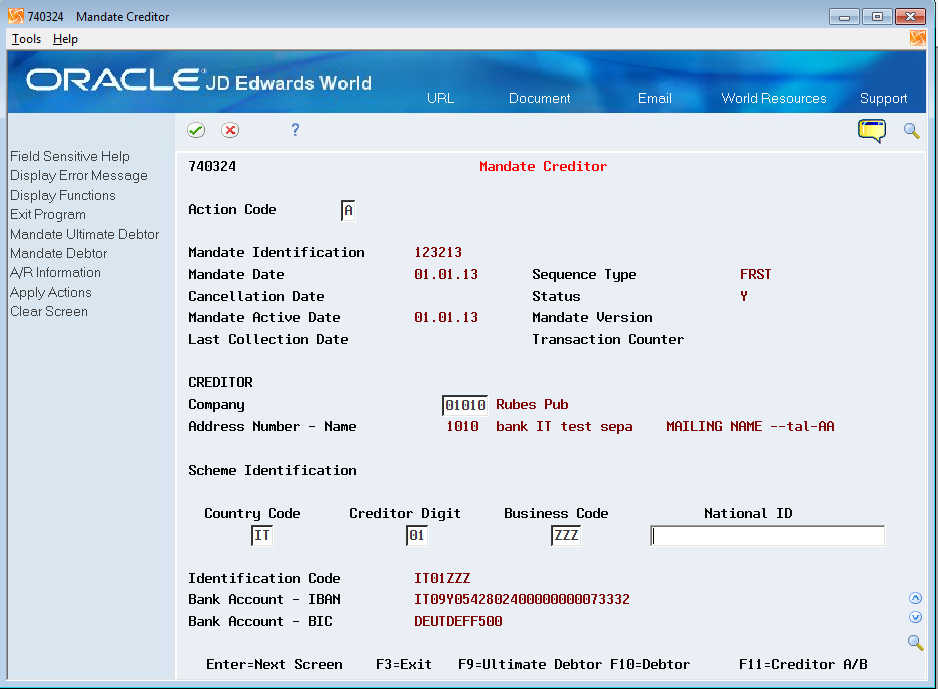
6.3 Enter Creditor Information for a Mandate
From SEPA Direct Debits (G740002), choose Mandate Debtor.
On the Mandate Debtor screen, choose Creditor (F8).
-
From Creditor Mandate, complete the following fields:
-
Address Number - Name
-
Country Code
-
Creditor Digit
-
Business Code
-
National ID
-
-
Apply the Add action.
- Address Number - Name
-
Enter the address book number of the creditor.
- Country Code
-
Enter a value from the Creditor Country Code (74/SA) UDC table.
- Creditor Digit
-
Enter the 2-digit verification code for the creditor.
- Business Code
-
Enter a value from the Creditor Business Code (74/BC) UDC table.
- National ID
-
Enter the national ID of the creditor. This is the country-specific part of the creditor identifier and is the national identifier of the creditor. The system does not validate this number.
6.4 Enter Ultimate Debtor Information for a Mandate
From SEPA Direct Debits (G740002), choose Mandate Debtor.
On the Mandate Debtor screen, choose Ultimate Debtor (F9)
Figure 6-3 Mandate Ultimate Debtor screen
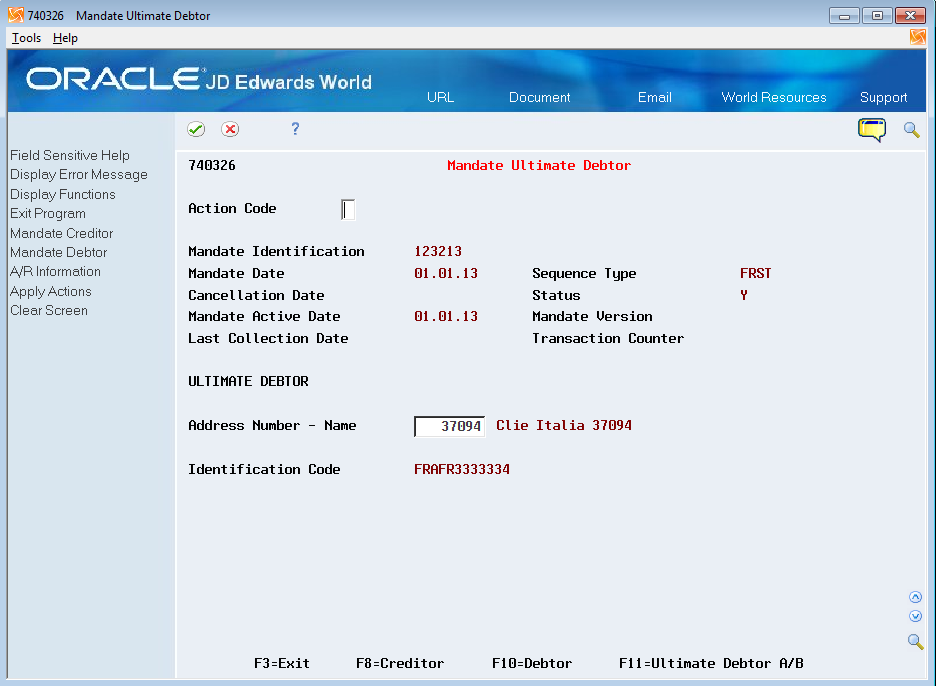
Description of "Figure 6-3 Mandate Ultimate Debtor screen"
To enter ultimate debtor information
On Mandate Ultimate Debtor
Complete the Address Number - Name field with the address book number of the ultimate debtor, and then use the Add action.