| Oracle® Retail Xstore Point of Service Mobile User Guide Release 20.0 F35714-03 |
|

 Previous |
 Next |
| Oracle® Retail Xstore Point of Service Mobile User Guide Release 20.0 F35714-03 |
|
Previous |
Next |
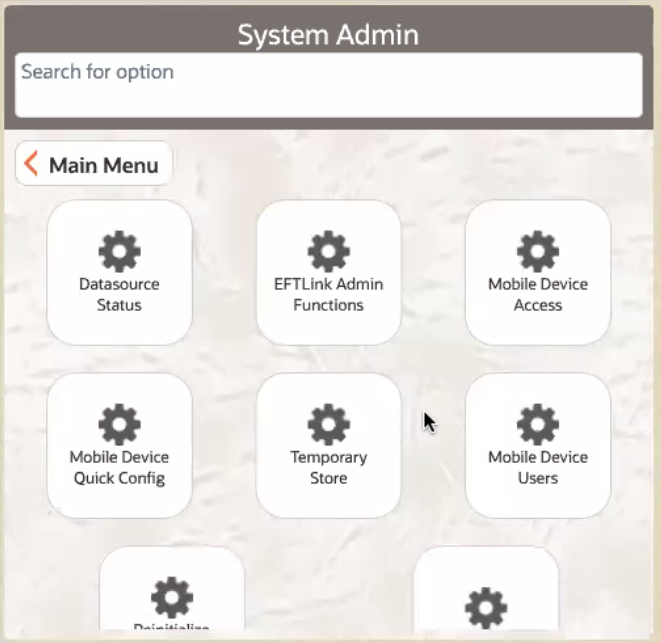
The System Admin option provides access to the Xstore Mobile POS hardware and configuration options.
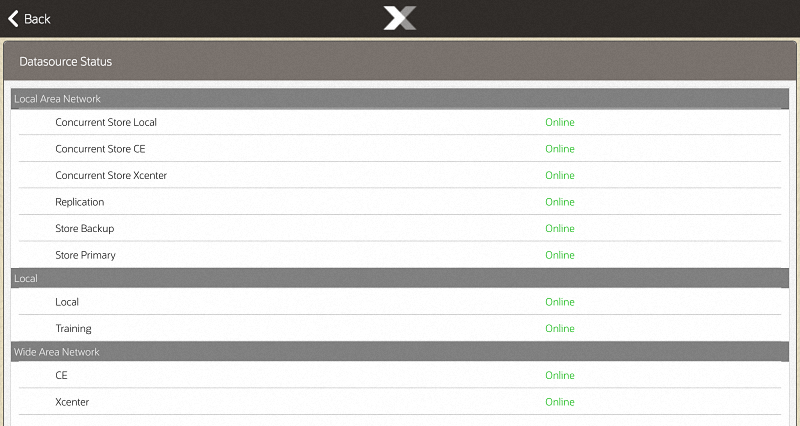
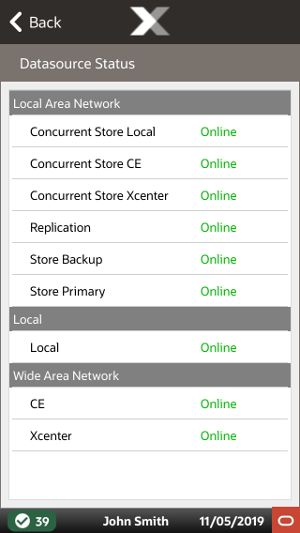
This option for tablet, thin client and handheld, displays the networks that are online and those that are offline. It is a view-only screen.
Select System Admin from the Main Menu.
Click Datasource Status in the System Admin menu.
The Datasource Status displays the Local Area Networks, Local, and Wide Area Network.
The networks that are online will display the word Online in green.
The networks that are offline will display the word Offline in red.
Oracle Retail EFTLink provides a standard based framework that enables support for payment solutions. EFTLink sits between the Xstore POS and the payment services provider, and enables retailers to reduce the scope of their PCI-DSS obligation, specifically around the elements of PA-DSS compliance. EFTLink provides a method of abstracting the payment solution from the POS application, and enables a retailer to work with a payment service provider, removing the need for certifications.
Oracle Retail Xstore Point of Service uses EFTLink for all authorization requests. EFTLink controls all access to the payment terminals (PIN Entry Device -PEDs) via the appropriate EPS core plug-in. Credit card data is not stored inside, nor does it pass through, Xstore and EFTLink. EFTLink has pre-built electronic payment system EPS core plug-ins for numerous payment service providers around the globe. EFTLink is a protocol converter and converts a single standard POS request message to pay and perform services into the payment solution providers, PSPs, electronic payment solution EPS protocols.
EFTLink Admin Functions supports the ability to send a command to Oracle Retail EFTLink to manage the administrative tasks required to support any payment processor that is certified with EFTLink.
Select System Admin from the Main Menu.
Click EFTLink Admin Functions in the System Admin menu. See System Admin Menu.
Select Merchant such as Cayan, Point US.
Enter the merchant credentials: Account Name, Account Software Key, Site Identifier, Account DBA and Terminal Identifier.
When working with Xstore Mobile devices, cash drawers allow monies to be collected. An Xstore register can only ever be configured to use one type of cash drawer (networked cash drawer or fixed cash drawer).
Example, if a store has 10 desktop/fixed registers and 10 thin clients, and 10 tablets each device type must be configured to the same type of cash drawer, either fixed cash drawer or networked cash drawer. In this example, the 10 desktop/fixed registers would either need to be all set up for fixed cash drawers or all 10 to networked cash drawers. The 10 thin clients would need to be either all configured to fixed cash drawers or all 10 to networked cash drawers. Lastly, all 10 tablets would need to be configured to the networked cash drawers.
The following combinations of fixed cash drawer and networked cash drawer configurations are permitted:
Desktop/fixed register and thin client to a fixed cash drawer

Desktop/fixed register and thin client to a networked cash drawer
Mobile device (tablet, thin client and handheld) to a networked cash drawer
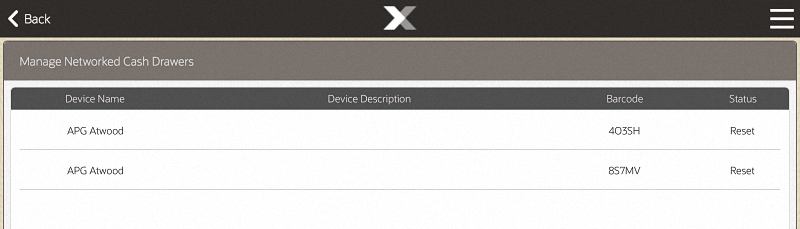
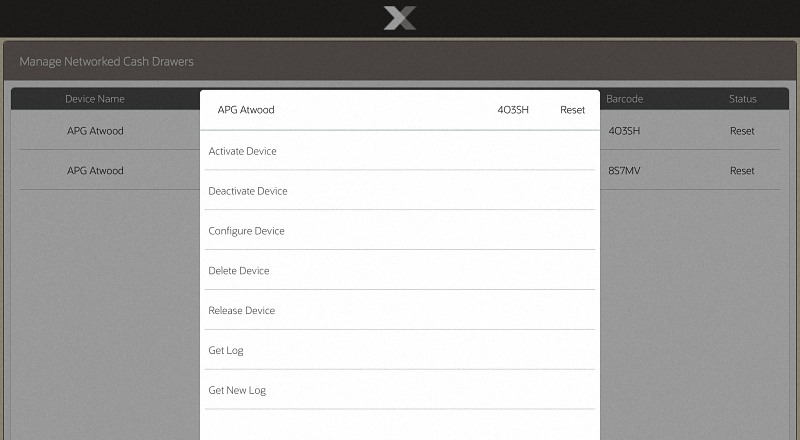
The option to manage the networked cash drawers is available on tablets and thin client and desktop.
From outside a sale, select System Admin from the Main Menu.
Click Manage Networked Cash Drawers in the System Admin menu. See System Admin Menu.
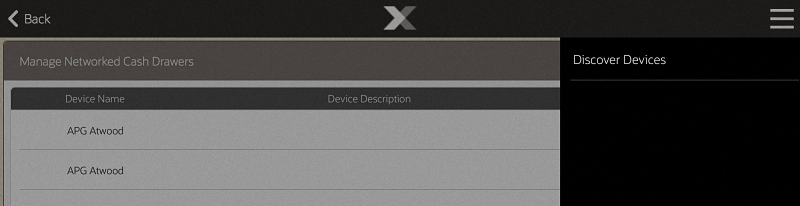
Upon navigating to the screen, a discovery is performed to identify all networked cash drawers on the network.
A list of all discovered networked cash drawers are displayed with their device name, device description, barcode and status.
The status of the cash drawer may be:
New: Configuration has not been entered.
Active: The cash drawer is available to use.
Inactive: The cash drawer is not available to use. When Inactive, a cash drawer till cannot be assigned to the cash drawer. The cash drawer must be activated first to be able to assign tills to it.
Reset: Restored to factory settings and configuration needs to be entered.
Select a cash drawer from the list.
You can Activate and Deactivate networked cash drawers by selecting the correlating button. Activate changes the status of the networked cash drawer to Active. Deactivate changes the status to Inactive.
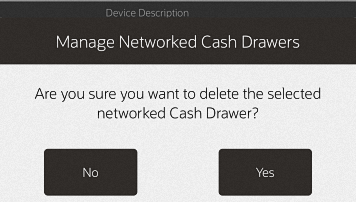
You can delete the networked cash drawer from the database by selecting the Delete Device option.
Select Yes to confirm deletion.
|
Note: The Activate, Deactivate, Delete and Configure activities are controlled by user security. An employee must have the proper security privileges to use these buttons. |
Use the Discover Devices option in the Context Menu to find new networked cash drawers on the network.
This section describes the networked cash drawers:
Select a cash drawer from the list on the Manage Networked Cash Drawers screen and select Configure.
Enter the required data to configure the screen. If the drawer is an existing drawer, the configurable values will be shown with the option to change the values.
Select the Save Configs button to apply the changes to the Configure screen. You are returned to the Manage Networked Cash Drawers screen.
|
Note: You can clear all configurations by selecting the Clear Configs option. |
On occasions when the networked cash drawer cannot be opened (maybe due to a network loss), it is possible to manually release the cash drawer in-use and allow other users to use them.
|
Note: Ensure there is no current transaction taking place prior to using this process. |
Select System Admin from the Main Menu.
Click Manage Networked Cash Drawers in the System Admin menu. See System Admin Menu.
Upon navigating to the screen, a discovery is performed to identify all networked cash drawers on the network.
Select the in-use cash drawer from the list of cash drawers.
Select Release Device.
|
Note: The Release Device option is controlled by user security. An employee must have the proper security privileges to release the cash drawer. |
Confirm you want to release the cash drawer: "Are you sure you want to release the cash drawer <cash drawer id and name>?"
Select Yes on this prompt, to continue.
The cash drawer is manually released from being in-use and is available to use again.
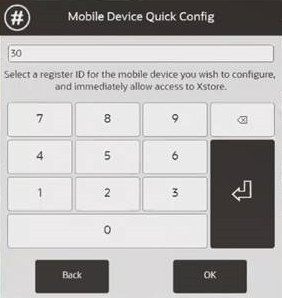
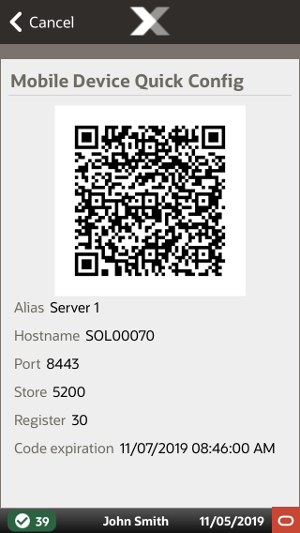
Mobile Device Quick Config allows you to generate a QR code for a mobile device to connect to the Xstore Mobile server. By generating a QR code using this process it removes any potential for errors while entering the Hostname, port, register, and Store ID during the configuration of the new mobile device. This also makes the process for entering that information much faster. You can generate the QR code and go right into the next step of scanning the QR code (see Scan QR Code to Configure Mobile Device) to configure the device. This process requires at least one mobile device that has already been set up in your store as generating the QR will take place on one mobile device and then the device being configured will scan this QR code.
Select System Admin from the Main Menu.
Click Mobile Device Quick Config in the System Admin menu. See System Admin Menu.
You are prompted to enter the register ID that will be used for the new mobile device. The system will recommend a register ID based on system availability. You are not required to use the displayed register ID. You can delete the recommended register ID and enter your own.
Select OK to enter your register ID.
Xstore generates a QR code containing the configuration information for the other mobile device you are setting up. It is not for this device that generated the QR code as the new mobile device will be scanning this QR code.
|
Note: The QR code has an expiration that is listed on the screen. Also, selecting Cancel deletes the QR code and a new one will need to be generated. |
The process is now complete for generating a QR code that can be used in the next process, Scan to Configure which will configure the other mobile device with the following details: hostname, port, register ID and store.
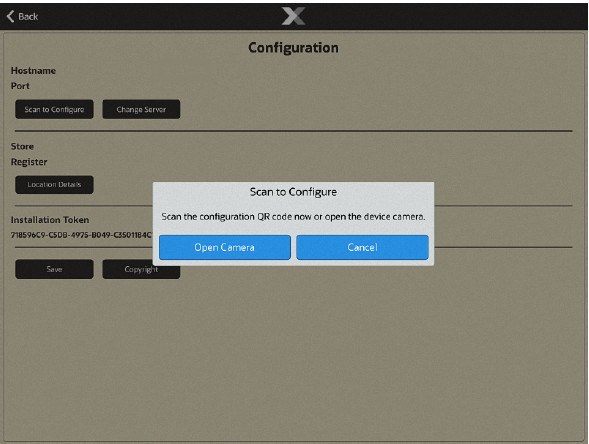
Open the Configuration screen on the mobile device that requires configuration by swiping the screen from the left to the right. The Configuration screen is displayed on the device that requires set up.
Select Scan to Configure to scan the QR code from the other mobile device that has the QR code available (generated in the above steps - see Mobile Device Quick Config).
At the prompt select Open Camera.
The camera opens and you will need to scan the QR code on the other mobile device.
Scan the QR code.
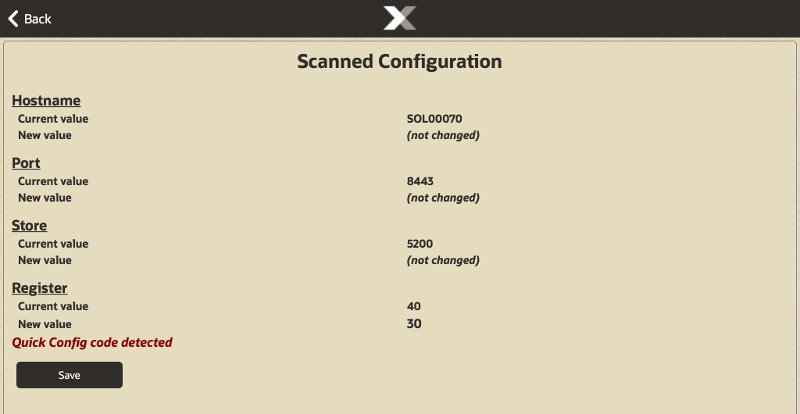
The mobile device will display the details for the scanned configurations.
The Scanned Configuration screen provides the current value for Hostname, Port, Store and Register. If this is a new mobile device each of those values will be blank. If this is not a new device the configurations that had been previously configured will be displayed. The new value represents the data that was in the QR code.
When the statement Quick Config Code detected is displayed on the screen above the Save key this means the device has been 'allowed' and is available for use in the store. You will not need to go to the function for Mobile Device Access as it has already been done by the process here. If the screen does not display this message go to Mobile Device Access to change the status to "allow".
Select Save to accept the new values for the configuration of your mobile device.
This concludes the process for configuring a mobile device by scanning a QR code off of another mobile device.
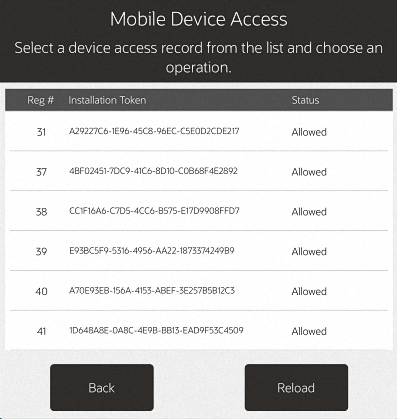
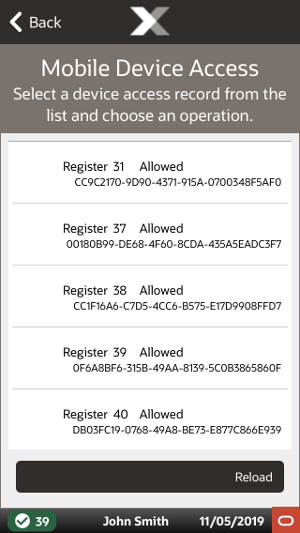
This option allows you to manage the mobile devices to function as a register in the store. When installing a new mobile device the Xstore Mobile server will initially block that device from running Xstore until an administrator goes into this function to enable the newly configured device. This can be done after a device has been configured by entering in the hostname, port, store number, and register number. The steps below give the mobile device access to the mobile server so that it can be used in the store.
Select System Admin from the Main Menu.
Click Mobile Device Access in the System Admin menu. See System Admin Menu.
|
Note: Use Reload to update the list of device authentications. |
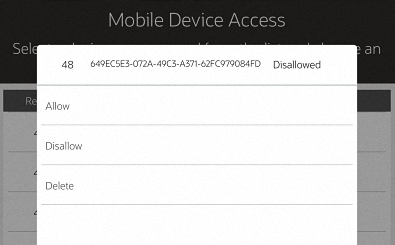
Select the mobile device to change which will bring up the menu options to allow, disallow, or delete the device.
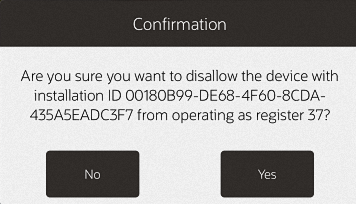
Change selected device to Allowed or Disallowed and select Yes to confirm the action.
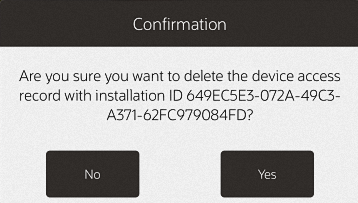
Select the Delete option to remove the device configuration from the Xstore register.
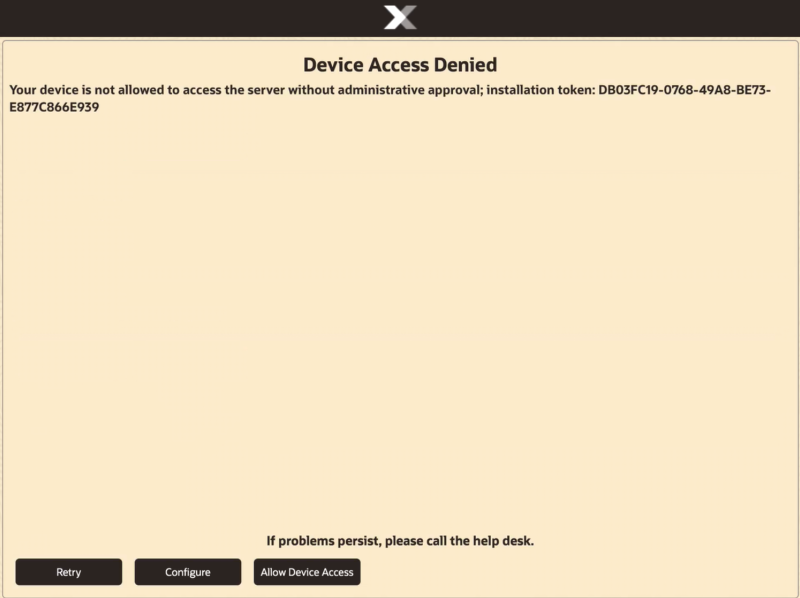
A mobile device cannot access the mobile server until the mobile device has been approved by an authorized employee. This is done after configuring the hostname, port, register and store numbers and selecting Save.
An authorized user can go through the steps found in the Mobile Device Access section or a user with the appropriate security privileges can enter their username and password to allow access to the server as shown in the steps below.
The mobile Configuration screen can be accessed by swiping left to right on the screen.
When the mobile device has not been allowed access to the server a prompt displays stating the device access is denied.
|
Note: If you want to confirm your device has access to the server go to the Mobile Device Access section to confirm. |
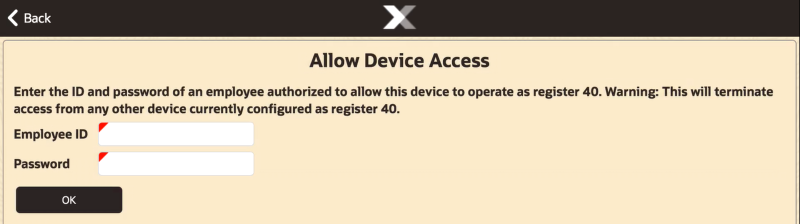
Select Allow Device Access.
Enter your username and password (must have proper security rights)
If you have the correct privileges, the device will connect to the server and the Xstore Mobile application will load for you to begin transacting.
This concludes the process for allowing a device to access the mobile server.
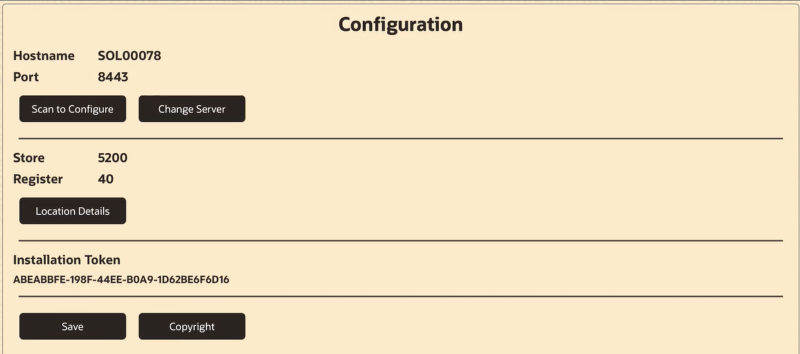
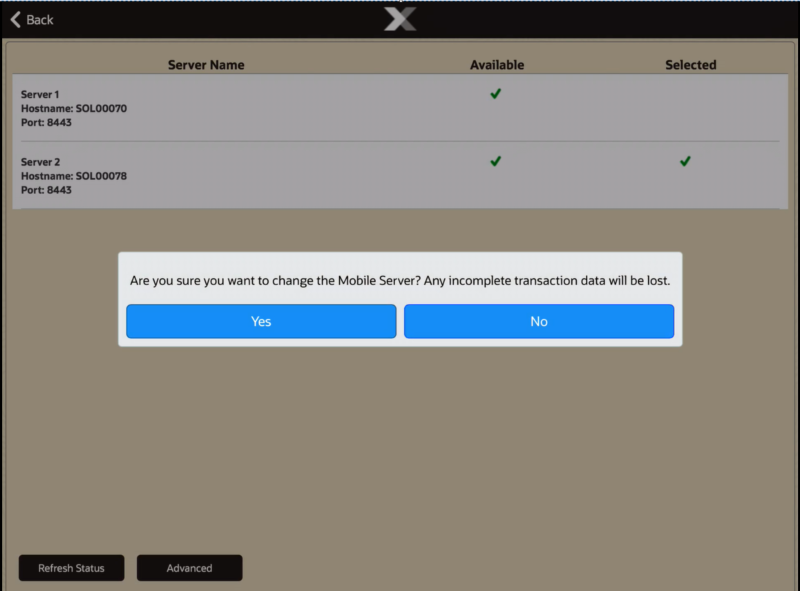
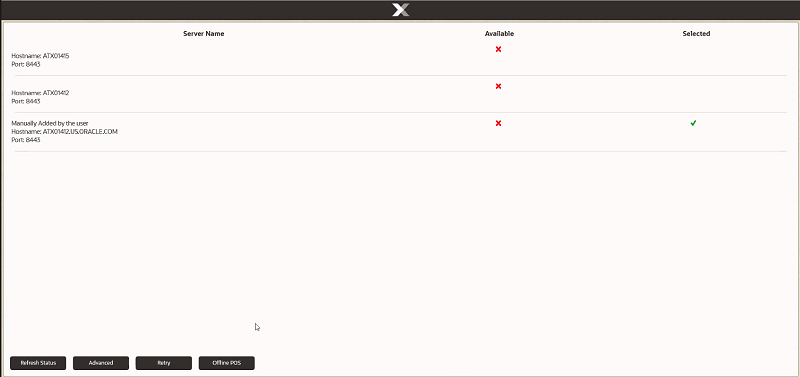
The mobile server failover process is to be used when a mobile server fails. During a mobile server failure the user will be prompted with an error that the server lost connectivity. There will be an option on the error message to change the server. The user can select that option to open the list of mobile servers available for your store. If the store only has one mobile server there will not be multiple servers listed. A user can also change the server manually from the configuration screen.
Open the Configuration screen on the mobile device by swiping the screen from the left to the right.
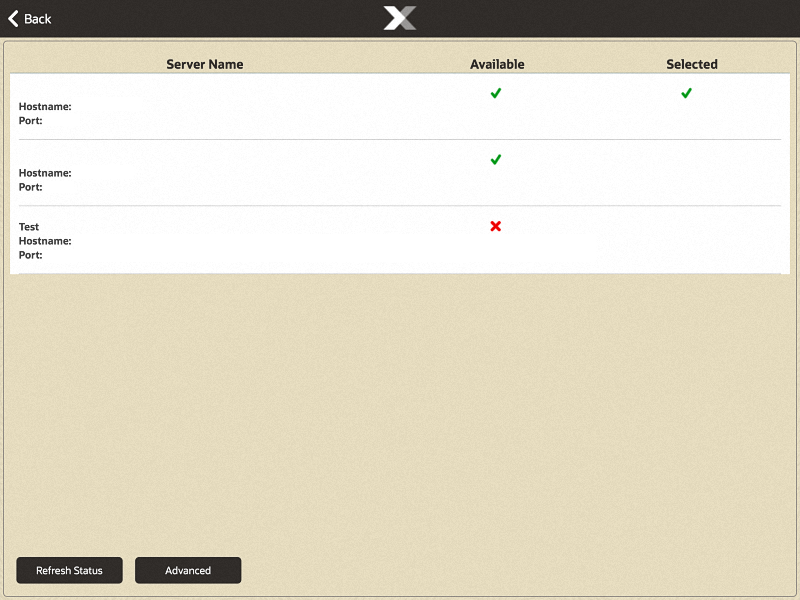
After swiping to get to the Configuration screen select Change Server. The list of mobile servers displays.
About the Server List screen:
The Refresh Status button when selected will have the device look for any new or available servers.
The Advanced button takes the user to a new screen for entering the hostname and port of a new server that needs added or to look up a mobile server manually by entering in the hostname and port.
Selecting the server row that you want to connect to displays a prompt, "Are you sure you want to change the Mobile Server? Any incomplete transaction data will be lost."
Select Yes to change the server.
|
Note: Any transactions that are not complete will be lost when changing the mobile server. |
This concludes the process for changing the mobile server that the mobile device is connected to. This process makes changes to one mobile device - to switch another mobile device follow the same steps.
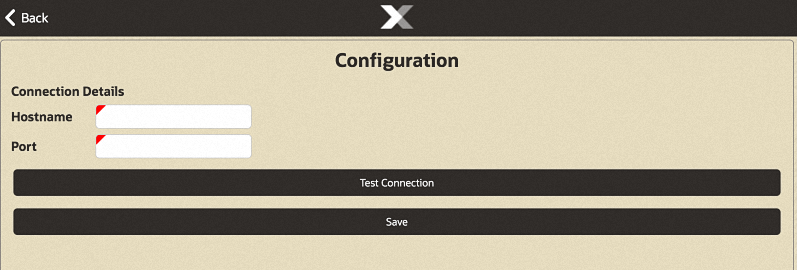
If a new server has been added to your store or the server list did not bring the list of expected servers you can manually add the server hostname and port to add the mobile server to the server list.
Open the Configuration screen on the mobile device by swiping the screen from the left to the right.
Select Change Server. The list of mobile servers displays.
If your server is not listed select Advanced. The screen to enter the mobile server hostname and port displays:
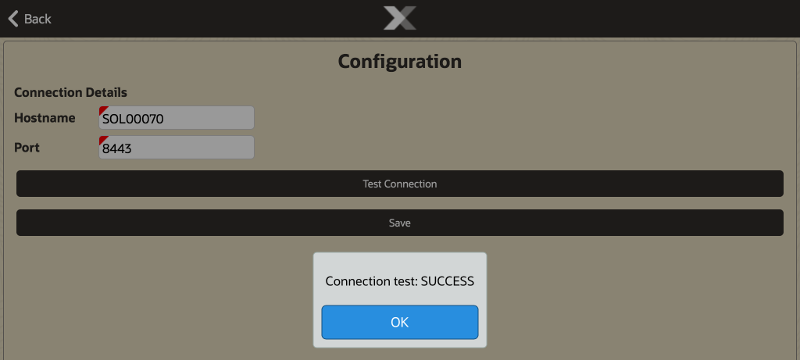
Enter the hostname and port to look up a new server and then select Test Connection.
The device will display a prompt if the server was found.
Select OK.
Select Save to save the newly found mobile server to the server list.
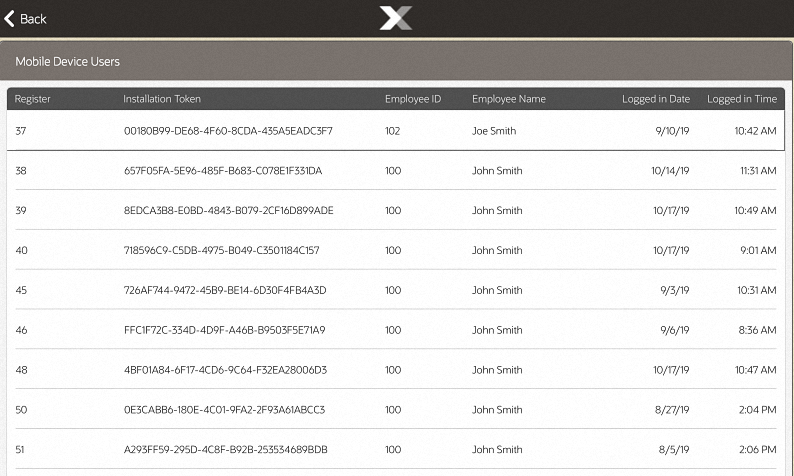
This option allows you to keep track of devices. A read-only screen to see which employee has logged into each device and what date and time. This will help if a mobile device comes up missing, you can see who was last using the device.
Select System Admin from the Main Menu.
Click Mobile Device Users in the System Admin menu. See System Admin Menu.
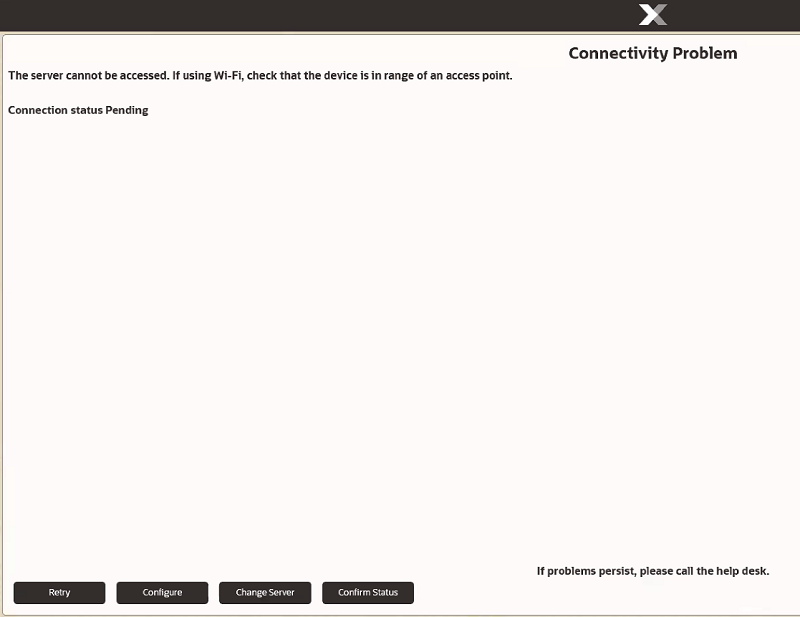
In the event that connection to all mobile servers is lost, it is possible to enter in basic sales and return transactions manually in Xstore Mobile.
During a mobile server failure you are prompted with an error message that the server lost connectivity. There is an option on the error message to change the server. You can select that option to open the list of mobile servers available for your store. If your store only has one mobile server there will not be multiple servers listed.
When connection is lost, the Connectivity Problem screen is shown. Select Change Server.
If your system is configured to perform transactions offline, an Offline POS button is shown when all mobile servers in the list are offline. Select Offline POS.
Select New Transaction to start an offline transaction. See Offline Sales Transactions and Entering Returns when in Offline Mode for more information on performing sales and returns whilst in offline mode.
There is a check at the end of each transaction to determine if the mobile server is back online:
If the mobile server the device was configured to use is back online, then the device returns to the Xstore Mobile login screen.
If another server in the list is online, you are taken to the Change Server configuration screen. The offline mode will then be disabled.
If no servers are available, you go to the list of offline transactions and can choose to conduct another one or return to the Change Server screen.
|
Note: All offline transactions need reviewing and either approved or rejected before the store is able to close. |
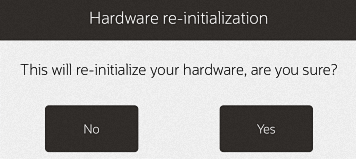
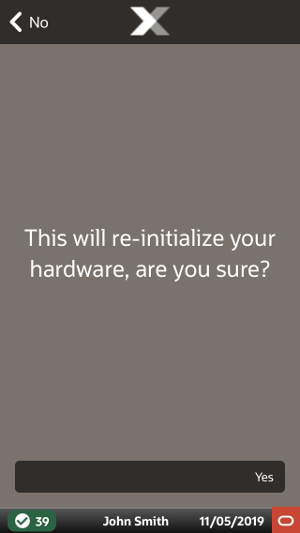
To reset the peripheral hardware devices:
Select System Admin from the Main Menu.
Click Reinitialize Hardware in the System Admin menu. See System Admin Menu.
The system performs the following process for the hardware devices:
close ??>release??>claim??>open
When prompted, select Yes to confirm you want to re-initialize the hardware.
There are two types of temporary stores:
Extension Stores - uses the same store number as the brick and mortar store (physical store). The store is extended to a remote location such as in a mall. Stock and sales are associated with the parent store. Only Extension Store requests can be created/maintained in Xstore POS.
Event Stores - unique store number with no affiliation to an actual brick and mortar store. Also referred to as a standalone popup store. Store operates completely standalone, reporting its own sales and handles own inventory. Event Stores can only be created in Xadmin. See Oracle Retail Xstore Office User Guide for more information.
|
Note: Not all functionality is available on a mobile device configured as an extension type temporary store. |
The following topics are covered in this section:
To request a mobile server for specific dates or for an indefinite amount of time to host a temporary store.
Select System Admin from the Main Menu.
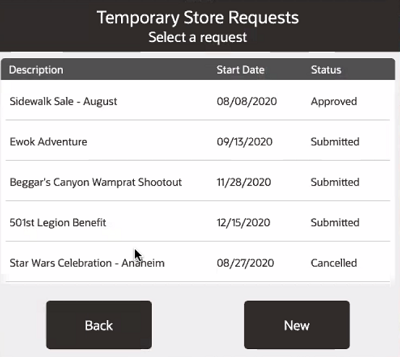
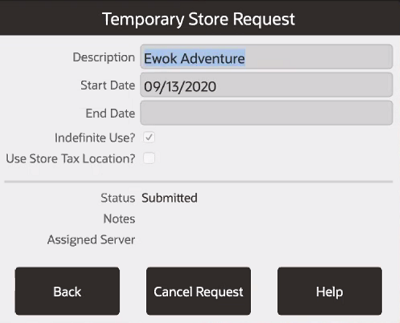
Click Temporary Store in the System Admin menu. A list of requests for that store within the last year is displayed. View-only information shows the status of the request, the assigned server and any notes added to the event.
The status can be:
Submitted
Approved
Rejected (rejected by the Home Office)
Cancelled (cancelled by Xstore user)
You can only cancel a request that is in Submitted or Approved status. See Cancel Temporary Store Request.
Select an event to open or select New to create a new request for an extension type temporary store.
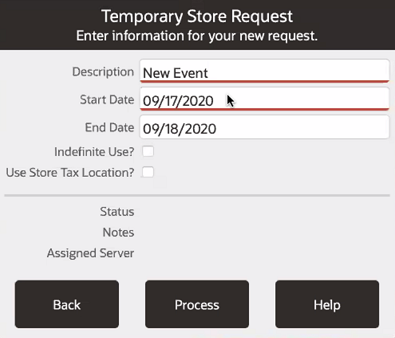
To create a new request:
Enter description, start date, and an end date.
If it is an indefinite request no end date is required. Select the check box for Indefinite Use?
Select Use Store Tax Location? if required. If left unchecked, you are prompted for the tax location each time a register is opened.
Select Process. After the request has been submitted there is no option to update the request. It has to be cancelled if not required.
A message is shown in the Message Tab to alert you when the status of a temporary store request for a mobile server for has changed.
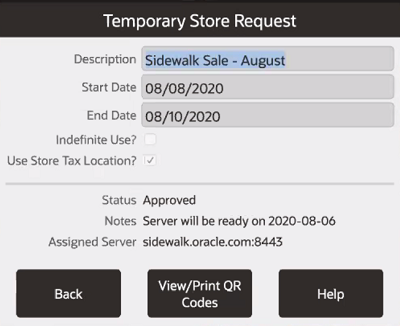
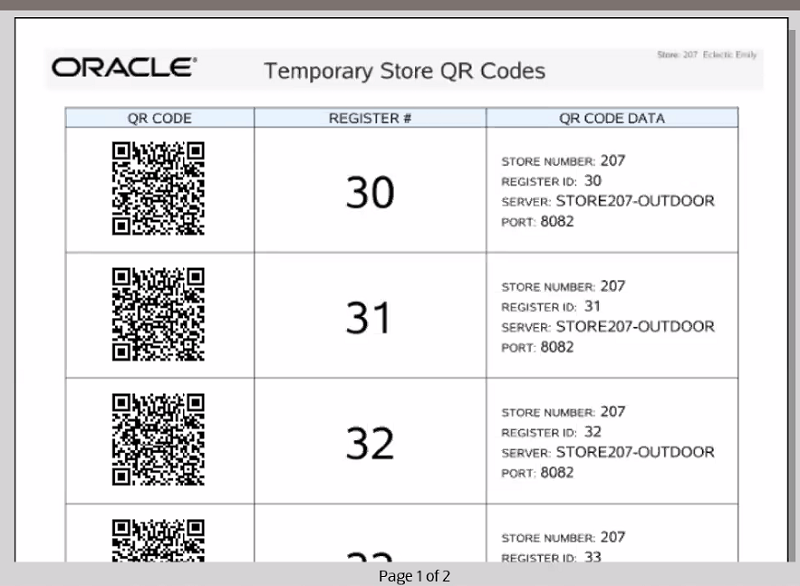
Once approved, you can generate a report to show QR codes. The QR code can be scanned to quickly set up mobile devices that will be used at the temporary store.
When a temporary store request has been approved by the home office, you can access the QR codes for setting up mobile devices to be used at the temporary store.
To view/print QR codes.
Select System Admin from the Main Menu.
Click Temporary Store in the System Admin menu. A list of requests for that store within the last year is displayed.
Select an Approved request.
Select View/Print QR Codes.
A Register Range screen appears. Enter the register range to print the QR Codes for.
You can only cancel a request that is in Submitted or Approved status.
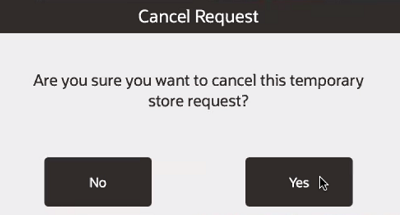
To cancel a request for a temporary store:
Select System Admin from the Main Menu.
Click Temporary Store in the System Admin menu. A list of requests for that store within the last year is displayed. View-only information shows the status of the request.
Select an event to open.
Select Cancel Request.
Select Yes to confirm the cancellation.
The request is changed to Cancelled status.
For extension type temporary stores, if Use Store Tax Location? is not checked when a temporary store is requested, at the very first register open of a new temporary store, you are prompted for the tax location and that is applied to sales.
Each time a register is opened for a temporary store you are prompted to confirm the tax location.
You can close your store from an extension type temporary store using a mobile client and the lead register in the physical store initiates the nightly close process.
The following functionality is available on a temporary store mobile device.
Sales/return functionality except Layaway, Work Order, Presale, Hold, Send Sale, and Warranty Plan transaction types
Change Password
Ability to sell items from a Gift Registry and Wish List (all of wish list is enabled)
Ability to create a wish list
Customer Maintenance
Register Open/Close
Store Open/Close
Till Management
Electronic Journal - only that temp store's transactions
Balance Inquiry
Omni Order Transaction Type (sale only, no order pickup). Omni channel Order Maintenance will be enabled on the temporary store only to check current order status for orders placed in the temp store (home store orders will not be visible).
Clock in/clock out but an associate can only clock in/out either at the home store or at the extension store)
The following reports
All daily sales reports with only the temporary stores data:
Flash Sales Summary
Flash Sales by Department
Flash Sales by Hour
Flash Sales by Employee
Daily Sales
Daily Sales and Cash
All Sales analysis reports with only the temporary stores data:
Sales by Hour
Sales by Department
Sales by Hour Analysis
Tax Exemption
Journal Report
Line Void
Post Void
Transaction Cancel
Price Override
Suspended Transaction
Sales Goals
Merchandise Sales Analysis
Inventory Count Sheet
Inventory Count Variance
Inventory Functions Below:
Inventory Counts - cycle counts
Item Transfer
Inventory Adjustment
Hardware Functions
Tabs - Info, Task, Goals, Message, Customer Offers, Associated Items
Fiscal and tax free invoices cannot be issued from extension store registers. Retailers still have the following options:
Do not use the extension model for stores where these are needed. Instead use event stores (that is, standalone popup stores).
Use the extension model but require customers to visit the physical store (note that these can be issued retroactively) when a fiscal or tax free invoice is desired. Note that this may result in a customer getting reimbursed for tax after the fact instead of having the tax deducted at the point of sale.
Accessing the version and copyright information is found at the bottom right hand corner of any screen in Xstore on the Status Bar. Select the red O tag to display the about information.