| Oracle® Retail Xstore Point of Service User Guide Release 20.0 F35716-05 |
|

 Previous |
 Next |
Oracle Retail Order Broker Cloud Service is an optional module that can be interfaced with Xstore Point of Service to provide information about inventory availability across all sales channels.
Using this order functionality, you can sell an item that is not in stock at your store and the Order Broker Cloud Service module automatically selects the best location to fulfill the customer's order across the enterprise.
There are multiple purchasing options available, such as same-store pickup, different store pickup, and delivery to a customer-specified address. You can track and maintain the orders using the Back Office Customer Maintenance function. See the Oracle Retail Xstore Point of Service Manager's Guide for more information about Back Office processing.
This chapter describes the following topics:
Xstore Point of Service provides different options for fulfilling an order:
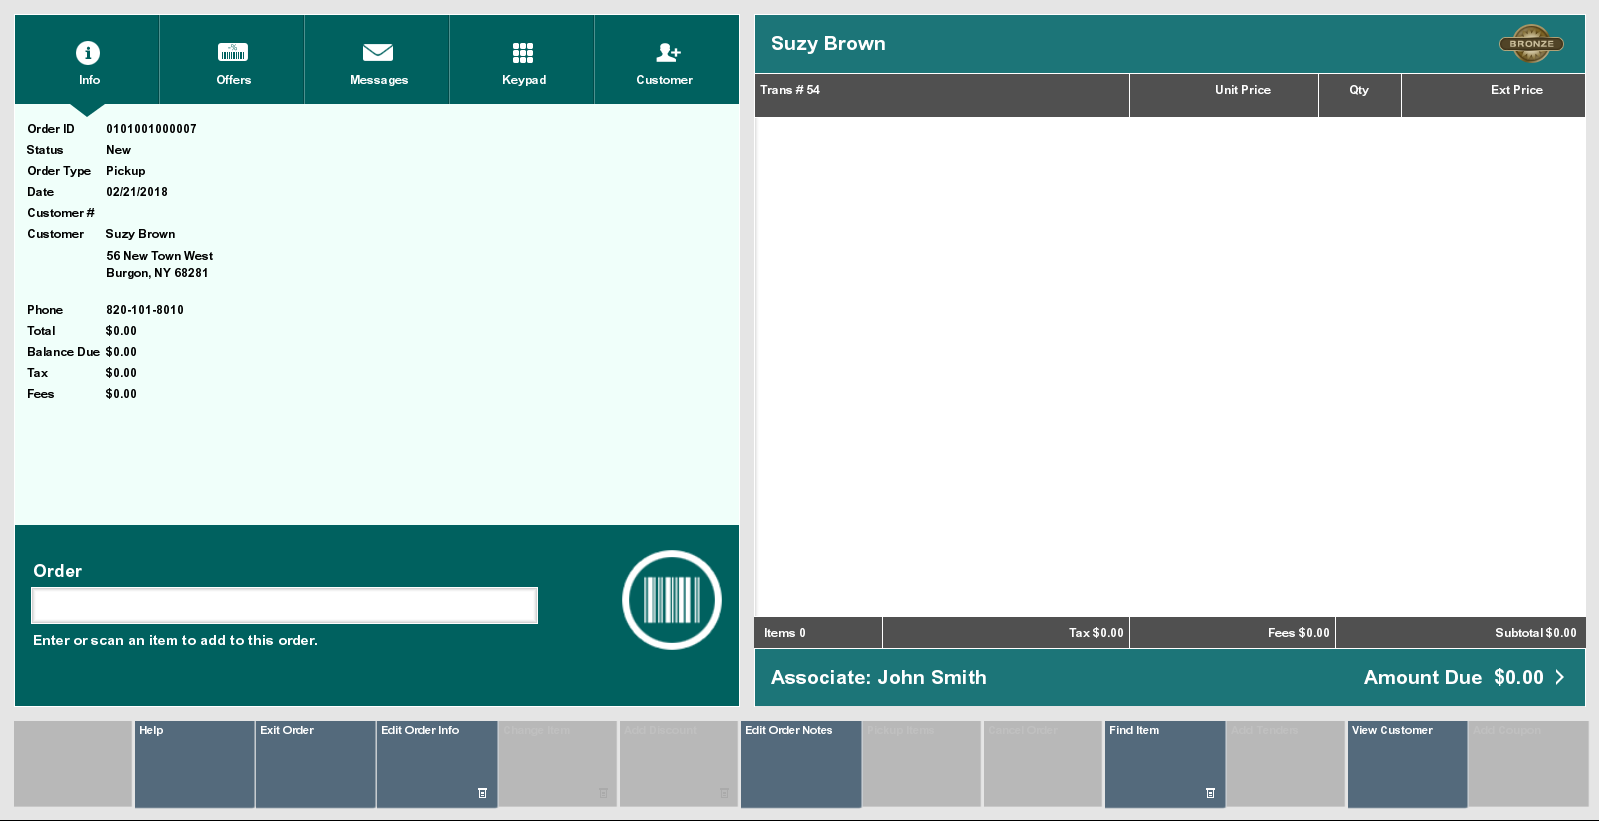
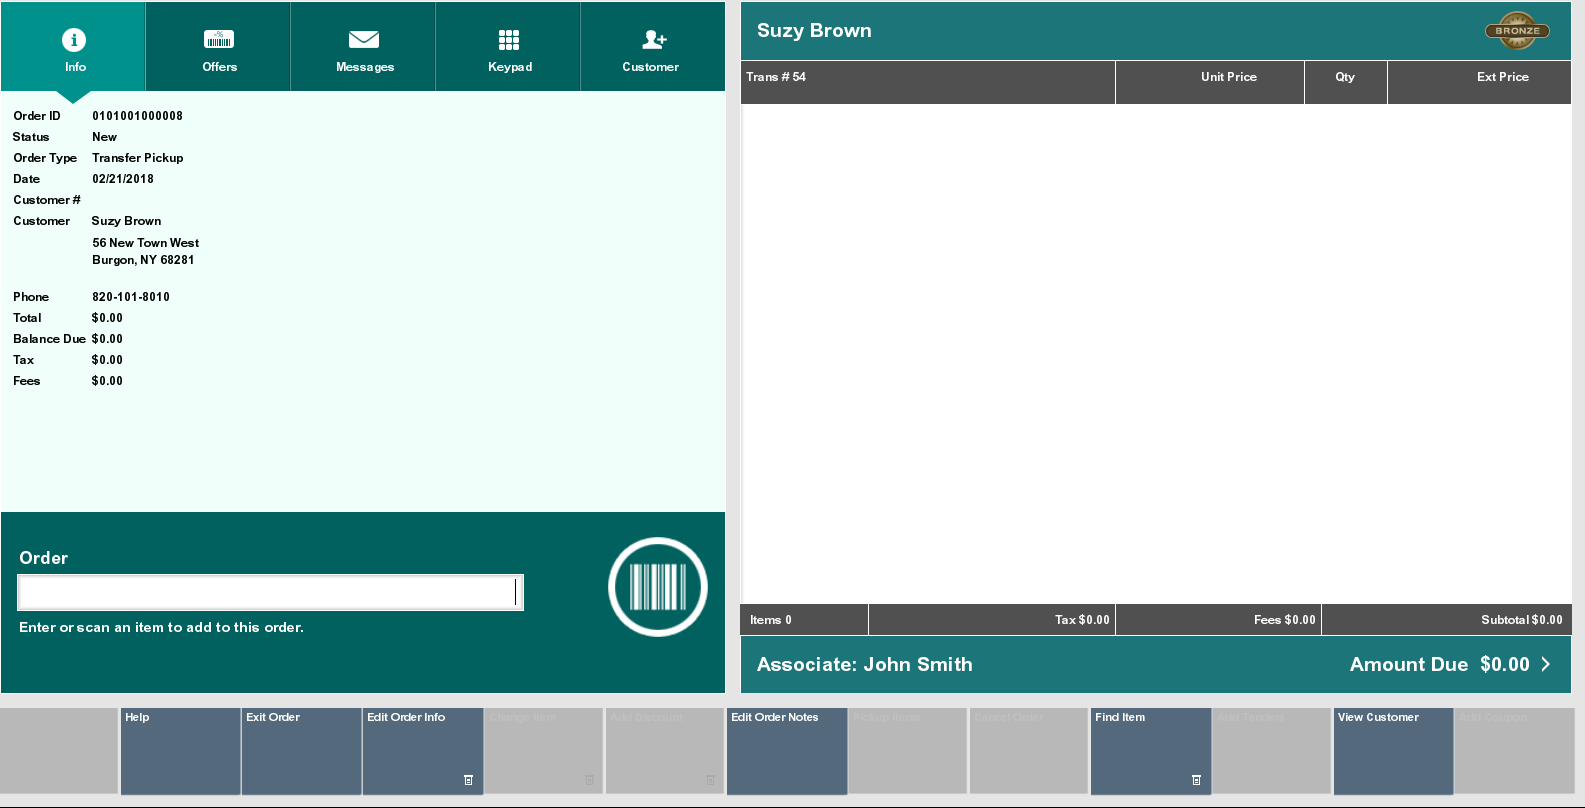
If an item is not available in your store, use this option to have the item shipped to your store for pickup at a later time. In this scenario, order creation and order fulfillment are both handled by the same Xstore Point of Service store location. Inventory is sourced out of another location and shipped to the Xstore Point of Service location. In Xstore Point of Service, this order type is defined as Transfer Pickup.
The process for picking up items at another store depends upon whether legacy order types are enabled or disabled.
If the inventory exists in the store where the customer wants to pick up, then that store is used and the order type is defined as a pickup. However, if the inventory does not exist in the store where the customer wants to pick it up, then Order Broker will find another location from which to fulfill the order. The order will be shipped from that location to the pickup. In this case, Xstore Point of Service considers it a Transfer Pickup.
If an item is not available in your store, use this option to find another store location where the item is currently available. The customer can pick up the item from that store once it is in a status of Ready for Pick Up. In this scenario, both order creation and order fulfillment is being done by the Xstore Point of Service system. Inventory comes out of the fulfilling store if that store has inventory available; if the store does not have inventory available, Order Broker finds the required inventory. In Xstore Point of Service, this order type is defined as Pickup.
If an item is not available in your store, use this option to have the item shipped directly to the customer's home (or another specified address). Order creation is done by the Xstore Point of Service system. In this scenario, order fulfillment may be done by another store or a distribution center. Inventory comes out of the fulfilling location. In Xstore Point of Service, this order type is defined as Delivery.
Order items can have the following statuses:
New: Indicates the item has been added to the order.
Polled: Indicates the source/fulfilling location got the item request.
Accepted: Indicates the source location has confirmed it can satisfy the order request.
Reserved: Indicates the item has been put aside for the customer at the source/fulfilling location.
In Transit: Indicates the item has been shipped.
In Transit Polled: Indicates the store in which the customer is to pick up the product has acknowledged that the items are in transit and is expecting the order.
Received: Indicates the item has been received in the store.
Fulfilled: Indicates the item has been picked up/delivered.
Cancelled: Indicates the item has been canceled.
Rejected: Indicates the source location has rejected the order and the item is sourced from another location. The status of the order becomes unfulfillable.
Unfulfillable: Indicates the item has been rejected and an alternative location could not be determined.
Orders can have the following statuses:
Open: At least one item in the order has a status of: New, Polled, Accepted, or In Transit.
Ready for Pick Up: All items are in reserved or received status (can also include canceled item).
Ready to Ship: This is applicable only for customer delivery, transfer pickup, or delayed pickup (pickup from this store). All items must be reserved, or some items are reserved and some canceled.
Complete: The order has been completed and the customer is in possession of their items.
Canceled: All items are canceled.
Unfulfillable: All items are unfulfillable or a mix of unfulfillable and canceled. Unfulfillable items are those that have been rejected by the store assigned as the source for the item and Order Broker cannot find another source store.
When new orders require your attention, a notification will appear on the Message Bar. Click the message bar to view information about the new orders.
After clicking the message bar, Xstore Point of Service opens a window displaying the following information about the orders:
Total New Orders: The total number of new orders. These include all orders with a status of ACCEPTED, POLLED, or RESERVED.
Ship Orders: The number of new orders waiting to be shipped from this store.
Customer Pick Up Orders: The number of new customer pickup orders to be picked up in this store.
Items Awaiting Pick: The total number of items that must be set aside for the new orders.
Average Order Age: The average age of the orders awaiting fulfillment. The age can be in either minutes or days and hours.
Oldest Order Age: The age of the oldest order awaiting fulfillment. The age can be in either minutes or days and hours.
Unfulfillable Orders: The total number of orders that cannot be fulfilled. When an order is rejected and cannot be filled at another location, the status becomes unfulfillable.
See the Oracle Retail Xstore Point of Service Manager's Guide for more information about processing orders in the back office.
A customer name and address is required to create an Order Broker order. You must assign a customer to the transaction prior to order creation if you did not do so at the beginning of the transaction. Refer to Associate a Customer with a Transaction for more information about setting up a customer.
To create an Order Broker order:
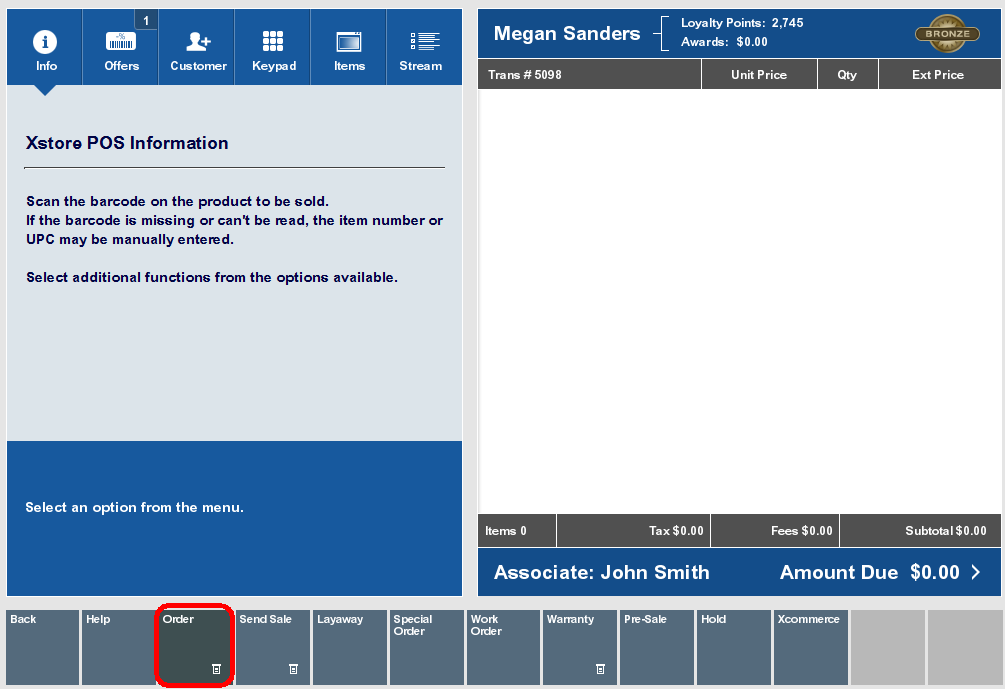
Click Extended Transaction in the Register Sale screen.
Click Order.
If a customer is associated with the transaction:
If the customer has one or more open orders, Xstore Point of Service displays a list of the open orders.
If the customer has no open orders, Xstore Point of Service prompts for order search criteria.
If no customer is associated with the transaction, Xstore Point of Service prompts for order search criteria.
Click New.
Associate a customer with the transaction. See Associate a Customer with a Transaction.
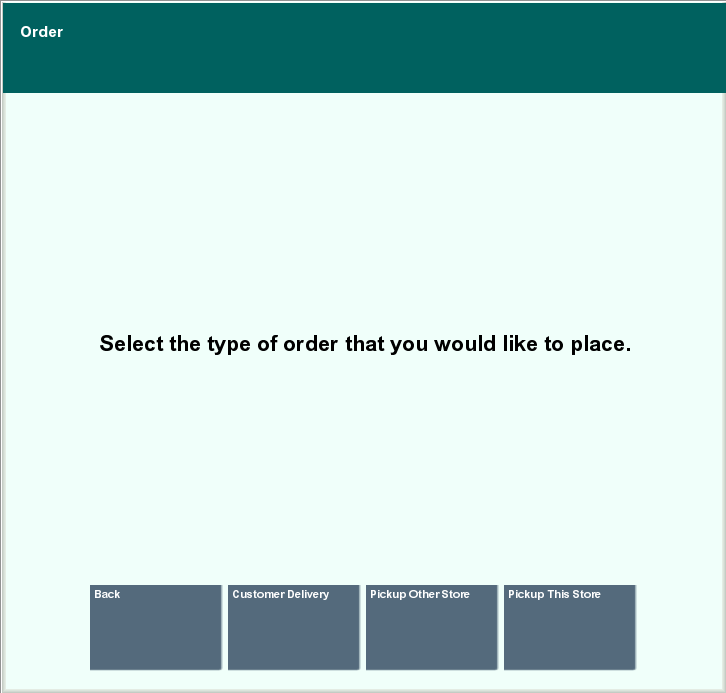
Select the type or order:
Customer Delivery: If an item is not available in your store, use this option to have the item shipped directly to the customer's home (or specified address). This order type is defined as Delivery type in Xstore Point of Service. Continue with Customer Delivery.
Pickup Other Store: If an item is not available in the store where the customer wishes to pick it up, the item will be sent to the pickup store from another location. The pickup store will then hold the item until the customer picks it up. This order type is defined as a Pickup if the item is in stock at the pickup store, and a Transfer Pickup if the item is sent to the pickup store from another store. Continue with Pickup Other Store.
Pickup This Store: If an item is not available in your store, use this option to have the item shipped to your store for pickup at a later time. This order type is defined as Transfer Pickup type in Xstore Point of Service. Continue with Pickup This Store.
To create an order for customer delivery:
Click Customer Delivery.
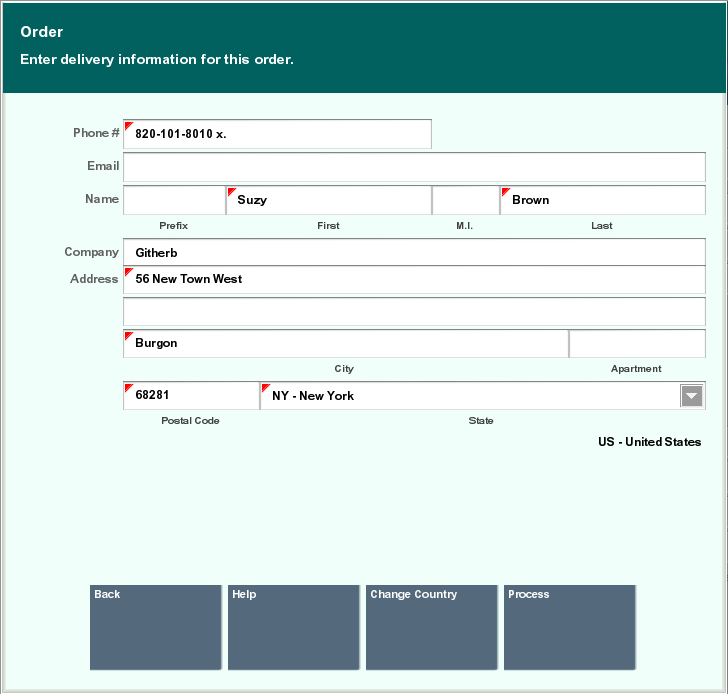
Enter the delivery information:
|
Note: If your system is configured to provide Address Lookup functionality, an Address Lookup button will be available to allow you to quickly look up customer addresses using minimal information. |
Phone: Phone number.
Email: E-mail address.
Prefix: Name prefix.
First: First name.
M.I.: Middle initial.
Last: Last name.
Company: Company name.
Address: First and second line of the street address.
Apartment: Apartment number.
State/Zip: Zip Code and state or province.
City/Country: City and country.
Click Process.
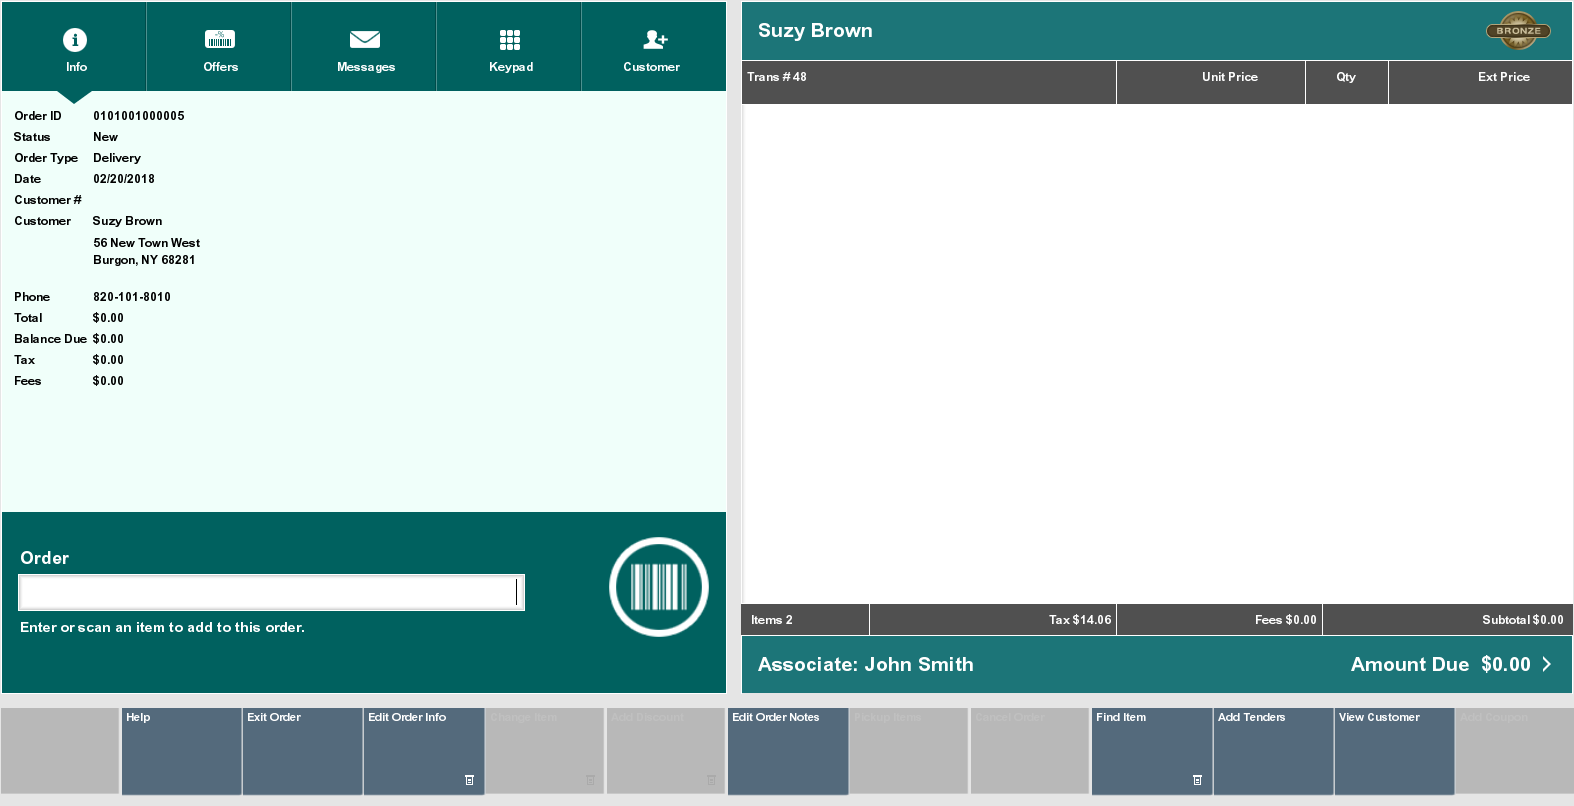
Item entry opens.
Enter an item for the order. See Entering Items.
After entering each item, Xstore Point of Service prompts for a delivery method for the item.
Select the shipping method:
Click the shipping method.
Use the up and down arrows to highlight the shipping method and press the Spacebar.
Click OK.
Repeat Steps 4 to 6 for each item to add to the transaction.
When you are finished adding order items:
Click Add Tenders to tender and complete the transaction.
Click Exit Order to exit the order and continue the transaction.
To create an order for pickup at another store:
Click Pickup Other Store.
Enter an item for the order. See Entering Items.
After entering each item, Xstore Point of Service prompts for the pickup location for the item.
Enter the search criteria for the pickup location:
City: City.
State: State.
Postal Code: Postal or zip code.
Country: Country.
Miles: Radius around the city in which to search for a store.
Click Process.
Xstore Point of Service displays a list of stores matching the search criteria.
Select the pickup store:
Click the store.
Use the up and down arrows to highlight the store and press the Spacebar.
Click OK.
The item is added to the transaction.
When you are finished adding order items:
Click Add Tenders to tender and complete the transaction.
Click Exit Order to exit the order and continue the transaction.
To create an order for pickup at the current store:
Click Pickup This Store.
Enter the items for the order. See Entering Items.
When you are finished adding order items:
Click Add Tenders to tender and complete the transaction.
Click Exit Order to exit the order and continue the transaction.
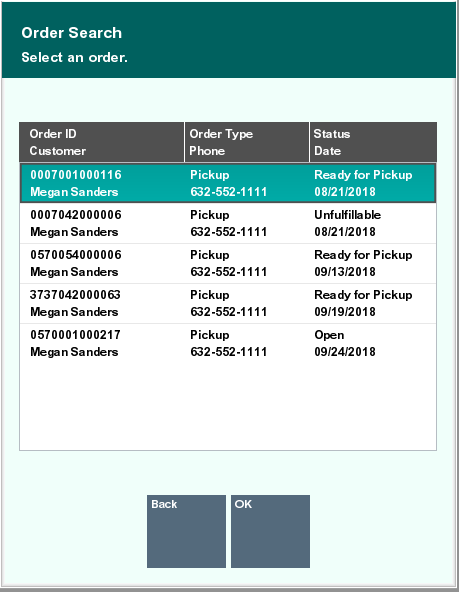
To search for an Order Broker order:
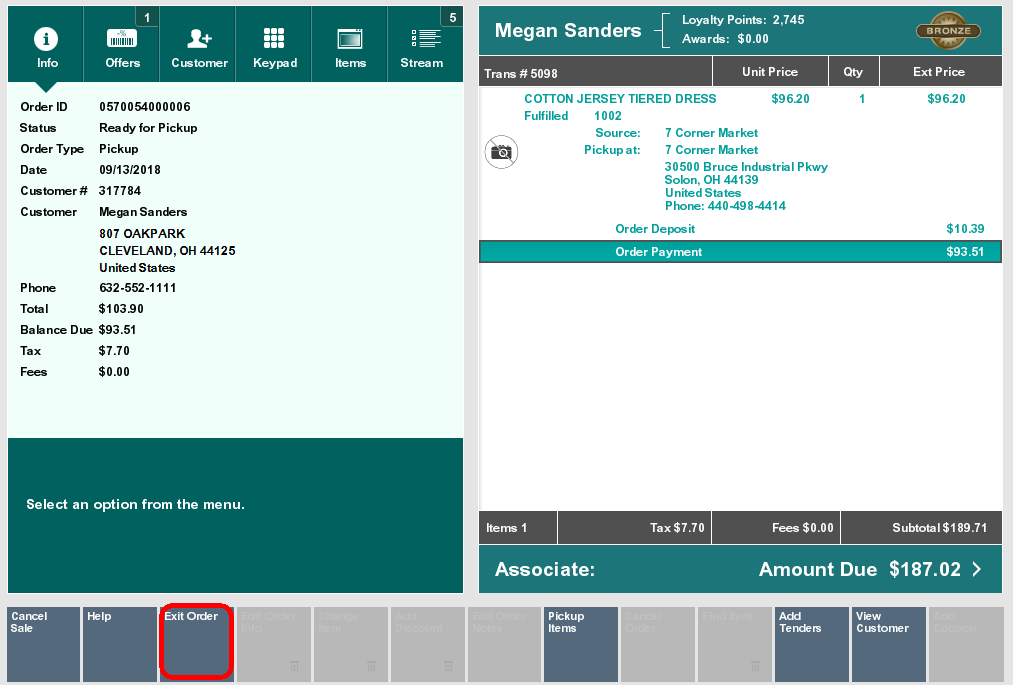
Click Extended Transaction in the Register Sale screen. See Figure 14-2.
Click Order.
If a customer is associated with the transaction:
If no customer is associated with the transaction, Xstore Point of Service prompts for order search criteria. Continue with Step 4.
Click Order Search.
Xstore Point of Service displays a search window.
Enter the search criteria.
Click Process.
If only one order matches the search criteria, Xstore Point of Service opens the order. The order is opened and the transaction continues.
If more than one order matches the search criteria, Xstore Point of Service displays a list of orders. Continue with Step 6.
Select the order:
Click the item.
Use the up and down arrows to highlight the correct item and press the Spacebar.
Click OK.
Xstore Point of Service opens the order. Continue the transaction.
Order items can only be changed in Order mode. See Chapter 8, "Modify a Transaction" for more information about changing line items in a transaction.
To make changes to Order Broker order items, perform the appropriate action:
Edit Delivery Information. Note that this can only be done for Order Broker orders before tendering. If a delivery address needs to be changed after the order is sent to Order Broker, the order must be canceled and a new order created with the correct address.
Make changes to the line items. See Chapter 8, "Modify a Transaction" for more information about changing items in a transaction.
To change the delivery information for an order:
|
Note: Note that this can only be done for Order Broker orders before tendering. If a delivery address needs to be changed after the order is sent to Order Broker, the order must be canceled and a new order created with the correct address. |
Click Edit Delivery Info.
Change the delivery information as necessary:
For a Customer Delivery order, enter the customer address. See Step 2 in Customer Delivery for more information.
For a Pickup Other Store order, search for the pickup store. See Steps 3 to 6 in Pickup Other Store for more information.
The customer must return to the store where an order was created to cancel that order. If an item has been reserved, a message prompt will display indicating that you must un-reserve the item in the Back Office before canceling the order.
To cancel an order:
Click Cancel Order.
Xstore Point of Service displays a list of items in the order.
Select the items to cancel:
Click the items.
Use the up and down arrows to highlight the correct items and press the Spacebar.
Click Select All to cancel the entire order.
Click Select & Continue.
A confirmation prompt opens.
Click Yes.
Xstore Point of Service prompts for a reason.
Select the reason:
Click the reason.
Use the up and down arrows to highlight the correct reason and press the Spacebar.
Click OK.
The items are removed and any return amount is applied to the transaction.
Continue the transaction:
Click Add Tenders to tender and complete the transaction.
Click Exit Order to exit the order and continue the transaction.
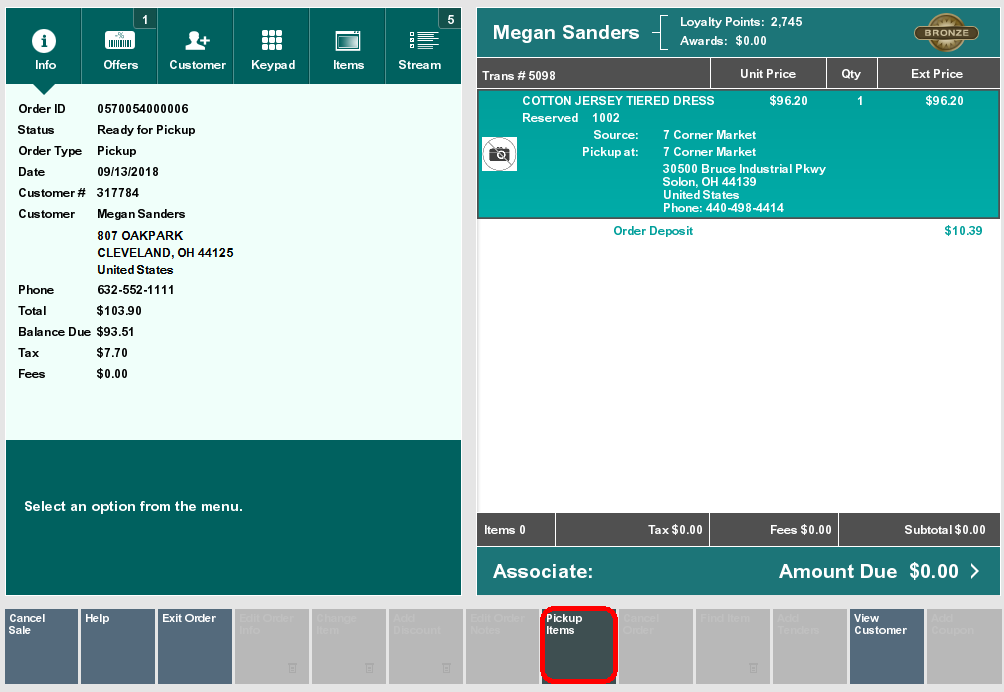
To perform a pickup of an order:
|
Note: If you enter the customer's information at the beginning of a sale and the customer's order item has been received at the store, a message may display indicating the order has been received and is ready for pickup. Press Enter to acknowledge the message and continue with Step 1 below. |
Open an Order Broker Order, see Opening an Order Broker Order.
Select Pickup /Cancel Order.
Xstore Point of Service displays a list of orders for that customer.
Select an oder from the list.
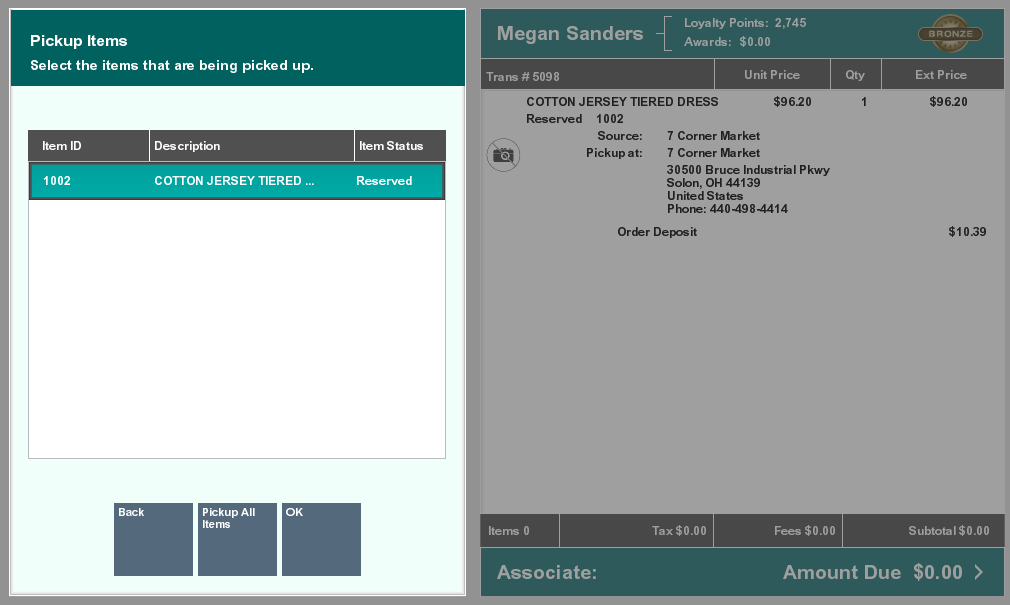
Select Pickup Items.
Xstore Point of Service displays a list of items in the order that are ready to be picked up.
Select the items to pick up:
Click the items.
Use the up and down arrows to highlight the correct items and press the Spacebar.
Click Pickup All Items to pick up the entire order.
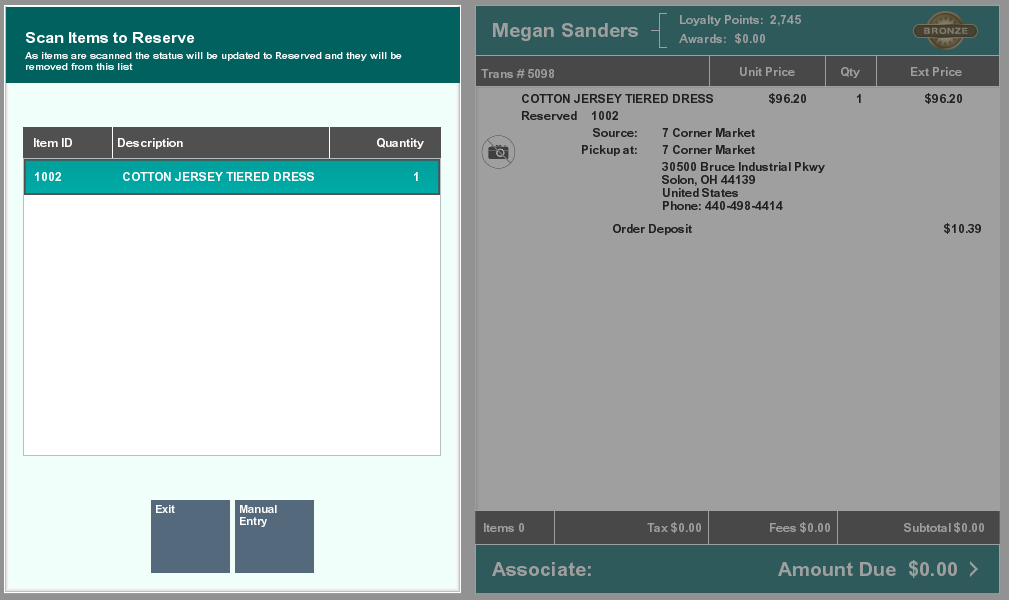
If your system has the Scan Items Prior to Adding to Transaction setting configured, the items display in a list to scan from, to confirm they are the correct items.
If your system does not have the Scan Items Prior to Adding to Transaction setting configured, no scanning is required. Continue at step 9
Scan the items from the list. The items will be marked Reserved and removed from the list.
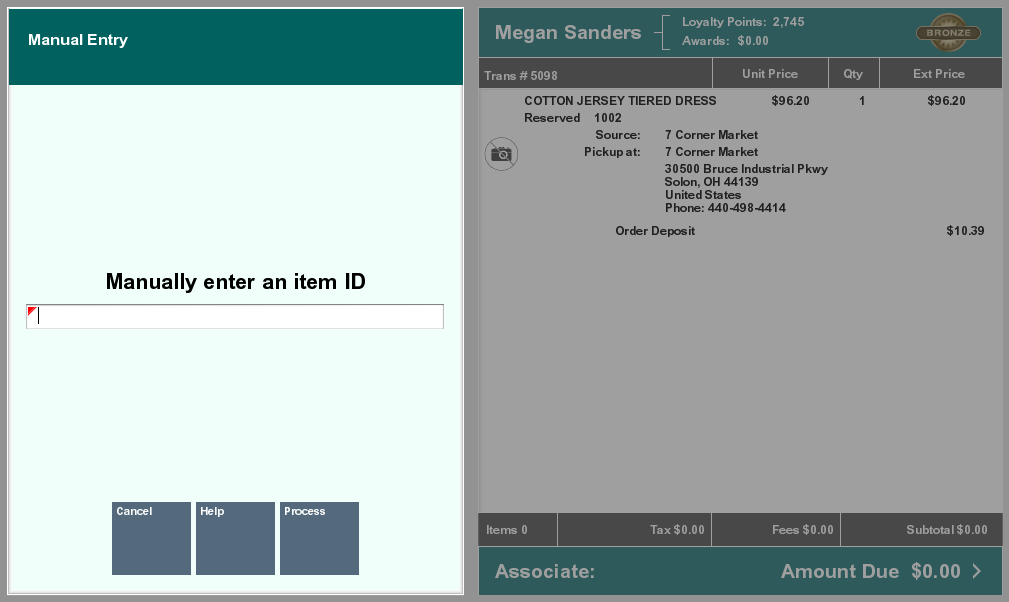
If the item does not scan, select Manual Entry and enter the ID of the item.
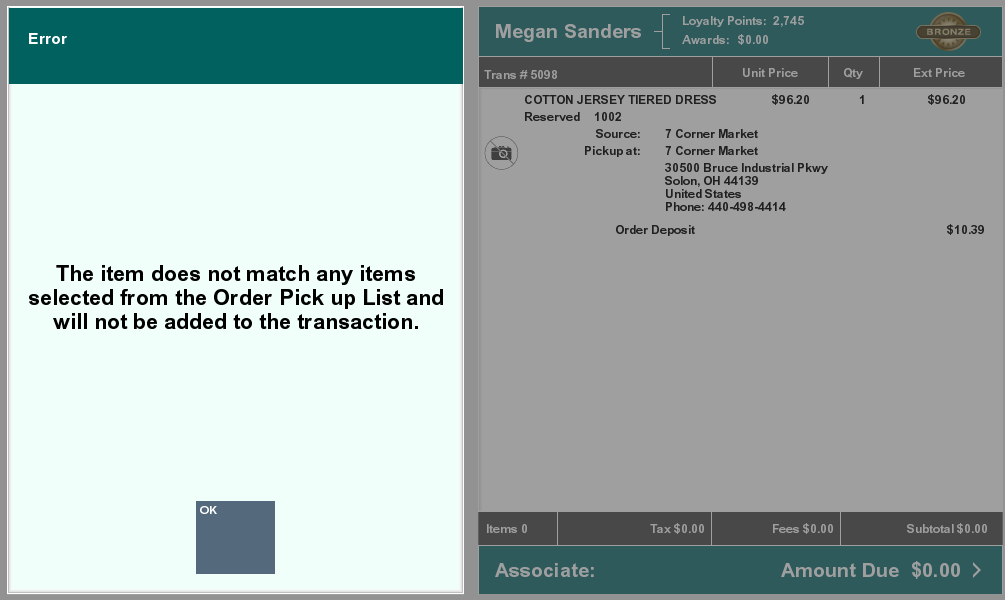
If an item is scanned or entered that does not match any items selected from the order pickup list, a warning message is shown and the item is not added to the transaction. Select OK to continue.
After an item has been scanned or manually entered, it is added to the transaction.
When all items have been added, select Exit Order.
Continue the transaction:
Click Add Tenders to tender and complete the transaction.
Click Exit Order to exit the order and continue the transaction.