Relate Batch Customer and Sales Integration

Relate Batch Customer and Sales Integration allows you to send merchandise hierarchy, item, customer, sales and return information from CWSerenade to Relate. Sending this information to Relate provides a centralized view of the customer’s value across your enterprise. You can use this information to perform data analysis, or segmentation, in Relate.
Relate Batch Customer and Sales Integration Process Flow

You must send information to Relate in the correct order.
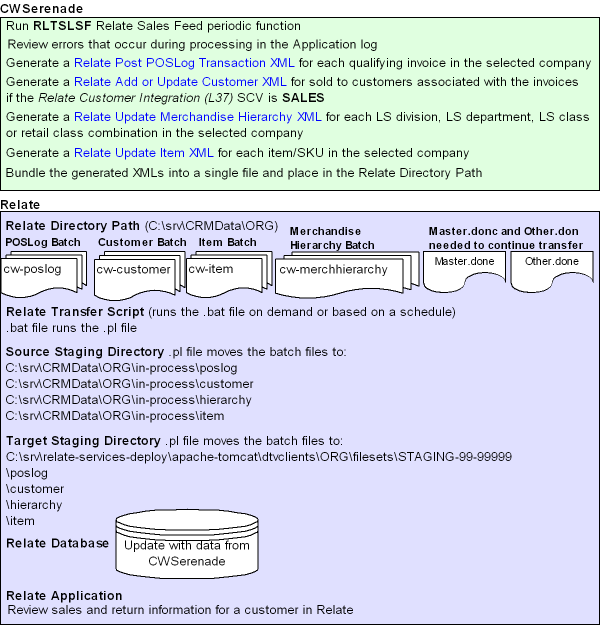
Send merchandise and item information to Relate: Run the Relate Item Feed to send merchandise hierarchy and item information to Relate.
• CWSerenade generates the Relate Update Merchandise Hierarchy Message and Relate Update Item Message for all of the items in the specified company.
• Relate processes the messages from CWSerenade and updates Relate with the merchandise hierarchy and item information.
See Relate Item Feed for processing details.
Send sales and return Information to Relate: On a nightly basis, run the Relate Sales Feed to send sales and return information to Relate.
• CWSerenade generates the:
• Relate Post POSlog Transaction Message for invoices that are not excluded from the Relate Sales feed.
• Relate Update Merchandise Hierarchy Message and Relate Update Item Message for the items included on the invoices that have not previously been sent to Relate, or have been updated since the last time they were sent to Relate.
• Relate Add or Update Customer Message for the sold to customers associated with the invoices if the Relate Customer Integration (L37) system control value is set to SALES.
• Relate processes the messages from CWSerenade and updates Relate with the sales and return information.
See Relate Sales Feed for processing details.
If you also use XStore: If the integration to Relate includes CWSerenade and XStore, you may wish to load merchandise hierarchy and item information from XStore instead of CWSerenade. In this case, you would not use the Relate Item Feed in CWSerenade. However, if XStore does not carry all of the items that are offered in the catalog and web site, you will need to load merchandise hierarchy and item information from both XStore and CWSerenade; in this situation, you should only use the Relate Sales Feed.
Viewing sales and return information in Relate: You can review the information sent to Relate in Customer Lookup / Edit. The Customers section of the Relate User Guide provides information on reviewing and updating a customer in Relate.
• The Relate Add or Update Customer Message creates or updates a customer in Relate on a periodic basis. Customer information displays on the Customer Lookup / Edit screen. You can also review a summary of the customer on the Customer Dashboard screen.
Note: See the Relate Customer Integration for information on communicating customer information interactively between Relate and CWSerenade.
• The Relate Post POSlog Transaction Message creates sale and return transactions in Relate. Sale and return information displays on the Transaction History screen for a selected customer. You can also review a summary of the transactions associated with a customer in the Purchase Activity section of the Customer Dashboard screen.
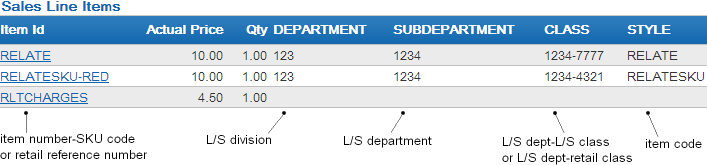
• The Relate Update Item Message provides item information for the items included on a sale or return. Item information displays for Sales Line Items and Return Line Items on the Transaction History screen for a selected customer.
• The Relate Update Merchandise Hierarchy Message provides the merchandise hierarchy assigned to an item. The merchandise hierarchy assigned to an item displays for Sales Line Items on the Transaction History screen for a selected customer.
See each message layout for more information on how CWSerenade populates each message, how the information updates the Relate database, and where you can view the information on the Relate screens.
Viewing sales and return information from Relate in CWSerenade: You can use the Display Purchase History Screen to review a customer’s purchase history from Relate. See Relate Purchase History Integration for an overview, required setup, and detailed information about the Display Purchase History screen.
In this topic:
• Relate Batch Customer and Sales Integration Process Flow
• Relate Integration Setup (Sales and Customer)
• Setup in CWSerenade for the Relate Sales and Customer Integration
• Item/SKU Relate Extract Setting
• Required Configuration when Relate Uses SSL
• Setup in Relate for the Relate Sales and Customer Integration
• CWSerenade Company > Relate Organization
• CWSerenade Customer Profile > Relate Attribute Definition
• Creating Customer Type Codes
• Relate Update Merchandise Hierarchy Message
• Sample Relate Update Merchandise Hierarchy Message
• Sample Relate Update Item Message
• Relate Add or Update Customer Message
• Sample Relate Add or Update Customer Message
• Relate Post POSlog Transaction Message
• Sample Relate Post POSlog Transaction Message - Sale
• Sample Relate Post POSlog Transaction Message - Return
For more information: This section provides information on the CWSerenade sales and item integration with Relate. See:
• The Relate Implementation Guide (Installer Version) for more information on the procedures and instructions required to install and configure the Relate application and database.
• The Relate Configuration Guide for more information on configuration settings for Relate that are defined using the Conflate tool.
• The Relate Batch Processing and Web Services Guide for more information on the Relate messaging interface, including how Relate processes XML messages and the details of each message.
• The Relate Database Dictionary for more information on the tables in the Relate database.
• The Relate User Guide for more information on using the Relate application.
• Relate Customer Integration for information on interactively synchronizing customer information between Relate and CWSerenade.
• Relate Purchase History Integration for information on reviewing a customer’s purchase history from Relate in CWSerenade.
• Relate Customer Wish List Integration for more information on how to review and modify a customer’s wish list from Relate using the Display Wish List Screen in CWSerenade.
• Relate Loyalty Integration for information on using the Relate Loyalty integration with CWSerenade.
Relate Integration Setup (Sales and Customer)

The setup required to use the Relate Item Feed, Relate Sales Feed, and Relate Customer Integration is described below.
Required versions: To use the CWSerenade sales or customer integrations with Relate, you must be on these versions:
• CWSerenade version 4.5 or higher.
• Relate version 10.5 or higher.
In addition, the Relate Customer Integration, Relate Purchase History Integration, and Relate Customer Wish List Integration uses version 2.3 of the Relate Customer API.
Setup is required in both CWSerenade and Relate.
• Setup in CWSerenade for the Relate Sales and Customer Integration
• Setup in Relate for the Relate Sales and Customer Integration
Setup in CWSerenade for the Relate Sales and Customer Integration
The setup required in CWSerenade to use the Relate Item Feed, Relate Sales Feed, and Relate Customer Integration is described below.
• Item/SKU Relate Extract Setting
• Relate Batch Customer Conversion
• Required Configuration when Relate Uses SSL
System Control Value |
Description |
Defines whether you assign a long SKU class or retail class to an item. Unselect this field to assign a long SKU class to an item. In this situation, select the following system control values: • Require Long SKU Division with Long SKU Department (E85) • Require L/S Department (I92) Select this field to assign a retail class to an item. A retail class is a long SKU class that is linked to a long SKU department. Also, the system requires you to enter long SKU values for an item: long SKU department, long SKU class (retail class), long SKU style, and long SKU vendor. Note: Not related to the Relate Customer Integration. |
|
Use the Relate Integration Values (L52) umbrella screen to set the following values: |
|
Defines the store ID associated with customers sent to Relate in the Relate Add or Update Customer Message. This is the Signup Store and Home Store assigned to the customer in Relate. The store ID cannot be greater than 8 positions. The system also includes the store ID you define here in the name of the XML batch file that is sent to Relate. Example: MESSAGE_CO#_STORE_ID_DATETIME.xml, where: • MESSAGE is the type of the message contained in the XML batch file • CO# is the CWSerenade company number • STORE_ID is the value defined in the Default Store for Sales Download (K69) system control value • DATETIME is the date and time the file was created in YYMMDDHHMMSS format; for example if the file was created on November 23, 2010 at 9:21:41, the DATETIME displays as 101123092141. An example of the XML batch file name that contains the Relate Add or Update Customer Message is: cw-customer_007_12301974_101123092141.xml. If the store ID does not exist in Relate, Relate automatically creates it when it processes the Customer message. Note: Not related to the Relate Customer Integration. |
|
Enter SALES to generate a Relate Add or Update Customer Message when you run the Relate Sales Feed. In this situation, CWSerenade includes only sold to customers that are associated with the invoices in the Relate Post POSlog Transaction Message. Enter INTERACT to send information on new and updated customers to Relate interactively if Relate is the system of record for customer information. See Relate Customer Integration for more information. |
|
Defines how CWSerenade identifies items/SKUs in the Relate Update Item Message and Relate Post POSlog Transaction Message. ITEM = CWSerenade uses the Item code and SKU code. XREF = CWSerenade uses the Retail reference number. If you use retail reference number, make sure you define a unique reference number for each of your items/SKUs. • You can define a retail reference number for a non-SKUed item on the Create or Change Item (Base Information) screen. You can define a retail reference number for a SKUed item on the Create or Change SKU - 1 of 2 (With Overrides) screen. Note: Not related to the Relate Customer Integration. |
|
Defines the item code to include in the Relate Post POSlog Transaction Message to represent all non-merchandise amounts for an invoice, such as freight, additional freight, handling and additional charges. Required if the Merchandise Only in Sales Feed (L36) system control value is unselected. Note: Not related to the Relate Customer Integration. |
|
Defines the types of sales (debit) invoices CWSerenade excludes from the Relate Post POSlog Transaction Message. Note: Not related to the Relate Customer Integration. |
|
Return Disposition Code to Exclude in Relate Sales Feed (M22) |
Defines the return disposition code assigned to return (credit) invoices that CWSerenade excludes from the Relate Sales Feed when the Suppress refund field in the Order Payment Method table is Y. In this situation, CWSerenade does not generate a return confirmation for these returns. Note: Not related to the Relate Customer Integration. |
Select this field to include merchandise and tax amounts only in the Relate Post POSlog Transaction Message. Unselect this field to include full invoice totals, including merchandise, freight, and additional charges, in the Relate Post POSlog Transaction Message. Use the Item for Non-Merchandise Amounts (L39) system control value to define the item code to include in the Relate Post POSlog Transaction Message to represent all non-merchandise amounts for an invoice, such as freight, additional freight, handling and additional charges. Note: Not related to the Relate Customer Integration. |
|
Use this field to identify the Relate organization that maps to your CWSerenade company. |
|
Select this field to include demographic profile data in the customer integration with Relate. Unselect this field to omit demographic profile date from the customer integration with Relate. For more information: See CWSerenade Customer Profile > Relate Attribute Definition for details on how to configure and map attribute data. |
|
Use Work with Store Cross Reference (WSCR) to set up cross reference information between a store location and CWSerenade.
• The Store # must match the store ID defined in the Default Location for Sales Download (K69) system control value. Note: If the store ID does not exist in Relate, Relate automatically creates it when it processes the Relate Add or Update Customer Message.
• The Item Hierarchy Levels should be set up as:
• Item Hierarchy Level 1 = L\S DIVISION
• Item Hierarchy Level 2 = L\S DEPARTMENT
• Item Hierarchy Level 3 = L\S CLASS
Note: Not related to the Relate Customer Integration.
In Working with Pay Types (WPAY), define a store tender for each pay type that you send to Relate in the Relate Sales Feed.
Note: If the store tender does not exist in Relate, Relate automatically creates it in the DTV_TENDER_TYPES table when it processes the Relate Post POSlog Transaction Message.
Note: Not related to the Relate Customer Integration.
CWSerenade sends the currency code for the offer associated with the source code on the order header in the Relate Post POSlog Transaction Message. MICROS recommends you create ISO currency codes in Working with Currency (WCUR) and assign the ISO currency codes to your offers in Working with Offers (WOFR).
Example: USD is the ISO currency code for the US Dollar.
Note: You can assign a currency code to an offer only if the Use Alternate Currency Pricing (H89) system control value is selected.
Note: Not related to the Relate Customer Integration.
The merchandise hierarchy used in the CWSerenade integration with Relate is:
CWSerenade Merchandise Hierarchy |
Relate Merchandise Hierarchy Level |
Long SKU division code |
DEPARTMENT |
Long SKU department code |
SUBDEPARTMENT |
• If Use Retail Integration (H26) is selected: long SKU department code + retail class code, separated by a dash (--). • If Use Retail Integration (H26) is unselected: long SKU department code + long SKU class code, separated by a dash (--). Note: The system uses the retail class code or long SKU class code defined at the item level and not the SKU level. |
CLASS |
No corresponding value; the CWSerenade integration with Relate does not use the merchandise hierarchy level SUBCLASS. |
SUBCLASS |
Item code |
STYLE |
Note: When creating or updating items in CWSerenade, make sure each item is assigned to a long SKU division code, long SKU department code, and long SKU class code or retail class code (based on the setting of the Use Retail Integration (H26) system control value). Not related to the Relate Customer Integration.
Note: Not related to the Relate Customer Integration.
Item/SKU Relate Extract Setting
The Relate Sales Feed generates the Relate Update Item Message only for items whose SKU Relate Extracted field in the SKU table is N or blank for the company for which you ran the Relate Sales Feed periodic process.
CWSerenade updates the SKU Relate Extracted field in the SKU table to N when any of the following fields change:
• Long SKU Department, Long SKU Class, Item Description, or Cost (Average cost, FIFO cost, LIFO cost, or Standard Cost, based on the setting of the Costing Method (A25) system control value) in the Item table.
• SKU Description, Long SKU Class, or Cost (SKU Average cost, SKU FIFO cost, SKU LIFO cost, or SKU Standard Cost, based on the setting of the Costing Method (A25) system control value) in the SKU table.
You can update the Long SKU Department, Long SKU Class, Item Description and Cost for an item on the Create or Change Item screen; see Create Item Screen. Note: If the item contains SKUs, the system updates the SKU Relate Extracted field in the SKU table to N for all of the SKUs of the item. You can update the Cost for a non-SKU item on the Create Item (Base Information) Screen.
You can update the SKU Description, Long SKU Class, and Cost for a SKU on the Create or Change SKU screen; see Create SKU 1 of 2 (With Overrides) Screen and Create SKU 2 of 2 (With Overrides) Screen. Note: If the item contains SKUs, the system updates the SKU Relate Extracted field in the SKU table to N only for the specific SKU of the item that has been updated.
Note: Not related to the Relate Customer Integration.
The cwdirectcp_relate.properties file contains settings required for integration with Relate.
Where is the file located? This file is located in the same folder as the other CWSerenade properties files, where C: represents the root drive where CWSerenade is installed:
C:\Serenade\server\conf\cwdirectcpproperties\cwdirectcp_relate.properties
How to edit the file: MICROS recommends that you first make a backup copy of the configuration file. Then use a text editor, being careful not to change any of the settings except those indicated below.
Note: Your changes take effect the next time you stop and restart the SERENADE service (or the application server).
Setting |
Description |
Setting |
Defines the location where CWSerenade places the batch files to send to Relate. If this setting is blank or an invalid path, the system writes a message to the CWSerenade Application Log: Relate Item Feed not run because the RELATE_DIRECTORY_PATH was not set up on this server. See Properties File Configuration. Note: Not related to the Relate Customer Integration. Important: MICROS recommends setting the RELATE_DIRECTORY_PATH to a location on the Relate application server and using the Relate Transfer Script to process the files. However, if the RELATE_DIRECTORY_PATH is a location on the CWSerenade application server, you will need to manually copy the batch files over to the Relate application server. To process the batch files immediately, place the files in the following location: C:\srv\relate-services-deploy\apache-tomcat\dtvclients\ORG\auto_fileset, where C: is the root drive where Relate is installed and ORG is the Relate organization descriptor. |
This can be a location on the CWSerenade application server or the Relate application server. CWSerenade application server example: C://CWSerenade//RelateData// where: CWSerenade = the name of the CWSerenade application server RelateData = the name of the folder on the application server where the files to send to Relate are placed.
Relate application server example: ////relateoms//srv//CRMData//ORG// where: relateoms = the name of the Relate application server. CRMData = the name of the folder on the Relate application server where the batch files are placed. ORG = the organization descriptor associated with the data in the batch file. |
|
Defines the location on the CWSerenade application server where the RLTCSID Update Customer with Relate ID periodic function (program name PFRCIU) looks for the Relate query results comma separated value file (CSV) to process. See Relate Update Customer with Relate ID Process. |
Valid location on the CWSerenade application server; for example: C://CWSerenade//RelateData//customerId// |
|
Defines the location on the CWSerenade application server where the RLTNOID Report Customer with No Relate ID Report periodic function (program name PFRCNI) generates the Serenade Customers without Relate IDs report. See Relate CWSerenade Customer without Relate ID Report. |
Valid location on the CWSerenade application server; for example: C://CWSerenade//RelateData//customerWithoutRelateIdReports// |
|
RELATE_CUSTOMER_SERVICE_PREFIX |
The system uses this property to build the URL for communication with Relate during the Relate Customer Integration, Relate Loyalty Integration, Relate Purchase History Integration, and Relate Customer Wish List Integration. |
http://relateserver:8084/ soap/ where: relateserver = the name of your Relate server 8084 = the port to use on the Relate server |
RELATE_CUSTOMER_SERVICE_SUFFIX |
The system uses this property, along with the RELATE_CUSTOMER_SERVICE_PREFIX, to build the URL for communication with Relate using the Customer Services API. |
/v2_3/CustomerServices?wsdl where 2_3 is the version of the Customer Services API |
The Relate user ID with Security Group permission included in Relate’s API messages. |
Must be a valid user ID in Relate that has Security Group permission |
|
Indicates the Telephone Type in Relate that maps to the daytime phone number in CWSerenade. Should be set to BUSINESS. How to define in Relate? You can create a telephone type of BUSINESS in Relate by: • sending the Relate Add or Update Customer Message with a ContactType of Phone and a SubTypeCode BUSINESS • adding a row to the CST_PHONE_TYPCODE table in the Relate database |
RELATE_DAY_PHONE_LABEL=BUSINESS |
|
Indicates the Telephone Type in Relate that maps to the evening phone number in CWSerenade. How to define in Relate? You can create a telephone type of HOME in Relate by: • sending the Relate Add or Update Customer Message with a ContactType of Phone and a SubTypeCode HOME • adding a row to the CST_PHONE_TYPCODE table in the Relate database |
RELATE_EVE_PHONE_LABEL=HOME |
|
Indicates the Telephone Type in Relate that maps to the third phone number in CWSerenade. The Third Phone Number Type (L53) system control value controls whether the third phone number is labeled as the mobile or fax number in CWSerenade. Note: MICROS recommends the name entered in the Third Phone Number Type (L53) system control value match the value defined for the RELATE_FAX_PHONE_LABEL. How to define in Relate? You can create a telephone type of FAX or MOBILE in Relate by: • sending the Relate Add or Update Customer Message with a ContactType of Phone and a SubTypeCode FAX or MOBILE • adding a row to the CST_PHONE_TYPCODE table in the Relate database |
RELATE_FAX_PHONE_LABEL=MOBILE |
|
Indicates the Alt Key Type of the alternate key in Relate that maps to the CWSerenade customer number. Relate automatically creates this entry for a customer when you send the customer to Relate if it does not already exist. Also, Relates adds a row to the CST_ALT_KEY_TYPCODE table in the Relate database if it does not already exist. |
RELATE_ALT_ID_SERENADE=SERENADE_ID |
|
RELATE_ALT_ID_POS |
Not currently implemented. |
N/A |
RELATE_ALT_ID_WEB |
Indicates the Alt Key Type of the alternate key in Relate that maps to the ecommerce site’s customer number. How to define in Relate? You can create a alternate key type such as EONE_USER_ID in Relate by: • sending the Relate Add or Update Customer Message from your ecommerce system with an AlternateKey whose TypeCode is EONE_USER_ID • adding a row to the CST_ALT_KEY_TYPCODE table in the Relate database Note: See the Relate Customer Integration for information on how the ecommerce customer ID is used to identify the customer in the order API. |
RELATE_ALT_ID_SERENADE=EONE_USER_ID |
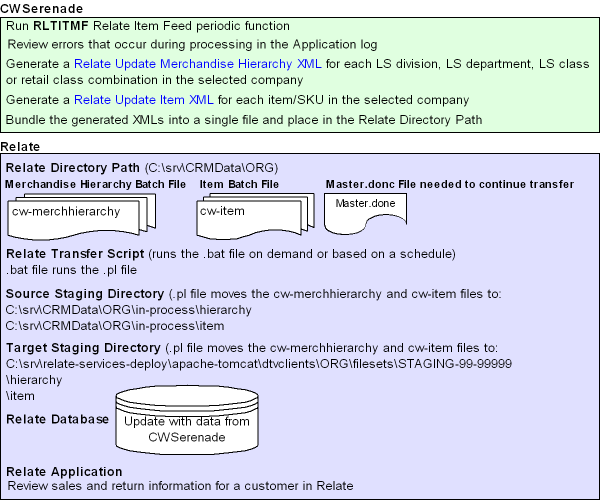
Relate Item Feed: Use the RLTITMF Relate Item Feed periodic function (program name PFR0101) to send the Relate Update Merchandise Hierarchy Message and Relate Update Item Message to Relate during the Relate Item Feed. Assign this periodic function to a daily periodic process. See How to Schedule a Job.
Relate Sales Feed: Use the RLTSLSF Relate Sales Feed periodic function (program name PFR0102) to send the Relate Update Item Message, Relate Add or Update Customer Message and Relate Post POSlog Transaction Message to Relate during the Relate Sales Feed. Assign this periodic function to a daily periodic process. See How to Schedule a Job.
Relate Customer Integration Synchronization: Use the SYNCRDB periodic function (program name PFR0105) to send customer information to Relate, either as part of an initial export of customer records to Relate, or when there is a communication failure during interactive processing. See Synchronizing Customer Information through a Periodic Function for more information.
Customer Upload to Relate: Use the RLTCSUP Customer Upload to Relate periodic function (program name PFRBCC) to send all CWSerenade sold to customers to Relate; see Relate Batch Customer Conversion.
Update Customer with Relate ID: Use the RLTCSID Update Customer with Relate ID periodic function (program name PFRCIU) to update the Relate ID in the Customer Sold To table with the Customer ID from Relate; see Relate Batch Customer Conversion.
Report Customer with No Relate ID: Use the RLTNOID Report Customer with No Relate ID periodic function (program name PFRCNI) to generate a report listing CWSerenade sold to customers that do not have a Relate ID defined in the Customer Sold To table; see Relate Batch Customer Conversion.
Relate Batch Customer Conversion
This may be useful when you first integrate CWSerenade with Relate and want to begin using the Relate Customer Integration.
The Relate Batch Customer Conversion process consists of the following steps:
1. Running the RLTCSUP Customer Upload to Relate periodic function (program name PFRBCC) to send all CWSerenade sold to customers, excluding any sold to customers whose Ghost field in the Customer Sold To table is Y or that already have a Relate ID, to Relate using the batch Relate Add or Update Customer Message.
2. Running the RLTCSID Update Customer with Relate ID periodic function (program name PFRCIU) to update the Relate ID in the Customer Sold To table with the Customer ID from Relate.
3. Running the RLTNOID Report Customer with No Relate ID periodic function (program name PFRCNI) to generate a report listing CWSerenade sold to customers that do not have a Relate ID defined in the Customer Sold To table.
Relate Batch Customer Upload to Relate Process
This process generates a batch customer conversion XML batch file, containing all sold to customers minus any flagged as a ghost or that already have a Relate ID, to send to Relate for processing.
Before you begin: Before you send all sold to customers to Relate, you should:
• Run Customer Sold To Merge/Purge to eliminate duplicate records.
• Make sure you have completed the Relate Integration Setup (Sales and Customer).
• Optionally, run the CTYCONV Country Code Conversion periodic function (program name PFCCC32) to update the country code in CWSerenade tables from a 3-digit country code to a 2-digit ISO country code. If you run this periodic function, once it is done, you should also run the CTY3DEL Delete 3 Character Country Code periodic function (program name PFCCCD3) to delete the 3 position country code from the CWSerenade tables since it is no longer used.
Note: Before you run these programs, you should end any running jobs and clear the following tables:
• Catalogue Request Interface
• CSF Vendor Download
• Customer API
• DW Tables: Company, Customer Bill To, Customer Ship To, Customer Sold To, Entity, Geography, SKU, Vendor, Warehouse
• EC Tables: Country, SCF State, Ship Exclusion, State
• F21 Tables: Vendor Master
• Lawson Vendor Interface
• Marketing Download Tables: Customer Address Chg, Customer Inquiry, Customer Status Chg, Order Header, Vendor Download
• MBS Tables: Changed Customers, Work File
• NeoData Tables: Order Header
• PC Tables: Address Changes, Extract, Finder -Pre-assigned AC
• Phone Order Expanded
• Promotion Upload
• RI Item Upload
• Vendor Interface Download
• Vendor Upload
• WMS Tables: Vendor master file
• World Pak Tables: Item File, Order Detail, Order Header
1. |
Run the RLTCSUP Customer Upload to Relate periodic function (program name PFRBCC) to submit the RLTCUSTUP job. Note: When you submit the RLTCSUP periodic function, the system creates an Active Procedure to keep track of the updates made so that the process can be stopped and restarted at a later time. |
2. |
CWSerenade writes any messages related to the Relate batch customer conversion, including any errors that may occur during processing, to the CWSerenade Application Log. |
3. |
CWSerenade generates the following message using customer information from the CWSerenade database: Relate Add or Update Customer Message: Contains customer information for all sold to customers in the CWSerenade company for which the Relate batch customer conversion was run. CWSerenade creates an XML batch file that contains all of the Customer messages generated and names the file cw-customer_conversion_CO#_STORE_ID_DATETIME.xml where: • CO# is the CWSerenade company number • STORE_ID is the value defined in the Default Location for Sales Download (K69) system control value • DATETIME is the date and time the file was created in YYMMDDHHMMSS format; for example if the file was created on November 23, 2010 at 9:21:41, the DATETIME displays as 101123092141. Example file name: cw-customer_conversion_007_12301974_101123092141.xml |
4. |
CWSerenade places the customer conversion XML batch file in the directory defined in the RELATE_DIRECTORY_PATH setting in the Relate Properties file. CWSerenade also creates an empty text file named OTHER.done to notify Relate that the XML batch file is ready to be picked up and processed by Relate. |
5. |
Run the Relate Transfer Script on the Relate application server to retrieve the customer conversion XML batch files from the RELATE_DIRECTORY_PATH and place it in the Source Staging Directory, where C: is the root drive where Relate is located and ORG is your organization ID: C:\srv\CRMData\ORG\in-process\customer Note: In order for the Relate Transfer script to process correctly: • The Other.done file must exist in the RELATE_DIRECTORY_PATH to process the Relate Add or Update Customer Message. • The RELATE_DIRECTORY_PATH must be defined in the .pl file; see Configure the .pl File. |
6. |
Relate monitors the source staging directory for new messages to process. After Relate processes a message, it moves the message to the Target Staging Directory, where C: is the root drive where Relate is located and ORG is your organization ID: C:\srv\relate-services-deploy\apache-tomcat\dtvclients\ORG\filesets\STAGING-99-999\customer Three sub-folders exist under the customer folder: • archived: Contains a copy of the XML batch file. • failed: Files in this directory contain XML code for the records that did not process correctly. You can use the XML API File Reader to determine why the error occurred. See the XML API File Reader section of the Relate Batch Processing and Web Services Guide for more information. • logs: Contains log files for the batch processing results. Any errors that occurred during processing display in the log file. |
7. |
For each XML message that is processed successfully, Relate updates the appropriate tables in the Relate database. You can view the results in the Relate application. For more information: See Relate Add or Update Customer Message for more information on how CWSerenade populates the message, the tables in the Relate database that are updated and where you can view the information in Relate. |
Relate Update Customer with Relate ID Process
This process updates the Relate ID in the Customer Sold To table with the correct customer ID from Relate.
1. |
Run the following query over the Relate database, where REL is the value defined in the Relate Organization Descriptor (L50) and SERENADE_ID is the value defined for the RELATE_ALT_ID_SERENADE setting in the Relate Properties file: SELECT ALT_CUST_ID [Serenade Customer ID], CUST_ID [Relate Customer ID] FROM [Relate].[dbo].[CST_CUST_ALT_KEY] CUSTID JOIN [Relate].[dbo].[DTV_ORGANIZATION] ORG ON CUSTID.ORGANIZATION_ID = ORG.ORGANIZATION_ID WHERE ORG_NAME='REL' AND ALT_KEY_TYPCODE='SERENADE_ID' |
2. |
The query produces a list of Relate customers that have a CWSerenade customer ID defined in the alternate key SERENADE_ID. Example: 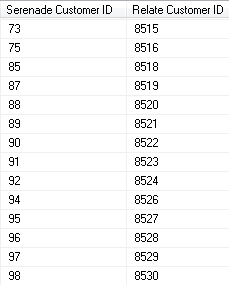 |
3. |
Save the query results as a comma separated value file (CSV) in the directory specified in the RELATE_CUSTOMER_ ID_DIRECTORY_PATH setting in the Relate Properties file. |
4. |
Run the RLTCSID Update Customer with Relate ID periodic function (program name PFRCIU) to submit the RLTCUSTID job. This job uses the CWSerenade Customer number and Relate Customer ID in the saved query file to update the Relate ID for the sold to customer in the Customer Sold To table. For each record in the Customer Sold To table that is updated, the system also updates the Synchronize with Remote DB field to N. Note: This periodic function updates the Relate ID for the sold to customer in the Customer Sold To table based on the query results file, regardless of whether a Relate ID was already defined for the sold to customer. |
5. |
CWSerenade writes any messages related to the Relate ID update, including any errors that may occur during processing, to the CWSerenade Application Log. |
6. |
Once the job is complete, the system deletes the query results file saved in the RELATE_CUSTOMER_ ID_DIRECTORY_PATH. |
Relate CWSerenade Customer without Relate ID Report
This process generates a report listing the CWSerenade sold to customers that do not have a Relate ID. If you have run the Relate Batch Customer Upload to Relate Process and Relate Update Customer with Relate ID Process, this report should include only sold to customers whose Ghost field in the Customer Sold To table is Y. Any other sold to customer listed on this report should be reviewed in both CWSerenade and Relate to determine why it does not have a Relate ID.
1. |
Run the RLTNOID Report Customer with No Relate ID Report periodic function (program name PFRCNI) to submit the RLTCSTNOID job. |
2. |
This job looks for sold to customers in the Customer Sold To table whose Relate ID field is blank. The system creates a comma separated value file (CSV) in the directory specified in the RELATE_CUSTOMER_WITHOUT_RELATE_IDDIRECTORY_PATH setting in the Relate Properties file. CWSerenade names the file SerenadeCustomersWithoutRelateIds_DATETIME.csv where DATETIME is the date and time the file was created in YYYYMMDD_HHMMSS format; for example if the file was created on March 19, 2014 at 9:21:41, the DATETIME displays as 20140319_09:21:41. Example file name: SerenadeCustomersWithoutRelateIds_20140319_20140319_120556.csv |
3. |
CWSerenade writes any messages related to the RLTNOID periodic function, including any errors that may occur during processing, to the CWSerenade Application Log. |
Sample report: A sample of the CWSerenade Customers without Relate IDs report is displayed below.
17 24 27 28 34 50 53 55 58 |
LISA JANE BRYN ROSE OLAF JOSIAH GRACE PEARL THOMAS ELIJAH |
LETENDRE CARRINGTON MATILDA COOPER JONES JANE LILLIAN RUSSELL WILSON |
33331-1147 01468-1566 B3J1V1 01420-2697 01119 02053-1715 02053-1715 01581-3960 01118-1545 |
Contents:
• Sold to customer number: The sold to customer number without a Relate ID.
• Last name: The last name of the sold to customer without a Relate ID.
• First name: The first name of the sold to customer without a Relate ID.
• Zip: The postal code for the sold to customer without a Relate ID.
Required Configuration when Relate Uses SSL
If Relate uses SSL, perform the following steps:
1. Obtain the certificate from Relate and load it onto a folder on each CWSerenade application server, such as C:\CWI\Install\Relate_Certs\.
2. On the CWSerenade server, select Start > Run. At the Run window, enter cmd and select OK to advance to a command prompt window.
3. At the command prompt window, type keytool - import -keystore C:\Relate_Certs\cacerts -file C:\CWI\Install\Relate_Certs\servername.crt -alias relate where:
• C:\Relate_Certs\cacerts = the path on the application server for the cacerts directory
• C:\CWI\Install\Relate_Certs\ = the directory where the Relate certificate was stored
• servername.crt = the Relate certificate name
• relate = the alias for the Relate certificate, which might be the exact server.domain.com name or something more generic like relate
4. Press Enter.
5. When the system prompts you for the keystore password, type changeit and press Enter.
6. When the system asks whether to trust the certificate, type yes and press Enter.
The system displays a message indicating the certificate was added to the keystore.
Setup in Relate for the Relate Sales and Customer Integration
The setup required in Relate to use the Relate Item Feed, Relate Sales Feed, and Relate Customer Integration is described below.
• CWSerenade Company > Relate Organization
• CWSerenade Customer Profile > Relate Attribute Definition
• Creating Customer Type Codes
CWSerenade Company > Relate Organization
An organization in Relate corresponds to a company in CWSerenade. You associate a Relate organization with a CWSerenade company through the Relate Organization Descriptor (L50) system control value.
Use Conflate to define configuration settings for the Relate organization that integrates with CWSerenade. See the Relate Configuration Guide for more information on how to define configuration settings for Relate using the Conflate tool.
Configuration Settings Required for the CWSerenade Customer and Sales Integrations with Relate
Select Edit Configs in Conflate to define these settings for the organization that integrates with CWSerenade.
Organization Descriptor |
The organization descriptor must match the setting in the Relate Organization Descriptor (L50) system control value. This setting identifies the Relate organization that maps to your CWSerenade company. |
Default Location ID |
Enter a default location ID of up to 12 positions. |
Customer Classes All Types |
Enter NONE, NONE. |
Customer Classes Default Type |
Enter NONE. |
Select this field if the integration to Relate includes CWSerenade and XStore. Selecting this field will assign an XSTORE_ID to the customer if one does not already exist. |
|
Use Customer Validation |
Select this option to validate customer input and strip invalid character data. Customer validation is performed using the Relate customer-validation.xml file. Customer information is checked for extra spaces, special characters, numbers in inappropriate places, and other similar configurable checks. |
Merchandise Hierarchy Level Codes |
Defines the merchandise hierarchy level codes received in the Relate Update Merchandise Hierarchy Message. Create the merchandise hierarchy level codes as: • DEPARTMENT • SUBDEPARTMENT • CLASS • SUBCLASS • STYLE Note: The CWSerenade integration with Relate does not use the merchandise hierarchy level SUBCLASS; however, Relate requires you to create each level in order to create the hierarchy correctly. |
Retail Transaction Register ID Length |
Set to 8. |
Retail Transaction Store ID Length |
The store ID sent to Relate from CWSerenade is defined in the Default Location for Sales Download (K69) system control value and cannot be greater than 8 positions. |
Note: Whenever you makes changes to an organization’s configuration settings, you must stop the Relate service, deploy the configuration settings to Relate, and restart the Relate service. See:
• Shut Down Services in the Add New Organization section of the Relate Implementation Guide (Installer Version) for more information on how to stop the Relate service.
• the Relate Configuration Guide for more information on deploying configuration settings to Relate.
• Restart Services in the Add New Organization section of the Relate Implementation Guide (Installer Version) for more information on how to restart t he Relate service.
CWSerenade Customer Profile > Relate Attribute Definition
In Relate, use the Attribute Definition screen to create an attribute definition for each CWSerenade profile code that may be associated with a customer exported to Relate. See the Attribute Definition section of the Relate User Guide for detailed instructions.
Requirement: This setup is required whenever you send profile data to Relate, regardless of whether you use the Relate Add or Update Customer Message or the interactive Relate Customer Integration.The Send Profile Data to Relate (L51) system control value controls whether to include demographic profile data.
Required settings: When creating the attribute definition, define the fields as follows:
Field |
Description |
Intended Use |
Select Customer. |
Attribute Name |
Enter the Profile Description as defined in CWSerenade. |
Unique |
Select this checkbox. |
Description |
Enter a description for the attribute definition. Example: If the CWSerenade profile is MARITAL STATUS, enter MARITAL STATUS. |
Data Type |
Select Character. |
If a customer profile > attribute definition cross reference does not exist:
• Relate Batch Customer and Sales Integration: If you send a profile code in the Relate Add or Update Customer Message to Relate that does not exist as an attribute definition in Relate, Relate will not process the message and instead places the message in an error status.
Example:
XML Line Number: 3
Response: UNKNOWN_ATTRIBUTE_TYPE: attributeType=CALL ANYTIME
Exception(s) :
com.dtv.csx.services.customer.attributes.AttributeException: UNKNOWN_ATTRIBUTE_TYPE: attributeType=CALL ANYTIME
• Relate Customer Integration: If Relate sends an attribute value for an attribute that you have not created as a profile category in Setting Up Customer Profiles (WPFL), CWSerenade ignores the profile data when creating or updating the customer. Also, if Relate sends an attribute value for an attribute that exists as a profile category in CWSerenade, but you have not set up a corresponding profile data option, CWSerenade ignores the profile data. See Profile data under Customer Data Mapping between CWSerenade and Relate for more information.
Relate attributes required if you also use Xstore: use the Attribute Definition screen in Relate to create an attribute definition for the following attributes.
Name |
Use |
Description |
Unique |
Data Type |
ACTIVE_FLAG |
Customer |
Xstore Active Flag |
Y |
Logical |
EMAIL_RCPT_FLAG |
Customer |
Xstore Email Receipt Flag |
Y |
Logical |
CUSTOMER_GROUPS |
Customer |
Xstore groups |
Y |
Character |
PROMPT_TO_JOIN_LOYALTY |
Customer |
TRUE=Prompt Customer to Join Loyalty |
N |
Character |
PARTY_TYPE_CODE |
Customer |
Xstore Party Type |
N |
Character |
Purpose: If you use the Relate Customer Integration and have not sent customer information to Relate through the Relate Batch Customer and Sales Integration, you need to confirm that all the required type codes are set up in Relate to support the mapping in the customer integration. If necessary, you need to create the type codes by adding rows to the corresponding tables in the Relate database.
Created dynamically? If you have previously used the Relate Add or Update Customer Message to send customer information to Relate, then the type codes were dynamically created in the Relate database tables listed below.
Properties file entries: If a type code is one of the properties defined in the Relate Properties, the property is indicated in the table below. Normally, you should use the setting indicated in the table unless your MICROS representative indicates otherwise.
Displayed where?
• The customer address type is displayed on the Customer Addresses screen in Relate.
• The alternate key type is displayed on the Customer Alternate Keys screen in Relate.
• The email type is displayed on the Customer Email Addresses screen in Relate.
• The phone type is displayed on the Customer Telephone Numbers screen in Relate.
Type Code |
Relate Table |
Setting |
Property |
Address |
CST_ADDR_TYPCODE |
HOME |
none |
Alternate key |
CST_ALT_KEY_TYPCODE |
SERENADE_ID |
RELATE_ALT_ID_ SERENADE |
CST_EMAIL_TYPCODE |
HOME |
none |
|
Phone |
CST_PHONE_TYPCODE |
daytime phone: BUSINESS |
RELATE_DAY_PHONE_LABEL |
evening phone: HOME |
RELATE_EVE_PHONE_LABEL |
||
fax or mobile phone: MOBILE |
RELATE_FAX_PHONE_LABEL |
The Relate Transfer script allows you to move batch files from a specified source directory to a specified target directory.
Note:
• Not related to the Relate Customer Integration.
• Before you start using the Relate Transfer script, MICROS recommends contacting your Relate Implementation team to ensure the script if configured correctly.
The Relate Transfer script is made up of two pairs of files:
• .bat file: calls and executes the associated PERL script (.pl) file. You can define a schedule for the .bat file or run the .bat file on demand.
• .pl file: the script that performs the transfer and cleanup. Note: In order to run this script, you must have Perl installed on the Relate application server.
The operations of the jobs are controlled by the Windows Job Scheduler running on the Relate application server. To automate the process, the .bat file is linked to a Scheduled Task managed by the O/S scheduler.
Note: You must set up a separate Relate Transfer script for each of your Relate organizations. The directory where you place the batch files for processing determines which organization is associated with the batch files.
The RELATE_DIRECTORY_PATH in the Relate Properties file defines the location where CWSerenade places the batch files to send to Relate. An example of the directory on the Relate application server is C:\srv\CRMData\ORG where:
• CRMData = the name of the folder on the Relate application server where the batch files are placed.
• ORG = the Relate organization descriptor associated with the data in the batch file.
Subfolders for Source Staging Directory
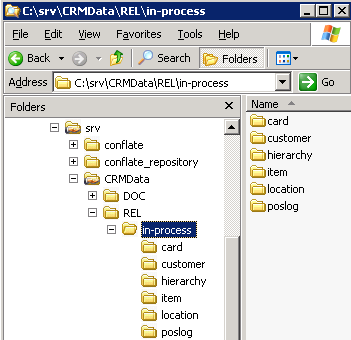
The following folders are required on the Relate application server during the Relate Transfer script process. If these folders do not already exist, you must create them.
Source drop off directory: The location where CWSerenade places the batch files to send to Relate. For example: C:\srv\CRMData\ORG, where ORG is the Relate organization descriptor. This directory should match the directory defined in the RELATE_DIRECTORY_PATH in the Relate Properties file.
Staging process folders: Under the source drop off directory, create the following staging process folders:
• in-process\card
• in-process\customer
• in-process\hierarchy
• in-process\item
• in-process\location
• in-process\poslog
Example: An example of the Source folder structure on the Relate application server is displayed below.
Source Staging Folder Permissions
In order for CWSerenade to place batch files in the source drop off directory, the folder must allow for Change and Read permissions. To do this:
1. Right-click on the CRMData folder and select Sharing and Security.
2. On the Folder Properties window, select Share this folder and in the Share name field, enter CRMData.
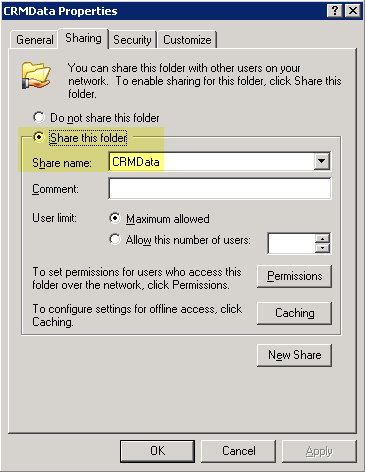
3. Select Permissions to advance to the Permissions for Folder window. In the Allow column select Change and Read permissions.
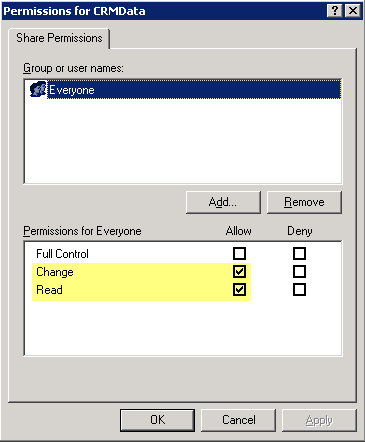
4. Click Apply and then OK to save your changes.
The following folders are required on the Relate application server during the Relate Transfer script process. If these folders do not already exist, you must create them.
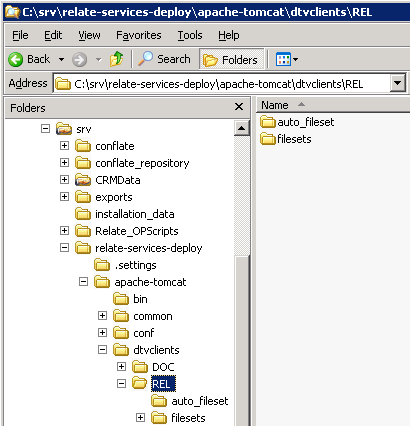
Under the \srv\relate-services-deploy\apache-tomcat\dtvclients\ directory, create a folder for your Relate organization descriptor.
Under the organization descriptor folder, create the following folders:
• auto_fileset
• filesets
Example: An example of the Target folder structure on the Relate application server is displayed below.
The following folders are required on the Relate application server during the Relate Transfer script process. If these folders do not already exist, you must create them.
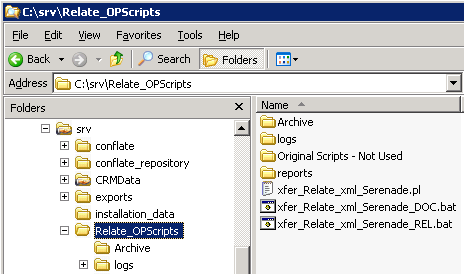
1. Under the \srv\ folder, create the folder Relate_OPScripts.
2. Copy the .bat file and .pl file to this folder.
Note: Contact your Relate Implementation team if you do not have the .bat file and .pl file.
3. Under the Relate_OPScripts folder, create the folder logs.
Example: An example of the Scripts folder structure on the Relate application server is displayed below.
Configure the .bat File
Open the .bat file in a text editor. The contents should look similar to the following:
Line # |
Line Contents |
1. |
@echo off |
2. |
c: |
3. |
cd c:\srv\Relate_OPScripts |
4. |
perl xfer_relate_xml_Serenade.pl ORG >> c:\srv\Relate_OPScripts\logs\ORG\xfer_Relate_xml_Serenade_%date:~-4,4%%date:~-10,2%%date:~-7,2%.log |
5. |
exit |
Verify that line 3 contains the Scripts Directory.
Verify that line 4 contains the exact name of the .pl file, followed by the Relate organization descriptor defined at the end of the RELATE_DIRECTORY_PATH.
Open the .pl file in a text editor.
Locate the following line:
#!/usr/bin/perl
Verify the line contains the location where Perl is installed on the Relate application server.
Locate the following line, where $DIV is a generic value for the Relate organization descriptor:
my $SOURCEDIR = "/srv/CRMData/$DIV";
Verify the line contains the location on the Relate application server defined in the RELATE_DIRECTORY_PATH setting in the Relate Properties file. For example, if the RELATE_DIRECTORY_PATH contains ////relateoms//CRMData//REL//, then the line should contain /srv/CRMData/$DIV.
Scheduling the Relate Transfer Script
Use the following steps to create a schedule for when the Relate Transfer script runs.
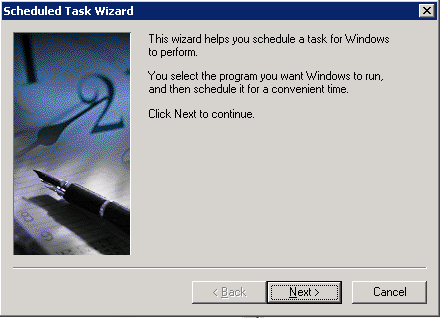
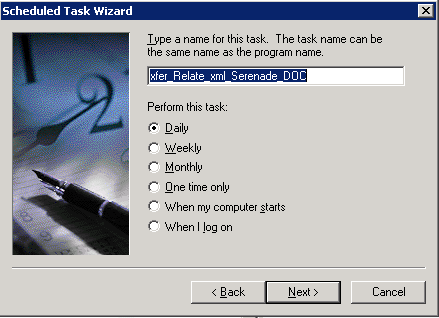
1. On the Relate application server, select Start > Control Panel > Scheduled Tasks > Add Scheduled Task to advance to the Scheduled Task Wizard window. Click Next.
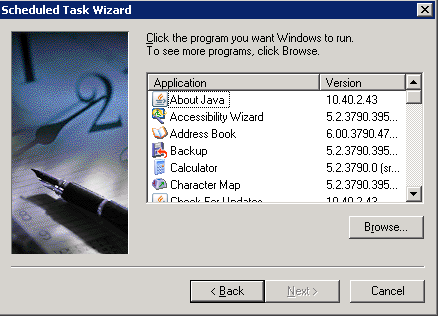
2. Click Browse to navigate to the Scripts Directory and select the .bat file you wish to schedule. Highlight the .bat file and click Open to select it.
3. Enter a name for the schedule and select how often you wish to run the .bat file. Click Next.
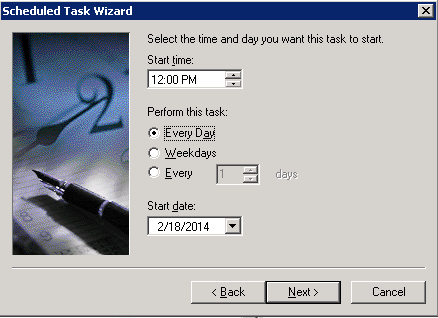
4. Define the details of the schedule. Click Next.
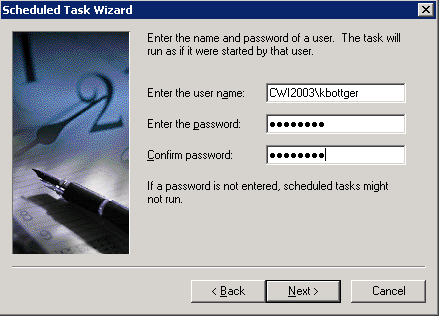
5. Enter the user ID and password for the user that will run the .bat file. Click Next.
6. Click Finish to create the schedule.
The Relate Item Feed allows you to send merchandise hierarchy and item information for all items and SKUs in the selected company from CWSerenade to Relate.
Relate Item Feed Setup: See Relate Integration Setup (Sales and Customer).
1. |
Run the RLTITMF Relate Item Feed periodic function (program name PFR0101) to submit the RLTITMF job. |
2. |
CWSerenade writes any messages related to the Item feed, including any errors that may occur during processing, to the CWSerenade Application Log. |
3. |
CWSerenade generates the following messages using item information from the CWSerenade database: |
|
Relate Update Merchandise Hierarchy Message: Contains item hierarchy information. CWSerenade creates an XML batch file that contains all of the Merchandise Hierarchy messages generated and names the file cw-merchhierarchy_CO#_STORE_ID_DATETIME.xml where: • CO# is the CWSerenade company number. • STORE_ID is the value defined in the Default Location for Sales Download (K69) system control value. • DATETIME is the date and time the file was created in YYMMDDHHMMSS format; for example if the file was created on November 23, 2010 at 9:21:41, the DATETIME displays as 101123092141. Example file name: cw-merchhierarchy_007_69007_101123092141.xml |
|
Relate Update Item Message: Contains item information for all items/SKUs in the company for which you ran the Relate Item Feed periodic process. CWSerenade creates an XML batch file that contains all of the Item messages generated and names the file cw-item_CO#_STORE_ID_DATETIME.xml where: • CO# is the CWSerenade company number. • STORE_ID is the value defined in the Default Location for Sales Download (K69) system control value. • DATETIME is the date and time the file was created in YYMMDDHHMMSS format; for example if the file was created on November 23, 2010 at 9:21:41, the DATETIME displays as 101123092141. Example file name: cw-item_007_12301974_101123092141.xml |
4. |
CWSerenade updates the SKU Relate Extracted field in the SKU table for all items/SKUs to Y. |
5. |
CWSerenade places the XML batch files in the directory defined in the RELATE_DIRECTORY_PATH setting in the Relate Properties file. CWSerenade also creates an empty text file named MASTER.done to notify Relate that the XML batch files are ready to be picked up and processed by Relate. |
6. |
Run the Relate Transfer Script on the Relate application server to retrieve the XML batch files from the RELATE_DIRECTORY_PATH and place them in the Source Staging Directory, where C: is the root drive where Relate is located and ORG is your organization ID: C:\srv\CRMData\ORG\in-process\hierarchy C:\srv\CRMData\ORG\in-process\item Note: In order for the Relate Transfer script to process correctly: • The MASTER.done file must exist in the RELATE_DIRECTORY_PATH. • The RELATE_DIRECTORY_PATH must be defined in the .pl file; see Configure the .pl File. |
7. |
Relate monitors the source staging directory for new messages to process. After Relate processes a message, it moves the message to the Target Staging Directory, where C: is the root drive where Relate is located and ORG is your organization ID: C:\srv\relate-services-deploy\apache-tomcat\dtvclients\ORG\filesets\STAGING-99-999\hierarchy C:\srv\relate-services-deploy\apache-tomcat\dtvclients\ORG\filesets\STAGING-99-999\item Three sub-folders exist under the hierarchy and item folders: • archived: Contains a copy of the XML batch file. • failed: Files in this directory contain XML code for the records that did not process correctly. You can use the XML API File Reader to determine why the error occurred. See the XML API File Reader section of the Relate Batch Processing and Web Services Guide for more information. • logs: Contains log files for the batch processing results. Any errors that occurred during processing display in the log file. |
8. |
For each XML message that is processed successfully, Relate updates the appropriate tables in the Relate database. You can view the results in the Relate application. For more information: For more information on how CWSerenade populates each message, the tables in the Relate database that are updated and where you can view the information in Relate, see: |
The Relate Sales Feed allows you to send sales and return information from CWSerenade to Relate.
Relate Sales Feed Setup: See Relate Integration Setup (Sales and Customer).
1. |
Run the RLTSLSF Relate Sales Feed periodic function (program name PFR0102) to submit the RLTSLSF job. |
2. |
CWSerenade writes any messages related to the Sales feed, including any errors that may occur during processing, to the CWSerenade Application Log. |
3. |
CWSerenade generates the following messages using item and invoice information from the CWSerenade database: |
|
Relate Post POSlog Transaction Message: Contains sales and credit invoice information for invoices whose Extracted to Store field in the Invoice Header table is blank. Excluded sales (debit) invoices: The system excludes sales (debit) invoices from the Relate Post POSlog Transaction message whose OST OBR Delivery Type in the Order Ship To table matches the setting of the Cross Channel Orders to Exclude in Sales Feed (L35) system control value. Excluded return (credit) invoices: The system excludes return (credit) invoices from the Relate Post POSlog Transaction message whose return disposition code matches the setting of the Return Disposition Code to Exclude in Relate Sales Feed (M22) system control value when the Suppress refund field in the Order Payment Method table is Y. Merchandise amounts only? The setting of the Merchandise Only in Sales Feed (L36) system control value determines whether CWSerenade includes full invoice totals or only merchandise and tax amounts in the message. ItemID setting: The setting of the MICROS Integration Item ID (L38) system control value determines how CWSerenade populates the ItemID in the message. Non-merchandise amounts: If the Merchandise Only in Sales Feed (L36) system control value is unselected, the Item for Non-Merchandise Amounts (L39) system control value defines the item code that represents all non-merchandise amounts for an invoice, such as freight, additional freight, handling and additional charges in the message. |
|
CWSerenade creates an XML batch file that contains all of the POS messages generated and names the file cw-poslog_CO#_STORE_ID_DATETIME.xml where: • CO# is the CWSerenade company number • STORE_ID is the value defined in the Default Location for Sales Download (K69) system control value • DATETIME is the date and time the file was created in YYMMDDHHMMSS format; for example if the file was created on November 23, 2010 at 9:21:41, the DATETIME displays as 101123092141. Example file name: cw-poslog_007_12301974_101123092141.xml |
|
Relate Add or Update Customer Message: Contains customer information for the sold to customers associated with the invoices in the Relate Post POSlog Transaction Message. This message is generated during the Sales Feed only if the Relate Customer Integration (L37) system control value is set to SALES. CWSerenade creates an XML batch file that contains all of the Customer messages generated and names the file cw-customer_CO#_STORE_ID_DATETIME.xml where: • CO# is the CWSerenade company number • STORE_ID is the value defined in the Default Location for Sales Download (K69) system control value • DATETIME is the date and time the file was created in YYMMDDHHMMSS format; for example if the file was created on November 23, 2010 at 9:21:41, the DATETIME displays as 101123092141. Example file name: cw-customer_007_12301974_101123092141.xml |
|
Relate Update Merchandise Hierarchy Message: Contains item hierarchy information for the items in the Relate Update Item Message. CWSerenade creates an XML batch file that contains all of the Merchandise Hierarchy messages generated and names the file cw-merchhierarchy_CO#_STORE_ID_DATETIME.xml where: • CO# is the CWSerenade company number. • STORE_ID is the value defined in the Default Location for Sales Download (K69) system control value. • DATETIME is the date and time the file was created in YYMMDDHHMMSS format; for example if the file was created on November 23, 2010 at 9:21:41, the DATETIME displays as 101123092141. Example file name: cw-merchhierarchy_007_69007_101123092141.xml |
|
Relate Update Item Message: Contains item information for items whose SKU Relate Extracted field in the SKU table is N or blank for the company for which you ran the Relate Sales Feed periodic process. CWSerenade creates an XML batch file that contains all of the Item messages generated and names the file cw-item_CO#_STORE_ID_DATETIME.xml where: • CO# is the company number • STORE_ID is the value defined in the Default Location for Sales Download (K69) system control value • DATETIME is the date and time the file was created in YYMMDDHHMMSS format; for example if the file was created on November 23, 2010 at 9:21:41, the DATETIME displays as 101123092141. Example file name: cw-item_007_12301974_101123092141.xml See Item/SKU Relate Extract Setting for more information on when the system updates the SKU Relate Extracted field in the SKU table to N. |
4. |
CWSerenade updates the: • SKU Relate Extracted field in the SKU table for the items/SKUs included in the Sales Feed to Y. • Extracted to Store field in the Invoice Header table to Y. |
5. |
CWSerenade places the XML batch files in the directory defined in the RELATE_DIRECTORY_PATH setting in the Relate Properties file. • If the XML batch file contains Relate Update Merchandise Hierarchy Messages or Relate Update Item Messages, CWSerenade also creates an empty text file named MASTER.done to notify Relate that the XML batch files are ready to be picked up and processed by Relate. • If the XML batch file contains Relate Add or Update Customer Messages or Relate Post POSlog Transaction Messages, CWSerenade also creates an empty text file named OTHER.done to notify Relate that the XML batch files are ready to be picked up and processed by Relate. |
6. |
Run the Relate Transfer Script on the Relate application server to retrieve the XML batch files from the RELATE_DIRECTORY_PATH and place them in the Source Staging Directory, where C: is the root drive where Relate is located and ORG is your organization ID: C:\srv\CRMData\ORG\in-process\customer C:\srv\CRMData\ORG\in-process\hierarchy C:\srv\CRMData\ORG\in-process\item C:\srv\CRMData\ORG\in-process\poslog Note: In order for the Relate Transfer script to process correctly: • The MASTER.done file must exist in the RELATE_DIRECTORY_PATH to process Relate Update Merchandise Hierarchy Messages or Relate Update Item Messages. • The Other.done file must exist in the RELATE_DIRECTORY_PATH to process Relate Add or Update Customer Messages or Relate Post POSlog Transaction Messages. • The RELATE_DIRECTORY_PATH must be defined in the .pl file; see Configure the .pl File. |
7. |
Relate monitors the source staging directory for new messages to process. After Relate processes a message, it moves the message to the Target Staging Directory, where C: is the root drive where Relate is located and ORG is your organization ID: C:\srv\relate-services-deploy\apache-tomcat\dtvclients\ORG\filesets\STAGING-99-999\customer C:\srv\relate-services-deploy\apache-tomcat\dtvclients\ORG\filesets\STAGING-99-999\hierarchy C:\srv\relate-services-deploy\apache-tomcat\dtvclients\ORG\filesets\STAGING-99-999\item C:\srv\relate-services-deploy\apache-tomcat\dtvclients\ORG\filesets\STAGING-99-999\poslog Three sub-folders exist under the customer, hierarchy, item, and poslog folders: • archived: Contains a copy of the XML batch file. • failed: Files in this directory contain XML code for the records that did not process correctly. You can use the XML API File Reader to determine why the error occurred. See the XML API File Reader section of the Relate Batch Processing and Web Services Guide for more information. • logs: Contains log files for the batch processing results. Any errors that occurred during processing display in the log file. |
8. |
For each XML message that is processed successfully, Relate updates the appropriate tables in the Relate database. You can view the results in the Relate application. For more information: For more information on how CWSerenade populates each message, the tables in the Relate database that are updated and where you can view the information in Relate, see: • Relate Update Merchandise Hierarchy Message |
Relate Update Merchandise Hierarchy Message
Purpose: The Relate Update Merchandise Hierarchy message contains item hierarchy information for the items included in the Relate Update Item Message to send to Relate.
The merchandise hierarchy used in the CWSerenade integration with Relate is:
CWSerenade Merchandise Hierarchy |
Relate Merchandise Hierarchy Level |
Long SKU division code |
DEPARTMENT |
Long SKU department code |
SUBDEPARTMENT |
• If Use Retail Integration (H26) is selected: long SKU department code + retail class code, separated by a dash (--). • If Use Retail Integration (H26) is unselected: long SKU department code + long SKU class code, separated by a dash (--). |
CLASS |
No corresponding value; the CWSerenade integration with Relate does not use the merchandise hierarchy level SUBCLASS. |
SUBCLASS |
Item code |
STYLE |
To generate: Process the Relate Item Feed or Relate Sales Feed.
• The Relate Item Feed generates a Merchandise Hierarchy message that includes merchandise hierarchy data for all items.
• The Relate Sales Feed generates a Merchandise Hierarchy message that includes merchandise hierarchy data only for items whose SKU Relate Extracted field in the SKU table is N or blank.
XML batch file name: CWSerenade bundles all of the Merchandise Hierarchy messages generated at one time into an XML batch file. The name of the XML batch file is cw-merchhierarchy_CO#_STORE_ID_DATETIME.xml where:
• CO# is the CWSerenade company number.
• STORE_ID is the value defined in the Default Location for Sales Download (K69) system control value.
• DATETIME is the date and time the file was created in YYMMDDHHMMSS format; for example if the file was created on November 23, 2010 at 9:21:41, the DATETIME displays as 101123092141.
Example: cw-merchhierarchy_007_69007_101123092141.xml.
Viewing merchandise hierarchy in Relate: You can view the merchandise hierarchy levels assigned to an item for Sales Line Items on the Transaction Detail window for a customer. The Transaction Detail window is not populated until you send a Relate Post POSlog Transaction Message to Relate.
For more information: See:
• Sample Relate Update Merchandise Hierarchy Message for a sample message.
• The Merchandise Hierarchy section of the Relate Web Services Guide for more details on the Update Merchandise Hierarchy message.
Tag Name |
Comments |
MerchandiseHierarchy |
|
Action |
UpdateMerchandiseHierarchy defaults. |
MerchandiseHierarchyID |
The MerchandiseHierarchyLevel determines the information that defaults to MerchandiseHierarchyID. DEPARTMENT Hierarchy Level The long SKU division code. From LSD Long SKU Division in the Long SKU Department table. SUBDEPARTMENT Hierarchy Level The long SKU department code. From LSD Department in the Item table. CLASS Hierarchy Level • If Use Retail Integration (H26) is selected: The long SKU department code + retail class code, separated by a dash (--). From LSD Department in the Item table and RTC Long SKU Class in the Retail Class table. • If Use Retail Integration (H26) is unselected: The long SKU department code + long SKU class code, separated by a dash (--). From LSD Department and Long SKU Class in the Item table. STYLE Hierarchy Level The item code. From ITM Number in the Item table. Relate: Updates HIERARCHY_ID in the ITM_MERCH_HIERARCHY table. Displays in the Dept, Sub Dept, Class and Style fields for Sales Line Items on the Transaction History tab of the Customer Lookup / Edit screen. |
MerchandiseHiearchy Level |
Defines the type of information in the MerchandiseHierarchyID tag. Valid values are: DEPARTMENT = The MerchandiseHierarchyID contains the long SKU division code. SUBDEPARTMENT = The MerchandiseHierarchyID contains the long SKU department code. CLASS = The MerchandiseHierarchyID contains the: • Long SKU department code + retail class code, separated by a dash (--) if Use Retail Integration (H26) is selected. • Long SKU department code + long SKU class code, separated by a dash (--) if Use Retail Integration (H26) is unselected. STYLE = The MerchandiseHierarchyID contains the item code. Relate: Updates MERCH_HIERARCHY_LEVEL_CODE in the ITM_MERCH_HIERARHCY table. |
DisplayName |
The MerchandiseHierarchyLevel determines the information that defaults to DisplayName. DEPARTMENT Hierarchy Level The long SKU division description. From the LDV L/S Division Descrip in the Long SKU Division table. SUBDEPARTMENT Hierarchy Level The long SKU department description. From the LSD Description in the Long SKU Department table. CLASS Hierarchy Level • The retail class description if the Use Retail Integration (H26) system control value is selected. From the RTC Retail Class Descript in the Retail Class table. • The long SKU class description if the Use Retail Integration (H26) system control value is unselected. From the Description in the Long SKU Class table. STYLE Hierarchy Level The item description. From the Description in the Item table. Relate: Updates DISPLAY_NAME in the ITM_MERCH_HIERARHCY table. |
Description |
The MerchandiseHierarchyLevel determines the information that defaults to Description. DEPARTMENT Hierarchy Level The long SKU division description. From the LDV L/S Division Descrip in the Long SKU Division table. SUBDEPARTMENT Hierarchy Level The long SKU department description. From the LSD Description in the Long SKU Department table. CLASS Hierarchy Level • The retail class description if the Use Retail Integration (H26) system control value is selected. From the RTC Retail Class Descript in the Retail Class table. • The long SKU class description if the Use Retail Integration (H26) system control value is unselected. From the Description in the Long SKU Class table. STYLE Hierarchy Level The item description. From the Description in the Item table. Relate: Updates DESCRIPTION in the ITM_MERCH_HIERARHCY table. |
SortOrder |
1 defaults. Relate: Updates SORT_ORDER in the ITM_MERCH_HIERARCHY table. |
ParentHierarchyID |
The MerchandiseHierarchyLevel determines the information that defaults to ParentHierarchyID. DEPARTMENT Hierarchy Level The long SKU division code. From the LDV L/S Division in the Long SKU Division table. SUBDEPARTMENT Hierarchy Level The long SKU division code. From the LDV L/S Division in the Long SKU Division table. CLASS Hierarchy Level The long SKU department code. From the LSD Department in the Long SKU Department table. STYLE Hierarchy Level • The long SKU department code + retail class code, separated by a dash (--) if the Use Retail Integration (H26) system control value is selected. From the LSD Department in the Long SKU Department table and RTC Long SKU Class in the Retail Class table. • The long SKU department code + long SKU class code, separated by a dash (--) if the Use Retail Integration (H26) system control value is unselected. From the LSD Department in the Long SKU Department table and Long SKU Class in the Long SKU Class table. Relate: Updates PARENT_ID in the ITEM_MERCH_HIERARCHY table. |
ParentHierarchyLevel |
Defines the type of information in the ParentHierarchyID tag. Valid values are: DEPARTMENT = The ParentHierarchyID contains the long SKU division code. SUBDEPARTMENT = The ParentHierarchyID contains the long SKU department code. CLASS = The ParentHierarchyID contains the: • Long SKU department code + retail class code, separated by a dash (--) if Use Retail Integration (H26) is selected. • Long SKU department code + long SKU class code, separated by a dash (--) if Use Retail Integration (H26) is unselected. Relate: Updates PARENT_MERCH_HIERARCH_LVLCODE in the ITM_MERCH_HIERARCHY table. |
Sample Relate Update Merchandise Hierarchy Message
<MerchandiseHierarchyMaintenance>
STYLE hierarchy level:
<MerchandiseHierarchy Action="UpdateMerchandiseHierarchy">
<MerchandiseHierarchyID>RELATE</MerchandiseHierarchyID>
<MerchandiseHierarchyLevel>Style</MerchandiseHierarchyLevel>
<DisplayName>RELATE ITEM DESCRIPTION</DisplayName>
<Description>RELATE ITEM DESCRIPTION</Description>
<SortOrder>1</SortOrder>
<ParentHierarchyID>1234-7777</ParentHierarchyID>
<ParentHierarchyLevel>Class</ParentHierarchyLevel>
</MerchandiseHierarchy>
DEPARTMENT hierarchy level:
<MerchandiseHierarchy Action="UpdateMerchandiseHierarchy">
<MerchandiseHierarchyID>123</MerchandiseHierarchyID>
<MerchandiseHierarchyLevel>Department</MerchandiseHierarchyLevel>
<DisplayName>123 LONG SKU DIVISION</DisplayName>
<Description>123 LONG SKU DIVISION</Description>
<SortOrder>1</SortOrder>
<ParentHierarchyID>123</ParentHierarchyID>
<ParentHierarchyLevel>Department</ParentHierarchyLevel>
</MerchandiseHierarchy>
SUBDEPARTMENT hierarchy level:
<MerchandiseHierarchy Action="UpdateMerchandiseHierarchy">
<MerchandiseHierarchyID>1234</MerchandiseHierarchyID>
<MerchandiseHierarchyLevel>SubDepartment</MerchandiseHierarchyLevel>
<DisplayName>1234 LONG SKU DEPARTMENT</DisplayName>
<Description>1234 LONG SKU DEPARTMENT</Description>
<SortOrder>1</SortOrder>
<ParentHierarchyID>123</ParentHierarchyID>
<ParentHierarchyLevel>Department</ParentHierarchyLevel>
</MerchandiseHierarchy>
CLASS hierarchy level:
<MerchandiseHierarchy Action="UpdateMerchandiseHierarchy">
<MerchandiseHierarchyID>1234-7777</MerchandiseHierarchyID>
<MerchandiseHierarchyLevel>Class</MerchandiseHierarchyLevel>
<DisplayName>7777 LONG SKU CLASS</DisplayName>
<Description>7777 LONG SKU CLASS</Description>
<SortOrder>1</SortOrder>
<ParentHierarchyID>1234</ParentHierarchyID>
<ParentHierarchyLevel>SubDepartment</ParentHierarchyLevel>
</MerchandiseHierarchy>
</MerchandiseHierarchyMaintenance>
Purpose: The Relate Update Item message contains item information to send to Relate.
To generate: Process the Relate Item Feed or Relate Sales Feed.
• The Relate Item Feed generates an Item message that includes all items.
• The Relate Sales Feed generates an Item message that includes only items whose SKU Relate Extracted field in the SKU table is N or blank.
XML batch file name: CWSerenade bundles all of the Item messages generated at one time into an XML batch file. The name of the XML batch file is cw-item_CO#_STORE_ID_DATETIME.xml where:
• CO# is the CWSerenade company number
• STORE_ID is the value defined in the Default Location for Sales Download (K69) system control value
• DATETIME is the date and time the file was created in YYMMDDHHMMSS format; for example if the file was created on November 23, 2010 at 9:21:41, the DATETIME displays as 101123092141.
Example: cw-item_007_12301974_101123092141.xml.
Viewing items in Relate: You can view items for Sales Line Items and Return Line Items on the Transaction Detail window for a customer. The Transaction Detail window is not populated until you send a Relate Post POSlog Transaction Message to Relate.

For more information: See:
• Sample Relate Update Item Message for a sample message.
• The Item Requests section of the Relate Web Services Guide for more details on the Update Item message.
Tag Name |
Comments |
Item |
|
Action |
UpdateItem defaults. |
|
Type=ItemID |
The setting of the MICROS Integration Item ID (L38) system control value determines the information that defaults to the ItemID value. • If set to XREF, this field contains the Retail reference number. From Retail reference # in the SKU table. Note: If a Retail reference number is not defined for an item, 0 defaults. • If set to ITEM, this field contains the Item code + SKU element 1 + SKU element 2 + SKU element 3, with each value separated by a dash (--). From ITM Number and SKU Code in the SKU table. Examples: • If the item code is ITM1, SKU element 1 is RED, SKU element 2 is XSML and SKU element 3 is WMNS, the Item displays as ITM1-RED-XSML-WMNS. • If the item code is ITM1 and SKU element 2 is XSML, the Item displays as ITM1--XSML. Notice that the system does not include a dash after SKU element 2 if a value is not defined for SKU element 3. • If the item code is ITM1 and SKU element 3 is WMNS, the Item displays as ITM1---WMNS. Relate: Updates ITEM_ID in the ITM_ITEM table. Displays in the Item ID field for Sales Line Items on the Transaction History tab of the Customer Lookup / Edit screen. |
ItemID Type=UPC |
The UPC code assigned to the item. From UPC in the Item UPC table. Relate: Updates MANUFACTURER_UPC in the ITM_ITEM_XREF table. |
Description |
The item description + SKU description. If the item does not contain SKUs, only the item description defaults. From Description in the Item table and SKU table. Relate: Updates DESCRIPTION in the ITM_ITEM table. |
MerchandiseHierarchy ID Level |
DEPARTMENT hierarchy level ID = The long SKU division code associated with the long SKU department assigned to the item. From LSD Long SKU Division in the Long SKU Department table. Level = Department defaults. Relate: Updates ITEM_DEPT_ID in the ITM_ITEM table. Displays in the Dept field for Sales Line Items on the Transaction History tab of the Customer Lookup / Edit screen. SUBDEPARTMENT hierarchy level ID = The long SKU department assigned to the item. From LSD Department in the Item table. Level = SubDepartment defaults. Relate: Updates ITEM_SUB_DEPT_ID in the ITM_ITEM table. Displays in the Sub Dept field for Sales Line Items on the Transaction History tab of the Customer Lookup / Edit screen. CLASS hierarchy level ID = The setting of the Use Retail Integration (H26) system control value determines the information that defaults to ID. • If unselected, the ID field contains the long SKU department + long SKU class assigned to the item, with the values separated by a dash (--). From LSD Department and Long SKU Class in the Item table. • If selected, the ID field contains the long SKU department + retail class assigned to the item, with the values separated by a dash (--). From LSD Department in the Item table and RTC Long SKU Class in the Retail Class table. Level = Class defaults. Relate: Updates ITEM_CLASS_ID in the ITM_ITEM table. Displays in the Class field for Sales Line Items on the Transaction History tab of the Customer Lookup / Edit screen. STYLE hierarchy level ID = The item code. From ITM Number in the Item table. Level = Style defaults. Relate: Updates SUBCLASS_ID in the ITM_ITEM table. Displays in the Style field for Sales Line Items on the Transaction History tab of the Customer Lookup / Edit screen. |
Item Price ValueTypeCode Amount |
ValueTypeCode = UnitCost defaults. Amount = The cost of the item/SKU, with 2 implied decimals. Example: 12.99 displays as 1299. If no cost is defined, 000 defaults. The setting of the Costing Method (A25) system control value determines the cost that defaults to Amount. • If set to STANDARD, from SKU Standard Cost in the SKU table or Standard Cost in the Item table (if not defined at the SKU level). • If set to AVERAGE, from SKU Average Cost in the SKU table or Item Average Cost in the Item table (if not defined at the SKU level). • If set to FIFO, from SKU FIFO Cost in the SKU table or FIFO Cost in the Item table (if not defined at the SKU level). Relate: Updates UNIT_COST in the ITM_ITEM table. |
Manufacturer |
|
Name |
The name of the vendor assigned to the item. From Name in the Vendor table. Relate: Updates MANUFACTURER in the ITM_ITEM table. |
Marketing |
|
Season |
The name of the season assigned to the item. From Season description in the Season table. Relate: Updates SEASON_CODE in the ITM_ITEM table. |
BrandOwner Name |
The name of the vendor assigned to the item. From Name in the Vendor table. Relate: Updates BRAND_NAME in the ITM_ITEM table. |
Sample Relate Update Item Message
<ItemMaintenance>
<Item Action="UpdateItem">
<ItemID Type="ItemId">RELATE</ItemID>
<ItemID Type="UPC">1123201090123</ItemID>
<ItemID Type="UPC">11232010</ItemID>
<Description>RELATE ITEM DESCRIPTION</Description>
<MerchandiseHierarchy ID="88" Level="Department" />
<MerchandiseHierarchy ID="1" Level="SubDepartment" />
<MerchandiseHierarchy ID="1-1" Level="Class" />
<MerchandiseHierarchy ID="RELATE" Level="Style" />
<ItemPrice ValueTypeCode="UnitCost">500</ItemPrice>
<Manufacturer>
<Name>ACME SUPPLY LTD INCORPORATED</Name>
</Manufacturer>
<Marketing>
<Season>SUMMER</Season>
</Marketing>
<BrandOwner Name="ACME SUPPLY LTD INCORPORATED" />
</Item>
<Item Action="UpdateItem">
<ItemID Type="ItemId">RELATESKU-RED</ItemID>
<ItemID Type="UPC">11231012</ItemID>
<ItemID Type="UPC">112320101</ItemID>
<Description>RELATESKU ITEM DESCRIPTION RED RELATESKU SKU DESCRIPTION</Description>
<MerchandiseHierarchy ID="88" Level="Department" />
<MerchandiseHierarchy ID="1" Level="SubDepartment" />
<MerchandiseHierarchy ID="1-1" Level="Class" />
<MerchandiseHierarchy ID="RELATESKU" Level="Style" />
<ItemPrice ValueTypeCode="UnitCost">000</ItemPrice>
<Manufacturer>
<Name>ACME SUPPLY LTD INCORPORATED</Name>
</Manufacturer>
<Marketing>
<Season>SUMMER</Season>
</Marketing>
<BrandOwner Name="ACME SUPPLY LTD INCORPORATED" />
</Item>
</ItemMaintenance>
Relate Add or Update Customer Message
Purpose: The Relate Add or Update Customer message contains customer information to send to Relate. If the customer does not exist, Relate creates the customer; otherwise Relate updates the customer’s information.
To generate: The setting of the Relate Customer Integration (L37) system control value defines when CWSerenade notifies Relate about a new or updated customer record.
• If set to SALES, CWSerenade generates the file when you run the Relate Sales Feed. In this situation, CWSerenade includes only sold to customers that are associated with the invoices in the Relate Post POSlog Transaction Message.
• If set to INTERACT, CWSerenade sends a message interactively when a user creates or updates a customer. See the Relate Customer Integration for more information.
Regardless of the setting of the Relate Customer Integration (L37) system control value, CWSerenade generates the file when you run the Relate Batch Customer Upload to Relate Process.
XML batch customer file name: If the Relate Customer Integration (L37) system control value is set to SALES, CWSerenade bundles all of the Customer messages generated at one time into an XML batch file. The name of the XML batch customer file is cw-customer_CO#_STORE_ID_DATETIME.xml where:
• CO# is the CWSerenade company number
• STORE_ID is the value defined in the Default Location for Sales Download (K69) system control value
• DATETIME is the date and time the file was created in YYMMDDHHMMSS format; for example if the file was created on November 23, 2010 at 9:21:41, the DATETIME displays as 101123092141.
Example: cw-customer_007_12301974_101123092141.xml.
XML batch customer conversion file name: When you run the Relate Batch Customer Upload to Relate Process CWSerenade generates a batch customer conversion XML batch file, containing a Relate Add or Update Customer message for all sold to customers minus any flagged as a ghost, to send to Relate for processing. The name of the XML batch customer conversion file is cw-customer_conversion_CO#_STORE_ID_DATETIME.xml where:
• CO# is the CWSerenade company number
• STORE_ID is the value defined in the Default Location for Sales Download (K69) system control value
• DATETIME is the date and time the file was created in YYMMDDHHMMSS format; for example if the file was created on November 23, 2010 at 9:21:41, the DATETIME displays as 101123092141.
Example: cw-customer_conversion_007_12301974_101123092141.xml
Note: You can also use the Relate Customer Integration to keep CWSerenade and Relate customer records synchronized.
Viewing customers in Relate: Use the Customer Lookup / Edit page to search for a customer. Locate the customer in the list of customers that match your search criteria. Click the customer to advance to the Customer Summary Window; this window displays summary information for the customer. From this window, you can review and edit the customer information. See Customer Summary Window in the Relate User Guide for screen details.
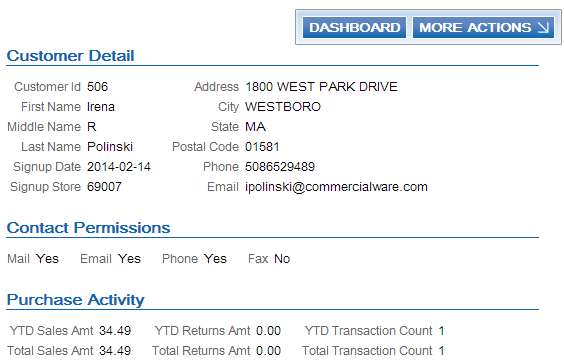
For more information: See:
• See Sample Relate Add or Update Customer Message for a sample message.
• The Customer Requests section of the Relate Web Services Guide for more details on the Add or Update Customer message.
• The Customer Lookup / Edit section of the Relate User Guide for more information on reviewing and updating customers.
Tag Name |
Description |
Customer |
|
Action |
AddOrUpdate defaults. |
Source |
Contact Center defaults if this is a new sold to customer. Relate: Updates SOURCE in the CST_CUSTOMER table. Displays in the Source field on the Customer Dashboard. |
BusinessName |
The company assigned to the sold to customer. From the NAM Company name in the Customer Sold To table. Relate: Updates BUSINESS_NAME in the CST_CUSTOMER table. Displays in the Business Name field on the Customer Dashboard. |
RetailStoreID |
The value defined in the Default Location for Sales Download (K69) system control value. Relate: Updates SIGNUP_RTL_LOC_ID in the CST_CUSTOMER table. Displays in the Signup Store field on the Customer Dashboard. |
LastUpdateInfo |
|
UpdateUserID |
SERENADE-USERID defaults, where USERID is the user ID of the person who submitted the Relate Sales Feed or Relate Batch Customer Upload to Relate Process. Relate: Updates UPDATE_USER in the CST_CUSTOMER table. Displays in the Update User ID field on the Customer Dashboard. |
Affiliation Defines the store associated with the customer. |
|
RetailStoreID |
The value defined in the Default Location for Sales Download (K69) system control value. Relate: Updates HOME_RTL_LOC_ID in the CST_CUSTOMER table. Displays in the Home Store field on the Customer Dashboard. |
PersonalPreferences Defines whether the customer allows correspondence by mail, phone, email or fax. |
|
ContactPreference ContactType Mail SubTypeCode HOME Permission |
ContactType = Mail defaults. SubTypeCode = HOME defaults. Permission = true defaults if the Mail flag is selected; otherwise false defaults. From CST Mail name? in the Customer Sold To table. Relate: Updates MAIL_CONTACT_FLAG in the CST_CUSTOMER table. Displays in the Mail field in the Contact Permissions section of the Customer Summary window (Yes displays if the Permission is true; No displays if the Permission is false). |
ContactPreference ContactType Phone SubTypeCode HOME Permission |
ContactType = Phone defaults. SubTypeCode = HOME defaults. Permission = true defaults if a Day or Evening phone number exists; otherwise false defaults. From Phone# in the Customer Sold To Phone # table whose Phone # type is D or E. Relate: Updates PHONE_CONTACT_FLAG in the CST_CUSTOMER table. Displays in the Phone field in the Contact Permissions section of the Customer Summary window (Yes displays if the Permission is true; otherwise No displays). |
ContactPreference ContactType Email SubTypeCode HOME Permission |
ContactType = Email defaults. SubTypeCode = HOME defaults. Permission = true defaults if the Email status setting for the primary email address is O1; otherwise false defaults. From Email status in the Customer Sold To Email table for the email address whose Primary field is Y. Relate: Updates EMAIL_CONTACT_FLAG in the CST_CUSTOMER table. Displays in the Email field in the Contact Permissions section on the Customer Summary window (Yes displays if the Permission is true; No displays if the Permission is false). |
ContactPreference ContactType Fax SubTypeCode FAX Permission |
ContactType = Fax defaults. SubTypeCode = FAX defaults. Permission = true defaults if the Third Phone Number Type (L53) system control value is set to FAX and the Do Not Fax field for the customer in CWSerenade is unselected; otherwise, false defaults. From the Do not fax field in the Customer Sold To table. Relate: Updates FAX_CONTACT_FLAG in the CST_CUSTOMER table. Displays in the Fax field in the Contact Permissions section on the Customer Summary window (Yes displays if the Permission is true; No displays if the Permission is false). |
Individual The prefix and suffix assigned to the customer’s name. To view a customer’s full name in Relate, select customer action CUSTOMER to advance to the Customer Information screen. |
|
Salutation |
The prefix assigned to the sold to customer. From the NAM Prefix in the Customer Sold To table. Relate: Updates PREFIX in the CST_CUSTOMER table. Displays in the Prefix field on the Customer Information screen. |
Suffix |
The suffix assigned to the sold to customer. From the NAM Suffix in the Customer Sold To table. Relate: Updates SUFFIX in the CST_CUSTOMER table. Displays in the Suffix field on the Customer Information screen. |
Name The customer’s name. To view a customer’s full name in Relate, select customer action CUSTOMER to advance to the Customer Information screen. |
|
Location First |
The first name of the sold to customer. From the NAM First Name in the Customer Sold To table. Relate: Updates FIRST_NAME in the CST_CUSTOMER table. Displays in the First Name field on the Customer Information screen. |
Location Middle |
The middle initial of the sold to customer. From the NAM Initial in the Customer Sold To table. Relate: Updates MIDDLE_NAME in the CST_CUSTOMER table. Displays in the Middle Name field on the Customer Information screen. |
Location Last |
The last name of the sold to customer. From the NAM Last Name in the Customer Sold To table. Relate: Updates LAST_NAME in the CST_CUSTOMER table. Displays in the Last Name field on the Customer Information screen. |
Address The customer’s address. To view the entire address for a customer in Relate, select customer action ADDRESS to advance to the Customer Address screen. |
|
TypeCode |
Home defaults. Relate: Updates ADDRESS_TYPCODE in the CST_ADDRESS table. Displays in the Address Type field on the Customer Address screen. |
PrimaryFlag |
True defaults. Relate: Updates PRIMARY_FLAG in the CST_ADDRESS table. Displays in the Primary field on the Customer Address screen (True displays as Yes) |
ContactPreferenceCode |
Valid values: Y = The customer allows contact. This value is set to Y if the Mail flag is selected (the MAIL ContactType Permission is true). N = The customer does not allow contact. This value is set to N if the Mail flag is unselected (the MAIL ContactType Permission is false). From CST Mail name? in the Customer Sold To table. Relate: Updates CONTACT_FLAG in the CST_ADDRESS table. Displays in the Contact Permission\Opt In field on the Customer Address screen. |
Country |
The country code assigned to the sold to customer. From the RPR Country in the Customer Sold To table. Note: MICROS recommends that you assign ISO Country Codes to a sold to customer. Relate: Updates COUNTRY in the CST_ADDRESS table. Displays in the Country field on the Customer Address Detail window. |
AddressLine1 |
The street address assigned to the sold to customer. From the NAM Street Address in the Customer Sold To table. Relate: Updates ADDRESS1 in the CST_ADDRESS table. Displays in the Address Line 1 field on the Customer Address Detail window. |
AddressLine2 |
The second address line assigned to the sold to customer. From the NAM Address line 2 in the Customer Sold To table. Relate: Updates ADDRESS2 in the CST_ADDRESS table. Displays in the Address Line 2 field on the Customer Address Detail window. |
AddressLine3 |
The third address line assigned to the sold to customer. From the XNA Address line 3 in the Customer Sold To Extended table. Relate: Updates ADDRESS3 in the CST_ADDRESS table. Displays in the Address Line 3 field on the Customer Address Detail window. |
AddressLine4 |
The fourth address line assigned to the sold to customer. From the XNA Address line 4 in the Customer Sold To Extended table. Relate: Updates ADDRESS4 in the CST_ADDRESS table. Displays in the Address Line 4 field on the Customer Address Detail window. |
ApartmentNumber |
The apartment number assigned to the sold to customer. From the NAM Apartment in the Customer Sold To table. Relate: Updates APARTMENT in the CST_ADDRESS table. Displays in the Apartment field on the Customer Address Detail window. |
City |
The city assigned to the sold to customer. From the NAM City in the Customer Sold To table. Relate: Updates CITY in the CST_ADDRESS table. Displays in the City field on the Customer Address Detail window. |
Territory |
The state code assigned to the sold to customer. From the NAM State in the Customer Sold To table. Relate: Updates STATE in the CST_ADDRESS table. Displays in the State field on the Customer Address Detail window. |
PostalCode |
The zip code assigned to the sold to customer, with any additional formatting removed. From the NAM Zip in the Customer Sold To table. Relate: Updates POSTAL_CODE in the CST_ADDRESS table. Displays in the Postal Code field on the Customer Address Detail window. |
The primary email addresses assigned to the customer; CWSerenade does not send secondary email addresses to Relate. To view the email address for a customer in Relate, select customer action EMAIL to advance to the Customer Email Addresses screen. |
|
TypeCode |
Home defaults. Relate: Updates EMAIL_TYPCODE in the CST_EMAIL table. Displays in the Email Type field on the Customer Email Addresses screen. |
PrimaryFlag |
true defaults, indicating the email is the customer’s primary email address. From the CEM Primary? in the Customer Sold To Email table. Relate: Updates PRIMARY_FLAG in the CST_EMAIL table. Displays in the Primary field on the Customer Email Addresses screen (Yes displays if the PrimaryFlag is true). |
ContactPreferenceCode |
The status of the email address. Valid values: Y = The CWSerenade email status is O1 indicating the email address is the preferred method of correspondence. N = The CWSerenade email status is O2, O3, or O4 indicating the email address is not the preferred method of correspondence. From the CEM Email Status in the Customer Sold To Email table. Relate: Updates CONTACT_PREF in the CST_EMAIL table. Displays in the Contact Permission/Opt In field on the Customer Email Addresses screen. |
EmailAddress |
The email address defined for the sold to customer. From the CEM Email Address in the Customer Sold To Email table. Relate: Updates EMAIL_ADDR in the CST_EMAIL table. Displays in the Email field on the Customer Email Addresses screen. |
FormatPreferenceCode |
TEXT defaults. Relate: Updates FORMAT_PREF in the CST_EMAIL table. Displays in the Format Preference field on the Customer Email Addresses screen. |
Telephone The phone numbers assigned to the customer. To view the telephone details for a customer in Relate, select customer action PHONE to advance to the Customer Telephone Numbers screen. |
|
TypeCode |
The entries defined for the following settings in the Relate Properties file: RELATE_DAY_PHONE_LABEL = The TypeCode to display for the customer’s day time phone number. RELATE_EVE_PHONE_LABEL = The TypeCode to display for the customer’s evening phone number. RELATE_FAX_PHONE_LABEL = The TypeCode to display for the customer’s fax/mobile phone number. Relate: Updates PHONE_TYPCODE in the CST_CUST_PHONE table. Displays in the Phone Type field on the Customer Telephone Numbers screen. |
PrimaryFlag |
true defaults for the first phone number in the Customer Sold To Phone # table that is populated for the sold to customer, in Day, Eve, Fax/Mobile order; otherwise, false defaults. Relate: Updates PRIMARY_FLAG in the CST_CUST_PHONE table. Displays in the Primary field on the Customer Telephone Numbers screen. |
ContactPreferenceCode |
Defines whether the customer allows contact by this number. For the day and evening phone numbers: Y defaults if a corresponding phone number is defined; otherwise N defaults. If the Third Phone Number Type (L53) system control value is set to FAX: • N defaults if the Do Not Fax field is selected for the customer. • Y defaults if the Do Not Fax field is unselected for the customer. If the Third Phone Number Type (L53) system control value is set to MOBILE: Y defaults if a mobile phone number is defined; otherwise, N defaults. |
PhoneNumber |
The unformatted phone number for the sold to customer. From the CS# Phone # in the Customer Sold To Phone # table. Relate: Updates PHONE_NUM in the CST_CUST_PHONE table. Displays in the Phone Number field on the Customer Telephone Numbers screen. |
DeleteAllByType |
Indicates the phone number has been deleted in CWSerenade and should be deleted in Relate. Relate: Removes the specified phone number from the CST_CUST_PHONE table. RENT_FLAG in the CST_CUSTOMER table. |
PersonalSummary |
|
GenderType |
The default value defined for the profile code in the Default Male/Female Profile Code (C74) system control value. Note: Mapped only if a value is defined in the Default Male/Female Profile Code (C74) system control value, the default value is M or F, and the Send Profile Data to Relate (L51) system control value is selected. |
Rent |
Valid values: true = Rent false = Do not rent. From the CST Rent name? in the Customer Sold To table. Relate: Updates RENT_FLAG in the CST_CUSTOMER table. Displays in the Rent field on the Customer Dashboard (Yes displays if the Rent is true; No displays if the Rent is false). |
BirthDate |
The customer’s date of birth, in YYYY-MM-DD format. 1900 defaults as the year; however, this year is not used if a birth year has already been defined in Relate. From CST Birth Month, CST Birth Date, and CST Birth Year in the Customer Sold To table. Note: If you remove the Birth month and Birth date from the customer in CWSerenade, the Birth date defined in Relate is retained. Relate: Updates BIRTH_DATE in the CST_CUSTOMER table. Displays in the Birth Date field on the Customer Dashboard. |
AlternateKey Allows you to cross reference a customer in Relate to a sold to customer in CWSerenade. To view alternate keys for a customer in Relate, select customer action ALTERNATE KEY to advance to the Customer Alternate Keys screen. |
|
TypeCode |
The entry for the RELATE_ALT_ID_SERENADE setting in the Relate Properties file. Relate: Updates ALT_KEY_TYPCODE in the CST_CUST_ALT_KEY table. Displays in the Alt Key Type field on the Customer Alternate Keys screen. |
AlternateID |
The sold to customer number. From the CST Customer # in the Customer Sold To table. Relate: Updates ALT_CUST_ID in the CST_CUST_ALT_KEY table. Displays in the Alternate Key field on the Customer Alternate Keys screen. |
To view profile codes for a customer in Relate, select customer action ATTRIBUTES to advance to the Customer Attributes screen. Included in the integration? The Send Profile Data to Relate (L51) system control value controls whether to include demographic profile data. Required setup: You need to complete the setup described under CWSerenade Customer Profile > Relate Attribute Definition. |
|
CustomAttribute name AttributeValue |
name = The description of a profile code assigned to the sold to customer. From the PFL Description in the Profile table. Relate: Corresponds to an ATTRIBUTE_NAME in the DTV_ATTRIBUTE_TYPE table. Displays as the Name field on the Attributes tab of the Customer Lookup / Edit screen. Note: The attribute name in the message must match an attribute name in the DTV_ATTRIBUTE_TYPE table. See CWSerenade Customer Profile > Relate Attribute Definition for setup instructions. AttributeValue = A description of the profile data assigned to the sold to customer. From the PDA Description in the Profile Data table. Relate: Updates ATTRIBUTE_VALUE in the CST_CUST_ATTRIBUTES table. Displays in the Value field on the Attributes tab of the Customer Lookup / Edit screen. |
Sample Relate Add or Update Customer Message
<Customers>
<Customer Action="AddOrUpdate">
<Source>C</Source>
<BusinessName>MICROS RETAIL</BusinessName>
<CustomerClass>CL</CustomerClass>
<SignupDate>2007-03-21T00:00:00</SignupDate>
<RetailStoreID>12345</RetailStoreID>
<LastUpdateInfo>
<UpdateUserID>4454</UpdateUserID>
<UpdateDate>2010-11-17T00:00:00</UpdateDate>
</LastUpdateInfo>
<Affiliation>
<RetailStoreID>12345</RetailStoreID>
</Affiliation>
<PersonalPreferences>
<ContactPreference ContactType="MAIL" SubTypeCode="HOME" Permission="true" />
<ContactPreference ContactType="PHONE" SubTypeCode="HOME" Permission="false" />
<ContactPreference ContactType="EMAIL" SubTypeCode="HOME" Permission="true" />
</PersonalPreferences>
<EntityInformation>
<Individual>
<Name>
<Name Location="First">TROY</Name>
<Name Location="Middle">W</Name>
<Name Location="Last">BOTTGER</Name>
</Name>
<ContactInformation>
<Address ValidFlag="false" TypeCode="HOME" PrimaryFlag="true" ContactPreferenceCode="N" Label="Soldto">
<Country>USA</Country>
<ApartmentNumber>NO APT</ApartmentNumber>
<AddressLine1>109 RIVER LN X</AddressLine1>
<AddressLine2>NO ADDR LINE 2</AddressLine2>
<AddressLine3>NO ADDR LINE 3</AddressLine3>
<AddressLine4>NO ADDR LINE 4</AddressLine4>
<City>TEMPLETON</City>
<Territory>MA</Territory>
<PostalCode>01468</PostalCode>
</Address>
<EMail TypeCode="HOME" PrimaryFlag="false" ContactPreferenceCode="O2">
<EMailAddress>tbottger@example.com</EMailAddress>
</EMail>
<EMail TypeCode="HOME" PrimaryFlag="true" ContactPreferenceCode="O1">
<EMailAddress>tbottger@example.com</EMailAddress>
</EMail>
<EMail TypeCode="HOME" PrimaryFlag="false" ContactPreferenceCode="O4">
<EMailAddress>tbottger@example.com</EMailAddress>
</EMail>
<Telephone TypeCode="WORK" PrimaryFlag="true" Label="DAY">
<PhoneNumber>5085550112</PhoneNumber>
</Telephone>
<Telephone TypeCode="HOME" PrimaryFlag="false" Label="EVE">
<PhoneNumber>5085550113</PhoneNumber>
</Telephone>
<Telephone TypeCode="FAX" PrimaryFlag="false" Label="FAX">
<PhoneNumber>5085550114</PhoneNumber>
</Telephone>
</ContactInformation>
<PersonalSummary Rent="false" />
</Individual>
</EntityInformation>
<AlternateKey TypeCode="SERENADE_ID">
<AlternateID>30</AlternateID>
</AlternateKey>
<CustomAttribute name="PROFILE CATEGORY CD">
<AttributeValue>A</AttributeValue>
</CustomAttribute>
<CustomAttribute name="BIRTHDAY">
<AttributeValue>BIRTHDAY</AttributeValue>
</CustomAttribute>
</Customer>
</Customers>
Relate Post POSlog Transaction Message
Purpose: The Relate Post POSlog Transaction message contains sale and credit information to send to Relate.
Relate: You can view sale and credit transactions in Relate on the Transaction History tab of the Customer Lookup / Edit screen. See the Customer Lookup / Edit section of the Relate User Guide for more information.
To generate: Process the Relate Sales Feed. CWSerenade includes sale and credit information only for invoices whose Extracted to Store field in the Invoice Header table is blank that are not excluded by the Cross Channel Orders to Exclude in Sales Feed (L35) system control value or Return Disposition Code to Exclude in Relate Sales Feed (M22) system control value.
Batch XML file name: CWSerenade bundles all of the POSlog messages generated at one time into an XML batch file. The name of the XML batch file is cw-poslog_CO#_STORE_ID_DATETIME.xml where:
• CO# is the CWSerenade company number
• STORE_ID is the value defined in the Default Location for Sales Download (K69) system control value
• DATETIME is the date and time the file was created in YYMMDDHHMMSS format; for example if the file was created on November 23, 2010 at 9:21:41, the DATETIME displays as 101123092141.
Example: cw-poslog_007_12301974_101123092141.xml.
If you use multiple currencies: The amounts passed in the message are in the local currency (the currency defined in the Local Currency Code (A55) system control value).
Viewing transactions in Relate: You can view transactions on the Transaction History screen for a customer. To view the details for a transaction, click the transaction to open the Transaction Detail window. See Transaction History Screen in the Relate User Guide for screen details.
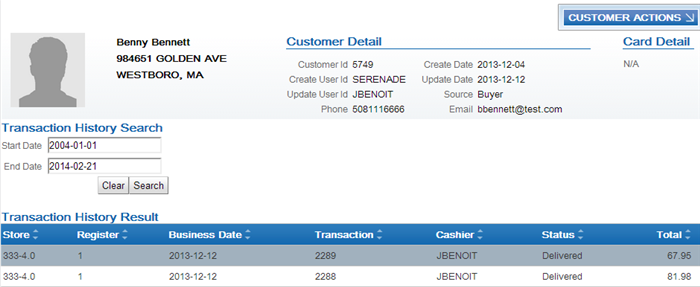
To view the details for a transaction, click the transaction to open the Transaction Detail window. See Transaction Detail Window in the Relate User Guide for screen details.
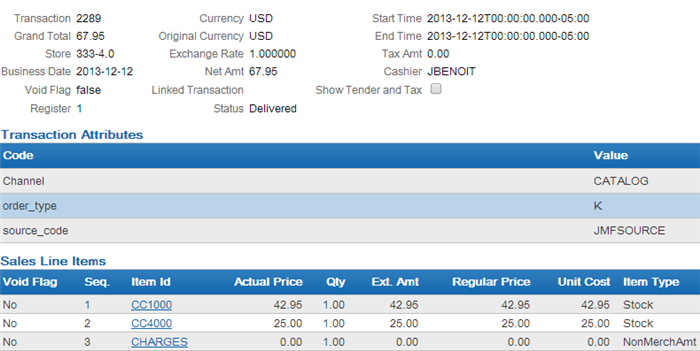
The Purchase Activity section of the Customer Dashboard also provides a summary of the transactions associated with a customer. See Customer Dashboard in the Relate User Guide for screen details.
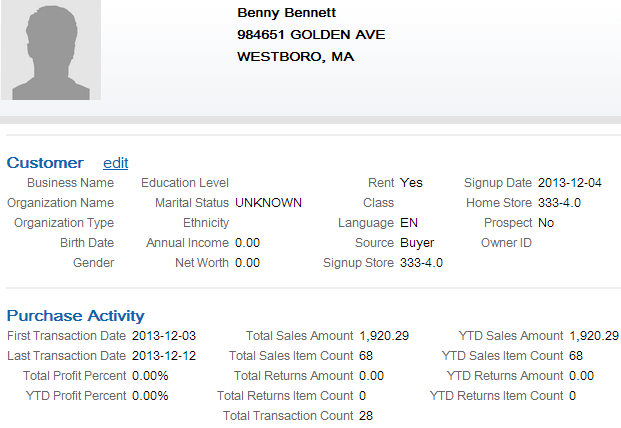
Note: If the Merchandise Only in Sales Feed (L36) system control value is unselected, indicating you use the item in the Item for Non-Merchandise Amounts (L39) system control value to represent the freight, additional freight, handling and additional charges on an invoice, Relate includes this item in the quantity and amount totals on the Purchase Activity tab.
For more information: See:
• Sample Relate Post POSlog Transaction Message - Sale and Sample Relate Post POSlog Transaction Message - Return for sample messages.
• The Transactions section of the Relate Web Services Guide for more details on the Post POSlog Transaction message.
• The Customer Lookup / Edit section of the Relate User Guide for more information on reviewing sales and return transactions for a customer.
Tag Name |
Description |
Transaction |
|
CancelFlag |
false defaults. |
TrainingModeFlag |
false defaults. |
OfflineFlag |
false defaults. |
Action |
PostTransaction defaults. |
TransactionType |
ECOMM_SALE defaults. |
RetailStoreID |
The value defined in the Default Location for Sales Download (K69) system control value. Relate: Updates RTL_LOC_ID in the TRN_TRANSACTION table. Displays in the Store field on the Transaction History tab of the Customer Lookup / Edit screen. |
WorkstationID |
The register assigned to the retail store. From the Register # in the Store Cross Reference table. Relate: Updates WKSTN_ID in the TRN_TRANSACTION table. Displays in the Register field on the Transaction History tab of the Customer Lookup / Edit screen. |
TillID |
1 defaults. |
SequenceNumber |
Invoice number. From the IHD Invoice # in the Invoice Header table. Relate: Updates TRANS_SEQ in the TRN_TRANSACTION table. Displays in the Transaction field on the Transaction History tab of the Customer Lookup / Edit screen. |
BusinessDayDate |
Invoice date in YYYY-MM-DD format. From the IHD Invoice Process Date in the Invoice Header table. Relate: Updates BUSINESS_DATE in the TRN_TRANSACTION table. Displays in the Business Date field on the Transaction History tab of the Customer Lookup / Edit screen. |
BeginDateTime |
Invoice date in YYYY-MM-DD:THH:MM:SS format. Note: The time always displays as 00:00:00. From the IHD Invoice Process Date in the Invoice Header table. Relate: Updates BEGIN_DATETIME in the TRN_TRANSACTION table. Displays in the Begin Time field on the Transaction History tab of the Customer Lookup / Edit screen. |
EndDateTime |
Invoice date in YYYY-MM-DD:THH:MM:SS format. Note: The time always displays as 00:00:00. From the IHD Invoice Process Date in the Invoice Header table. Relate: Updates END_DATETIME in the TRN_TRANSACTION table. Displays in the End Time field on the Transaction History tab of the Customer Lookup / Edit screen. |
OperatorID |
The user ID of the user that placed the order. From the OHD Entered by USR User in the Order Header table. Relate: Updates OPERATOR_ID in the TRN_TRANSACTION table. Displays in the Cashier field on the Transaction History tab of the Customer Lookup / Edit screen. |
CurrencyCode |
The currency of the invoice, based on the offer associated with the source code on the order header. From the OFR Currency code in the Offer table. Relate: Updates ISO_CURRENCY_TYPCODE in the TRN_TRANSACTION table. Displays in the Currency field on the Transaction History tab of the Customer Lookup / Edit screen. |
PosTransactionProperties |
|
PosTransactionPropertyCode |
Channel defaults. Relate: Updates PROPERTY_CODE in the TRN_TRANSACTION_PROPERTY table. |
PosTransactionPropertyValue |
Defines whether the invoice is associated with a web order. Valid values: ECOMM = Web order. CATALOG = Non-web order. From OHD Internet Order in the Order Header table; I indicates internet order; any other value indicates catalog order. Relate: Updates PROPERTY_VALUE in the TRN_TRANSACTION_PROPERTY table. |
PosTransactionPropertyCode |
source_code defaults. Relate: Updates PROPERTY_CODE in the TRN_TRANSACTION_PROPERTY table. |
PosTransactionPropertyValue |
The source code from the order header. From the OHD SRC Source code in the Order Header table. Relate: Updates PROPERTY_VALUE in the TRN_TRANSACTION_PROPERTY table. |
PosTransactionPropertyCode |
order_type defaults. Relate: Updates PROPERTY_CODE in the TRN_TRANSACTION_PROPERTY table. |
PosTransactionPropertyValue |
The order type assigned to the order header. From the OTY Order type in the Order Header table. Relate: Updates PROPERTY_VALUE in the TRN_TRANSACTION_PROPERTY table. |
RetailTransaction |
|
TypeCode |
Transaction defaults. Relate: Updates TRANS_TYPCODE in the TRN_TRANSACTION table. |
TransactionStatus |
Delivered defaults. Relate: Updates TRANS_STATCODE in the TRN_TRANSACTION table. Displays in the Status field on the Transaction History tab of the Customer Lookup / Edit screen. |
LineItem LineItem can represent: • An item; in this situation, Sale (debit invoice) or Return (credit invoice) follows LineItem. The ItemType in the Sale or Return element indicates whether the item is a merchandise item or is the item code defined in the Item for Non-Merchandise Amounts (L39) system control value that represents all non-merchandise amounts for an invoice, such as freight, additional freight, handling and additional charges. • ItemType Stock indicates the item is a merchandise item on the invoice. • ItemType NonMerchAmt indicates the item represents the non-merchandise amounts for the invoice. The system includes a NonMerchAmt item only if the Merchandise Only in Sales Feed (L36) system control value is unselected. • Tax; in this situation, Tax follows LineItem and includes the tax amount associated with the invoice. • Tender; in this situation, Tender follows LineItem. The TenderType in the Tender element indicates the payment method associated with the invoice and Amount is the amount charged to the payment method. |
|
VoidFlag |
false defaults. Relate: Updates VOID_FLAG in the TRN_LINE_ITEM table. Displays in the VoidFlag field for Sales Line Items, Return Line Items, Price Line Item Modifiers, Tax Line Items or Tender Line Items on the Transaction History tab of the Customer Lookup / Edit screen. |
EntryMethod |
Valid values: keyed defaults if the LineItem represents a merchandise item. dtv:ListSelection defaults if the LineItem represents the the Item for Non-Merchandise Amounts (L39). Note: Not included if the LineItem represents tax or tender. |
SequenceNumber |
A sequential number assigned to each line item. Relate: Updates LINEITM_SEQ in the TRN_LINE_ITEM table. Displays in the Seq field for the Sales Line Items, Return Line Items, Price Line Item Modifiers, Tax Line Items or Tender Line Items on the Transaction History tab of the Customer Lookup / Edit screen. |
BeginDateTime |
Invoice date in YYYY-MM-DD:THH:MM:SS format. Note: The time always displays as 00:00:00. From the IHD Invoice Process Date in the Invoice Header table. Relate: Updates BEGIN_DATE_TIMESTAMP in the TRN_LINE_ITEM table. |
EndDateTime |
Invoice date in YYYY-MM-DD:THH:MM:SS format. Note: The time always displays as 00:00:00. From the IHD Invoice Process Date in the Invoice Header table. Relate: Updates END_DATE_TIMESTAMP in the TRN_LINE_ITEM table. |
|
Included only for a debit invoice. If the Merchandise Only in Sales Feed (L36) system control value is unselected, the system uses the item defined in the Item for Non-Merchandise Amounts (L39) system control value to represent all non-merchandise amounts for an invoice, including freight, additional freight, handling and additional charges. Note: The Unit Cost, Dept, Sub Dept, Class and Style fields that display on the screen in Relate are defined for an item when you send the item to Relate in the Relate Update Item Message. Relate stores this information in the ITM_ITEM table. |
|
ItemType |
Merchandise Item Stock defaults. Non-Merchandise Amounts Item NonMerchAmt defaults. Note: The system includes a NonMerchAmt item only if the Merchandise Only in Sales Feed (L36) system control value is unselected. Relate: Updates ITM_ITEM_TYPCODE in the TRN_LINE_ITEM table. Displays in the Item Type field for the Sales Line Items on the Transaction History tab of the Customer Lookup / Edit screen. |
Merchandise Item The setting of the MICROS Integration Item ID (L38) system control value determines the information that defaults to this field. • If set to XREF, this field contains the Retail reference number. From the Retail reference # in the SKU table. Note: If a Retail reference number is not defined for an item, 0 defaults. • If set to ITEM, this field contains the Item code + SKU element 1 + SKU element 2 + SKU element 3, with each value separated by a dash (--). From the ITM Number and SKU Code in the SKU table. Examples: • If the item code is ITM1, SKU element 1 is RED, SKU element 2 is XSML and SKU element 3 is WMNS, the ItemID displays as ITM1-RED-XSML-WMNS. • If the item code is ITM1 and SKU element 2 is XSML, the ItemID displays as ITM1--XSML. • If the item code is ITM1 and SKU element 3 is WMNS, the ItemID displays as ITM1---WMNS. Non-Merchandise Amounts Item The item defined in the Item for Non-Merchandise Amounts (L39) system control value defaults. Relate: Updates ITEM_ID in the TRN_LINE_ITEM table. Displays in the Item ID field for the Sales Line Items on the Transaction History tab of the Customer Lookup / Edit screen. |
|
Description |
The item description + SKU description. If the item does not contain SKUs, only the item description defaults. From the Description in the Item table and SKU table. |
RegularSalesUnitPrice |
Merchandise Item The offer price defined for the item. 0.00 displays if the offer price is zero. From Offer Price field in the Order Detail table. Non-Merchandise Amounts Item The sum of freight, additional freight, handling and additional charges. 0.00 displays if no freight, handling or charges exist. Relate: Updates ITEM_BASE_UNIT_PRICE in the TRN_LINE_ITEM table. Displays in the Regular Price field for the Sales Line Items on the Transaction History tab of the Customer Lookup / Edit screen. |
ActualSalesUnitPrice |
Merchandise Item The price of the item on the invoice. 0.00 displays if the price is zero. From the IDT Price field in the Invoice Detail table. Non-Merchandise Amounts Item The sum of freight, additional freight, handling and additional charges. 0.00 displays if no freight, handling or charges exist. Relate: Updates ITEM_UNIT_PRICE in the TRN_LINE_ITEM table. Displays in the Actual Price field for the Sales Line Items on the Transaction History tab of the Customer Lookup / Edit screen. |
ExtendedAmount |
Merchandise Item The extended price of the item on the invoice. 0.00 displays if the extended price is zero. From the IDT Price x the IDT Qty Shipped in the Invoice Detail table. Non-Merchandise Amounts Item The sum of freight, additional freight, handling and additional charges. 0.00 displays if no freight, handling or charges exist. Relate: Updates ITEM_EXTENDED_AMT in the TRN_LINE_ITEM table. |
Quantity |
Merchandise Item The quantity of the item shipped. From the IDT Qty Shipped in the Invoice Detail table. Non-Merchandise Amounts Item 1 defaults. Relate: Updates ITEM_QUANTITY in the TRN_LINE_ITEM table. Displays in the Qty field for the Sales Line Items on the Transaction History tab of the Customer Lookup / Edit screen. |
|
Included only for credit invoices. If the Merchandise Only in Sales Feed (L36) system control value is unselected, the system uses the item defined in the Item for Non-Merchandise Amounts (L39) system control value to represent all non-merchandise amounts for an invoice, such as freight, additional freight, handling and additional charges. Note: The Unit Cost field that displays on the screen in Relate is defined for an item when you send the item to Relate in the Relate Update Item Message. Relate stores this information in the ITM_ITEM table. |
|
ItemType |
Merchandise Item Stock defaults. Non-Merchandise Amounts Item NonMerchAmt defaults. Relate: Updates ITM_ITEM_TYPCODE in the TRN_LINE_ITEM table. Displays in the Item Type field for the Return Line Items on the Transaction History tab of the Customer Lookup / Edit screen. |
ItemID |
Merchandise Item The setting of the MICROS Integration Item ID (L38) system control value determines the information that defaults to this field. • If set to XREF, this field contains the Retail reference number. From the Retail reference # in the SKU table. Note: If a Retail reference # is not defined for an item, 0 defaults. • If set to ITEM, this field contains the Item code + SKU element 1 + SKU element 2 + SKU element 3, with each value separated by a dash (--). From the ITM Number and SKU Code in the SKU table. Examples: • If the item code is ITM1, SKU element 1 is RED, SKU element 2 is XSML and SKU element 3 is WMNS, the ItemID displays as ITM1-RED-XSML-WMNS. • If the item code is ITM1 and SKU element 2 is XSML, the ItemID displays as ITM1--XSML. • If the item code is ITM1 and SKU element 3 is WMNS, the ItemID displays as ITM1---WMNS. Non-Merchandise Amounts Item The item defined in the Item for Non-Merchandise Amounts (L39) system control value defaults. Relate: Updates ITEM_ID in the TRN_LINE_ITEM table. Displays in the Item ID field for the Return Line Items on the Transaction History tab of the Customer Lookup / Edit screen. |
Description |
The item description + SKU description. If the item does not contain SKUs, only the item description defaults. From the Description in the Item table and SKU table. |
RegularSalesUnitPrice |
Merchandise Item The offer price defined for the item. 0.00 displays if the offer price is zero. For a return, the price is a negative amount. From Offer Price in the Order Detail table. Non-Merchandise Amounts Item The sum of freight, additional freight, handling and additional charges associated with the return. 0.00 displays if no freight, handling or charges exist. Relate: Updates ITEM_BASE_UNIT_PRICE in the TRN_LINE_ITEM table. Displays in the Regular Price field for the Return Line Items on the Transaction History tab of the Customer Lookup / Edit screen. |
ActualSalesUnitPrice |
Merchandise Item The price of the item on the invoice. 0.00 displays if the price is zero. For a return, the price is a negative amount. From IDT Price in the Invoice Detail table. Non-Merchandise Amounts Item The sum of freight, additional freight, handling and additional charges associated with the return. 0.00 displays if no freight, handling or charges exist. Relate: Updates ITEM_UNIT_PRICE in the TRN_LINE_ITEM table. Displays in the Actual Price field for the Return Line Items on the Transaction History tab of the Customer Lookup / Edit screen. |
ExtendedAmount |
Merchandise Item The extended price of the item on the invoice. 0.00 displays if the extended price is zero. For a return, the price is a negative amount. From IDT Price x the IDT Qty Shipped in the Invoice Detail table. Non-Merchandise Amounts Item The sum of freight, additional freight, handling and additional charges associated with the return. 0.00 displays if no freight, handling or charges exist. Relate: Updates ITEM_EXTENDED_AMT in the TRN_LINE_ITEM table. Displays in the Extended Amount field for the Return Line Items on the Transaction History tab of the Customer Lookup / Edit screen. |
Quantity |
Merchandise Item The quantity of the item returned. The quantity is always a positive number. From IDT Qty Shipped in the Invoice Detail table. Non-Merchandise Amounts Item 1 defaults. Relate: Updates ITEM_RETURNED_QUANTITY in the TRN_LINE_ITEM table. Displays in the Returned Qty field for the Return Line Items on the Transaction History tab of the Customer Lookup / Edit screen. |
ReasonCode |
Return defaults. Relate: Updates ITEM_RETURN_REASCODE in the TRN_LINE_ITEM table. Displays in the Reason field for the Return Line Items on the Transaction History tab of the Customer Lookup / Edit screen. |
Disposal |
Undecided defaults. |
Reason |
A code for the reason for the return. From Return reason code in the Order Line History table. If multiple returns have been made against the line, this is the first return reason code. Relate: Updates ITEM_RETURN_FLAG in the TRN_LINE_ITEM table. |
ReturnType |
Valid values: Verified = Return processed against a line on the order. Unverified = Return processed as a negative order line. Relate: Updates ITEM_RETURN_TYPCODE in the TRN_LINE_ITEM table. Displays in the Type field for the Return Line Items on the Transaction History tab of the Customer Lookup / Edit screen. |
ReasonComment |
The description for the reason for the return. From Description in the Return Reason table. |
Associate |
|
AssociateID |
The user ID of the user that placed the order. From the OHD Entered by USR User in the Order Header table. Relate: Displays in the Cashier field on the Transaction History tab of the Customer Lookup / Edit screen. |
RetailPriceModifier Included for Sale and Return transactions if the item or SKU price on the invoice differs from the offer price. |
|
MethodCode |
Promotion defaults. |
VoidFlag |
false defaults. Relate: Displays in the VoidFlag field for the Price Line Item Modifiers on the Transaction History tab of the Customer Lookup / Edit screen. |
SequenceNumber |
1 defaults. Relate: Displays in the Line Item Seq field for the Price Line Item Modifiers on the Transaction History tab of the Customer Lookup / Edit screen. |
Amount Action |
The RegularSalesUnitPrice - the ActualSalesUnitPrice. This is the Price in the SKU Price or Offer Price table - the IDT Price in the Invoice Detail table. Action = Subtract if the amount is a negative number. Action = Add if the amount is a positive number. Relate: Updates PRICEMOD_PRICE_CHANGE_AMT in the TRN_LINE_ITEM_MODIFIER table. Displays in the Amt and PriceModifier Type fields for the Price Line Item Modifiers on the Transaction History tab of the Customer Lookup / Edit screen. |
ReasonCode |
Combined defaults. Relate: Updates PRICEMOD_PRICE_CHANGE_REASCODE in the TRN_LINE_ITEM_MODIFIER table. Displays in the Price Change Reason field for the Price Line Item Modifiers on the Transaction History tab of the Customer Lookup / Edit screen. |
TransactionLink Included for Return transactions. |
|
ReasonCode |
Return defaults. |
SequenceNbr |
The original invoice associated with the purchase of the item being returned. From the IHD Invoice # in the Invoice Header table. Relate: Updates ORIG_TRANS_ID in the TRN_LINE_ITEM table. Displays in the Original Transaction field for Return Line Items on the Transaction History tab of the Customer Lookup / Edit screen. |
RetailStoreID |
The value defined in the Default Location for Sales Download (K69) system control value. Relate: Updates ITEM_ORIG_RTL_LOC_ID in the TRN_LINE_ITEM table. Displays in the Original Store field for Return Line Items on the Transaction History tab of the Customer Lookup / Edit screen. |
BusinessDayDate |
Invoice date of the original invoice in YYYY-MM-DD format. From the IHD Invoice Process Date in the Invoice Header table. Relate: Updates ITEM_ORIG_BUSINESS_DATE in the TRN_LINE_ITEM table. |
WorkstationID |
The register assigned to the retail store. From the Register # in the Store Cross Reference table. Relate: Updates ITEM_ORIG_WKSTN_ID in the TRN_LINE_ITEM table. Displays in the Original Register field for Return Line Items on the Transaction History tab of the Customer Lookup / Edit screen. |
TaxType |
Sales defaults. |
Amount |
The total tax for the invoice ship to. 0.00 displays if the tax amount is zero. For a return (credit invoice), the amount will be negative. From Tax in the Invoice Ship To table. Relate: Updates TAX_TOTAL in the TRN_TRANSACTION table. Displays in the Tax Amt field for General on the Transaction History tab of the Customer Lookup / Edit screen. |
|
Repeating group for each payment method associated with the invoice. Note: CWSerenade does not pass a payment method if the amount charged to the payment method is zero. |
|
TenderType |
A description of the pay category assigned to the pay type. Valid values: Cash / Check = Pay category 1. Credit Card = Pay category 2. A/R = Pay category 3. COD = Pay category 4. Coupon / Credit = Pay category 5. Based on the IPM Pay Category in the Invoice Payment Method table. |
TenderID |
The store tender ID defined for the payment method. From the PAY Store Tender in the Pay Type Extended table. Relate: Updates TND_TENDER_ID in the TRN_LINE_ITEM table. Displays in the Tender ID field for the Tender Line Items on the Transaction History tab of the Customer Lookup / Edit screen. Note: If the tender ID does not exist in Relate, Relate automatically creates it in the DTV_TENDER_TYPES table. |
Amount |
The amount charged to the payment method. For a return (credit invoice), the amount will be negative. If the Merchandise Only in Sales Feed (L36) system control value is selected, this is the merchandise amount + tax amount. From the IPM Merch + IPM Tax in the Invoice Payment Method table. If the Merchandise Only in Sales Feed (L36) system control value is unselected, this is the entire amount charged to the payment method. From the IPM Merch + IPM Tax + IPM Add’l freight + IPM Add’l charges + IPM Freight + IPM Handling in the Invoice Payment Method table. Relate: Updates TND_TENDER_AMT in the TRN_LINE_ITEM table. Displays in the Tender Amt field for the Tender Line Items on the Transaction History tab of the Customer Lookup / Edit screen. |
CreditDebit Included only if the payment method is Credit Card. |
|
PrimaryAccountNumber |
The credit card number used as payment. All but the last 4 digits of the number are masked. From the IPM Credit Card # in the Invoice Payment Method table. Relate: Updates TND_ACCT_NBR in the TRN_LINE_ITEM table. Displays in the Account # field for the Tender Line Items on the Transaction History tab of the Customer Lookup / Edit screen. Note: Relate masks the card number before storing it in the database; the masked number displays on the screen. |
GiftCard Included only if the payment method is Stored Value Card. |
|
CardNumber |
Stored value card number used as payment. All but the last 4 digits of the number are masked. From the IPM Credit Card # in the Invoice Payment Method table. Relate: Updates TND_ACCT_NBR in the TRN_LINE_ITEM table. Displays in the Account # field for the Tender Line Items on the Transaction History tab of the Customer Lookup / Edit screen. Note: Relate masks the card number before storing it in the database; the masked number displays on the screen. |
Total |
|
TotalType |
TransactionGrandAmount defaults. If the Merchandise Only in Sales Feed (L36) system control value is selected, the amount is the total merchandise amount + tax amount for the merchandise items on the invoice, excluding any tax on freight and handling. From Merchandise + Tax in the Invoice Ship To table. If the Merchandise Only in Sales Feed (L36) system control value is unselected, the amount is the invoice total. From Merchandise + Tax + Freight + Handling + Add’l Charges + Add’l Freight in the Invoice Ship To table. For a return (credit invoice), the amount will be negative. Relate: Updates TOTAL in the TRN_TRANSACTION table. Displays in the Grand Total field for General on the Transaction History tab of the Customer Lookup / Edit screen. |
AlternateKey |
|
TypeCode |
SERENADE_ID defaults. Relate: Corresponds to the ALT_KEY_TYPCODE in the CST_CUST_ALT_KEY table. |
AlternateID |
The sold to customer number associated with the transaction. From the CST Customer # in the Customer Sold To table. Relate: Corresponds to the ALT_CUST_ID in the CST_CUST_ALT_KEY table. |
Sample Relate Post POSlog Transaction Message - Sale
<POSLog>
<Transaction CancelFlag="false" TrainingModeFlag="false" OfflineFlag="false" Action="PostTransaction" TransactionType="ECOMM_SALE">
<RetailStoreID>69007</RetailStoreID>
<WorkstationID>902</WorkstationID>
<TillID>1</TillID>
<SequenceNumber>610</SequenceNumber>
<BusinessDayDate>2011-01-27</BusinessDayDate>
<BeginDateTime>2011-01-27T00:00:00</BeginDateTime>
<EndDateTime>2011-01-27T00:00:00</EndDateTime>
<OperatorID>KBOTTGER</OperatorID>
<PosTransactionProperties>
<PosTransactionPropertyCode>Channel</PosTransactionPropertyCode>
<PosTransactionPropertyValue>CATALOG</PosTransactionPropertyValue>
</PosTransactionProperties>
<PosTransactionProperties>
<PosTransactionPropertyCode>source_code</PosTransactionPropertyCode>
<PosTransactionPropertyValue>SOURCE7</PosTransactionPropertyValue>
</PosTransactionProperties>
<PosTransactionProperties>
<PosTransactionPropertyCode>order_type</PosTransactionPropertyCode>
<PosTransactionPropertyValue>O</PosTransactionPropertyValue>
</PosTransactionProperties>
<RetailTransaction TypeCode="Transaction" TransactionStatus="Delivered">
<LineItem VoidFlag="false" EntryMethod="keyed">
<SequenceNumber>1</SequenceNumber>
<BeginDateTime>2011-01-27T00:00:00</BeginDateTime>
<EndDateTime>2011-01-27T00:00:00</EndDateTime>
<Sale ItemType="Stock">
<ItemID>RELATESKU-RED</ItemID>
<Description>RELATESKU ITEM DESCRIPTION RED RELATESKU SKU DESCRIPTION</Description>
<RegularSalesUnitPrice>10.00</RegularSalesUnitPrice>
<ActualSalesUnitPrice>10.00</ActualSalesUnitPrice>
<ExtendedAmount>10.00</ExtendedAmount>
<Quantity>1</Quantity>
<Associate>
<AssociateID>KBOTTGER</AssociateID>
</Associate>
</Sale>
</LineItem>
<LineItem VoidFlag="false" EntryMethod="keyed">
<SequenceNumber>2</SequenceNumber>
<BeginDateTime>2011-01-27T00:00:00</BeginDateTime>
<EndDateTime>2011-01-27T00:00:00</EndDateTime>
<Sale ItemType="Stock">
<ItemID>RELATE</ItemID>
<Description>RELATE ITEM DESCRIPTION</Description>
<RegularSalesUnitPrice>10.00</RegularSalesUnitPrice>
<ActualSalesUnitPrice>10.00</ActualSalesUnitPrice>
<ExtendedAmount>10.00</ExtendedAmount>
<Quantity>1</Quantity>
<Associate>
<AssociateID>KBOTTGER</AssociateID>
</Associate>
</Sale>
</LineItem>
<LineItem VoidFlag="false" EntryMethod="ListSelection">
<SequenceNumber>3</SequenceNumber>
<BeginDateTime>2011-01-27T00:00:00</BeginDateTime>
<EndDateTime>2011-01-27T00:00:00</EndDateTime>
<Sale ItemType="NonMerchAmt">
<ItemID>RLTCHARGES</ItemID>
<Description>RELATE NON-MERCHANDISE CHARGES</Description>
<RegularSalesUnitPrice>0.10</RegularSalesUnitPrice>
<ActualSalesUnitPrice>0.10</ActualSalesUnitPrice>
<ExtendedAmount>0.10</ExtendedAmount>
<Quantity>1</Quantity>
<Associate>
<AssociateID>KBOTTGER</AssociateID>
</Associate>
</Sale>
</LineItem>
<LineItem VoidFlag="false">
<SequenceNumber>4</SequenceNumber>
<BeginDateTime>2011-01-27T00:00:00</BeginDateTime>
<EndDateTime>2011-01-27T00:00:00</EndDateTime>
<Tender TenderType="Credit Card">
<TenderID>4444</TenderID>
<Amount>20.10</Amount>
<CreditDebit>
<PrimaryAccountNumber>************1443</PrimaryAccountNumber>
</CreditDebit>
</Tender>
</LineItem>
<LineItem VoidFlag="false">
<SequenceNumber>5</SequenceNumber>
<BeginDateTime>2011-01-27T00:00:00</BeginDateTime>
<EndDateTime>2011-01-27T00:00:00</EndDateTime>
<Tax TaxType="Sales">
<Amount>0.00</Amount>
</Tax>
</LineItem>
<Total TotalType="TransactionGrandAmount">20.10</Total>
<Customer>
<AlternateKey TypeCode="SERENADE_ID">
<AlternateID>57</AlternateID>
</AlternateKey>
</Customer>
</RetailTransaction>
</Transaction>
</POSLog>
Sample Relate Post POSlog Transaction Message - Return
<POSLog>
<Transaction CancelFlag="false" TrainingModeFlag="false" OfflineFlag="false" Action="PostTransaction" TransactionType="ECOMM_SALE">
<RetailStoreID>69007</RetailStoreID>
<WorkstationID>902</WorkstationID>
<TillID>1</TillID>
<SequenceNumber>623</SequenceNumber>
<BusinessDayDate>2011-02-01</BusinessDayDate>
<BeginDateTime>2011-02-01T00:00:00</BeginDateTime>
<EndDateTime>2011-02-01T00:00:00</EndDateTime>
<OperatorID>KBOTTGER</OperatorID>
<PosTransactionProperties>
<PosTransactionPropertyCode>Channel</PosTransactionPropertyCode>
<PosTransactionPropertyValue>CATALOG</PosTransactionPropertyValue>
</PosTransactionProperties>
<PosTransactionProperties>
<PosTransactionPropertyCode>source_code</PosTransactionPropertyCode>
<PosTransactionPropertyValue>SOURCE7</PosTransactionPropertyValue>
</PosTransactionProperties>
<PosTransactionProperties>
<PosTransactionPropertyCode>order_type</PosTransactionPropertyCode>
<PosTransactionPropertyValue>P</PosTransactionPropertyValue>
</PosTransactionProperties>
<RetailTransaction TypeCode="Transaction" TransactionStatus="Delivered">
<LineItem VoidFlag="false" EntryMethod="keyed">
<SequenceNumber>1</SequenceNumber>
<BeginDateTime>2011-02-01T00:00:00</BeginDateTime>
<EndDateTime>2011-02-01T00:00:00</EndDateTime>
<Return ItemType="Stock">
<ItemID>12301974</ItemID>
<Description>RELATE ITEM DESCRIPTION</Description>
<RegularSalesUnitPrice>-10.00</RegularSalesUnitPrice>
<ActualSalesUnitPrice>-10.00</ActualSalesUnitPrice>
<ExtendedAmount>-10.00</ExtendedAmount>
<Quantity>1</Quantity>
<Reason>5</Reason>
<Disposal>Undecided</Disposal>
<ReturnType>Verified</ReturnType>
<ReasonComment>DAMAGED</ReasonComment>
<Associate>
<AssociateID>KBOTTGER</AssociateID>
</Associate>
<TransactionLink ReasonCode="Return">
<SequenceNumber>621</SequenceNumber>
<RetailStoreID>69007</RetailStoreID>
<WorkstationID>902</WorkstationID>
<BusinessDayDate>2011-02-01</BusinessDayDate>
</TransactionLink>
</Return>
</LineItem>
<LineItem VoidFlag="false" EntryMethod="keyed">
<SequenceNumber>2</SequenceNumber>
<BeginDateTime>2011-02-01T00:00:00</BeginDateTime>
<EndDateTime>2011-02-01T00:00:00</EndDateTime>
<Return ItemType="Stock">
<ItemID>1272011</ItemID>
<Description>RELATESKU ITEM DESCRIPTION RED RELATESKU SKU DESCRIPTION</Description>
<RegularSalesUnitPrice>-10.00</RegularSalesUnitPrice>
<ActualSalesUnitPrice>-10.00</ActualSalesUnitPrice>
<ExtendedAmount>-10.00</ExtendedAmount>
<Quantity>1</Quantity>
<Reason>5</Reason>
<Disposal>Undecided</Disposal>
<ReturnType>Verified</ReturnType>
<ReasonComment>DAMAGED</ReasonComment>
<Associate>
<AssociateID>KBOTTGER</AssociateID>
</Associate>
<TransactionLink ReasonCode="Return">
<SequenceNumber>621</SequenceNumber>
<RetailStoreID>69007</RetailStoreID>
<WorkstationID>902</WorkstationID>
<BusinessDayDate>2011-02-01</BusinessDayDate>
</TransactionLink>
</Return>
</LineItem>
<LineItem VoidFlag="false" EntryMethod="keyed">
<SequenceNumber>3</SequenceNumber>
<BeginDateTime>2011-02-01T00:00:00</BeginDateTime>
<EndDateTime>2011-02-01T00:00:00</EndDateTime>
<Return ItemType="Stock">
<ItemID>98</ItemID>
<Description>PACKAGE INSERT</Description>
<RegularSalesUnitPrice>0.00</RegularSalesUnitPrice>
<ActualSalesUnitPrice>0.00</ActualSalesUnitPrice>
<ExtendedAmount>0.00</ExtendedAmount>
<Quantity>1</Quantity>
<Reason>5</Reason>
<Disposal>Undecided</Disposal>
<ReturnType>Verified</ReturnType>
<ReasonComment>DAMAGED</ReasonComment>
<Associate>
<AssociateID>KBOTTGER</AssociateID>
</Associate>
<TransactionLink ReasonCode="Return">
<SequenceNumber>621</SequenceNumber>
<RetailStoreID>69007</RetailStoreID>
<WorkstationID>902</WorkstationID>
<BusinessDayDate>2011-02-01</BusinessDayDate>
</TransactionLink>
</Return>
</LineItem>
<LineItem VoidFlag="false" EntryMethod="ListSelection">
<SequenceNumber>4</SequenceNumber>
<BeginDateTime>2011-02-01T00:00:00</BeginDateTime>
<EndDateTime>2011-02-01T00:00:00</EndDateTime>
<Return ItemType="NonMerchAmt">
<ItemID>RLTCHARGES</ItemID>
<Description>RELATE NON-MERCHANDISE CHARGES</Description>
<RegularSalesUnitPrice>-2.10</RegularSalesUnitPrice>
<ActualSalesUnitPrice>-2.10</ActualSalesUnitPrice>
<ExtendedAmount>-2.10</ExtendedAmount>
<Quantity>1</Quantity>
<Associate>
<AssociateID>KBOTTGER</AssociateID>
</Associate>
</Return>
</LineItem>
<LineItem VoidFlag="false">
<SequenceNumber>5</SequenceNumber>
<BeginDateTime>2011-02-01T00:00:00</BeginDateTime>
<EndDateTime>2011-02-01T00:00:00</EndDateTime>
<Tender TenderType="Credit Card">
<TenderID>MC</TenderID>
<Amount>-23.10</Amount>
<CreditDebit>
<PrimaryAccountNumber>************1443</PrimaryAccountNumber>
</CreditDebit>
</Tender>
</LineItem>
<LineItem VoidFlag="false">
<SequenceNumber>6</SequenceNumber>
<BeginDateTime>2011-02-01T00:00:00</BeginDateTime>
<EndDateTime>2011-02-01T00:00:00</EndDateTime>
<Tax TaxType="Sales">
<Amount>-1.00</Amount>
</Tax>
</LineItem>
<Total TotalType="TransactionGrandAmount">-23.10</Total>
<Customer>
<AlternateKey TypeCode="SERENADE_ID">
<AlternateID>86</AlternateID>
</AlternateKey>
</Customer>
</RetailTransaction>
</Transaction>
</POSLog>
