25 Setting Up the SOAaaS or the OSBaaS Self Service Portal
This chapter describes the procedure to set up and enable the SOA Self Service Portal or the OSB Self Service Portal. It contains the following sections:
25.1 Getting Started with SOAaaS and OSBaaS
This section helps you get started by providing an overview of the steps involved in setting up SOA as a Service (SOAaaS) and OSB as a Service (OSBaaS) to provision a service instance on one or more physical hosts.
Table 25-1 Getting Started with Middleware as a Service
| Step | Task |
|---|---|
|
1 |
Clone the database used by the Source SOA domain or OSB domain. Oracle recommends using the DBaaS feature available in Enterprise Manager. See Section 25.2. |
|
2 |
Meet the Prerequisites for creating the SOA/OSB provisioning profiles: See Section 25.3 |
|
3 |
Setting Up SOA and OSB Self Service Portal. See Section 25.4 |
25.2 Setting Up DBaaS used to Clone a SOA Repository
Following are the high-level steps to setup the Database Self Service Portal and request for a database instance that can be used for setting up the SOA Self Service Portal. Cloning method followed for setting up database instance for SOA is using RMAN backup. Following are the high-level steps:
Table 25-2 Provisioning Databases Using RMAN Backup Profile
| Step | Task | Role |
|---|---|---|
|
1 |
Follow the steps in the Getting Started section to enable DBaaS. |
|
|
2 |
Set up one or more PaaS Infrastructure Zones. Note: Oracle recommends using the same Infrastructure zone for Database and SOA/OSB. |
|
|
3 |
Create a database provisioning profiles using the RMAN Backup option. Note: Select the SOA/OSB dehydration store database used by the source SOA/OSB domain to create the profile. |
See Section 19.1.2.1, "Creating a Database Provisioning Profile Using RMAN Backup" |
|
4 |
Create a database pool. |
See Section 19.1.1.1, "Creating a Database Pool for Database as a Service" |
|
5 |
Create a database service template for SOA. Create a database service template for OSB. |
|
|
6 |
While deploying a database for SOA/OSB, select the service template you have created. |
-
Note:
-
The same user credentials that are used to create the Database Service instance should be used for creating the SOA/OSB Service instance. If you instead use other credentials, you must ensure that the SOA Service user has been granted the required accesses on the database.
-
Along with DBaaS, PDBaaS is also supported for cloning a SOA repository.
-
25.2.1 Creating a Database Service Template for SOA Profile
Prerequisite:
To truncate the business data present inside the SOA dehydration store (source environment), use the truncate script provided as a part of the SOA product. For this, you must first create a Generic Component and upload truncate_soa_oracle.sql script to Software Library. For more information on this, see Oracle Enterprise Manager Cloud Control Administrator's Guide.
Note that the truncate script (truncate_soa_oracle.sql) is located in the following directory path: /MW_HOME/SOA_ORACLE_HOME/rcu/integration/soainfra/sql/truncate
To create the service template for a SOA Profile, follow these steps:
-
Follow the steps listed in Section 19.1.2.1 to create the database profile.
-
On the Create Service Template: Customization page, specify the custom scripts that need to be executed before and after the database is created. See Section 23.1, "Pre and Post Request Creation / Deletion Scripts" for details.
-
Click Next. The Create Service Template: Roles page is displayed.
-
Click Add to select the SSA user roles to which this service template will be available. All users belonging to the selected role can use this service template. Click Next.
-
On the Create Service Template: Review page review the field entries and click Create.
The newly created service template is displayed on the Database Cloud Self Service Portal Setup: Service Templates page.
25.2.2 Creating a Database Service Template for OSB Profile
Prerequisite (Applicable only for OSB 11g targets)
OSB uses Logging Last Resource (LLR) transaction optimization feature which creates LLR tables in the OSB schema for each managed server in the OSB domain, including the Administration Server.
As part of cloning the OSB database, you need to drop these tables. Otherwise, startup of the cloned OSB domain will fail. To drop these tables, you can create a a Generic Component and upload llr_table.sql script to the Software Library.
To create the script for each for each LLR table present in source OSB environment, add the following statement to the SQL script:
TRUNCATE table WL_LLR_<SERVER_NAME>
For example, if the OSB domain has administrator server and two managed servers with name OSB_SERVER1 and OSB_SERVER2, then the content of the sql script would look like:
TRUNCATE table WL_LLR_ADMINSERVER
TRUNCATE table WL_LLR_OSB_SERVER1
TRUNCATE table WL_LLR_OSB_SERVER2
To create the service template for OSB profile, follow these steps:
-
Follow the steps listed in Section 19.1.2.1 to create the database profile.
-
On the Create Service Template: Customization page, specify the custom scripts that need to be executed before and after the database is created. See Section 23.1, "Pre and Post Request Creation / Deletion Scripts" for details.
-
Click Next. The Create Service Template: Roles page is displayed.
-
Click Add to select the SSA user roles to which this service template will be available. All users belonging to the selected role can use this service template. Click Next.
-
On the Create Service Template: Review page review the field entries and click Create.
The newly created service template is displayed on the Database Cloud Self Service Portal Setup: Service Templates page.
25.3 Prerequisites for Creating a SOA or an OSB Provisioning Profile
Meet all the prerequisites mentioned in the Oracle Enterprise Manager Lifecycle Management Administrator's Guide before creating a SOA or an OSB provisioning profile.
25.4 Setting Up the SOA and OSB Cloud Self Service Portal
The EM_SSA_ADMINISTRATOR can configure and set up the SOA/OSB Cloud Self Service Portal by creating middleware pools, setting up quotas, defining request settings, configuring the load balancer, creating service templates, and configuring chargeback.
Note:
To create a database profile for SOA or OSB domain, you must use a Single Instance database or a RAC database. For a RAC database, use GridLink data source. Multi datasource is not supported.The following table lists the tasks that must be performed, and the user roles that can perform the task.
| Step | Task | User Role |
|---|---|---|
| 1 | Set up one or more PaaS Infrastructure Zones. See Section 11.2.2.1, "Creating a PaaS Infrastructure Zone" | EM_CLOUD_ADMINISTRATOR |
| 2 | Creating SOA Provisioning Profiles.
Meet the prerequisites mentioned in Section 25.3. For steps on how to create the SOA profile, see Oracle Enterprise Manager Lifecycle Management Administrator's Guide. Note: Ensure that you grant privileges on the profile to the
|
EM_SSA_ADMINISTRATOR |
| 3 | Section 25.4.1, "Creating a SOAaaS and OSBaaS Pool" | EM_SSA_ADMINISTRATOR |
| 4 | Section 24.3, "Creating a Load Balancer Configuration" | EM_SSA_ADMINISTRATOR |
| 5 | Section 24.4, "Configuring Request Settings" | EM_SSA_ADMINISTRATOR |
| 6 | Section 24.5, "Setting Up Quotas" | EM_SSA_ADMINISTRATOR |
| 7 | Section 25.4.2, "Creating SOA and OSB Service Templates" | EM_SSA_ADMINISTRATOR |
| 8 | Section 24.7, "Configuring Chargeback" | EM_SSA_ADMINISTRATOR |
25.4.1 Creating a SOAaaS and OSBaaS Pool
A Middleware Pool contains a set of resources that can be used to provision a service instance within a PaaS Infrastructure Zone. You must create separate Middleware pools in the PaaS Infrastructure Zone for each WebLogic version of Middleware Home.
To create a SOA Pool or an OSB Pool, follow these steps:
-
Log into Enterprise Manager as a user with the
EM_SSA_ADMINISTRATORrole. -
From the Enterprise menu, select Cloud, then select Cloud Home. The Cloud Home page appears.
-
From the Oracle Cloud menu, select Setup, then select Getting Started. The common tasks that need to be performed before setting a specific service family is displayed. Click the Setup link next to Middleware service family in the left panel.
-
Select SOA Infrastructure or Oracle Service Bus from the drop down list, and then click Middleware Pool. The Middleware Pool page appears.
-
On the Middleware Pool page, click Create.
-
Enter the Target Name, a name, and description for the middleware pool.
-
Select the PaaS Infrastructure Zone in which the middleware pool is to be created. Click Next.
-
Click Add to add one or more hosts to the middleware pool. Click Next.
-
On the Placement Constraints page, in the Maximum Number of WebLogic Servers (per host) field;, enter the maximum number of server instances that can be running on each host in the pool.
-
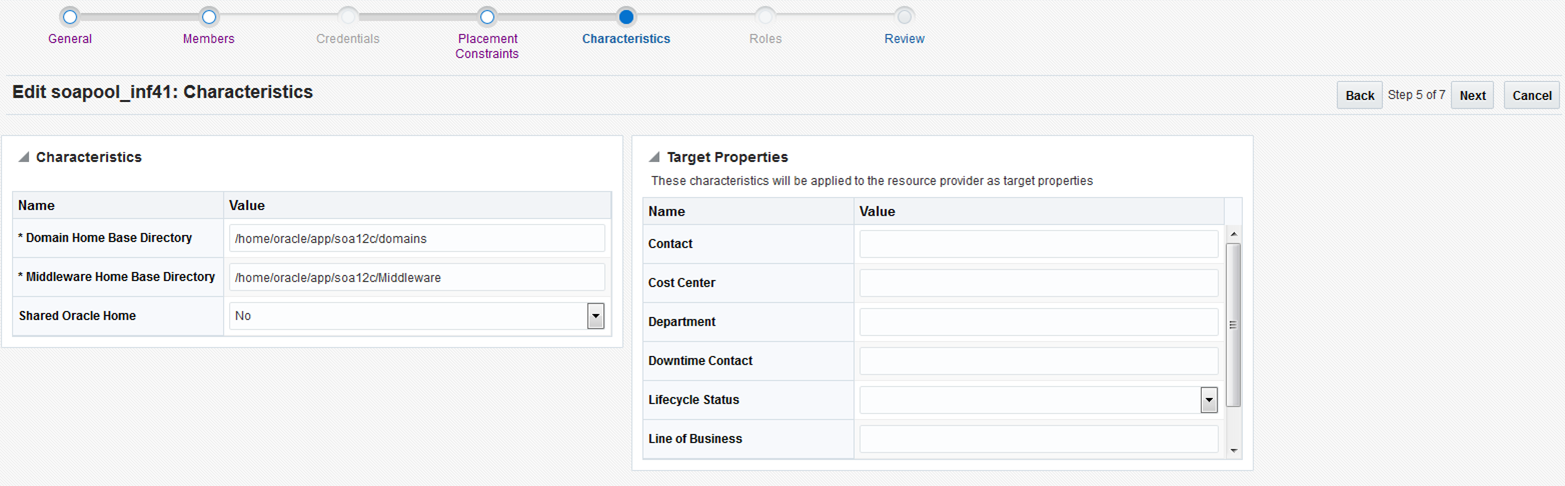
On the Characteristics page, specify the characteristics that will be used to tag and identify the target properties. The following options are possible:
-
To use a shared location, select Yes from the Shared Oracle Home menu, and provide an NFS path for the Middleware Home Base Directory. In this case, the SSA Administrator should make sure that the NFS path is mounted on all the hosts in the Middleware Resource Provider (used for SOA and OSB).
-
To use a local path, select No from Shared Oracle Home menu, and provide a location that is consistent across hosts in the Middleware Resource Provider.
-
-
On the Review page, click Submit to create a SOA or an OSB pool. The newly created pool can now be used to create the corresponding SOA and OSB Service Templates.
25.4.2 Creating SOA and OSB Service Templates
A Service Template is a service definition that can be used to provision a service instance on a middleware pool.
Prerequisites
-
A PaaS Infrastructure Zone must have been created.
-
A Middleware Pool must have been created.
-
A Middleware Provisioning Profile with appropriate values must be present in the Software Library. The owner of the profile must grant View privileges on the profile to the SSA user.
-
The database service template for a SOA profile and OSB profile are different. For information on how it can be created, see Section 25.2.1 and Section 25.2.2.
-
If the SOA or OSB setup is configured with OHS or OTD settings, you must configure the Service Template also with these settings. To do so, on the Service Template creation page, ensure that you select Enabled for Load Balancer and provide the necessary OHS or OTD details. If not, the deployment procedure will fail and the Service Template will not get created.
Note:
You can edit a service template that has active instances and modify the configuration parameters. When a service template is modified:-
New instances created after the changes have been made will use the new parameters.
-
Old instances or instances created before the template was modified will use the earlier values.
-
Changes made to zones and roles will be applicable to both old and new instances.
To create a Middleware Service Template, follow these steps:
-
Log into Enterprise Manager as an user with the
EM_SSA_ADMINISTRATORrole. -
From the Enterprise menu, select Cloud, then select Cloud Home. The Cloud Home page appears.
-
From the Oracle Cloud menu, select Setup, then select Getting Started. The common tasks that need to be performed before setting a specific service family is displayed. Click the Setup link next to Middleware service family in the left panel.
-
Select SOA Infrastructure or Oracle Service Bus from the drop down list and click Service Templates.
-
On the Service Templates page, click Create.
-
On the General page, enter a name and description for the service template. The name must be unique and the description should provide information on the type of service template being created.
-
In the Profile SOA field, click the Search icon and select a Provisioning profile. For information on how to create these profiles, see Oracle Enterprise Manager Lifecycle Management Administrator's Guide. Click Next.
-
On the Characteristics page, specify the characteristics that will be used to tag and identify the target properties. Service instances created from the template will have the characteristics. Click Next.
-
On the Resource Providers page, click Add to select the Middleware Pool into which that the service instances can be provisioned. The PaaS Infrastructure Zone with which the middleware pool is associated is displayed. Click Next.
-
On the Configuration page, enter the following details:
Table 25-3 SOA Configuration Details
Name Description Middleware Home Base Path and Java Home
Middleware Home Base Path: If you have set the NFS path while creating resource provider, then that path is populated here by default, and you are recommended to retain the same path. However, if the path was not set while creating resource provider, the Middleware Home base path from the profile is displayed, which can be updated if required.
Domain Home Base Path: Enter the absolute path to the base directory where this domain should be created, or provide the relative path to the Middleware Home Base Path as follows: '$MIDDLEWARE_HOME/' prefix. For example,
$MIDDLEWARE_HOME/domains.Alternatively, you can set this from the Resource Provider Characteristics page. If you have set the values already, they will appear pre-populated here.
Note: For a shared middleware home, this domain home base path should be an absolute value.
Java Home: The Java home path used by source domain (from where the profile is created) is displayed here. You can change this path, if required. Ensure that same java version is used by destination domain as well.
Note: If you are using a Windows operating system, ensure that the Java home path does not have any spaces.
Work Directory: The files are staged in this directory during provisioning. Specify an absolute path or a path relative to middleware home base path. For example,
$MIDDLEWARE_HOME/workPlacement Parameters
Expected Memory Consumption: Approximate CPU used by each additional instance in percentage. The memory consumption should be greater than or equal to the sum of Xms and MaxPermSize.
For example, -Xms1280m, MaxPermSize=256m. Sum = 1280 MB+256 MB= 1536 MB (1.536 GB). Make sure that the value entered for memory consumption is greater than or equal to 1.5 GB.
Expected CPU Utilization: Approximate Memory required by each additional instance in GB
Note: These properties will be used to assign hosts with sufficient resources available for instance creation.
Server Startup Arguments
Managed Server Startup Arguments: Enter memory and java arguments to start the server.
Example: -Xms512m -Xmx1536m -XX:CompileThreshold=8000 -XX:PermSize=512m -XX:MaxPermSize=512m -Dweblogic.security.SSL.ignoreHostnameVerification=true”
Note: Coherence configuration is done automatically; there is no need to specify the coherence parameters here.
Weblogic Administration User Credentials
Username: This is the WebLogic username used to create a profile. The user name will be populated by default, and should not be updated.
Password: This will be set as passowrd for created weblogic account.
Pre and Post Scripts
Prescript for Service Instance: Select the script that should be executed before creating, deleting, or scaling up service instance.
Postscript for Service Instance: Select the script that should be executed after creating, deleting, or scaling up service instance.
Note: If you have upgraded from FMW plug-in 12.1.0.7 to FMW plug-in 12.1.0.8, then you will need to create a consolidated Prescript and a Postscript for your service. This script must include operations like create, delete, and scale-up. Save the file as a directive in the Software Library.
Following this, you must edit the existing service template Configuration page, to include the newly created scripts.
Hosts for Executing Scripts: Hosts discovered in Enterprise Manager, on which the scripts should run. Use ',' to separate multiple target hosts.
Named Credentials for execution of scripts: Enter the Named Credentials for the hosts on which the scripts should run. Note that SSA Administrator should have View privileges on these Named Credentials. For example,
CredName:CredOwner.Execute Scripts on Admin Server Hosts: Enter 1 (YES) to execute scripts on Managed Server Host, and 0 (NO) to Skip Adminstrator Server Host.
Execute Scripts on Managed Server Hosts: Enter 1 (YES) to execute scripts on the Adminstrator Server Host, and 0 (NO) to Skip Managed Server Hosts.
Note: After an upgrade the value of this flag gets reset. Make sure that you edit the existing service template, and set the flag value appropriately.
The scripts must meet the following guidelines:
-
Directive that is created should be a PERL directive.
-
An input parameter named
INPUT_FILE_LOCATIONmust be defined. -
The path to the location of a property file must be specified in the
INPUT_FILE_LOCATIONparameter. -
The property file contains information about the service instance and the domain.
See Section 25.4.3 for a sample script file, properties file, and the generated output.
Port Range
Port Range Start: Lower bound for choosing Free Ports
Port Range End: Upper Bound for choosing Free Ports.
Note: The port range will be used to assign ports for servers and nodemangers. It should be between 1024-65535.
Enable Load Balancer: Enter Yes to enable and No to disable the Load Balancer. Note that if you select YES', there should be a load balancer configured with the selected resource providers.
Load Balancer
Select Yes only if the source domain used in the service template has already been configured with a load balancer. If the source domain is not configured with a load balancer, you must select No.
Note: If the source profile used in the service template has been configured with OHS or OTD, then select Yes to enable the load balancer. If not, the service template creation will fail.
Click Next.
-
-
On the Roles page, click Add to select the self service user roles to which this service template will be available. All users belonging to the selected role can use this service template. Click Next.
-
On the Review page, review the information entered so far and click Submit. The newly created service template will appear in the Middleware Cloud Self Service Portal Setup: Service Templates page. You can click on the Service Template Name link to view additional details.
25.4.3 Sample Postscript
This sample postscript prints the contents of the properties file and also prints details regarding the managed server, administration server, and so on.
25.4.3.1 Sample Properties File
The properties file contains the following:
OPERATION= CREATE
SERVICE_INSTANCE= inst_01_14b3668772c
DOMAIN_NAME= inst_01_14b3668772c_SSA_USER1
DOMAIN_HOME= /scratch/middleware_ps4/inst_01_14b3668772c_SSA_USER1
MW_HOME= /scratch/middleware_ps4
WLS_HOME= /scratch/middleware_ps4/wlserver_10.3
ADMIN_SERVER= example.com,27877,8142
MANAGED_SERVERS= example.com,13614,1488,4166;
EXTERNAL_HOSTS= example.com
EXECUTE_SCRIPTS_ON_ADMIN_SERVER_HOST=  Yes
EXECUTE_SCRIPTS_ON_MANAGED_SERVER_HOSTS=  Yes
Note:
Similar to Create operation, you can perform a Delete or a Scale Up operation.25.4.3.2 Sample Script
A sample script is given below:
#!/usr/bin/perl
use File::Path;
#use File::Spec();
use File::Spec;
use Cwd;

my $dir = getcwd();
my $inputFile = $ARGV[0];

print "Input File Location = ".$inputFile."\n";
print "===================================================================="."\n";
print "The properties file contents accessible to this script are as follows "."\n";

my @prop;
#Create Hash from properties
open FILE, "<$inputFile" or die("Could not open text file '" . $inputFile . "': $!");
my %hash;
while ($line4 = <FILE>)
{
chomp($line4);
my ($key, $val) = split(/=/,$line4);
print $key."= ".$val."\n";
$hash{$key}=$val;
}
close FILE;
print "===================================================================="."\n";
my $ACTION = $hash{'OPERATION'};
if ( $ACTION eq "CREATE" ) {
    print " This is Service Instance Creation Operation \n";
} elsif ( $ACTION eq "SCALEUP" ) {
    print " This is Scale Up Operation \n";
} elsif ( $ACTION eq "DELETE" ) {
    print " This is Delete Service Instance Operation \n";
} else {
    print " Unsuppported Configuration Action".$ACTION."\n";
}
print "===================================================================="."\n";

my $ADMIN_SERVER = $hash{'ADMIN_SERVER'};

print "======================Admin Server Details Begins==================="."\n";
my @fields = split (/,/, $ADMIN_SERVER);
my $arraySize = @fields;
if ($arraySize == 4) {
    print "Admin Server Name is ".$fields[0]."\n";
    print "Admin Server Host Name is ".$fields[1]."\n";
    print "Admin Server NON SSL Port is ".$fields[2]."\n";
    print "Admin Server SSL Port is ".$fields[3]."\n";
} else {
    print "Admin Server Host Name is ".$fields[0]."\n";
    print "Admin Server NON SSL Port is ".$fields[1]."\n";
    print "Admin Server SSL Port is ".$fields[2]."\n";
}
print "======================Admin Server Details Ends===================="."\n";

print "\n";

print "======================Managed Server's Details Begins==============="."\n";
my $MANAGED_SERVERS = $hash{'MANAGED_SERVERS'};
my $managedServer;
my @noOfManagedServers = split (/;/, $MANAGED_SERVERS);
for ($count = 0; $count < @noOfManagedServers; $count++) {
     $managedServer = $noOfManagedServers[count];
     @fields = split (/,/, $managedServer);
     $arraySize = @fields;
     if ( $ACTION eq "DELETE" ) {
        print "Managed Server Name is ".$fields[0]."\n";
        print "Managed Server Host Name is ".$fields[1]."\n";
        print "Managed Server NON SSL Port is ".$fields[2]."\n";
        print "Managed Server SSL Port is ".$fields[3]."\n";
     } else {
        print "Managed Server Host Name is ".$fields[0]."\n";
        print "Managed Server NON SSL Port is ".$fields[1]."\n";
        print "Managed Server SSL Port is ".$fields[2]."\n";
    }
    print "\n"
}
print "===================Managed Server's Details Ends===================="."\n";

print "\n";

print "===================External Host's Details Begins==================="."\n";
my $EXTERNAL_HOSTS = $hash{'EXTERNAL_HOSTS'};
my @hosts = split (/,/, $EXTERNAL_HOSTS);
for ($count = 0; $count < @hosts; $count++) {
    print "External Host is ".$hosts[count]."\n";
}

print "=====================External Host's Details Ends==================="."\n";
25.4.3.3 Sample Script Output
The output of the directive is given below:
Input File Location = /ade/jan1215/oracle/work/agentStateDir/1422547083465.properties
======================================================================
The properties file contents accessible to this script are as follows
OPERATION= CREATE
SERVICE_INSTANCE= inst_01_14b3668772c
DOMAIN_NAME= inst_01_14b3668772c_SSA_USER1
DOMAIN_HOME= /scratch/middleware_ps4/inst_01_14b3668772c_SSA_USER1
MW_HOME= /scratch/middleware_ps4
WLS_HOME= /scratch/middleware_ps4/wlserver_10.3
ADMIN_SERVER= example.com,27877,8142
MANAGED_SERVERS= example.com,13614,1488,4166;
EXTERNAL_HOSTS= example.com
EXECUTE_SCRIPTS_ON_ADMIN_SERVER_HOST=  Yes
EXECUTE_SCRIPTS_ON_MANAGED_SERVER_HOSTS=  Yes
======================================================================
 This is Service Instance Creation Operation
======================================================================
=======================Admin Server Details Begins===================
Admin Server Host Name is example.com
Admin Server NON SSL Port is 27877
Admin Server SSL Port is 8142
=======================Admin Server Details Ends====================

=======================Managed Server's Details Begins===============
Managed Server Host Name is example.com
Managed Server NON SSL Port is 13614
Managed Server SSL Port is 1488

=======================Managed Server's Details Ends====================

=======================External Host's Details Begins===================
External Host is example.com
=======================External Host's Details Ends===================
25.4.4 Resource Management Script
The Resource Management Script specifies the location of the property file which contains a list of name value pairs. The content of the file varies based on the Create, ScaleUp, and Delete operations.
25.4.4.1 Create Operation
The content of the file for the Create operation are:
ACTION=CREATE
ZONE_NAME=<value>
POOL_NAME=<value>
NUMBER OF SERVERS BEFORE THIS REQUEST=<value>
NUMBER OF SERVERS REQUESTED=<value>
NUMBER OF SERVERS POSSIBLE WITH AVAILABLE RESOURCES=<value>
NUMBER OF SERVERS NEEDED=<value>
MAXIMUM SERVERS ALLOWED PER HOST=<value>
MIDDLEWARE_HOME=<value>
EXPECTED CPU UTILIZATION IN PERCENTAGE=<value>
EXPECTED MEMORY CONSUMPTION IN GB==<value>
25.4.4.2 Scaleup Operation
The content of the file for the Scaleup operation are:
ACTION=SCALEUP
ZONE_NAME=<value>
POOL_NAME=<value>
NUMBER OF SERVERS BEFORE THIS REQUEST=<value>
NUMBER OF SERVERS REQUESTED=<value>
NUMBER OF SERVERS POSSIBLE WITH AVAILABLE RESOURCES=<value>
NUMBER OF SERVERS NEEDED=<value>
MAXIMUM SERVERS ALLOWED PER HOST=<value>
MIDDLEWARE_HOME=<value>
DOMAIN_NAME=<value>
EXPECTED CPU UTILIZATION IN PERCENTAGE=<value>
EXPECTED MEMORY CONSUMPTION IN GB==<value>
25.4.4.3 Delete Operation
The content of the file for the Delete operation are:
ACTION=DELETE
ZONE_NAME=<value>
POOL_NAME=<value>
NUMBER OF SERVERS BEFORE THIS REQUEST=<value>
NUMBER OF SERVERS BEING REMOVED=<value>
HOSTS FROM WHERE SERVERS BEING REMOVED=<value>
MIDDLEWARE_HOME=<value>
DOMAIN_NAME=<value>
25.5 Creating a SOA Instance
This section provides the prerequisites and steps for creating a SOA instance. This procedure should be performed by logging in as a SSA user.
25.5.1 Prerequisites for Creating a SOA Instance
Meet the following prerequisites before creating a SOA instance:
-
A database instance should be ready. To create a database instance see Section 21.2, "Requesting a Database".
-
The EM SSA Administrator should have created a SOA service template. For the steps to create a SOA service template, see Section 25.4.2, "Creating SOA and OSB Service Templates".
25.5.2 Procedure for Creating a SOA Instance
Follow the steps below to create a SOA instance:
-
Log in to Enterprise Manager Cloud Control as a SSA user.
-
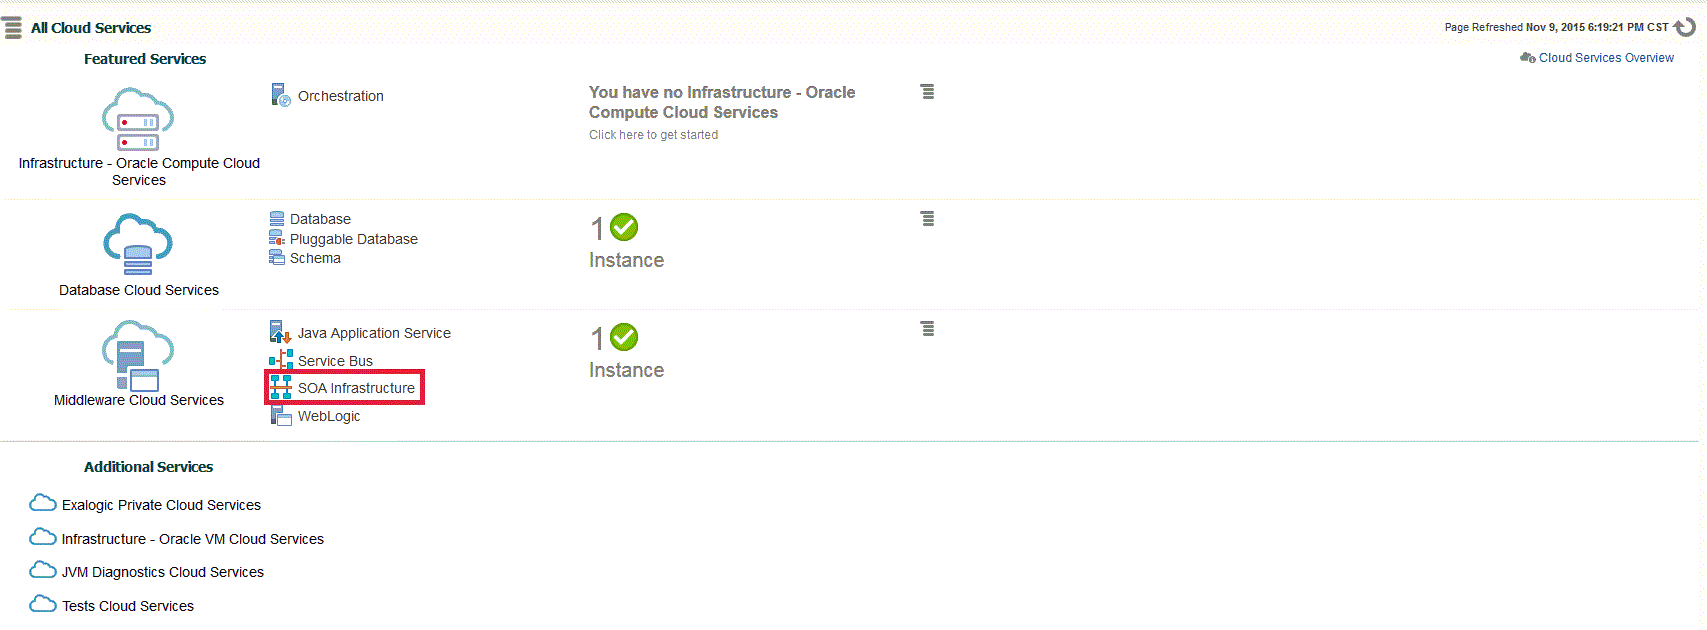
From the Enterprise menu, select Cloud, and then select Self Service Portal.
-
On the All Cloud Services page, click SOA Infrastructure.
-
On the Middleware Cloud Services page, click Create Instance button.
-
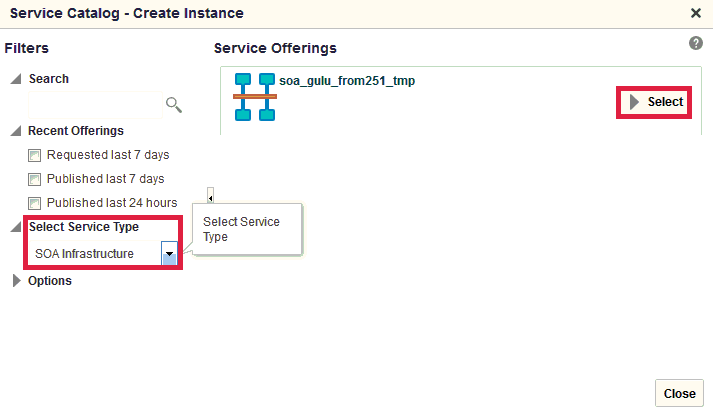
In the Service Catalog - Create Instance window, click Select Service Type drop-down box, select SOA Infrastructure, and then click Select against the desired Service Offering.
-
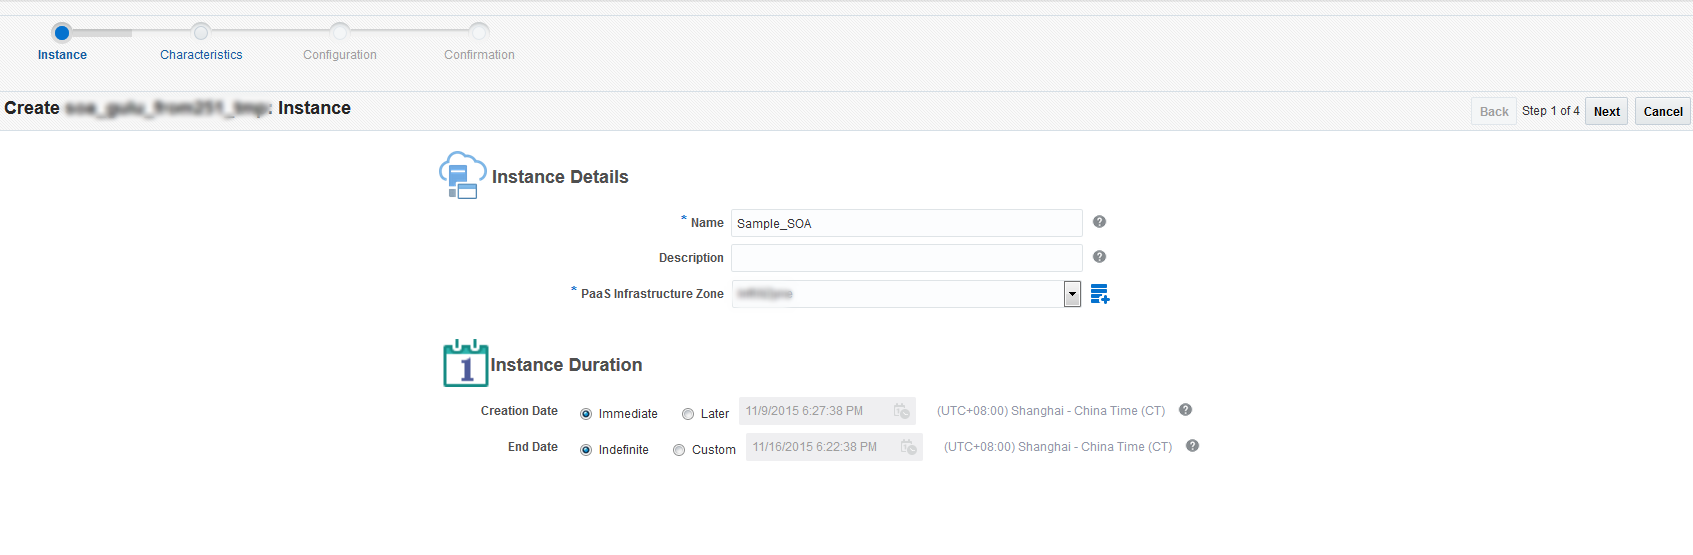
On the Create Instance page, enter the Instance Details and click Next.
-
Optionally, on the Characteristics page, enter the Target Properties and click Next.
-
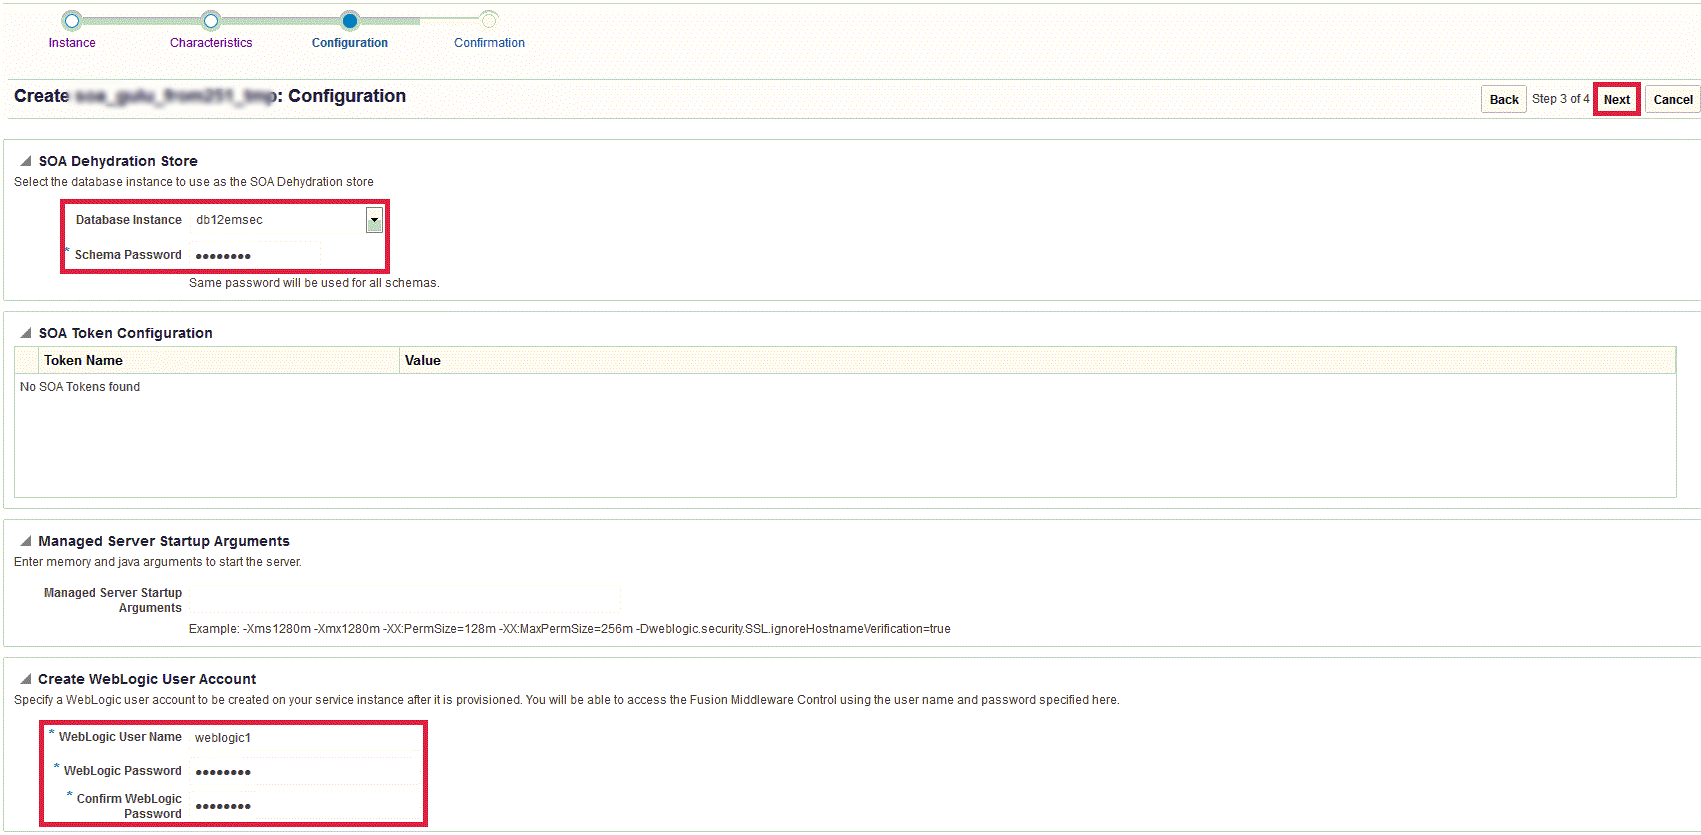
On the Configuration page, select the Database Instance and enter the Schema Password. In the Create WebLogic User Account section, enter the WebLogic User Name, WebLogic Password, and Confirm WebLogic Password in their respective boxes and click Next.
-
On the Confirmation page, click Submit.
The newly created SOA Infrastructure is displayed on the Middleware Cloud Services page.
Note:
OSBaaS allows projects to be deployed on a single node as well as the cluster. It is strongly recommended that you do not deploy projects on individual nodes. Deploy projects on the cluster.