D ACSLS Support of the SL3000
The SL3000 offers the following benefits:
-
Storage capacity from 200 to 4500 storage cells.
-
Performance from 1 to 56 tape drives.
-
Support of mixed media and a variety of tape drive.
-
Ability to partition an SL3000 at the storage cell and drive level.
-
An option (with ACSLS 7.3 PUT0801 or later) to install an Access Expansion Module (AEM). This option is discussed under "Using the AEM".
Caution:
You mustauditan SL3000 after it is configured or reconfigured to ACSLS. You must alsoauditan SL3000 after increasing or changing the activated capacity of the library.The library reports the potential cell locations that are not accessible to ACSLS when ACSLS audits it. Inaccessible cell locations include: locations where CAPs, drives, and operator panels are installed; cell locations that the robots cannot access; cell locations that are not activated; and locations that are not in this partition.
ACSLS Support
ACSLS provides support for the following SL3000 features:
-
New LSM and panel types, and panel maps for the SL3000 Library
-
Up to eight (8) partitions.
The SL3000 can partition down to the drive and cell level. If cells are reassigned from one partition to a different partition, cartridges in those cells will be orphaned, and they will no longer be accessible by the partition that they were in before. To avoid this, before re-partitioning an SL3000, move cartridges to cells that will remain in your partition.
-
New maximum numbers of CAPs (12), drives per panel (32), and cell rows (52) for the SL3000.
-
Ability to dedicate a CAP to a partition within the SL3000.
CAPS are dedicated to a partition using the SL Console. The library reports dedicated CAPs to ACSLS.
CAPs dedicated to a partition managed by ACSLS can be set to automatic mode.
-
SL3000 CAP Aliasing
The SL3000 can have up to 12 CAPs, but some backup applications currently only support a maximum of 3 CAPs per LSM. CAP aliasing lets you alias CAPs 3-10 as CAPs 0, 1, or 2.
With PUT0801, you are no longer able to alias CAP 0. CAP 0 is reserved for the Access Expansion Module (AEM) and has special characteristics. Because of this, only CAP numbers 1 and 2 can be used as aliases.
-
ACSLS 7.3 with PUT0801 supports AEMs for bulk enters and ejects.
Before Configuring ACSLS for the SL3000
Before you configure ACSLS for the SL3000:
-
Connect the SL3000 to ACSLS
-
Verify that all of the components of the SL3000 are operational.
ACSLS builds its library configuration from the information reported by the library. If SL3000 components are not operational, the library information may not be reported to ACSLS, and the ACSLS configuration of the SL3000 could be incomplete.
Connecting the SL3000 to ACSLS
The SL3000 library uses TCP/IP protocol over an Ethernet physical interface to manage and communicate with the host and ACSLS. This interface enables ACSLS to connect to, and communicate with the SL3000.
Using TCP/IP connection(s) to the SL3000 provide these advantages:
-
ACSLS can send multiple concurrent requests to the library, and the library can process them in parallel. This improves library performance.
-
When connected using TCP/IP, the SL3000 supports Dual TCP/IP and Redundant Electronics.
-
The TCP/IP Host/Library Interface is a richer interface than the SCSI Media Changer over Fibre Channel. More information is available to ACSLS about library status, errors, and so forth.
It is preferable to have the SL3000 library on a separate subnet, or a controlled network to protect it from floods of ARP broadcasts.
Verifying that all SL3000 Components are Operational
To verify that all of the components of the SL3000 are operational, logon to the StorageTek Library Console (SL Console).
Refer to the SL3000 User's Guide for procedures.
Configuring SL3000 to ACSLS
Once the SL3000 components are operational, configure SL3000 to ACSLS. You can use either acsss_config (see "Setting CSI Tuning Variables") or Dynamic Configuration (see "Using the Dynamic Configuration (config) utility").
Auditing the SL3000
Audit an SL3000 after it is configured or reconfigured to ACSLS. Auditing informs ACSLS which cells are part of the partition that it is managing in this library and displaying the cells that are actually present on panel drives or CAPs.
-
First, configure or reconfigure an SL3000 to ACSLS.
-
Auditthe ACS. -
Look at the allocated and free cells by entering any of the following commands:
-
free_cells.sh -a -
get_license_info -
display cell * -f status
-
-
Look at the drives using either:
-
query drive all -
display drive * -f typeserial_numwwn
-
SL3000 Addressing
An SL3000 can be expanded without changing any of the ACSLS addresses for drives and storage cells. Since ACSLS addresses map the largest possible SL3000 library, you can add modules without changing the addresses of existing cells, drives, and CAPs.
If modules are not installed, the panels on them are simply mapped as ”not installed”. If panels are installed, the addresses on these panels become available. In this way, when you install a new module, addresses of the panels on existing modules do not change.
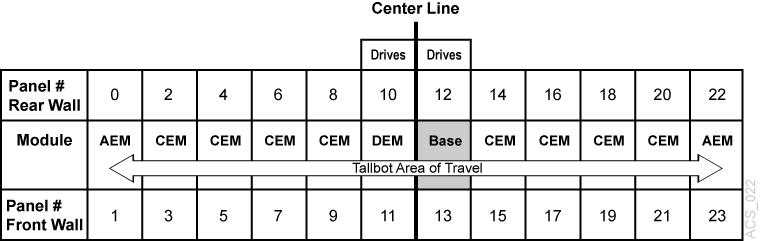
The smallest SL3000 configuration is a single Base Drive Module (BDM). In a single BDM configuration, panels 12 and 13 are installed, and all other potential panel locations are not installed. When you add a Drive Expansion Module (DEM), panels 10 and 11 are also installed. If you add a Cartridge Expansion Module (CEM) to the right of the BDM, panels 14 and 15 are now installed. The addresses of the cells and drives on the BDM never change. This ensures that as you increase your SL3000 capacity. The ACSLS addresses for drives and storage cells do not change.
CAP Numbering
CAPs are numbered, as follows:
-
CAP 0 is reserved for the AEM on the left
-
CAPs 1-5 - in the CEMs on the left and the DEM
-
CAP 6 - in the Base (the only required CAP)
-
CAPs 7-10 - in the CEMs on the right
-
CAP 11 is reserved for the AEM on the right
If CAPs are not present, ACSLS reports them as ”not installed”. This keeps CAP locations from changing in SL3000 when new CAPs are added.
CAPs can be dedicated to a partition.
SL3000 Modules
There are five types of modules in an SL3000 library:
-
Base module, one, required
The Base Module consists of a single frame. This module centralizes the infrastructure for all other modules in the library, which includes the power configurations, robotics (TallBot), electronic modules, cartridge access port, storage cells, tape drives, and operator controls.
One Base Module, and only one, is required for every library installation.
On the front of this module is:
-
A single, 26 cartridge-dual magazine-cartridge access port (CAP).
-
A service door for library access.
-
A front panel with three LEDs: Library Active, Service Required, and Wait.
-
An optional feature for a touch screen operator panel or window.
-
-
Drive expansion module (DEM) one, on the left-side, only
A Drive Expansion Module (DEM) may be attached adjacent to the Base Module on the left-side, only. This module allows further expansion of tape drives and provides additional data cartridge capacity.
-
Cartridge expansion module (CEM) left or right-side
The Cartridge Expansion Module (CEM) provides additional cartridge cell capacity and growth—no tape drives are in this module. A maximum of four CEMs are supported on a single library in addition to the Base Module (required) and optional drive expansion module.
-
Parking expansion module (PEM) leftmost and the rightmost side modules.
The Parking Expansion Module (PEM) is the same as the cartridge expansion module, with six columns of arrays (three on the front wall and three on the rear wall) that are inaccessible to allow the library to park a defective robot. In the left PEM, it is the three leftmost columns (front and back). In the right PEM, it is the three rightmost columns.
Note:
An SL3000 with dual robots has either AEMs or PEMs -
Access Expansion Module (AEM)
AEM is discussed under "Using the AEM".
New Panel Types
Instead of having specific panel definitions in the SL3000 that define each possible cell location, there are generic panel definitions.
The three generic panel types map to a variety of specific panel maps. They are:
-
A single SL3000 cell panel type.
To find out which cells are present in this library and which are part of the activated capacity and are assigned to this partition, you must
auditthe library. -
A drive panel type.
ACSLS identifies which drives are present by configuring the library. Before you do this, you must make sure all drives are powered-on and ready before configuring the library.
-
Not installed.
This is a placeholder for the front and rear panels on modules that are not yet installed.
Understanding Internal SL3000 Addressing
There are differences in the internal addresses of the SL3000 and other libraries supported by ACSLS and HSC.
-
The SL3000 is one's-based (1) and uses negative numbers.
-
Other libraries use a zero-based (0) with no negative numbers.
-
The SL3000 uses five parameters: library, rail, column, side, and row.
-
Other libraries use: ACS, LSM, panel, row, and column (HLI–PRC).
The modules of the library consists of walls, columns, and rows that house cartridges, tape drives, cartridge access ports, and robotic units.
You can use the SL Console to translate between the SL3000 internal address and the ACSLS panel, row, and column.
Refer to the SL3000 User's Guide for detailed information and procedures.
Using the AEM
The AEM (access expansion module) is essentially a very large CAP that has all of the characteristics of a CAP, such as online/offline states and the ability to be shared by partitions.
The AEM allows you to perform bulk loads or unloads of up to 234 cartridges at a time, to or from the library. It also allows for the non-disruptive maintenance of a library TallBot.
AEMs share many of the features and functions as rotational CAPs, but they also have some unique characteristics. They are:
-
Access Door
-
Safety Door
-
CAP Operations
-
Non-Disruptive Maintenance
For detailed information on the AEM, refer to the StorageTek SL3000 Modular Library System User's Guide, part number 316194401.
Access Door
The AEM access door is the external door you open to bulk load or unload cartridges to or from the library.
Safety Door
The safety door is the internal ”garage door,” which lowers to separate the AEM from the rest of the library. This door allows for safe access to the inside of the AEM, either for the library operator to load or unload cartridges, or for a Storage CSE to perform service on the Tallbot or other AEM components.
CAP Operations
The advantages of the AEM is that it allows you to perform the following:
-
Bulk enters
Bulk enters enables to you to enter up to 234 cartridges at a single time.
You must start a normal enter specifying the AEM
cap_id. This can either be a manual enter or you can set the AEM to automatic enter mode.In a partitioned library, you can only set a CAP to automatic enter mode if the CAP is dedicated to your partition. Dedicating an AEM to only your partition makes it unavailable to other partitions. Consider other SL3000 users before doing this.
-
Bulk ejects
When ejecting more that 42 volumes to the AEM, the preferred tool for larger ejects is
lib_cmdorejecting.sh. Any other user interface, includingcmd_proc,xeject, or an ACSAPI eject will limit the eject load to 42 cartridges at a time. See "Using lib_cmd" and "ejecting.sh". -
Non-disruptive robot maintenance
Caution:
When performing a bulk eject using the AEM, ensure all CAP magazines are present. Theejectfails if there are missing CAP magazines at locations where ACSLS is attempting toejectcartridges.Note:
The AEM should not to be used for entering or ejecting small numbers of cartridges. It should only be used for bulk enters and ejects.Using the AEM for small enters and ejects is much slower since the service safety door must be lowered when the AEM is accessed to enter or remove volumes, and raised when access to the AEM is completed.
For smaller numbers, use CAPs 1-10. See "CAP Numbering".
Since the AEM should not be used for small enters and ejects, the maximum CAP priority is 1. This aids in preventing the AEM from being selected when the CAP ID is wildcarded with an asterisk on an
audit,enter, oreject.
Non-Disruptive Maintenance
The AEM allows the CSE access and service a library TallBot through the use of a safety door (or ”garage” door), without having to take the library offline. If the TallBot is defective, it parks itself in the AEM while the library remains online. If redundant TallBots are installed, the library can continue normal operations through the remaining functional TallBot.
The CSE uses a special key to unlock the Service Access lock on the safety door. This causes the AEM safety door to lower, sectioning off the AEM from the rest of the library. Once the safety door is fully down, the CSE opens the AEM safety door and safely performs maintenance on the defective TallBot or other AEM components, while the library remains online. The AEM itself is taken offline during the maintenance period, causing cartridge load/unload functions to be suspended.
When maintenance is complete, the CSE: closes the safety door; the safety door raises; the TallBot is re-initialized and performs an audit to the AEM CAP cartridge slots; and the AEM is brought back online.
Aliasing SL3000 CAP IDs
The SL3000 has 12 CAPs, but some backup applications currently only support a maximum of 3 CAPs per LSM. CAP aliasing lets you alias CAPs 3-10 as CAPs 1 or 2.
Cap 0 is reserved for the Access Expansion Module (AEM) bulk load CAP. Since CAP 0 in an SL3000 has special attributes, it cannot be an alias CAP ID.
Map the Library CAP IDs to alias CAP IDs by using the following template.
$ACS_HOME/data/external/SL3000/SL3000_CAP_Aliases.SAMPLE
Note:
When Setting CAP IDs:For Library CAP IDs:
- LSM must be zero (0)
- ID must be 3-10
- There can be no duplicate library CAP IDs
For Alias CAP IDs
- CAP number must be 1 or 2
- There can be no duplicate alias CAP ID
# SL3000 CAP Aliases (SL3000_CAP_Aliases)
#
# This file maps real library SL3000 CAP IDs to CAP ID aliases.
# It is used when ACSAPI clients do not support SL3000
# CAP numbers greater than 2.
# (The SL3000 can have 12 CAPs, with a maximum CAP number of 11.)
# Alias a SL3000 CAP to an alias CAP number by providing the full
# SL3000 CAP ID and the aliased CAP number on the same line.
# For example:
#  SL3000 CAP ID     Alias CAP Number
#          0,0,6                    1
#
#    The LSM must be zero.
#    The CAP ID must be between 3 and 10
#    No duplicate SL3000 CAP IDs.
# Rules for SL3000 CAP IDs:
# Rules for Alias CAP numbers:
#    The CAP number must be 1 or 2.
#    No duplicate alias CAP numbers.
#
 # Using the CAP Aliases file:
#   (1) A # in the first column comments out a line.
#       The above CAP alias example is commented out.
#   (2) Only specify CAP numbers as an alias when there
#       is no actual CAP at that location.  For example,
#       use CAP 2 as an alias when there is no CAP 2
#       installed in the SL3000 library.
#   (3) Only CAP numbers 1 and 2 can be used as aliases.
#       NOTE: CAP number 0 (zero) is reserved for the
#       Access Expansion Module (AEM) and thus cannot
#       be specified as an alias.
#   (4) After updating the CAP Aliases file, you must:
#       a) Shutdown ACSLS.
#       b) Reconfigure ACSLS (using acsss_config) to update
#          the CAPs defined in the ACSLS database.
#       c) Restart ACSLS.
# Save the CAP alias file as:
#   $ACS_HOME/data/external/SL3000/SL3000_CAP_Aliases
# by copying and modifying the template:
#   $ACS_HOME/data/external/SL3000/SL3000_CAP_Aliases.SAMPLE
#
#   SL3000 CAP ID    Alias CAP Number
           0,0,6                   1
           0,0,4                   2
# Alias a SL3000 CAP to an alias CAP number by providing the full
# SL3000 CAP ID and the aliased CAP number on the same line.
# For example:
#  SL3000 CAP ID     Alias CAP Number
#          0,0,6                    1
#
# Rules for SL3000 CAP IDs:
#    The LSM must be zero.
#    The CAP ID must be between 3 and 10
#    No duplicate SL3000 CAP IDs.
The example above shows a modified SL3000_CAP_Aliases file. The comment (#) character has been removed from the lines shown in bold to specify that alias CAP number assignments are enabled. In this example, the:
-
physical CAP ID 0,0,4 is aliased to CAP number 1.
-
physical CAP ID 0,0,6 is aliased CAP number 2.
Moving Cartridges Before Removing Cells from a Partition
The SL3000 can partition down to the drive and cell level. For more information, refer to "Moving Cartridges Before Removing Cells from a Partition".
SL3000 CAP Behavior
The SL3000 supports up to 12 Cartridge Access Ports (CAPs). There can be a CAP on each SL3000 panel.
For CAP behavior in a partitioned library, refer to "Partitioning a Library or Changing Partition IDs".
Caution:
All ACSs must have at least one CAP. This can be dedicated or is shared. Because all of the CAPs in an SL3000 can be dedicated to other partitions, this is a crucial restriction when configuring SL3000 partitions.Finding Missing SL3000 Cartridges
If a cartridge is out of place or unaccounted for by ACSLS:
-
Perform a physical audit of the SL3000 using the SL Console.
The physical audit of the SL3000 is performed as a background task in between handling
mountand other library operation requests.Caution:
If the SL3000 contents are out of sync with ACSLS due to manual operations such as loading cartridges directly, it is not advisable to attempt continued operations. -
Run an ACSLS
auditto update the ACSLS database to match the actual inventory of library cartridges.
Varying the SL3000 Offline
Vary SL3000 components offline to ACSLS before they are powered off, if they are inoperative, and before you open an SL3000 access door. This notifies ACSLS that they are unavailable. Once they are available, vary them back online.
Use ACSLS to vary SL3000 components offline, not SL Console
Vary SL3000 components (ACSs, LSMs, and CAPs) offline to ACSLS, not the SL Console.
ACSLS allows outstanding requests to complete before taking components offline, unless it is a vary offline force. The SL Console has no knowledge of outstanding requests to ACSLS.
Varying components offline using SL Console may cause requests in progress to fail.
When to vary SL3000 components offline to ACSLS
This section describes when to vary components offline to ACSLS.
Before opening the access door
Before opening the SL3000 access door, vary the ACS offline by using the following command.
vary acs acs_id offline
Note:
If any CAPs in the SL3000 are in automatic mode, you must:-
Set them to manual mode before opening the access door.
-
Set them back to automatic mode after you close the access door and the SL3000 comes back online.
Using the Dynamic Configuration (config) utility
The dynamic configuration (config) utility allows you to implement configuration changes to ACSLS libraries (and components) while ACSLS remains online and running. These configuration changes are recorded in the acsss_config.log file.
The following dynamic configuration utilities are supported:
-
config acs -
config drives -
config lsm -
config ports
Using the config utility provides the following benefits:
-
ACSLS can continue running, allowing you to perform
mountrequests to unaffected library components. -
Allows you to reconfigure specified library components while all other configuration information remains unchanged. For example, when specifying:
-
An ACS, the configurations of other ACSs are not affected.
-
An LSM, the configurations of other LSMs are not affected.
-
A drive panel (the drives on a panel) mounts and dismounts to all existing drives are not affected.
-
Auditing New Cartridge Addresses
After an expansion has occurred, complete the following procedure:
-
Varythe ACS and ports offline. -
Do one of the following:
-
Add or remove a module(s)
-
Change capacity
-
Re-partition the library
-
-
Varythe ACS and ports online. -
Update the configuration in the ACSLS database using one of the following procedures.
-
Dynamic:
-
config acsacs_id or config lsm lsm_id -
Auditthe library.
-
-
Static:
-
Bring down ACSLS: acsss disa;ble
-
Update the ACSLS configuration:
acsss_config -
Bring up ACSLS:
acsss enable -
Auditthe library.
-
-
ACSLS Dual TCP/IP
Dual TCP/IP connections between the ACSLS server and the library is an option that can be purchased for the SL3000.
SL3000 Requirements
-
Coordinate with both your system administrator and network administrator to understand your current network environment, and to identify all necessary IP addresses in advance.
-
Coordinate with your system administrator to either configure your network interface or to validate that it is configured properly.
Refer to "Overview" for more information on this feature, and the StreamLine Modular Library System Dual TCP/IP Feature document.
Note:
The procedure for implementing Dual TCP/IP connections is the same for both SL8500 and SL3000 libraries.