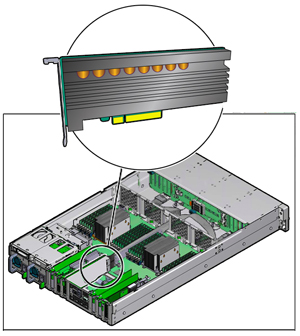
Replace Oracle F320 Flash Card (Server Power-Off)
Replace an existing Oracle Flash Accelerator F320 PCIe Card if the drive fails or the usable drive life has been exceeded.
 | Caution - Possible data loss. Exceeding the maximum number of Oracle 3.2 TB NVMe PCIe Flash Cards or placing cards in unsupported slots results in host platform error reports and shutdown. |
 | Caution - Possible component damage. Circuit boards and drives contain electronic components that are extremely sensitive to static electricity. Ordinary amounts of static electricity from clothing or the work environment can destroy the components located on these boards. Do not touch the components along their connector edges. These procedures require that you handle components that are sensitive to electrostatic discharge. This sensitivity can cause the components to fail. To avoid damage, ensure that you follow anti-static practices as described in ESD Safety Measures. |
 | Caution - Hazardous voltages are present. To reduce the risk of electric shock and danger to personal health, follow the instructions. |
Note - Your server chassis might require a PCIe carrier extension for each installed Oracle Flash Accelerator F320 PCIe Card to facilitate air flow. Your server chassis might contain a card carrier or other configuration. Refer to the servers service manual for PCIe card removal and replacement instructions.
The following task describes an example procedure. Follow the servers service manual detailed instructions.
-
Prepare the server operating system, as required, before you remove
drives.
-
Secure Erase the drive. For Oracle Solaris systems, use the nvmeadm tool to erase all namespace media for the specified controller. See Servicing the Oracle F320 Flash Card Using Oracle Hardware Management Pack.
For example:
# nvmeadm erase --help
erase:. Usage:  nvmeadm erase [OPTIONS] [Controller Name ...]
OPTIONS:
     -a, --all  : Selects all namespaces on the specified controller.
     -n, --namespace=namespace_id : Selects a namespace on the specified controller.
-
Unmount the Oracle F320 Flash Cards using the specific procedure before removal. Refer to the servers service manual for instructions.
-
Follow the servers service manual instructions for orderly shutdown during NVMe storage drive insertion and removal service actions.
-
-
Observe the status indicators (LEDs) on the rear panel of the server to
verify which Oracle F320 Flash Card in the server requires replacement.
-
See Status Indicators. Green (Transfer Speed), Amber (Fail, disk status), Green (Activity).
-
If necessary, make a note of where the PCIe cards are installed.
-
-
Prepare the server for service.
Refer to the servers service manual for instructions.

Caution - Hazardous voltages are present. Disconnect the server from the main power and from any networks before installing the card to avoid electrical shock.
-
Remove the server from active operation.

Caution - Possible data loss. Exceeding the maximum number of Oracle 3.2 TB NVMe PCIe Flash Cards or placing cards in unsupported slots results in host platform error reports and shutdown.
-
Turn off the server.
Power down the system.
- Disconnect all power cords from the server power supplies.
-
Remove the cover from the chassis.
Your server chassis might use another configuration. Refer to the servers service manual for instructions.
-
Remove the server from active operation.
-
Identify the physical location of the Oracle F320 Flash Card that you want
to remove.
Your server chassis might require a PCIe carrier extension for each installed Oracle Flash Accelerator F320 PCIe Card to facilitate air flow. Refer to the servers service manual for instructions.

-
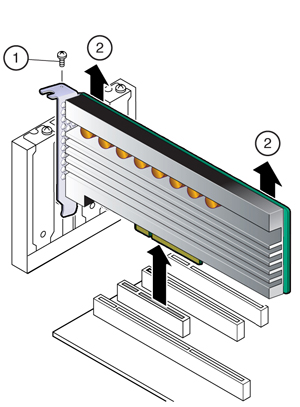
Remove the bracket from the server chassis [1].
Remove the bracket screw.
-
Remove the card from the server chassis [2].
Carefully lift the card out of the PCIe slot to remove the card.


Caution - Hot surface. Avoid contact. Surfaces are hot and might cause personal injury if touched.
Note - Whenever you remove a PCIe card, you should replace it with another PCIe card or a PCIe filler panel. Installing PCIe filler panels in vacant PCIe slots helps reduce the level of electromagnetic interference (EMI) emitted by the server. - Place the PCIe card on an antistatic mat.
-
Locate the proper PCIe slot for the card you are replacing.
If necessary, remove the PCIe filler panel from the slot.
-
Insert the replacement card in the supported PCIe slot.
Your server chassis might require a PCIe carrier extension for each installed Oracle Flash Accelerator F320 PCIe Card to facilitate air flow. Your server chassis might contain a card riser or other configuration. Refer to the servers service manual for card installation instructions.
-
Remove the blank bracket panel on the server chassis that aligns
with the empty PCIe slot.
Save the bracket screw, if applicable.
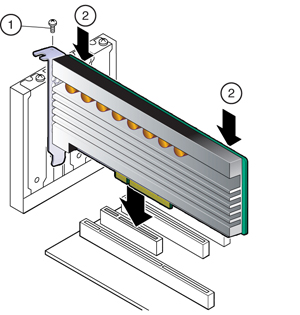
- Press down gently, but firmly, to properly seat the card in the slot.
The following figure shows how to insert the card in a PCI Express slot:

Your server chassis might contain a card riser or other configuration. Refer to the servers service manual for card installation instructions.
-
Remove the blank bracket panel on the server chassis that aligns
with the empty PCIe slot.
-
Secure the card bracket to the server chassis.
Engage the server retention mechanism to secure the card to the server chassis.
Or: Install the bracket screw, as required.
-
Return the server to service.
Refer to the servers service manual.
-
Replace the cover.
Your server chassis might use another configuration. Refer to the servers service manual for instructions.
- Reconnect the power cord and any network cables.
-
Power on the system.
The card hardware insertion is complete.
-
Replace the cover.
-
Configure the Oracle F320 Flash Card and verify drive availability.
-
Follow the servers service manual instructions for Oracle F320 Flash Card NVMe storage drive configuration and identification.
-
Use appropriate software commands to return the system to an operational state:
-
Power on the Oracle F320 Flash Card as required.
-
Attach a device driver as required.
-
Re-activate mirror if manual intervention is required.
-
Re-sync mirror if manual intervention is required.
-
-
-
Verify that the Amber Fail LED is not lit and that the green LEDs are lit
on the card that you installed.
Green (Transfer Speed), Amber (Fail, disk status), Green (Activity) See Status Indicators.