6 Working with the Extensibility SDK
This chapter provides information about the extensibility SDK for Oracle Communications Network Integrity.
This chapter contains the following sections:
-
Extending MIB II SNMP Discovery for Updated Vendor and Interface Type
-
Extending an Existing Cartridge to Discover and Reconcile New Characteristics
-
Extending the MIB II SNMP Discovery to Change Interface Name Value
About Extensibility Scenarios
Cartridge projects and actions in Network Integrity are extensible using Oracle Communications Design Studio for Network Integrity. The productized and sample cartridges provided by Network Integrity are designed to be completely extensible and re-usable.
When you make a cartridge project dependent on another, you allow the dependent cartridge project access to the extensible elements from the base cartridge project.
The following sections are examples of some common extensibility scenarios.
Each of the scenarios follows a detailed example but is meant to demonstrate the many extensibility features and methods within Network Integrity cartridge development. The following concepts are demonstrated in the scenarios:
-
Re-using existing actions
-
Conditional execution using conditions
-
The use of specifications and characteristics to extend the model
-
The use of input and output parameters
-
The use of scan parameter groups and characteristics to extend the Network Integrity UI
-
Using filters to modify default discrepancy detection behavior
-
What extension points are available in productized cartridges
The scenarios are made up of high-level steps. For more detailed steps, see the Design Studio Help or the Design Studio Modeling Network Integrity Help.
See the following extensibility scenarios:
-
Extending MIB II SNMP Discovery for Updated Vendor and Interface Type
Describes how to update the vendor number and interface type mapping tables in the MIB II SNMP Discovery cartridge.
-
Extending an Existing Cartridge to Discover and Reconcile New Characteristics
Describes how to extend an existing cartridge to discover new data from a device and reconcile this data with an Inventory system.
-
Extending the MIB II SNMP Discovery to Change Interface Name Value
Describes how to extend the MIB II SNMP Discovery action to map the SNMP variable ifName to the interface entity name rather than the entity interface description.
-
Multiple Vendor SNMP Discovery
Describes how to extend an existing cartridge to discover device data from multiple vendors.
-
Describes how to extend an existing cartridge to discover data using multiple protocols.
Extending MIB II SNMP Discovery for Updated Vendor and Interface Type
This scenario describes the steps required to update the vendor number and interface type mapping tables in the MIB II SNMP Discovery cartridge. The vendor number table translates an enterprise object identifier number to a vendor name. The interface type table translates an ifType value into a human readable name. These mapping tables are created and output by the MIB II Properties Initializer processor.
The following tasks are performed in this example:
-
Adds a new interface type (#333, ”tachyonEther”)
-
Adds a new vendor number (#90210, ”West Beverly Hills School District”)
-
Changes an existing vendor name (#34416, from ”Ottawa Area Intermediate School District” to ”Ottawa Area Middle School District”)
The following cartridges must be loaded in the Design Studio and not have any errors:
-
Address_Handlers
-
MIB_II_Model
-
MIB_II_SNMP_Cartridge
This scenario is made up of high-level steps that are explained in greater detail in the Design Studio Modeling Network Integrity Help.
To extend the MIB II SNMP Discovery cartridge project for updated vendor and interface type information:
-
Create a Network Integrity cartridge project called Vendor_Type_Update. Make your cartridge project dependent on the MIB_II_SNMP_Cartridge cartridge project.
-
Create a discovery action called Discover Updated MIB II SNMP.
-
In Discover Updated MIB II SNMP, add the Discover MIB II SNMP action as a processor.
-
Create a discovery processor called MIB II Properties Updater and place it after the MIB II Properties Initializer processor. This processor will be used to update the two mapping tables.
-
Open the Processor editor Context Parameters tab for MIB II Properties Updater and add snmpIfTypeMap and snmpVendorNameMap as input parameters. These parameters are the output from the MIB II Property Initializer processor.
-
Create the implementation class for this discovery processor. See "Implementing a Processor" for instructions on how to add an implementation class to a processor.
-
Add the implementation code into the body of the invoke method of the discovery processor implementation class, similar to the following:
// Rename 34416 from "Ottawa Area Intermediate School District" // to "Ottawa Area Middle School District" // Add a new vendor ID 90210 = West Beverly Hills School District // Map<String, String> vendorNameMap = request.getSnmpVendorNameMap(); vendorNameMap.put("34416", "Ottawa Area Middle School District"); vendorNameMap.put("90210", "West Beverly Hills School District"); // Add a new interface type 333 as tachyonEther. // Map<String, String> ifTypeMap = request.getSnmpIfTypeMap(); ifTypeMap.put("333", "tachyonEther"); -
Build, deploy, and test your cartridge.
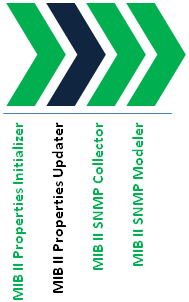
Figure 6-1 shows the processor workflow of the Discover Updated MIB II SNMP action and the placement of the MIB II Properties Updater processor.
This discovery action inherits all the processors from the Discover MIB II SNMP action. See MIB-II SNMP Cartridge Guide for more information.
Extending an Existing Cartridge to Discover and Reconcile New Characteristics
This scenario describes the steps required to extend an existing cartridge project to discover new data from a device and reconcile this data with an inventory system.
For this scenario the following data is discovered and stored on the physical device:
-
Running Configuration Last Saved Date
-
Running Configuration Last Modified Date
-
Startup Configuration Last Modified Date
The following cartridges must be loaded in the Design Studio and not have any errors:
-
Address_Handlers
-
ora_ni_uim_cisco_device_sample
-
ora_ni_uim_devices
-
Cisco_Model
-
Cisco_SNMP_Cartridge
-
Cisco_UIM_Cartridge
-
Cisco_UIM_Model
-
MIB_II_Model
-
MIB_II_SNMP_Cartridge
-
MIB_II_UIM_Cartridge
This scenario is made up of high-level steps that are explained in greater detail in the Design Studio Modeling Network Integrity Help.
To extend a cartridge project to discover and reconcile new characteristics:
-
Create a new UIM cartridge project called Disco_Recon_Specs.
-
From the ora_ni_uim_cisco_device_sample cartridge project, copy and rename the following specifications to Disco_Recon_Specs:
-
cisco3640, rename it to cisco3640Custom
-
cat6509, rename it to cat6509Custom
-
cisco7206, rename it to cisco7206Custom
-
-
Open the Data Schema editor for Disco_Recon_Specs and create the following characteristics:
-
runningConfigLastSavedDate
-
runningConfigLastChangedDate
-
startupConfigLastChangedDate
-
-
Add the new characteristics to the renamed specifications.
-
Create a new Network Integrity cartridge project called Disco_Recon_Char. Make Disco_Recon_Char dependent on Disco_Recon_Specs and Cisco_UIM_Cartridge.
-
Add the renamed specifications to the model collection for Disco_Recon_Char.
-
Create a discovery action in Disco_Recon_Char and name it Discover Extended Cisco.
-
In Discover Extended Cisco, add the Discover Enhanced Cisco SNMP action as a processor.
-
In Discover Extended Cisco, create an SNMP processor called Custom Cisco Collector.
-
Perform a web search and download a MIB file called CISCO-CONFIG-MAN-MIB. Do the following:
-
Copy the MIB file to the MIB directory.
To find the MIB directory, in Design Studio, on the Windows menu, select Preferences. In the Preferences dialog box, expand Oracle Communications Design Studio, then select Network Integrity. The MIB directory is displayed in the dialog box.
-
Copy the MIB file to the SNMP Adapter on the Network Integrity server. See "Extending the SNMP JCA Resource Adapter" for more information.
-
On the Processor editor SNMP tab, load the CISCO-CONFIG-MAN-MIB file and add the following MIB object IDs to Custom Cisco Collector from CISCO-CONFIG-MAN-MIB.private.enterprises.cisco.ciscoMgmt.ciscoConfigManMIB.ciscoConfigManMIBObjects.ccmHistory:
-
ccmHistoryRunningLastChanged
-
ccmHistoryRunningLastSaved
-
ccmHistoryStartupLastChanged
-
-
-
Create a discovery processor named Custom Cisco Modeler to map the new fields to the specifications and characteristics:
-
On the Processor editor Context Parameters tab, add the following input parameters:
-
physicalDevice: output by the Cisco SNMP Physical Modeler processor
-
the document output by Custom Cisco Collector processor
-
-
-
Create the implementation class for Custom Cisco Modeler. See "Implementing a Processor" for more information.
-
Add the following implementation code into the invoke method that was auto-generated:
Note:
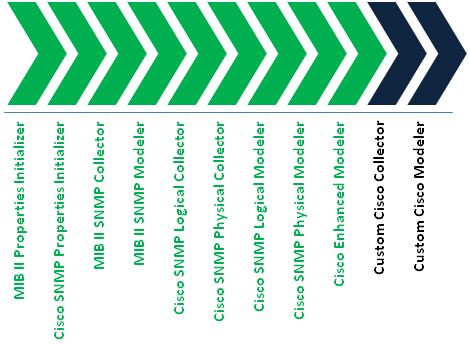
Import statements are required to successfully compile the following code, the imports should all be resolvable by Eclipse with the existing classpath. No classpath changes are necessary.// Get the running config and startup config values from the SNMP response document // Keep the values in local variables CiscoConfigManMibMib configMib = request.getCustomCiscoCollectorResponseDocument().getDiscoveryResult().getCiscoConfigManMibResults(); String runningConfigChanged = Long.toString(configMib.getCcmHistoryRunningLastChanged()); String runningConfigSaved = Long.toString(configMib.getCcmHistoryRunningLastSaved()); String startupConfigChanged = Long.toString(configMib.getCcmHistoryStartupLastChanged()); if (request.getPhysicalDevice() != null) { // Get the physical device. PhysicalDevice physicalDevice = request.getPhysicalDevice(); // Get the specification name on the physical device String specName = physicalDevice.getSpecification().getName(); if (specName != null) { // Change the specification to the custom specification type // and set the new fields if (specName.equals(Cisco3640.SPEC_NAME)) { Cisco3640Custom custom = new Cisco3640Custom(physicalDevice); custom.setRunningConfigLastChangedDate(runningConfigChanged); custom.setRunningConfigLastSavedDate(runningConfigSaved); custom.setStartupConfigLastChangedDate(startupConfigChanged); } else if (specName.equals(Cat6509.SPEC_NAME)) { Cat6509Custom custom = new Cat6509Custom(physicalDevice); custom.setRunningConfigLastChangedDate(runningConfigChanged); custom.setRunningConfigLastSavedDate(runningConfigSaved); custom.setStartupConfigLastChangedDate(startupConfigChanged); } else if (specName.equals(Cisco7206VXR.SPEC_NAME)) { Cisco7206VXRCustom custom = new Cisco7206VXRCustom(physicalDevice); custom.setRunningConfigLastChangedDate(runningConfigChanged); custom.setRunningConfigLastSavedDate(runningConfigSaved); custom.setStartupConfigLastChangedDate(startupConfigChanged); } } }Figure 6-2 shows the processor workflow of the Discover Extended Cisco action and the placement of the Custom Cisco Collector and Custom Cisco Modeler processors.
This discovery action inherits all the processors from the Discover Enhanced Cisco SNMP action. See Cisco Router and Switch UIM Cartridge Guide for more information.
-
Create a discrepancy detection action named Detect Extended Cisco:
-
On the Action editor Result Source tab, add the Discover Extended Cisco action as the result source. This indicates that the extended discrepancy detection action applies to extended discovery results.
-
On the Action editor Processors tab, add the Detect Enhanced Cisco Discrepancies action as a processor.
See Cisco Router and Switch UIM Cartridge Guide for more information about the Detect Enhanced Cisco Discrepancies action.
-
-
Create a discrepancy resolution action named Resolve Extended Cisco in UIM:
-
On the Action editor Details tab, enter Correct in UIM in the Resolution Action Label field.
-
On the Action editor Result Source tab, add the Discover Extended Cisco action as the result source.
-
On the Action editor Processor tab, add the Resolve Cisco in UIM action as a processor.
See Cisco Router and Switch UIM Cartridge Guide for more information about the Resolve Cisco in UIM action.
-
-
(Optional) Create an import action.
The existing Import Cisco from UIM action available in the Cisco UIM cartridge imports the extended devices types with new characteristics. Create this import action if you want to deploy the Extensibility cartridge without also deploying the Cisco UIM cartridge.
-
Create an import action called Import Extended Cisco from UIM. See the Design Studio Modeling Network Integrity Help for information about how to create an import action, and how to extend existing import actions.
-
On the Action editor Processors tab add the Import Cisco from UIM action as a processor.
See Cisco Router and Switch UIM Cartridge Guide for more information about the Import Cisco from UIM action.
-
Extending the MIB II SNMP Discovery to Change Interface Name Value
This scenario describes the steps required to extend the MIB II SNMP discovery action to map the ifName to the interface name rather than the interface description. In addition, this scenario exposes a scan parameter that the end-user can use to control the behavior of the interface name mapping.
Note:
Changing how the name field is mapped affects how generic discrepancy detection looks up import entities because the lookup is done using name field (this can be modified using discrepancy detection filters, see "About Filters" for details). If the interface name field is modified for discovery, but is not modified on the import data, many ’extra entity' discrepancies are produced because discrepancy detection is unable to find the interface of the import side.Avoid this issue by ensuring that the name field for discovery and import are identical, or by using a different field than name to look up the interface on the import side. An example of using a different field is in the Detect MIB II UIM Discrepancies action in the MIB_II_UIM_Cartridge. This discrepancy detection action overrides the default lookup to use the NativeEMSName instead of the name field.
The following high-level steps are involved in this scenario:
-
Create new Network Integrity cartridge project
-
Create new discovery action that re-uses an existing discovery action
-
Create new scan parameter groups with new characteristics
-
Add new processor to change mapping of interface name
The following cartridges must be loaded in the Design Studio and not have any errors:
-
Address_Handlers
-
MIB_II_Model
-
MIB_II_SNMP_Cartridge
This scenario is made up of high-level steps that are explained in greater detail in the Design Studio Modeling Network Integrity Help.
To extend the MIB II SNMP cartridge to change the interface name value:
-
Create a Network Integrity cartridge project called InterfaceName. Make your cartridge project dependent on the MIB_II_SNMP_Cartridge cartridge project.
-
Create a discovery action called Discover Custom MIB II SNMP.
-
In Discover Custom MIB II SNMP, add the Discover MIB II SNMP action as a processor.
-
Create a scan parameter group called MIBIICustomParameters. Add the scan parameter group to the Discover Custom MIB II SNMP action.
-
For MIBIICustomParameters, create a characteristic called mapIfDescToInterfaceName.
-
Add two enumeration values to mapIfDescToInterfaceName:
-
Open the Data Schema editor for mapIfDescToInterfaceName.
-
Click the Enumerations subtab.
-
Add an enumeration called True and another called False.
-
In the Default column, set True to be the default value.
-
-
On the Scan Parameter Group editor Layouts tab for MIBIICustomParameters, do the following:
-
Select mapIfDescToInterfaceName.
The UI Settings area displays the scan parameter values for mapIfDescToInterfaceName.
-
In the Display Name field, enter Map Description to Interface Name.
This is the name that will appear in the Network Integrity UI for the scan parameter.
-
-
Save all changes.
-
In the Discover Custom MIB II SNMP action, create a discovery processor called Custom Interface Name Modeler.
-
Open the Processor editor Context Parameters tab for Custom Interface Name Modeler and add logicalDevice as an input parameter. This parameter is the output from the MIB II SNMP Modeler processor.
-
On the Processor editor Details tab, create the implementation class for the discovery processor.
-
Add the implementation code similar to the following:
Note:
Import statements are required to successfully compile the following code, the imports should all be resolvable by Eclipse with the existing classpath, no classpath changes are necessary.@Override public void invoke(DiscoveryProcessorContext context, CustomInterfaceNameModelerProcessorRequest request) throws ProcessorException { // if the user specified they do not want the ifDesc as the name of the interface then use the ifName instead if ("false".equalsIgnoreCase(request.getMibiiCustomParameters().getMapIfDescToInterfaceName())) { List<DeviceInterface> deviceInterfaces = request.getLogicalDevice().getDeviceInterfaces(); changeInterfaceNameToIFName(deviceInterfaces); } } private void changeInterfaceNameToIFName(List<DeviceInterface> deviceInterfaces) { // loop through every interface and change the mapping. for (DeviceInterface deviceInterface : deviceInterfaces) { // the Discover MIB II SNMP Discovery Action is inserting the ifName into the VendorInterfaceNumber so the following code copies that to the name field deviceInterface.setName(deviceInterface.getVendorInterfaceNumber()); // Change interface name on any sub-interfaces as well changeInterfaceNameToIFName(deviceInterface.getSubInterfaces()); } } -
To register discrepancy detection and discrepancy resolution on the new Discover Custom MIB II SNMP discovery action, add new result sources to the Detect MIB II UIM Discrepancies and Resolve MIB II in UIM in the MIB_II_UIM_Cartridge that register for results from the Discover Custom MIB II SNMP discovery action. See "About Discrepancy Detection Actions" and "About Discrepancy Detection Processors" for details. (Alternatively, the Detect MIB II UIM Discrepancies and Resolve MIB II in UIM actions could be extended in the InterfaceName_Cartridge. See "Extending an Existing Cartridge to Discover and Reconcile New Characteristics" Extensibility Scenario for details on doing this).
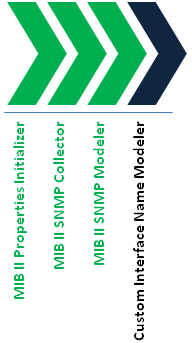
Figure 6-3 shows the processor workflow of the Discover Custom MIB II SNMP action and the placement of the Custom Interface Name Modeler processor.
This discovery action inherits all the processors from the Discover MIB II SNMP action. See MIB-II SNMP Cartridge Guide for more information.
Multiple Vendor SNMP Discovery
This scenario describes the steps required to extend an existing cartridge to discover data from devices from multiple vendors.
The following cartridges must be loaded in the Design Studio and not have any errors:
-
Address_Handlers
-
ora_ni_uim_devices
-
MIB_II_Model
-
MIB_II_SNMP_Cartridge
-
MIB_II_UIM_Cartridge
-
Cisco_Model
-
Cisco_SNMP_Cartridge
-
Cisco_UIM_Cartridge
-
Cisco_UIM_Model
There are multiple scenarios, depending on your objectives.
One way is you want to discover devices from a single vendor. You should then extend the MIBII SNMP cartridge by reusing the Discover MIB II SNMP action and adding an SNMP Collector and an SNMP Modeler for the vendor. The SNMP Collector polls vendor-specific MIBs and the SNMP Modeler models the devices based on the collected SNMP OIDs.
Another way is you want to discover multiple vendor devices, for example, Cisco and Juniper devices. You should extend the Enhanced Cisco SNMP action in the Cisco UIM cartridge.
Use the sysObjectId from RFC1213MIB to determine a device vendor. For example, Cisco devices have the sysObjectId value that starts with 1.3.6.1.4.1.9, and Juniper device have the sysObjectId value starting with 1.3.6.1.4.1.2636. Set up a range of IP addresses and scan those IP addresses by polling the sysObjectId. Based on the sysObjectValue returned, configure two conditions: one returns true if the sysObjectId value starting with 1.3.6.1.4.1.9 (meaning it is a Cisco device), or return false if otherwise; the other return true if the sysObjectId value starting with 1.3.6.1.4.1.2636 (meaning it is a Juniper device), or return false if otherwise.
The Cisco UIM cartridge contains the Discover Enhanced Cisco SNMP action. Create a discovery action by reusing this Discover Enhanced Cisco SNMP action, which gives this new discovery action all the functions to discover the enhanced Cisco devices (including the MIB II SNMP discovery). Extend this discovery action to support Juniper devices by creating a Juniper SNMP collector and a Juniper modeler to this discovery action. The two conditions determine when to execute the Cisco related collectors and modelers and when to execute the Juniper collector and modeler based on the device type.
This scenario is made up of high-level steps that are explained in greater detail in the Design Studio Modeling Network Integrity Help.
To extend a cartridge to discover devices from multiple vendors:
-
Create a Network Integrity cartridge project called Multi-Vendor. Make your cartridge project dependent on the Cisco_UIM_Cartridge cartridge project.
-
Create a discovery action called Discover Multi-Vendor.
-
In Discover Multi-Vendor, add the Discover Enhanced Cisco SNMP action as a processor.
-
Manually copy the JUNIPER-MIB to the MIB directory and to the SNMP adapter on the Network Integrity server. See "Supporting New MIBs" and "Extending the SNMP JCA Resource Adapter" for more information.
-
Create an SMMP processor called Juniper SNMP Collector and add it to Discover Multi-Vendor as the last processor.
-
In Juniper SNMP Collector, add the OID jnxBoxDescr (from JUNIPER-MIB).
In a production environment, you would add more OIDs to poll and model more information.In this example, only the description field is polled.
-
Create an SNMP processor called Juniper SNMP Modeler and add it to Discover Multi-Vendor as the last processor. This processor takes the SNMP output parameter from Juniper SNMP Collector as its input parameter. Implement this processor by implementing the invoke method. In this example, only the description field for the Juniper device is logged. In a realistic scenario, the complete model of the Juniper device would exist in this invoke method.
The following is the Java snippet for the invoke method.
@Override public void invoke(DiscoveryProcessorContext context, JuniperProcessorProcessorRequest request) throws ProcessorException { logger.log(Level.INFO, "Processing Juniper device " + request.getScopeAddress()); JuniperSNMPCollectorResponseType responseDoc = request.getJuniperSNMPCollectorResponseDocument(); DiscoveryResultType result = responseDoc.getDiscoveryResult(); JuniperMibMib juniperMibResults = result.getJuniperMibResults(); if(juniperMibResults != null) { logger.log(Level.INFO, "Juniper Device Description: " + juniperMibResults.getJnxBoxDescr()); } } -
Create a Cisco condition that checks the sysObjectId to determine whether a device is a Cisco device or not. This condition takes the mibiisnmpCollectorResponseDocument (an output parameter from MIB II SNMP Collector) as the input parameter. The following is a Java snippet for this Cisco condition:
public class CiscoConditionImpl implements CiscoCondition { private static final String CISCO_PREFIX = "1.3.6.1.4.1.9."; @Override public boolean checkCondition(DiscoveryProcessorContext context, CiscoRequest request) throws ProcessorException { MIBIISNMPCollectorResponseType snmpResponse = request .getMibiisnmpCollectorResponseDocument(); logger.log(Level.INFO, "CiscoConditionImpl" + context.getProcessorName()); if (snmpResponse != null && snmpResponse.getDiscoveryStatus() == DiscoveryStatus.SUCCESS) { logger.log(Level.INFO, "CiscoConditionImpl discovery succeeded"); if (snmpResponse.getDiscoveryResult().getRfc1213MibResults() != null) { String sysObjectId = snmpResponse.getDiscoveryResult() .getRfc1213MibResults().getSysObjectID(); logger.log(Level.INFO, "CiscoConditionImpl raw sys object id:" + sysObjectId); if (sysObjectId != null) { if (sysObjectId.startsWith(".")) { sysObjectId = sysObjectId.substring(1); } return sysObjectId.startsWith(CISCO_PREFIX); } } } return false; } } -
Create a Juniper condition, that checks the sysObjectId to determine whether a device is a Juniper device. This condition takes the mibiisnmpCollectorResponseDocument (an output parameter from MIB II SNMP Collector) as the input parameter. This Juniper condition is similar to the Cisco condition. The difference is that the sysObjectId for Juniper device starts with 1.3.6.1.4.1.2636..
-
Apply the Cisco condition to the following processors and set Equals to true:
-
Cisco SNMP Logical Collector
-
Cisco SNMP Physical Collector
-
Cisco SNMP Logical Modeler
-
Cisco SNMP Physical Modeler
-
Cisco Enhanced Modeler
By applying the Cisco condition, the processors are invoked only if the device is a Cisco device.
-
-
Apply the Juniper condition to the following Juniper processors and set Equals to true:
-
Juniper SNMP Collector
-
Juniper SNMP Modeler
-
Note:
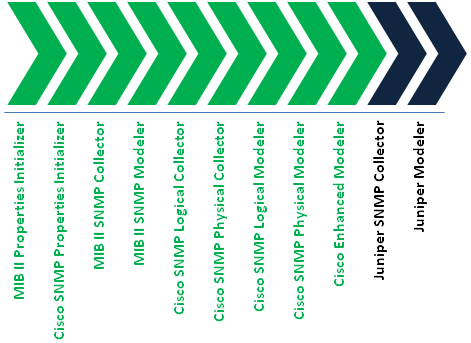
In this example, only a single Juniper OID is collected and the value of the collected Juniper OID in the Juniper SNMP Modeler is logged. In a realistic scenario, several Juniper OIDs are collected to model a Juniper device. See "Extending an Existing Cartridge to Discover and Reconcile New Characteristics" on how to map new SNMP OIDs to new Characteristics and how to update UIM related actions for importing, discrepancy detection and resolution with the new Characteristics.Figure 6-4 shows the processor workflow of the Discover Multi-Vendor action and the placement of the Juniper SNMP Collector and Juniper Modeler processors.
This discovery action inherits all the processors from the Discover Enhanced Cisco SNMP action. See Cisco Router and Switch UIM Integration Cartridge Guide for more information.
Multiple Protocol Discoveries
This scenario describes the steps required to extend an existing cartridge to discover data using multiple protocols.
The following cartridges must be imported into the Design Studio and build without errors:
-
Address_Handlers
-
Cisco_Model
-
Cisco_SNMP_Cartridge
-
Cisco_UIM_Cartridge
-
Cisco_UIM_Model
-
MIB_II_Model
-
MIB_II_SNMP_Cartridge
-
MIB_II_UIM_Cartridge
In this scenario, a range of devices can be discovered. Some devices are SNMP-enabled; some devices support an alternate protocol (for example, TL1). With a list of IP addresses for each of these devices, the discovery action can dynamically discover a device using either SNMP or the alternate protocol.
The Cisco UIM Sample cartridge contains the sample Discover Enhanced Cisco SNMP action. Create a discovery action that reuses the Discover Enhanced Cisco SNMP action. This discovery action can be extended to support the alternate protocol by creating a discovery processor that implements the alternate protocol to this discovery action. To use a JCA resource adapter for this alternate protocol, see "Working with JCA Resource Adapters".
Create a condition that checks whether the SNMP polling to a device is successful or not. If a device supports SNMP, this condition returns true; otherwise if the device supports the alternate protocol, this condition returns false. By applying this condition to the processors, the discovery action can dynamically discover a device using either SNMP or the alternate protocol.
This scenario is made up of high-level steps that are explained in greater detail in the Design Studio Modeling Network Integrity Help.
To extend a cartridge to discover devices using multiple protocols:
-
Create a discovery action called Discover MultiProtocol and make it dependent on the Cisco_UIM_Cartridge cartridge project.
-
Create a discovery action called Discover Multi-Protocol.
-
In Discover Multi-Protocol, add the Discover Enhanced Cisco SNMP action as a processor.
-
Create a discovery processor called Alternate Protocol Collector to implement the alternate protocol to discover a device and add it to Discover Multi-Protocol as the last processor.
-
Implement Alternate Protocol Collector by implementing the invoke method. In this example, one line is logged indicating that this processor implements an alternate protocol. In a realistic scenario, implement the alternate protocol to discover a device in this invoke method. The following is the Java snippet for the invoke method:
@Override public void invoke(DiscoveryProcessorContext context, AlternateProtocolCollectorProcessorRequest request) throws ProcessorException { logger.log(Level.INFO, "SNMP Failed - using alternate protocol to discover device " + request.getScopeAddress()); } -
Create a condition called SnmpSucceeds that checks the SNMP results from MIB II Collector to determine whether the SNMP discovery on a device is successful or not. This condition takes mibiisnmpCollectorResponseDocument (an output parameter from MIB II SNMP Collector) as the input parameter. The following is a Java snippet for this SnmpSucceeds condition:
public class SnmpSucceedsConditionImpl implements SnmpSucceedsCondition { @Override public boolean checkCondition(DiscoveryProcessorContext context, SnmpSucceedsRequest request) throws ProcessorException { MIBIISNMPCollectorResponseType snmpResponse = request.getMibiisnmpCollectorResponseDocument(); return snmpResponse != null && snmpResponse.getDiscoveryStatus() == DiscoveryStatus.SUCCESS; } } -
Apply the SnmpSucceeds condition to the following processors and set the Equals to be true:
-
MIB II SNMP Modeler
-
Cisco SNMP Logical Collector
-
Cisco SNMP Physical Collector
-
Cisco SNMP Logical Modeler
-
Cisco SNMP Physical Modeler
-
Cisco Enhanced Modeler
By applying the SnmpSucceeds condition, these processors are invoked only if the SnmpSucceeds condition returns true.
-
-
Apply the SnmpSucceeds condition to the Alternate Protocol Collector processor and set the Equals to be false.
Note:
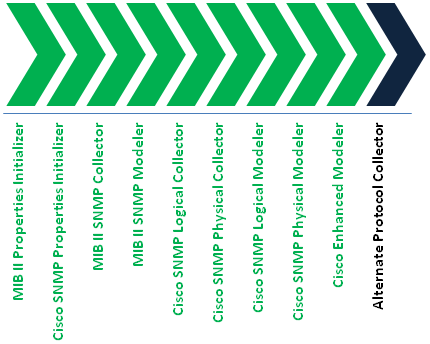
In this example, only the message is logged to indicate that an alternate protocol is used in the Alternate Protocol Collector processor. In a realistic scenario, the alternate protocol would be implemented and the network data collected using this protocol and model the collected network data. See "Extending an Existing Cartridge to Discover and Reconcile New Characteristics" section on how to map the collected network data (in that section, the network data is SNMP OID) to new Characteristics and how to update UIM related actions for importing, discrepancy detection and resolution with the new Characteristics.Figure 6-5 shows the processor workflow of the Discover MultiProtocol action and the placement of the Alternate Protocol Collector processor.
This discovery action inherits all the processors from the Discover Enhanced Cisco SNMP action. See Cisco Router and Switch UIM Integration Cartridge Guide for more information.