Purchase Order Layering and Backorder Notifications

Overview: Use the Generate Backorder Notifications function to generate backorder notices informing customers when backordered items are expected to ship. You must work within the guidelines of the Federal Trade Commission (FTC) on backorder notifications; for this reason, backorder cards are also called “FTC cards.”
This function also produces the Backorder Cancellation Register, which lists orders containing backordered items that are due for cancellation. You have the option of canceling the items through order maintenance or contacting the customers to suggest alternate items.
Order Broker: Order lines that have been assigned to the Order Broker for fulfillment continue to generate backorder notices until they are fulfilled. See the Order Broker Integration for more information.
Note: You should run the Purchase Order Layering function before generating backorder notices to update the expected delivery dates of backordered items. See Batch Purchase Order Layering Screen (BPOL).
In this topic:
• Backorder Notification Setup
• Related System Control Values
• Email Notification Templates
• Additional Backorder Notification Setup
• Generate Backorder Cards (GBOC)
• Generating Backorder Notices
• Generating First Backorder Notices
• Generating Second Backorder Notices
• Excluding Backorder Notifications
• Generating Backorder Email Notifications
• Backorder Notice Generation Summary
• Backorder Cancellation Register
• Batch Purchase Order Layering Screen (BPOL)

Purpose: Before you can generate backorder notifications, you must complete the necessary setup.
• Related System Control Values
• Email Notification Templates

When generating backorder email notifications, the user ID of the user that submits the BO_CARDS job must also be set up as a user ID in Work with Directory Entries (WRKDIRE). However, the User ID field in Work with Directory Entries is 8 positions long, while the User ID field in Work with User Profiles (WRKUSRPRF) is 10 positions long. In order to match the user ID defined in Work with User Profiles to the user ID defined in Work with Directory Entries, you must create user IDs in Work with User Profiles that are only 8 positions long.
The following values control Generate Backorder Cards (GBOC) and Batch Purchase Order Layering Screen (BPOL).
Description |
Valid Values |
Summary |
program name (the standard program is BOR0008) |
The print program that the system uses to generate backorder cards. Note: If the Validate Prefix (I27) system control value is set to Y, you can set this system control value to BOR0037 in order to print the full prefix description on the backorder card. |
|
numeric value |
Number of days to allow before including the item on the Backorder Cancellation Register. The system uses this value only if you entered Cancel in the FTC -- Action after Second Notification (C70) system control value. |
|
numeric value |
Number of days to add to the expected receipt date to perform special handling before shipping a backordered item. |
|
numeric value |
Number of days to add to the expected receipt date for shipping backordered drop ship items. A drop ship item is an item that your vendor ships for you, rather than shipping it from your own warehouse. The calculation is for the expected ship date = the current date + FTC -- # of Days to Add for Drop Ships (C68) + the Lead days for the vendor item. The Assign Drop Ship Expected Ship Date (I59) system control value controls whether the expected ship date is displayed for drop ship items. See that system control value for more information. |
|
CANCEL, CONTINUE, STOP (or blank) |
The action for the system to take the next time you generate backorder notices after you have generated the second notification to a customer. |
|
numeric value |
The number of days for the system to add to the expected arrival date for items with no open purchase orders. |
|
numeric value |
The number of days to delay sending a backorder notice for order types that receive immediate backorder notices (defined in the Order Type file; see Establishing Order Types (WOTY)). If an item is backordered, but you will be able to ship it before this number of days passes, the system does not generate a backorder notice. |
|
FTC--Number of Days Prior to Next Backorder Date to Generate Second Notice (E67) |
numeric value |
The number of days before the second backorder notice is due to print the notice, or include the order in a report listing orders flagged for cancellation. The system uses this value if the action after second notification is CANCEL. You can use this system control value either to generate backorder notices in advance, or take corrective action to avoid cancelling backordered items. |
FILE, PRINT, FILE/PRINT |
The destination for second notices: written to the Backorder Pending Cancellation file only, generated and not written to the file, or generated and written to the file. If you set this field to FILE or FILE/PRINT, you can use Working with Backorders Pending Cancellation (WBPC) to continue to work with the orders. |
|
numeric value |
The number of days to add to the backorder date when a customer accepts the delay following the second notice. This option is available through Working with Backorders Pending Cancellation (WBPC). |
|
Y or N |
Indicates whether items or SKUs whose Suppress backorder card field is set to Y will appear on first backorder notices, or never appear. Items/SKUs set to suppress will never trigger a backorder notice on their own, and will be included on a first backorder notice only if an unsuppressed item is backordered. You would typically choose to suppress promotional items, free gifts, catalogs, etc. from backorder notification. Such items are never eligible to be canceled through Working with Backorders Pending Cancellation (WBPC). |
|
numeric value |
Number of days to add to the expected receipt date for CWCollaborate drop ship items. The system uses this date, rather than the FTC -- # of Days to Add for Drop Ships (C68), if the item’s default vendor has the Drop ship output field set to C). The calculation is for the expected ship date = the current date + Drop Ship Lead Days (H36) + the Lead days for the vendor item. |
|
program name (the standard program is BOR0035) |
Indicates the program to use when sending an email backorder notification to a customer. See When Does the System Generate an Email Notification? for an overview of how the system determines whether to send an email notification, generate a spool file for printing, or produce the Outbound Email XML Message (CWEmailOut), and for information on entering the text to appear in the email or XML message. |
|
Y or N |
Indicates whether to calculate and display (or print) the expected ship dates for drop ship items. The expected ship dates for drop ship items are calculated as follows: • CWCollaborate items (the item’s default vendor has the Drop ship output field set to C): the expected ship date = the current date + Drop Ship Lead Days (H36) + the Lead days for the vendor item • other drop ship items: the expected ship date = the current date + FTC -- # of Days to Add for Drop Ships (C68) + the Lead days for the vendor item |
|
FILE, PRINT, FILE/PRINT |
Identifies the output for first backorder notices: written to the Backorder Pending Cancellation file only, generated and not written to the file, or generated and written to the file. If you set this field to FILE or FILE/PRINT, you can use Working with Backorder First Notices (WBFN) to work with first backorder notices. |
Overview: Email notification templates control the standard text to include in the notice and indicate whether to generate an actual email or the Outbound Email XML Message (CWEmailOut). You can set up default templates for your company using Working with E-Mail Notification Templates (WEMT), and you can also set up overrides at the entity level using Working with Entities (WENT).
There are separate templates for first backorder notices, second backorder notices, and continue backorder notices.
If an order is not eligible for email notification or the Outbound Email XML Message (CWEmailOut), the system generates a backorder card instead. See Other Order-Related Email Notifications for a discussion of how the system determines whether to generate an email notification or the Outbound Email XML Message (CWEmailOut).
Additional Backorder Notification Setup
In order to generate backorder notifications through the Outbound Email API:
• the Backorder Notification E-Mail Program (G95) must not be blank, and
• the outbound XML version for the EMAIL_OUT process in Working with Integration Layer Processes (IJCT) must be set to 2.0 or higher. If the outbound XML version is set to 1.0 and the Use email API flag is set to Y, no Outbound Email XML Message (CWEmailOut) or email is produced when you generate backorder notices, although the process does still write the Order Transaction History message indicating that an email was sent to the customer.
Generate Backorder Cards (GBOC)
Purpose: Use the Generate Backorder Notifications function to generate backorder notices informing customers when backordered items are expected to ship.
• Generating Backorder Notices
• Generating First Backorder Notices
• Generating Second Backorder Notices
• Excluding Backorder Notifications
• Generating Backorder Email Notifications
Backorder processing summary:
Note: You should run the Purchase Order Layering function before generating backorder cards to update the expected delivery dates of backordered items. See Batch Purchase Order Layering Screen (BPOL).
Instructions:
1. Enter GBOC in the Fast path field at the top of any menu, or select Generate Backorder Cards from a menu.
2. The BO_CARDS job generates first, second, and continuing backorder notices (depending on the settings in the System Control file) using the Backorder Card Print Program (D04). Depending on your setup and whether the customer is eligible for an email notification, the job generates:
• a spool file for printed backorder cards; see Backorder Card
• backorder notification emails or the Outbound Email XML Message (CWEmailOut); see Generating Backorder Email Notifications
• the Backorder Cancellation Register, using the program BOR0007. The register is generated regardless of whether the notifications generated are printed or emailed.
3. For each generated notice, the job writes a message to the Order History file such as the message for printed backorder notices, for example: 1st B/O--line 2, ship date 04/15/09. If the job generates an email or the Outbound Email XML Message (CWEmailOut), the job also writes a message such as BO First to ekaplan@commercialware.com.
Future orders: Future orders are not included in backorder processing until their arrival date is within theReservation Lead Days (B27) system control value.
Generating First Backorder Notices
The system generates an initial (first) backorder notice immediately if you set the Immediate B/O (Immediate backorder notice) field to Y at the Create Order Type Screen.
If you have defined a Number of Days to Delay Initial Backorder Notice (D89), the system does not generate a notice for a backordered item unless you do not expect to ship the item until after the defined delay period.
Note: Once an expected delivery date for a backordered item is passed or changed, the system generates a backorder card, regardless of the setting of the Immediate B/O (Immediate backorder notice) field.
Typically, you would want to notify customers immediately about backordered items if they place an order through the mail or fax; you can inform customers who order by phone at the time you take their orders if an item they want is currently backordered.
First backorder notice output: The FTC - First Notice Output (J70) system control value defines how the system generates a first backorder notice.
• PRINT = When you select to Generate Backorder Cards (GBOC), the system generates first backorder notices. The first backorder notice is printed, emailed, or sent in the Outbound Email XML Message (CWEmailOut), based on your settings; see Generating Backorder Email Notifications.
• FILE = When you Generate Backorder Cards (GBOC), the system creates a record in the Backorder Cancellation Pending file for each first backorder notice. These notices are flagged with a Type of F. You can use the Working with Backorder First Notices (WBFN) menu option to review and generate first backorder notices with this type.
• FILE/PRINT = When you use Generate Backorder Cards (GBOC), the system generates first backorder notices. In addition, the system creates a record in the Backorder Cancellation Pending file for each first backorder notice. These notices are flagged with a Type of F. You can use the Working with Backorder First Notices (WBFN) menu option to review first backorder notices with this type; however, you cannot use this menu option to generate first backorder notices since the system already generated them during Generate Backorder Cards (GBOC) processing.
Generating Second Backorder Notices
The FTC--Second Notice Output (E68) system control value defines how the system generates a second backorder notice.
• PRINT = When you Generate Backorder Cards (GBOC), the system generates second backorder notices. The second backorder notice is printed, emailed, or sent through the Outbound Email XML Message (CWEmailOut), based on your settings and the customer’s preferences; see Generating Backorder Email Notifications. In addition, if the FTC -- Action after Second Notification (C70) system control value is set to:
• STOP (or blank) = The system does not generate any additional backorder notices.
• CANCEL = The system assigns a cancellation date to the order line and prints the item on the Backorder Cancellation Register.
• CONTINUE = The system generates another backorder notice if the same number of days as previous FTC notices has passed, the delivery date changes, or you miss the promised delivery date.
• FILE = When you Generate Backorder Cards (GBOC), the system looks at the FTC -- Action after Second Notification (C70) system control value to determine how to proceed.
• STOP (or blank) = The system generates a second backorder notice and does not generate any additional backorder notices.
• CANCEL = The system creates a record in the Backorder Cancellation Pending file for each second backorder notice, assigns a cancellation date to the order line, and prints the item on the Backorder Cancellation Register. You can use the Working with Backorders Pending Cancellation (WBPC) menu option to work with and generate second backorder notices. The system submits the job SEC_NOTICE job when you generate notices through this menu option. In this situation, the system writes two identical order history messages: one when you write the record to the Backorder Cancellation Pending file, and one when you actually print the notice.
• CONTINUE = The system generates a second backorder notice and then generates another backorder notice if the same number of days as previous FTC notices has passed, the delivery date changes, or you miss the promised delivery date.
• FILE/PRINT = When you use Generate Backorder Cards (GBOC), the system generates second backorder notices. In addition, if the FTC -- Action after Second Notification (C70) system control value is set to:
• STOP (or blank) = The system does not generate any additional backorder notices.
• CANCEL = The system assigns a cancellation date to the order line, creates a record in the Backorder Cancellation Pending file and prints the item on the Backorder Cancellation Register. You can use the Working with Backorders Pending Cancellation (WBPC) menu option to review backorders pending cancellation.
• CONTINUE = The system generates another backorder notice if the same number of days as previous FTC notices has passed, the delivery date changes, or you miss the promised delivery date.
Excluding Backorder Notifications
The Exclude B/O notifications field for the order type on an order determines if the system generates backorder notifications for an order. If this field for the order type on an order is set to Y, the system does not generate backorder notifications for the order.
Note: Because the order is excluded from backorder notifications, the system does not:
• generate a backorder notification for any backordered items on the order.
• include the order on the Backorder Cancellation Pending report.
• include the order on the Backorder Cancellation Register.
• write a message to the Order History file indicating the order was excluded from backorder notification.
Generating Backorder Email Notifications
The system sends an email notice to the customer or generates the Outbound Email XML Message (CWEmailOut) rather than generating a spool file for printing when:
• the E-mail notification field for the order type is set to Y, and
• the customer’s Opt-in/out setting is O1 or O2. See Determining the Opt-in/out Setting.
The system generates the Outbound Email XML Message (CWEmailOut) if the e-mail template for the backorder notification type has the Use email API flag set to Y; otherwise, if this flag is set to N, the system generates an email notice.
Note:
• If you clear the email address and the Suppress Email Address Search (J09) system control value is set to Y, the system does not generate order-related emails or XML messages for the order. See that system control value for more information.
• The system does not confirm that the customer’s email address is valid.
Email template: You can use the Working with Entities (WENT) menu option to create an entity-level email template, and the Working with E-Mail Notification Templates (WEMT) menu option to create a default company-level backorder notification template. The template specifies the text to print above and below the standard backorder information as well as the Use email API setting.
About the outbound email API: See Outbound Email API for an overview.
Save in email repository? The Write Outbound Email to Email Repository (H99) system control value controls whether email notifications are stored in correspondence history. See this system control value for more information on identifying and reviewing outbound emails for a customer.
The Assign Drop Ship Expected Ship Date (I59) system control value determines whether to display or print the expected ship date for drop ship items. See that system control value for more information.
For more information:
• Batch Purchase Order Layering Screen (BPOL)
• Working with Backorder First Notices (WBFN)
• Working with Backorders Pending Cancellation (WBPC)
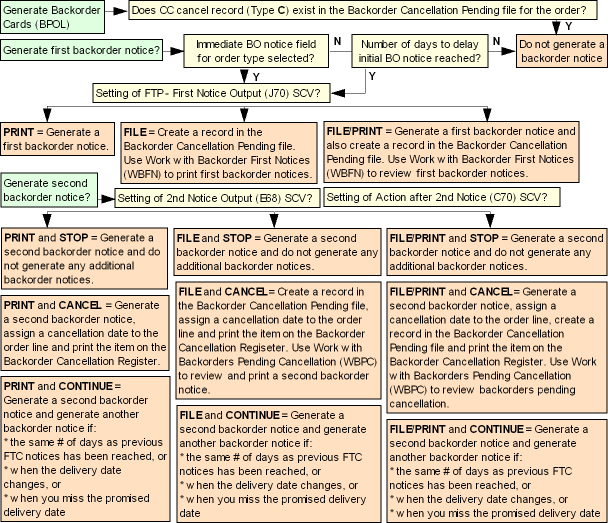
Backorder Notice Generation Summary
The table below explains how the system generates backorder notifications, based on the settings of the FTC - First Notice Output (J70), FTC--Second Notice Output (E68), and FTC -- Action after Second Notification (C70) system control values.
1st Notice Output (J70) |
2nd Notice Output (E68) |
Action After 2nd Notice (C70) |
Notice Output and Other Results |
CANCEL |
First notice: Generated. Second notice: The system generates a second notice, assigns a cancellation date to the order line and also prints the item on the Backorder Cancellation Register. Third notice: Not generated. |
||
FILE |
CANCEL |
First notice: The system creates a record in the Backorder Cancellation Pending file for the first notice. You can use the Working with Backorder First Notices (WBFN) menu option to generate and review first notices. Second notice: The system generates a second notice, assigns a cancellation date to the order line and also prints the item on the Backorder Cancellation Register. Third notice: Not generated. |
|
FILE/PRINT |
CANCEL |
First notice: The system generates a first notice and also creates a record in the Backorder Cancellation Pending file for the first backorder notice. You can use the Working with Backorder First Notices (WBFN) menu option to review first backorder notices. Second notice: The system generates a second notice, assigns a cancellation date to the order line and also prints the item on the Backorder Cancellation Register. Third notice: Not generated. |
|
FILE |
CANCEL |
First notice: Generated. Second notice: The system creates a record in the Backorder Cancellation Pending file, assigns a cancellation date to the order line and prints the item on the Backorder Cancellation Register. You can use the Working with Backorders Pending Cancellation (WBPC) menu option to review and print a second notice. Third notice: Not generated. |
|
FILE |
FILE |
CANCEL |
First notice: The system creates a record in the Backorder Cancellation Pending file for the first notice. You can use the Working with Backorder First Notices (WBFN) menu option to generate and review first notices. Second notice: The system creates a record in the Backorder Cancellation Pending file, assigns a cancellation date to the order line and prints the item on the Backorder Cancellation Register. You can use the Working with Backorders Pending Cancellation (WBPC) menu option to review and print a second notice. Third notice: Not generated. |
FILE/PRINT |
FILE |
CANCEL |
First notice: The system generates a first notice and also creates a record in the Backorder Cancellation Pending file for the first notice. You can use the Working with Backorder First Notices (WBFN) menu option to review first notices. Second notice: The system creates a record in the Backorder Cancellation Pending file, assigns a cancellation date to the order line and prints the item on the Backorder Cancellation Register. You can use the Working with Backorders Pending Cancellation (WBPC) menu option to review and print a second notice. Third notice: Not generated. |
FILE/PRINT |
CANCEL |
First notice: Generated. Second notice: The system generates a second notice, assigns a cancellation date to the order line, creates a record in the Backorder Cancellation Pending file, and prints the item on the Backorder Cancellation Register. You can use the Working with Backorders Pending Cancellation (WBPC) menu option to review backorders pending cancellation. Third notice: Not generated. |
|
FILE |
FILE/PRINT |
CANCEL |
First notice: The system creates a record in the Backorder Cancellation Pending file for the first notice. You can use the Working with Backorder First Notices (WBFN) menu option to print and review first notices. Second notice: The system generates a second notice, assigns a cancellation date to the order line, creates a record in the Backorder Cancellation Pending file, and prints the item on the Backorder Cancellation Register. You can use the Working with Backorders Pending Cancellation (WBPC) menu option to review backorders pending cancellation. Third notice: Not generated. |
FILE/PRINT |
FILE/PRINT |
CANCEL |
First notice: The system generates a first notice and also creates a record in the Backorder Cancellation Pending file for the first notice. You can use the Working with Backorder First Notices (WBFN) menu option to review first notices. Second notice: The system generates a second notice, assigns a cancellation date to the order line, creates a record in the Backorder Cancellation Pending file, and prints the item on the Backorder Cancellation Register. You can use the Working with Backorders Pending Cancellation (WBPC) menu option to review backorders pending cancellation. Third notice: Not generated. |
CONTINUE |
First notice: Generated. Second notice: Generated. Third notice: Generated when: • the same number of days as previous FTC notices has been reached, or • the delivery date changes, or • you miss the promised delivery date |
||
FILE |
CONTINUE |
First notice: The system creates a record in the Backorder Cancellation Pending file for the first backorder notice. You can use the Working with Backorder First Notices (WBFN) menu option to print and review first backorder notices. Second notice: Generated. Third notice: Generated when: • the same number of days as previous FTC notices has been reached, or • the delivery date changes, or • you miss the promised delivery date |
|
FILE/PRINT |
CONTINUE |
First notice: The system generates a first notice and also creates a record in the Backorder Cancellation Pending file for the first notice. You can use the Working with Backorder First Notices (WBFN) menu option to review first notices. Second backorder notice: Generated. Third notice: Generated when: • the same number of days as previous FTC notices has been reached, or • the delivery date changes, or • you miss the promised delivery date |
|
FILE |
CONTINUE |
First notice: Generated. Second notice: Generated. Third notice: Generated when: • the same number of days as previous FTC notices has been reached, or • the delivery date changes, or • you miss the promised delivery date |
|
FILE |
FILE |
CONTINUE |
First notice: The system creates a record in the Backorder Cancellation Pending file for the first notice. You can use the Working with Backorder First Notices (WBFN) menu option to print and review first notices. Second notice: Generated. Third notice: Generated when: • the same number of days as previous FTC notices has been reached, or • the delivery date changes, or • you miss the promised delivery date |
FILE/PRINT |
FILE |
CONTINUE |
First notice: The system generates a first notice and also creates a record in the Backorder Cancellation Pending file for the first backorder notice. You can use the Working with Backorder First Notices (WBFN) menu option to review first backorder notices. Second notice: Generated. Third notice: Generated when: • the same number of days as previous FTC notices has been reached, or • the delivery date changes, or • you miss the promised delivery date |
FILE/PRINT |
CONTINUE |
First notice: Generated. Second notice: Generated. Third notice: Generated when: • the same number of days as previous FTC notices has been reached, or • the delivery date changes, or • you miss the promised delivery date |
|
FILE |
FILE/PRINT |
CONTINUE |
First notice: The system creates a record in the Backorder Cancellation Pending file for the first notice. You can use the Working with Backorder First Notices (WBFN) menu option to print and review first backorder notices. Second notice: Generated. Third notice: Generated when: • the same number of days as previous FTC notices has been reached, or • the delivery date changes, or • you miss the promised delivery date |
FILE/PRINT |
FILE/PRINT |
CONTINUE |
First notice: The system generates a first notice and creates a record in the Backorder Cancellation Pending file for the first backorder notice. You can use the Working with Backorder First Notices (WBFN) menu option to print and review first notices. Second notice: Generated. Third notice: Generated when: • the same number of days as previous FTC notices has been reached, or • the delivery date changes, or • you miss the promised delivery date |
STOP or blank |
First notice: Generated. Second notice: Generated. Third notice: Not generated. |
||
FILE |
STOP or blank |
First notice: The system creates a record in the Backorder Cancellation Pending file for the first backorder notice. You can use the Working with Backorder First Notices (WBFN) menu option to review first notices. Second notice: Generated. Third notice: Not generated. |
|
FILE/PRINT |
STOP or blank |
First notice: The system generates a first notice and also creates a record in the Backorder Cancellation Pending file for the first backorder notice. You can use the Working with Backorder First Notices (WBFN) menu option to review first notices. Second notice: Generated. Third notice: Not generated. |
|
FILE |
STOP or blank |
First notice: Generated. Second notice: Generated. Third notice: Not generated. |
|
FILE |
FILE |
STOP or blank |
First notice: The system creates a record in the Backorder Cancellation Pending file for the first notice. You can use the Working with Backorder First Notices (WBFN) menu option to review first notices. Second notice: Generated. Third notice: Not generated. |
FILE/PRINT |
FILE |
STOP or blank |
First notice: The system generates a first notice and also creates a record in the Backorder Cancellation Pending file for the first notice. You can use the Working with Backorder First Notices (WBFN) menu option to review first notices. Second notice: Generated. Third notice: Not generated. |
FILE/PRINT |
STOP or blank |
First notice: Generated. Second notice: Generated. Third notice: Not generated. |
|
FILE |
FILE/PRINT |
STOP or blank |
First notice: The system creates a record in the Backorder Cancellation Pending file for the first backorder notice. You can use the Working with Backorder First Notices (WBFN) menu option to review first notices. Second notice: Generated. Third notice: Not generated. |
FILE/PRINT |
FILE/PRINT |
STOP or blank |
First notice: The system generates a first notice and also creates a record in the Backorder Cancellation Pending file for the first notice. You can use the Working with Backorder First Notices (WBFN) menu option to review first notices. Second notice: Generated. Third notice: Not generated. |
Batch Purchase Order Layering Screen (BPOL)
Purpose: Use the purchase order layering function to update the expected delivery dates for items you have ordered from your vendors. It is important to run this function before you generate backorder notices or run any other function that relies on accurate purchase order date and quantity information, such as the WATS Inventory Counts (see System Operations Loading and Transmitting the WATS Inventory Count (WWIC)). You can add Batch Purchase Order Layering to your daily periodic process, or run it on demand at any time.
Note: If you receive purchase orders into suspense, run Batch Purchase Order Layering in order to update the Expected delivery date in Order Entry, Order Maintenance, Order Inquiry, Inventory Inquiry and Item Availability. Once you place the suspended stock, run Batch Purchase Order Layering again to clear the Expected delivery date. This information is also included in the item availability download to the web storefront; see FTC -- # of Days for Items without Expected Ship Date (C71) for a discussion.
Overview: When you take an order for a backordered item, the system evaluates when you can ship the item based on:
• the quantity and expected delivery dates of open purchase orders for the item, and
• previous backorders for the item.
The system does not update each of the fields related to purchase order layering automatically during the course of your business day if you enter a change to purchase order quantity or date, or if the previous backorders should change. For this reason, you must run Batch Purchase Order Layering to make sure that all of the information related to backordered items is correct.
Example: You have the following open purchase orders for item AB100:
Purchase Order Number |
Expected Delivery |
Quantity |
11 |
08/01 |
10 |
22 |
09/01 |
10 |
1. You currently have 9 open orders for item AB100 (Available quantity = -9). Customer #1 calls and places an order for a quantity of 1 AB100. The item has an expected ship date of 8/1 (the date of the first purchase order).
2. Customer #2 calls and places an order for a quantity of 1 AB100. The item has an expected ship date of 9/1 (the date of the second purchase order).
3. The first 5 open orders for AB100 are canceled. This frees up 5 of the items on the first purchase order; you will now be able to ship an item to customer #2 when the first purchase order comes in on 8/1. However, you must run Purchase Order Layering to update all related fields on the system, such as the expected ship date for the order detail line.
Work order processing: Finished Good Work Order Processing (WWOR) also uses the Batch Purchase Order Layering function to update the Due date on the work order so that:
• the Expected due date on an order is the date when you enter a finished good item that is not available but does have a work order in process, and
• the Next expected purchase order date for a finished good item is the date entered on the work order in Inquiring into Item Availability (DIAV).
Rejected orders: If you place an order in which the order quantity fully depletes the open quantity for a PO Layer record, and then reject the order, the system holds the PO Layer record against the rejected order until you run Batch Purchase Order Layering. Any new orders entered do not display the expected due date for the PO Layer record until you run Batch Purchase Order Layering.
Example: There is a PO Layer record for 25 units of item AB10.
• Item: AB10
• Whs: 100
• PO #: 123
• Due date: Dec 1
• Open Qty: 25
You place an order for 25 units of item AB10. The expected due date of December 1 for the item is from the PO Layer record. You then reject the order and place a new order. There is no expected due date, only the backordered quantity.
Calculate expected delivery date for items with no open purchase orders? The Calculate Expected Date in OE if No PO (J61) system control value controls whether the Batch Purchase Order Layering function updates the expected delivery date for backordered order lines if the item is not on any open purchase orders and is not sold out. If this system control value is set to Y, then each time you run Batch Purchase Order Layering the program updates the expected delivery date for the order detail line by adding the FTC -- # of Days for Items without Expected Ship Date (C71) system control value setting to the current date. If the Calculate Expected Date in OE if No PO (J61) system control value is set to N, then the Batch Purchase Order Layering program leaves the expected delivery date blank. See that system control value for a discussion.
How to display this screen: Enter BPOL in the Fast path field at the top of any menu or select Batch Purchase Order Layering from a menu.
POR0390 ENTER Batch PO Layering 10/02/06 11:07:25 KAB Co
*** Press F9 to submit Batch PO Layering
F3=Exit F9=Accept F12=Cancel F24=Select company |
Instructions: When you run batch purchase order layering, the system performs purchase order layering updates for all warehouses.
Press F9to start the batch job POLAYER. This batch job performs all the field updates necessary before you generate backorder cards (see Generate Backorder Cards (GBOC)), or any other function requiring accurate purchase order receipt information.
The POLAYER job:
• Deletes all records in the PO Layering file for the submitted company.
• Creates records in the PO Layering file using the PO Detail file for the submitted company for all allocatable warehouses. Note: The system does not create records in the PO Layering file for non-allocatable warehouses.
• Updates the due date and backorder quantity for order lines on backorder. See Determining the Expected Ship Date for more information on the steps the system performs to update the due date and backorder quantity for order lines on backorder.
Note: When you run batch purchase order layering, the system updates the expected ship date for a backordered order line, but does not update the backorder warehouse on the order line, even if the warehouse associated with the purchase order can fulfill the backordered order line. For example, if the backorder warehouse on an order line is the item’s primary warehouse, and you enter a purchase order for a warehouse that is part of the warehouse list associated with the order line, the system does not update the backorder warehouse on the order line to the warehouse in the warehouse list, even though the order line may be fulfilled by the warehouse in the warehouse list and not the primary warehouse.
| Soldout Notification Card | Contents | SCVs | Search | Glossary | Reports | Solutions | XML | Index | Backorder Card |

CS12_04 CWDirect 18.0.x 2018 OTN