
Vendors are companies who supply you with merchandise or services. A record must be established on the system for every vendor from whom you purchase merchandise, or for whom you enter A/P invoices.
In this topic:
• Enter Email Address for Drop Ship Vendor Window
• Display Vendor History Screen
• Change Vendor Extended Screen
• Display Vendor Extended Screen
• Work with Vendor Discounts Screen
• Work with Vendor Contacts Screen
• Combined Discount Calculation
• Create Vendor Contact Screen
• Change Vendor Contact Screen
• Display Vendor Contact Screen
• Work with Vendor FOB Address Screen
• Create Vendor FOB Address Screen
• Change Vendor FOB Address Screen
• Display Vendor FOB Address Screen
• Work with Vendor Notes Screen
Upload vendors: You can upload vendor information into CWDirect using the Load Vendor Upload menu option; see Working with Vendor Upload (LVUP).

How to display this screen: Enter WVEN in the Fast path field at the top of any menu or select the Work with Vendors option from the menu.
POR0001 DISPLAY Work with Vendors 3/29/00 10:37:13 The KL Mail Order Company
Opt Vendor# Name St Zip Telephone# Ext
Type options, press Enter. 2=Change 4=Delete 5=Display 7=Discounts 8=History 14=Contacts 15=FOB 23=Notes 98=User Field 99=Letter
2 GERMAN VENDOR 2 01609 1(508)297-0690 123 101 US VENDOR MA 01701 (508) 626-2600 101 1010 EASTERN US VENDOR 2 PA 02153 592-2443 1012 NORTHERN US VENDOR 1012 MS 41201 {123} 456-7890 123 10001 WESTERN US VENDOR 10001 CA 91701 (498) 704-8529 10003 SOUTHERN US VENDOR 10003 TX 51701 (857) 693-7465 10004 CENTRAL US VENDOR 10004 NE 21804 (274) 968-1320 10005 ITALIAN VENDOR 10005 06705 127596042963 10006 FRENCH VENDOR 10006 76424 163848458585
F3=Exit F6=Create F12=Cancel F21=Print list F24=Select company |
Field |
Description |
Vendor # |
A code that identifies a supplier who sells you goods or services. Numeric, 7 positions; optional. |
Name |
The name of the vendor. Alphanumeric, 30 positions; optional. |
St (State) |
A code representing a state or province where a vendor's business is located. State codes are defined in and validated against the State file, which is accessible through the Work with Countries menu option; see Customer Service Setting Up the Country File (WCTY). Alphanumeric, 2 positions; optional. |
Zip |
The vendor's postal (zip) code. Alphanumeric, 10 positions; optional. |
Screen Option |
Procedure |
Create a new vendor |
Press F6 to advance to the First Create Vendor Screen. |
Change vendor information |
Enter 2 next to a vendor to advance to the First Change Vendor Screen. |
Delete vendor information |
Enter 4 next to a vendor to delete it. |
Display vendor information |
Enter 5 next to a vendor to advance to the First Display Vendor Screen. |
Create a vendor discount |
Enter 7 next to a vendor to advance to the Work with Vendor Discounts Screen. |
Display vendor history |
Enter 8 next to a vendor to advance to the Display Vendor History Screen. |
Work with vendor contacts |
Enter 14 next to a vendor to advance to the Work with Vendor Contacts Screen. |
Work with vendor FOB addresses |
Enter 15 next to a vendor to advance to the Work with Vendor FOB Address Screen. |
Display vendor notes |
Enter 23 next to a vendor to advance to the Work with Vendor Notes Screen. |
Work with user defined fields |
Enter 98 next to a vendor to advance to the Work with User Fields Screen. |
Enter letters |
This option is not currently supported. |

Purpose: Use this screen to begin to create a vendor. This is the first of two Create Vendor screens; when you complete this screen, you advance to the Second Create Vendor Screen.
How to display this screen: Press F6 at the Work with Vendors Screen.
POR0265 ADD Create Vendor (1 of 2) 1/16/03 8:49:06 KAB Co.
Vendor . . . . . . . . Name . . . . . . . . . Address . . . . . . .
City/St/Postal/Cntry . Contact name . . . . . Phone#/Ext . . . . . . Fax# . . . . . . . . . Email . . . . . . . .
Remit to . . . . . . . Address . . . . . . .
City/St/Zip/Cntry . . Email . . . . . . . .
F3=Exit F8=Create vendor extended F12=Cancel |
Field |
Description |
A code that identifies a supplier. Numeric, 7 positions. Create screen: required. Change screen: display-only. |
|
Name |
The name of the vendor or the vendor's company. Alphanumeric, 30 positions; required. |
Address |
The vendor's address, as it should appear on purchase orders. Alphanumeric, 3 lines with 32 positions each line; required. |
City/St/Postal/Cntry |
The city, state, postal zip code, and country associated with the vendor. If the Require state field for the country in the vendor address is set to Y, the system requires a state code for the vendor address: State is required for this country. Note: The system does not validate the vendor’s address in the same way it validates a customer’s address, as in order entry. For example, it does not validate that the state is associated with the SCF for the postal code. City: alphanumeric, 25 positions; required. State: alphanumeric, 2 positions; optional. Postal code: alphanumeric, 10 positions; required. Country code: alphanumeric, 3 positions; required. |
Contact name |
The name of your primary contact at the vendor site. This name prints on purchase orders. You can create additional contacts for a vendor from the Work with Vendor Contacts Screen. Alphanumeric, 30 positions; optional. |
Phone #/Ext (Telephone number and extension) |
The vendor's telephone number and extension. You can define a telephone number format to map to the phone numbers operators enter into the system. Telephone number formats are defined by arranging numbers and special characters such as hyphens and parenthesis in the same order and position as the numbers in a phone number would display. When an operator enters a phone number, the system compares the number of numeric characters in the phone number with the telephone number formats you have defined. In order to match a format, the phone number must have the same number of numeric positions as a telephone number format. If the system cannot find a match, the phone number does not map to a telephone number format and is saved as it was entered by the operator. See Chapter 1 of the order entry manual for information on telephone number format validation. Phone #: alphanumeric, 14 positions; optional. Extension: alphanumeric, 4 positions; optional. |
The telephone number for the vendor's facsimile (fax) machine. Enter this telephone number if you are faxing purchase orders or drop ship picks to the vendor through the Fax Interface (Fax PO set to Y). If you enter a fax number, this number defaults into the Print and/or Fax Pop-Up Window that appears at the purchase order header screen when you press F19 in purchase order entry or maintenance, or F9 in purchase order inquiry. If you do not specify a fax number here and set the Fax PO field to Y, you will not be able to fax purchase orders or drop ship picks to the vendor. Alphanumeric, 14 positions; optional. |
|
The vendor’s email address. See Email Address Validation for information on how the system verifies that your entry is formatted correctly. The system generates the purchase order by email if the Email P/O flag is set to Y. See Purchase Order Emails for a discussion. The vendor email address is defined in the Vendor file. Vendor for EMail Gift Certificate (I04) system control value If you define a vendor in the Vendor for E-Mail Gift Certificate (I04) system control value and the program ECR0383 in the Gift Certificate E-Mail Program (H07) system control value, the system sends gift certificate emails to the email address defined for the vendor. Alphanumeric, 50 positions; optional. |
|
The name of the person or company you send payment to for vendor invoices. Enter the remit-to address if sending payment to a factor (a third party who, in turn, pays the vendor). See the Factor field. The remit-to address prints on checks for the vendor. Note: If any portion of a name or address appears in the Remit to fields, the system bypasses the vendor name and address and print the Remit to name and address on A/P checks. If you enter any information in the Remit to fields, be sure that it is correct and complete. Alphanumeric, 30 positions; optional. |
|
The address where you mail checks for the vendor. The Accounts Payable system uses this address when generating checks. Alphanumeric, 30 positions; optional. |
|
The city, state, postal zip code, and country where you should mail payment to the vendor. If the Require state field for the country in the vendor address is set to Y, the system requires a state code for the vendor address: State is required for this country. Alphanumeric, 25 positions; optional. |
|
The remit to vendor’s email address. See Email Address Validation for information on how the system verifies that your entry is formatted correctly. Alphanumeric, 50 positions; optional. |
.
Screen Option |
Procedure |
Create the Vendor Extended record |
Press F8 to advance to the Change Vendor Extended Screen. |
Purpose: Use this screen to complete entry of a vendor.
How to display this screen: Complete the First Create Vendor Screen.
POR0265 ADD Create Vendor (2 of 2) 1/22/14 14:40:40 EZK Mail Order
Vendor . . . . . . . : 1012 US VENDOR 1012 Print P/O . . . . . . (Y,N) Fax P/O . . . . . . . (Y,N) Print checks . . . . . (Y,N) Drop ship output . . . (P,O,C,L) Send returns to Collaborate (Y,N) Factor . . . . . . . . (Y,N) D/S batch size . . . EDI P/O . . . . . . . (Y,N) PO Ship Via . . . . Terms . . . . . . . . Discount % . . . . . . Email P/O . . . . . . . . Y (Y,N) Surcharge % . . . . . Quality rating . . . . A/P Interface vendor . Parent Vendor . . . Currency code . . . . USD Vendor price currency S (S=System, V=Vendor, N=No Conversion) VAT number . . . . . . Type of Vendor . . . . V=Vendor, M=Manufacturer EFT Account # . . . . User fields . . . . .
F3=Exit F8=Create vendor extended F12=Cancel |
Field |
Description |
This value indicates whether purchase order forms print for this vendor. If so, you order products on the purchase order, print it, then mail it to the vendor. Y = Print purchase orders for this vendor. N = Do not print purchase orders for this vendor. This field works together with the Print Drop Ship Invoice with PO (C85) system control value to control whether to print drop ship invoices with purchase orders: if the system does not print the purchase order, it does not print the drop ship invoice either. Alphanumeric, 1 position; required. |
|
This value indicates whether purchase orders or drop ship pick slips can be faxed to the vendor. You can fax purchase orders in addition to, or instead of, mailing confirming copies (Print P/O = Y). Y = Faxing purchase orders or drop ship pick slips is enabled. See Possible Drop Ship Output for an overview. N = Do not fax purchase orders or drop ship pick slips to this vendor. If you set this field to Y without entering a fax telephone number, you return to the First Create Vendor Screen with the cursor in the Fax# field, and the following message appears at the bottom of your screen:
A FAX number is required for vendor due to FAX flag being set.
If you enter Y at this field, the Fax PO flag at the Print and/or Fax Pop-Up Window defaults to Y. This pop-up window appears at the purchase order header screen when you press F19 in purchase order entry or maintenance, or F9 in purchase order inquiry. Alphanumeric, 1 position; required. |
|
Print checks |
This value indicates whether to print A/P (Accounts Payable) checks to the vendor to pay for products or services purchased. Y = Print Accounts Payable checks for the vendor. N = Do not print Accounts Payable checks for this vendor. Instead of actually printing checks, you can use wire transfers or some other method to pay the vendor. Alphanumeric, 1 position; required. |
This value indicates whether to process drop ship orders by printing picks, printing purchase orders, or transmitting information through the CWCollaborate Interface for internet-based drop ship processing. Drop ship merchandise is merchandise that you sell but do not stock. P = Print drop ship pick slips for this vendor. O = Print drop ship purchase orders for this vendor. Note: You can also print drop ship invoices for the vendor if the Print Drop Ship Invoice with PO (C85) system control value is set to Y. If your company and the vendor are fax-enabled, you can also fax drop ship pick slips and/or purchase orders. See Possible Drop Ship Output for an overview. |
|
|
C = Use the CWCollaborate interface for this vendor. L = Use the interface with Locate’s Supplier Direct Fulfillment module for this vendor. The CWCollaborate Interface and the Locate Supplier Direct Fulfillment Interface each provide access to an internet-based, collaborative environment for retailers and vendors to share and process information related to drop ship orders. If you use CWCollaborate or Locate’s Supplier Direct Fulfillment module, your system generates a purchase order and automatically distributes it to the integrated application. You can flag a vendor to use the CWCollaborate or Locate interface only if the Use CWCollaborate/Locate system control value on the Drop Ship Integration Values Screen (H20) is set to Y. If the system control value is set to N, when you try to enter C or L in this field, the screen displays a message: Collaborative shipping vendor is not allowed.
Email address required? When you enter C or L in this field, the Enter Email Address for Drop Ship Vendor Window opens if you have not entered a vendor email address on the Create Vendor Contact Screen. |
|
A/P implications: If you print drop ship pick slips for a vendor, you can use the drop ship invoice number for matching to an A/P invoice. The invoice number is generated when you bill the order or print pick slips, depending on the setting of the Generate Invoice Number at Pick Gen (H80) system control value. The screens you use when you match an A/P invoice with a drop ship invoice differ from those you use when you match to a purchase order; not all of the same options are available. For example, you cannot work with A/P-P/O discounts for an A/P invoice matched to a drop ship invoice, even if the Enter Gross A/P Invoice Amount (F03) system control value is set to Y If you print drop ship purchase orders for a vendor (regardless of whether you enter O to print purchase orders, C to use CWCollaborate, or L to use Locate’s Supplier Direct Fulfillment module), you use the same screens for matched A/P invoice entry as when you match to any other purchase order; all options are available. Regardless of the setting of this field, unmatched A/P invoice entry is the same. See Accounts Payable Working with A/P Invoice Entry (MAPE) for more information on A/P invoice entry. Alphanumeric, 1 position; required. |
This value indicates whether the system should send return and return authorization information for this vendor to CWCollaborate. Y = Automatically send return and return authorization information to CWCollaborate through the CWCollaborate Interface. N or blank = Do not send return or return authorization information to CWCollaborate for this vendor. Regardless of the setting of this field, the system accepts return information sent from CWCollaborate; you can give your vendor authority to create returns in CWCollaborate without first obtaining a return authorization. Return authorizations are not supported in the integration with Locate’s Supplier Direct Fulfillment module. This field displays only if the system control value Use CWCollaborate on the Drop Ship Integration Values Screen (H20) is set to Y. Alphanumeric, 1 position; optional. |
|
D/S batch size (drop ship batch size) |
The number of picks to include in a drop ship batch when you are Processing Drop Ship Orders by Batch (MDSB) for this vendor. The drop ship batch size determines the number of pick slips that print in one batch before the system creates a new batch. Example: Batch size = 2 # of picks to release = 5 In this situation, the system generates 3 batches: Batch 1 contains 2 pick slips Batch 2 contains 2 pick slips Batch 3 contains 1 pick slip This field does not apply to the CWCollaborate Interface or the Locate Supplier Direct Fulfillment Interface. Numeric, 7 positions; optional. |
This value indicates whether you are sending payment to a factor. Factors are typically used in the apparel industry because the piece goods that are the “raw materials” of this industry are supplied by various manufacturers. In this case, you may remit the invoice to a bank, which then distributes the payment appropriately. Y = Payment on invoices go to a factor. N = Payment on invoices goes directly to the vendor. Enter the factor's address in the Remit to fields on Screen #1. Alphanumeric, 1 position; required. |
|
EDI P/O |
This value indicates whether you transmit purchase order information electronically to the vendor using EDI (Electronic Data Interchange) telecommunications. You may use this method instead of generating hard copy purchase orders for this vendor. Y = Transmit an EDI file with purchase orders to the vendor. N = Do not use EDI. If you enter Y, the following fields pop up when you complete this screen:
------------ EDI ------------- Wait for ASN . . . . N (Y,N) Include Hold . . . . N (Y,N) |
|
Entering Y in the first field indicates that you would like to wait for Advanced Shipment Notice from the EDI service provider. Entering Y in the second field indicates that you would like to include held invoices in the EDI transmission. Neither of these fields is currently implemented. Note: These two fields are concatenated and stored in the EDI file field in the Vendor file. Alphanumeric, 10 positions; required. |
A code that represents the shipper used for shipping merchandise to your company from this vendor. Purchase order ship via codes are defined in and validated against the PO Ship Via file; see Working with Purchase Order Ship Via (WPSV). Numeric, 2 positions; optional. |
|
A code for the terms and conditions for payment to the vendor, such as 30 days after invoice date or at the end of the month. Terms codes are defined in and validated against the Terms file. The value you enter here defaults in PO Entry and A/P Invoice Entry. Numeric, 2 positions; optional. |
|
The primary discount percentage applied towards items purchased from this vendor. This discount is applied to the dollar value of merchandise and is taken during Purchase Order Entry. Any other discounts defined in the Vendor Discount file are applied after the primary discount has been calculated. See Work with Vendor Discounts Screen. Numeric, 5 positions with a 2 place decimal; optional. |
|
Indicates whether to email the purchase order in PDF format. Valid values are: Y = Email the purchase order in PDF format using the Email address specified for the vendor. If you select this setting, then the Email address is required and the Print PO flag must be set to Y. N = Do not email the purchase order; print it or fax it instead. For more information: See Purchase Order Emails for a discussion. Alphanumeric, 1 positions; required. |
|
A standing surcharge added to purchases from this vendor. A surcharge is typically added to purchases from a broker. The percentage is based on the item price in Purchase Order Entry. Numeric, 5 positions with a 2 place decimal; optional. |
|
Locate cutover date |
The date when you changed the vendor’s Drop ship output setting from C to L. When you change a vendor to use Locate’s Supplier Direct Fulfillment module instead of CWCollaborate, all new purchase orders for the vendor are sent to Locate instead of CWCollaborate, and the system does not send any updates (cancellations or address changes) to CWCollaborate. This field is on the Change Vendor (2 of 2) and Display Vendor (2 of 2) screens, and is included only if you have changed the vendor’s Drop ship output setting from C to L. This field is used only when changing the vendor from CWCollaborate to Locate for drop ship processing. Numeric, 8 positions (MM/DD/YY format); display-only. |
Quality rating |
This field is not currently implemented. Numeric, 5 positions with a 2 place decimal; system-assigned. |
A/P interface vendor |
The vendor code on your third party Accounts Payable system. This code is used as a bridge between CWDirect and your own Accounts Payable system. Alphanumeric, 10 positions; optional. |
A code for a company that is made up of one or more subsidiary vendors. If your unique interface program supports it, you can define a vendor as a parent vendor if you wish to pay the main (parent) vendor for the merchandise you received from each subsidiary (child) vendor. • If the vendor code defined in this field matches the code you are creating, this vendor represents a parent vendor. • If the vendor code defined in this field does not match the code you are creating, this vendor represents a child vendor. |
|
|
Example: Vendors 101, 102, and 103 all report to vendor 10123. Instead of paying vendors 101, 102, and 103 separately for the merchandise you received, you can pay vendor 10123 for all of the merchandise you received from each of the subsidiary vendors. If the Require Entry of Parent Vendor system control value is set to Y, you must enter a valid vendor code in this field or an error message displays:
Parent Vendor number is required.
Note: This field is used only if your unique interface program supports it. Numeric, 7 positions; optional. |
Currency code |
A code to identify a currency type. This code is used by the Purchase Order system to identify a vendor's currency and to perform currency conversion processing if the vendor's currency is different from yours. Currency codes are defined in and validated against the Currency Code file (fast path = WCUR). This value defaults from the Local Currency Code (A55) system control value, but you can override it. The currency code you enter here defaults when you enter purchase orders, but you can override it. Alphanumeric, 3 positions; required. |
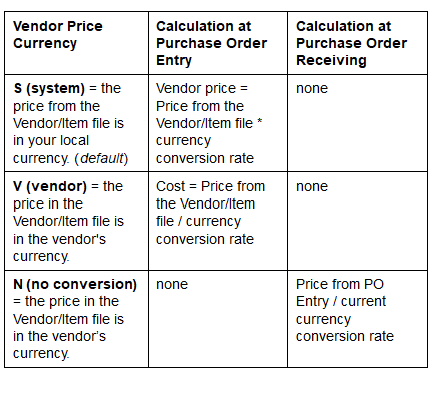
This field indicates whether the prices from this vendor are in the system's currency or the vendor's own currency and controls how and when currency conversion takes place. |
|
|
 |
|
Note: If this field is set to N or V, you must define vendor items in the Vendor Item file for the system to calculate the cost at the time of receiving. If you override the currency rate during Purchase Order Receiving, the system uses the following calculation: Price from Purchase Order Entry/current currency conversion rate. Alphanumeric, 1 position; required. |
VAT number |
A number used when calculating foreign currency. Alphanumeric, 20 positions; optional. |
Type of vendor |
Identifies whether the vendor is an actual vendor or a manufacturer. Valid values are: M = Manufacturer V= Vendor Alphanumeric, 1 position; optional. |
EFT account # |
The electronic fund transfer account number for this vendor. Alphanumeric, 20 positions; optional. |
User fields |
Use these fields to enter additional vendor information. The system defaults the value defined in the Vendor user field 3 field to the Item user field 3 field in Work with Item/SKUs (see Performing Initial Item Entry (MITM)) when you create or change an item and the program name INR1156 has been defined in the User function field for the CHGITEM and ADDITMSKU user exit points. See System Operations Working with User Exit Point (WUEP). Alphanumeric, three 10-position fields; optional. |
Screen Option |
Procedure |
Create the Vendor Extended record |
Press F8 to advance to the Change Vendor Extended Screen. |
Enter Email Address for Drop Ship Vendor Window
Purpose: Use this window to enter an email address for a vendor when you use the CWCollaborate Interface or Locate Supplier Direct Fulfillment Interface to process drop ship orders for the vendor.
The CWCollaborate and Locate interfaces automatically send email notification to vendors when you create and send drop ship purchase orders or when you request cancellation of an order line.
Important: If your vendor enters an email address on the CWCollaborate Administration/Vendor Preferences screen or you as a retailer enter an email address on the CWCollaborate Vendor Profile screen, the system uses the CWCollaborate-entered email addresses instead of the email address you enter here for sending new PO notifications or cancellation requests to your vendor. Entering a different address on the CWCollaborate screens, however, does not update the address you enter here.
How to display this screen: Enter C or L in the Drop ship output field on the Second Create Vendor Screen. If you have not entered an email address for the vendor in the Create Vendor Contact Screen, this pop-up window opens.
Enter Email Address for Drop Ship Vendor
Enter
|
Field |
Description |
Email address |
The vendor contact's email address. See Email Address Validation for information on how the system verifies that your entry is formatted correctly. Alphanumeric, 50 positions; optional. |
To change: Enter 3 next to a vendor at the Work with Vendors Screen to advance to the first Change Vendor screen. At this screen you can change any information except the vendor code. See First Create Vendor Screen and Second Create Vendor Screen for field descriptions.
You can display this screen by pressing Page Down at the first Change Vendor screen. See Second Create Vendor Screen for field descriptions.
Screen Option |
Procedure |
Display vendor history |
Press F7 to advance to the Display Vendor History Screen. |
Display vendor extended information |
Press F8 to advance to the Display Vendor Extended Screen. |
Work with vendor contacts |
Press F14 to advance to the Work with Vendor Contacts Screen. |
Display vendor notes |
Press F23 to advance to the . |
To display: Enter 5 next to a vendor at the Work with Vendors Screen to advance to the first Display Vendor screen. You cannot update any information on this screen. See First Create Vendor Screen for field descriptions.
You can display this screen by pressing Page Down at the first Display Vendor screen. See Second Create Vendor Screen for field descriptions.
Screen Option |
Procedure |
Display vendor history |
Press F7 to advance to the Display Vendor History Screen. |
Display vendor extended information |
Press F8 to advance to the Display Vendor Extended Screen. |
Work with vendor contacts |
Press F14 to advance to the Work with Vendor Contacts Screen. |
Display vendor notes |
Press F23 to advance to the Work with Vendor Notes Screen. |
Purpose: Use this screen to review performance statistics for this vendor. The OTHR_ASYNC job updates this information.
How to display this screen: Enter 8 next to a vendor at the Work with Vendors Screen or press F7 at the First Display Vendor Screen or the Second Display Vendor Screen.
POR0256 DISPLAY Display Vendor History 3/05/98 11:05:25 The Mail Order Company
Vendor . . : 1012 ALEX NEWBOLD
Total Open Held Cancelled Number POs : 86 4 Value POs : 1365264.40 2061.00 1850.40 .00
Year Period # POs Value POs
97 12 40 712361.40 98 01 24 632043.00 98 02 9 4500.00 98 03 13 16360.00
F3=Exit F12=Cancel |
Field |
Description |
Vendor |
A code for the supplier of a product or service you purchase. Numeric, 7 positions; display-only. |
Number POs |
The number of purchase orders to date, since adding the vendor to the system. This information is also broken out into open POs (not received or partially received), held POs, and canceled POs. The fields are updated appropriately if you purge purchase orders. Numeric, 7 positions; display-only. |
Value POs |
The value of the purchase orders to date. This information is also broken out into open POs (unreceived or partially received), held POs, and canceled POs. These fields are updated appropriately if you purge purchase orders. Numeric, 7 positions; display-only. |
Year |
The current fiscal year. Numeric, 2 positions (YY format); optional. |
Period |
The current period. A period is user-defined, but usually refers to an accounting month. Accounting periods are defined in and validated against the Accounting Periods file. Numeric, 2 positions; optional. |
# POs |
The number of purchase orders for the year and period. These fields are not updated when you purge purchase orders, and contain true historical (life-to-date) information. Numeric, 7 positions; display-only. |
Value POs |
The value of the purchase orders for the year and period. These fields are not updated when you purge purchase orders and contain true historical (life-to-date) information. Numeric, 7 positions; display-only. |
• review the total dollar value of outstanding (open) A/P invoices for the vendor
• review the dollar value of outstanding (unreceived or partially received) purchase orders for the vendor
• review or define the discount calculation method used for discounts in the Vendor Discount file
• review or define the dollar amount of cash that should be paid against outstanding invoices for the vendor and the weeks on which these payments should be disbursed
• review or define the dollar limits, if any, to impose on additional charges when uploading A/P invoices from the vendor, and the general ledger numbers to use for each type of charge
• review account aging with the vendor
How to display this screen: Press F8 at the First Change Vendor Screen or the Second Change Vendor Screen.
POR0345 CHANGE Change Vendor Extended 5/14/02 12:29:26 EZK Mail Order
Vendor . . . . . . : 4 BIRDS OF A FEATHER
Open A/P . . . . . : 370.00 --A/P Upload Overrides-- On Order . . . . . : 506.47 G/L# $ Limit Priority . . . . . . Frt: 305 1.00 Disc calc method . : Hnd: 20007 1.00 Hold checks . . . . : N (Y,N) Oth: 305 1.00 Week 1 disbursement . N (Y,N) Week 2 disbursement . N (Y,N) Week 3 disbursement . N (Y,N) Week 4 disbursement . N (Y,N) Aging: MONTH 1 . . . : 370.00 MONTH 2 . . . : .00 MONTH 3 . . . : .00 MONTH 4 . . . : .00 MONTH 5 . . . : .00 MONTH 6 . . . : .00
F3=Exit F12=Cancel |
Field |
Description |
Vendor |
A code that identifies the supplier from whom you purchase goods or services. Numeric, 7 positions; display-only. |
Vendor description (Unlabeled field to the right of the Vendor field) |
The name of the vendor. Alphanumeric, 30 positions; display-only. |
Open A/P |
The total dollars of outstanding (unpaid or partially paid) A/P invoices for this vendor. The system looks at the invoice details in an open status in the Invoice Detail file to determine the open A/P balance amount for a vendor. The system: • multiplies the Cost by the number of Units to determine the open invoice amount. • subtracts the Paid amount from the open invoice amount to determine the open A/P balance for each invoice. • totals the open A/P balance for each invoice to determine the total open A/P amount for the vendor. If the Open A/P is out of balance, you can use the Resetting Open A/P (ROAP) menu option to reset the open A/P balance. Numeric, 13 positions with a 2-place decimal; display-only. |
A/P Upload Overrides Note: The following fields display only if the A/P Invoice Upload Division (H70) system control value specifies a valid division. Also, the system performs the checks described below only if the A/P Invoice Upload Auto Accept Batch (H73) system control value is set to Y. These checks are performed only on regular (debit) invoices. See Working with A/P Invoice Upload Errors (WAPU) for an overview on the A/P invoice upload. |
|
The general ledger account number to use for header-level or detail-level freight charges on uploaded A/P invoices. The system uses the following hierarchy to determine the general ledger number to use: Detail-level charges: 1. Use the Freight G/L number for the vendor item, if any; otherwise, 2. Use the Freight G/L number for the vendor, if any; otherwise, 3. Use the A/P Invoice Upload Default Detail General Ledger Number (H72). Header-level charges: 1. Use the Freight G/L number for the vendor, if any; otherwise, 2. Use the A/P Invoice Upload Default Detail General Ledger Number (H72). General ledger numbers are defined in and validated against the General Ledger Account file; see Working with G/L Accounts (WGLA) for more information. Numeric, 8 positions; optional. |
|
The maximum dollar value of each header-level or detail-level freight charge to process without flagging the A/P invoice and suspending it in a batch. Detail-level freight charges: The system checks both this field and the Freight $ limit for the vendor item, if any, and compares the freight charge on the invoice detail line with the lower of the two limits. The invoice is suspended in batch if the freight charge for any detail line exceeds either of the limits. The freight charge is flagged with a code of VND-DTLFRT or VIT-DTLFRT on the A/P Invoice Upload Report. If there is no Freight $ limit specified for either the vendor or the vendor item, the system creates the invoice in open status. Note: The detail-level freight charge is a flat charge; it is not multiplied by the unit quantity on the invoice detail line. Header-level freight charges: The invoice is suspended in batch if the freight charge on the order header exceeds this limit. If there is no Freight $ limit specified for the vendor, the system creates the invoice in open status. The freight charge is flagged with a code of VND-HDRFRT on the A/P Invoice Upload Report. Numeric, 9 positions with a 2-place decimal; optional. |
|
The general ledger account number to use for header-level or detail-level handling charges on uploaded A/P invoices. The system uses the following hierarchy to determine the general ledger number: Detail-level charges: 1. Use the Handling G/L number for the vendor item, if any; otherwise, 2. Use the Handling G/L number for the vendor, if any; otherwise, 3. Use the A/P Invoice Upload Default Detail General Ledger Number (H72). Header-level charges: 1. Use the Handling G/L number for the vendor, if any; otherwise, 2. Use the A/P Invoice Upload Default Detail General Ledger Number (H72). General ledger numbers are defined in and validated against the General Ledger Account file; see Working with G/L Accounts (WGLA) for more information. Numeric, 8 positions; optional. |
|
The maximum dollar value of each header-level or detail-level handling charge to process without flagging the A/P invoice and suspending it in a batch. Detail-level handling charges: The system checks both this field and the Handling $ limit for the vendor item, if any, and compares the handling charge on the invoice detail line with the lower of the two limits. The invoice is suspended in batch if the handling charge for any detail line exceeds either of the limits. The handling charge is flagged with a code of VND-DTLHND or VIT-DTLHND on the A/P Invoice Upload Report. If there is no Handling $ limit specified for either the vendor or the vendor item, the system creates the invoice in open status. Note: The detail-level handling charge is a flat charge; it is not multiplied by the unit quantity on the invoice detail line. Header-level handling charges: The invoice is suspended in batch if the handling charge on the order header exceeds this limit. If there is no Handling $ limit specified for the vendor, the system creates the invoice in open status. The handling charge is flagged with a code of VND-HDRHND on the A/P Invoice Upload Report. Numeric, 9 positions with a 2-place decimal; optional. |
|
The general ledger account number to use for header-level or detail-level “other” (miscellaneous) charges on uploaded A/P invoices. The system uses the following hierarchy to determine the general ledger number: Detail-level charges: 1. Use the Other G/L number for the vendor item, if any; otherwise, 2. Use the Other G/L number for the vendor, if any; otherwise, 3. Use the A/P Invoice Upload Default Detail General Ledger Number (H72). Header-level charges: 1. Use the Other G/L number for the vendor, if any; otherwise, 2. Use the A/P Invoice Upload Default Detail General Ledger Number (H72). General ledger numbers are defined in and validated against the General Ledger Account file; see Working with G/L Accounts (WGLA) for more information. Numeric, 8 positions; optional. |
|
The maximum dollar value of each header-level or detail-level “other” (miscellaneous) charge to process without flagging the A/P invoice and suspending it in a batch. Detail-level “other” charges: The system checks both this field and the Other $ limit for the vendor item, if any, and compares the “other” charge on the invoice detail line with the lower of the two limits. The invoice is suspended in batch if the “other” charge for any detail line exceeds either of the limits. The “other” charge is flagged with a code of VND-DTLOTH or VIT_DTLOTH on the A/P Invoice Upload Report. If there is no Other $ limit specified for either the vendor or the vendor item, the system creates the invoice in open status. Note: The detail-level “other” charge is a flat charge; it is not multiplied by the unit quantity on the invoice detail line. Header-level “other” charges: The invoice is suspended in batch if the “other” charge on the order header exceeds this limit. If there is no Other $ limit specified for the vendor, the system creates the invoice in open status. The “other” charge is flagged with a code of VND-HDROTH on the A/P Invoice Upload Report. Numeric, 9 positions with a 2-place decimal; optional. |
|
This value indicates whether A/P checks should go on hold automatically when you generate them through the Accounts Payable system. If so, an authorized user must remove the hold status so that the checks can be issued. This field defaults to N upon creation of the Vendor Extended record; however, if the A/P Vendor Hold Status (A37) field in the Accounts Payable area of the Secured Features file is set to *ALLOW, you may override this value to Y. |
|
|
The following pop-up window appears if you change the value in this field after creating A/P invoices with the default held status: Confirm Global Update
Vendor Check Print Status is: Y
Press ENTER to update all existing Invoices with the new Status or press F12 to cancel update of Invoice records.
F12=Cancel
Press Enter to update all unpaid vendor invoices with the new status; otherwise, press F12 so only newly entered invoices use this status. Alphanumeric, 1 position; required. |
On order |
The total dollar value of purchase orders which are outstanding (unreceived or partially received) for this vendor. Numeric, 13 positions with a 2-place decimal; display-only. |
Priority |
The Cash Disbursement priority, in a range from 9 (highest priority) to 0 (lowest priority). When determining which A/P invoices to pay during check generation, the system searches the vendors in descending priority sequence (9-0). Numeric, 1 position; optional. |
A code that defines the calculation method used for the three discounts defined in the Vendor Discounts file. Valid values are: C = Combined discount. This discount method combines the total dollar amount of all 3 discounts to determine the net cost. T = Tiered discount. This discount method calculates the largest discount against the purchase order's gross cost, then the second largest discount is calculated against the net result of the first discount, and the third largest discount is calculated against the net result of the second discount. Blank = No discount is applied. If you leave this field blank, you cannot to apply any discounts when working with a purchase order or an A/P invoice, regardless of your entries in the discount fields. Note: These discounts do not apply to drop ship purchase orders. See Combined Discount Calculation and Tiered Discount Calculation for examples of each discount calculation. Alphanumeric, 1 position; required if using vendor discounts. |
|
Week 1-4 disbursements |
These fields indicate the dollar amount of cash that should be paid against outstanding A/P invoices received from this vendor. There are four week disbursements so that the Accounts Payable department can set up a schedule of payments to make to this vendor. These disbursements are particularly helpful when trying to monitor cash flow. Numeric, 11 positions with a 2-place decimal; optional. |
Week 1-4 (Y/N) |
This value Indicates whether to perform disbursements for week 1, 2, 3, or 4. Valid values: Y = Vendor payments for week 1, 2, 3, or 4 are disbursed. N (default) = Vendor payments for week 1, 2, 3, or 4 are not disbursed. Alphanumeric, 1 position; optional. |
Aging |
The dollar amount of all A/P invoices for a vendor assigned to the appropriate aging buckets. Numeric, 11 positions with a 2-place decimal; display-only, updated by the system. |
Display Vendor Extended Screen
Purpose: Use this screen to review:
• the total dollar value of outstanding (open) A/P invoices for the vendor
• the dollar value of outstanding (unreceived or partially received) purchase orders for the vendor
• the discount calculation method used for discounts in the Vendor Discount file
• the dollar amount of cash that should be paid against outstanding invoices for the vendor and the weeks on which these payments should be disbursed
• the dollar limits, if any, to impose on additional charges when uploading A/P invoices from the vendor, and the general ledger numbers to use for each type of charge
• account aging with the vendor
How to display this screen: Press F8 at the First Display Vendor Screen or the Second Display Vendor Screen.
For more information: See Change Vendor Extended Screen for a screen sample and field descriptions. You cannot change any information on this screen.
Work with Vendor Discounts Screen
Purpose: Use this screen to create vendor discounts to apply against the gross cost of the purchase order in Purchase Order Entry/Maintenance (see Purchase Order Line Discount Screen), receiving and in Accounts Payable Entry.
How to display this screen: Enter 7 next to a vendor on the Work with Vendors Screen.
The following message displays if you have not defined a Discount calc (Discount calculation method) in the Vendor Extended file:
Discount Calculation Method not defined for Vendor.
POR0444 CHANGE Work with Vendor Discounts 3/05/98 12:40:22 The Mail Order Company
Vendor # : 1012 US VENDOR
Discount Percent Unit Discount Trade Coop Special
F3=Exit F12=Cancel |
Field |
Description |
Vendor # |
A user-defined code to identify the supplier of an item. Vendor codes are defined in and validated against the Vendor file. See Numeric, 7 positions; display-only. |
Vendor description (Unlabeled field to the right of the Vendor field) |
The name of the vendor. Alphanumeric, 30 positions; display-only. |
Discount (Discount fields) |
The names of the three discount fields. These fields are controlled by the Discount 1 Field (D97), Discount 2 Field (D98), and Discount 3 Field (D99) values in the System Control file. The discount fields appear blank if values have not been defined. Note: The system calculates the primary discount on a purchase order before calculating any discounts defined in the Vendor Discount file. Alphanumeric, 11 positions; display-only. |
Percent |
The percentage the system applies against the unit cost of an item on the purchase order. If you enter a discount percentage, you cannot enter a unit discount for the same discount field. The system calculates discount percentages before subtracting any dollar discounts. Note: The system calculates percentage discounts based on the method defined in the Discount calc (Discount calculation method) field in the Vendor Extended file. See Combined Discount Calculation and Tiered Discount Calculation for examples of each. Numeric, 11 positions with a 4-place decimal; optional. |
Unit discount |
The dollar amount the system subtracts from the unit cost of an item on the purchase order. If you enter a unit discount amount, you cannot enter a discount percentage for the same discount field. Note: The system calculates percentage discounts based on the method defined in the Discount calc (Discount calculation method) field in the Vendor Extended file. See Combined Discount Calculation and Tiered Discount Calculation for examples of each. Numeric, 11 positions with a 4-place decimal; optional. |
Instructions: Use the following steps to create a vendor discount:
1. Complete the Percent or Unit discount field for each discount field label. If you leave both the Percent and Unit discount fields blank, no discount applies for this label.
2. Press Enter. The system validates your entries and highlights any fields you need to correct. Correct any fields again.
3. The discounts you have entered apply to all purchase orders entered for this vendor. These discounts are calculated based on the method you have entered in the Discount calc (Discount calculation method) field in the Vendor Extended file.
See Combined Discount Calculation and Tiered Discount Calculation.
Note: The calculation of discounts in a foreign currency is not currently implemented.
The combined discount calculation method combines the values of all 3 discounts to determine the net cost. Any discount percentages defined for the discounts are calculated before the unit discounts are applied.
Note: The Combined Discount Calculation does not apply to drop ship purchase orders.
Example: An example of the combined discount calculation method is:
Cost of item = $100.00
Primary discount (defined in Vendor file) = 10%
Discount 1 = $10.00 (unit discount)
Discount 2 = 20% (percentage discount)
Discount 3 = 10% (percentage discount)
Step 1: Calculate the primary discount percentage
cost ($100.00) x primary discount (10%) = unit discount amount for primary discount ($10.00)
Step 2: Subtract the primary discount amount from the cost
cost ($100.00) - primary discount ($10.00) = cost after primary discount ($90.00)
Step 3: Calculate discount 2 percentage
cost ($90.00) x discount 2 (20%) = unit discount amount for discount 2 ($18.00)
Step 4: Calculate discount 3 percentage
cost (90.00) x discount 3 (10%) = unit discount amount for discount 3 ($9.00)
Step 5: Add discount amounts 1, 2 and 3 together
discount 2 ($18.00) + discount 3 ($9.00) + discount 1 ($10.00) = combined discount ($37.00)
Step 6: Subtract the total combined discount amount from the cost
cost ($90.00)- total combined discount (37.00) = net cost ($53.00)
The tiered discount calculation method calculates:
• the largest discount against the item's cost, then
• the second largest discount is calculated against the net result of the first discount, then
• the third largest discount is calculated against the net result of the second discount
Any discount percentages defined for the discount fields are calculated before the unit discounts are applied.
Note: The Tiered Discount Calculation does not apply to drop ship purchase orders.
Example: An example of the tiered discount calculation method is:
Cost of item = $100.00
Primary discount (defined in Vendor file) = 10%
Discount 1 = $10.00 (unit discount)
Discount 2 = 20% (percentage discount)
Discount 3 = 10% (percentage discount)
Step 1: Calculate the primary discount percentage
cost ($100.00) x primary discount (10%) = unit discount amount for primary discount ($10.00)
Step 2: Subtract the primary discount amount from the cost
cost ($100.00) - primary discount ($10.00) = cost after primary discount ($90.00)
Step 3: Calculate the largest discount percentage
cost ($90.00) x discount 2 (20%) = largest discount amount ($18.00)
Step 4: Subtract the largest discount amount from cost
gross cost ($90.00) - largest discount ($18.00) = net of first calculation ($72.00)
Step 5: Calculate the 2nd largest discount percentage
net of first calculation ($72.00) x discount 3 (10%) = second largest discount amount ($7.20)
Step 6: Subtract the 2nd largest discount amount from cost
net of first calculation ($72.00) - second largest discount amount ($7.20) = net of second calculation ($64.80)
Step 7: Subtract the 3rd largest discount amount from cost
net of second calculation ($64.80) - third largest discount amount ($10.00) = net of third calculation ($54.80)
Work with Vendor Contacts Screen
Purpose: Use this screen to create, change, delete or display contacts for a specific vendor.
How to display this screen: Enter 14 next to a vendor on the Work with Vendors Screen, or press F14 on the First Change Vendor Screen, First Display Vendor Screen, Second Change Vendor Screen, or Second Display Vendor Screen.
POR0480 DISPLAY Work with Vendor Contacts 3/05/98 12:00:16 The KL Mail Order Company
Vendor: 101 US VENDOR
Opt Seq# Contact Name Title Type
Type options, press Enter. 2=Change 4=Delete 5=Display
1 ALEX NEWBOLD MANAGER T 3 BERNADETTE T MIRANDA BUYER R 5 CATHERINE M MASI ADMINISTRATION U 7 EARL CAREY MANAGER I 9 HOLLY VANESSE SALES H 11 JEREMY CLEGG SALES ADMINISTER T 13 JULIE-MARIE BROWN ACCOUNTANT U 15 MICHELLE SLOSBERG MARKETING Y 17 ROBERT LYNN PUBLIC RELATIONS E +
F3=Exit F6=Create F8=Resequence F12=Cancel F21=Print list |
Field |
Description |
Vendor |
The vendor number and description associated with the vendor contacts. Vendor number: numeric, 7 positions; display-only. Vendor description: alphanumeric, 30 positions; display-only. |
The sort sequence number assigned to this vendor contact. This number determines how the vendor contacts display on the screen and on the Vendor Contact Listing (F21 to print). If you do not define a sort sequence number, the system assigns a sequence number of 0 to the vendor contact. Note: If you are using CWCollaborate to automatically process drop ship orders for this vendor, you must enter the sequence number 999 to insure that email notifications are automatically sent to the vendor when you create drop ship purchase orders for this vendor. See Enter Email Address for Drop Ship Vendor Window for more information. |
|
|
You can press F8 to resequence each vendor contact that displays on the screen in increments of 2. For example contact 1 = sequence # 0 contact 2 = sequence # 0 contact 3 = sequence # 5 contact 4 = sequence # 8 When you press F8, the system resequences the vendor contacts in the following order: contact 1 = sequence # 1 contact 2 = sequence # 3 contact 3 = sequence # 5 contact 4 = sequence # 7 Numeric, 3 positions; optional. |
Contact name |
The name of the vendor contact. Alphanumeric, 30 positions; optional. |
Title |
The contact's title within the organization. Alphanumeric, 30 positions; display-only. |
Type |
A user-defined field to identify the address type. This field is informational only. Alphanumeric, 1 position; optional. |
Screen Option |
Procedure |
Create a vendor contact |
Press F6 to advance to the Create Vendor Contact Screen. |
Change a vendor contact |
Enter 2 next to a vendor contact to advance to the Change Vendor Contact Screen. |
Delete a vendor contact |
Enter 4 next to a vendor contact to delete it. |
Display a vendor contact |
Enter 5 next to a vendor contact to advance to the Display Vendor Contact Screen. |
Resequence the sequence number for each vendor contact |
Press F8. The system assigns sequence numbers to each vendor contact in increments of 2. |
Purpose: Use this screen to create a vendor contact.
How to display this screen: Press F6 on the Work with Vendor Contacts Screen.
POR0481 ENTER Create Vendor Contact 3/05/98 12:41:39 The KL Mail Order Company
Vendor . . . . . . . : 101 US VENDOR
Contact name . . . . . Contact title. . . . . Address. . . . . . . . 10 SPEEN STREET
City/St/Postal/Cntry . FRAMINGHAM MA 01701 USA Phone#/Ext . . . . . . Fax#/Ext . . . . . . .
Email address . . .
Address type . . . . . Sort Sequence #. . . .
F3=Exit F12=Cancel |
Field |
Description |
Vendor |
The vendor number and description associated with the vendor contact you are creating. Vendor number: numeric, 7 positions; display-only. Vendor description: alphanumeric, 30 positions; display-only. |
Contact name |
The name of the vendor contact. Alphanumeric, 30 positions; required. |
Contact title |
The contact's title within the company. Alphanumeric, 30 positions; optional. |
Address |
Address lines 1, 2 and 3 for the vendor contact. The vendor's address defaults. Alphanumeric, 32 positions; address line 1 required, address lines 2 and 3 optional. |
City/St/Postal/Cntry (City, state, postal code, country) |
The city, state, postal zip code and country associated with the vendor contact. The vendor's city, state, postal code and country defaults. If the Require state field for the country in the vendor contact address is set to Y, the system requires a state code for the vendor address: State is required for this country. Note: The system does not validate the contact’s address in the same way it validates a customer’s address, as in order entry. For example, it does not validate that the state is associated with the SCF for the postal code. City: alphanumeric, 25 positions; required. State: alphanumeric, 2 positions; optional. Postal code: numeric, 10 positions; optional. Country: alphanumeric, 3 positions; required. |
Phone #/Ext (Telephone number and extension) |
The vendor contact's telephone number and extension. You can define a telephone number format to map to the phone numbers operators enter into the system. See Customer Service Setting Up the Country File (WCTY) for information on telephone number formats. Phone #: alphanumeric, 14 positions; optional. Extension: alphanumeric, 4 positions; optional. |
Fax #/Ext (Facsimile machine telephone number) |
The telephone number for the vendor's facsimile (fax) machine. Enter this telephone number if faxing purchase orders and drop ship picks to the vendor through the Fax Interface (Fax PO = Y). If you enter a fax number, this number defaults into the Print and/or Fax Pop-Up Window that appears at the purchase order header screen when you press F19 in purchase order entry or maintenance, or F9 in purchase order inquiry. Fax number: alphanumeric, 14 positions; optional. Extension: alphanumeric, 4 positions; optional. |
Email address |
The vendor contact's email address. Used for email notifications for vendors fulfilling drop ship purchase orders through CWCollaborate Interface or Locate Supplier Direct Fulfillment Interface. See Email Address Validation for information on how the system verifies that your entry is formatted correctly. Alphanumeric, 50 positions; optional. |
Address type |
A user-defined field to identify the address type. This field is informational only. Alphanumeric, 1 position; optional. |
The sort sequence number assigned to this vendor contact. This number determines how the vendor contacts display on the screen and on the Vendor Contact Listing (F21 to print). If you do not define a sort sequence number, the system assigns a sequence number of 0 to the vendor contact. Note: If you are using CWCollaborate to automatically process drop ship orders for this vendor, you must enter the sequence number 999 to insure that email notifications are automatically sent to the vendor when you create drop ship purchase orders for this vendor. See Enter Email Address for Drop Ship Vendor Window for more information. |
|
|
You can press F8 on the Work with Vendor Contacts Screen to resequence each vendor contact that displays on the screen in increments of 2. For example contact 1 = sequence # 0 contact 2 = sequence # 0 contact 3 = sequence # 5 contact 4 = sequence # 8 When you press F8, the system resequences the vendor contacts in the following order: contact 1 = sequence # 1 contact 2 = sequence # 3 contact 3 = sequence # 5 contact 4 = sequence # 7 Numeric, 3 positions; optional. |
To change: Enter 2 next to a vendor contact at the Work with Vendor Contacts Screen to advance to the Change Vendor Contact screen. You can change any information on this screen except the vendor. See Create Vendor Contact Screen.
To display: Enter 5 next to the vendor contact at the Work with Vendor Contacts Screen to advance to the Display Vendor Contact screen. You cannot change any information on this screen. See Create Vendor Contact Screen.
Work with Vendor FOB Address Screen
Purpose: Use this screen to create, change, delete or display multiple FOB addresses for a specific vendor.
FOB (freight on board) address is the location where title to merchandise being shipped passes from the seller to the buyer. If the FOB address is an Origin type, ownership of the merchandise passes from seller to buyer at the origin of the shipping route, and the buyer is responsible for transportation costs and risk of loss or damage from that point. If the FOB address is a Destination type, ownership of the merchandise passes from seller to buyer at the receiving point for the merchandise, and the seller is responsible for transportation costs and risk of loss or damage until the merchandise reaches its destination.
How to display this screen: Enter 15 next to a vendor on the Work with Vendors Screen.
POR0593 DISPLAY Work with Vendor FOB Address 5/18/99 15:16:31 EZK MAIL ORDER COMPANY
Vendor: 101 US VENDOR
Opt Type City St Postal cd Freight terms
Type options, press Enter. 2=Change 4=Delete 5=Display
D BOSTON MA 02053 30 DAYS O FRAMINGHAM MA 01701 ONCE D ACTON MA 01718 90 DAYS D LOS ANGELES CA 90003 ABC1234567 D DENVER CO 45620 30 DAYS O FRAMINGHAM MA 01701 30 DAYS
F3=Exit F6=Create F12=Cancel F21=Print List |
Field |
Description |
Vendor |
The vendor number and description associated with the vendor. Vendor number: numeric, 7 positions; display-only. Vendor description: alphanumeric, 30 positions; display-only. |
Type |
This code identifies the address as an Origin (O) or Destination (D) type. An Origin (O) type FOB address specifies the location from which merchandise is being shipped, and indicates that ownership of merchandise being shipped transfers to the buyer when it leaves the vendor's warehouse (at the point of its shipping origin). A Destination (D) type FOB address specifies the location to which merchandise is being shipped, and indicates that ownership of the merchandise transfers to the buyer when it arrives at its destination. Alphanumeric, 1 position,; display-only. |
City |
The city of the FOB address. Alphanumeric, 25 positions; display-only. |
State |
The state of the FOB address. The system validates that the state you enter is assigned to the SCF in the first three positions of the postal code. Alphanumeric, 2 postions; display-only. |
Postal code |
The zip code of the FOB address. Alphanumeric, 10 postions; display-only. |
Freight terms |
The freight terms for this vendor and this FOB address. Alphanumeric, 10 postions; display-only. |
.
Screen Option |
Procedure |
Create a vendor FOB address |
Press F6 to advance to the Create Vendor FOB Address Screen. |
Change a vendor FOB address |
Enter 2 next to a Vendor FOB address to advance to the Change Vendor FOB Address Screen. |
Delete a vendor FOB address |
Enter 4 next to a vendor FOB address to delete it. |
Display a vendor FOB address |
Enter 5 next to a vendor FOB address to advance to the Display Vendor FOB Address Screen. |
Create Vendor FOB Address Screen
Purpose: Use this screen to create a vendor FOB address.
How to display this screen: Press F6 on the Work with Vendor FOB Address Screen.
POR0603 ENTER Create Vendor FOB Address 5/18/99 16:58:14 EZK MAIL ORDER COMPANY
Vendor: 101 US VENDOR
Postal code . . . City . . . . . . State . . . . . . Country . . . . . Freight Terms . . FOB Type . . . .
F3=Exit F12=Cancel |
Field |
Description |
Vendor |
The vendor number and description of the vendor for whom you are creating an FOB address. Vendor number: numeric, 7 positions; display-only. Vendor description: alphanumeric, 30 postions; display-only. |
Postal code |
The zip code of the Vendor FOB address. Alphanumeric, 10 postions; required. |
City |
The city of the vendor FOB address. Alphanumeric, 25 positions; required. |
State |
The state of the vendor FOB address. If the Require state field for the country in the vendor FOB address is set to Y, the system requires a state code for the vendor address: State is required for this country. Alphanumeric, 2 postions; required. |
Country |
The country of the vendor FOB address Note: If the system control value Use Zip/City/State Defaulting? (B13) is set to Y, the City, State and Country fields automatically display the correct address information when you enter a zip code in the Postal Code field. Alphanumeric, 3 postions; required. |
Freight terms |
A brief description of the freight terms for this vendor FOB address. Alphanumeric, 10 positions; required. |
FOB type |
This code identifies the FOB type for this address. Valid types are Destination (D) and Origin (O). Enter D in this field if the FOB address is the location to which merchandise is being shipped; this indicates that title to the merchandise passes from the seller to the buyer when the merchandise reaches its destination. Enter O in this field if the FOB address is the location from which merchandise is being shipped; this indicates that title to the merchandise passes from the seller to the buyer as soon as the merchandise leaves the seller's dock (its shipping origin). Alphanumeric, 1 position; required. |
Change Vendor FOB Address Screen
To change: Enter 2 next to a vendor FOB address at the Work with Vendor FOB Address Screen to advance to the Change Vendor FOB Address screen. You can change any information on this screen except vendor number and vendor name. See Create Vendor FOB Address Screen for field descriptions.
Display Vendor FOB Address Screen
To display: Enter 5 next to a vendor FOB address at the Work with Vendor FOB Address Screen to advance to the Display Vendor FOB Address screen. You cannot change any information on this screen. See Create Vendor FOB Address Screen for field descriptions.
Purpose: Use this screen to display, add, or change free-form notes about this vendor. You can work with vendor notes through purchase order entry, receiving, and inquiry.
How to display this screen: At the Work with Vendors Screen, enter 23 next to a vendor; or press F23 from the:
• Work with Purchase Order Screen (Header) (PO entry)
• PO Entry - Maintain Detail Screen (PO entry)
• PO Maintenance - Maintain Detail Screen (PO maintenance)
• First Display Purchase Order Detail Screen (PO inquiry)
INR0464 CHANGE Work with Vendor Notes 3/05/98 12:26:19 The Mail Order Company
Vendor : 1012 US VENDOR Note Print
F3=Exit F8=Add/Change F12=Cancel |
Field |
Description |
Note |
Fields for you to enter free-form text. Alphanumeric, 60 positions (each line); optional. |
Defines whether each vendor note prints or whether it is for informational purposes only. B = Print the message on the purchase order and PO receiving worksheet. P = Print the message on the purchase order. W = Print the message on the PO receiving worksheet. Blank = Do not print the message on the purchase order or receiving worksheet; the message is informational only. Alphanumeric, 1 position; optional. |
| Working with Purchase Order Ship Via (WPSV) | Contents | SCVs | Search | Glossary | Reports | Solutions | XML | Index | Working With PO Additional Charges (WPAC) |

ME02_03 CWDirect 18.0.x 2018 OTN