12 Understanding STA Analytics
This section provides concepts and tasks to help you interpret and use the data provided by STA. It assumes a basic understanding of STA features and functions.
This chapter includes the following sections:
Data Retention
Data in the STA data store is retained indefinitely as a historical record and never deleted. However, data for removed resources—libraries, drives, and media—may be hidden from the STA data screens depending on the Data Handling settings for your username. See "Removed Drives and Media" and "Removed Libraries" for details.
When STA first begins tracking a library, drive, or media, that resource is assigned an STA Start Tracking timestamp. If the resource is later removed from the library environment, an STA Stop Tracking timestamp is assigned. And then if the resource is later re-added, the STA Start Tracking attribute reflects the original timestamp assigned when STA first began tracking the resource.
Note:
Periodically, the MySQL Event Scheduler purges processed SNMP records from the database to minimize database growth.Incomplete Exchanges
A media exchange may take from seconds to hours to process and complete depending on the nature of the initiating host request. To perform full analytics on an exchange and update drive and media health, STA must receive information from both the media mount and dismount events. If a library connection is dropped while exchanges are in process, you may notice incomplete exchanges on the Exchanges Overview screen.
Following are some reasons why library connections may be dropped:
-
You manually delete a library connection through the STA user interface.
-
You stop STA to perform server maintenance or an STA upgrade.
-
There is a power or network outage affecting the STA server.
When the library connection is restored, STA processes and reports all new exchanges normally. While the connection is down, however, STA receives no exchange information, which has the following effects:
-
STA receives no record of exchanges that start and finish completely during the connection down time. These exchanges do not appear on the STA screens and are not used in calculating drive or media health.
-
STA receives only partial information for exchanges that either start or finish while the connection is down. For example, for exchanges that start while the connection is down and finish after it has been restored, STA receives only the dismount information. Conversely, STA receives only the mount information for exchanges that start while the connection is up but finish while it is down. For these partial exchanges, STA does not have enough information to perform full analytics, and attributes such as Drive and Media Health, Exchange Elapsed Time, Exchange Mount Time, and Media and Drive Exchange Status on the Exchanges Overview screen are set to null or "Unknown". Additionally, these exchanges are not used in calculating drive or media health.
Dimmed Values on STA Screens
At times you may see data elements or resource identifiers that are dimmed—or grayed out—on the screen. While these data elements are usually active links leading to additional detail, the dimmed values are not links. Following are elements that may be dimmed:
-
Removed drives; see "Removed Drives and Media" for details.
-
Removed media; see "Removed Drives and Media" for details.
-
Exchanges not yet complete; once the exchange completes, the identifier is no longer dimmed, and the link is active.
-
Alert Event types for which a corresponding element does not exist
Dimmed data elements may also be the result of an upgrade in progress. They gradually become active links as they are processed.
Removed Drives and Media
By default, drives and media that have been removed from your tape library environment do not appear on the STA screens. The Data Handling preferences for your STA username allow you to turn on the display of removed drives, removed media, or both. Your selections take effect immediately, so depending on your needs, you can selectively show or hide removed drives and media throughout your login session. See the following sections for additional detail:
-
The STA Screen Basics Guide for instructions on changing these display settings.
-
"Identifying Removed Drives and Media" for how removed drives and media are displayed on Overview screens.
-
"Impact of Removed Drives and Media on Calculated Totals" for how calculated values are affected by these display settings.
Note:
Data for removed drives and media is never removed from the STA data store. See "Data Retention" for details.Identifying Removed Drives and Media
If you choose to display removed drives or media, they are identified by the following attribute values on the Drives – Overview and Media – Overview screens:
-
The STA Stop Tracking date indicates the date and time when STA determined the drive or media no longer exists in any of the monitored libraries. Because there may be a lag between the time when a drive or media is removed and when the library notifies STA of the change, this value may differ slightly from the time when the item was physically removed.
-
The following attributes are set to "REMOVED":
-
Library Complex Name
-
Drive Library Name or Media Library Name
-
Library Model
-
Partition Type
-
Partition Name
-
Physical Address
On activity screens, such as Exchanges – Overview and Media Validation Overview, the identifiers for removed drives and media are dimmed. See "Dimmed Values on STA Screens" for details.
-
Impact of Removed Drives and Media on Calculated Totals
STA provides both current information about your tape library system and historical information collected over time. As drives and media are added and removed from your system, the total number of drives and media used for STA calculations also varies. These variations can result in differences between a historical summary value, such as a 30-day rolling average, and a corresponding value calculated using only currently displayed records.
-
Historical summaries—Rolling 30-day and daily summaries and averages are always calculated based on the number of drives and media in the system during the reporting period; therefore, they are not affected by the removed drives and media settings for your STA username. For example, a drive removed on day 10 of a 30-day period will be included in calculating summaries and averages for the first 10 days of the period, but not for the remaining 20 days. See "How Removed Drives and Media Affect Calculated Summaries" for examples.
-
Currently Displayed Values—Totals and aggregations displayed on Overview and Analysis screens are calculated based on the number of records currently displayed; therefore, they are affected by the removed drives and media settings for your STA username. For example, if your removed drives display setting is turned off, removed drives will not be listed on the Drives – Overview screen, nor will they be included in the total record count on that screen, nor in the aggregations on the Drives – Analysis screen. See "How Removed Drives and Media Affect Overview and Analysis Screens" for examples.
How Removed Drives and Media Affect Calculated Summaries
STA calculates a wide variety of daily and 30-day summary attributes, such as megabytes read, written, sent, and received; number of drive errors and cleans; and percent drive utilization. Drives and media are included in calculating these values up until the time they are removed from the tape library system.
For example, removing a drive from a monitored library at 17:00 on April 15 has the following impacts to these summary values:
-
Daily summaries — The drive's activity for April 15 before 17:00 is included in the day's daily summaries. Because the drive has been removed, it will not have any activity to include in daily summaries for April 16 and beyond.
-
30-day summaries — The drive's activity is included in all 30-day summaries for April 15 and the next 30 days, although the number of days' activity included will be reduced with each succeeding day, as the 30-day window moves forward. The 30-day summary on May 15 will be the first one that does not include any activity for the drive.
How Removed Drives and Media Affect Overview and Analysis Screens
This section provides examples illustrating the effects of your removed drives and media display settings on the following screens.
Note:
While these examples focus on removed drives, the same principles and screen display characteristics apply to removed media and the "Show Removed Media" settings.Drives – Overview Screen
Figure 12-1 shows the Drives – Overview screen after the "Show Removed Drives" setting has been selected. Removed drives are listed on the Drives – Overview screen, and the total number of records includes the removed drives. In this example, there are a total of 1,024 drives, and drive HU180214PT is highlighted to show that the Library Complex Name and Drive Library Name both indicate "REMOVED," and the date the drive was removed is displayed in the STA Stop Tracking column.
Figure 12-1 Drives – Overview Screen, Show Removed Drives Setting "On"
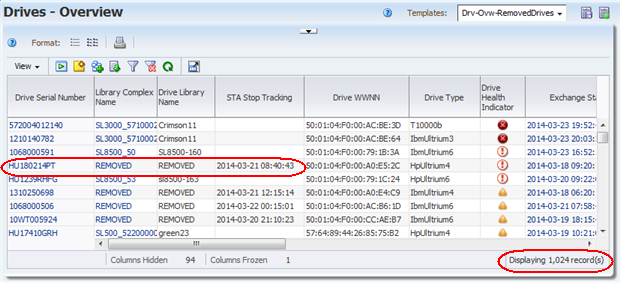
Description of ''Figure 12-1 Drives – Overview Screen, Show Removed Drives Setting "On"''
Figure 12-2 and Figure 12-3 show the Drives – Overview screen after the "Show Removed Drives" setting has been deselected. Removed drives are not listed on the Drives – Overview screen, and the total number of records does not include removed drives. In Figure 12-2, there are a total of 936 drives, and the STA Stop Tracking date is blank for all drives displayed.
Figure 12-2 Drives – Overview Screen, Show Removed Drives Setting "Off"
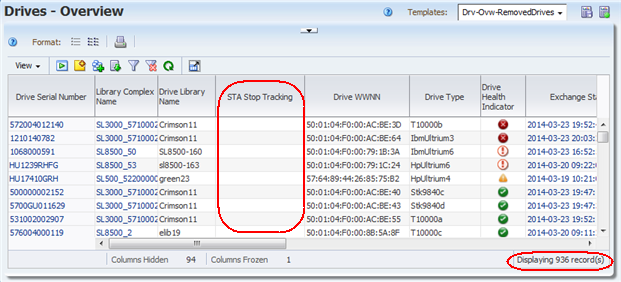
Description of ''Figure 12-2 Drives – Overview Screen, Show Removed Drives Setting "Off"''
In Figure 12-3, the Drives – Overview screen has been filtered to show all drives with serial numbers starting with "HU180214." The removed drive HU180214PT does not appear in the list.
Figure 12-3 Drives – Overview Screen, Show Removed Drives Setting "Off" and Filtered for a Known Removed Drive
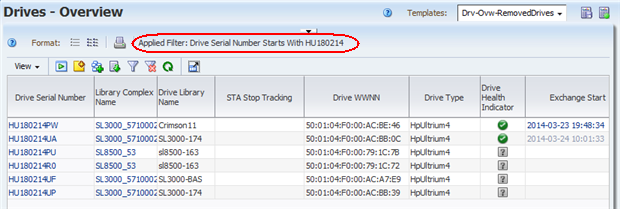
Description of ''Figure 12-3 Drives – Overview Screen, Show Removed Drives Setting "Off" and Filtered for a Known Removed Drive''
Drives – Analysis Screen
Figure 12-4 shows the Drives – Analysis screen after the "Show Removed Drives" setting has been selected. Aggregated data for removed drives are included under the headings Library Complex Name "REMOVED" and Drive Library Number "-1". The total number of drives is 1024, and the total removed drives is 88.
Figure 12-4 Drives – Analysis Screen, Show Removed Drives Setting "On"
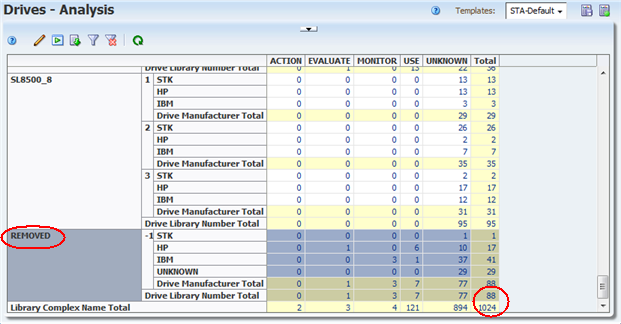
Description of ''Figure 12-4 Drives – Analysis Screen, Show Removed Drives Setting "On"''
Figure 12-4, shows the Drives – Analysis screen after the "Show Removed Drives" setting has been deselected. Aggregated data for removed drives are not included in the table. There are no headings for Library Complex Name "REMOVED" and Drive Library Name "-1". The total number of drives is 936.
Figure 12-5 Drives – Analysis Screen, Show Removed Drives Setting "Off"
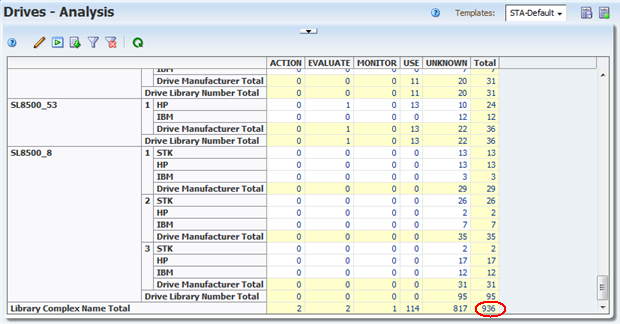
Description of ''Figure 12-5 Drives – Analysis Screen, Show Removed Drives Setting "Off"''
Exchanges and Cleaning Activities Screens
The Exchanges Overview and Drive Cleanings Overview screens always show exchanges involving removed drives and media, regardless of your display settings. All screen attributes indicate the values at the time of the exchange.
In Figure 12-6, the "Show Removed Drives" setting is selected. The "Drive Serial Number" entries for removed drives are active links to the Drives – Overview, Detail View screen.
Figure 12-6 Exchanges Overview Screen, Show Removed Drives Setting "On"
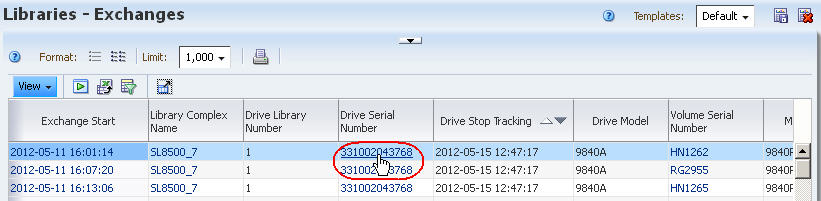
Description of ''Figure 12-6 Exchanges Overview Screen, Show Removed Drives Setting "On"''
In Figure 12-7, the "Show Removed Drives" setting is deselected. The "Drive Serial Number" entries for removed drives are dimmed and are not active links.
Figure 12-7 Exchanges Overview Screen, Removed Drives Setting "Off"
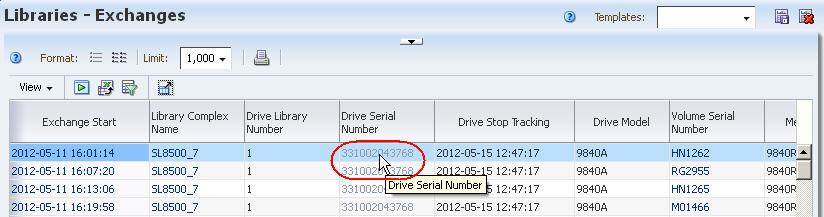
Description of ''Figure 12-7 Exchanges Overview Screen, Removed Drives Setting "Off"''
Alerts Overview Screen
The Alerts Overview screen always shows alerts involving removed drives and media, regardless of your display settings. Alerts are always retained, even after the associated drive or media has been removed.
In the following example, your "Show Removed Drives" setting has been deselected. STA is monitoring LibraryABC, which has 60 drives, and two drives are responsible for all 27 drive alerts seen in the last 30-day period. The two drives are subsequently removed from the library.
On the Drives – Overview screen, the value of the Drive Alerts (30 Days) attribute is "0" for all drives in LibraryABC. This is because the drives responsible for all 27 alerts have been removed from the library.
On the Alerts Overview screen filtered by "Alert Type Is Drive", 27 alerts are shown.
Media Validation Overview Screen
Pending STA media validation requests for removed drives and media remain in the validation request queue until you explicitly cancel them. See "Cancel Pending Media Validation Requests" for details
Removed Libraries
If you remove a library from the tape library environment, the following updates are made immediately to the STA screens:
-
STA no longer collects data from the library, and you can delete the STA server trap recipient from the library SNMP configuration.
-
The library is removed from the Libraries Overview and Complexes Overview screens.
-
The drives and media included in the library are removed from the Drives and Media screens.
-
All exchanges and cleaning activities that have occurred in the library are removed from Exchanges Overview and Drive Cleanings Overview screens.
-
All messages for the library and its drives and media are removed from the Drives Messages, Media Messages, and All Messages Overview screens.
-
Pending STA media validation requests remain in the validation request queue until you explicitly cancel them. See "Cancel Pending Media Validation Requests" for details
See "Remove a Library Connection From STA" for instructions.
Although the library data is removed from the user interface screens, it is never removed from the STA data store. If you later restore a connection to the library, all existing library data is made available on the STA screens again. See "Data Retention,".
What Happens to Data When an SL8500 Library is Moved to a New Complex
Note:
This information applies to SL8500 libraries only; other library models cannot be moved between complexes.Because STA rolls up all data to the applicable library complex, moving an SL8500 library from one complex to another affects the way data is displayed, sorted, and filtered on all STA screens.
In STA, each library complex is identified by a unique Library Complex Name. For SL8500 complexes, the value for this attribute is a concatenation of the library model and the complex ID—for example, SL8500_1 or SL8500_53. Oracle Service manually assigns the SL8500 complex ID to the library when it is installed and ensures that each complex at your site has a unique ID. See the STA Installation and Configuration Guide for additional details about complex IDs.
All SL8500 libraries in a multi-library complex share the same Library Complex Name, and if a library is moved from one complex to another, its Library Complex Name changes to reflect the new complex ID. This affects how data for the library is rolled up and displayed, as described in the following scenario.
-
An SL8500 library, "BigLibrary1", is assigned to a complex with two other libraries. Oracle Service assigns ID 1 to the complex.
-
In STA, you create a connection to BigLibrary1. The Library Complex Name for BigLibrary1 is SL8500_1.
-
STA monitors BigLibrary1, and all data for the library is rolled up to Library Complex Name SL8500_1.
-
After three months, you decide to move BigLibrary1 to a new complex. You remove the STA connection to BigLibrary1, and all data for the library is retired, as described in "Removed Libraries".
-
Oracle Service moves BigLibrary1 to the new complex, which has complex ID 2.
-
You reestablish the STA connection to BigLibrary1. This has the following effects on new and historical data for the library:
-
Because BigLibrary1 is now in complex ID 2, the STA Library Complex Name for the library is SL8500_2, and all data collected by STA from this point forward is rolled up to that Library Complex Name.
-
All historical data, from the first three-month period, is still rolled up to Library Complex Name SL8500_1.
-
When you sort or filter data by Library Complex Name, the data for BigLibrary1 is associated to two different complexes, depending on the time period.
-
"Missing" Media
Media must be in a library storage cell or drive at the time of a data collection in order for it to be detected (see "Maintaining SNMP Connections and the STA Data Store" for details about the data collection process). Media in a "transient" location is not detected by a data collection. Transient locations are defined as any of the following:
-
Robot hand
-
Elevator — SL8500 libraries only
-
Pass-thru port (PTP) — SL8500 complexes only
-
Drive, at the time of library initialization; that is, the library was re-initialized while the media was left in the drive.
The STA application includes logic to handle these transient movements — media that has unexpectedly "disappeared" is kept on the STA screens in anticipation of detecting it again within a specific short period of time. STA removes the media from the screens only if it still does not detect the media within that time period. Although this is a rare occurrence, you are most likely to observe it in an SL8500 complex, where media cartridges are frequently transferred from one library to another through pass-thru ports (PTPs).
If you cannot find a volume serial number (VSN or volser) that you expect to see on the Media – Overview screen, it is recommended that you do the following:
-
Verify that you have the correct volser.
-
Filter the Media – Overview screen for that volser, to be sure it is really missing from the list.
-
If the volser appears on the Media – Overview screen, check the Start Tracking, End Tracking, and Ejected Date attributes. The Ejected Date indicates the media was ejected through a cartridge access port (CAP) or access expansion module (AEM) (SL3000 libraries), or mailslot (SL150 libraries).
-
If the media has an End Tracking date but no Ejected Date, the media may have been removed from the library environment by an unsupported method, such as through an open library door. On the Dashboard, check the Media Exception Report portlet. This report lists media that has left the library through a means other than a CAP, AEM, or mailslot.
-
Initiate a manual data collection on the library in which you expect the media to be located. See "Perform a Manual Data Collection" for instructions.
Duplicate Volume Serial Numbers
In the STA data store, media history is retained by volume serial number (VSN or volser). That is, all history for a particular piece of media is tied to its volser. For this reason, it is recommended that you avoid duplicate volume serial numbers (VSNs or volsers) in the tape environment monitored by STA. Volsers should be unique across all monitored libraries. Duplicate volsers will result in co-mingling of data for different pieces of media.
Volsers are considered to be duplicates only if the media with the same volser also have the same domain and type. Domain identifies the media format, and type identifies the version, as illustrated in the following examples:
-
LTO6 – "LTO" is the domain and "6" is the type.
-
T10000T1 – "T10000" is the domain and "T1" is the type.
The same volser used on two different LTO4 cartridges would be considered duplicate, while the same volser on an LTO4 cartridge and an LTO5 or T10000T1 cartridge would not.
True duplicate volsers may occur for a variety of reasons, such as:
-
In the case of cleaning media, there are only 999 globally available volsers. Large tape environments with 1,000 or more cleaning media will of necessity have duplicate volsers.
-
Various tape management applications may allow duplicate volsers. This is the case only for libraries with SCSI host connections —SL150, SL500, and some SL3000 libraries. Libraries with Host Library Interface (HLI) host connections — SL8500 and some SL3000 libraries — use Oracle's StorageTek Enterprise Library Software (ELS) or Oracle's StorageTek Automated Cartridge System Library Software (ACSLS), which do not allow duplicates.
Following are situations in which there may appear to be duplicate volsers, but in fact there is just one media and the volser is unique:
-
A media is moved from one library to another.
-
A media is ejected from a library, taken off site for some time, and then re-entered into a library.
"Duplicate Detected" Flag on Exchanges
The Duplicate Detected flag appears on the Exchanges Overview screen and indicates that the volser involved in the exchange is a duplicate — the media has the same volser as another media of the same domain and type but with a different media serial number (MSN). If you find exchanges with this flag, you should investigate and determine whether to assign a different volser to one of the media, as the data for the two will be co-mingled. See the STA Data Reference Guide for additional information.
Note:
Only some drive types and firmware levels report MSNs; therefore, with some drive types, STA may not receive all the information necessary to detect duplicate volsers.Mapping Host and STA Drive Identifiers
In STA, tape drives can be identified by drive serial number, World Wide Name (WWN), or physical location within the library. However STA does not know, and cannot display, the logical device ID that a host uses to identify a drive. If you want to map the host drive identifiers to the STA identifiers, you must do this manually.
Mainframe Identifiers
Mainframe hosts use a four-digit hexadecimal drive ID (0000–FFFF) to identify a drive. To map the host identifiers to the STA identifiers, you can use Oracle's Enterprise Library Software (ELS) Display DRives command on the mainframe host. The IDEntity option lists the mainframe hexadecimal ID, serial number, and WWN for each drive. Following is an example of the command output.
Example 12-1 Sample ELS Display DRives Command Output
DISPLAY DRIVES IDENTITY
.SLS4633I Display Drives Command 994
 DRIVE LOCATION MODEL WORLD WIDE NAME SERIAL NUMBER
 0A10 00:02:01:08 T9840D 50:01:04:F0:00:79:18:CD 5700GU008737
 0A11 00:02:01:09 T9840D 50:01:04:F0:00:79:18:C1 5700GU006080
 0B04 01:01:01:14 T9940B 50:01:04:F0:00:89:A7:74 479000025047
 0B05 01:02:01:14 T9940B 50:01:04:F0:00:89:A7:44 479000026693
 0B06 01:02:01:15 T1B35 50:01:04:F0:00:89:A7:68 572004003720
 0B07 01:02:01:11 T1B35 50:01:04:F0:00:89:A7:68 572004003720
You can issue this command from a variety of locations on the mainframe host, including the operator console or an SMCUUUI utility batch job. Optionally, you can save the output of the command to a.csv or .xml file. See the ELS Command, Control Statement, and Utility Reference manual for complete details about usage, syntax, and options.
Open Systems Identifiers
On open systems hosts (Linux and Solaris), logical device names for tape drives are found in the /dev/rmt directory. To map the host logical names to the STA identifiers, you can do a long listing (ls -l) of this directory. The command output shows the logical device name and the pointer to the raw device file, which includes the WWN for the drive. Following is an example of the output on Linux; the logical device name and WWN for each drive are highlighted in bold type.
Example 12-2 Sample Linux /dev/rmt Directory Listing
# ls -l /dev/rmt
lrwxrwxrwx 1 root root 86 Jan 31 16:31 /dev/rmt/0cbn ->../../devices/pci@79,0/pci10de,377@a/pci1077,171@0/fp@0,0/tape@w500104f000b8050e,0:cbn
lrwxrwxrwx 1 root root 86 Jan 31 16:31 /dev/rmt/1cbn ->../../devices/pci@79,0/pci10de,377@a/pci1077,171@0/fp@0,0/tape@w500104f000b80511,0:cbn
#