Implementing Configurable User Profile Synchronization
This section provides an overview of configurable user profile synchronization and discusses how to:
Enable Security PeopleCode options.
Set up configurable user profile synchronization.
When you implement configurable user profile synchronization among databases, you can select, or configure, the fields containing data for which you want to subscribe.
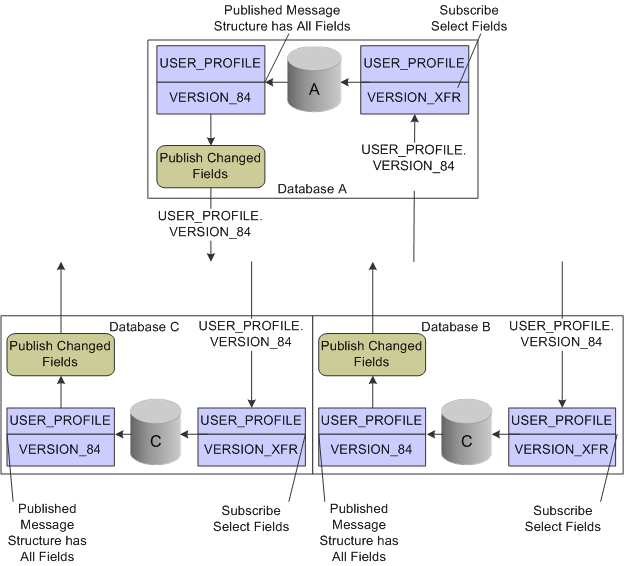
All participating databases use the USER_PROFILE service operation and the USER_PROFILE.VERSION_84 message to publish user profile information.
All participating databases use the USER_PROFILE_XFR service operation and the USER_PROFILE.VERSION_XFR message to subscribe to the incoming data. You configure the USER_PROFILE_XFR inbound routing with a USER_PROFILE.VERSION_84 external alias. This alias enables the subscribing databases to receive the inbound USER_PROFILE.VERSION_84 message and transform it based on your field configuration.
The USER_PROFILE.VERSION_XFR message definition excludes only the following record.fields by default:
PSOPRDEFN.OPRCLASS
PSOPRDEFN.ROWSECCLASS
PSOPRDEFN.SYMBOLICID
PSOPRDEFN.PRCSPRFLCLS
PSOPRDEFN.DEFAULTNAVHP
The subscription PeopleCode for the USER_PROFILE_XFR service operation will fail if any expected records are missing or out of order. It will also fail if certain record.fields are not in the USER_PROFILE.VERSION_XFR message. The following is a list of the required record.fields for the USER_PROFILE.VERSION_XFR message to function:
PSOPRDEFN.OPRID
PSOPRALIAS.OPRALIASTYPE
PSROLEUSER_VW.ROLENAME
RTE_CNTL_USERVW.ROLENAME
RTE_CNTL_USERVW.RTE_CNTL_PROFILE
PSUSEREMAIL.EMAILTYPE
PSUSEREMAIL.EMAILID
Image: Diagram of the flow of user profile information as it uses configurable synchronization among three PeopleSoft databases
This diagram shows the service operations and messages, and the way in which user profile data is published by and subscribed to by three PeopleSoft systems that use configurable user profile synchronization.
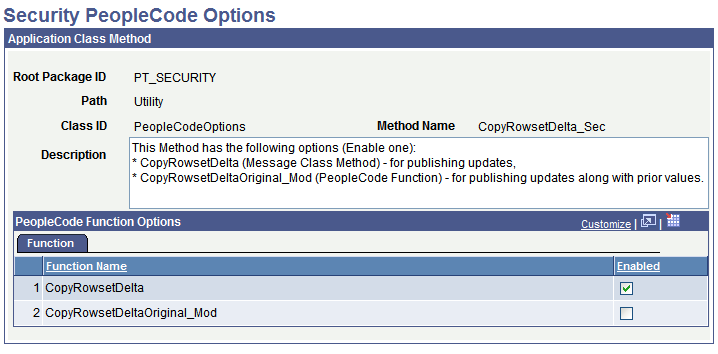
Access the Security PeopleCode Options page ().
Image: Security PeopleCode Options page
This example illustrates the fields and controls on the Security PeopleCode Options page.
|
Field or Control |
Definition |
|---|---|
| Application Class Method |
Application classes, at their base level, are PeopleCode programs. In addition, application classes provide more structure. Using the Application Packages, you have a clear definition of each class, as well as its listed properties and methods, which makes it easier for you to create a complex program that uses many functions. This group box displays information about the PT_SECURITY application package. |
| PeopleCode Function Options |
This group box displays the available PeopleCode functions for the CopyRowsetDelta_Sec method, which you use to implement user profile synchronization. |
| Function Name |
Select from these two functions:
|
| Enabled |
Select a check box to choose the type of user profile synchronization. You can enable only one option in the list of functions. |
To set up configurable user profile synchronization:
Turn on the Pub/Sub servers.
In each publishing database, access the Security PeopleCode Options page and enable the CopyRowsetDeltaOriginal_Mod PeopleCode function.
Define the local gateway URL for Integration Broker.
In each participating database, activate the domain in Integration Broker.
In each participating database, create and configure the remote nodes.
See Configuring Nodes.
In each participating database, configure single signon by setting up each subscribing database as a trusted node.
In each participating database, define the gateway properties; include all PeopleSoft nodes.
In each participating database, deactivate the inbound generated USER_PROFILE.VERSION_84 routing definition.
See Activating and Inactivating Routing Definitions in the Routing Component.
Note: This step is necessary only if you implemented standard user profile synchronization and are switching to configurable user profile synchronization.
In each participating database, configure and activate the routings for the USER_PROFILE service operation.
In each publishing database, you must create outbound routings to each subscribing node. For example, if you are in a CRM database publishing to an HCM and a FIN database, you must create two outbound routings.
See Activating and Inactivating Routing Definitions in the Routing Component.
In each participating database, activate the USER_PROFILE_XFR service operation.
In each participating database, configure the routings for the USER_PROFILE.VERSION_XFR service operation.
In each subscribing database, select the Generate Any-to-Local check box to create the necessary inbound routings or create point-to-point inbound routings.
In each publishing database, change the external alias on the Parameters page to USER_PROFILE.VERSION_84.
In each subscribing database, grant permission list security for the USER_PROFILE_XFR service operations.
In each subscribing database, configure the USER_PROFILE.VERSION_XFR message definition:
Expand the User Profile message records.
Select the fields that you want the subscribing database to update.
Clear the fields that you want the subscribing database to ignore.
Save the message.