12Calendar
Calendar
This chapter describes how to use the calendar. It does not apply to users who integrate Microsoft Outlook with their applications. It includes the following topics:
About the Calendar
Use the Calendar screen to manage your time and scheduled activities. You can choose the visual format that you want for the calendar. These formats include the daily, weekly, or monthly calendar format. In the Calendar screen, you can schedule activities, view activities, invite participants to meetings, view your tasks in a To Do list, and print your calendar.
Note the following about using calendar:
An explicit click is required to make a date selection in the calendar.
The current date is not assumed as the default date.
Calendar does not show a time zone drop down list for Sales Orders.
A 7 day view is not available for calendar.
The following image shows an example of the Calendar screen.

Each activity that appears in the calendar is highlighted in the color associated with the Status field value of that activity. The color legend for the calendar shows only those colors that appear in the displayed calendar, not all possible colors. The Siebel administrator can change the colors for Status field values and change the field that determines activity color from the Status field to another field, such as the Type field. For more information about customizing these colors and fields, see Configuring Siebel Open UI.
All-day events appear in a reserved slot at the start of the calendar screen. By default, the all day slot does not appear in the calendar, and must be enabled by your Siebel administrator. For more information about customizing the calendar all day slot, see Configuring Siebel Open UI.
Your working hours for the current date and future dates are denoted by line that represents the beginning of your workday (or the current time), and a line that represents the end of your workday. You can change the start time and the end time of your workday. For more information about changing your workday start and end times, see Length of a Workday.
In the Activities screen, you can create an activity with a planned start time, and the activity is automatically placed on your calendar. Changing the information for a scheduled activity on the calendar changes the same information in the Activities screen. Similarly, changing information about an activity in the Activities screen changes the same information in the calendar.
Some views in the Calendar screen display a To Do list. Activities that you specify as To Do activities appear in your To Do list. You can view your uncompleted To Do activities in this list.
Calendar Formats
The configuration of your application determines the availability of certain features. Therefore, the calendar formats you see can differ from the calendar formats described in this topic. Calendar format buttons appear in the Calendar screen. The following table describes the calendar format buttons.
Table Calendar Format Buttons
Button |
Button Name |
Description |
|---|---|---|
Switch to daily view |
Displays your activities that are scheduled for the selected day. |
|
Switch to week view |
Displays your activities that are scheduled for the selected week. You can designate a 5 Day Weekly format or a 7 Day Weekly format in your user preferences. For more information, see Default Calendar Formats. |
|
Switch to month view |
Displays your activities that are scheduled for the selected month. |
If the current date appears in the calendar format, then that date is automatically selected and highlighted when you access a calendar. If you click a time slot in the calendar, then that time slot is also highlighted.
You can navigate to a date from a calendar format in the following way:
Click the navigation buttons on either side of the calendar title to navigate to the previous calendar interval or to the next calendar interval as required.
The calendar title determines the calendar interval to which you navigate. For example, if the calendar title is August 6 - 12, 2012, then the calendar is in the weekly calendar format.
Click the Today link to navigate to the current date when the current date does not appear in the displayed calendar format.
Click the calendar select button to navigate to a date. This date does not have to appear in the displayed calendar format.
When you click the calendar select button, you access the calendar control. Unlike the calendar control for fields, the calendar control for the Calendar screen does not include an OK button and a Now button that you can click to select a date. In the calendar control for the Calendar screen, you click a date to select the date. For more information about the calendar control, see Calendar Control.
In the monthly calendar format, click a date in the calendar.
Calendar Views
Calendar views are available in screens, such as Accounts, Contacts, Campaigns, Projects, and Opportunities. Each Calendar view allows you to create activities without navigating to the Calendar screen and leaving the current screen.
Calendar views in screens allow you to associate activities with an active record. For example, if you create a new activity in the Calendar view of the Accounts screen, then the new activity applies to the Account and Site fields in the active account record.
You can navigate to a date in Calendar views in the same way that you navigate to a date in Calendar screens. For more information about this date navigation, see Calendar Formats.
This date navigation is available only if administrators configure calendar views in screens for the Siebel Web client application. For more information about this configuration, see Configuring Siebel Open UI.
Viewing Activities
Activities can appear in the Activities screen, in the Calendar, and in the To Do list. The place where an activity appears depends on the place where you create it. The following table explains where activities appear.
Activities cannot appear in the Calendar and the To Do list at the same time.
Table Where Activities Appear
If you create an activity here |
Then the activity automatically appears here |
Comments |
|---|---|---|
Calendar screen |
Calendar screen Activities screen |
None. |
To Do list |
To Do list Activities screen |
None. |
Activities screen |
The location associated with value you select from the drop-down list for the Display In field |
Values in the drop-down list for the Display In field include: Calendar and Activities, To Do and Activities, Activities Only, and Communication and Activities. If you choose Calendar and Activities in the Display In field, but do not assign a start time to the activity, then the activity does not appear in your calendar. If you choose Communication and Activities in the Display In field and Email - Inbound in the Type field, then the activity appears in Communications List view of the Communications screen. |
About Activity Defaults
When you create a new calendar activity, some fields are populated with default values. The following table describes these values as they appear in a preconfigured application.
Table Default Values for Calendar Activity Fields
Field |
Default Value |
|---|---|
Type |
Appointment. |
Start |
Date and time that is determined by the way you create the activity. If you select a single time slot or multiple time slots in the calendar, then the default Start value is the date and start time for that time slot or group of time slots. If you click New Record (the plus (+) icon), then the default Start value is the calendar date to which you navigate and the start time of the time slot that begins after the current time. For example, if the current time is 11:02 A.M. and the calendar interval in your user preferences is 15 minutes, then the start time defaults to 11:15 A.M. |
Duration |
Default value, in minutes, in your user preferences. |
End |
Start time plus the value in the Duration field. |
Owner |
Your user ID in the application when you view your calendar, and another user ID when you view another user’s calendar. |
Recurring Activity Defaults
When you create a recurring activity, the End By field defaults to a predetermined value that is based on the value you select from the drop-down list for the Repeat Type field. You can change this predetermined value as needed.
The following table shows the default values for the End By field. For more information about recurring activities, see Creating Recurring Calendar Activities.
Table Default Values for End By Field
If Repeat Type value is... |
Then the default End By value is... |
|---|---|
Daily |
Today plus 7 days |
Weekly |
Today plus 90 days |
Monthly |
Today |
Yearly |
Today |
Viewing Calendar Activities
You can view and manage activities in the daily, weekly, or monthly format of your calendar. You can specify any of the calendar formats as the default format in the Calendar screen. For more information, see Default Calendar Formats.
To view calendar activities
Navigate to the Calendar screen.
The calendar appears, showing the daily calendar format.
(Optional) Click a button to change the calendar format.
For more information, see Calendar Formats.
Place your cursor over the hyperlink for an activity description to view details about that activity.
Adding Activities to the Calendar
You can add activities to any time slot in the calendar. You can designate the time for your work hours in your user preferences. For more information, see Length of a Workday.
To add an activity to the calendar
Navigate to the Calendar screen.
(Optional) Navigate to a date in the calendar.
If you complete this step, then the value in the Start field of the Calendar Detail form includes the date to which you navigate. The Calendar Detail form appears when you complete the next step. For information about navigating to a date in the calendar, see Calendar Formats.
In the daily, weekly, or monthly calendar format, click New Record (the plus (+) icon).
The Calendar Detail form appears.
Complete the fields.
Click Save This One.
The activity appears in your calendar and in the Activities screen.
Entering Activities Directly in the Calendar
In the daily and weekly calendar format, you can enter an activity directly in the calendar.
To enter an activity directly in the calendar
Navigate to the Calendar screen.
In the daily or weekly calendar format, click the time slot for which you want to create the activity.
To create an activity that spans multiple time slots, then click the first time slot and with the mouse button depressed, move the activity to the last time slot and then release the mouse button.
In the New Event dialog box, enter a description, and click OK.
The activity appears in your calendar and in the Activities screen.
Deleting Calendar Activities
You can delete an activity from any calendar format in the Calendar screen. However, you cannot delete read-only activities. Read-only activities include the following activities:
Some activities imported from other applications, such as Microsoft Outlook or Microsoft Exchange.
Activities that you do not own in your calendar.
Activities that you can only view in the calendars of other users.
Activities that are protected by industry-specific functionality.
For example, some call records in the Life Sciences application are read-only. You can delete the call record, but not the calendar activity for the call record.
To delete an activity
Navigate to the Calendar screen.
In the daily, weekly, or monthly calendar format, click the hyperlink for an activity description to access the activity.
The Calendar Detail form appears.
Click Delete This One.
If you are the primary employee for the activity, then deletes the activity from every participant’s calendar. If you are a non-primary employee for the activity, then deletes the activity from only your calendar.
Creating Recurring Calendar Activities
You might find that you want to schedule recurring activities, such as meetings. Instead of creating a new meeting every time a recurring meeting occurs, you can create one activity and set the activity to repeat at specific times to create a series of meetings.
To create a recurring calendar activity
Navigate to the Calendar screen.
In the daily, weekly, or monthly calendar format, click New Record (the plus (+) icon).
The Calendar Detail form appears.
Complete the fields.
The following table describes some fields.
Field
Description
Alarm
(Optional) Select this check box to activate an alarm for the activity.
A user preference automatically activates the alarm each time you create an activity. For more information, see Activating Alarms for All Calendar Activities.
Repeat Type
Select a value to designate how often you want this activity to recur. For more information about the Repeat Type value, see Recurring Activity Defaults.
Select the appropriate option for the value that you select in the Repeat Type field.
End By
(Optional) Select the date on which you want the activity to stop recurring by selecting this option and clicking the Calendar button in the field.
Click Save This One.
Changing Recurring Activities to Nonrecurring Activities
You can change a recurring activity to a nonrecurring activity.
To change a recurring activity to a nonrecurring activity
Navigate to the Calendar screen.
In the daily, weekly, or monthly calendar format, click the hyperlink for an activity description to access the activity.
The Calendar Detail form appears.
From the drop-down list for the Repeat Type field, choose Non-Repeating.
Click Save All.
All future instances of the activity are deleted. The activity for the current day and previous days are not deleted.
Deleting Recurring Calendar Activities
When you delete a recurring activity, you can choose to delete just one instance or every instance of the activity.
Complete the procedure in this topic to delete one instance of a recurring activity.
To delete a recurring activity
Navigate to the Calendar screen.
In the daily, weekly, or monthly calendar format, click the hyperlink for an activity description to access the activity.
The Calendar Detail form appears.
Do one of the following:
Click Delete This One.
Deletes the current instance of the activity. Every other instance is still scheduled
Click Delete All.
Deletes every instance of the recurring activity from the current day forward. Any instances of the recurring activity before the current day remain on the calendar.
Adding Activities in the To Do List
The To Do list appears in the Calendar screen next to the calendar format.
To Do activities have the following characteristics:
They are activities that have a Type field value of To Do.
They carry forward every day until they are marked complete.
They do not appear in the Calendar itself.
To add a To Do activity
Navigate to the Calendar screen.
In the To Do list, click New (the plus (+) icon).
A blank row appears in the list.
Enter values in the Description and Due fields.
(Optional) To add more information to the activity, drill down on the Description field hyperlink of the activity.
Marking To Do Activities Complete
To Do activities remain in your To Do list and carry forward to the next day until they are complete. Use the Done check box to mark a To Do activity as complete. After an activity is marked complete, that activity does not appear in the To Do list when the Calendar screen is refreshed. Only incomplete items appear in the To Do list.
To mark a To Do activity as complete
Navigate to the Calendar screen.
In the To Do list, select the To Do activity you want to mark as complete.
Select the Done check box.
Changing Activities
After adding an activity to your calendar, you can change the activity. You drill down on the activity and make changes in the Calendar Detail form. For more information, see the following:
Changing Nonrecurring Activities
Complete the procedure in this topic to change nonrecurring activities.
To change a nonrecurring activity
Navigate to the Calendar screen.
In the daily, weekly, or monthly calendar format, click the hyperlink for an activity description to access the activity.
The Calendar Detail form appears.
Make the necessary changes, and click Save This One.
Changing Recurring Activities
Complete the procedure in this topic to change recurring activities. When you change a recurring activity, you must make sure to save it properly.
To change a recurring activity
Navigate to the Calendar screen.
In the daily, weekly, or monthly calendar format, click the hyperlink for an activity description to access the activity.
The Calendar Detail form appears.
Make the necessary changes, and click one of the following buttons:
Save This One. Saves the changes you make to the current recurring activity, changes the activity to a non-recurring activity, and does not change every other recurring activity in the series.
For example, a recurring activity is scheduled to occur daily from August 21 until August 25. If you change the August 23 instance of the activity and click Save This One, then only the August 23 activity changes. This activity also becomes non-recurring and is no longer associated with the other activities in the series.
Save All. Saves changes you make to the current recurring activity and to all subsequent recurring activities in the series. However, the changes are not applied to any activities that are scheduled before the current activity.
For example, a recurring activity is scheduled to occur daily from August 21 until August 25. If you change the August 23 activity and click Save All, then the activities scheduled for August 23, August 24, and August 25 change, but the activities scheduled for August 21 and August 22 do not change.
Rescheduling Activities
Changing the date fields
Moving the activity
Stretching the activity border
Changing Date Fields
In any calendar format, you can change date fields to reschedule activities.
To reschedule an activity by changing date fields
Navigate to the Calendar screen.
In the daily, weekly, or monthly calendar format, click the hyperlink for an activity description to access the activity.
The Calendar Detail form appears.
Change the value in the Start field.
Change the value in the End field.
Moving Activities
In the daily and weekly calendar format, you can move an activity to reschedule the activity.
To reschedule an activity by moving the activity
Navigate to the Calendar screen.
In the daily or weekly calendar format, click to select the activity time slot on the calendar and with the mouse button depressed, move the activity to a different time slot on the calendar and then release the mouse button.
Stretching Activity Borders
In the daily and weekly calendar format, you can stretch the cell borders for an activity to reschedule the activity.
To reschedule an activity by stretching the activity border
Navigate to the Calendar screen.
To change a start time for the activity, do the following:
Place the cursor over the upper border of the activity.
A line with arrowheads appears.
Click to select the activity’s upper border and with the mouse button depressed, move the border to an earlier or later time and then release the mouse button.
To change an end time for the activity, do the following:
Place the cursor over the lower border of the activity.
A line with arrowheads appears.
Click to select the activity’s lower border and then move the border to an earlier or later time.
Adding Participants to Activities
When you add an activity to your calendar, you might also want to add the people who participate in the activity. You can add participants to the activity on your calendar. Participants can include contacts and employees.
Participants can also include resources, such as a projector or a conference room. For more information, see Using the Participant Availability Subview.
Adding Contacts to Activities
You can add contacts to activities.
To add contacts to an activity
Navigate to the Calendar screen.
In the daily, weekly, or monthly calendar format, click the hyperlink for an activity description to access the activity.
The Calendar Detail form appears with the Participants list beneath it.
In the Participants list, click Add Contact.
The Add Contacts dialog box appears.
Select one or more contact records, and then click OK.
The selected contacts appear in the Participants list and are part of the activity.
Adding Employees to Activities
You can add employees to an activity.
To add employees to an activity
Navigate to the Calendar screen.
In the daily, weekly, or monthly calendar format, click the hyperlink for an activity description to access the activity.
The Calendar Detail form appears with the Participants list beneath it.
In the Participants list, click Add Employee.
The Add Employees dialog box appears. Use Query (the magnifying glass icon) in the Employees list to find an employee as required.
Select one or more employee records, and then click OK.
The selected employees appear in the Participants list and are part of the activity.
(Optional) Review the Participants list to verify an employee’s availability.
Adding Resources to Activities
You can add resources to an activity.
To add resources to an activity
Navigate to the Calendar screen.
In the daily, weekly, or monthly calendar format, click the hyperlink for an activity description to access the activity.
The Calendar Detail form appears with the Participants list beneath it.
In the Participants list, click Add Resource.
The Pick Resource dialog box appears.
Query for the type of resource you are looking for.
Select one or more records, and click Check Availability.
Only the resources that you select in step 4 appear. A check mark appears in the Available column for any resource that is available during the time of the activity.
Select the available or unavailable resources that you want to add to the activity, and then click OK.
The selected resources appear in the Participants list.
Removing Participants from Activities
You can remove contacts, employees, and resources from an activity using the Calendar Detail form.
Removing Contacts from Activities
You can remove contacts from activities.
To remove contacts from an activity
Navigate to the Calendar screen.
In the daily, weekly, or monthly calendar format, click the hyperlink for an activity description to access the activity.
The Calendar Detail form appears with the Participants list beneath it.
To remove a single contact:
Click the contact name in the Participants list to select the contact.
Click Delete (the trash can icon).
Click OK when prompted to confirm the deletion.
To remove multiple contacts:
In the Contacts field of the Calendar Detail form, click the multiple select button.
The Contacts dialog box appears showing a list of Available and a list of Selected contacts for the activity.
-
In the Selected list, do one of the following:
Select the contact that you want to remove from the activity, and then click Remove (the single arrow pointing backward). Repeat as required.
Select Remove All (the double arrows pointing backward) to remove all contacts from the activity.
Click OK.
Removing Employees from Activities
You can remove employees from activities.
To remove employees from an activity
Navigate to the Calendar screen.
In the daily, weekly, or monthly calendar format, click the hyperlink for an activity description to access the activity.
The Calendar Detail form appears with the Participants list beneath it.
To remove a single employee:
Click the employee name in the Participants list to select the employee.
Click Delete (the trash can icon).
Click OK when prompted to confirm the deletion.
To remove multiple employees:
In the Employees field of the Calendar Detail form, click the multiple select button.
The Employees dialog box appears showing a list of Available and a list of Selected employees for the activity.
In the Selected list, do one of the following:
Select the employee that you want to remove from the activity, and then click Remove (the single arrow pointing backward). Repeat as required.
Select Remove All (the double arrows pointing backward) to remove all employees from the activity.
The removed employees no longer appear in the list of selected employees.
- Click OK.
Removing Resources from Activities
You can remove resources from activities.
To remove resources from an activity
Navigate to the Calendar screen.
In the daily, weekly, or monthly calendar format, click the hyperlink for an activity description to access the activity.
The Calendar Detail form appears with the Participants list beneath it.
To remove a resource, do the following:
Click the resource name in the Participants column of the Participant Availability subview to select the resource.
Click Delete (the trash can icon).
Click OK when prompted to confirm the deletion.
Using the Participant Availability Subview
The Participant Availability subview that appears after the Calendar Detail form provides more information about an activity and its participants.
The following image shows an example of the participant availability subview.
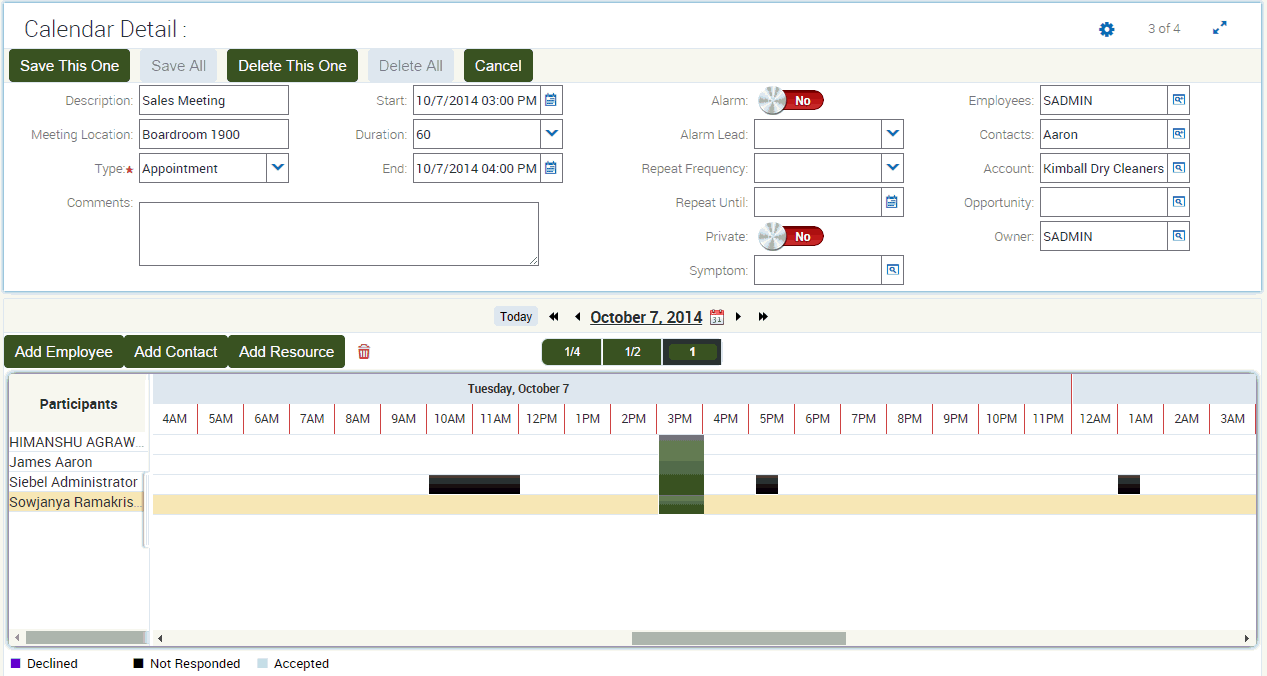
The following information describes the participant availability subview and how to use it:
The participant availability subview consists of two panes as follows:
The Calendar in the main pane showing activity scheduling information.
The Participants list in the side pane.
Click Add Employee, Add Contact, or Add Resource to add new participants to an activity.
Click the participant name in the Participants column, and click Delete (the trash can icon) to remove an existing participant from an activity.
Contacts that appear in this subview have no associated schedules.
All the schedules you see in the Participant Availability subview are converted to the time zone specified in your time zone preferences. For example, if your calendar displays Pacific time, and you are viewing an activity involving a user in the Eastern time zone, then the Eastern time zone user’s schedule is converted to Pacific time for you. If the Eastern time zone user is looking at the same activity in the calendar, then the schedule is converted to Eastern time.
Navigating to a date in the Participant Availability subview is similar to navigating to a date in the calendar. For more information about calendar navigation, see Calendar Formats.
Double navigation arrows are available to navigate to one week forward or one week back.
You can advance the schedule to a future date by using the horizontal scroll bar after the schedule. To see more than three days after the activity's current date, then you must reset the start date in the Calendar Detail form.
Click the hour increment buttons (1/4, 1/2, and 1) to change the time increments that appear in the schedule.
You can choose to display only your work hours or all 24 hours of the day. For more information, see Default Display for Participant Schedule.
Scheduled activities appear as blocks on the calendar. The blocks are highlighted in the color associated with the Status field of the activity. The color legend shows only those colors that appear in the schedule, not all possible colors.
The start time of the current activity is denoted with a line, and the end time of the current activity is denoted with a line.
Any changes you make in the Calendar Detail form are automatically reflected in the Participant Availability subview.
Reassigning Activities
After creating an activity and adding employees to it, you might want to reassign the activity to a different employee. That is, you might want to make a different employee the primary employee for the activity.
To reassign an activity
Navigate to the Calendar screen.
In the daily, weekly, or monthly calendar format, click the hyperlink for an activity description to access the activity.
The Calendar Detail form appears.
In the Employees field, click the multiple select button.
The Employees dialog box appears showing the list of selected employees for the activity, and the primary employee appears with a check mark in the Primary field.
You must change the primary employee to reassign the activity.
If the employee to whom you want to assign the activity does not appear in the Selected list of employees, then select the employee in the Available list of employees, and then click Add (the single arrow pointing forward) to add the employee to the Selected list of employees.
When the employee to whom you want to assign the activity appears in the Selected list of employees, do the following:
Click the Primary field in the record for this employee, and then click the check box.
The activity is reassigned.
If the previous primary employee is no longer involved with the activity, then access the Employees selection dialog box again, select the employee in the Selected list of employees, and then click Remove (the single arrow pointing backward) to remove the employee from the Selected list of employees.
Using Alarms for Activities
Alarms can notify you of the start time for a pending activity. The Alarm check box in each activity record activates this notification. For alarm notification, a dialog box appears in the application window at a predetermined time before the start of an activity. You can postpone the alarm so that it appears again at a specified time. For more information, see Postponing and Dismissing Alarms.
For a recurring activity, the alarm appears at the specified time before the start of each instance of the activity. You can specify the time at which an alarm triggers for each activity when you create the activity. You can also specify a default alarm time for all activities. For more information, see Default Alarm Lead Times.
Alarms trigger and appear only if you are logged in to the application at the time of the alarm. If you log in after an alarm is scheduled to trigger, then it triggers when you log in. Also, an alarm does not appear if the application is not the active application on your desktop when the alarm is due. Instead, you hear the alarm chime and you see a flashing button in your task bar. You can click the flashing button in the task bar to view the alarm.
Depending on the configuration of your application, you might not have access to alarm functionality. For more information, contact your administrator.
Activating Alarms
To activate (or set up) an alarm for an activity, select the Alarm check box in an activity record on any screen that provides an Activities view or in the Calendar screen.
Alarms work correctly only if your computer's time zone setting is the same as the time zone set up in your user preferences. For more information, see Default Time Zone.
To activate an alarm for a calendar activity
Navigate to the Calendar screen
In the Daily, Weekly, or Monthly calendar format, click the hyperlink for an activity description to access the activity.
The Calendar Detail form appears.
Select the Alarm check box
The Alarm Lead field is automatically populated with the default lead time set up in your user preferences. For more information, see Default Alarm Lead Times.
To change the lead time, select a value from the drop-down list for the Alarm Lead field.
Click Save This One.
An alarm icon appears next to the hyperlink for the description of the activity in the calendar.
Postponing and Dismissing Alarms
When an alarm appears on your screen, you can postpone or dismiss it. When you postpone it, you can specify the length of time for the alarm snooze. In your user preferences, you can set a default for the alarm snooze time in all of the activities you create. For more information, see Default Alarm Snooze Times.
Postponing Alarms
You can postpone an alarm in the Alarm dialog box.
To postpone an alarm
In the Alarm dialog box, choose the length of time for which you want to postpone the alarm from the drop-down list for the Snooze For field.
Click Snooze to postpone the alarm.
The alarm appears again after the amount of time you specify passes.
Dismissing Alarms
You can dismiss an alarm in the Alarm dialog box.
To dismiss an alarm
In the Alarm dialog box, click Dismiss to close the alarm.
The alarm does not appear again for the activity.
Using the Calendar Details Button
A Calendar Details button is available for Activities in your Web application provided that the Display In field for the selected activity is set to Calendar and Activity. Clicking Calendar Details opens the calendar detail form where you can perform a lot of the same tasks that you can perform from the Calendar screen.
To use the Calendar Details button
Granting Access to Your Calendar
When working with your team members, you might want to allow them to see your activities or to add activities to your schedule. To grant other people access to your calendar, you add team members in the Access List, and give them view or update privileges
To give others access to your calendar
Navigate to the Calendar screen, then the Access List view.
The Calendar Access list appears.
Click New (the plus (+) icon).
The Add Employees dialog box appears.
Select the record for an employee, and then click OK.
The employee you select appears in the Calendar Access list, and that employee can now view your calendar.
(Optional) To allow the employee to add activities to your calendar, select the Allow Updates check box.
About Using Group Calendars
You might want to see certain calendar activities common to all of your colleagues, such as trade shows, training events, holidays, and so on. Your Siebel administrator can create a user ID representing your group and give you and your colleagues access to this user ID. For more information, contact your Siebel administrator.
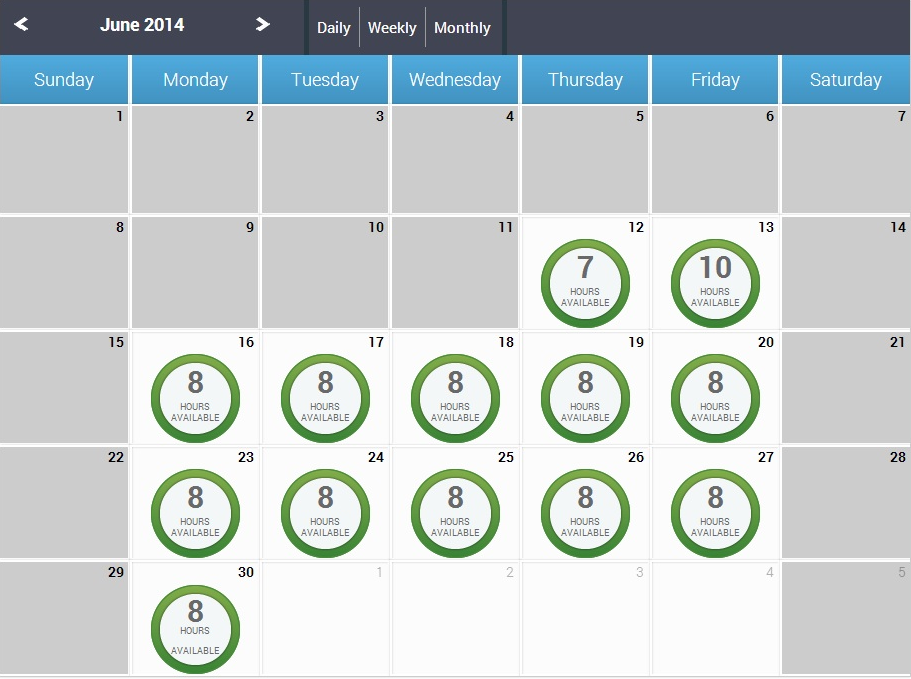
About Viewing Calendar Availability
When trying to find a time to schedule a meeting, you might want to consult a detailing of how many available hours a user has on a particular day. If calendar availability is enabled, then when you open a monthly view of the calendar, it shows the available hours for every day in the future. The available hours for each day are highlighted on the calendar as follows: 8 hours available, 10 hours available, 7 hours available, and so on. These hours are calculated by taking the number of working hours defined by the user, and subtracting the time for any events already scheduled for that day.
The following image shows an example of calendar availability.
Calendar availability is available only if administrators configure Siebel Open UI to allow it. For more information about this configuration, see Configuring Siebel Open UI.
Saving Charts
Data can appear in chart format. Charts are graphical representations of data and are available as views in some screens. Use charts to compare data sets. Typically, you can access a chart from the second level view bar.
Use the drop-down list on the chart to determine the data to include in the chart. Most charts also include control buttons representing chart types from which you can select the format of the chart. Supported chart formats include the following: bar chart, pie chart, line chart, stacked bar chart, scatter chart.
You can save charts in the application for use in other applications, such as, Microsoft PowerPoint. When you save a chart, you have a copy of the chart that you can include in presentations, documents, or other places where you might want to display it.
To save a chart
Navigate to the chart you want to save.
Right-click the chart, and select Save Image As.
In the dialog box that appears, do the following:
Navigate to the location where you want to save the chart.
Do not change the default file name, or enter a new name in the File name field.
Select an image type from the drop-down list for the Save as type field.
Click Save.