6Record Management
Record Management
This chapter describes how to perform common record tasks in your Web application. It includes the following topics:
Creating Records
You can create records in the application using several methods, such as clicking a button or choosing an option from a menu. When you create a record, a new record form or line item appears, containing fields to complete.
This topic shows how to create records using some options available in the application. You can use the method that you prefer, or the method that is available.
Some records contain read-only fields. Read-only fields are fields in which you cannot enter data. You might not have user privileges that allow you to enter data in the read-only field, or the data in the field might be automatically populated by the application.
To create a record
Do one of the following:
In the list or form, click Add or New (the plus (+) or double plus (++) icon).
In the list or form, click Menu (the cogwheel icon), and then click New Record.
In the list or form, click Edit, and then select New Record from the application-level menu.
A blank record form or line item appears, containing fields to complete.
Enter the appropriate data, and save the record.
Related Topics
Associating Records Using a Single Selection Dialog Box
Creating Records Using Quick Fill
You can store default values for fields in templates, and then use these templates when you create new records. These templates, called quick fill templates, populate fields in a form. Your administrator can set up these templates for your organization, and you can create your own templates.
For example, if you are a service representative, then you can create quick fill templates containing the default field values for common types of service requests that you create. Then, when you receive a request call for one of these types, you can apply the appropriate template to create a new service request with default field values.
Although users can save values for read/write fields, single-value and multi-value fields that are read-only are not supported. For example, if you create a quick fill template for a contact, and enter a value in the Account Name field, then that value is not saved in the template.
After you create a set of templates, you might want to delete the templates you no longer use or to rename some of the templates. You can perform these tasks in your user preferences. For more information, see Maintaining Quick Fill Templates.
Creating Quick Fill Templates
You can create a quick fill template.
To create a quick fill template
In a form, create a new record.
Do not save this record.
Complete all the record fields for which you want to define default values.
In the form, click Menu (the cogwheel icon), and then click Save as Template.
The Save Template As dialog box appears.
If an error message appears about entering a value for a required field, then click OK to dismiss the message.
Use the Template Name and Template Description fields to name and describe the quick fill template.
Click Save.
If a message appears indicating that you cannot save the template because a template with the same name already exists, then do the following:
Click OK on the message dialog box.
Click Overwrite to overwrite the existing template.
In the Template Name field, type in a name to save the template with a different name and then click Save.
Delete the new record.
Applying Quick Fill Templates to New Records
You can apply a quick fill template to a new record.
To apply a quick fill template to a new record
In a form, create a new record by completing the required fields only.
Save the record and then drill down on the new record.
In the form, click Menu (the cogwheel icon), and then click Apply Template.
The Pick Template dialog box appears.
In the Pick Template list, select the template you want to use, and click OK.
The values defined in the quick fill template are populated in the record.
Save the record.
Creating Records Using Quick Fill Templates
You can use a quick fill template to create a record.
To use a quick fill template to create a record
In a form, click Menu (the cogwheel icon), and then click New From Template.
The Pick Template dialog box appears.
In the Template list, select the template you want to use, and click OK.
A new record appears, populated by the values defined in the quick fill template.
Creating Records Using the Last Quick Fill Template
You can create a record using the last quick fill template that you used.
To create a record by using the last used quick fill template
In a form, click Menu (the cogwheel icon), and then click New From Last Template.
A new record appears, populated with the values defined in the quick fill template that you last used.
Copying Records
If a significant amount of data in a record you want to add is similar to the data in an existing record, then you can copy the existing record, and modify the copy to create the new record.
To copy a record
Find and select the record you want to copy.
Complete either of the following steps:
Click Menu (the cogwheel icon), and then click Copy Record.
From the application-level menu, choose Edit, then Copy Record.
A new record appears, populated with the copied data.
Change the fields in the new record as needed, and step off the record to save your changes.
Editing Records
To edit a record, you must have appropriate access privileges.
To edit a record
Find and select the record you want to change.
Change the fields in the record, and step off the record to save your changes.
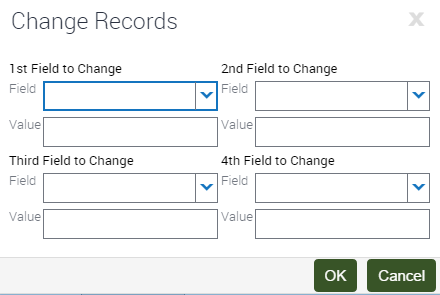
Changing Multiple Records
You might want to modify the same data in multiple records. Instead of repeatedly changing the same information in each record, you can change the same information in several records at once using the Change Records dialog box. You can change up to four fields at the same time.
The following image shows an example of the change records dialog box.
To change multiple records
Navigate to the screen.
Select the records you want to change by holding down the CTRL key and clicking each record.
To select records that are contiguous, you can select the first record, hold down the SHIFT key, and select the last record.
Click Menu (the cogwheel icon), and then click Change Records.
The Change Records dialog box appears.
In the drop-down lists for the fields in this dialog box (1st Field, 2nd Field, 3rd Field, and 4th Field to Change), columns on the list applet appear, except for those columns that are marked Inactive or Read Only. List columns do not appear if they are based on a join field and pick applets are not associated with them.
Note: Be careful when updating the value for a Multi-Value Group (MVG) field. When you update the value for such a field, you not only update the field value for the records you select in step 2, but in all records in the application that contain the same field value.From the 1st Field to Change drop-down list, select the field in which you want to change data.
Enter the new data in the corresponding Value field.
Repeat step 4 and step 5 until you enter all of the information you want to change in your selected records.
Click OK to apply the changes.
Saving Records
You can save records in several ways.
To save a record
When you finish editing or adding a record in a form or list, do one of the following:
Step off the record to commit the changes to the database.
Stepping off the record means leaving it in any way, such as by moving to another record or by using the record navigation buttons.
Click Menu (the cogwheel icon), and then click Save Record.
From the application-level menu, choose Edit, then Save Record.
Canceling Changes to Records
You might find that you want to cancel your changes to a record before you save the record. You can undo your changes to a record only if you have not yet saved the record.
To cancel changes to a record
Do one of the following:
Click Menu (the cogwheel icon), and then click Undo Record.
From the application-level menu, choose Edit, then Undo Record.
Deleting Records
You can delete a record by using Delete (the trash can icon), Menu (the cogwheel icon) in a list or form, and the application-level menu. Only one record can be deleted at a time.
Employee records are end-dated but not deleted to preserve historical information. For example, if an employee creates 100 records and later leaves the organization, then those records are not deleted in the Siebel application.
To delete a record
Do one of the following:
Select the record you want to delete, and then click Delete (the trash can icon).
Select the record you want to delete, click Menu (the cogwheel icon), and then click Delete Record.
From the application-level menu, choose Edit, then Delete Record.
A dialog box appears, asking you to confirm the deletion.
Click OK to delete the record.
Associating Records Together
When you work with records, you need access to all information that is related to those records. You can associate a record with another record. For example, when you work with an account, you can track contacts for that account. Use the Contacts screen to add and manage contacts. Many screens, such as the Accounts screen, include a Contacts view. In the Contacts view, you can associate a contact with an account record.
To associate a record with another record
Navigate to the appropriate screen.
Drill down on a field in the record with which you want to associate another record.
Navigate to the appropriate view.
The selected view appears.
In the selected view, click Add or New (the plus (+) or double plus (++) icon).
A blank record or a selection dialog box appears.
Do one of the following:
Complete the fields to add a new record.
From the selection dialog box, select a record, and click OK to add the record.
Related Topics
Printing Records
You can print records in the application in the following ways:
Running a report. You can print records by running and then printing a report. For more information about reports, see Running Reports.
Browser print. You can use the print feature for the browser to print an image of the current screen. To print a screen that contains colors, then use the color printing feature for your browser. Color printing is important for screens in which colors signify meaning, such as calendar screens and notification screens.
Using Field Hyperlinks in Records
Field hyperlinks can appear in a record that is in a list. They usually consist of (blue) text that is underlined when you place your cursor over the hyperlink. A field hyperlink provides one-click access to detailed or additional information for the underlined text. For example, when an account name appears as a field in a list, it appears as a hyperlink. This hyperlink allows you to navigate directly to additional information about that account name.
Clicking a field hyperlink that accesses information that is associated with a selected record and that is within the current screen is called drilling down. Clicking a field hyperlink that accesses information that is associated with a selected record but that is outside the current screen is called drilling across.
When you drill across screens by using field hyperlinks, you remain in the same thread. Consequently, you might navigate to a new screen and view, but you do not see all the records available in that screen and view. If you want to see every record in the new screen, then you must navigate to that screen again.
Displaying Record Count
You can see a count of the number of records in a list without navigating to the last record in that list. If you execute a query, then this function shows you the total number of records in the query results.
To display a record count
(Optional) Execute a query.
Click Menu (the cogwheel icon), and then click Record Count.
The Record Count dialog box appears.If you do not execute a query, then this dialog box shows the total number of records in the active list.
If you execute a query, then this dialog box shows the total number of records that match your query criteria.
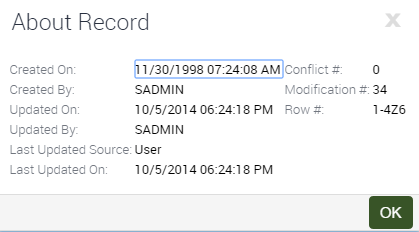
Finding Information About Records
You can view information about a record in the About Record dialog box.
The following image shows an example of the about records dialog box.
To find information about a record
Navigate to and select the record.
Click Menu (the cogwheel icon), and then click About Record.
The About Record dialog box appears. The following table describes some fields in the dialog box.
Field
Description
Updated On
Displays the date and time of the last update for the record.
Last Updated Source
Displays the component for the record. This information is useful for debugging issues when multiple components might change the data.
Last Updated On
Displays the date and time when the data changed in the database and provides a consistent timestamp usage across all components for each record.
For remote users, the Last Updated date (in the extracted database) might be different from the Last Updated On date (in the server database).
Conflict #
Displays the conflict number.
Siebel Remote uses this number to prevent duplication of records. For more information, see Siebel Remote and Replication Manager Administration Guide.
Modification #
Displays the modification number. This number increases each time a record is updated. It is used when two or more users try to update a record at the same time.
For example, if user A and user B are both reading a record with modification number 3, and user A updates the record, then the modification number changes to 4. If user B then tries to update the record, then the modification number of user B’s record (3) is not current, and user B’s update is rejected. User B is not able to update the record until it is refreshed with user A’s changes.
Click OK to close the dialog box.
Accessing the About Record Dialog Box After a Merge
If you access the About Record dialog box after merging records, then it displays the last updated date for the remaining record. It does not show the merge date as the last updated date, nor does it show the last updated date for the record that is merged into the existing record.
Identifying New Records
If you are a member of a team that shares information, then you can see any new records that are added to that shared information. You can see a record only if you have access rights to view that record.
If a record is newly added to the application, then an asterisk (a star icon) appears in the New field in that record. After you drill down on a field in the new record, the asterisk disappears from the New field.
To identify a new record
In a list, look for an asterisk (a star icon) in the New field for the record.
Flagging Records
In certain screens, such as Projects, you can flag records that you want to single out. A flag acts as a reminder that only you can see.
To flag a record
Navigate to the record you want to flag.
In the Priority Flag field of the record, select the check box.
When you step off the record, a flag is placed in Priority Flag field.
The Priority Flag field is not available in all views. If you cannot see a Priority Flag field for the record, then check your Columns Displayed settings. For information about showing and hiding columns, see Organizing List Columns.
Adding Notes to Records
When you work with records, you might want to enter notes. You can add a note to a record in the Notes view.
In the Notes view, you can enter public notes or private notes. Anyone who can access the record can see a public note for the record. Only the person who enters the note can see a private note.
The Notes view is not available in all screens. It appears only when it is beneficial to keep notes for individual records, for example, in the Accounts, Contacts, and Opportunities screens.
To add a note to a record
Find and drill down on a field in the record to which you want to add a note.
Navigate to the Notes view, and then navigate to the Private Notes subview or the Public Notes subview.
Click New (the plus (+) icon) to create a record.
From the drop-down list for the Type field, choose Note.
In the Description field, enter the text for the note.
Merging Duplicate Records
You might find that two or more records contain the same information. To keep the database accurate, you can merge the records into one record. Use the Merge Records command to merge multiple records into one record.
When you use the Merge Records command, the Merge Records dialog box appears with a message similar to the following:
Merge Records
The 2 selected record(s) will be merged into Person Uid: 55:3CFCH. Proceed to merge?
OK/Cancel
If other records are associated with the records you merge, then those records are associated with the surviving record. Any duplicate associated records are deleted.
You can merge only records for which you are the owner or for which you are the primary person. The merge functionality might not be available to you because of your access privileges and your configuration.
To merge two records
Click the record that is the source record.
Press and hold down the CTRL key, and then click the record that is the surviving record.
After the merge is complete, the source record is merged into the surviving record.
From the application-level menu, choose Edit and then Merge Records.
Note: If the Merge Records command is unavailable, then the functionality is not supported for the record types you select.The Merge Records dialog box appears, displaying a field value for the surviving record.
Review the information in the dialog box to make sure the correct record survives, and click OK to complete the merge.
The records are merged into a single record that has the name of the surviving record and that includes the data from the surviving record.
Attaching Files to Records
When the Attachments view is available within a screen, you can attach a file to a record. You can attach files such as Microsoft Outlook email messages, Microsoft Word documents, and image files. The Attachments view allows others who work with the record to access the attachment so that they see the latest information.
The Attachments view is not available in all screens. It appears only when it is beneficial to keep supporting material for individual records, for example, in the Contacts, Accounts, and Opportunities screens.
If you edit files attached to records, then your changes are saved when you step off the attachment record in the application.
Users can edit attachments in the Web application only if Java is available on the client computer. If not, then users must download the document to a secure location specified by the browser, and upload the edited document thereafter. If Java is available on the client computer, then users can edit and save documents in the Web application without an intermediate save location.
You can attach files to records in the following ways:
Attaching Files Using the New File Button
You can create a file attachment by using the New File button in the Attachments view.
To attach a file to a record using the New File button
Drill down on a field in the record to which you want to add the file attachment.
Navigate to the Attachments view.
The Attachments list appears.
Click New File.
A dialog box appears.
Locate and select the file you want to attach to the record, and then click Open.
Note: You can select multiple files by holding down the CTRL key and clicking each file. To select files that are contiguous, you can select the first file, hold down the SHIFT key, and select the last file.The dialog box closes, and the file appears in the Attachments list as an attachment record with the appropriate fields populated.
Complete additional fields as necessary.
The following table describes some fields.
Field
Description
Update File
Select this check box to indicate that you want the attachment copy of the file to be updated automatically each time the original file is updated.
Download File
Select this check box to indicate that the document is retrieved during the next synchronization session.
This field allows you to request files from the server, and applies only if you use Siebel Remote.
Attaching Files Using Menu (the Cogwheel Icon)
You can create a file attachment using Menu in the Attachments view.
To attach a file to a record using Menu
Drill down on a field in the record to which you want to add the file attachment.
Navigate to the Attachments view.
The Attachments list appears.
Click Menu (the cogwheel icon), and then click New Record to create a record.
In the Attachment Name field, click the select button.
The Add Attachment dialog box appears.
Click Browse to locate and select the file you want to attach to the record, and then click Open.
The dialog box and the Add Attachment dialog box close, and the file appears in the Attachments list as an attachment record with the appropriate fields populated.
Attaching Files By Moving Files to the Attachments View
You can create an attachment by moving a file to the Attachments view.
To attach a file to a record by moving the file to the Attachments view
Drill down on a field in the record to which you want to add the attachment.
Navigate to the Attachments view.
The Attachments list appears.
Locate the file you want to attach to the record.
Click the file to select it and with the mouse button depressed, move the file to the Attachments list and then release the mouse button.
The file appears in the Attachments list as an attachment record with the appropriate fields populated.
Attaching URLs to Records
In addition to attaching files to records, you can also attach URLs to records to provide team members with the latest information.
You can attach URLs to records in the following ways:
Attaching URLs Using the New URL Button
You can create a URL attachment by using the New URL button in the Attachments view.
To attach a URL to a record using the New URL button
Drill down on a field in the record to which you want to add the URL attachment.
Navigate to the Attachments view.
The Attachments list appears.
Click New URL.
The Add URL dialog box appears.
Enter the URL in the URL field, or copy and paste the URL from a Web page into the URL field, and then click Add.
The Add URL dialog box closes, and the URL appears as a hyperlink in the Attachments list. You can click this hyperlink to access the corresponding website. If you cannot access the website after adding it as an attachment, then you might not be connected to the network.
Attaching URLs Using Menu (the Cogwheel Icon)
You can create a URL attachment using Menu in the Attachments view.
To attach a URL to a record using Menu
Drill down on a field in the record to which you want to add the URL attachment.
Navigate to the Attachments view.
The Attachments list appears.
Click Menu (the cogwheel icon), and then click New Record to create a record.
In the Attachment Name field, click the select button.
The Add Attachment dialog box appears.
Enter the URL in the URL field, or copy and paste the URL from a Web page into the URL field, and then click the Save to save the record.
The Add Attachment dialog box closes, and the URL appears as a hyperlink in the Attachments list. You can click this hyperlink to access the corresponding website. If you cannot access the website after adding it as an attachment, then you might not be connected to the network.
Attaching Emails and Email Attachments to Records
Provided that you install and deploy the Outlook to Siebel Drag and Drop addin (see Article ID 2117212.1 on My Oracle Support), then you can directly attach emails or email attachments from your Microsoft Outlook email client to records in your Siebel application. This improves the usability and productivity of call center agents.
To attach Microsoft Outlook emails or email attachments to records
Download the Outlook to Siebel Drag and Drop addin, and then double click Outlook_Add-in_for_Siebel.exe to install the addin.
Restart Microsoft Outlook for the addin to take effect. In the Microsoft Office client, verify that the Outlook to Siebel Drag and Drop addin is installed successfully.
Note: In Siebel Innovation Pack 2017, support for Outlook to Siebel Drag and Drop has been enhanced. For more information, see the topic about Installing Outlook to Siebel Drag and Drop on Client Computers in Siebel Installation Guide for the operating system you are using.Log in to your application.
Navigate to the Activities screen, drill down on the activity to which you want to attach emails or email attachments, and then go to the Attachments view for the selected activity.
The Attachments list appears.
Now go to your Microsoft Outlook email client and locate the emails or email attachments that you want to attach to the activity record in your application.
With both your application and the Microsoft Outlook email client open on-screen, do one or more of the following as required:
Select one single email from Microsoft Outlook and with the mouse button depressed, move the email into your application and then release the mouse button.
Select multiple emails from Microsoft Outlook and with the mouse button depressed, move the emails into your application and then release the mouse button.
Select an email attachment from Microsoft Outlook and with the mouse button depressed, move the email attachment into your application and then release the mouse button.
Any Microsoft Outlook emails or email attachments that you attach to records in your application appear in the Attachments list.
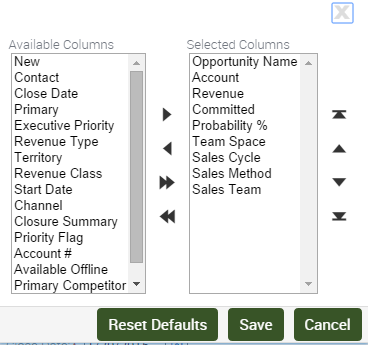
Organizing List Columns
A list consists of columns of data. Some columns might not appear on the screen. You can add, remove, and rearrange the list columns as needed by using the Columns Displayed dialog box.
The following image shows an example of the columns displayed dialog box.
To organize columns in a list
In a list, click Menu (the cogwheel icon), and then click Columns Displayed.
The Columns Displayed dialog box appears.
Select one or more columns in one of the lists (Available Columns or Selected Columns).
Click the buttons between the Available Columns and the Selected Columns list to show or hide the columns you select.
The following table describes the buttons.
Button
Description

Single arrow pointing forward. Click to show the column you select.
Moves the column you select to the Selected Columns list. After you click Save, the column will appear in the list you are modifying.

Single arrow pointing backward. Click to hide the column you select.
Moves the column you select to the Available Columns list. After you click Save, the column will not appear in the list you are modifying.

Double arrows pointing forward. Click to show all columns in the list.
Moves all columns from the Available Columns to the Selected Columns list. After you click Save, all columns will appear in the list you are modifying.

Double arrows pointing backward. Click to hide all columns in the list.
Moves all columns from the Selected Columns to the Available Columns list. After you click Save, none of the columns will appear in the list you are modifying.
Select a column in the Selected Columns list, and then use the column-ordering buttons next to the Selected Columns list to change the order in which the columns appear in the list.
The following table describes the buttons.
Button
Description

Single up navigation arrow. Click to move the column you select.
Moves the column you select up one position in the Selected Columns list. After you click Save, the column is moved up one position in the list you are modifying.

Single down navigation arrow. Click to move the column you select.
Moves the column you select down one position in the Selected Columns list. After you click Save, the column is moved down one position in the list you are modifying.

Single up navigation arrow with a line. Click to move the selected column.
Moves the column you select to the start of the Selected Columns list. After you click Save, the column is moved to the start of the list you are modifying.

Single down navigation arrow with a line. Click to move the selected column.
Moves the column you select to the end of the Selected Columns list. After you click Save, the column is moved to the end of the list you are modifying.
Click Save.
Sorting List Columns
You can sort the records in a list by the values in one or more columns. For example, you can sort accounts to appear alphabetically by name (by sorting on the Name column). You can use an advanced sort to sort by up to three columns at once. For example, you might want to sort the accounts by name, then by current volume of sales, and then by city.
The active sort order of a column is designated in the column header. An arrow pointing up means the column is sorted in ascending order. An arrow pointing down means the column is sorted in descending order.
Sorting a Single List Column
You can sort data a single column in ascending order and in descending order.
To sort a single column
In a list, click the column header of the column that you want to sort.
Click Sort.
The column is sorted in ascending or descending order.
Click the column header again.
Click Sort.
The column is sorted in the opposite order.
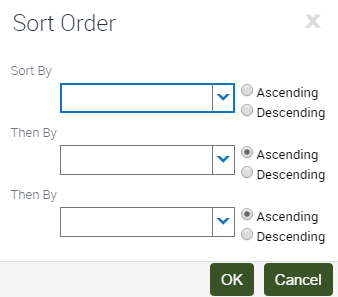
Performing an Advanced Sort in Lists
You use the Sort Order dialog box to perform an advanced sort.
To perform an advanced sort in a list
In a list, click Menu (the cogwheel icon), and then click Advanced Sort.
The Sort Order dialog box appears. The following image shows an example of the sort order dialog box.
From the drop-down list for the Sort By field, select the first column to sort by.
From the drop-down list for the first Then By field, select the second column to sort by.
From the drop-down list for the second Then By field, select the third column to sort by.
Use the Ascending and Descending option buttons to define the sort order for each column you select for the advanced sort.
Click OK.
The columns are sorted in the order you specify.
Locking List Columns
Lists can contain many columns. You might find that you want to scroll horizontally across a list to view additional columns without losing focus of the first few columns in the list. In this scenario, you can lock the first few columns. Columns that are locked have a lock icon in the column header to indicate that the column is locked.
The following image shows an example of a list view with locked columns. The locked columns, all of which have a lock icon, include the Account column and all the columns that precede the Account column.

To lock list columns
Navigate to the list where you want to lock columns.
Click the header of the column that you want to lock.
Click Lock.
A lock appears in the selected column and in all columns preceding the selected column (if there are any). You can scroll across the remaining columns without loosing focus of the locked columns.
To unlock list columns, click the header of the last locked column (which is beside the first unlocked column), and then click Unlock.
The lock disappears from the selected column and in all columns preceding the selected column.
Resizing List Columns
You might find that you want to change the width of a column so that you can see all of the data in the column. A changed column width is automatically saved, so you do not have to repeatedly resize the column.
To resize columns
Place the cursor over the column divider of the column you want to resize.
A resize arrow appears.
Click to select the column divider and, without releasing the selection, move the column divider out to widen the column or in to narrow the column.