5Selection Dialog Boxes
Selection Dialog Boxes
This chapter describes how to use selection dialog boxes in your Web application. It includes the following topics:
Launching Selection Dialog Boxes
The following table describes the buttons that launch selection dialog boxes.
Table Description of Select Buttons
Button |
Button Name |
Description |
|---|---|---|
Single select button |
Launches a single selection dialog box. This dialog box applies to pick applets. Single selection dialog boxes allow you to add only one record to a field. In some cases, you can create a record using the single selection dialog box. |
|
Multiple select button |
Launches a multiple selection dialog box. This dialog box applies to Multi-Value Group (MVG) applets. Multiple selection dialog boxes allow you to select multiple records and add them to a field. In some cases, you can create a record using the multiple selection dialog box. |
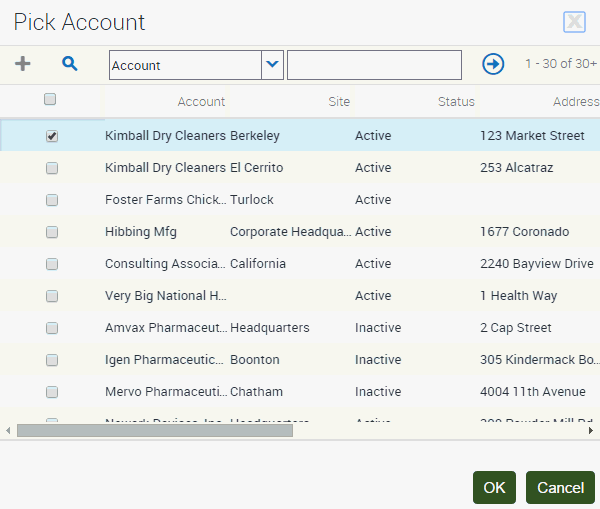
Associating Records Using a Single Selection Dialog Box
On different screens in the application, you can associate a record with an existing record in a single selection dialog box and with a new record in a single selection dialog box.
The following image shows an example of a single selection dialog box.
Associating Records with Existing Records
Complete the procedure in this topic to associate a record with an existing record in a single selection dialog box.
To associate a record with an existing record in a single selection dialog box
Navigate to the appropriate screen.
Select the record you want to associate with another record.
Click the single select button in the appropriate field.
A single selection dialog box appears.
In the dialog box, locate and select the record you want to associate with the existing record.
Click OK.
Associating Records with New Records
Complete the procedure in this topic to associate a record with a new record in a single selection dialog box.
To associate a record with a new record in a single selection dialog box
Navigate to the appropriate screen.
Select the record you want to associate with a new record.
Click the single select button in the appropriate field.
A single selection dialog box appears.
Click New (the plus (+) icon).
The form for the new record appears.
In the form, enter the information for the new record, and click Save.
The new record appears in the single selection dialog box, and this new record is selected.
Click OK.
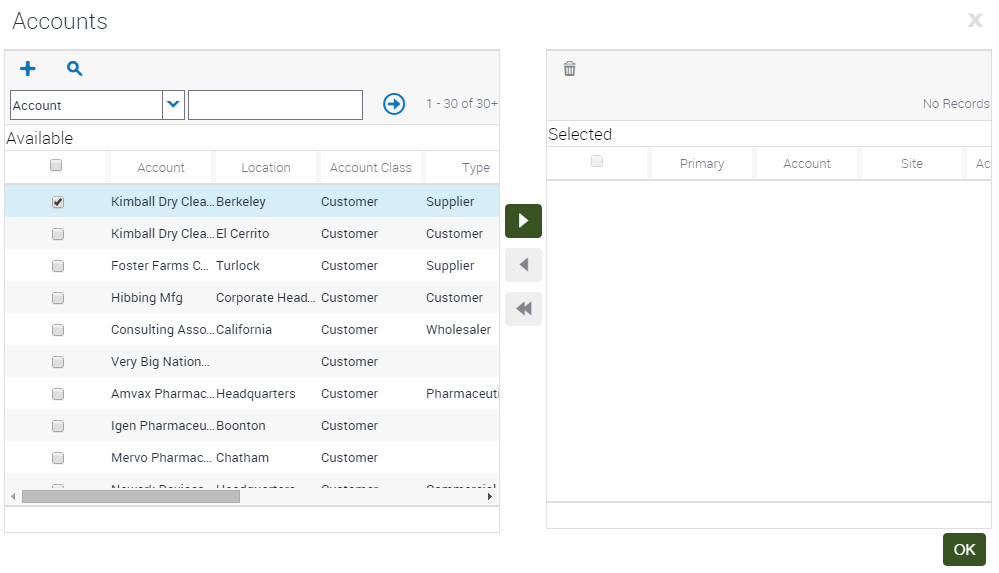
Associating Records Using a Multiple Selection Dialog Box
Multiple selection dialog boxes allow you to associate multiple records with one record. On different screens in the application, you can associate a record with an existing record in a multiple selection dialog box and with a new record in a multiple selection dialog box.
The following image shows an example of a multiple selection dialog box.
Associating Records with Existing Records
Complete the procedure in this topic to associate a record with an existing record in a multiple selection dialog box.
To associate a record with an existing record in a multiple selection dialog box
Navigate to the appropriate screen.
Select the record you want to associate with other records.
Click the multiple select button in the appropriate field.
A multiple selection dialog box appears showing the list of available records and a list of selected records for the field.
In the list of available records, select the record you want to associate with the current record, and then click the navigation button to move the record to the list of selected records.
Note: You can select multiple records by holding down the CTRL key and clicking each record. To select records that are contiguous, you can select the first record, hold down the SHIFT key, and select the last record.(Optional) To remove one or more records in the list of selected records, select the records, and then click the navigation button to move the records back to the list of available records.
Click OK.
Associating Records with New Records
Complete the procedure in this topic to associate a record with a new record in a multiple selection dialog box.
If you attempt to add data to the database from a dialog box and then decide to cancel the record, then the data you add in the dialog box is not deleted from the database. However, if the data exists in the application only in the record for which you open the dialog box, then deletes the data you add in the dialog box.
To associate a record with a new record in a multiple selection dialog box
Navigate to the appropriate screen.
Select the record you want to associate with a new record.
Click the multiple select button in the appropriate field.
A multiple selection dialog box appears showing the list of available records and a list of selected records for the field.
Click New (the plus (+) icon).
The form for the new record appears.
In the form, enter the information for the new record, and click Save.
The new record appears in the list of selected records, and this new record is selected.
Click OK.
Querying for Records in a Selection Dialog Box
You can query in a selection dialog box just as you query in a list or form. Consequently, you can search for specific information from one field or from several fields simultaneously.
To query for records in a selection dialog box
In the selection dialog box, click Query (the magnifying glass icon).
A blank row appears in the selection dialog box.
Enter your query criteria in the appropriate fields.
A wildcard is automatically assumed after text you enter in the query fields. If you search for
Siebe, then all words beginning with the lettersSiebeare found.If you query a data field that has a calendar select button to display the calendar control, then you must include the date field value in quotes if you execute the query without specifying a time. For more information about entering query criteria, see Simple Query Operators.
Click Go.
The records matching your query criteria appear.
Finding Records in a Selection Dialog Box
A selection dialog box can contain many records. You might find it necessary to search for the records you want to see in the list. You can perform full- or partial-text searches on one field.
Finding records is similar to querying for records, but you do not save search results when you find records.
To find records in a selection dialog box
In the selection dialog box, select the field you want to search from the drop-down list for record fields.
In a multiple selection dialog box, the drop-down list for record fields appears before the list of available records, and not before the list of selected records.
Type the text you want to search for in the field for a search value.
The field for a search value appears next to the drop-down list for record fields. A wildcard is automatically assumed after text you enter in the field for a search value. If you search for
Siebe, then all words beginning with the lettersSiebeare found.Search queries in pick lists are not case sensitive.
Click Go.
The records matching your criteria appear.