4Designing Marketing Campaign Load Formats
Designing Marketing Campaign Load Formats
This chapter describes how to design marketing campaign load formats. It includes the following topics:
Creating and Testing Campaign Load Formats
Campaign load formats define the way campaign-related data is copied from a marketing data source into the Siebel transactional database for launching a campaign. You must define campaign load formats for your marketing data sources before you can use Siebel Business Application Integration (EAI) technology to import this information. For example, contact information such as first and last name, phone number, and email address can be brought into the Siebel database during campaign load only if you define campaign load formats for this data. The Campaign Load workflow process is used to manage the load process.
For information about creating a campaign load format for the Siebel Data Warehouse, see Examples of Recommended Campaign Load Mappings.
This topic contains the following information:
Creating Campaign Load Formats
Before you begin creating campaign load formats, make sure the subject area in the Business Intelligence Administration Tool includes the required fields to load new customers and execute your campaigns. For example, if you are loading contact data, you must verify that the Subject Area used for the Campaign Load Format includes Contact First Name, Middle Name, Last Name, and so on. For more information about creating Subject Areas for list formats, see the Oracle Business Intelligence Enterprise Edition documentation.
Creating campaign load formats requires that you complete the following tasks:
Creating a Campaign Load Format and Adding Columns
Campaign load formats have columns that are always required, regardless of the type of customer data being loaded, for example, contacts, accounts, or prospects. The following procedure describes how to create a campaign load format and add columns to the format.
To create a campaign load format and add columns
Using one of the following methods, navigate to the List Designer start page:
In the Siebel Marketing application, navigate to the Administration - Marketing screen, then the List Formats view.
If you log in to the Marketing module directly, click the Marketing screen tab and then click Create a List Format.
From the list of Subject Areas on the right, select a subject area that includes the required columns for your campaign load format.
Subject areas are available for this purpose, including the following:
Campaign Load - Contacts
Campaign Load - Accounts
Campaign Load - Prospects
Note: Your administrator might have added additional subject areas.Expand the folders in the selection panel and click each column name to add it to the format.
- Verify that you have included the required columns for each integration object and integration component, based on the type of party being loaded (contacts, accounts, or prospects).
Note: The column label must exactly match the field name of the integration component in the Siebel runtime repository. For information about required integration component fields, see Enabling and Synchronizing Marketing Server Components and Field Names for Marketing Integration Components.
To rename a column label that does not exactly match the field name of the integration component, click the properties button.
Select the Custom Headings option.
If you use one of the standard subject areas listed in Step 2, then the column names match the field names in the integration components in the Siebel enterprise application.
Enter the necessary table and column heading.
The table heading must match the integration component name and the column heading must match the field name.
Select the following required columns to add them to the campaign load format:
From the Contact folder, add the Person UId column.
From the Campaign Contact folder, add the following columns: Campaign Id, Segment Id, Load Number, Token Number, Scalability Batch Number, and Treatment Id.
Note: The Treatment Id column is an external key, and is now a required column. Depending on your upgrade history and system configuration, your current list formats might not include this column. If this is the case, add a System Data Expression for Treatment Id to the Business Intelligence Web configuration files (see Oracle Marketing Segmentation Guide) and add this expression as a column to your Campaign Load list formats (see Creating and Testing Campaign Load Formats).
The following table shows the mappings used in the preconfigured reports.
Table External Key Mappings
| Type of Party | Key | Party Id | Map to this Column Id |
|---|---|---|---|
Contacts |
Key 1 |
Contact Id |
Contact.ROW_ID |
Accounts |
Key 1 |
Contact Id |
Contact.ROW_ID |
Accounts |
Key 2 |
Account Id |
Account.ROW_ID |
Prospects |
Key 3 |
Prospect Id |
Prospect.ROW_ID |
Enabling System Data Expressions for Required Columns
Several of the Campaign Contact columns required for the campaign load format must be populated with values that are determined by the list generation process at run time. To accomplish this, you set up the Campaign Contact columns to use system data expressions. The following procedure describes this task.
To enable system data expressions for required columns
Click the properties button on the Campaign Contact column.
In the dialog box, first click the Custom Headings check box.
This makes sure the table and column name are not changed when you modify the formula in the next step.
- Clear the current formula from the Column Formula box.
Place your cursor in the Column Formula box, then click the Available System Data link.
Select the appropriate system data expression from the values in the following table.
Column Corresponding System Data Expression Campaign Id
Campaign Id
Load Number
Load Number
Scalability Batch Number
Email Batch Number
Segment Id
Segment Id
Token Number
Token Number
Treatment Id
Treatment Id
The expression is added to the formula. For example, the Campaign ID column would show the following formula:
@{campaignID}{0}Note: If you get an error message in the Formula dialog box, then ignore the error.Click OK.
Assigning Integration IDs
Every campaign load format requires an integration ID, referred to as Key 1, that supplies the enterprise-wide ID representing that customer. For example, most corporate data warehouses already have unique customer IDs assigned as the enterprise customer ID. Campaign load expects this column to be included in the campaign history. The following procedure describes how to set up the campaign load format integration ID.
To assign integration IDs
Choose the Column from the Subject Area that provides the Integration ID for the Contacts Target Level.
Select the column in the right pane.
Click the formula button in the column.
Check the Custom Headings box.
Delete the existing formula and replace it with the appropriate value from the table in Creating a Campaign Load Format and Adding Columns.
Click OK.
Requalifying List Results Against Original Criteria
The following procedure describes how to requalify list results against original criteria. The members of the campaign load file must be evaluated against the segment criteria when generating the campaign load file. This option limits the information in the list file only to members of the segment, and any Qualified List Items constrained on the segment tree. There is no need to reload the campaign because it picks up the changes in the people who are added to the segment when the campaign is launched.
To requalify list results against original criteria
In the Columns view, in the Filters pane, select the following check box:
Re-qualify list results against original segment criteria
The following line is automatically added to the filter criteria:
Re-qualified against original segment criteria
About Siebel Contact and Campaign History Tables
When you load a campaign, the Campaign Load workflow process modifies data in the Siebel database after the Contact a integration component is mapped and the campaign load mapping data is modified.
Contacts table (S_CONTACT). The Contacts table stores contact-level information.
Campaign History table (S_CAMP_CON). The Campaign History table contains the history of contacts who qualify for campaigns, as well as the Campaigns ID, Segment ID, Wave Number, and so on.
If you include optional integration component fields such as Account or Contact Address in the campaign load format, other tables are updated with data according to the integration fields that are mapped.
For every record that qualifies for a campaign, the Campaign Load process uses the Contact component user key to determine if the contact record exists. The following table contains the table update rules.
Table Campaign Load Table Update Rules
| Siebel Contact Record | S_CONTACT | S_CAMP_CON |
|---|---|---|
Exists |
Update existing record |
Insert new record |
Does not exist |
Insert new record |
Insert new record |
Example of Configuring Campaign Load Format for Control Groups, Allocation Limits, and Stage Funneling
Campaign load formats support the use of control groups, allocation limits, and stage funneling. For more information on these features, see Siebel Marketing User Guide.
This topic gives an example of how to create campaign load formats for control groups, allocation limits, and stage funneling. You can use this feature differently, depending on your business model.
To create a campaign load format that supports control groups, allocation limits, and stage funneling
Navigate to the Administration - Marketing screen, then the List Formats view, and open the Campaign Load - Contacts Example list format.
Add a new column that uniquely identifies a target in the target level and change the formula to RANK([key column]). For example, in the Campaign Load - Contact and Prospect Example list format, the column has the following properties:
Table Heading: Contact
Column Heading: RANK ROW_WID
Column Formula: RANK(Contact.ROW_WID)
Hide: Yes
Add another column to the list form.
Change the Column Formula to use the previous Rank column to calculate control group flag based on a system variable called controlGroupPct. For example, in the Campaign Load - Contact and Prospect Example list format, the column has the following properties:
Table heading: Campaign Contact
Column Heading: Control Group Flag
Column Formula: CASE WHEN (RANK(Contact.ROW_WID) - TRUNCATE(RANK(Contact.ROW_WID)*@{controlGroupPct}{0}/100,0)*100/@{controlGroupPct}{0}) < 1 THEN 'Y' ELSE 'N' END
Hide: No
Add a filter to restrict the query count according to constraining stage wave Ids and the percentage allocation limit. For example, in the Campaign Load - Contact and Prospect Example list format, the filter is:
Re-qualified against original segment criteria

AND '@{constrainingStageFlag}{N}' = 'N' OR "Campaign Contact"."Load Wave Id" IN
(@{constrainingWaveID}{'0'})

AND '@{pctAllocationFlag}{N}' = 'N' OR (RANK(Contact.ROW_WID) -
TRUNCATE(RANK(Contact.ROW_WID)*@{allocationLimit}{1000000}/100,0)*100/
@{allocationLimit}{1000000}) < 1

AND '@{pctAllocationFlag}{N}' = 'Y' OR RANK(Contact.ROW_WID) <=
@{allocationLimit}{1000000}
Example of Creating a Response Load Format
The response list format creates responses from the program flow. It can be stored in the My Data Load Format or Shared Data Load Format folders. This topic gives an example how to create a response load format based on the Analytics Data Load - Responses sample list format. You can use this feature differently, depending on your business model.
To create a response load format
Navigate to the Administration - Marketing screen, then the List Formats view, and open the Analytics Data Load - Responses sample list format.
Create new columns and map the column headers to the integration objects, using the following table as a guide.
Table Heading Column Heading Column Formula Response
Id
'NOID'
Response
Response Type
'@{responseType}{}'
Response
Treatment Id
'@{treatmentID}{}'
Response
Description
'@{description}{}'
Response
PR_CON_ID
"- Contact Profile"."Contact Id"
Response
PRSP_CON_ID
"- Contact Profile"."Prospect Id"
Response
ACCNT_ID
"- Contact Profile"."Account Id"
Response
SRC_ID
'@{campaignID}{}'
Response
Response Value
'@{responseValue}{}'
Response
Response Cost
'@{responseCost}{}'
Response
Response Cost Currency Code
'@{responseCostCurrencyCode}{}'
Response
Score
'@{score}{}'
Add a filter to restrict the query count based on constraining stage wave Ids. For example:
Re-qualified against original segment criteria
AND ' '@{constrainingStageFlag}{N}'= 'N' OR "Campaign History (Transaction
Database)"."Campaign Load Wave Id" IN (@{constrainingWaveID}{'0'})
Set the header and footer to match the object name “Response”.
Set the Purpose attributes. For example:
Purpose: Analytics Data Load
Delimited
Max# Records: 1000
Example of Creating a Lead Load Format
The response list format creates leads from the program flow. It can be stored in the My Data Load Format or Shared Data Load Format folders. This topic gives an example how to create a lead load format based on the Analytics Data Load - Leads sample list format. You can use this feature differently, depending on your business model.
To create a lead load format
Navigate to the Administration - Marketing screen, then the List Formats view, and open the Analytics Data Load - Leads sample list format.
Create new columns and map the column headers to the integration objects, using the following table as a guide.
Table Heading Column Heading Column Formula Lead
Id
'NOID'
Lead
Lead Status
'@{leadStatus}{}'
Lead
Treatment Id
'@{treatmentID}{}'
Lead
Description
'@{description}{}'
Lead
Contact Id
"- Contact Profile"."Contact Id"
Lead
Prospect Id
"- Contact Profile"."Prospect Id"
Lead
Account Id
"- Contact Profile"."Account Id"
Lead
Source Id
'@{campaignID}{}'
Lead
Division Owner
'@{divisionID}{}'
Lead
Quality
'@{leadQuality}{}'
Lead
Lead Score
'@{score}{}'
Lead
Primary Partner Id
'@{partnerID}{}'
Lead
Calc Lookback Days
'@{leadLookbackDays}{}'
Lead
Calc Product Id
'@{productID}{}'
Lead Product
Product Id
'@{productID}{}'
Lead Position
Position Id
'@{positionID}{}'
Add a filter to restrict the query count based on constraining stage wave IDs. For example:
"Re-qualified against original segment criteria
"AND ' '@{constrainingStageFlag}{N}'= 'N' OR "Campaign History (Transaction
Database)"."Campaign Load Wave Id" IN (@{constrainingWaveID}{'0'})
Set the header and footer to match the object name Mktg Prog Lead Dedup.
Set the Purpose attributes. For example:
Purpose: Analytics Data Load
Delimited
Max# Records: 1000
Testing Campaign Load Formats
To verify that you have created a valid campaign load format, it is recommended that you build a test campaign and test segment.
To test your campaign load mapping
Verify that you have included the minimum required fields for each integration component.
For more information, see About Marketing Integration Objects.
Confirm that the Campaign Load Format includes the required columns for all formats:
Campaign Id
Segment Id
Load Number
Batch Number
Token Number
Treatment Id
Confirm that the parent integration component is mapped for every child component. For example, if you included Account Address fields, make sure that you also included Account Name and Location.
Create a test segment using the Segment Designer. For the segment, go to the Advanced Options tab and change the Campaign Load List Format to use your new Campaign Load Format. Save the segment.
Create a new campaign under the Campaigns screen tab.
In the Design tab, perform the following steps:
Click the Offers link.
In the Offers list, click New.
In the Add Offer dialog box, choose a test offer and click OK.
In the Treatments list at the bottom of the view, click New.
In the Pick Treatment list, choose a test treatment.
Navigate to the Design screen, then the Segments/Lists view for the Campaign, and click Add Segment to choose your test segment.
Click the Segments/Lists link.
In the Segments/Lists list, click Add Segment.
In the Previously Used Segments dialog box, click Choose a new Segment.
Locate and select your test segment.
In the Allocation matrix at the bottom, a check box will appear for the treatments you associated in Step 6.
Check the check box and click Save.
Click the menu on the upper form for the campaign and choose 'Load Campaign'. In the dialog box, confirm the load time and click OK to submit.
Navigate to the Execute screen, then the System Tasks view to monitor whether the Campaign Load task successfully completed. Investigate any error messages that appear in the Task Log.
After the load completes successfully, validate that the data loaded matches the expected information.
While your campaign is still selected, navigate to All Contacts/Prospects across Organizations and query for the campaign members for that Load Number. Optionally, export these rows to a file using the Export menu command.
Navigate to the Administration - Marketing screen, Marketing Server Admin, and then the Manage Marketing Jobs view. Find the Marketing Job that you generated with the type WriteListFiles. Open the details link and find the network path to the file that was generated.
Compare the contents of the file and the data that was loaded into your campaign to confirm that the data was complete and correct.
Make any changes required to the Campaign Load Format using the List Format Designer. Be sure to save any changes to the Format.
When completed, purge the load history by performing the following steps:
Navigate to the Campaigns screen and click the campaign.
In the Execute tab, click Suspend Wave.
Note: You must suspend the waves in the load before you can purge a load.In the Execution Status view, click Purge Load, and then delete your test campaign.
About Marketing Integration Objects
For each campaign load format, you must select only one of the following integration objects:
Marketing Contact integration object. If any campaign contact names do not exist within the Siebel transactional database, you must use the Marketing Contact integration object. It provides the field mappings necessary to import new contacts and accounts. For more information, see About the Marketing Contact Integration Object.
Marketing Prospect integration object. If any prospect names from your target segment do not exist within the Siebel transactional database, you must use the Marketing Prospect integration object. It provides the field mappings necessary to import new prospects. For more information, see About the Marketing Prospect Integration Object.
Marketing Person integration object. If your campaign contacts and prospects exist within the Siebel transactional database prior to loading any campaigns, then you can also use the Marketing Person integration object. Typically, this configuration occurs for installations that use the Siebel Data Warehouse populated from the Siebel transactional database and that do not introduce new customers into the Siebel Data Warehouse from other sources. Because the contact and prospect field information is already recorded, to load the campaign in this configuration, you only need to map the Contact and Prospect IDs between the data warehouse and Siebel transactional database. For more information, see About the Marketing Person Integration Object.
Marketing Lead integration object. If any leads for a particular campaign do not exist within the Siebel transactional database, you must use the Marketing Lead integration object. It provides the field mappings necessary to import new leads. For more information, see About the Marketing Lead Integration Object.
Marketing Response integration object. If any inferred responses for a particular campaign do not exist within the Siebel transactional database, you must use the Marketing Response integration object. It provides the field mappings necessary to import new inferred responses. For more information, see About the Marketing Response Integration Object.
Siebel Marketing does not provide an integration object that can insert new contacts and prospects simultaneously in the same load.
This topic contains the following information:
About the Marketing Contact Integration Object
The Marketing Contact integration object provides field mappings to typical contact- and account-related information from the external data sources. The predefined integration object, Marketing Contact, defines the information that is exchanged between the external data source and Siebel Marketing, using EAI technology. For more information about EAI, see Overview: Siebel Enterprise Application Integration. For a list of fields for the Marketing Contact integration object, see Field Names for Marketing Integration Components.
The following figure shows the integration components for the Marketing Contact integration object. Required fields apply when a new contact is inserted into the Siebel transactional database.
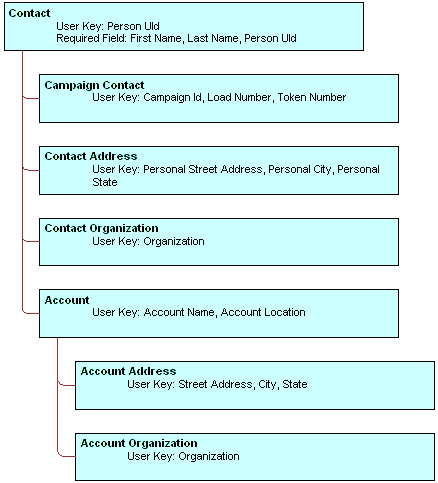
During campaign load, integration component User Keys determine if a record already exists in the component (for the given values) and if the record is unique. Required fields cannot be a null value for the new record.
The following table describes the Marketing Contact integration components.
Table Marketing Contact Integration Component Description
| Component | Comment |
|---|---|
Account |
Maps account information associated with the contact. |
Account Address |
Maps the account address. |
Account Organization |
Maps information about the account’s organization. |
Campaign Contact |
Maps campaign history-level information such as campaign Id, load number, wave number, contact Id, prospect Id, account Id, and the keys that bind contacts with their unique IDs in the data warehouse. |
Contact |
Maps contact-level information such as the contact’s name, telephone number, email address, and so on. |
Contact Address |
Maps the contact’s address information. |
Contact Organization |
The Contact Organization component maps information about the contact organization. |
Mapping Rules for the Marketing Contact Integration Components
Using contact information for campaign load requires the following integration components:
Contact. Includes information such as contact first name, contact last name, and so on.
Campaign Contact. Fields must be mapped in the campaign load report. Mapping includes the required campaign load columns and the keys that store unique IDs from the data warehouse for the party (contacts, prospects, or accounts) being loaded.
Use the following rules when mapping components:
A parent integration component must be mapped before mapping a child component. For example, the Account Address component cannot be mapped unless Account is mapped.
User Key fields must be mapped for each integration component if one or more fields for the component is mapped.
Required fields must be mapped for each integration component if one or more fields for the component are mapped.
Make sure that the campaign load format includes a column indicating the organization in which the contact and account data must be loaded.
Sample Mappings for Contact Key Components
The combination of keys that are mapped in the campaign load report depend upon the target levels that you use.
The following table describes examples of Key mappings for sample target levels.
Table Key Mappings for Sample Target Levels
| Target Level | Key Mapping |
|---|---|
Contacts |
Key 1 |
Accounts |
Key 2 |
Prospects |
Key 3 |
Households |
Key 4 |
About the Marketing Prospect Integration Object
The Marketing Prospect integration object provides field mappings to typical prospect information from marketing data source(s). The required fields are fields that cannot be a null value for the new record.
The following figure shows the integration components for the Marketing Prospect integration object. Required fields apply when a new prospect is inserted into the Siebel transactional database.
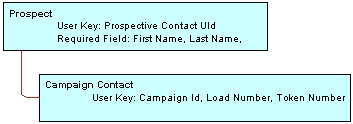
For a list of fields for the Marketing Prospect integration object, see Field Names for Marketing Integration Components.
The following table describes the Marketing Prospect Integration components.
Table Marketing Prospect Integration Component Description
| Component | Comment |
|---|---|
Campaign Contact |
Maps campaign history-level information.
|
Prospect |
Maps prospect information.
|
Mapping Rules for the Marketing Prospect Integration Components
Using prospect information for a campaign load requires the following integration components:
Prospect. Includes information such as prospect first name, prospect last name, and so on.
Campaign Contact. Fields must be mapped in the campaign load report. Mapping includes the required campaign load columns and the keys that store unique IDs from the data warehouse for the prospects being loaded.
About the Marketing Person Integration Object
Most deployments of the Siebel Marketing application use the Marketing Contact integration object for loading campaign data. The Marketing Contact integration object is most commonly used because it supports inserting new contact and account names into the transaction database. In contrast, the Marketing Person integration object only supports inserting new records into the Campaign History table for contacts or prospects that already exist in the transaction database.
When all the customer data resides in the Siebel transaction database, the load process can avoid inserting new customers and improve the load time. The Marketing Person integration object supports this simple lookup load process.
Only use the Marketing Person integration object when all target contacts, accounts and prospects in the campaign already exist in the transaction database. The only required mapping is between the Row ID from the Contact and Prospect tables in the Siebel transactional database and the external data source, typically the Siebel Data Warehouse. For a list of fields for the Marketing Person integration object, see Field Names for Marketing Integration Components.
The following figure shows the integration components for the Marketing Person integration object. Required fields apply when a new campaign contact record is inserted into the Siebel transactional database.

The following table describes the integration component for the Marketing Person integration object.
Table Marketing Person Integration Component Description
| Component | Comment |
|---|---|
Campaign Contact |
Maps the required campaign history columns and keys that store the unique IDs from the data warehouse for the party being loaded. User Key: Campaign Id, Load Number, Token Number, and one or more of the following:
|
Mapping Rules for the Marketing Person Integration Components
When creating a campaign load mapping using the Marketing Person integration object, use the following guidelines:
The Contact Id and Prospect Id values imported from the external data source must match the Row IDs for the Contact or Prospect in the contact or prospect tables.
If all incoming target names are contacts, then mapping the Prospect Id is not required. Alternatively, you could use the Marketing Contact integration object. If all incoming target names are prospects, then you do not need to use Contact Id. If the target list includes both contacts and prospects, then both fields are required.
About the Marketing Lead Integration Object
The Marketing Lead integration object provides field mappings to typical lead-related information from external data sources. The Mktg Prog Lead Dedup integration object defines the information that is exchanged between the external data source and Siebel Marketing, using EAI technology.
The following table describes the integration components for the Lead integration object.
Table Marketing Lead Integration Component Description
| Component | Description |
|---|---|
Lead |
Defines all the primary attributes of the entity lead. User Key: Id |
Lead Organization |
Defines the Organization attributes associated with the lead. User Key: Organization Id |
Lead Position |
Defines attributes of Position associated with the lead. User Key: Position Id |
Lead Product |
Defines attributes of Products associated with the lead. User Key: Product Id |
About the Marketing Response Integration Object
The Marketing Response integration object provides field mappings to typical response-related information from external data sources. The response integration object defines the information that is exchanged between the external data source and Siebel Marketing, using EAI technology.
The following table describes the integration components for the Response integration object.
Table Marketing Response Integration Component Description
| Component | Description |
|---|---|
Response |
Defines all the primary attributes of the response. User Keys:
|
Related Organization |
Defines the attributes of products associated with the response. User Key: Mod Key (Modification Key) |
Response Log |
Defines survey-related attributes for the response. User Key: Question Text, Answer Text |
Examples of Recommended Campaign Load Mappings
Campaign Load Mappings depend on the following:
The data source. The data source includes Siebel Data Warehouse, Siebel transactional database, or a data source other than Siebel applications.
The data elements required to be imported. These elements include Contact fields, Account fields, Contact address, and so on.
Contact qualification. Determine if new contacts or existing contacts qualify for a campaign.
Presence of contacts and prospects in the Siebel database. Determine if all contacts and prospects are already present in the contact and prospect tables in the Siebel database.
This topic contains descriptions of mappings with the name of the sample campaign load format report in which the recommended mappings appear. You can find the examples listed in the following topics in the Siebel File System: Shared Campaign Load Formats/Marketing/Example List Formats.
Examples of Mappings to the Siebel Data Warehouse
These mappings are applicable when campaigns are run against Siebel Data Warehouse.
Recommended Mappings for Existing Contacts And Prospects. See the following sample campaign load format report:
Campaign Load - Contacts and Prospects Example
Recommended Mappings for Existing Accounts. See the following sample campaign load format report:
Campaign Load - Existing Accounts
Examples of Mappings to the Siebel Database
The mappings shown in the following reports are applicable when campaigns are run on Oracle’s Siebel database.
Recommended Mappings for Contacts And Prospects. See the following sample campaign load format report:
Campaign Load - Contacts and Prospects Example
Recommended Mappings for Accounts. See the following sample campaign load format report:
Campaign Load - Existing Accounts
Examples of Mapping to a Non-Siebel Database
The mappings shown in the following reports are applicable when campaigns are run on a non-Siebel database.
Recommended Mappings for New Contacts. This is for cases where some of the contacts being loaded for the campaign do not exist in the Siebel database. See the following sample campaign load format:
Campaign Load Contacts - Example
Recommended Mappings for New Accounts. This is for cases where some of the accounts being loaded for the campaign do not exist in the Siebel database. See the following sample campaign load format:
Campaign Load Accounts - Example
Recommended Mappings for New Prospects. This is for cases where some of the prospects being loaded for the campaign do not exist in the Siebel database. See the following sample campaign load format:
Campaign Load Prospects - Example