5Installing and Configuring Email Marketing
Installing and Configuring Email Marketing
This chapter describes how to install and configure Email Marketing. It includes the following topics:
About Siebel Email Marketing
The Siebel Email Marketing Server is a combination of components designed to support high volume, personalized, email messages and to track email bounces and clickthrough responses. The Siebel Email Marketing Server consists of the following three components, each of which has its own installer that is separate from the Siebel Marketing Server installer:
The Email Sending Daemon (ESD). Assembles each outbound email message for a campaign using the email template (HTML or text) and the recipient list, and then sends each message to your company's outbound Mail Transfer Agent (MTA) for delivery.
The Bounce Handler Daemon (BHD). Tracks email messages that cannot be delivered, parses the returned email messages, and records the cause of the bounce.
The Click Through Daemon (CTD). Tracks clicks made by the email recipient on any Siebel-supported links included in the email template.
This topic contains the following information:
Example of Email Delivery
A good understanding of email delivery is helpful in understanding the key principles and items presented in the following topics. The provided example is a simplified description of the email delivery process and describes one email being sent. When you send thousands or millions of emails, the process becomes more complex. Siebel Email Marketing is designed to address the issues associated with sending a large volume of emails.
When an email is sent by person A to person B, an attempt is made to deliver the email. The first step in the process occurs when the user clicks Send in his or her email client. The email client tries to initiate a connection to an email server.
When the client has a connection to a Mail Transfer Agent, the Mail Transfer Agent and the client communicate using the Simple Mail Transfer Protocol. The following are important parts of this communication:
One critical piece of this communication involves the transfer of the email message to the Mail Transfer Agent.
Another piece of this communication is the passing of the sender's email address. This email address is often referred to as the SMTP envelope from (or sender) address. The use of the term envelope represents the email content as a letter and the SMTP communication as the envelope used to carry the letter.
If the recipient of the email (person B) has his or her mailbox on this server, then the server drops the email in the box and the job is done. If person B is on another domain, then the Mail Transfer Agent executes a Domain Name Service (DNS) lookup to find the address of another Mail Transfer Agent to communicate with. Another Simple Mail Transfer Protocol conversation occurs and the second Mail Transfer Agent receives the message and delivers it to the mailbox for person. When it is in person B's mailbox, the recipient can retrieve it using another protocol such as Post Office Protocol (POP) and read the message in an email application.
About Bounce Codes
Unexpected issues can occur during the email delivery process. For example, the domain of the recipient can be unreachable or not exist at all. In this case, an error message or bounce is created by the Mail Transfer Agent that identifies the problem, and the bounce is returned to the sender of the message. The sender’s email address is called the From Address of the SMTP envelope.
Another problem might be that the domain has been found but the user does not exist on that domain. Again, a bounce is created and sent back to the sender of the original message. Both of these are examples of hard bounces. This means that not only was the email unable to be delivered but that it can never be delivered.
Another type of bounce is a soft bounce, which means that although the email could not be delivered at present, it might be possible to deliver the message in the future. The following information lists the possible bounce codes.
Table Bounce Codes
| Bounce Code | Description |
|---|---|
Address Moved |
The recipient has changed the email address and the new address is available. This type of bounce occurs rarely. |
Bad Sender |
The email address is bad: either the address is formatted incorrectly (unlikely) or there is no such user. |
Last Resort |
The bounce parser could not determine the type of bounce, but it has the name of the original recipient. |
Mailbox Problem |
The email address exists, but the mailbox is full or temporarily locked. This type of bounce occurs rarely. |
Message Too Large |
The message size exceeds the recipient’s allowable limit. |
Network Problem |
Because of network problems, the MTA is unable to connect to either the receiving Mail Server or some other necessary server (such as a company’s LDAP server). This type of bounce occurs rarely. |
Protocol Problem |
The receiving Mail Server does not work with the version of SMTP the MTA uses. This type of bounce occurs rarely. |
Security Problem |
The receiving Mail Server does not allow email from your domain. This can occur when the receiving Mail Server blocks domains of known or suspected spammers. |
System Problem |
The receiving email server is having technical problems and cannot accept mail right now. |
Unparsable |
The bounce parser could not classify the bounce message into any other category. |
For additional information on bounce codes and the status of email addressees, see About Creating Classification Rules for Bounce Messages and Configuring the Status of Email Addresses.
Frequently Used Terms for Email Marketing
The following table contains abbreviations and terms frequently used in Email Marketing.
Table Frequently Used Terms for Email Marketing
| Term | Definition |
|---|---|
BHD |
Bounce Handler Daemon. Processes asynchronous bounced email (bounces that do not occur in the SMTP communications between the Email Sending Daemon and the Mail Transfer Agent). |
Bounce |
An email that is returned due to a temporary or permanent error condition. There are hard bounces and soft bounces as described in the following list:
|
CTD |
Click Through Daemon. Handles the following customer actions:
|
Daemon |
A program that is not invoked explicitly, but is dormant waiting for an action or event to activate it. |
DNS |
Domain Name System. Created to provide a way to translate domain names to their corresponding IP addresses. The DNS server maintains a list of domain names and IP addresses and each request is pointed to the correct corresponding IP address. |
DMZ |
Demilitarized Zone. A section of your corporate network that acts like a neutral zone or buffer between your internal network and the Internet. It is created by placing one firewall between the outside (internet) and Web servers, and a second firewall between the Web servers and your internal network. External users can access servers in the neutral zone, but not servers on the internal network. The servers in the DMZ handle incoming and outgoing traffic. |
DNS groups |
DNS domain names are categorized into groups called a record and each record is given a special name such as MX or A.
|
ESD |
Email Sending Daemon. Manages the following tasks:
|
MTA |
Mail Transfer Agent. A program responsible for receiving, routing, and delivering email messages. MTAs receive email messages and recipient addresses from local users and remote hosts, perform alias creation and forwarding functions, and deliver the messages to their destinations. An MTA is sometimes called a Mail Transport Agent, a mail router, an Internet mailer, or a mail server program. Commonly used MTAs include sendmail, qmail, and Exim. |
SMTP |
Simple Mail Transport Protocol. Used to move each email over the Internet. |
SOAP |
Simple Object Access Protocol. The use of XML and HTTP to access services, objects, and servers in a platform-independent manner. For more information about SOAP, see Oracle Business Intelligence Web Services Guide. |
WSD |
Web Survey Daemon. Resides in the DMZ and supports Web landing sites and surveys without the need for SmartScript. |
About Installing and Configuring Siebel Email Marketing
The Siebel Email Marketing Server consists of three components, each of which comes with its own installer and is separate from the Siebel Marketing Server installer. The installation media for the three Email Marketing Server components are distributed together on media separate from the Siebel Enterprise installation media.
This topic describes some of the issues to consider when installing the different components of Siebel Email Marketing. The Email Marketing components can reside outside the firewall, with ports opened for SOAP (HTTP) and networked file system access through the firewall. Alternatively, the Email Marketing components can reside inside the firewall with ports 80 and 25 opened on the firewall (or proxies) or relays put in place.
These components talk to the Siebel Marketing Object Manager using SOAP. For more information about the Siebel Java Data Bean, see Transports and Interfaces: Siebel Enterprise Application Integration.
Email Sending Daemon
The Email Sending Daemon (ESD) assembles an email to be sent to a list or segment of contacts and prospects and delivers each email to the corporate outbound Mail Transfer Agents. Assembly includes adding headers in front of the email message content and merging personalized data into the message content.
The Email Sending Daemon listens on port 8090 for SOAP requests from the Siebel Marketing Server. A SOAP request includes the filename of the email message content, the email message headers, and the Marketing Server subwave contacts and prospects list (containing mail merge data). These files are found in the Marketing File System which is commonly a networked directory accessible to the Email Sending Daemon. The Email Sending Daemon must be able to communicate with one or more outbound Mail Transfer Agents to send mailings over the internet. The Email Sending Daemon must be able to tell the Marketing Server when it has completed a subwave as well as deliver details of email address errors that occurred while it communicated using Simple Mail Transfer Protocol to the Mail Transfer Agents (called synchronous bounces).
The most common placement for the Email Sending Daemon is within the corporate network, behind the DMZ. However, the Email Sending Daemon component can be placed inside the DMZ or outside the firewall, if there is a port opened to connect to the Siebel Marketing Server using SOAP and the networked Marketing File System.
Bounce Handler Daemon
Typically, the Bounce Handler Daemon (BHD) receives and processes bounced mail on port 25 (the default SMTP port).
Email messages that have bounced appear similar to regular email, though their email message content and headers probably have noticeable differences in content. For a bounced email to be returned to the Bounce Handler Daemon, the original email must have a usable return address (the SMTP envelope from address). The correct SMTP envelope From Address is generated for you using the Bounce Handler Daemon's domain name (supplied by you when you configure the Email Marketing Server).
The recommended approach is to place the Bounce Handler Daemon computer in the DMZ. However, some network support technicians can choose to place the Bounce Handler Daemon behind an inbound Mail Transfer Agent. The approach that you choose depends on the configuration of your network, DMZ, existing inbound Mail Transfer Agent, and firewall. The following example describes a typical approach.
You might have a domain name of example.com and an inbound Mail Transfer Agent (in this example mail.example.com) for mail to that domain. The Mail Transfer Agent mail.example.com currently routes email successfully to computers in the internal network. It might be in the DMZ with a special hole for port 25 traffic or straddling the outer firewall with one NIC in the DMZ and the other NIC on the Internet. The Bounce Handler Daemon might be running inside the DMZ, with an internal-only hostname such as example-host.internal.example.com.
In this example, you would choose a Bounce Handler Daemon hostname such as bounces.example.com that is not already used by external DNS and then perform the following steps:
Configure the Bounce Handler Daemon to use this hostname.
Add a DNS MX record for this hostname to an internal DNS server that can be contacted by the inbound Mail Transfer Agent (mail.example.com).
Add this hostname to the Internet DNS servers as a hostname with an IP address for the inbound Mail Transfer Agent.
Because the Internet DNS MX records for bounce.example.com point to the inbound Mail Transfer Agent, bounced email for the Bounce Handler Daemon is sent there first. Mail.example.com must be configured to relay the mail for bounces.example.com to the Bounce Handler Daemon using the internal DNS server for the correct internal IP address.
Organizations often create IP numbers that cannot be directly reached from outside their enterprise. For example, IP numbers starting with 10.* or 192.168.* are only available inside the enterprise. Similarly, organizations often have hostnames, such as my-machine.corp.example.com, that are only visible inside the company network. If you use an IP address or hostname that is only available inside your company network for your Bounce Handler Daemon hostname, then Mail Transfer Agents outside your network cannot connect to the Bounce Handler Daemon. Therefore, the Bounce Handler Daemon server must be available, directly or indirectly, from outside your network.
Click Through Daemon
The Click Through Daemon (CTD) listens on port 8060 for HTTP requests (Clickthrough, Message Open, Forward to a Friend and un-subscription and subscription requests). This component can be placed in the DMZ, inside or outside the firewall, if a port is opened that allows it to connect to the Siebel Marketing Server using SOAP protocol. Web proxy servers can be used to route the HTTP requests to the Click Through Daemon server.
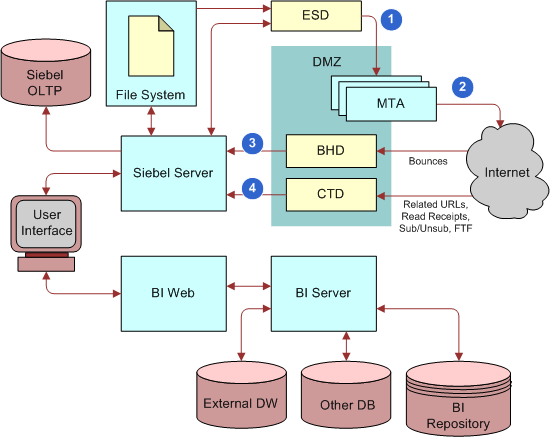
Architecture of Siebel Email Marketing
An example of a typical architectural structure for Siebel Email Marketing components is shown in the following image. The Email Marketing components interact with Siebel Marketing as follows:
The Email Sending Daemon, located in the corporate network, listens for requests from the Siebel Marketing Server, then assembles each outbound email message for a campaign, and sends it to the Mail Transfer Agent for delivery.
For more detailed information on how the Email Sending Daemon interacts with Siebel Marketing, see Email Sending Daemon Integration and Workflow.
The Mail Transfer Agent receives the email messages and forwards them to their destinations.
The Bounce Handler Daemon, located in the DMZ, tracks email messages that cannot be delivered and records the reason why the message cannot be delivered.
The Click Through Daemon, located in the DMZ, tracks clicks made by email recipients on links included in the email template that are supported by Siebel Marketing.
If Siebel Email Marketing components lose connectivity to the Siebel Server, then they queue all data and continue to function. After the connection is reestablished, queued data is processed.
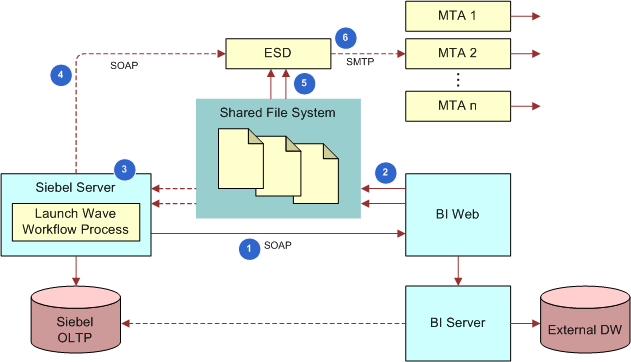
Email Sending Daemon Integration and Workflow
The figure below shows a more detailed view of the Siebel Email Sending Daemon, its interrelationship with Siebel Marketing, and the outbound flow of work within this architecture. The following steps correspond with the numbers in the figure:
A workflow is launched to generate list files for each batch (subwave).
If Basic email personalization mode is implemented, then the Siebel Server generates the list files.
If Advanced email personalization mode is implemented, then the workflow calls Business Intelligence Web to generate a list that is formatted for email personalization, then Business Intelligence Presentation Server generates the list files.
The workflow waits until files are returned.
Workflow launches a subprocess for each file and then notifies the Email Sending Daemon of the location of each file.
The Email Sending Daemon retrieves each subwave list of Prospects and Contacts.
The Email Sending Daemon sends email to the Prospects and Contacts in each subwave list.
Requirements for Installing Email Marketing
Before installing Email Marketing, you must perform the following tasks:
Configuring Basic and Advanced Email Personalization
Your application can be configured to use one of two methods for email merge fields:
Basic. The Basic mode is used when your organization has not licensed or deployed the marketing segmentation module, or if your requirements do not call for advanced merge fields. This option uses a fixed set of merge fields based on the available fields in the campaign recipient business component. In this mode, the email list is generated directly from the business component and delivered to the Email Sending Daemon for sending the email messages.
Advanced. The Advanced mode is only available if your organization has deployed the marketing segmentation module. This option provides a flexible set of merge fields based on data from any data source or table accessed by the Oracle Business Intelligence repository. The merge fields are determined by the fields in the Personalization Format (Email Server list format) that you select for the email offer.
Configuring Basic Email Personalization Mode
To configure basic email personalization mode, perform the steps in the following procedure.
To configure basic email personalization mode
Navigate to the Administration - Server Configuration screen, then the Servers view.
Select a server.
In the Components tab, query for the Marketing component.
Click the Parameters tab for this object manager.
Query for the Email Personalization Format parameter.
Make sure the Value field is set to any value other than a path name. For example, set it to Default Merge Fields. Using a nonpath name as a value allows Basic Personalization.
Configuring Advanced Email Personalization Mode
The advanced personalization mode requires that you install the Marketing Module for segmentation and list generation and configure the required marketing metadata for list export. Perform the following steps to set up advanced email personalization.
To configure advanced email personalization mode
Configure the marketing metadata for list generation. For instructions, see the Oracle Business Intelligence Enterprise Edition documentation.
Create one or more Email Server List Formats in the List Format Designer. For instructions, see Oracle Marketing Segmentation Guide.
Designate one of the list formats as the default Email Personalization format for the Siebel Marketing application by performing the steps in the following procedure. This set of merge fields populates for any new email offers that are created.
Navigate to the Administration - Server Configuration screen, Servers, and then the Components view.
In the components list, query for the Marketing (ENU) component.
Click the Parameters view tab.
In the Component Parameters list, query for the Email Personalization Format parameter.
The initial value is Default Merge Fields.
To change the default system email list format to another email list format, enter the full Web catalog path in the Value on Restart column. For example:
/shared/Marketing/Example List Formats/Advanced Merge Fields
If the catalog path is too long to enter in the parameter column, then you might need to shorten the folder and list format name in the Business Intelligence Web catalog.
Removing an Existing Version of the Email Marketing Daemons
If you have an existing version of the Email Sending Daemon, Bounce Handler Daemon, and Click Through Daemon, then you must remove them before proceeding with this install. The following procedures describe this task for a Windows and UNIX environment.
Removing Existing Email Marketing Daemons on a Windows Server
To remove existing Email Marketing daemons on a Windows server, perform the steps in the following procedure.
To remove existing Email Marketing daemons on a Windows Server
From the Start menu, choose Settings, Control Panel, Administrative Tools, and then Services.
Stop the services for Email Marketing daemons.
Right-click the Email Sending Demon service and select Stop.
Right-click the Bounce Handler Demon service and select Stop.
Right-click the Click Through Demon service and select Stop.
Return to the Control Panel and select Add or Remove Programs.
To remove each daemon, perform the following steps (following the instructions in each dialog box):
Select the Email Sending Daemon program and click Change/Remove.
Select the Bounce Handler Daemon program and click Change/Remove.
Select the Click Through Daemon program and click Change/Remove.
Locate the directory where the Email Marketing daemon programs were installed and remove the daemons.
The default installation location for Email Sending Daemon is
C:\Program Files\esd.The default installation location for Bounce Handler is
C:\Program Files\bhd.The default installation location is
C:\Program Files\ctd.
Note: After the uninstall, some files that could cause problems for the new installation might remain. Deleting files in these directories makes sure that the new installation does not inherit outdated information.
Removing Existing Email Marketing Daemons on a UNIX Server
To remove existing Email Marketing daemons on a UNIX Server, perform the steps in the following procedure.
To remove existing Email Marketing daemons on a UNIX server
Log in as root.
The Root user has the rights to install and remove applications.
To remove the Email Sending Daemon program, perform the following steps:
Navigate to the directory where the Email Sending Daemon program was installed and, if it is running, then stop the Email Sending Daemon using the following command:
./tomcat-ctl.sh stop
Navigate to the parent directory where the Email Sending Daemon program was installed and remove the Email Sending Daemon program directory using the following command:
rm -rf esd
To remove the Bounce Handler Daemon program, perform the following steps:
Navigate to the directory where the Bounce Handler Daemon program was installed and, if it is running, then stop the Bounce Handler Daemon using the following command:
./bin/bhd-ctl.sh stop
Navigate to the parent directory where the Bounce Handler Daemon program was installed and remove the Bounce Handler Daemon program directory using the following command:
rm -rf bhd
To remove the Click Through Daemon program, perform the following steps:
Navigate to the directory where the Click Through Daemon program was installed and, if it is running, then stop the Click Through Daemon using the following command:
./tomcat-ctl.sh stop
Navigate to the parent directory where the Click Through Daemon program was installed and remove the Click Through Daemon program directory using the following command:
rm -rf ctd
Installing the Java Runtime Environment
Verifying That the Object Manager Is Enabled and Running
The object manager component (such as Marketing) to which you connect must be enabled and running on the Siebel Server. To verify this, perform the following task.
To verify that the Object Manager component is enabled and running
Log in to the Siebel Server.
Navigate to the Administration - Server Configuration screen, Servers, and then the Components view.
Query for the alias name, and make sure the component has a status of Online or Running.
For example, the Marketing component for the English language version has an alias name of SMObjMgr_enu.
Installing the Email Marketing Server
To install the Email Marketing Server, you must first locate the Email Marketing Daemon installation programs. They are shipped on separate media from the Marketing operational application media. Installers for all platforms and Email Marketing daemons (Email Sending Daemon, Bounce Handler Daemon, and Click Through Daemon) can be found on this media.
To install Email Marketing, you must install each of the following components:
Email Sending Daemon (ESD). The Email Sending Daemon installation program for Email Marketing is called esd-install.exe on MS Windows and esd-install.bin on UNIX. The Email Sending Daemon is typically placed on a different server from the Marketing Server or any of the other Email Marketing components.
Determine the appropriate location in which to install the Email Sending Daemon. Typically it is installed on the corporate network, behind the corporate DMZ. Selecting this location requires the network administrator to perform the following tasks:
Define how the Email Sending Daemon connects to outbound Mail Transfer Agents within the DMZ.
Provide a way for the Email Sending Daemon to look up DNS records for outbound Mail Transfer Agents.
Bounce Handler Daemon (BHD). The Bounce Handler Daemon installation program for Email Marketing is called bhd-install.exe on MS Windows and bhd-install.bin on UNIX. The Bounce Handler Daemon can be placed on a separate server from the Marketing Server or any of the other Email Marketing components. However, it typically shares a server with the Click Through Daemon.
Determine the appropriate location in which to install the Bounce Handler Daemon. Typically it is installed inside the corporate DMZ. Selecting this location requires the network administrator to perform the following tasks:
Register the IP address that identifies the Bounce Handler Daemon on the Internet. The IP address must be registered as a DNS MX record. Historically, it takes at least two weeks (after registration) for the entire Internet to be properly updated with this information. Therefore, register as early as possible.
Define a way for the Bounce Handler Daemon to receive inbound SMTP messages from the Internet through the outer DMZ firewall. The Bounce Handler Daemon passes asynchronous bounce details to the Marketing Server through SOAP protocol. The communication between the Bounce Handler Daemon and the Marketing Server requires you to define a way for the SOAP messages to pass through the inner DMZ firewall.
Click Through Daemon (CTD). The Click Through Daemon installation program for Email Marketing is called ctd-install.exe on MS Windows and ctd-install.bin on UNIX. The Click Through Daemon can be placed on a separate server from the Marketing Server or any of the other Email Marketing components. However, it typically shares a server with the Bounce Handler Daemon.
Determine the appropriate location in which to install the Click Through Daemon. Typically it is installed inside the corporate DMZ. Selecting this location requires the network administrator to perform the following tasks:
Define a way for the Click Through Daemon to service HTTP requests from the Internet through the outer DMZ firewall.
Register the IP address that identifies the Click Through Daemon on the Internet. The IP address must be registered as a DNS A record. Historically, it takes at least two weeks (after registration) for the entire Internet to be properly updated with this information. Therefore, register as early as possible.
The Click Through Daemon passes details about the HTTP requests it serviced (Tracked URLs, Forward To Friend, and so on) to the Marketing Server through SOAP protocol. The communication between the Click Through Daemon and the Marketing Server requires you to define a way for the SOAP messages to pass through the inner DMZ firewall.
This topic contains the following information:
Installing the Email Sending Daemon
Complete the steps in the following procedure to install the Email Sending Daemon. Before installing the Email Sending Daemon, make sure that you have completed the installation requirements for email marketing. For more information, see Requirements for Installing Email Marketing.
To install the Email Sending Daemon on a Windows or UNIX server
On a Windows server, run the Email Sending Daemon installation program, esd-install.exe.
On a UNIX server, perform the following steps:
Make an installation directory named esd using the following command:
mkdir esd
Copy the Email Sending Daemon installation program from the installation media to the directory that you created.
In the Email Sending Daemon installation directory, run the Email Sending Daemon installation program.
In the Installation dialog box, review the information, and then click Next.
In the Choose Java Virtual Machine dialog box, select the Java Runtime Environment (JRE) that you installed in Requirements for Installing Email Marketing, and then click Next.
Note: Make sure that you choose the correct JRE. Selecting the wrong JRE prevents the Email Sending Daemon from starting properly.In the Choose Install Folder dialog box, choose the Email Sending Daemon installation directory, and then click Next.
Note: Make sure that there are no spaces in the installation directory path.Review the Pre-Installation Summary dialog box, and then click Install.
In the Install Complete dialog box, verify the information, and then click Done.
Navigate to the Start menu, Settings, Control Panel, Administrative Tools, and then Services application.
-
If the Siebel Email Sending Daemon service does not exist, create a Windows service for stopping and starting the service as follows::
Navigate to the directory where you installed Email Sending Daemon in Step 5.
Double-click the
install-win32-service.batfile. This creates the Email Sending Daemon service in the Windows services list.
Installing the Bounce Handler Daemon
This topic contains the information that you need to install the Bounce Handler Daemon. Before installing the Bounce Handler Daemon, make sure that you have completed the installation requirements. For more information, see Requirements for Installing Email Marketing.
To install the Bounce Handler Daemon on a Windows or UNIX server
On a Windows server, run the Bounce Handler Daemon installation program.
On a UNIX server, perform the following steps:
Make an installation directory named bhd using the following command:
mkdir bhd
Copy the Bounce Handler Daemon installation program from the installation media to the directory that you created.
In the Bounce Handler Daemon installation directory, run the Bounce Handler Daemon installation program.
In the Installation dialog box, review the information, and then click Next.
In the Choose Java Virtual Machine dialog box, select the Java Runtime Environment (JRE) that you installed in Requirements for Installing Email Marketing, and then click Next.
Note: Make sure that you choose the correct JRE. Selecting the wrong JRE prevents the Bounce Handler Daemon from starting properly.In the Choose Install Folder dialog box, choose the Bounce Handler Daemon installation directory, and then click Next.
Note: Make sure that there are no spaces in the installation directory path.Review the Pre-Installation Summary dialog box, and then click Install.
In the Install Complete dialog box, verify the information, and then click Done.
To install the Bounce Handler Daemon as a service, open a command prompt, navigate to the BHD root installation directory, then run the
install-win32-service.bat installcommand.To uninstall, run the
install-win32-service.bat removeorinstall-win32-service.bat uninstallcommand.
Installing the Click Through Daemon
This topic contains the information that you need to install the Click Through Daemon. Before installing the Click Through Daemon, make sure that you have completed the installation requirements. For more information, see Requirements for Installing Email Marketing.
To install the Click Through Daemon on a Windows or UNIX server
On a Windows server, run the Click Through Daemon installation program.
On a UNIX server, perform the following steps:
Make an installation directory named ctd using the following command:
mkdir ctd
Copy the Click Through Daemon installation program from the installation media to the directory that you created.
In the Click Through Daemon installation directory, run the Click Through Daemon installation program.
In the Installation dialog box, review the information, and then click Next.
In the Choose Java Virtual Machine dialog box, select the Java Runtime Environment (JRE) that you installed in Requirements for Installing Email Marketing, and then click Next.
Note: Make sure that you choose the correct JRE. Selecting the wrong JRE prevents the Click Through Daemon from starting properly.In the Choose Install Folder dialog box, choose the Click Through Daemon installation directory, and then click Next.
Note: Make sure that there are no spaces in the installation directory path.Review the Pre-Installation Summary dialog box, and then click Install.
In the Install Complete dialog box, verify the information, and then click Done.
Navigate to the Start menu, Settings, Control Panel, Administrative Tools, and then the Services application.
-
If the Siebel Click Through Daemon service does not exist, create a Windows service for stopping and starting the service as follows:
Navigate to the directory where you installed Click Through Daemon in Step 5.
Double-click the
install-win32-service.batfile. This creates the Click Through Daemon service in the Windows services list.
Roadmap for Configuring Email Marketing Daemons
This topic contains the information that you need to configure Email Marketing Server and the Siebel Marketing application so that they can communicate with each other. To configure the Email Marketing daemons, perform the following tasks and processes:
Before You Begin
Many of the configuration values you must specify for the Email Marketing daemons are specified in the properties file for the component, for example, the URL used to connect the Email Sending Daemon to Siebel Marketing, the location of the Siebel File System, and various other parameters that control the behavior of the Email Marketing components.
The component properties files, esd.properties, bhd.properties, and ctd.properties, are located in the ESD_root, BHD_root, and CTD_root installation directories, respectively. For additional information about the properties files, see New and Changed Properties in the esd.properties Configuration File.
Identifying the Web Service Endpoint URL
The Email Marketing components use the Web service endpoint URL to connect with Siebel Marketing. This topic describes how to identify the Web service endpoint URL. You require the URL when configuring each of the Email Marketing daemons.
This task is a step in Roadmap for Configuring Email Marketing Daemons.
To identify the Web services endpoint URL
Log in to Siebel Server.
Navigate to the Administration - Web Services screen, then the Inbound Web Services view.
In the Name field, query for the WebMarketing Web service.
In the Service Ports applet, copy the contents of the Address field.
Process of Configuring the Email Sending Daemon
This topic contains the configuration tasks you need to perform so that the Marketing application can communicate with the Email Sending Daemon. Additionally, you must configure the Email Sending Daemon to read files from the Marketing File System and communicate with the outbound Mail Transfer Agents. During these tasks, you have an opportunity to verify that the Email Sending Daemon has been correctly installed and configured. For information about this test, see Process of Testing the Email Marketing Components with Siebel Marketing.
This process is a step in Roadmap for Configuring Email Marketing Daemons.
To configure the Email Sending Daemon to connect to the Marketing Server, perform the following tasks:
Identifying the Outbound Mail Transfer Agents for the Email Sending Daemon
Configuring the Email Sending Daemon to Access the Marketing File System
Configuring Web Services Properties for the Email Sending Daemon
Configuring the Marketing Application to Connect to the Email Sending Daemon
Configuring the Email Address Headers for the Email Marketing Server
Identifying the Outbound Mail Transfer Agents for the Email Sending Daemon
The Email Sending Daemon (ESD) must have one or more outbound Mail Transfer Agents (MTAs) to deliver the email over the Internet. If you specify multiple MTAs, then the ESD uses the additional MTAs as backups. In the esd.properties file, you specify the names of your MTAs. When the ESD starts, it uses the first MTA on the list. When an MTA fails, the ESD uses the next MTA on the list. To use the first MTA again, you must restart the ESD, usually by rebooting the server.
This task is a step in Process of Configuring the Email Sending Daemon.
To identify the outbound Mail Transfer Agent for ESD
Determine the hostname of the outbound Mail Transfer Agent.
Open the esd.properties file in a text editor such as WordPad (Windows) or vi (UNIX).
Locate the string esd.mailServers.
In the string esd.mailServers, replace "CHANGE_ME" with the hostname of the outbound Mail Transfer Agent. If there is more than one, then separate them with commas.
Save your changes.
Configuring the Email Sending Daemon to Access the Marketing File System
The Email Sending Daemon needs to access the Siebel Marketing File System to load the email message content (generated from the email offers and attachments) and the subwaves of contacts and prospects generated for a campaign wave. This topic describes how to configure the Email Sending Daemon to access the Siebel Marketing File System.
This task is a step in Process of Configuring the Email Sending Daemon.
Configuring the Email Sending Daemon to Access the Marketing File System on a Windows Server
The following procedure describes how to configure the Email Sending Daemon to access the Marketing File System on a Windows Server.
To configure the ESD to access the Marketing File System on a Windows Server
Log in to Siebel Server.
Navigate to the Administration - Server Configuration screen, Servers, and then the Parameters view.
Query for Marketing File System.
Write down the value of this parameter to use later in this task.
Identify the Windows share name for this directory.
Write down this name to use later in this task.
Open the esd.properties file with a text editor, such as WordPad.
In the string esd.mountPoint, replace "CHANGE_ME" with the following path, using the share name determined in Step 4:
\\\\siebel_server_hostname\\marketing_file_system_share_name
Use two backslashes for each standard single backslash when defining this path. For example,
C:\WindowsisC:\\Windows.Caution: If the Marketing File System is on the same server as the Email Sending Daemon, then use the complete path to the Marketing File System instead of the share name to avoid potential permission issues.Save your changes to the esd.properties file.
Configuring the Email Sending Daemon to Access the Marketing File System on UNIX
The following procedure describes how to configure the Email Sending Daemon to access the Marketing File System on a UNIX server.
To configure the ESD to access the Marketing File System on a UNIX Server
Log in to Siebel Server.
Navigate to the Administration - Server Configuration screen, Servers, and then the Parameters view.
Query for Marketing File System.
Write down the value of this parameter to use later in this task.
Determine if this directory is exported through NFS. If it is not, then export it.
Open the esd.properties file with a text editor, such as vi.
On the Email Sending Daemon server, make sure the Marketing File System is NFS mounted. If it is not, then mount it at this time.
Write down the full path name of the mounted Marketing File System to use later in this task.
In the string esd.mountPoint, at the right of the string, add the Marketing File System NFS mount directory.
Save your changes to the esd.properties file.
Configuring the SOAP Communications Port
The Marketing application on Siebel Server communicates with the Email Sending Daemon using the SOAP protocol, which uses HTTP requests. You must configure the Email Sending Daemon to listen for these HTTP requests on a specific port. This task is described in the following procedure.
This task is a step in Process of Configuring the Email Sending Daemon.
To configure the SOAP communications port
Consider what port number you want to use to service the SOAP commands (HTTP requests) on the Email Sending Daemon.
Because this HTTP server does not service standard HTTP requests such as Web pages, any port can be used (even the default of 8090). Write down the port number you decide to use.
At the following location, open the server.xml file in a text editor:
esd_installation_directory\config\server.xml
Locate the XML tag Connector by searching for the following phrase:
Define a non-SSL Coyote HTTP/1.1 Connector
Identify the value of the port attribute and, if necessary, change it to the value you chose in Step 1.
The default value is 8090.
Save the change.
You need this port number again in a subsequent task.
Configuring Web Services Properties for the Email Sending Daemon
You can configure the Web services properties for the Email Sending Daemon by changing the properties in the esd.properties file.
This task is a step in Process of Configuring the Email Sending Daemon.
To configure the Web services properties for the Email Sending Daemon
Navigate to the esd.properties file in the ESD_root installation directory.
Open the esd.properties file in a text editor.
Change the Web services properties in the esd.properties file as indicated in the following table.
Property Description Web Service URL
esd.handler.webservice.url=CHANGE_ME
Replace CHANGE_ME with the URL obtained in Identifying the Web Service Endpoint URL.
Web Service username
esd.handler.webservice.username=CHANGE_ME
Replace CHANGE_ME with the Administration user name.
Web Service password
esd.handler.webservice.password=CHANGE_ME
Replace CHANGE_ME with the Administration user password.
(Optional) If you choose to encrypt the Web service username and password using the JMangle algorithm, then set the JAR_PATH environment variable in the jmangle.bat file. The jmangle.bat file is located in the ESD_root
/bindirectory.Make sure that the value you specify for the JAR_PATH reflects the directory structure of the ESD_root
/bindirectory. For example:JAR_PATH=../common/lib/Siebel.jar;../common/lib/common.jar
Verifying the Email Sending Daemon Installation
At this point, you can test the installation of the Email Sending Daemon. To verify that the installation was successful, you start the Email Sending Daemon and then perform several verification steps. For information about testing how the Email Marketing components and the Marketing application work together, see Process of Testing the Email Marketing Components with Siebel Marketing.
This task is a step in Process of Configuring the Email Sending Daemon.
Starting the Email Sending Daemon on a Windows Server
The following procedure describes how to start the Email Sending Daemon on a Windows server.
To start the Email Sending Daemon on a Windows Server
From the Start menu, choose Settings and then the Control Panel menu item.
In Control Panel, choose Administrative Tools and then Services.
Right-click the Email Sending Daemon service and select Start.
Starting the Email Sending Daemon on a UNIX Server
The following procedure describes how to start the Email Sending Daemon on a UNIX server.
To start the Email Sending Daemon on a UNIX server
Open a window and navigate to the Email Sending Daemon install directory.
Enter and run the following command:
./tomcat-ctl.sh start &
Optionally, you can enter and run the following commands:
./tomcat-ctl.sh start &; tail -f logs/esd.log
Note: The first command (./tomcat-ctl.sh start &) launches the daemon. The second command (tail -f logs/esd.log) displays output to the esd log as it is running without generating a read lock on the file. A read lock would prevent these commands from working.
Verifying the Email Sending Daemon Installation
The following procedure describes how to verify the Email Sending Daemon installation.
To verify the Email Sending Daemon installation
Open the esd_InstallLog.log file located in the esd installation directory and read the summary at the start of the file.
Make sure it says that the installation was successful with no warnings or errors. If there are warnings or errors, then you must identify the cause and fix the error.
Verify that the Email Sending Daemon Windows Service or UNIX process runs and stays running without an error message.
Verify that a esd.log file exists in the following directory:
esd installation directory\logs\esd.log
- Verify that the following text is in the esd.log file:
INFO OnPremiseAppListener ESD is licensed.
Make sure there are no ERROR or WARN level messages in the esd.log file.
Confirm that the Email Sending Daemon Web container is running.
Note: You need the port number that you obtained in Configuring the SOAP Communications Port.Verify that you can open the following Web page without error using Internet Explorer:
http://email_sending_daemon_server_hostname:email_sending_daemon_soap_port/esd/
soaprpc
Configuring the Marketing Application to Connect to the Email Sending Daemon
This topic describes how to set up the Marketing application to connect to the Email Sending Daemon.
This task is a step in Process of Configuring the Email Sending Daemon.
To configure the Marketing application to connect to the Email Sending Daemon
Open Internet Explorer and navigate to the Siebel Marketing Server login screen. For example:
http://marketing server hostname/marketing_enu
Log in as the server administrator.
Navigate to the Administration - Web Services screen, and then the Outbound Web Services view.
In the Outbound Web Services list, in the Name field, query for SendMailingService.
In the Service Ports list, in the SendMailing record, perform the following steps:
Obtain the Web Port Id identified in Configuring the SOAP Communications Port.
In Address field, change the URL using the following syntax:
http://esd server hostname:esd web port/esd/soaprpc
Click Clear Cache.
Navigate to the Administration - Marketing screen, and then the Servers view.
In the Servers list, in the Name field, query for Email Marketing Server.
In the parameters list, locate the Email Sending Daemon (ESD) parameter, and verify that the Outbound Web Service Port field contains SendMailing.
Configuring the Email Address Headers for the Email Marketing Server
This topic describes how to configure the From and Reply-To headers for outbound email sent using the Email Sending Daemon.
This task is a step in Process of Configuring the Email Sending Daemon.
To configure the From Address and Reply-To Address for the Email Marketing Server
Navigate to the Administration - Marketing screen, and then the Servers view.
In the Servers list, in the Name field, query for Email Marketing Server.
In the parameters list, in the Value field, update the values as shown in the following table.
Parameter Type Value From Address (From header)
email address
An address to use as the From header for outgoing emails.
Reply To Address (Reply-To header)
email address
An address to use as the Reply-To header for outgoing emails.
Process of Configuring the Bounce Handler Daemon
The Bounce Handler Daemon notifies the Marketing Component Group that it has processed asynchronous bounces and needs to pass these bounce details to the Marketing Component Group. This topic contains the information that you need to configure the Bounce Handler Daemon to communicate with the Marketing Component Group.
This process is a step in Roadmap for Configuring Email Marketing Daemons.
To configure the Bounce Handler Daemon, perform the following tasks:
Configuring Web Services Properties for the Bounce Handler Daemon
Review About Creating Classification Rules for Bounce Messages
Configuring How the Bounce Handler Daemon Classifies Bounce Messages
Verifying the Bounce Handler Daemon Installation
To verify that the Bounce Handler Daemon installation was successful, you start the Bounce Handler Daemon and then perform installation tests. This topic describes these tasks. For information about testing how the Email Marketing components and the Marketing Component Group work together, see Process of Testing the Email Marketing Components with Siebel Marketing.
This task is a step in Process of Configuring the Bounce Handler Daemon.
Starting the Bounce Handler Daemon on a Windows Server
To start the Bounce Handler Daemon on a Windows server, perform the steps in the following procedure.
To start the Bounce Handler Daemon on a Windows Server
From the Start menu, choose Settings and then the Control Panel menu item.
In Control Panel, choose Administrative Tools and then Services.
Right-click the bhd service and select Start.
Starting the Bounce Handler Daemon on a UNIX Server
To start the Bounce Handler Daemon on a UNIX server, perform the steps in the following procedure.
To start the Bounce Handler Daemon on a UNIX server
Open a window and navigate to the Bounce Handler Daemon install directory.
Enter and run the following command:
./bin/bhd-ctl.sh start &
Optionally, you can enter and run the following commands:
./bin/bhd-ctl.sh start &; tail -f bhd.log
The first command (./bin/bhd-ctl.sh start &) launches the daemon. The second command (tail -f bhd.log) displays output to the bhd log as it is running without generating a read lock on the file. A read lock would prevent these commands from working.
Verifying the Bounce Handler Daemon Installation
To verify the Bounce Handler Daemon installation, perform the steps in the following procedure.
To verify the Bounce Handler Daemon installation
Verify that the Bounce Handler Daemon Windows Service or UNIX process is running and stays running without an error message.
Open the bhd_InstallLog.log file (found in the bhd installation directory) and read the Summary at the start of the file. Make sure it says that the installation was successful with no warnings or errors. If there are warnings or errors, then you must identify the cause and fix the error.
Verify that a bhd.log file exists in the following directory:
bhd installation directory\logs\bhd.log
Verify that the following text is in the bhd.log file:
INFO OnPremiseMain BHD is licensed.
Make sure there are no ERROR or WARN level messages in the bhd.log file.
From a command prompt window, telnet to the Bounce Handler Daemon SMTP port (25) (for example, telnet bhd.example.com 25), wait for a greeting, and then enter the word quit and press ENTER. Your telnet session then ends.
Configuring the Bounce Address of the SMTP Envelope
This topic describes how to configure the hostname that you use to create the bounce address of the SMTP envelope. This bounce address is the email address that receives bounced emails. The hostname you use as the bounce address is the host name of the Bounce Handler Daemon.
This task is a step in Process of Configuring the Bounce Handler Daemon.
To configure the SMTP envelope bounce address
Navigate to the Siebel Marketing login screen at
http://marketing application hostname/marketing_enu
Log in as the server administrator.
Navigate to the Administration - Marketing screen and then the Servers view.
In the Servers list, in the Name field, query for Email Marketing Server.
In the parameters list, in the Value field, update the values as shown in the following table.
Parameter Type Value Bounce Handler Daemon (BHD)
bhd server hostname
Configuring Web Services Properties for the Bounce Handler Daemon
You can configure the Web Services properties for the BHD by changing the properties in the bhd.properties file. This topic describes this task.
This task is a step in Process of Configuring the Bounce Handler Daemon.
To configure Web services properties for the Bounce Handler Daemon
Navigate to the bhd.properties file in the BHD_root installation directory.
Open the bhd.properties file in a text editor such as WordPad (Windows) or vi (UNIX).
Change the Web services properties in the bhd.properties file as indicated in the following table.
Property Description Web Service URL
bhd.webservice.url=CHANGE_ME
Replace CHANGE_ME with the URL obtained in Identifying the Web Service Endpoint URL.
Web Service username
bhd.webservice.username=CHANGE_ME
Replace CHANGE_ME with the Administration user name.
Web Service password
bhd.webservice.password=CHANGE_ME
Replace CHANGE_ME with the Administration user password.
(Optional) If you choose to encrypt the Web service username and password using the JMangle algorithm, then set the JAR_PATH environment variable in the jmangle.bat file. The jmangle.bat file is located in the BHD_root
/bindirectory.Make sure that the value you specify for the JAR_PATH reflects the directory structure of the BHD_root
/bindirectory. For example:../lib/Siebel.jar;../lib/common.jar
About Creating Classification Rules for Bounce Messages
You can extend the Bounce Handler Daemon's ability to recognize different categories and types of bounces by creating rules that specify how values in the delivery status notification messages received for undelivered emails are to be classified. You create new bounce classification rules in the following files, which are located in the bhd_install_home/config directory:
customDCBounceConfig. Used to define rules for classifying bounce messages by matching specified string values in the Diagnostic Code entry of the delivery status notification message
customFromBounceConfig. Used to define rules for classifying bounce messages by matching specified string values in the From header of the delivery status notification message
customSubjectBounceConfig. Used to define rules for classifying bounce messages by matching specified string values in the Subject header of the delivery status notification message
You can create as many bounce message classification rules as required for your Siebel Marketing environment. If you create custom classification rules, then bounce messages are classified using these custom rules. If you choose not to create custom classification rules, or if the Email Marketing Server cannot find a match for an undelivered email in the custom classification rules you create, then bounce messages are classified using standard Siebel Marketing functionality.
Note that you cannot customize the following Bounce Handler Daemon processing functionality:
If the delivery status notification message for an undelivered email contains a Diagnostic Code entry, then entries in the customFromBounceConfig and customSubjectBounceConfig files are not processed.
If the delivery status notification message does not contain a Diagnostic Code entry, then entries in the customFromBounceConfig file take precedence over entries in the customSubjectBounceConfig file.
If the delivery status notification message for an undelivered email contains a From header which includes a value equal to MAILER-DAEMON, then entries in the customFromBounceConfig and customSubjectBounceConfig files are not processed.
If the delivery status notification message for an undelivered email contains an Action field which includes a value equal to Failed, then entries in the customFromBounceConfig and customSubjectBounceConfig files are not processed.
Configuring How the Bounce Handler Daemon Classifies Bounce Messages
You can configure how the Bounce Handler Daemon classifies bounce messages by defining custom classification rules. This topic describes how to perform this configuration task. For information about the files used to define custom classification rules, see About Creating Classification Rules for Bounce Messages.
This task is a step in Process of Configuring the Bounce Handler Daemon.
The following procedure describes how to create custom rules for classifying bounce messages.
To define classification rules for bounce messages
Navigate to the bhd_install_home
/configdirectory.Using a text editor, edit the appropriate customxxBounceConfig file.
The file you edit will vary according to whether you want to create a classification rule by matching values in the Diagnostic Code entry, or the From header, or the Subject header of the delivery status notification message for the undelivered email. For additional information about the customxxBounceConfig files, see About Creating Classification Rules for Bounce Messages.
To create a classification rule by matching string values in the Diagnostic Code entry of the delivery status notification message, add the entries shown in the following table to the customDCBounceConfig file.
Parameter Value DIAGNOSTICCODEDATA=
The diagnostic code you want to match. Either enter the exact string you want to match, or enter the value in the form of a regular expression. For information on regular expression notation, see the Java 2 Platform Standard Edition 5.0 API Specification at
http://docs.oracle.com/javase/1.5.0/docs/api/java/util/regex/Pattern.html#sum
Information on regular expressions is also available at http://www.vogella.com/articles/JavaRegularExpressions/article.html
CODE=
The value you want to assign bounce messages that contain the diagnostic code specified in the DIAGNOSTICCODEDATA parameter.
HARD=
Enter either Yes or No to indicate whether or not bounce messages that include the diagnostic code specified in the DIAGNOSTICCODEDATA parameter are to be classified as hard bounces.
A hard bounce refers to an email that cannot ever be delivered. A soft bounce refers to an email that cannot be delivered at present, but that can possibly be delivered in the future.
For example, you might want to classify bounce messages that include the following diagnostic code:
Diagnostic-Code: smtp; 5.4.7 - Delivery expired (message too old) 421-'4.7.0
[TS01] Messages from 155.91.38.221 temporarily deferred due to user complaints -
4.16.55.1; see http://postmaster.yahoo.com/421-ts01.html' (delivery attempts: 1)
To assign these bounce messages a code of MAILBOX_CUSTOMSTATE, and to classify them as soft bounces, enter the following values:
DIAGNOSTICCODEDATA=.*5\\.4\\.7.*
CODE=MAILBOX_CUSTOMSTATE
HARD=no
To create a classification rule by matching string values in the From header of the delivery status notification message, add the entries shown in the following table to the customFromBounceConfig file.
Parameter Value FROMDATA=
The string value in the From header that you want to match. Either enter the exact string to match, or enter the value in the form of a regular expression. See Step 3 for information on regular expressions.
CODE=
The code you want to assign bounce messages that contain the specified string in the From header.
HARD=
Enter either Yes or No to indicate whether or not bounce messages that include the specified string are to be classified as hard bounces.
For example, to classify bounce messages returned from a specific Mail Transfer Agent as hard bounces, and to assign them a code of BAD_ADDRESS, enter the following values:
FROMDATA=.*name_of_mailer.*
CODE=BAD_ADDRESS
HARD=yes
To create a classification rule by matching string values in the Subject header of the delivery status notification, add the entries in the following table to the customSubjectBounceConfig file.
Parameter Value SUBJECTDATA=
The string value in the Subject header that you want to match. Either enter the exact string to match, or enter the value in the form of a regular expression. See Step 3 for information on regular expressions.
CODE=
The code you want to assign bounce messages that contain the specified string in the Subject header.
HARD=
Enter either Yes or No to indicate whether or not bounce messages that include the specified string are to be classified as hard bounces.
For example, to classify bounce messages that contain the string VACATION in the Subject header as soft bounces, and to assign them a code of AUTO_REPLY, enter the following values:
SUBJECTDATA= (?i).*VACATION.*
CODE=AUTO_REPLY
HARD=no
Note: In the SUBJECTDATA field, the values (?i) indicate that the match is case-insensitive.If you create custom bounce codes for the CODE parameter, you must also add the new code value to the Siebel BOUNCE_REASON_CODE Lists of Values (LOV).
For information about customizing Siebel CRM LOVs, see Siebel Applications Administration Guide.
After creating a custom rule, stop and restart the Bounce Handler Daemon for the rule to take effect.
Process of Configuring the Click Through Daemon
This topic contains the information that you need to configure the Click Through Daemon to communicate with the Marketing Component Group. The Click Through Daemon needs to pass the server details about the HTTP requests it has serviced (Tracked URLs, Forward To Friend, and so on) to the Marketing Component Group.
This process is a step in Roadmap for Configuring Email Marketing Daemons.
To configure the Click Through Daemon to connect to the Marketing Component Group, perform the following tasks:
Configuring the Click Through Daemon, Web Marketing, and Events Base URLs
Configuring Web Services Properties for the Click Through Daemon
Configuring the Click Through Daemon HTTP Server Port
Personalization elements sent in emails to contacts and prospects that the Click Through Daemon services (for example, Track Message Open, Tracked URLs, and so on) must be able to issue HTTP requests to the Click Through Daemon. You must configure your firewalls or DMZ to service these requests and the Email Sending Daemon to listen for these HTTP requests on a specific port. This topic describes this task.
This task is a step in Process of Configuring the Click Through Daemon.
To configure the Click Through Daemon HTTP server port
Identify the port number to use to service HTTP requests on the Click Through Daemon and write it down for use in subsequent tasks.
Configure your firewall to properly service these requests over this port.
Open the server.xml file in the ctd_installation_directory\
confdirectory with a text editor.Search for the following phrase:
Define a non-SSL Coyote HTTP/1.1 Connector
Search for the XML tag Connector using the following phrase:
Find the value of the port attribute
By default this value is 8060. If you chose a different port number to service HTTP requests on the Click Through Daemon, then change the port attribute value and save the file.
Verifying the Click Through Daemon Installation
To verify the Click Through Daemon installation was successful, you start the Click Through Daemon and then perform the installation test. For information about testing how the Email Marketing components and the Marketing Component Group work together, see Process of Testing the Email Marketing Components with Siebel Marketing.
This task is a step in Process of Configuring the Click Through Daemon.
Starting the Click Through Daemon on a Windows Server
The following procedure describes how to start the Click Through Daemon on a Windows server.
To start the Click Through Daemon on a Windows Server
From the Start menu, choose Settings and then the Control Panel menu item.
In Control Panel, choose Administrative Tools and then Services.
Right-click the ctd service and select Start.
Starting the Click Through Daemon on a UNIX Server
The following procedure describes how to start the Click Through Daemon on a UNIX server.
To start the Click Through Daemon on a UNIX server
Open a window and navigate to the Click Through Daemon install directory.
Enter and run the following command:
./tomcat-ctl.sh start &
Optionally, you can enter and run the following commands:
./tomcat-ctl.sh start &; tail -f logs/ctd.log
Note: The first command (./tomcat-ctl.sh start &) launches the daemon. The second command (tail -f logs/ctd.log) displays output to the ctd log as it is running without generating a read lock on the file. A read lock would prevent the tail command from working.
Verifying the Click Through Daemon Installation
The following procedure describes how to verify the Click Through Daemon installation.
To verify the Click Through Daemon installation
Verify that the Click Through Daemon MS Windows service or UNIX process runs and stays running without an error message.
Open the ctd_InstallLog.log file in the ctd installation directory and read the Summary at the start of the file.
Make sure it says that the installation was successful with no warnings or errors. If there are warnings or errors, then you must identify the cause and fix the error.
Verify that a ctd.log file exists in the directory
ctd_installation_directory\logs.Verify that the following text is in the ctd.log file:
INFO OnPremiseAppListener CTD is licensed.
Make sure there are no ERROR or WARN level messages in the ctd.log file.
Confirm that the Click Through Daemon Web container is running.
Note: To do this, you need the port number that you obtained in Configuring the Click Through Daemon HTTP Server Port.Verify that you can open the following Web page without an error using Internet Explorer
http://Click_Through_Daemon_server_hostname:Click_Through_Daemon_http_port/ctd/
soaprpc
Configuring the Click Through Daemon, Web Marketing, and Events Base URLs
This topic describes how to configure the base URLs for URLs sent in email campaigns. The following are the sets of base URLs that can be generated:
Click Through Daemon base URL (used for Tracked URLs, Forward To Friend, and so on)
Web Marketing base URL
Events base URL
This task is a step in Process of Configuring the Click Through Daemon.
To configure base URLs for email campaigns
Navigate to the Siebel Marketing Server login screen at
http://marketing application hostname/marketing_enu
Log in as the server administrator.
Navigate to the Administration - Marketing screen and then the Servers view.
In the Servers list, in the Name field, query for Email Marketing Server.
In the parameters list, in the Value field, update the values as shown in the following table.
Parameter Type Value Click Through Daemon (CTD)
http://Click Through Daemon server hostname:port number
Web Server
URL for Web Marketing;URL for Events
For example:
http://hostname/emarketing_enu;

http://hostname/eevents_enu
Configuring Web Services Properties for the Click Through Daemon
You can configure the Web Services properties for the CTD by changing the properties in the ctd.properties file, located in the CTD_root_installation directory.
This task is a step in Process of Configuring the Click Through Daemon.
To configure Web services properties for the Click Through Daemon
Navigate to the ctd.properties file in the CTD_root_installation directory.
Open the ctd.properties file in a text editor.
Change the Web services properties in the ctd.properties file as indicated in the following table.
Property Description Web Service URL
ctd.webservice.url=CHANGE_ME
Replace CHANGE_ME with the URL obtained in Identifying the Web Service Endpoint URL.
Web Service username
ctd.webservice.username=CHANGE_ME
Replace CHANGE_ME with the Administration user name.
Web Service password
ctd.webservice.password=CHANGE_ME
Replace CHANGE_ME with the Administration user password.
(Optional) If you choose to encrypt the Web service username and password using the JMangle algorithm, then set the JAR_PATH environment variable in the jmangle.bat file. The jmangle.bat file is located in the CTD_root
/bindirectory.Make sure that the value you specify for the JAR_PATH reflects the directory structure of the CTD_root
/bindirectory. For example:JAR_PATH=../common/lib/Siebel.jar;../common/lib/common.jar
Configuring Email Marketing Components for HTTPS Communications
This topic describes how to configure the Email Marketing Server components to support communications with Siebel Marketing using the HTTPS protocol.
This task is a step in Roadmap for Configuring Email Marketing Daemons.
If the Siebel Web server has been configured to use SSL or TLS encryption for communications with Web clients (HTTPS protocol), and if the Web service endpoint URL that the Email Marketing components use to connect with Siebel Marketing uses HTTPS, then you must perform the following tasks:
Import the certificate file used by the Siebel Web server onto the computer on which you installed the Email Marketing components.
Configure the Windows services or UNIX shell scripts used to start the Email Marketing Server components for HTTPS.
The procedures in this topic describe how to perform these tasks in a Windows environment and in a UNIX environment.
Configuring the Email Marketing Server to Use HTTPS on UNIX
The following procedure describes how to configure Email Marketing Server components for HTTPS communications on a UNIX environment.
To configure the Email Marketing Server to Use HTTPS on UNIX
On the computer on which you installed the Email Sending Daemon, create a keystore file for the CA certificate used by the Siebel Web server using a program such as Java keytool.
For example, create a keystore file named cacerts.
On the computer on which the Email Sending Daemon is installed, verify that the
JAVA_HOMEvariable is set to the installation directory of the JRE environment that is being used by the Email Sending Daemon, and verify that the PATH variable includes theJAVA_HOME/binfolder.Note: The Siebel Web server certificate file must be imported in thelib\securityfolder of the Java Runtime Environment (JRE) environment being used by the Email Marketing Server daemons. For information, see Installing the Java Runtime Environment.Import the Siebel Web server CA certificate file into the keystore file you created in Step 1 using the following command:
keytool -import -alias hostname -file certificate_file_name -keystore
keystore_name -storepass keystore_password
where:
hostname is the name of the Email Sending Daemon host computer.
certificate_file_name is the name of the certificate file.
keystore_name is the name of the keystore file you created in Step 1.
keystore_password is the keystore file password.
If you not specify the full path to the keystore file, the file is created in the user home folder.
(Optional) If the Click Through Daemon is installed on a different computer to the Email Sending Daemon, create a keystore file and import the Siebel Web server certificate into the keystore file on the Click Through Daemon computer.
To perform these tasks, follow the instructions in Step 1 through Step 3, substituting references to the Email Sending Daemon with the Click Through Daemon.
(Optional) If the Bounce Handler Daemon is installed on a different computer to the Email Sending Daemon, create a keystore file and import the Siebel Web server certificate into the keystore file on the Bounce Handler Daemon computer.
To perform these tasks, follow the instructions in Step 1 through Step 3, substituting references to the Email Sending Daemon with the Bounce Handler Daemon.
When configuring the Web services properties for Email Sending Daemon, Click Through Daemon, and Bounce Handler Daemon, make sure that the URL specified for the
component.handler.webservice.urlparameter points to a Siebel Inbound Web service that uses HTTPS.
For additional information on this task, see the following:
Configuring the Email Marketing Server to Use HTTPS on Microsoft Windows
The following procedure describes how to configure Email Marketing Server components for HTTPS communications on a Microsoft Windows environment.
To configure the Email Marketing Server to Use HTTPS on Windows
On the computer on which you installed the Email Sending Daemon, create a keystore file for the CA certificate file used by the Siebel Web server using a program such as Java keytool.
For example, create a keystore file named cacerts.jks.
Import the Siebel Web server certificate file into the
lib\securityfolder of the Java Runtime Environment (JRE) being used by the Email Marketing Server daemons as described in Steps 2 and 3 in Configuring the Email Marketing Server to Use HTTPS on UNIX .(Optional) If the Click Through Daemon is installed on a different computer to the Email Sending Daemon, create a keystore file and import the Siebel Web server certificate into the keystore file on the Click Through Daemon computer.
To perform these tasks, follow the instructions in Steps 1 through 3 in Configuring the Email Marketing Server to Use HTTPS on UNIX, substituting references to the Email Sending Daemon with the Click Through Daemon.
(Optional) If the Bounce Handler Daemon is installed on a different computer to the Email Sending Daemon, create a keystore file and import the Siebel Web server certificate into the keystore file on the Bounce Handler Daemon computer.
To perform these tasks, follow the instructions in Steps 1 through 3 in Configuring the Email Marketing Server to Use HTTPS on UNIX , substituting references to the Email Sending Daemon with the Bounce Handler Daemon.
When configuring the Web services properties for Email Sending Daemon, Click Through Daemon, and Bounce Handler Daemon, make sure that the URL specified for the
component.handler.webservice.urlparameter points to a Siebel Inbound Web service that uses HTTPS
(Optional) Verifying Email Marketing Component Configuration
After you have installed and configured the Email Marketing components, you can optionally use the Email Marketing configuration check utility provided with Siebel Marketing to verify your configuration. The Email Marketing configuration check performs tests to verify that the Email Sending Daemon, the Bounce Handler Daemon, and the Click Through Daemon components are correctly setup and functioning.
To use the Email Marketing configuration check utility, run the end2end.jar file for each component, as described in the following procedure.
To verify Email Marketing component configuration
Start the ESD, the CTD, and the BHD components as Windows services.
To start the Email Marketing configuration check, run the following command from the command line for each of the ESD, BHD, and CTD components in turn:
java -DpropertyFile=component_property_file_path -jar component-end2end.jar_path
where:
component_property_file_path is the full path to the component’s property file.
component-
end2end.jar_path is the full path to the end2end.jar file for the component, which is located in the component_root\webapps\component\WEB-INF\lib directory.
The following is an example of the command to run for the Email Sending Daemon:
java –DpropertyFile=D:\programs\esd\esd.properties –jar D:\Program
Files\esd\webapps\esd\WEB-INF\lib\esd-end2end.jar
The following table shows some of the tests performed by the Email Marketing configuration check for each component.
| Component | Conditions Verified by the Configuration Check Utility |
|---|---|
Email Sending Daemon |
|
Click Through Daemon |
|
Bounce Handler Daemon |
|
Process of Testing the Email Marketing Components with Siebel Marketing
This topic describes how to test all the Email Marketing components and the Siebel Marketing application together as a complete product. This test involves sending a test email to three or more test contacts. The content of the test email template must include links to test the Click Through Daemon, the Web Marketing Server, and the Events server. Make sure at least two of the contacts are invalid email addresses, one within the corporate domain, and one outside the corporate domain. These test bounce handling and bounce detail communications for the Email Sending Daemon and the Bounce Handler Daemon. Additionally, send email to at least one email account that you can access outside of your corporate network. This tests your Email Sending Daemon, DNS alterations, and corporate firewall configurations.
To perform this comprehensive test of the Email Marketing components, perform the following tasks:
Creating the Test Email Template
Create a test email template as described in the following procedure.
This task is a step in Process of Testing the Email Marketing Components with Siebel Marketing.
To create the test email template
Create a test email template to verify your Email Marketing components are correctly installed and configured. For information about creating an email template, see Siebel Marketing User Guide.
When you create the test email template, make sure you add a One-Click Unsub Response Form, a Web Offer link, and an Event link.
Note: Because this email is sent over the Internet, it is recommended that you add text that announces that this is a test email, offers your apologies if someone unintended receives it, and provides information so the recipients can contact you.
Sending the Test Email Template to Test Contacts
Send the test email template as described in the following procedure.
This task is a step in Process of Testing the Email Marketing Components with Siebel Marketing.
To send the test email template
Determine the contacts to whom the test email template is sent, create an email offer from it, and send it to these contacts.
Whether you use a list or a segment to generate your target contacts for this test, make sure the following three contact types are included:
Invalid contact email address within the corporate domain. This tests communication from the Email Sending Daemon to the Marketing Component Group. The Email Sending Daemon reports synchronous bounces to the Marketing Component Group. An invalid email address within the corporate domain generates a synchronous bounce from the Mail Transfer Agent.
Note: The administrator must make sure that the Mail Transfer Agent is configured to handle synchronous bounces and confirm that the contact's email address generates a synchronous bounce. This is desirable even if the Mail Transfer Agent is normally not configured to handle synchronous bounces. The reason for this is to make sure that if the normal Mail Transfer Agent configuration changes and starts performing synchronous bounces, then your server can properly record them. After testing, the administrator can return the Mail Transfer Agent to its normal configuration.Invalid contact email address outside of the corporate domain. This tests the corporate firewall and Internet DNS configuration of the Bounce Handler Daemon. This also tests communication between the Bounce Handler Daemon and the Marketing Component Group. An invalid email address for a domain other than the corporate domain generates an asynchronous bounce. The Bounce Handler Daemon must be able to receive bounced emails, process bounced emails, and send the bounce details to the Marketing Component Group.
Be aware that some email domains (such as aol.com) do not generate bounces. Also, be aware that email bounces are not guaranteed to be returned. It can take some research to determine whether the problem is actually the Bounce Handler Daemon or one of a number issues not related to the installation and configuration of the Email Marketing components.
Valid contact email address for an email account accessible outside of the corporate firewall. This tests the corporate firewall and Internet DNS configuration with the Click Through Daemon, Web Server, and Event Server. This tests communication between the Click Through Daemon and the Marketing Server. The email sent to a valid contact contains a One-Click Unsub Response Form, a Web Offer link, and an Event link. The tester must access this account and email from a computer outside the corporate firewall to correctly execute this test.
Launch a campaign using a list or segment including the described types of contacts.
Monitor the campaign to make sure that it succeeds without any errors. One example of an error is an error message in the log containing the word SOAP. This indicates that the Siebel Marketing application is not correctly configured to communicate with the Email Sending Daemon.
Confirming That Tests Function as Expected
Perform the tests in this topic to confirm that the Siebel Marketing application performed as expected.
This task is a step in Process of Testing the Email Marketing Components with Siebel Marketing.
To confirm that tests function as expected
Test an email offer sent to a valid contact email address as follows:
Verify that the email offer was received. Find a computer that is outside of the corporate network and has access to the valid contact’s email account. Then you must access that account from the computer that is outside of the corporate network.
Results of test. If the email offer is received, then you have confirmed the following results:
The Marketing Server communicates with the Email Sending Daemon.
The Email Sending Daemon can access the email message content and subwaves from the Marketing File System.
The Email Sending Daemon can send email to email accounts outside of the corporate domain using the corporate Mail Transfer Agents.
The email message From and Reply-To headers are correct.
Click the One Click Unsub link in the email.
A Web page that is hosted by the Click Through Daemon appears with the message, You have been unsubscribed!
Results of test. This message confirms that you correctly configured the Click Through Daemon for the corporate firewall and it has been properly added to the Internet DNS records. Additionally, this confirms that the Marketing application has been correctly configured with the base URL for the Click Through Daemon.
Click the One Click Unsub link in the email for the Web Offer link and the Event link.
Results of test. The Web Server and Event Server base URLs are properly configured within the Marketing application.
Verify campaign details:
Synchronous bounce reported. Navigate to the All Contacts/Prospects Across Organizations applet for the test campaign. Verify that the invalid contact with an email address within the corporate domain is identified as a bounce.
Results of test. The Email Sending Daemon is able to communicate with the Marketing application and can report synchronous bounces.
Note: You might need to add the Email Bounce Type and Email Bounce Reason Code columns to the visible columns shown in this applet.Asynchronous bounce reported. Navigate to the Campaign Contact/Prospect Applet-Admin applet for the test campaign. Verify that the invalid contact with an email address outside of the corporate domain is identified as a bounce.
Results of test. The Bounce Handler Daemon can receive bounces sent from outside of the company firewall. This means the Bounce Handler Daemon's hostname is correctly configured in the Internet DNS records. The Bounce Handler Daemon is able to communicate with the Marketing Component Group and can report asynchronous bounces. The Marketing application has been correctly configured to use the Bounce Handler's hostname as the SMTP envelope from address.
One Click Unsub recorded. Navigate to the Campaign Response List applet and verify that the valid contact's email address is entered here with a Response Type of One Click Unsub.
Results of test. The Click Through Daemon can communicate with the Marketing Component Group and update the Siebel transactional database with information that it collects when an email recipient clicks on a link that it monitors.
Administering Email Marketing
This topic describes the on-going administration tasks that you perform to monitor and maintain Siebel Email Marketing after it is installed and configured. The administration tasks include the following:
Monitoring Email Sending Daemon Jobs Using the Jobs Console
The Email Marketing Server Jobs console provides an interface that allows administrators to view and control email jobs currently being processed by the Email Sending Daemon. The Jobs console is provided as a Java Server Page (JSP); to access the console, perform the steps in the following procedure.
To monitor Email Sending Daemon jobs using the Jobs console
Define the username and password that are to be used to access the Jobs console in the tomcat-users.xml configuration file, which is located in the ESD_root
/confdirectory.Navigate to the Jobs console at the following URL:
http://ESD_hostname:port/esd/jobMonitor.jsp
where:
ESD_hostname is the host name of the Email Sending Daemon.
port is the port number of the Jobs console (default is 8090).
The port number of the Jobs console is the same as the port number used by the Email Sending Daemon. If you have changed the default port number used by the Email Sending Daemon (8090), then use the same port number to access the Jobs console.
Enter the username and password you defined in Step 1 to log in to the Jobs console.
The following figure shows the Jobs console, which displays all active and incomplete jobs being processed by the Email Sending Daemon.
You can use the Jobs console to Pause, Resume, and Cancel jobs. Clicking the Pause button suspends a job with a status of In Progress; clicking the Resume button resumes a Paused job; and clicking the Cancel button cancels the job and removes it from the console.
If you click the hyperlink in the Delivered column of the console, then a list of all the email addresses to which emails have been sent is displayed.
To monitor email jobs in the buffer queue, navigate to the component_root/queueDir directory, where component_root is the installation directory of the Email Sending Daemon, the Bounce Handler Daemon, or the Click Through Daemon.
Prioritizing Email Sending Daemon Jobs
In Siebel Marketing, the priority level that you specify for a campaign also determines the priority that is assigned to email jobs associated with the campaign. As a result, email jobs for critical campaigns are executed before jobs for less critical campaigns. The priority levels that can be chosen for a campaign and, therefore, for associated email jobs are: 1-Urgent, 2-High, 3-Medium, or 4-Low.
In general, the Email Sending Daemon suspends processing of a lower priority job if a higher priority job enters the processing queue. However, in some circumstances, it is more efficient to continue processing the lower priority job, for example, if the low-priority email job has only a few recipients and the high-priority job has thousands.
To accommodate these circumstances, you can determine a priority threshold for email jobs. The priority threshold is the number of recipients that an email job must have in order that its priority level is always maintained. For example, if you specify a value of 50, then email jobs with fewer than 50 recipients are always assigned a priority of High by the Email Sending Daemon, even if the priority initially specified for the campaign is 3-Medium, or 4-Low.
The following procedure describes how to set the priority threshold for Email Sending Daemon jobs.
To set the priority threshold for Email Sending Daemon jobs
Navigate to the esd.properties file in the ESD_root installation directory.
Open the esd.properties file in a text editor.
Set the value of the esd.priorityThreshold parameter to an appropriate value.
The default value is 5001, indicating that the priority assigned to any email job with more than 5001 recipients is not to be overridden by the Email Sending Daemon.
The following figure shows the job prioritization workflow.
Limiting Maximum Throughput Rate for the Email Sending Daemon
You can limit the number of emails that the Email Sending Daemon sends to your company's outbound Mail Transfer Agent (MTA) each second in order to avoid delays resulting from the MTA being overburdened. This topic describes how to limit the maximum throughput rate, specified in messages per second, for the Email Sending Daemon.
To set a maximum throughput rate
Navigate to the esd.properties file in the ESD_root installation directory.
Open the esd.properties file in a text editor.
Set the esd.smtp.throttleVal property to one of the following values:
-1 (High, no throttle). Sends emails at the highest rate possible. This is the default setting.
250-350 (Medium). Sends emails at the rate of this setting, per second.
250-50 (Low). Sends emails at the rate of this setting, per second.
Disabling SMTP Command Pipelining
The Email Sending Daemon implements SMTP command pipelining by default. SMTP command pipelining allows the Email Sending Daemon to send multiple emails to the Mail Transfer Agent at a time, without having to wait for a response to each individual email.
Pipelining significantly improves the performance of email communications. However, it can result in an email being sent to the same recipient more than once in certain circumstances. When processing a group of emails, the Mail Transfer Agent returns an error if any problem arises during the email sending process, even if the email has been successfully delivered to some of the recipients. If the group of emails are then resent, then some individuals might receive the email a second time. If you want to make sure this situation never occurs, then disable SMTP pipelining as described in this topic.
To disable SMTP command pipelining
Navigate to the esd.properties file in the ESD_root installation directory.
Open the esd.properties file in a text editor.
Locate the SMTP talker configuration options section in the file.
Set the esd.smtp.suppressPipelining property to True.
About Email Marketing Log Files
This topic describes the log files that are generated by the Email Marketing Server during processing. These log files provide detailed information about the processes that have been run and list any errors that occurred. This topic also lists other files which can provide important information that can help you to troubleshoot email processing, or to improve the performance of the Email Marketing Server.
Email Marketing Log Files
The main log files generated for the ESD, CTD, and BHD components are as follows:
esd.log
ctd.log
bhd.log
Review these files, which are located in the logs folder of the main installation directory for each component, if errors occur during email processing. These files contain logger debug statements for the relevant component.
The Email Marketing components also generate important information in the log files shown in the following table. These files can provide useful information about email processing problems that are not caused by individual Email Marketing components.
Table Additional Log Files to Review
| Log File | Description |
|---|---|
failure.log |
Logs Queue Reader failures. |
stderr.log |
Logs any error stack that is not handled by an Email Marketing component. |
stdout.log |
Logs any output that is not explicitly directed to the Email Marketing component log files. |
commons-daemon.log (ESD and CTD components only) |
Contains errors generated by the Apache Tomcat application server. |
SiebelBounceHandlingDaemon.log (BHD component only) |
Contains information and errors generated by Commons Daemon. |
Files to Review When Troubleshooting Campaign Wave Processing
This topic describes files, other than log files, that are generated during Email Marketing processing which can provide useful troubleshooting information.
Email Files
When you launch a Siebel Marketing campaign including an email offer that is sent to recipients, Siebel Marketing generates a list of recipients file and an email .MIME file, both of which are processed by the Email Sending Daemon. The list of recipients file and the .MIME file can provide useful information when troubleshooting errors in campaign wave processing. The files are located in the following directories:
.MIME file: Siebel_File_System
\Marketing\EmailOfferContentList of recipients file: Siebel_File_System
\Marketing\wave_listwhere wave_list is the list of recipients for a wave.
Job Files
When the Email Sending Daemon processes a campaign wave, a directory is created for each job that is processed as part of the wave in the ESD_root\state_dir\mailings\ directory. For example:
ESD_root\state_dir\mailings\00000001ESD_root\state_dir\mailings\00000002
Within each \0000000n job directory, the following files are created for the job:
Delivered.txt: Lists all recipients to whom emails were successfully delivered.
Recipientsxxx.txt: Lists all recipients to whom emails were sent.
Retryxxx.txt: Lists all recipients to whom emails were re-sent.
State0.txt: Lists the status of the job.
Review these files if errors occur when the Email Sending Daemon runs a job.
Related Topic
Configuring Email Marketing Server Logging
This topic describes how to configure the type and amount of information that is logged by the Email Marketing Server.
The Email Marketing Server components are Java based applications that use the standard logging library for Java, log4j2, to control the logging behavior for the esd.log, ctd.log, and bhd.log files. You can configure the information that is written to each of the main component log files by editing the log4j2.properties configuration file for each component. This task is described in the following procedure.
To configure Email Marketing Server logging
Using a text editor, open the log4j2.properties file for the component for which you want to configure logging.
The log4j2.properties file is located in the lib folder of the main installation directory for each of the ESD, CTD, and BHD components.
The Email Marketing Server logs information for specific SMPT classes, and logging levels are set for each SMTP class.
For example, the following line in the log4j2.properties file records details in the log file of each individual to whom an email was successfully delivered:
log4j.logger.com.siebel.sem.smtp.MailingState=DEBUG
In the previous command,
smtp.MailingStateis the SMTP class that is logged and DEBUG is the log level. If you choose, you can enable logging for all SMTP classes by adding the following line to the end of the log4j2.properties file for a component:log4j.logger.com.siebel.sem.smtp=DEBUG
To change the amount of information that is logged for a class, navigate to the statement in the log4j2.properties file that enables logging for the class, then set the logging level to one of the following values, where DEBUG3 generates the maximum amount of information in the log file and FATAL generates the minimum amount of information:
Trace
All
DEBUG
INFO
WARN
ERROR
FATAL
OFF
In general, set log levels to DEBUG only when you are running the Email Marketing Server for debugging purposes. Running a component with DEBUG levels of logging can impact the performance of the component.
-
To configure the size of the component log files, and the number of archived log files maintained by the Email Marketing Server, edit the log4j2.properties file to specify values for the following parameters:
#appender.rolling.policies.time.type = TimeBasedTriggeringPolicy
#appender.rolling.policies.time.interval = 2
#appender.rolling.policies.time.modulate = true
appender.rolling2.policies.size.type = SizeBasedTriggeringPolicy
appender.rolling2.policies.size.size=1MB
appender.rolling2.strategy.type = DefaultRolloverStrategy
appender.rolling2.strategy.max = 5
-
To archive the component log files based on the time interval, edit the log4j2.properties file and configure the parameters as follows:
appender.rolling.policies.time.type = TimeBasedTriggeringPolicy
appender.rolling.policies.time.interval = 2
appender.rolling.policies.time.modulate = true
#appender.rolling2.policies.size.type = SizeBasedTriggeringPolicy
#appender.rolling2.policies.size.size=1MB
#appender.rolling2.strategy.type = DefaultRolloverStrategy
#appender.rolling2.strategy.max = 5
For additional information on logging, see Setting Up Administrator Alerts for Email Marketing and About Email Marketing Log Files.
Setting Up Administrator Alerts for Email Marketing
This topic describes how to configure the Email Marketing Server to send email alerts to the administrator if the Email Marketing components malfunction.
rollinguniquenumber will be the incremental value of the highest value used in the file.
logger.rolling<rollinguniquenumber>.name = com.siebel.sem.esd.integrated.OnPremiseAppListener
logger.rolling<rollinguniquenumber>.level = ERROR
logger.rolling<rollinguniquenumber>.additivity = false
logger.rolling<rollinguniquenumber>.appenderRef.rolling.ref = RollingFile
By default, the following predefined abnormality conditions trigger an alert for an Email Marketing Server component:
Component is unable to communicate with the Marketing server
Component is restarted
Component failed to write to the queue
Component is not licensed
Component is unable to communicate with the MTA
Alert levels can be set to the following values: INFO, DEBUG, TRACE, WARNING, ERROR, or FATAL. The Email Marketing Server generates alerts for the ERROR level and above, but you can configure the alert level for each SMTP class.
The following procedure describes how to enable administrator alerts.
To configure administrator alerts
To send administrator alerts for either the ESD, the BHD, or the CTD components, navigate to the log4j2.properties file in the component installation directory for the daemon you want to configure.
Locate the # IT Alerts settings section of the file.
Uncomment the parameters shown in the following table, then enter values similar to those shown.
Note: To send alerts from all three daemons, you must update these parameters in the log4j2.properties file of each component.Property Description appender.smtp.from= CHANGE_ME
Defines the From Address that is used to generate the alerts.
appender.smtp.Host=CHANGE_ME
Defines the SMTP host name that is used to send the alerts. This SMTP host must be different to the MTA's SMTP that is used to send marketing emails.
appender.smtp.to= CHANGE_ME
Defines the recipient of the alerts.
Stop and restart the relevant component for the changes to the log4j2.properties file to take effect.
Setting Up Automatic Failover for the Email Sending Daemon
Use the following procedure to designate a backup instance of the Email Sending Daemon.
To set up automatic failover for ESD
Install the ESD in two separate directories (for example, ESD1 and ESD2).
Configure ESD1 with the default port of 8080 and the default AJP port of 8009.
Open the conf/server.xml file and uncomment the section that starts with following line:
<Cluster className="org.apache.catalina.cluster.tcp.SimpleTcpCluster"
…….
</Cluster>
Configure ESD2 as follows:
In the conf/server.conf file, change the port to any other number (for example, 9090).
Modify the HTTP/1.1 Connector port parameter:
<!-- Define a non-SSL HTTP/1.1 Connector on port 9090 -->
   <Connector port="9090" ………..
In the conf/server.conf file, change the AJP port to any port number other than 8009.
Modify the AJP 1.3 Connector port parameter (for example, 9009):
<!-- Define an AJP 1.3 Connector on port 9009-->
    <Connector port="9009" …..
If ESD1 and ESD2 are running on the same computer or server, then you must open the install-win32-service.bat file (located in the ESD_root installation directory) and change the value of the -Dcom.sun.management.jmxremote.port parameter to any port number other than default value of 8096.
Open the conf/server.xml file and uncomment the section that starts with following line:
<Cluster className="org.apache.catalina.cluster.tcp.SimpleTcpCluster"
…….
</Cluster>
In the Cluster section, change Receiver, tcpListenPort property to a value other than 4001, so that ESD2 will be identified as a unique cluster node. (for example, Update tcpListenPort to 4002).
The current status of each instance of the ESD must be available to the other instance for automatic failover to occur. For this to happen, share the job status directory of each ESD instance with the other instance. The job status directory is created when you install the ESD at
esd_root\state_dir.For each job that is submitted to ESD, a directory is created in the
state_dir\mailingsdirectory that contains a file named state0.txt. The state0.txt file stores the status of the job.Make sure you have installed Apache 2.2.3, and downloaded mod_jk-apache-2.2.3.so from
http://tomcat.apache.org/download-connectors.cgi
Download JK 1.2 Binary for the operating system you are using from
http://www.pangex.com/pub/apache/tomcat/tomcat-connectors/jk/binaries
Rename mod_jk-apache-2.2.3.so to mod_jk.so, and then place it in the
Apache2/modulesdirectory.Configure the Apache Web server and use the Apache URL as the ESD SOAP URL. Apache will act as a load balancer for both ESD nodes.
Modify the apache conf/httpd.conf file and register the entry for the ESD URL as follows:
# Load mod_jk module
LoadModule    jk_module  modules/mod_jk.so
JkWorkersFile <point to workers.properties which suppose to be same location as
httpd.conf>#
Where to put jk logs
JkLogFile     <modjk log file path>
# Set the jk log level [debug/error/info]
JkLogLevel    error
# Select the log format
JkLogStampFormat "[%a %b %d %H:%M:%S %Y] "
# JkOptions indicate to send SSL KEY SIZE,
JkOptions     +ForwardKeySize +ForwardURICompat -ForwardDirectories
# JkRequestLogFormat set the request format
JkRequestLogFormat     "%w %V %T"
# Send esd soap request to worker named worker1
JkMount  /esd/soaprpc loadbalancer
JkMount  /esd/* loadbalancer
Modify the apache conf/ workers.properties file by registering both ESD nodes as worker nodes, and registering ESD1 as ACTIVE and ESD2 as HOT STAND BY:
# The advanced router LB worker
worker.list=loadbalancer
# Define a worker using ajp13
worker.worker1.port=ESD1_AJP_PORT_NUMBER(8009)
worker.worker1.host=ESD1_IP_ADDRESS
worker.worker1.type=ajp13
worker.worker1.redirect=worker2
# Define another worker using ajp13
worker.worker2.port= ESD1_AJP_PORT_NUMBER(9009)
worker.worker2.host= ESD2_IP_ADDRESS
worker.worker2.type=ajp13
# Disable worker2 for all requests except failover, hot stand by
worker.worker2.activation=disabled
# Define the LB worker
worker.loadbalancer.type=lb
worker.loadbalancer.balance_workers=worker1,worker2
Start the ESD and the Apache Web server in the following sequence:
ESD1 Node
ESD2 Node
Apache (load balancer)
Use the Apache URL as the ESD SOAP URL in the Marketing delivery profile:
http://apache_ip:apache_port/esd/soaprpc
Configuring the Status of Email Addresses
This topic describes how to configure the status of email addresses.
You can configure the circumstances in which the status of a contact’s email address is set to Bad Address or Undeliverable in the EMAIL_STATUS_CD field. The email address for a contact is set to a status of Bad Address if the number of hard bounces logged for the address exceeds a defined threshold and is set to a status of Undeliverable if the number of soft bounces logged for the email address exceeds a defined threshold. To configure the value of this threshold, perform the steps in the following procedure.
To configure how the email address status is determined
Navigate to the Administration - Business Process screen, Workflow Policies, and then the Policies view.
In the Policies list, query for the Update Contact Email Status object in the Workflow Object field.
Select either the Update Contact Email Hard Bounce Status policy or the Update Contact Email Soft Bounce Status policy.
Scroll down to the Conditions list, then enter a number in the Value field, for example, 10.
The number you enter becomes the threshold used to determine when a contact’s email address is assigned a status of Bad Address (hard bounces) or Undeliverable (soft bounces).
Implementing Spam Scoring of Email Templates Using Spam Assassin
This topic describes how to configure Email Marketing to integrate with SpamAssassin so that users can generate spam scores for email treatment templates before they are used in a campaign.
Generating a spam score for an email treatment template allows Siebel Marketing users to assess whether the emails generated using the template are likely to be classified as spam and be rejected by recipient's spam filters. If the email template generates a high spam score, then users can then modify the email template content until it passes the spam scoring test.
Siebel Marketing uses Apache SpamAssassin, an open source product released under the Apache License 2.0, to run the spam scoring test. SpamAssassin provides an API for an email sending component, in this case, the Email Sending Daemon, to test an email message against the scoring system and report any potential problems.
After spam scoring is enabled, when a user clicks the Verify and Preview button on the email editor to preview an email template message, spam scoring data for the email is displayed, as shown in the following image. The user can then manually correct any issues and preview the email template again to re-score the content.
Siebel Marketing does not embed Spam Assassin, but the Email Sending Daemon can be connected to a Spam Assassin instance. This involves installing the Spam Assassin application, then configuring the Email Sending Daemon to connect to the SpamAssassin service as described in the following procedure.
To implement spam scoring of email templates using SpamAssassin
Download and install SpamAssassin from the Apache SpamAssassin Web site at
http://spamassassin.apache.org/
Extract the files from the zip file you downloaded into a folder named SpamAssassin.
Start the SpamAssassin server using one of the following procedures:
If the Email Sending Daemon and SpamAssassin are running on the same computer, then open a command prompt Window and enter the following command to start the SpamAssassin server:
spamd -d
By default, the spamd -d command accepts connections only from the local system. For example:
C:\SpamAssassin >spamd.exe
If the Email Sending Daemon and SpamAssassin are located on different computers, then use the following command at the DOS prompt to start SpamAssassin:
spamd -d -i listen_ip_address -A allowed_hosts
where:
listen_ip_address is the address on which SpamAssassin is to listen.
allowed_hosts is a list of the IP addresses authorized to connect to this SpamAssassin instance.
For example, enter the following (in this example, 0.0.0.0 indicates that SpamAssassin is to listen on all IP addresses):
C:\SpamAssassin >spamd.exe -D -i 0.0.0.0 -A ESD_Machine_I.P
You must now connect the Email Sending Daemon to the SpamAssassin Server by editing properties in the esd.properties file as follows:
Navigate to the esd.properties file in the ESD_root installation directory.
Open the esd.properties file in a text editor.
Locate the SpamAssassin Server Setup section of the file, then add values for the parameters shown in the following table.
Parameter Value esd.spamServer
Enter the host name of the SpamAssassin server.
Specifying a value for this parameter enables the spam scoring feature.
If you do not want to enable spam scoring, then leave the value of this parameter as esd.spamServer=CHANGE_ME.
esd.spamPort
The port number used by SpamAssassin. The default is 783.
esd.reportSpamErrors
Set this parameter to true so that SpamAssassin error messages are displayed to the user, for example, if an error occurs connecting to the SpamAssassin server.