12Performing the Siebel Repository Merge
Performing the Siebel Repository Merge
This chapter provides guidelines for performing a Siebel Repository merge. This chapter includes the following topics:
Preparing for the Repository Merge
Environments: Development environment only.
The process of merging repositories to create a final customized repository used in the upgrade is time-intensive and resource-intensive. As a result, a merge might fail due to environmental factors, such as space constraints. When this happens, the merge process continues, even if there is a fatal database error, and the errors might go undetected.
If the merge fails, then you must restore the database environment to its premerge state and run the repository merge again. Additionally, it is recommended, as another precaution, that you export the New Customer Repository to preserve any existing workflows.
Recovering from a Failed Merge
It is recommended that you perform one of the following two tasks to preserve the premerge environment in the event of a failed merge:
Perform full database backup prior to the merge. Back up the entire database prior to the merge. If the merge fails, then you can restore the database to its premerge state, and rerun the merge operation.
Export the New Customer Repository prior to the merge. Export the New Customer Repository prior to the merge to create a backup copy. If the merge fails, then delete the failed repository, then import the backed up copy of the New Customer Repository. See Using Siebel Tools for information on exporting and importing repositories using the Database Configuration Wizard.
Configuring Siebel Repository Objects to Inherit Upgrade Behavior
Environments: Development environment only.
You can link objects together so that one object inherits the upgrade behavior of another. You do this by specifying an upgrade ancestor for an object.
You can specify an upgrade ancestor for the following object types:
Applet
Business component
Integration object
Report
Before doing the repository merge, review new objects you have created and determine whether you want to specify an upgrade ancestor.
Specifying an Upgrade Ancestor
Use the following procedure to specify an upgrade ancestor.
To specify an upgrade ancestor
Navigate to the object in Siebel Tools.
Click in the Upgrade Ancestor field.
A dialog box appears. It lists available upgrade ancestors.
Select the desired upgrade ancestor and click Pick.
Viewing the Descendants or Copies of an Object
Use the following procedure to view the descendants or copies of an object.
To view the descendants or copies of an object
Right-click the object.
Select View descendants from the picklist.
A dialog box appears and lists the descendants.
Related Topics
Performing a Siebel Repository Merge
Environments: Development environment only.
Platforms: Windows, UNIX, IBM z/OS.
This task merges customizations in the Prior Customer Repository (your current repository) into the New Customer Repository (the repository in the new Siebel release).
The repository merge typically takes five to seven hours to complete.
Requirement: The workstation on which the merge will occur must have a minimum of 512 MB of RAM and at least 2 GB of virtual memory or a 2–GB page file. Inadequate system resources is one of the most common causes of repository merge failures. If your repository includes a large amount of customization, then additional memory might be required.
EnableSafeboot=true is present in the
[InfraObjMgr] section of the tools.cfg file.
To merge the repository
Verify that all Siebel Tools projects are checked in and unlocked.
Close network connections to all repository users and exit Siebel Tools.
Open the tools.cfg file in the new Siebel release. It is located in the following directory:
SIEBEL_TOOLS_ROOT\bin\lang_codeIn this path,
lang_codeis the language, for example enu.Locate the SIEBEL section, and verify that the parameters are set as shown in the following example.
Parameter Value EnableToolsConstrainFALSESymStrPrefixX_Save the file and close it.
Navigate to Control Panel, System, Advanced, Performance Settings, and then Visual Effects.
Click Adjust for best performance.
Start Siebel Tools in the new Siebel release, using the following command:
SIEBEL_TOOLS_ROOT\bin\siebdev /editseeddataNote: The merge0.txt file will be generated in theSIEBEL_TOOLS_ROOT\bindirectory.From the Tools menu, choose View, Options, and then Language Settings.
Verify that the language mode setting is set as desired.
This will be the user interface language for Siebel Runtime Repositories based on the New Customer Repository. It will also be the language used by the postmerge utilities.
From the File menu choose the Open Repository command to open the Prior Customer Repository.
From the Tools menu, choose Upgrade, then the Upgrade Application menu item.
The Merge Repositories dialog box appears.
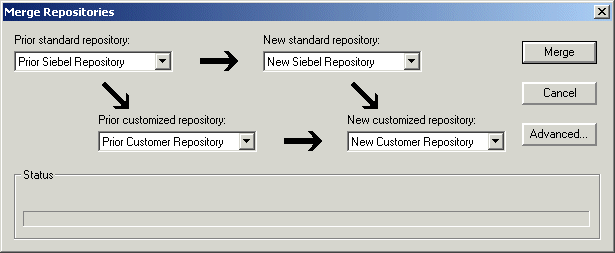
The Merge Repositories dialog box provides four options:
Merge. This button merges the repositories you specify to produce a New Customer Repository.
Cancel. This button cancels the repository merge and exits the Merge Repositories dialog box.
Advanced. This button opens the Merge Options dialog box.
In the Merge Repositories dialog box, choose the repositories listed in the following table.
Drop–Down List Item Value to Choose Prior Standard Repository
Prior x.x Siebel Repository, as appropriate for the version from which you are upgrading
Prior Customized Repository
Prior Customer Repository
New Standard Repository
New Siebel Repository
New Customized Repository
New Customer Repository
Click Advanced.
The Merge Options dialog box appears.
In the Merge Options dialog box, click the check boxes to activate or deactivate the merge options:
Abort merge if more than x errors occur. Activate this option to abort the repository merge automatically if more than a designated number of errors occur.
Caution: The typical Repository merge generates many benign errors. If you select this option, then set the number of errors to a large value. This will help prevent the Repository merge from aborting due to benign errors.Incorporate Custom Layout. Activate this option to help preserve field and button placement on prior custom or modified forms, views, and screens. Select a prior release and style for label placement.
After you have made your selections, click OK.
The Upgrade Check List dialog box appears.
In the Upgrade Check List dialog box, verify that each requirement has been met. When they have been met, select all the check boxes and click Continue.
Caution: The upgrade might fail if all the items in the checklist are not completed.After the merge completes, a dialog box appears, requesting that you make a backup of the New Customer Repository.
Related Topics
Reviewing the Siebel Repository Merge Log Files
Environments: Development environment only.
Platforms: Windows, UNIX, IBM z/OS.
To determine whether the repository merge was successful, review the merge log files. The merge is successful if it completes without unacceptable errors:
Acceptable errors. If an ancestor object is specified in an object definition, and the ancestor object is not present in the New Siebel Repository, this causes a merge error. This is an acceptable error and can be ignored.
Here is an example of an acceptable error in the merge log file,
merge0.txt:!!ERROR:CANNOT upgrade objects which have Briefing Tracking Profile Applet - Product marked as 'Upgrade Anc'
Unacceptable errors. All other types of merge errors are unacceptable errors and mean that the merge was not successful.
For more detailed information, go to 477269.1 (Article ID) on My Oracle Support, This document was previously published as Siebel Troubleshooting Steps 19.
Merge errors are displayed in the Upgrade Applications Objects List view in Siebel Tools. Additional details on merge errors are located in the repository merge log:
SIEBEL_TOOLS_ROOT\bin\merge0.txt
Each time you run the merge process, the name of the merge0.txt file is incremented, for example to merge1.txt.
If your repository merge process terminates and is flagged as Incomplete, then navigate to the Screens menu in Siebel Tools, and choose the Application Upgrader menu item. The most common reasons for its failure are:
The number or errors (!!ERROR) exceeds the number that was predefined in Siebel Tools when the merge was started.
The merge process has been terminated due to a local issue on the Siebel Tools workstation, such as a scheduled reboot.
RDBMS errors caused the process to stop.
Memory allotment issues on the workstation on which Siebel Tools is installed.
Network failure.
If the repository merge terminates and is flagged as Incomplete, then the merge must be restarted, as discussed in Performing a Siebel Repository Merge.
To determine whether the repository merge was successful
In Siebel Tools, from the Screens menu, choose Application Upgrader, and then Application Upgrade Object List.
In the Application Upgrades list, select the record of the merge.
Check the entry in the Status column.
Completed. This means the merge completed without errors.
Completed with Errors. This means the merge contains errors.
If the Status column indicates Completed, then no further action is required. The merge was successful.
If the Status column indicates Completed with Errors, then you must review the errors to determine whether the merge was successful. To review the errors, complete the remaining steps in this task.
In the Object Differences list, click Query.
In the Status field, enter
ERROR::* .Press Enter to run the query.
This displays all the objects where the merge process encountered errors.
Open the merge log file, merge0.txt. It is located in the following directory:
SIEBEL_TOOLS_ROOT\binIf there are multiple files, then open the one with the highest number in the file name, for example merge1.txt.
To locate merge errors in the file, search for the !!ERROR string.
Additionally, informational messages are marked as !!INFO.
Use the objects displayed in the Object Differences list and the errors displayed in the log file to analyze the errors:
If all the errors are acceptable, then the merge is considered successful.
It is advisable, however, to consider the number of acceptable errors when determining whether to re-run the merge operation.
If the log contains unacceptable errors, then the merge has failed.
If the merge contains unacceptable errors, then go to 477269.1 (Article ID) on My Oracle Support. This document was previously published as Siebel Troubleshooting Steps 19.
This document explains the meaning of many of the error messages that can appear in the log file. Use this document to correct the errors. If you cannot resolve all the errors, then contact Oracle Global Customer Support.
Open the workflow merge log file:
SIEBEL_TOOLS_ROOT\bin\merge0_ver.txtIf there are multiple files, then open the one with the highest number in the file name, for example merge1_ver.txt. This log file is created by the workflow premerge and postmerge steps.
Review the log file. If the file contains errors, then create a service request (SR) on My Oracle Support, or contact your Oracle sales representative for Oracle Advanced Customer Services to request assistance from Oracle’s Application Expert Services.
Related Topics
Generating Siebel Enterprise Integration Manager Temporary Columns
Environments: Development environment only.
Platforms: Windows, UNIX, IBM z/OS.
The repository merge process does not preserve Siebel Enterprise Integration Manager processing columns for custom mappings. You must generate the missing custom Siebel Enterprise Integration Manager processing columns again.
To generate Siebel Enterprise Integration Manager temporary columns
In Siebel Tools, from the File menu, choose Open Repository, and then New Customer Repository.
From the Tools menu, choose, Upgrade, and then Generate EIM Processing Columns.
A dialog box displays.
Click OK to generate Siebel Enterprise Integration Manager processing columns for custom mappings.
In the Object Explorer window, choose New Customer Repository and verify that the Comment field shows
UpgEimCol.This indicates that the Siebel Enterprise Integration Manager temporary columns were created successfully.
Related Topic
Reviewing Siebel Repository Object Property Conflicts
Environments: Development environment only.
Platforms: Windows, UNIX, IBM z/OS.
You can change how object property conflicts were resolved during the repository merge.
How Object Property Conflicts Occur
The repository merge compares repository object properties in the Prior Siebel Repository, Prior Customer Repository, and New Siebel Repository. When the value of an object property is different in all three repositories, an object property conflict exists.
This occurs when you have changed the value of an object property in the Prior Customer Repository, and the value of this property has also changed in the new release (New Siebel Repository).
An object property conflict does not occur if you changed the value of an object property in the Prior Customer Repository, and the object property value did not change in the new release. When this happens, the merge process transfers the changed value to the New Customer Repository.
The merge process resolves object property conflicts by referring to the setting of the object’s Standard Win property. For about 90% of repository objects, the merge process resolves conflicts by using the object property value in the New Siebel Repository.
Do not change the setting of the Standard Win property.
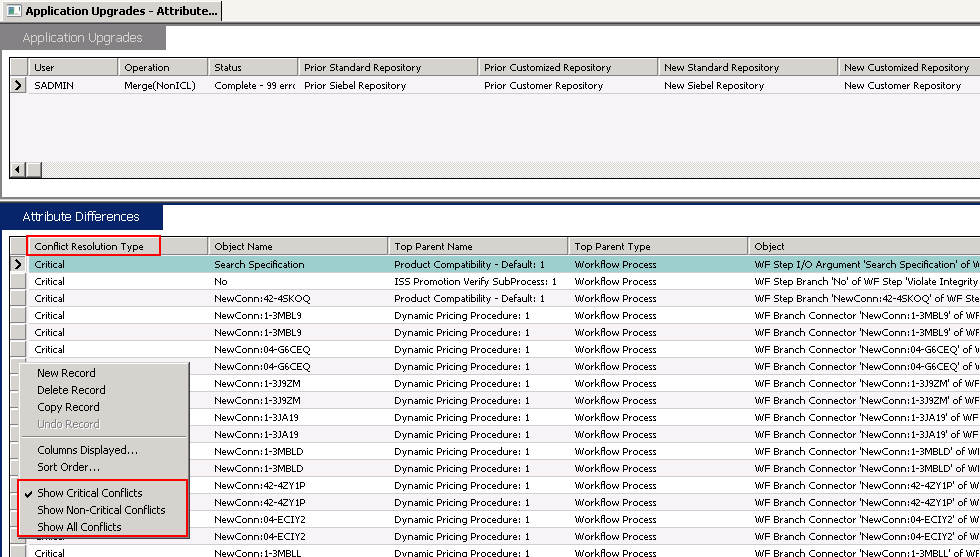
Application Upgrade Attribute List View
You can review and change how object property conflicts were resolved using the Application Upgrade Attribute List view in Siebel Tools. The Attribute Differences List in the view includes the following columns:
Object Name. The name of the object.
Attribute. The object property name.
Conflict. The merge process puts a check mark in this field if there was an object property conflict during the merge.
Resolution. Displays which property value the merge process used to resolve the conflict:
Standard Value. The property value in the New Siebel Repository was used. This value is displayed in the New Standard column.
Custom Value. The property value in the Prior Customer Repository was used. This value is displayed in the Prior Customized column.
Override. Put a check mark in this column to change how the conflict is resolved. Overriding the resolution changes the property value in the merged repository. If the resolution was the Standard Value, then the attribute value is changed to the Custom Value and vice versa.
Putting a check mark in the Override column does not change the value displayed in the Resolution column. It indicates that the displayed value was manually overridden in the merged repository.
Prior Standard. Displays the value of the object property in the Prior Siebel Repository.
Prior Customized. Displays the value of the object property in the Prior Customer Repository. In the Resolution column, this value is called the Custom Value.
New Standard. Displays the value of the object property in the New Siebel Repository. In the Resolution column, this value is called the Standard Value.
Requirement: The repository merge must have been successful. See Reviewing the Siebel Repository Merge Log Files.
Reviewing Object Property Conflicts
Use the following procedure to review object property conflicts.
To review object property conflicts
In Siebel Tools, from the Screens menu, choose Application Upgrader, and then Application Upgrade Attribute List.
In the Application Upgrades list, select the record of the successful merge.
In the Attribute Differences list, click Query.
In the Attribute Differences list, click in the Conflict field so that a check mark appears.
Press Enter to run the query.
The query displays a list of all object properties for which there is a conflict.
For each record, review the entry in the Resolution field.
To change the resolution, click in the Override field.
A check mark appears. This changes the value of the object property in the merged repository.
Avoid overriding conflicts for the following object properties.Left
Right
Top
Height
Width
Reviewing Object Property Conflicts at the Attribute Level
Use the following procedure to review object property conflicts at the attribute level.
To review conflicts at the attribute level
In Siebel Tools, from the Screens menu, choose Application Upgrader, and then Application Upgrade Attribute List.
By default, you can see only the critical conflicts in the Application Upgrades Attribute differences screen. You must review the critical conflicts. To view informational conflicts, right-click and select Show Non-Critical Conflicts. Noncritical conflicts include conflicts of attributes, such as Sequence number, Comments, Layout, and so on.
In the Application Upgrades list, select the record of the successful merge.
In the Attribute Differences list, click Query.
In the Attribute Differences list, click in the Conflict field so that a check mark appears.
Press Enter to run the query.
The query displays a list of all object properties in which there is a conflict.
For each record, review the entry in the Resolution field.
To change the resolution, click in the Override field.
A check mark appears that changes the value of the object property in the merged repository.
Avoid overriding conflicts for the following object properties:
Left
Right
Top
Height
Width
Related Topic
Generating the Runtime Repository Data
Environments: Development environment only.
Platforms: Windows, UNIX, IBM z/OS.
Once the Repository merge is complete and after all merge conflicts have been resolved and before starting upgphys, you must generate the Siebel Runtime Repository data. To generate the Siebel Runtime Repository data, you must execute the Full Publish command in Siebel Tools. Full publish has to be executed against the New Customer Repository. Make sure to change the DockRepositoryName in tools.cfg to New Customer Repository and ensure Siebel tools launches against the correct Repository. If there are multiple repositories in your database, then the first preference of opening a particular repository in Siebel tools is to read from devtools.prf preference file. If the devtools.prf preference file does not exist, Siebel Tools reads from the Repository name from the DockRepositoryName parameter of the tools.cfg file. Make sure you delete the devtools.prf to ensure Siebel Tools reads the Repository name from the tools.cfg file. For more information about executing the Full Publish command in Siebel Tools, see Using Siebel Tools.
The full Publish command is the following:
siebdev /c tools.cfg /TL ENU /d ServerDataSrc /u <username> /p <password> /
FullPublish
The TL <lang_code> parameter is a mandatory argument for Full Publish because it specifies the published languages for the database. You can add multiple languages separated by a comma. For example:
TL ENU,DEU,JPN
Depending on the number of the languages specified, the Full Publish process spans the number of Siebdev processes to compile objects in the specified language and write the data to the database. Siebdev silently closes after completion of a Full Publish, which indicates there are no errors. If there are errors during the Full Publish process, the Siebdev process throws errors and stops. In the log file, Failure Reported For indicates an error with an object. The log file lists the object name and type for Failure Reported For errors. Any Workflow Process errors in the log file can be ignored.
Related Topic
Regenerating the Siebel Repository Definition Files
Environments: Development environment only.
Platforms: Windows, UNIX, IBM z/OS.
If you have modified repository objects after the development environment upgrade (upgphys) and before upgrading the production test environment, then you must regenerate the schema.ddl and custrep.dat files. These files were created during the upgphys:
Schema.ddl. This file contains the logical definition of the Siebel database.
Custrep.dat. This file contains the definition of repository objects.
These files are used as input to the production test and production environment upgrades. These files contain only the Runtime Repository and required Design Time Repository, which is required for production environments. There is an additional custrep_dev.dat file that contains the entire development Repository. This file can be created for backup purposes. If you modify the object definitions or the schema definitions in the repository after these files have been created, then you must regenerate the files.
Regenerating the schema.ddl File
Use this procedure to regenerate the schema.ddl file.
To regenerate the schema.ddl file
On the Siebel Server where the Siebel Database Server files are installed, navigate to the following location:
Windows:
SIEBEL_ROOT\binUNIX:
$SIEBEL_ROOT/binRun the following command:
ddldict /u DatabaseOwner /p  /c "ODBCDataSource" /d TableOwner /f
DBSRVR_ROOT\DatabasePlatform\schema.ddl /e y /a y /l SiebelLogDir\sch_dict.log /n "Siebel Repository" /t dcir
where:
DatabaseOwner is the Siebel database administrator account name.
Password is the Siebel database administrator account password.
ODBCDataSource is the ODBC name for connecting to the database. Enclose the name in quotes.
TableOwner is the Siebel table owner name.
DBSRVR_ROOT is the absolute path to the Siebel Database Server installation directory.
DatabasePlatform is the Siebel Database Server directory name for the database, for example Oracle. The example shows Windows path syntax. On UNIX systems, use UNIX path syntax.
SiebelLogdir is the path to the directory where you want the output log placed (log output directory). The example shows Windows path syntax. On UNIX systems, use UNIX path syntax.
After the command completes, review the output log files for errors. If the log indicates there are errors, then create a service request (SR) on My Oracle Support, or contact your Oracle sales representative for Oracle Advanced Customer Services to request assistance from Oracle’s Application Expert Services.
Regenerating the custrep.dat File
Use this procedure to regenerate the custrep.dat file.
To regenerate the custrep.dat file
On the Siebel Server where the Siebel Database Server files are installed, navigate to the following location:
Windows:
SIEBEL_ROOT\binUNIX:
$SIEBEL_ROOT/binRun the following command:
repimexp /a O /u DatabaseOwner /p Password  /c "$ODBCDataSource" /d TableOwner /
r "Siebel Repository" /f $DbsrvrRoot/$DatabasePlatform/custrep.dat /l
$SiebelLogDir/exprep.log /v Y /Y "SrcWorkspaceName=MAIN;SrcEndVer=;Lang=ALL"
where:
DatabaseOwner is the Siebel database administrator account name.
Password is the Siebel database administrator account password.
ODBCDataSource is the ODBC name for connecting to the database. Enclose the name in quotes.
TableOwner is the Siebel table owner name.
DBSRVR_ROOT is the absolute path to the Siebel Database Server installation directory. The example shows Windows path syntax. On UNIX systems, use UNIX path syntax.
DatabasePlatform is the Siebel Database Server directory name for the database, for example Oracle.
SiebelLogdir is the path to the directory where you want the output log placed (log output directory). The example shows Windows path syntax. On UNIX systems, use UNIX path syntax.
This command exports only the repository content that is required on the production environment. The entire repository is not needed on the production environment for Siebel Innovation Pack 2017 and later releases.
After the command completes, review the output log files for errors. If the log indicates there are errors, then create a service request (SR) on My Oracle Support, or contact your Oracle sales representative for Oracle Advanced Customer Services to request assistance from Oracle’s Application Expert Services.
Related Topic
Deleting Unneeded Siebel Repository Files
Environments: Development environment only.
Platforms: Windows, UNIX, IBM z/OS.
When you are confident that the repository has been upgraded successfully, export the New Siebel Repository and Prior Customer Repository for safekeeping. You can also delete the following repositories:
Prior Standard Repository
New Standard Repository
Related Topic
Migrating Siebel Repository Objects to the Standard User Interface
Upgrades from: All Supported Siebel releases.Perform this task if you selected Incorporate Custom Layout (ICL) on your previous upgrade.
Environments: Development environment only.
Platforms: Windows, UNIX, IBM z/OS.
If you selected the Incorporate Custom Layout (ICL) merge option for your prior upgrade, then user interface objects in the New Customer Repository were deactivated and replaced by user interface objects from the Prior Customer Repository. Before upgrading to the next release, you must reactivate the standard user interface objects. You do this after the development upgrep and before the repository merge.
The migration returns the user interface to the state it would have been after a regular merge instead of an ICL merge. The following list refers to the Prior Customer Repository from your previous upgrade.
Customer-Created screens, views and applets are retained.
User interface controls you added in the Prior Customer Repository are retained, but control placements might need to be reconfigured.
User interface controls, list columns, page tabs, charts, applet Web template items, and view Web template items that you deleted in the Prior Customer Repository remain deleted.
Customer-Modified screens, views, and applets in the Prior Customer Repository that were further customized afterward are not migrated to the standard user interface. Customizations are preserved, but you might need to revise object layouts to conform to the user interface standard in the new release.
Standard objects in the Prior Customer Repository that were not deleted, or modified afterward are migrated to the standard user interface. No reconfiguration is required.
Standard objects in the Prior Customer Repository that were modified afterward are not migrated to the standard user interface. Customizations are preserved, but you might need to revise object layouts to conform to the user interface in the new release.
Migrating to the standard user interface uses defined logic to select objects and then modifies these objects as follows:
ICL objects. These are the screens, views, applets and child objects that received ICL handling in your previous upgrade. The ICL merge deactivated standard user interface objects in the New Customer Repository and replaced them with ICL objects from the Prior Customer Repository. Migration to the standard user interface deactivates and deletes ICL objects and activates their counterpart standard user interface objects.
Standard user interface objects. These are the user interface objects that were deactivated by the ICL merge step and have
-UPGappended to their names. They contain customizations from the previous repository merge, such as control deletion and addition. They do not contain certain user interface layout customizations such as control placement. Migration activates these objects. Standard user interface objects replace the ICL objects for the release you are upgrading from. The layouts of some of the standard user interface objects will need to be reconfigured.
Using Lag Time to Identify Postupgrade Customizations
ICL objects you have customized after the previous upgrade are not affected by the migration to the standard user interface. These changes are preserved and are included in the repository merge for the new release.
Siebel Tools identifies these customizations by comparing the modification time of ICL objects with their corresponding standard user interface objects. If the modification times differ by more than a specified lag time, then Siebel Tools does not change the ICL object, and it is treated as a customized object in the upcoming repository merge.
For example, your previous ICL repository merge required about three days to complete. This means the modification time of an ICL object and its corresponding standard user interface object did not differ by more than three days when the repository merge completed. You later modified an ICL object. Its modification time now differs by more than three days from the corresponding standard user interface object.
You then use Siebel Tools to migrate the repository to the standard user interface and use a lag time of three days. Since the modification time comparison for the ICL object is greater than the lag time, the ICL object is not replaced by the corresponding standard user interface object. The ICL object is treated as a customized object in the upcoming repository merge.
The default lag time is 72 hours. You can specify a lag time between 24 and 120 hours. Observe the following guidelines:
Avoid setting a lag time that is shorter than the time required to complete the previous repository merge. This can cause objects that were not customized after the merge to be treated as customized.
Do not set a lag time that is significantly larger than the length of the previous repository merge. This increases the risk that customizations were made before the lag time expired. These customizations are lost during the upcoming repository merge.
How Repository Objects Are Changed
The migration process locates both standard user interface objects and ICL objects in the repository. The process then determines whether to modify the standard user interface object or the corresponding ICL object:
Deleting the ICL object and activating the corresponding standard user interface object migrates the user interface object to standard.
Deleting a standard user interface object and retaining the corresponding ICL object preserves the customized ICL object.
The following table shows the logic used to modify these objects. Interpret the table columns as follows:
ICL Object Found? Yes means Siebel Tools has located a standard user interface object that has a corresponding ICL object. No means that a corresponding ICL object is not in the Siebel Repository. In most cases, this is because the object was inactive in the Prior Customer Repository during the previous merge. When this occurs, the object is appended with
-UPG, and no ICL object that preserves look and feel is created.Within Lag Time? Yes means that the modification time comparison is within the specified lag time. No means the comparison is not within the specified lag time and that you have modified the ICL object after the repository merge.
Status in Prior Siebel Repository. Siebel Tools checks the Active/Inactive status in the Prior Siebel Repository. This prevents activating an object that is inactive in the Prior Siebel Repository.
In the following table, Siebel Repository refers to your current Siebel Repository.
Table Logic Used to Modify Repository Objects
| ICL Object Found? | Within Lag Time? | Status in Prior Siebel Repository | How Migration Modifies Objects in the Siebel Repository |
|---|---|---|---|
Yes |
Yes |
Active |
|
Yes |
Yes |
Inactive |
|
Yes |
No |
Not applicable |
|
No |
Not applicable |
Not applicable |
|
How Logging Is Done
The migration process writes the changes to the repository in the following log file:
SIEBEL_ROOT\log\iclmigration.log
The beginning of the log lists high-level objects that were affected by the ICL feature. For each object, the log then iteratively lists the operations performed on all child objects.
Specifying a Lag Time
The default lag time is 72 hours. You can revise this by editing the Siebel Tools .cfg file. The minimum is 24 hours, and the maximum is 120 hours.
Requirement: You must have installed the version of Siebel Tools that shipped in the new release.
To specify a lag time
Navigate to the
SIEBEL_TOOLS_ROOT\bin\lang_codedirectory, wherelang_codeis the installed language, for example ENU.Using a text editor, open tools.cfg, and locate the [Siebel] section.
Add the following variable at the end of the section:
PriorICLMergeTimeLag = timewhere time is an integer greater than or equal to 24 and less than or equal to 120.
Save the file.
Restart Siebel Tools.
Migrating to the Standard User Interface
A menu option in Siebel Tools migrates ICL objects to the standard user interface. Upgrading the user interface requires a minimum of three hours to complete.
Requirements:
You must have installed the Siebel Tools version that shipped in the new release.
Set the lag time as desired. The default is 72 hours.
Verify that you have backed up the upgraded database.
To migrate to the standard user interface
Start Siebel Tools.
In the Tools menu, choose Upgrade, and then select Migrate ICL Objects to Standard.
In the ICL Migration dialog box, make the following selections and click Continue:
Prior Customer Repository: Select Prior Customer Repository. This is the Siebel Repository in your current release, which you have renamed in preparation for the upgrade.
Prior Standard Repository: Select Prior V7.X Siebel Repository. This is the Prior Standard Repository for your currently installed release. This repository was loaded when you performed the database upgrep for the new release.
In the ICL Migration Warning dialog box, click Yes to confirm you have backed up the Prior Customer Repository.
The ICL Migration Status dialog box appears. It displays log entries during the migration.
During the migration, you cannot perform other operations in Siebel Tools. You also cannot close Siebel Tools.
A pop-up message displays when the migration is complete.
To cancel the migration after it has begun, do the following:
In the ICL Migration Status dialog box, click Cancel.
In the dialog box that asks you to confirm you want to cancel, click Yes.
If you cancel the migration after it has begun, then you must restore the saved Prior Customer Repository from backup and begin the migration again.
Related Topics
Running the Siebel Postmerge Utilities
Environments: Development environment only.
Platforms: Windows, UNIX, IBM z/OS.
After the merge is completed successfully, run the postmerge utilities. These utilities make the following changes to user interface objects in the merged repository:
Convert certain flow-based form applets to grid-based.
Verify that new or customized screens, views, and applets from the Prior Customer Repository are configured correctly and can be accessed in the user interface.
Revise multi-value group (MVG) applets so that they are shuttle-enabled.
If you selected Incorporate Custom Layout (ICL) during the repository merge, then the utilities list the user interface objects that were affected.
Lists user interface objects that have missing required fields.
If the postmerge utilities encounter a problem and exit before completing, then do the following, fix the problem in the merged repository, and then rerun the utilities.
To run the postmerge utilities
If you are rerunning the postmerge utilities and want to save the existing log, then rename the log. The path to the log is as follows:
SIEBEL_TOOLS_ROOT\reppatch\log\reputility.logIf you do not rename the log, it will be overwritten.
In Siebel Tools, from the Screens menu, choose Application Upgrader, and then Application Upgrade Object List.
In the Application Upgrades list, select the record of the merge.
In the Application Upgrades list, right-click and select Launch Post Merge Utility from the pop-up menu.
A dialog box appears and displays the postmerge utilities log. When the utilities have finished, a message showing completion displays in the log.
Do not launch more than one instance of the postmerge utilities.
Related Topics
About the Siebel Postmerge Utilities