10Creating the Siebel Staging Database
Creating the Siebel Staging Database
This chapter describes how to create the staging database used in the development and production database upgrades. It includes the following topics:
Process of Creating the Staging Database
Upgrades: All upgrades.
Environments: All environments.
The process of creating the staging database involves performing the following tasks:
Perform the prerequisite tasks described in Required Tasks before Creating the Staging Database.
Create the DDL schema files that will be used to build the staging database by running the Database Configuration Wizard. See Creating the Staging Database Schema DDL Files.
Transfer the staging DDL files generated in Process of Creating the Staging Database to the z/OS host where they are applied. See Transferring the Staging DDL to the z/OS Host.
Set up the z/OS environment for the staging and target database upgrades and create the staging database. See Preparing the z/OS Upgrade Environment and Creating the Staging Database.
Drop interface tables and triggers. See Removing Interface Tables and Triggers.
Required Tasks before Creating the Staging Database
Upgrades: All upgrades.
Environments: All environments.
Before you create the staging database, complete the following tasks:
Select a schema owner for the staging database. Make sure the staging schema owner does not own any objects within the staging DB2 subsystem. The staging schema owner can be the same as the target schema owner.
Do the following:
Make sure you have a valid storage control file for the database to be upgraded. This contains the storage definitions of the existing database and is used to generate the DDL to build the staging database schema.
Name this storage control file storage_target_extonly.ctl.
If you do not have a valid storage control file, create one by running the Database Configuration Wizard and selecting the Extract from Catalog option. Specify database details for your existing Siebel database (the database to be upgraded). For further information on this task, see Implementing Siebel Business Applications on DB2 for z/OS.
The Extract from Catalog option extracts the storage layout of the database you specify from the DB2 catalog and creates a new storage control file that contains a copy of the storage definitions of the database.
Make sure the logical repository definitions and the physical schema definitions of the database to be upgraded match by running the Database Configuration Wizard, and specifying the following options:
Siebel Database Operation: Run Database Utilities.
Database Utility Selection: Synchronize Schema Definition.
Repository Synchronization Mechanism: Generate DDL into Files.
Storage Control File: Specify the file you extracted in the previous step.
Depending on the outcome of the synchronization process, do one of the following:
If the logical and physical schema database definitions match, no DDL is generated in the schema.sql file from the Synchronize Schema Definition process and no further action is required.
If the logical and physical schema database definitions do not match, the synchronization log file indicates the specific actions that are required to synchronize the schema definitions, such as rebuild tables, and the synchronization process generates the DDL required to perform the actions. Proceed to step 5.
Click Yes to exit from the Wizard, then do the following
Navigate to the directory you assigned as the Output Directory.
Transfer the schema.sql file to the z/OS host and ask your DBA to apply the DDL contained in the file.
For detailed information on running the Synchronize Schema Definition process, see Implementing Siebel Business Applications on DB2 for z/OS.
Creating the Staging Database Schema DDL Files
To create the staging database, you must generate schema DDL files from the target database. You then use these files and the storage control file you extracted from the target database to create the staging database. The following procedure describes how to generate the DDL files.
To generate the DDL files used to create the staging database
Run the Database Configuration Wizard. See About Running the Database Configuration Wizard on Windows and About Running the Database Configuration Wizard Under UNIX.
Specify the following options:
Upgrade Options:
Development environment: Upgrade Siebel Database Schema (upgrep).
Production environment: Upgrade Siebel Database Schema (upgrep + upgphys).
Upgrade Process: zSeries Staging of Files for Upgrade.
Storage Control File: Specify the name of the storage control file you extracted in Required Tasks before Creating the Staging Database.
DB2 Subsystem Name:
The DB2 subsystem name you specify for the staging database must be different to the DB2 subsystem name of the database to be upgraded (target database).
It is recommended that the DB2 subsystem name you specify for the staging or target database is the same as the ODBC Data Source Name (DSN) you specify for the database. If the database ODBC DSN is not the same as the DB2 subsystem name, you can create a new ODBC DSN for the staging or target database or amend the existing ODBC DSN.
See Information Required by the Database Configuration Wizard.
Launch the Siebel Upgrade Wizard. See Starting the Siebel Upgrade Wizard.
SQL commands are executed on your existing database to generate the staging database files. The Upgrade Wizard then stops (Pause #0). For a list of the files generated on the midtier by the Siebel Upgrade Wizard, see Upgrade Files for Siebel Business Applications.
Transferring the Staging DDL to the z/OS Host
When the Upgrade Wizard stops at Pause # 0, you must transfer the SQL and JCL templates and other staging DDL that has been generated on the midtier to the z/OS host where they can be executed. To do this, perform the following procedure.
To transfer the staging DDL to the z/OS host
Navigate to the
\DB2390\dbsrvr\dboutput\upgradedirectory (Windows) or the /DB2390/dbsrvr/dboutput/upgradedirectory (UNIX) and double-click the ftp_stg.bat file (Windows) or issue the following command (UNIX):ftp -vn < ftp_stg.txt > ftp_stg.log
Enter your TSO password and press Enter.
All the files required to create the staging database are transferred from the midtier to the z/OS host.
Review the ftp_stg.log file which is created in the upgrade directory and verify that all the files listed in the ftp_stg.txt file transferred successfully to z/OS staging data sets.
Preparing the z/OS Upgrade Environment and Creating the Staging Database
You must transfer the staging database and other upgrade files generated on the midtier by the Upgrade Wizard into data sets on the z/OS host. These files must then be processed and prepared for use. These files include the REXX code that contains all the panels and programs for running the upgrade processes, and files for creating the staging database.
To prepare your z/OS upgrade environment and create the staging database, complete the following procedures:
Authorization Requirements for Performing Upgrade Procedures on the z/OS Host
The user who performs upgrade procedures on the z/OS host requires the following authorities and access:
A thorough understanding of zSeries architecture, JCL, and TSO functions and navigation.
A TSO account with the authorization to allocate/create data sets on the z/OS host using the high-level qualifier specified in the FTP script.
Access to the DB2 staging and target system.
DB2 authorities to create DB2 objects and create DB2 VSAM data sets.
Grant and Bind authority.
DB2 Workload Manager refresh authority.
The default JOBCLASS is Q. Make sure you use the correct job class in the generated jobcards.
Customizing the JCL UNIT Parameter Value
If appropriate for your environment, you can amend the UNIT=SYSDA parameter setting for all of the JCL generated for the Siebel upgrade before you run any jobs on the mainframe. The UNIT=SYSDA parameter can be amended in the following data sets:
JOB0
Any of the VSTG000n or VSTG00nn data sets
To amend the UNIT parameter setting
Navigate to the data set you want to amend. Make a backup copy of the data set.
Go to Edit mode on the data set.
To change the UNIT=SYSDA parameter, enter the following command on the command line:
c sysda sgunit allwhere sgunit is the unit name you want to specify.
Press PF3 to save your changes.
All the JCL generated by the data set will use the new value you specified.
If you want to revert to the default UNIT parameter settings, either restore the backup copy of the data set you made in step 1 or transfer the staging data sets from the midtier again.
Creating the z/OS Setup Data Sets
Perform the steps in the following procedure to create the z/OS setup data sets.
To define and allocate z/OS setup data sets
After you have successfully transferred the staging files generated by the Upgrade Wizard up to Pause #0, log on to the host/LPAR where the staging database is to be created.
To create the REXX, CNTL and JCLLIB data sets, navigate to the
DSNHLQ.SIEBEL.JOB0data set.Go to Edit mode on the data set and submit the job using the JCL in the
DSNHLQ.SIEBEL.JOB0data set.After submitting the job, enter
cancelon the command line or press PF3 to save changes.Verify that the job ran successfully (return code is 0) and that the following data sets were created:
DSNHLQ.SIEBEL.EXECDSNHLQ.SIEBEL.JCLLIBDSNHLQ.SIEBEL.SP.SPCNTL
Verify that the following PDS members contain information that you defined in the Database Configuration Wizard on the midtier:
DSNHLQ.SIEBEL.EXEC(@TBOSTG)contains the value for the staging schema qualifier.DSNHLQ.SIEBEL.EXEC(@TBOTAR)contains the value for the target schema qualifier.
Preparing the Upgrade Environment and Building the Staging Database
After the files transferred from the midtier have been defined and allocated, you must set up the z/OS system environment variables, receive the files (uncompress the files), create JCL libraries, create the staging database, and assign jobname prefixes. The following procedure describes how to perform these tasks.
To set up the z/OS upgrade environment and build the staging database
Use the following command to display the Siebel In-Place Upgrade Main Menu:
EXEC 'DSNHLQ.SIEBEL.EXEC'The Main Menu is displayed. The panel ID is SBLUPG8P.
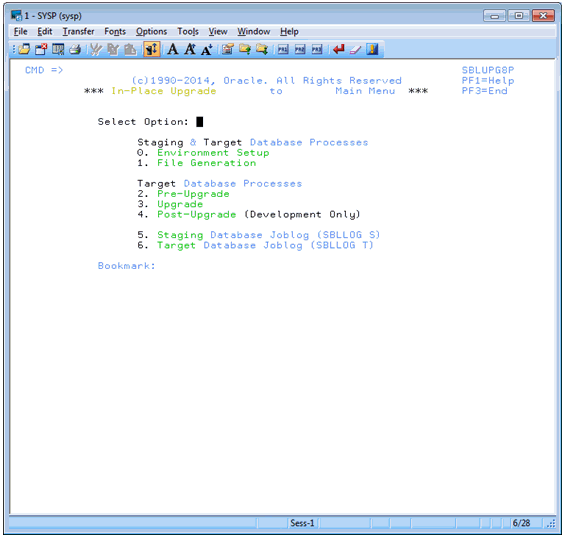
On the Siebel Upgrade Main Menu, select option 0: Environment Setup, and press Enter.
The Staging Database Environment Setup Menu is displayed. The panel ID is SBLSSETP. The options on this panel allow you to prepare files and set environment variables to create the staging database.
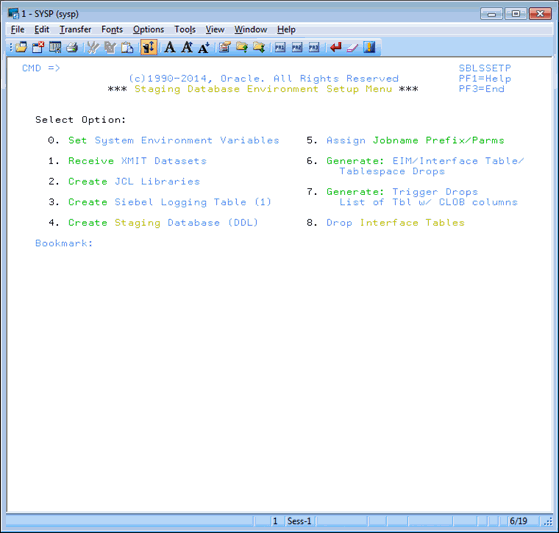
On the Staging Database Environment Setup Menu, select option 0: Set System Environment Variables.
The Staging System Variable Definitions panel appears. The panel ID is SBLSETVP.
Enter the following information and then press Enter:
WLM Name. Enter the DB2 WLM name, for example,
DB28WLM.WLM Load Library. Enter the DB2 WLM load library name.
Extract DB2 Libraries: Enter the DB2 load / runlib library names for the target subsystem. (These are the libraries where the DSN, DSNTEP2, and DSNTIAUL programs are located.)
Staging DB2 Libraries. Enter the DB2 load / runlib library names for the staging subsystem.
Note: The libraries you enter must exist (that is, they must be cataloged) and the library names must not be blank. Blank library names terminate concatenation.
Press Enter.
Messages appear indicating that the DSNHLQ and DB2 load library information was written to individual PDS members in the
DSNHLQ.SIEBEL.JCLLIBlibrary.Press PF3 to return to the Staging Database Environment Setup menu.
Select option 1: Receive XMIT Datasets, and press Enter.
Submit the JCL in data set
DSNHLQ.SIEBEL.install.jcl(SPXMITR).After submitting the job, enter cancel on the command line or press PF3 to save changes.
This job receives XMIT format files. Three PDS data sets are allocated and populated with members. The three PDS data set names are:
DSNHLQ.SIEBEL.LOADDSNHLQ.SIEBEL.SP.SPDDLDSNHLQ.SIEBEL.DBRMLIB
Verify that the job ran successfully.
Review the output in SDSF or another job output facility and verify that the job RC is 0. Verify that all three data sets (and members) were received properly. If the job ends abnormally with a return code of User 99, fix the failed job before proceeding with the upgrade. For information on restarting failed jobs, see Restarting Upgrade Jobs That Fail.
Press PF3 to return to the Staging Database Environment Setup menu.
Select option 2: Create JCL Libraries, and press Enter. This option builds and allocates the install JCL libraries.
You are placed in edit mode for data set
DSNHLQ.SIEBEL.VSTG0000.Note: If you want to change the job card, do so at this time.Run the job using the JCL in data set
DSNHLQ.SIEBEL.VSTG0000. The install JCL libraries are built and allocated and path-specific panels are added to theDSNHLQ.SIEBEL.EXEClibrary.Verify that the job ran successfully as described in Verifying JCL Upgrade Jobs.
Verify that this job allocated and populated data set
DSNHLQ.SIEBEL.INSTALL.JCL. This job also adds path-specific panels to theDSNHLQ.SIEBEL.EXEClibrary.After submitting the job, enter cancel on the command line or press PF3 to save changes.
On the Staging Database Environment Setup menu, select option 3: Create Siebel Logging Table (1). This option allows you to create and load the logging table for the staging jobs and to create the staging TMPTBL_ADDR table.
You are placed in edit mode for data set
DSNHLQ.SIEBEL.INSTALL.JCL(LOADLOG1).Note: If you want to change the job card, do so at this time.Run the job using the JCL in data set
DSNHLQ.SIEBEL.INSTALL.JCL(LOADLOG1).This job runs the DDL to create the TMP_SBLLOG_STG table in the staging environment and loads an initial set of log entries for logging batch job execution.
Verify that the job ran successfully as described in Verifying JCL Upgrade Jobs.
Verify that this job created the TMP_SBLLOG_STG table on the staging database and loaded an initial set of log entries for logging batch job execution.
After submitting the job, enter cancel on the command line or press PF3 to save changes.
On the Staging Database Environment Setup menu, select option 4: Create Staging Database (DDL), and press Enter to execute the DDL necessary to create the staging database.
You are in edit mode for data set
DSNHLQ.SIEBEL.INSTALL.JCL(STGDDL).Note: If you want to change the job card, do so at this time.Run the job using the JCL in data set
DSNHLQ.SIEBEL.INSTALL.JCL(STGDDL).Verify that the job ran successfully as described in Verifying JCL Upgrade Jobs.
This job executes the staging database DDL to create an exact schema version of the target database (database to be upgraded) in a staging environment using the Host/LPAR, DB2 subsystem and tableowner values you specified when you ran the Database Configuration Wizard.
Only the schema exists; it does not have to be populated with data. All objects must contain the DDL syntax DEFINE NO. Index definitions include the DEFER YES syntax.
Press PF3 to return to the Environment Setup menu.
Select option 5: Assign Jobname Prefix/Parms, and press Enter to assign unique jobname prefixes to JCL upgrade jobs by job type.
The Staging Jobname Prefix/Parm Definitions Jobcard parameters panel is displayed. The panel ID is SBLJPXP.
Enter a three-character job name prefix for all upgrade job types for items 1 through 20.
It is recommended that the three-character prefix is unique to make it easier to find your jobs in the queue, but it is only required for the nonunique index and obsolete index job prefixes (which cannot be the same). The remaining five characters of the job name (which do not appear and cannot be modified) are defined by Oracle and are unique for all upgrade jobs.
You can change the NOTIFY value from
&SYSUIDto your TSO ID or leave it as&SYSUID.Note: If you want to remove the notify parameter from the job card, replace the symbolic parameter&sysuidwith spaces.Review the job card parameters and make any necessary changes. Verify that you are using the correct accounting, job class, and message class.
Press Enter after entering the job name prefix and parameter definitions. The JCL template files are updated. Messages indicate when each step is completed.
Verifying JCL Upgrade Jobs
After running each JCL upgrade job, you must verify that the job ran successfully by reviewing the output in SDSF or another job output facility. All jobs must complete successfully before you proceed to the next step.
Once you have run the job Receive XMIT Datasets as described in Preparing the Upgrade Environment and Building the Staging Database, all jobs contain one of the following JCL INCLUDE members to check job step return codes. If condition codes are not met, then the job ends abnormally, with a return code of User 99, and the job must be rerun.
Acceptable return codes for each step of each job is controlled by the following three JCL test condition checks:
JCLTEST requires that the return code is less than or equal to 4
JCLTEST0 requires that the return code is 0
JCLTEST8 requires that the return code is less than or equal to 8
For example, if a job that includes the JCLTEST member generates a return code that is less than or equal to 4, the JCLTEST step is not processed and the JCLTEST return code is FLUSH. If the same job generates a return code that is greater than 4, the JCLTEST step is processed and the job ends abnormally.
Verify that the return code for each job is 0, 4, or 8 (depending on the job) and that the JCLTEST return code is FLUSH. If you do not see the FLUSH return code, you can verify the condition codes by searching for the condition code IEF206I.
Removing Interface Tables and Triggers
Once you have build the staging database and prepared the upgrade environment on the z/OS host, the final task to complete before you generate the upgrade files is to remove triggers and EIM/Interface tables from the staging database. The following procedure describes this task.
To remove EIM/Interface tables and triggers from the staging database
On the Staging Database Environment Setup Menu, select option 6: Generate EIM/Interface Table/Tablespace Drops, and press Enter.
Submit the JCL in the data set
DSNHLQ.SIEBEL.pregen.jcl(PREGEN1). This job generates the EIM, Interface table, and table space DROP statements.Verify that the job ran successfully as described in Verifying JCL Upgrade Jobs.
After submitting the job, enter cancel on the command line or press PF3 to save changes.
On the Staging Database Environment Setup Menu, select option 7. Generate Trigger Drops List of Tbl w/ CLOB columns, and press Enter.
Submit the JCL in the data set
DSNHLQ.SIEBEL.pregen.jcl(PREGEN2). A list of trigger drops and tables with CLOB columns is generated.Verify that the job ran successfully.
After submitting the job, enter cancel on the command line or press PF3 to save changes.
On the Staging Database Environment Setup Menu, select option 8 Drop Interface Tables, and press Enter.
Submit the JCL in the data set
DSNHLQ.SIEBEL.install.jcl (INFDRPJS)to drop EIM and Interface tables from the staging database.Verify that the job ran successfully as described in Verifying JCL Upgrade Jobs.
After submitting the job, enter cancel on the command line or press PF3 to save changes.
This completes the process of creating a staging database. You can now generate the upgrade files.