
|
|
|
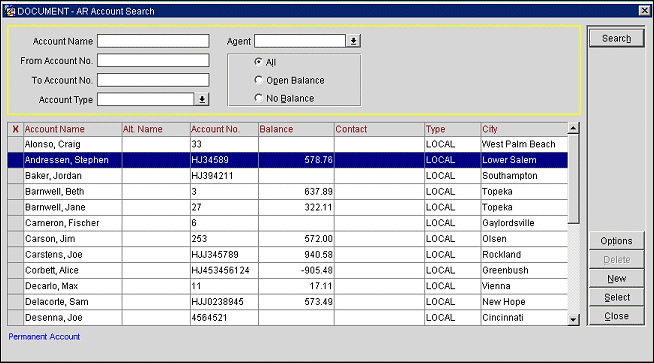
AR Account Search Screen
The Accounts Receivables feature is available when the Cashiering > Accounts Receivables application function is set to Y.
Select AR > Account Maintenance to access the AR Account Search screen. The AR Account Search screen is the starting point for most account maintenance activities. Use the search criteria to locate a specific AR account or group of accounts.
Note: The Cashiering > Bypass Cashier Login application parameter can be used to speed access to Cashiering functions for users having a cashier ID associated with their user ID. If the Cashiering > Bypass Cashier Login application parameter is set to Y, and if you have previously logged in to Cashiering and the Cashier is still open, the Cashier Login screen does not appear when subsequently accessing Cashiering functions. If Bypass Cashier Login is set to N (the default), you are prompted for a Cashier Login each time a Cashiering function is accessed.
Note: There are other ways to access AR features in OPERA. For example, the AR Account No. screen appears when you select the down arrow for the AR Number field on the Profile screen Stats & Info tab. Selecting the New or Edit button from the AR Account No. screen takes you to the Setup Account screen described below.
Many AR features are accessed directly from the AR Account Search screen, while others are available from the AR Account Maintenance screen, which appears when you select accounts and choose the Select button.
From the AR Account Search screen you can access these features:
By default, all accounts are displayed on this screen initially. To filter search results, enter your search criteria in the following fields.
Account Name. Enter all or the first part of the profile name to which the account is attached.
From Account Number/To Account Number. If you are searching for a specific AR account and you know its number, enter the account number in the From Account Number field. If you are searching for a range of AR account numbers, enter the first account number in the From Account Number field and the last account number in the To Account Number field. The following rules will apply if a partial account number is entered:
Account Type. Each AR account is assigned an account type. Account types are defined in Configuration > AR > Account Types. Some examples of AR account types are: CORP = Corporate, LOCAL = Local Business, CATER = Catering, TRAV = Travel Agents, and BNQT = Banquets. Selecting an account type helps you to categorize your accounts receivable accounts for searching and reporting. Select the down arrow to display the AR Account Types list of values.
Agent. Available when the AR > AR Account Agent application function is set to Y. Select the down arrow to choose the account agent whose accounts you want to search for.
Scope of Search. Select an option button to indicate how broad you want the search to be.
X. An X in this column indicates that the record is selected for an AR account maintenance function. Click in the X column to select the record. Or you can select the record by highlighting it and pressing the spacebar. If you are choosing only one record for a function, you can simply highlight the record without placing an X in this column.
Account Name. The profile name attached to this AR account.
Alt. Name. If the General > Alternate Name application function is set to Y, the guest name can also be recorded in the national character set (Chinese characters, for example). If the profile includes an alternate name, it appears in this field.
Account No. The accounts receivable number, if one has been assigned to this profile for the property. If the AR > Account Number Mandatory application parameter is set to N, and the profile has an AR account, this field is blank.
Balance. The current balance for the AR account, in local currency.
Contact. The name of the account contact specified on the Setup Account screen.
Type. The AR account type. Account types are defined in Configuration > AR > Account Types. Some examples of AR account types are: CORP = Corporate, LOCAL = Local Business, CATER = Catering, TRAV = Travel Agents, and BNQT = Banquets.
City. The city portion of the AR account address specified on the Setup Account screen.
Red Indicator lamps can be displayed at the bottom of the screen, if the AR account meets certain criteria. For example, if a Fixed Charge applies to the selected account, then a Fixed Charge lamp is displayed. See Indicator Lamps for details.
To flag an AR account (e.g., because of late payment), highlight the account on the AR Search screen and select the Options button, or select the Options button on the Account Maintenance screen. From the Account Posting Options menu, choose the Account Setup option.
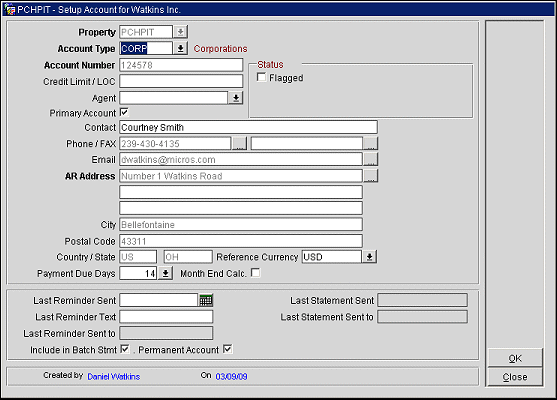
On the Setup Account screen, select the Flagged check box in the Status frame.
When you select this check box, a Description field becomes available. In this field you can enter the reason for flagging this account. If an AR account is flagged, you are notified when an invoice is created for the account, when an existing invoice is edited for the account, or when the bill is settled to the account. The following message appears: "Account <name> has been flagged <description>. Do you want to continue?" Respond Yes to continue. How flagged accounts are handled is determined by your property.
When the Profiles > Restriction/Flagged Reasons application parameter is set to Y, selecting the Flagged check box displays a Reason LOV and a Description field; the Reason field is mandatory. Select the down arrow to choose a flagged reason. The reason you select appears in the read-only Description field.
Flagged reasons are set up in Configuration > AR > Flagged Reasons (see Flagged Reasons for details.)
Note: You can also select the Stats & Info tab from the account-holder's Profile screen and click the down arrow on the AR Number field to create accounts at other properties and edit accounts for that profile. See Profile Stats & Info for details.
Note: For information about automatic creation of AR accounts at checkout, see Check Out to Direct Bill.
Starting from the AR Account Search screen, you can either create a new AR account, or edit an existing AR account.
Note: While you are working in the Account Maintenance screen, you can set up additional accounts for the company, travel agent, source, group, or individual whose account you are currently working with. To do so, select the Account Setup button from the Account Maintenance screen Options menu. See Account Maintenance Screen for details.
The following fields are available. (If you are creating a new AR account, all fields from the associated profile will be auto-filled, as appropriate; changes can be made to this information.)
Property. This field is displayed when the OPP_MHOT Multi-property license is active. You can select the properties to propagate the account to at the time you create the account.
Account Type. Each AR account is assigned an account type. Account types are defined in Configuration > AR > Account Types. Some examples of AR account types are: CORP = Corporate, LOCAL = Local Business, CATER = Catering, TRAV = Travel Agents, and BNQT = Banquets. Selecting an account type helps you to categorize your accounts receivable accounts for searching and reporting. Account types are also used to determine which statement format is to be used when printing statements for each account and the reminder cycle for that account. Select the down arrow to display the AR Account Types list of values. When you select an account type, its description appears to the right of the Account Type field.
Note: Default account types can be specified for each type of profile using the following AR application parameter settings: Default Travel Agent Account Type (for Travel Agent accounts), Default Group Account Type (for Group accounts), Default Company Account Type (for Company accounts), and Default Individual Account Type (for individual guest accounts). For example, when creating a new account for a Company profile type, the account type defaults to the type defined by Default Company Account Type.
Account Number. If this is a mandatory requirement in your organization (AR > AR Number Mandatory application parameter is set to Y), you will not be able to continue without entering an account number. If your property uses AR account number templates, and you enter a number in the incorrect format (the required format is defined in the AR > Account Picture application setting), a message prompts you with the correct format for account numbers. The account number must be unique at the property where it is created, and — if the OPP_MHOT Multi-property add-on license is active and the AR > Prompt Account Copy application parameter is set to Y — unique across any other property where the number may be propagated.
Note: Account numbers are required if the AR > AR Number Mandatory application parameter is set to Y. Uniformity of AR account numbers can be enforced by specifying an account number format, or template. Templates can be set up using the AR > Account Picture application setting.
Note: If the Cashiering > Automatically Assign AR Number application parameter is set to Y, an account number will be automatically assigned and this field will be read-only. When this parameter is active, the AR > Account Picture application setting is set to null and is not displayed; similarly, the AR Number Mandatory application parameter is set top Y and is not displayed.
Note: When the Cashiering > Allow Duplicate AR Numbers application parameter is set to Y, the same AR number can be entered on multiple AR accounts. This parameter is only displayed when the AR > Automatically Assign AR Number application parameter is set to N.
Note: When the Cashiering > Automatically Assign AR Number application parameter is set to Y and Start and End Values have been entered for the AR Number Sequence functionality, this field will automatically be populated with an account number value. This field will be editable and the account number can be changed, as long as it is a value that has not been assigned to an account, is greater than the Start Value and less than the End Value, and is not in the exclusion list.
AR Number can be excluded from being automatically assigned to an AR Account by including them in the Exclusion List. See AR Number Sequence Exclusion List for details.
When the OPP_MHOT Multi-Property Base add-on license is active, the Cashiering > Prompt Account Copy application parameter is set to Y. and the AR Number Sequence functionality is active, creating an AR Account in one property will display a message prompt to create the same AR Account in other properties. Select Yes and choose the property see below for an example and set of rules that is applied to assign AR Number is selected properties.
-- Create AR account in a Property A
-- Copy to other Property B
In Property B, if AR Number sequence is defined and active:
1. Same AR number is available in Property B (i.e., not assigned to any other account and is within AR Number sequence), it will be assigned.
2. Same AR number if not available in Property B, next available number from AR Number sequence will be used.
3. Same AR number if not available in Property B and there is no next available number from AR Number sequence, AR account cannot be created.
In Property B, if AR Number sequence is not defined or is inactive (this is essentially an existing functionality):
1. Same AR number is available in Property B (i.e., not assigned to any other account), it will be assigned.
2. Same AR number if not available in Property B, AR account cannot be created.
These same steps will occur for all the properties that were selected to have the AR Account created for.
In the event that in Property B an AR Account is created for an existing profile that already has an AR Account attached at Property A, this account number will not be assigned the same account number as Property A. This AR Account will be assigned an account number based on the AR Number Sequence set for Property B.
Credit Limit/LOC. The maximum amount of credit available to this account, or the amount of the letter of credit provided by the account holder. The credit limit for the account type associated with this account or, in the absence of a credit limit for the account type, the AR > Global Credit Limit application setting, can be used to set a default for this field. You can change this amount.
If you attempt to settle to direct bill or to directly add a new invoice to the AR account and the transaction would exceed the credit limit for the account, a warning message prompts you to indicate whether you want to proceed with the action. When settling to AR, the credit limit set for the AR account is compared to (1) the current outstanding balance on the AR account + any accruals awaiting Transfer FO Data + the amount being settled.
Other OPERA areas where validation takes place to verify the credit limit are:
Agent. Available when the AR > AR Account Agent application function is set to Y. Select the down arrow to choose the account agent who will be responsible for this account. The account agent can be used as a filter when running AR Aging reports.
Primary Account. Select this check box if this is the primary AR account for this profile. A profile can have multiple AR accounts at the same property. One AR account can be designated as the primary account for each property. The primary AR account will be used as a "default," for example, when the profile has multiple AR accounts and an AR account is listed in screen displays or in a report.
Flagged. Select the Flagged check box to set the AR account status to be notified of any special conditions whenever an invoice is created for this account. See Flagging an AR Account, above, for details.
Contact. Enter the name of the AR account contact. If you enter a contact here, the contact is used for AR purposes only (for example, for statements and reminder letters).
Phone / Fax. Enter the phone number and/or fax number used to contact this account or select the ellipsis button to display the Communication Information screen to select the Phone/Fax or enter a new one. If you enter phone and/or fax numbers here, the phone number and/or fax number is used for AR purposes only (for example, for statements and reminder letters).
Email. Enter the email address for the account or select the ellipsis button to display the Communication Information screen to select the email or enter a new one.
AR Address. By default, these fields are populated with the primary address from the profile associated with this account. Change this information if AR information is to be directed to a different address. If you enter an AR address, the address is used for AR purposes only (for example, for statements and reminder letters) and the address recorded in the profile will not be changed. The same also applies if an address is updated for the Profile, the AR Address will not be updated.
City. Enter the city of the AR account address.
Postal Code. Enter the postal code of the AR account address.
Country / State. Select the down arrows to display Countries list of values and the States and Provinces list of values. Select the country and state or province for the AR account address.
Reference Currency. This is the currency used for reminder letters and statements sent to this account. This field is populated with the profile Reference Currency. To change the reference currency, select the down arrow to display the Currency list of values. Choose the reference currency from the list. If you enter reference currency here, it is used for AR purposes only (for example, for statements and reminder letters).
Payment Due Days. Available when the Cashiering > Payment Due Days application parameter is set to Y, enter a positive numeric value between 0-999 to signify the number of days until the payment is due for the AR account. If a down arrow is displayed beside the field, then values are available for selection and have been configured in the Configuration > Setup > Screen Design > List of Values Maintenance > LOV Value Maintenance menu option and in the PAY DAYS LOV Group.
This date can be displayed on the AR Folio by adding the AR_PAYMENT_DUE_DATE merge code when customizing the sample folio and this will appear, as an example, like AR Pay Due Date 05/18/09.
Note: When creating an AR Account for a Profile that already has the Payment Due Days configured, this number is automatically populated in this field. But if creating an AR Account for a Profile that does not have the Payment Due Days already configured, the number entered here will not be copied back to the Profile.
Month End Calc. Available when the Cashiering > Payment Due Days application parameter is set to Y, select the check box in order to have OPERA calculate the Payment Due Date by beginning with the last day of the month for the Bill Generation Date and add the number specified in the Payment Due Days field to determine the Payment Due Date that will be displayed on the folio.
For Example
If a folio is settled to Direct Bill on March 21, 2012 and the Payment Due Days field is set to 45 Days with the Month End Calc. check box selected for the AR Account, the AR Payment Due Date will be displayed as May 15, 2012.
Last Reminder Sent. The date the last reminder was sent to this account. (See Reminders for details.)
Last Reminder Text. The text of the last reminder letter sent.
Last Reminder Sent To. The contact name to whom the last reminder letter was sent.
Last Statement Sent. The date the last statement was sent to this account. (See Statements for details.)
Last Statement Sent To. The contact name to whom the last statement was sent.
Include In Batch Statement. Select this check box if the account is to be included when batch statements are run. You might not want some accounts (such as internal accounts or credit card accounts) to be included in a batch statement run (AR > Mailing > Batch Statements); in these cases, un-select this check box.
Permanent Account. Select this check box if this account is to be a permanent AR account. As long as this check box is selected, the account cannot be deleted. This check box is selected by default.
Note: If the OPP_MHOT Multi-property add-on license is active and the AR > Prompt Account Copy application parameter is set to Y, you can propagate new AR accounts to other properties at the time you create the account. When you have provided the information for a new account on the Setup Account screen and you select the OK button, you are prompted whether you want to create the new AR account at other properties in your cluster. Respond Yes to display the Property List to choose the properties to create the account at.
Note: If the Setup AR Account is accessed when the Cashiering > Accounts Receivables application function is set to N, then see AR Account Setup When the AR Function is OFF for details.
To remove an AR account, highlight the account to delete in the AR Account Search screen search results grid then select the Delete button. If more than one AR Account is selected with an X and the Delete button is selected, only the AR Account that is highlighted in the grid will be deleted if it meets the guidelines below. Only 1 AR Account can be deleted at a time.
When deleting an account, OPERA removes the AR number from the profile to which the account is attached; the profile itself is not deleted from the OPERA database. To remove a profile entirely, access the Profile screen features.
AR accounts can be deleted subject to the restrictions outlined below.
Note: When you delete an AR account, financial data related to the account is not deleted from database tables.
Note: Accounts can only be deleted if there are no active transactions for the account. While an account can have a net balance of zero, transactions are considered active if the zero balance is due to equal and offsetting debits and credits. If that is the case, the account is considered to have active transactions and cannot be deleted.
To delete all no-balance accounts of a specific account type, or all no-balance accounts having account numbers in a specific range, use the AR Account Search screen search criteria to filter the accounts.
Show Me
See Also