
|
|
|
Business Block Reservations
Note: The Recently Used feature (available when the General > Recent Used Records Menu is set to Y) allows you to quickly access up to 10 of the last-used (created, opened, or changed) profiles, reservations, and business blocks from the main OPERA menu bar. (When the OPS/OPC<version number> Sales and Catering license is also active, up to 10 recently used contacts, events, and accounts are additionally available.)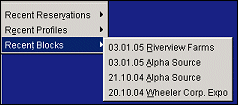
In multi-property environments, (when the OPP_MHOT Multi-Property PMS add-on license code is active), you can access business blocks and reservations at properties other than your log-in property if you have appropriate permissions at those properties. (In Sales and Catering environments, you can also access events for properties other than your log-in property.) Profiles (including contact and account profiles), are considered to be "global" across properties. If you have permission to view and edit profiles, you can access any profile, regardless of the property where it was created.
The Business Block function is a powerful way to handle groups and other room allotments. Business blocks can be used for handling regular groups, travel agent allotments, tour series and convention bookings as well. Throughout this section you may encounter the words block, group, and allotment. These three terms mean much the same thing.
The Business Block module and all items related to blocks are controlled by the Application Settings > Blocks > Business Block function. To use the Business Blocks module, you need to set this function to Y. The Application Settings > Blocks > Quick Business Block function gives the user the same functionality but with less options for searching and data collection.
Note: When the Sales and Catering webProposal interface is integrated with your application (PMS, S&C, ORS), business blocks created here can be sent to an XML file to create a webProposal. Certain fields entered on the Business Block screen may affect what is displayed in the webProposal when Options > webProposal is selected.
Note: When the Sales and Catering webProposal is active for the property, the application setting Block>BLOCK STATUS PROMPT WP UPDATE is available. The purpose of this setting is to ensure that when specific business blocks are updated, you have the option of updating the associated, previously sent webProposal. With this application setting, you can select the status codes associated with the blocks you want to alert you. When blocks with the selected status codes are updated and saved, a prompt appears (if the associated webProposal has initially been sent). The message asks "Do you want to update webProposal? - YES or NO." If you select "YES," the webProposal will open with the updated changes. If you select "NO," the webProposal will not launch and will not contain the block updates.
When creating a new group reservation, how do you decide whether to use a Business Block Reservation with sophisticated room block features or a Standard Group Reservation? Consider the following questions:
If you answered Yes to any of the above questions, then it is recommended you create a Business Block Reservation.
Select Reservations > Blocks > Business Block > New or Reservations > Blocks > Quick Business Block > New.
When the application function Blocks > Master Sub Allocations is active, the Business Block New screen displays a Master Allocation check box which allows for a Business Block to be designated as a Master Allocation). In addition to this check box the Master Block and Sync check boxes are also available when the application function Blocks > Master Sub Blocks is set to Y and they allow you to designate a Business Block as a Master Block upon creation. The Sync option allows you to synchronize changes made from a Master Block to automatically update the Subs. The Sync check box will only be enabled if the Master Block check box is selected and will be checked by default if the application parameter Blocks > Synchronize Master Sub is set to Y. See Master Business Blocks for more details.
Master Allocations cannot be synchronized; therefore, when the Master Allocation option is checked, the Sync option is disabled. For more details on Master/Sub Allocation functionality, see Business Block Master Allocation or Master Business Blocks.
The typical order in which you would enter a new block is the following:
1. Create a group profile as described in Profiles.
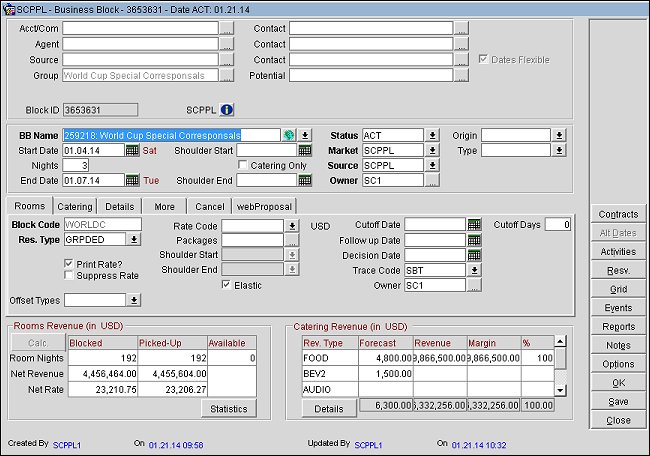
2. Create a new block header.
3. Attach the group profile to the block. Also, you have the option of attaching company, agent, source, and/or contact profiles.
4. Block the number of rooms you need on the Initial Rooms Grid and complete the Rate Grid (unless you selected a Rate Code on the Block Header). You are able to make any changes to the room block and its grids as necessary.
5. When the information is correct, and you are ready to accept reservations, the block status can then be changed to Open for Pickup.
6. Create the Post Master reservation.
Note: Occasionally you may encounter an insufficient number of rooms available for your block reservation. When this occurs the Borrow screen appears prompting you to borrow rooms from either the House Availability, or from other allocated room types. The default highlighted selection will always be set to where the availability is the greatest (i.e. House, if the rooms are to be borrowed from House Availability, or Room Type if the rooms are to be borrowed from a group of allocated room types. This Borrow screen can be hidden with the Popup Blocker functionality.
7. Once the room block is Open for Pickup, you use the associated group profile to create the individual reservations for members of the group. These new reservations will pull rooms from the specified room block. In OPERA, each group reservation consists of two primary elements, the original group reservation (or post master) and the reservations for individual group members. The block header you create indicates information such as the number of rooms the group will take, and the number of people per room, dates, group rates, etc. The individual group reservations will inherit the appropriate block header information as they are picked up from the room block.
8. View and edit individual reservations. Once one of the reservations in the block has been modified, depending on permissions granted, can be applied to:
Note: The Restrict Negotiated Units Ownership Group Application Parameter, available when the OPV_<version number> OPERA Vacation Ownership System license code is active, restricts users pre-blocking units attached to a contract that is in a "Negotiated" status. OPERA only allows users to check in reservations to a unit that is marked as "Actual". If a contract is not marked as "Actual" and a user either tries to either pre-block or check in to the unit, OPERA prompts, "Unit XXX has a status of Negotiating and therefore cannot be selected", where "XXX" indicates the room/unit number. The Restriction for Non Contracted Units Ownership Group Application Parameter can be overwritten when a user is granted the "OVERRIDE NON-CONTRACTED RESTRICTION" OVOS_MISC group permission.
Note: The Restriction for Non Contracted Units Ownership Group Application Parameter, available when the OPV_<version number> OPERA Vacation Ownership System license code is active, will only allow a unit that is attached to a contract with an “Actual” status to be assigned (pre-blocked) prior to check in. OPERA will only allow a unit that is attached to a contract with an “Actual” status to check in a reservation checked in. If a unit is not attached to a contract and a user tries to either pre-block or check in a reservation to this Unit, OPERA prompts, "Unit XXX is not attached to a contract and therefore cannot be selected", where "XXX" indicates the room number. The Restriction for Non Contracted Units Ownership Group Application Parameter can be overwritten when a user is granted the "OVERRIDE NEGOTIATED RESTRICTION" OVOS_MISC group permission.
Note: When the application function Blocks > Master Sub Allocations is set to Y, it is possible to convert a regular, existing Block to a Sub-Allocation of an existing Master Allocation. When this function is active, a new button displays on the Business Block > Options screen labeled Convert to Sub Alloc.. See Business Block Sub-Allocation for more details on this functionality.
Contracts. Available when the Blocks > Business Block Contracts application parameter is set to Y. Select this button to send select S&C reports via the fax and email delivery methods. See S&C Contract Sending for details.
Alternate Dates. Available when the application function Blocks > Alternate Dates is set to Y and the Dates Flexible check box is selected on the Business Block Header; however, this option is not VISIBLE until rooms have been booked or an event has been created. See Alternate Dates for further details.
Note: The Dates Flexible check box and Alternate Dates button will be inactive if the booking status code for the Business Block is Deduct from Inventory.
Note: The following behavior applies to alternate dates when Master/Sub Block functionality is active (when the Blocks > Master Sub Blocks application function is set to Y).
� The Alternate Dates button is not available from the business block when creating regular master blocks and sub blocks, tour series master and sub blocks (when the Blocks > Tour Series application function is set to Y and the Blocks > Tour Series Handling application setting is set to M), and master and sub allocations (when Blocks > Master Sub Allocations application function is set to Y).
� When converting a block with alternate dates to a tour series, or when converting a block with alternate dates to a master allocation, the alternate dates are deleted and the Alternate Dates button is disabled on masters and sub blocks.
Activities. Only available in the modules S&C (OPS/OPC<version number> Sales and Catering) and SFA (OPF<version number> Sales Force Automation). Selecting this button displays the Activity Search screen.
Analyze. (Available when the ORMS license code is active: OPO_<version number>, OPK_<version number>, or OPH_<version number>.) Select this button to view a group quotation for the block. See RMS Group Quotation. The Analyze button becomes enabled after creating or editing a block, and after the block details have been saved. If the Forecast Processor is not running, the Analyze button is disabled (gray) even though data has been entered. The availability of the block is based on the Block Summary table, which is dependent on the Forecast Processor. In that case, start the Forecast Processor and re-query the block - the Analyze button becomes available.
Resync. (Available when an OXI interface is active.) Use this button to synchronize individual block reservations to one or multiple OXI Interfaces directly from the Business Block Reservation screen. When selected, this option displays the Interface IDs screen. Only active OXI Interfaces are available for selection from this screen. Select the available OXI Interface to sync the current record to, and then select OK. Once the record has completed synchronization with OXI, a message displays verifying that the message was sent to OXI. See OXI Resync for OPMS for more details.
Resv. (Available when business block status is open-for-pickup.) Create a posting master and go to the Room List screen where you can make reservations for this business block.
When importing rooming lists into existing business blocks, select this button to continue the process. See Rooming List Imports for more information.
Grid. Go to the Room Grid screen to block rooms and handle reservations.
Events. Display the Event Search screen where events associated with the block are listed. (See Searching for an Event for details.) The Events button is available if the Attendees field on the Catering tab is not blank (null).
Note: Catering Events, Packages and Templates cannot be created from the Master Allocation or Master Block, however they can be created for a Sub-Allocation/Block. When selecting the Events button from the Master Allocation/Block, the Event Search screen will display either a list of events already existing for a Sub-Allocation/Block of the selected Master or a message prompting you to choose a Sub-Allocation/Block of the selected Master to create the Event for.
Reports. Display the OPERA Reports screen where you can select from a list of reports which are related to business blocks. (See Reports for details.)
Notes. Display the Business Block Notes screen showing any notes that have been entered for this block. See Business Block Notes for details.)
Options. Access the Business Block Options from the Business Block screen by selecting the Options function.
When the General > Enhanced Options Management application parameter is set to Y, you have another way of quickly accessing options without selecting the Options button to open the Options menu itself. You can press Ctrl+T to display the blue Option field.
For Example
To view all the available options in alphabetical order, scroll through the options list by selecting the Up and Down arrow keys. Press Enter to select the displayed option and open the corresponding option screen. Or, instead of scrolling through the options list, type the first three letters of the desired option. The corresponding options screen appears. (For example, type c-a-n for Cancel.)
You can also enter the first letter of the desired option and all options beginning with that letter will appear in alphabetical order as you scroll. To scroll, use the arrow keys or repeatedly press the beginning letter key. For example, if you typed a-a-a-a you might scroll through the options of Accompanying, Add on, Agent/Company, Alerts. Press Enter to open the desired option.
Agenda. (Available when the OPF<version number> Sales Force Automation license is active.) Create or edit a meeting agenda. The meeting agenda is a Sales Force Automation feature that provides a fast way for outbound sales organizations to capture clients' high-level meeting and F&B requirements — even if those requirements are vague and subject to change. (See F&B Meeting Agenda for details.)
The External Locking feature automatically controls editing access to Business Blocks when the business block is created by the property (local or remote) locking out central users, or created by central, locking out local or remote property users. External locking is intended to prevent changes to the block from being made simultaneously by central and the property. This feature is valuable in environments where ORS/SFA is integrated with either PMS (with or without OPERA S&C), or with standalone OPERA S&C. This feature is also available in an ORS/SFA environment when the add-on licenses OPX_ORS OXI 2-Way Interface with Remote ORS and/or OPX_SFA OPERA Xchange 2-Way Interface for SFA Central System are active. The External Locking feature applies whether or not PMS/S&C and ORS/SFA share the same OPERA database.
As described under External Locking Override, below, either central (i.e. ORS CRO) can take precedence and override a locked status to enable business block modifications to a block that is locked by a property; or the property (local or remote) can take precedence and override the lock if central has it locked.
Where the database is not shared, two copies of the business block record exist (one at the central level and one at the property level) and OXI messages communicate the locked/unlocked status between central and the property:
Note: In both OXI and OXI HUB, the External Locked YN application parameter must be set to Y.
Where the database is shared, a single business block record exists in the database and is shared by ORS/SFA and PMS/S&C. Its locked/unlocked status is controlled internally by OPERA:
Locked blocks are presented in View-only mode. Upon accessing a locked business block, the following message appears: "This business block is under external control. No changes allowed." In addition, External Locked and View Only lamps appear in the lower part of the Business Block screen.
When the Blocks > Edit Locked Blocks permission is assigned to a user, that user can make modifications to business blocks that are in locked status by the external system (whether at the central or property level). To do so, the user with the permission double-clicks on the View Only lamp in the lower portion of the Business Block screen. At this point, the business block is unlocked for the user. After changes are made and saved and the Business Block screen is closed, the block is automatically re-locked.
Note: The entity in control (whether it is central or the property) can also give control to the other by selecting the Control Centrally check box or the Control LOV on the Business Block Rooms Tab.
In SFA, certain hotel personnel may only need to create, edit, or delete offsets even though the business block may be locked and under External Control. In this case, users with the permission Blocks > EDIT LOCKED BLOCK OFFSETS can access the Business Block Search screen (Business Management > Blocks) and select the desired business block. At the Business Block screen, users can select the View Only lamp and override the lock to only make the necessary changes to offsets.
If the user is granted the permission Blocks > EDIT LOCKED BLOCK OFFSETS and the permission Blocks > EDIT LOCKED BLOCKS is not granted, when the user clicks on the View Only lamp to override the lock, only the following fields and areas are available for updates:
In an environment where properties are configured with an external system (i.e. ORS), delivery history of block updates to the external system can be viewed. Users can identify whether or not blocks have been successfully uploaded or are still in the process of being handled. This feature is available when the application parameter Blocks > Business Block Delivery History is active. The user is notified of any block delivery failures to the external system on the Business Block Search screen from the Search results grid. A red background in the first (+) column displays in the row of the failed block. When the failed block is highlighted, a lamp, Del. Failure, will appear on the Business Block Search screen. When the Edit button is selected from the Business Block Search screen for the failed block, the Del. Failure lamp will also appear on the Business Block screen. When the Del. Failure lamp is selected from either screen, the Block Changes screen opens where both successful and unsuccessful delivery messages can be reviewed for the current block. All block changes can also be viewed from the Options > Book Options > Changes menu.
See Also