
|
|
|
Dashboard 2 (Ctrl+F4)
The Dashboard screen (Miscellaneous > Show Quick Keys > Dashboard) is a single-screen view of essential reservation related data available by pressing the Ctrl+F4 quick key from anywhere within OPERA.
Note: The Reservations > Reservation View needs to be granted to access the Dashboard (Ctrl + F4) Quick Key. If only the Reservations > Reservation Edit permission is the only permission granted to the user, then they will not have access to the Dashboard (Ctrl + F4). And if both the Reservation > Reservation View and Reservations > Reservation Edit permissions are granted, then the user will be able to access the Dashboard (Ctrl + F4).
From this one screen you can handle core activities such as making new reservations; locating, updating and canceling reservations; requesting and applying deposits; processing guest check ins and check outs; pre-allocating rooms; managing guest billing; running reports; working with housekeeping; and reviewing and referencing availability, day types, and house status for today or any future date. You can easily verify guest names, whether they have checked in, and their room numbers. Volumes of other important information — such as guest profiles and stay histories — are available from the Dashboard, without returning to a menu!
All your guest interactions can be managed from one easy-to-find quick-key screen to ensure relevant and timely information is available to your staff. The Dashboard is designed for speed so your focus is your guest.
Alternative Dashboard layouts are available. Which layout you see depends on the General > Dashboard Layout View application setting. This layout is available when the General > Dashboard Layout View application setting is set to Dashboard 2.

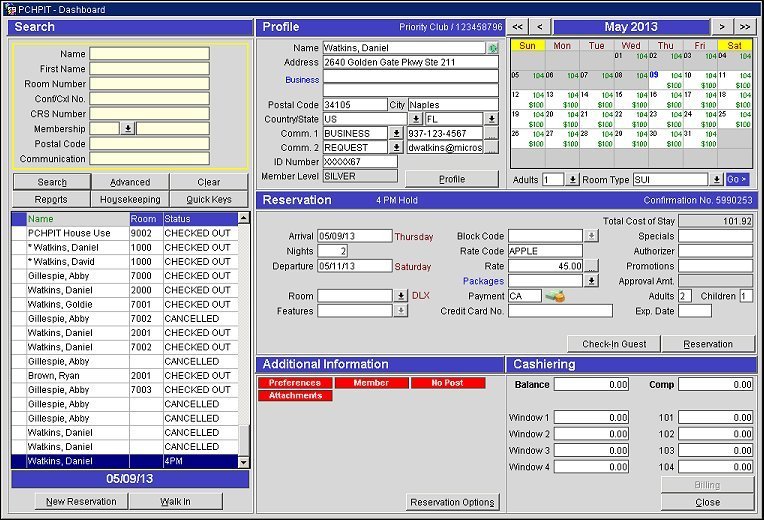
Following is a description of the Dashboard features for Layout 2. Many of the fields and buttons in each of the Dashboard sections are the same as those found on other OPERA screens such as the Reservation screen, the Profile screen, and the Billing screen. See the descriptions of these screens for complete details.
Use the Search panel on the left part of the Dashboard to locate reservations.
Multiple numbers can be searched when using the Room Number, Confirmation, or CRS Number fields by inserting a comma between each set of numbers.
Name. The guest's or accompanying guest's last name. If you are unsure of the correct spelling, enter only the first few letters (if you are sure of them). You can position your cursor in the Name field and swipe the guest's credit card through the credit card reader to search on the guest's name and credit card number.
The results for a search based on a last name are ordered by reservation arrival date, then by last name, then by first name.
Note: When searching on a guest's last name as the only search criteria entered, the search result will return any reservations that have a departure date in the past three days of the current business date will also be returned in addition to any future matching reservations. To find older reservations, enter more search criteria.
Note: "Reservation not found" is returned if no reservation exists for the name you enter.
Note: When swiping the credit card with your cursor in the Credit Card Number field, the search will be conducted based on the credit card number. When swiping the credit card with your cursor in the Name field, the search will be conducted based on the name associated with the credit card.
Note: When the CC Vault Function is active, searching by a guest name with the swipe of a credit card is not available.
First Name. Guest's or accompanying guest's first name. This field can be helpful if the guest has a common last name like Smith.
Room Number. Room number assigned on the reservation. Multiple room numbers can be entered separated by a comma. For example, if you want to search for Rooms 1001 and 1008, enter 1001, 1008 and select the Search button to return only those two rooms.
Note: When searching on room number only, all future reservations for that room number will be returned in addition to any reservations that have a departure date in the past three days of the current business date for the room number will also be returned. To find older reservations, enter more search criteria.
Conf/CXL No. Confirmation or cancellation number for the reservation. Specific confirmation or cancellation numbers can be searched on at a time by entering a comma between each number. (For a really fast search all you need is the reservation confirmation or cancellation number.)
CRS Number. GDS transaction number or other central reservations system transaction number associated with the reservation. Specific CRS numbers can be searched on at a time by entering a comma between each CRS number. (The CRS Number field appears as a standard search option if a CRS interface is installed.)
Membership. Select the down arrow to choose a membership type.
Member Number. Enter the membership number. If no membership type has been selected in the Membership field, the membership type in the Profiles > Default Membership Type application setting is assumed. If the guest has a membership card, position your cursor in the Membership Number field and swipe the card. OPERA will populate the Membership Number field with that membership number.
Postal Code. Enter the entire postal code for the guest's address (e.g., 34105).
Communication. Use this field to search by any communication type (e.g., Phone, Fax, Email) associated with the guest's profile.
Company. Name of the company associated with the reservation.
Agent. Name of the travel agent associated with the reservation.
Group. Name of the group associated with the reservation.
Block. Block code associated with the reservation.
Arrival Date From/Arrival Date To. Define the range of arrival dates you wish to search. By default, the Dashboard displays all reservations for today's date, including reserved, checked in, canceled, due out, and checked out.
Departure Date From/Departure Date To. Define the range of departure dates you wish to search.
Credit Card #. Manually enter, or swipe the guest's credit card, to search for the reservation by the credit card number attached to the reservation. When the credit card icon displays at the end of the field, the Credit Card Vault functionality is active. See Credit Card Vault for details.
Note: When the CC Vault Function is active, searching by a guest name with the swipe of a credit card is not available.
Custom Ref. External CRS system reference number associated with the reservation.
Party. Available when the Reservation > Party application function is set to Y, to display all party members, enter the name of the party only. To narrow your search, enter the name of the party along with other search criteria.
Show Waitlist. Available when the Reservations > Waitlist application function is set to Y, select this check box to display only waitlisted reservations that meet other search criteria.
Search Type. Select the option button that corresponds to the reservation status of the reservations you wish to display. These options can be used to filter other search criteria. Search Type options are not available if you have selected the Show Waitlist check box.
Click in the search results grid headers to re-order the display by last name, room number, or reservation status. (By default, search results are ordered by last name, first name, and arrival date.)
Color Code. The Reservations > Reservation Color Definition application setting can be set to Reservation, VIP Level, Market Code or None. Depending on the setting, a color may appear in this column to indicate a reservation, market code, or VIP status or condition agreed on by the property. For example, colors can be used as a quick reference to see if a guest is disabled or if the reservation belongs to a dignitary. The color and its definition appear in the Reservation section of the Dashboard when the guest's record is highlighted in the search results grid.
Name. Guest's name.
Room. Guest's room number.
Status. Reservation status.
Reports. The Reports button gives you access to the complete set of OPERA reports, setup for the Dashboard Report Group, without closing the Dashboard. Reports can be previewed, printed, emailed, and faxed at any convenient time using this option.
Housekeeping. Go directly to the Housekeeping screen by selecting this button. From there, room statuses can be checked or modified.
Quick Keys. Select this button to go to the Quick Keys menu. Quick Keys help you quickly accomplish tasks you perform frequently, no matter where you are working in OPERA, without leaving the task you are currently working on. (See Quick Keys for details.)
New Reservation. Select the New Reservation button to begin making a new reservation. The reservation flow that ensues depends on the Reservations>Reservation Flow application setting for the property. When the Reservations>Profile Search Prior to New Reservation application setting is set to Y, you must select a profile from the Profile Search screen before a new reservation can be made.
Walk In. Select this button to check in guests who arrive without previously having made a reservation. The reservation flow that ensues depends on the Reservations>Reservation Flow application setting for the property. You are prompted to select a room and to check in the guest as part of the reservation making process. (See Walk In for details.)
When the OPR<version number>ORS license code is active and the Protected field for the profile has been selected as CENTRAL, this protects this profile from changes being made at the PMS property level (details are explained below). When this profile is saved after CENTRAL Protect has been selected, the profile is identified with a green label "Protected" on both the ORS and PMS Profile Screen.
When a profile is Central Protected, only certain changes can be made to unprotected fields at the PMS property level, such as owner, routing instructions, commission, Profile Options, negotiated rates, comments, or preferences. These changes update the PMS profile and also transfer to and update the ORS profile. When the Profiles > Full Protection application parameter is set to N, changes cannot be made at the PMS property level to protected fields, such as the Last Name, First Name, Company, Address, Country, State, Communication Types, Name Code, VIP, or Profile Type. To restrict any changes at all from being made at the PMS level to a Central Protected profile (including unprotected fields of owner, routing instructions, commission, Profile Options, negotiated rates, comments, or preferences), an application parameter Profiles > Full Protection can be set to Y in PMS so no fields can be modified.
When the OPP_GCA OPERA Comp Accounting license is active, the Profile section title bar shows the membership type and membership number if the guest belongs to the membership program defined by the Comp Accounting > PTS Membership Type application setting.
Direct Entry Fields. You can directly edit or delete address and communication information fields right on the Dashboard. You can also add addresses and phone numbers (e.g., home addresses, business addresses, mobile phone numbers, business phone numbers, email addresses, etc.). Changes made here are automatically saved to the profile.
Name. Name of the guest associated to the reservation. This field cannot be edited as it is view only. The Name label will be blue when there is Alternate Name information for the displayed Profile/Reservation. Select the Globe button to display the Alternate Name for the guest.
Address. Enter the guest's address (mailing address) city, postal code and extension, country, and state. If postal codes for the city, state, and country have been configured in Configuration > Profiles > Geographic Data > Cities and Postal Codes, if you enter an existing postal code the city and state will automatically populate. If you enter a postal code that exists for more than one city or state, the first city or state configured automatically populates; you can then change to the other configured city or state. If you enter an existing postal code, but it doesn't match the current state, a message displays such as "Postal Code is not in the valid range." If you enter a postal code that has not been configured, you can enter any state and city without an error message. If multiple addresses are available for this profile, the Addresses lamp appears (in red) in the lower part of the screen (See Indicator Lamps for details). (See Addresses for details.) If multiple addresses are created, select one as the primary address. The primary address displays on the Profile screen with the address type (shown in blue: for example, Home Address, Business Address) next to it. The default primary address type is set by the Profiles > Individual Address Type application setting.
Address. Enter the guest's street address.
City. Enter the city portion of the guest's address.
Postal Code. Postal code portion of the guest's address.
State/Province. Select the down arrow to choose the state or province portion of the address, if applicable.
Country. Select the down arrow to choose the country portion of the guest's address. If an ISO country code is associated with the country code you select here, the appropriate national flag image will appear next to the Country field and list of values down arrow, if this option has been configured (see Countries for details).
Comm 1 and Comm 2. By default, the Comm 1 field displays the primary phone number, and the Comm 2 field displays the primary email address. If a primary phone number does not exist, then the primary email is displayed in Comm 1. If a primary email does not exist, then the primary fax is displayed in Comm 2. Select the ellipsis button to see complete communication information.
Note: A double click on the email address (when the Comm. field is set to EMAIL) launches a new email to be sent to the guest's email address. This feature is also available in the Profile screen.
Passport or ID Number. Passport or ID number for the guest. This field’s visibility on the Dashboard 2 is determined by the property’s configuration for Menu and Screen Design for the Dashboard 2 screen attributes. Only the Passport or ID Number field can be configured to be displayed or both fields can be selected to be hidden.
The following can happen when a number is added or updated when this field is set to Passport:
Note: By default, Passport Number and ID Number information is masked with Xs except for the last two characters. If you have Profiles > View Sensitive Information on Profile permission, you can double-click on the field to see this information in clear text. When updating ID and Passport numbers with masked values, the user is expected to replace the entire string rather than parts and pieces of the masked value. This is because these fields accommodate alphanumeric characters and therefore, if the string is not replaced in its entirety, the masked values will be saved as Xs. In an environment with Shared Security Services, Passport Number and ID Number information is unmasked in the Fiscal XML file.
Membership Level. This view-only field displays the membership level attached to the guest profile or the membership type that is equal to the property default membership type. This field’s visibility on the Dashboard 2 is determined by the property’s configuration for Menu and Screen Design for the Dashboard 2 screen attributes. If the property does not have a Default Membership Type configured, then the field will always be blank even if the guest has a membership with a level attached to the Reservation or Profile.
Note: If multiple Memberships are attached to the Profile it can happen that the Membership Type info at the top of the Profile Section of Dashboard2 displays a different Membership than the Level that is shown. This is due to the Level always using only the Default Membership Type, even if that is not attached to the Reservation.
Profile. Select this button to display the complete guest profile for review or editing.
Note: All changes made to this section of the Dashboard, whether they are additions, modifications, or deletions, will be reflected throughout the rest of OPERA.
The availability calendar section shows rate and availability information, as appropriate, for the current month. The buttons can be used to change the display for a different month and/or year.
Month. Click on the month to go to the Detailed Availability screen. The Detailed Availability screen shows a 14-day view of the availability of each of the property's Room Types by day, along with relevant statistics for the day. The current business date is the default start date for the display.
Date Blocks. The date is shown in the upper left corner of each block on the calendar. The current date is shown in blue, while other dates are shown in black.
Available Rooms to Sell. The number in the upper right corner of each date block shows the number of rooms available to sell for that date. By default, the availability displayed is for the room type set by the Reservations > Reservation Dashboard Calendar Room Type application setting, but you can check availability for any specific room type by using the Room Type search option below the calendar. If no Reservations > Reservation Dashboard Calendar Room Type application setting is specified, the Available Rooms To Sell defaults to HOUSE (all active room types at the property). If there are rooms available to sell, the availability number is green. A red zero means that there are no rooms of the selected room type available to sell, and a negative red number means that the selected room type is overbooked.
Rate Amount. A rate amount is displayed in the lower right corner in the date block for the room type shown in the Room Type field, and the number of adults shown in the Adults field.
Note: By default, the rates displayed are populated based on the values configured for the Reservations > Reservation Dashboard Calendar Rate Code, Reservations > Reservation Dashboard Calendar Adults, and Reservations > Reservation Dashboard Calendar Room Type application settings. If no Reservation Dashboard Calendar Room Type is selected, HOUSE (total house availability encompassing all active room types at the property) becomes the default. The room type can be changed by making a new selection in the Room Type field. If no Reservation Dashboard Calendar Adults is selected, 1 becomes the default. The number of adults can be changed by making a selection in the Adults field. A Reservation Dashboard Rate Code application setting is not specified, or if the rate code selected has no rate details specified for the calendar dates displayed, or if the room type selected for the Reservation Dashboard Calendar Room Type application setting is not configured for the rate code, rate amounts will not be displayed.
The rate amount is shown in green if there are rooms available to sell for the currently selected rate code/room type/number of adults. A red currency sign appears (e.g., $, �, �) in place of a rate amount if there are no rooms available to sell at for the designated rate code/room type/number of adults.
Day Type. Displayed when the Rates > Day Types application function is set to Y, a colored square in the date block indicates the day type (see Day Type Codes for details.) When clicking in a date with a day type in it, the House Status screen is displayed.
Adults. Number of adults that will be associated to the reservation; the default for this number is set by the Reservations > Reservation Dashboard Calendar Adults application setting. Select the down arrow to select a different number of adults for the reservation (maximum of 5). Then select the Go> button. Based on the number of adults selected, rates in the calendar will be refreshed depending on how the rates for each number of adults are defined in the Rate Details.
Room Type. By default, the calendar displays the room type set by the Reservations > Reservation Dashboard Calendar Room Type application setting. If no Reservations > Reservation Dashboard Calendar Room Type application setting is specified, the HOUSE availability (the number of rooms to sell for all active room types at the property) is used by default. You can use the Room Type field to check availability for any active room type at the property. Select the down arrow and choose a room type from the list of values. Then select the Go> button to display availability for that room type.
Go>. Select to refresh the rates in the calendar based on the new number of Adults and/or new Room Type that have been selected.
The Reservation section provides an overview of the reservation details. The title bar shows the reservation status and confirmation number.
You can directly edit most reservation information fields right on the Dashboard as you would when working with the Reservation screen. Changes made here are automatically saved to the reservation. Room Status, Company, and Approval Amount are not editable from the Dashboard.
"Smart" Buttons. Reservation section buttons behave intelligently to give you access to the features you need based on the reservation status of the guest highlighted in the Search section. This feature assists users (including new users) in doing their jobs efficiently. For example, if the reservation is checked in, the Change Reservation button displays, allowing you to update the reservation; the Cancel Check In button lets you reverse the check in — but only if guests have no charges on their account. When working with a checked out reservation, the Reinstate button is available. For due in reservations, the Check In button and Cancel button are available. Even the Room field down arrow is aware whether the current reservation is reserved, checked in, or due out. When a Check In message is available for the Due In reservation, the check in alert for the reservation will automatically display when the Check In button is selected. For reserved guests, the button lets you select a room. For checked in guests, the button lets you handle a room move. And no button appears for due out guests. For no shows, the room number is irrelevant so the Room and Room Status fields disappear.
Total Cost of Stay. This field’s visibility on the Reservation Dashboard is determined by the property’s configuration for Menu and Screen Design for the Reservation Dashboard 2 screen attributes. If the Total Cost of Stay is selected to be hidden within this configuration, the field will not be shown in the Reservation Dashboard. When shown, this read-only display shows the reservation’s Total Cost of: Lodging + Packages + Fixed Charges (No, if deposits are considered then we would be showing the guest pay own total) The Total Cost of Stay amount will also correspond with the Total Cost of Stay field displayed within Rate Info screen, and the Total Cost of Stay merge code within the Closing Script. See Rate Information for more information. The Total Cost of Stay field is displayed for all reservation statuses excluding Cancelled, Checked Out, No Show and those reservations with Pseudo room types.
Company. Company attached to the reservation.
Arrival. Arrival date. The corresponding day of the week displays next to the defined arrival date.
Nights. Number of nights the guest is staying.
Departure. Departure date. The corresponding day of the week displays next to the defined departure date.
Room Status. Show the Housekeeping status of the assigned room. The background color of this field will indicate the status at a glance: Dirty is red; Pickup (available if the Rooms Management > Pickup Status application function is set to Y) is yellow; if the Rooms Management > Inspected Status application function is set to Y, Inspected is green and Clean is cyan; if the Rooms Management > Inspected Status application function is set to N, Clean is green.
Note: The Room Status field will be visible only during the period from the arrival date (once a room number has been assigned) through check out.
Room. If the guest has not yet checked in, select the down arrow to display the Available Rooms Search screen. The screen displays room numbers for the selected room type, along with room features, floor number, reservation status, and current housekeeping status associated with each. You can search to identify inspected rooms, smoking and no smoking rooms, and rooms with specific features such as a particular view.
The Room field shows with a red background if the room is designated Do Not Move. (Available when the Reservations > Do Not Move Room application function is set to Y.)
When assigning a room to a Share Reservation with different arrival and departure dates, the room will be assigned to all of the reservations in the share according to their arrival and departure dates.
To the right of the Room field is the room type for the selected room number. Click on this link to display room type details. (See Image Maintenance for details.) The Room field will not be visible should the currently displayed reservation have a status of No Show.
Note: When the OPV_<version number> OPERA Vacation Ownership System license code is active and a room number is manually typed in that is not the first unit in rotation, then the Rotation Room Override prompt will display for a reason as to why that room was selected (See Rotation Room Override for details).
Change of Room Type to Charge. When the Reservation > Room Type to Charge application parameter is set to Y, OPERA implements the addition of the RTC field on the Reservation screen. By using this field it is possible to have the reservation be inventoried on one room type, but charged as if it was another room type (the room type specified in the RTC field). When you move a guest's reservation to a room which has a different room type, a prompt appears: "Room type has been changed to <new_room_type>. Do you want to change RTC to <new_room_type>?" Respond Yes to continue with the move and change the RTC to the new room type (Yes is the default). Respond No to continue with the move without changing the RTC from what appears on the Reservation screen. This feature is available only if the RTC on the Reservation screen matches the room type shown on the reservation prior to the move.
Features. Room features attached to this reservation. If features are associated with the reservation, you can select the down arrow to display the Features screen (in view- only mode), which displays the available feature codes and descriptions. Features attached to the reservation are marked with an X on the Features screen. If the FRONT DESK > FULL DESCRIPTION application parameter is active, hovering over this field displays the full description of the code values.
Block Code. If this reservation is for a guest who is part of a business block or group, the block or group code appears here. If this reservation is associated with a block, you can select the down arrow to display the Block Search screen in view-only mode. The Block Search screen allows you to view information such as the block start and end dates, block status, and numbers of rooms allotted to the block.
Rate Code. Rate code associated with the reservation. When multiple rate codes and/or rate amounts exist for the reservation, the Rate Code/Rate fields are highlighted in yellow.
Rate. The room rate for the reservation. Select the ellipsis button to access Daily Details, Rate Info, and Short Info buttons to check or modify the rates that will apply during the guest's stay.
Note: If the Rates > Multi Currency application parameter is set to Y and rate codes are configured in various currencies, the rate amount displayed is based on the currency of the rate code.
Packages. Packages associated with the reservation. Selecting the down arrow beside the Packages field from the Dashboard opens the Packages screen where packages can then be added, edited, deleted and/or excluded just as is currently done from within the reservation. Only the packages that cover the dates of the reservation are displayed in the Packages list of values.
When a Package is attached to a reservation and the stay dates are updated and fall outside of the start and end dates of the Package, then a message is displayed stating "An attached package does not have package details associated for this time period." After closing the message, the cursor is taken back to the Nights field and the number of nights is changed back to the reservations original amount.
Payment. The payment method as entered on the reservation details is displayed. When payment methods that are to be displayed screen have a display code assigned to their respective transaction codes, then an image will be displayed beside this field.
Credit Card No. The guest's masked credit card number. This field is mandatory if you select a credit card payment method in the Payment field. For users that are granted the Reservation > Credit Card Information View permission, they can double-click on the masked credit card number to display it. When this action is completed, an entry is logged into the User Log recording the user ID, date & time, action performed, etc. See User Log Activity for details.
Exp. Date. If you entered a credit card number in the Credit Card No. field, you must enter the card expiration date here. For users that are granted the Reservation > Credit Card Information View permission, the credit card expiration date is displayed, not masked.
Approval Amt. Approval amount for the guest credit card.
Adults. Number of adults on the reservation.
Children. Number of children on the reservation.
Specials. Special requests (e.g., foam pillows, crib, rollaway, extra towels) attached to the reservation. (These are configured in the "Specials" Preference Group.) If the FRONT DESK > FULL DESCRIPTION application parameter is active, hovering over this field displays the full description of the code values.
Authorizer. Available if the OPP_GCA Comp Accounting PMS add-on license is active. This authorizer will be recognized by the PTS system as the "trip authorizer." See Gaming Authorizers for details.
Promotions. If the Rates > Promotions application function is set to Y, this field is available. It shows the promotion codes (e.g., Fall Holiday, Superbowl Sunday, Buy One Get One Free) that are currently attached to the reservation.
Lamps. Red indicator lamp buttons (such as Share, Comments, Preference, Profile Notes, Routing, Attachments, and many more) display in this section for any options that apply to the current reservation or profile. Click on the lamp to access the underlying details for viewing or editing (See Indicator Lamps for complete list and details).
Reservation Options. The Reservation Options button displays the full menu of options that apply to the current reservation. (See Reservation Options for details.)
Key Info. When the Reservations > Cashiering Flow at Check In / During Stay application setting is set to Force Advance Bill or Force Advance Bill and Payment, and there is a key interface configured and active at the property, a view-only field shows the date through which the key generated for this reservation is valid and the key PIN code in the following format: Key valid date / Key PIN code. See Force Advance Bill and Payment at Checkin and Force Advance Bill for details.
Balance. A current total balance for windows 1 through 8 is displayed for quick reference at the top of the Cashiering section. Below the total balance, individual window balances are shown for windows 1 through 8, unless the OPP_GCA OPERA Comp Accounting license is active; in this case, window-by-window breakdowns are shown for windows 1 through 4.
Comp. When the OPP_GCA OPERA Comp Accounting license is active, the comp balance (total of all postings in windows 101 through 108) is displayed at the top of the Cashiering section, along with window-by-window breakdowns for windows 101 through 104.
Routing Codes. If a routing code has been configured for the guest's billing windows, they are shown in blue type. To set up or review routing options, the Routing button is available from the Reservation Options menu, and the Routing lamp is available in the Additional Information section.
Billing. Select the Billing button to go to the reservation Billing screen. The Billing button is available in the Cashiering section for checked in reservations. If the Cashiering > Pre Stay Charges and/or the Cashiering > Post Stay Charges application functions are set to Y at the property, and if the reservation conforms to the pre stay and/or post stay charging rules, the Billing button is available for reservations that have not yet checked in, or that have checked out. (See Pre Stay Charging and Post Stay Charging Rules for details.)
Check Out. The Check Out button is available in the Cashiering section if the current guest is scheduled to check out today.