4 Manage Purchase Orders
The Manage Orders option opens the Order Search page. In the Order Search page you can perform the following actions:
-
Search for purchase orders by various search criteria
-
View the entered search results
-
View a purchase order
-
Create a purchase order
-
Create a purchase order from an existing order
-
Edit a purchase order
-
Split a purchase order
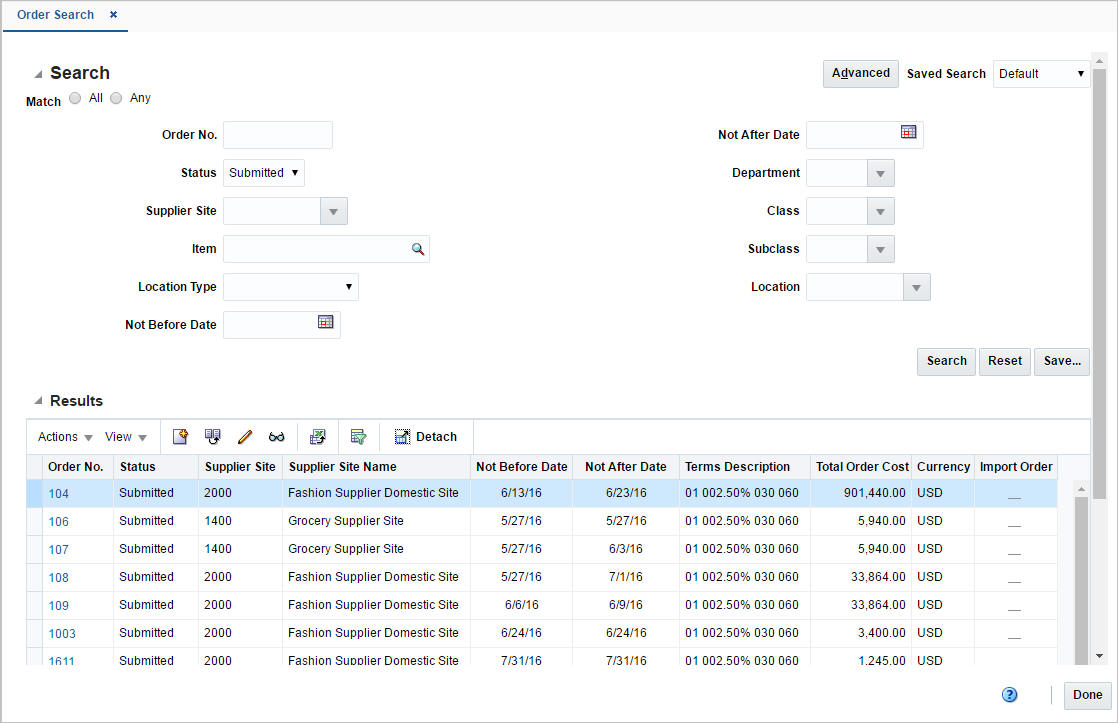
You can access the Order Search page from the Task menu, select Orders > Manage Orders. The Order Search page appears.
The Order Search page contains the following sections:
-
Search
For more information about how to search for an order, see the Searching for an Order section.
Searching for an Order
To search for an order:
-
From the Task menu, select Orders > Manage Orders. The Order Search page appears.
-
You can search for an order using basic or advanced search criteria, depending on the requirement. The basic mode is the default search mode.
-
Click Advanced to access the search section in advanced mode.
-
Click Basic to return to basic mode.
-
Searching for an Order Through the Basic Search Criteria
To search for an order using basic search criteria:
-
Enter, select or search for one or all of the following basic search criteria.
Table 4-1 Order Search - Basic Search Criteria and Description
Search Field Description Match
Check radio button All or Any.
All - only purchase orders matching all entered search criteria are shown.
Any - purchase orders matching any of the entered search criteria are shown.
Order No.
Enter the order number.
Status
Select the status of the purchase order, for example, approved.
Supplier Site
Enter or select the supplier site number.
Item
Enter or search for an item.
Location Type
Select the location type of a purchase order, for example, store or warehouse.
Not Before Date
Enter the date before which the item will be picked up by the customer or click the Calendar button to select the date.
Not After Date
Enter the date after which the item cannot be picked up by the customer or click the Calendar button to select the date.
Department
Enter, select or search for the department.
Class
Enter, select or search for the class.
Subclass
Enter, select or search for the subclass.
Location
Enter or select the location for the purchase order.
-
Click the Saved Search list to select one of the saved search criteria. Selecting a saved search populates the search section with the saved search criteria. If the run automatically function is enabled for the search, the search is executed immediately.
You can also personalize your saved searches by selecting Personalize. The Personalize Saved Searches page appears.
For more information about the Personalized Saved Search, see Personalize Saved Search in the Oracle® Retail Merchandising Foundation Cloud Service Do the Basics User Guide.
-
Click Search. The purchase orders that match the search criteria are displayed in the Results section.
-
Click Reset to clear the search section and results.
-
Click Save As... to save the current search criteria. The Create Saved Search page appears.
For more information about how to save your search criteria, see Create Saved Search in the Oracle® Retail Merchandising Foundation Cloud Service Do the Basics User Guide.
-
Click Done to close the page.
Searching for an Order Through Advanced Search Criteria
To search for an order using advanced search criteria:
-
To search using advanced search criteria, enter or select one or all of the advanced search criteria.
-
To narrow down the search, use the list next to the search fields. For example, determine if the entered value should equal or not equal the search result.
-
Click the Saved Search list to select one of the saved search criteria. Selecting a saved search populates the search section with the saved search criteria. If the run automatically function is enabled for the search, the search is executed immediately.
You can also personalize your saved searches by selecting Personalize. The Personalize Saved Searches page appears.
For more information about the Personalized Saved Search, see Personalize Saved Search in the Oracle® Retail Merchandising Foundation Cloud Service Do the Basics User Guide.
-
Click Search. The purchase orders that match the search criteria are displayed in the Results section.
-
Click Reset to clear the search section and results.
-
Click Save As... to save the current search criteria. The Create Saved Search page appears.
For more information about how to save your search criteria, see Create Saved Search in the Oracle® Retail Merchandising Foundation Cloud Service Do the Basics User Guide.
-
Click Add Fields to add more fields for the advanced search. To remove the field from the search, click the x right next to the field.
-
Click Reorder to change the order of the available search fields. The Reorder Search Fields page appears.
-
Select the desired search field and use the up and down arrows to rearrange the order of the fields.
-
Click OK to confirm the new order of the fields and close the page.
-
Click Cancel to reject any changes and close the page.
-
-
Click Done to close the page.
Viewing a Purchase Order
To view a purchase order follow the steps below.
-
From the Tasks menu, select Orders > Manage Orders. The Order Search page opens.
-
Enter or select search criteria as desired to make the search more restrictive. For more information about the order search function, see the Searching for an Order section.
-
Click Search. The orders that match the search criteria are displayed in the Results section.
-
Select a record.
-
Next select Actions > View, or use the View icon
 in the table toolbar. The Order page opens.
 -
To exit the Order page click Done or use the Close tab.
Results
The Results section lists the retrieved orders.
Delete a Purchase Order
To delete a purchase order follow the steps below. Only purchase orders holding the status Worksheet and Submitted can be deleted.
-
From the Tasks menu, select Orders > Manage Orders. The Order Search page opens.
-
Restrict the search to status Worksheet or Submitted. Enter or select further search criteria as desired to make the search more restrictive.
-
Click Search. The orders that match the search criteria are displayed in the Results section.
-
In the Order No. column, click the desired order number link. The Order page opens.
-
In the Toolbar, click the Delete Order icon.
-
You are prompted, if you want to delete the purchase order.
-
Click Yes. The status of the purchase order changes to Closed.
-
Choose one of the following options.
-
Click Save to delete the purchase order.
-
Click Save and Close to delete the purchase order and exit the Order page.
-
Click Cancel to reject your changes and exit the Order page.
-
Cancel All Items on a Purchase Order
The Cancel All Items option is only available, if the order was previously submitted for approval or approved. To cancel all items of a purchase order and close the order follow the steps below.
-
From the Tasks menu, select Orders > Manage Orders. The Order Search page opens.
-
Restrict the search to status Submitted or Approved. Enter or select further search criteria as desired to make the search more restrictive.
-
Click Search. The orders that match the search criteria are displayed in the Results section.
-
In the Order No. column, click the desired order number link. The Order page opens.
-
In the Toolbar select the Status list and select Cancel All Items.
-
You are prompted, if you want to cancel all items of the purchase order.
-
Click Yes to cancel all items of the purchase order.
-
The Cancel All Items page opens.
-
In the Cancel Reason field, enter or select the reason for cancelling all items on the purchase order.
-
Confirm your entry with OK. All the items of the purchase order are cancelled and the status of the purchase order changes to Closed.
-
After you have cancelled all items on the purchase order, choose one of the following options.
-
Click Save to save the purchase order.
-
Click Save and Close to save and close the purchase order. The Order page is closed.
-
Click Cancel to reject your changes and exit the Order page.
-
Reinstate All Items of a Purchase Order
If the purchase order holds the status Closed, you can reinstate all items with the Reinstate All Items button. Follow the steps below to reinstate all items of a closed purchase order.
-
From the Tasks menu, select Orders > Manage Orders. The Order Search page opens.
-
Restrict the search to status Closed. Enter or select further search criteria as desired to make the search more restrictive.
-
Click Search. The orders that match the search criteria are displayed in the Results section.
-
In the Order No. column, click the desired order number link. The Order page opens.
-
In the Toolbar select Reinstate All Items.
-
You are prompted, if you want to reinstate all the items on the selected purchase order.
-
Click Yes. The status of the purchase order changes to Worksheet.
-
After you have reinstated all items on the purchase order, choose one of the following options.
-
Click Save to save the purchase order in Worksheet status.
-
Click Save and Close to save the purchase order in Worksheet status and exit the Order page.
-
Click Cancel to reject your changes and exit the Order page. The purchase order stays closed.
-
Order Revisions
In the Order Revisions page you can view past changes and accept new changes for an approved purchase order. Changes can be made by the buyer, indicated as Retailer Version or by the supplier, indicated as Supplier Revision. The first version is the original purchase order. Changes are transmitted to and from the supplier through electronic data interchange (EDI). Versions or revisions can only be created for approved purchase orders.
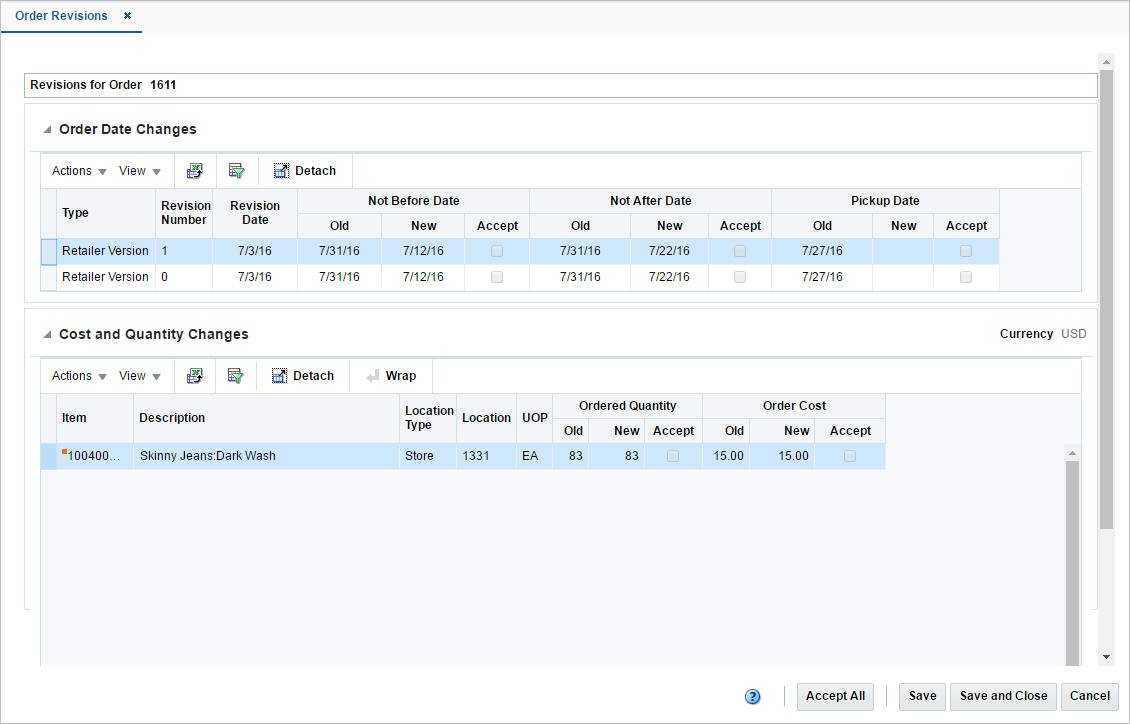
Order Date Changes
The Order Date Changes section displays the following changes:
-
Old and New Not Before Date, date before which the order deliveries are not expected.
-
Old and New Not After Date, date after which the order deliveries are not accepted.
-
Old and New Pickup Date, date when the item will be picked up.
Cost and Quantity Changes
The Cost and Quantity Changes section displays the following changes:
-
Old and New Ordered Quantity
-
Old and New Order Cost
Viewing an Order Revision
To view an order revision follow the steps below.
-
From the Tasks menu, select Orders > Manage Orders. The Order Search page opens.
-
Search for and retrieve a purchase order. Restrict the search to purchase order in Approved or Closed status. Click Search. The search results are shown in the Results section.
-
In the Results section, select a record.
-
Next select Actions > View. The Order page opens.
-
In the Toolbar, select More Actions > Order Revisions.
-
The Order Revisions page opens. You can view all past order date, cost and quantity changes for the selected purchase order.
Note:
Merchandising displays the latest changes at the top of the list, followed by the revision number in descending order. -
Click Done or use the Close Tab icon to close the Order Revisions page.
Accepting a Revision Order
To accept changes for an approved purchase order follow the steps below.
-
From the Tasks menu, select Orders > Manage Orders. The Order Search page opens.
-
Search for and retrieve a purchase order. Restrict the search to purchase orders in Approved status. Click Search. The search results are shown in the Results section.
-
In the Order No. column, click the order number link, or mark a record and select Actions > Edit or use the Edit icon . The Order page opens.
-
In the Toolbar select More Actions > Order Revisions.
-
The Order Revisions page opens. All Order Dates as well as Cost and Quantity Changes are displayed.
-
Select the Accept checkbox next to each change you want to accept. If you want to accept all of the changes, highlight the entire row, and click Accept All.
Note:
The Accept All button is only enabled, if there are unaccepted changes for the selected purchase order available. -
After you have accepted the desired changes, you have the following options.
-
Click Save to save the accepted changes.
-
Click Save and Close to save the accepted changes and close the Order Revisions page.
-
Click Cancel to reject all changes and close the Order Revisions page.
-
Split an Order
You can split order quantities for an item across suppliers in Merchandising. Follow the steps below to split the order quantities of your order.
-
From the Tasks menu, select Orders > Manage Orders. The Order Search page opens.
-
Enter or select search criteria as desired to make the search more restrictive.
-
Click Search. The orders that match the search criteria are displayed in the Results section.
-
Select a record in the Results section.
-
Select Actions > Split Orders, the Split by Supplier page opens.
-
Click Actions > Add or use the Add icon, to add an additional supplier.
-
To remove the supplier, click Delete to remove the primary supplier from the table.
-
In the Supplier Site field, enter, select or search for the supplier ID.
-
In the Country of Sourcing field, enter, select or search for the country of sourcing ID.
-
In the Unit Cost field, enter the unit cost for the item.
-
In the Order Quantity, enter the quantity of the item for the selected supplier site.
-
After you have entered the supplier site information, choose one of the following options.
-
Click OK to save your changes.
-
Click OK and Add Another to enter an additional supplier site.
-
Click Cancel to reject all changes and exit the Add Supplier Site page.
Note:
If the Recommended Order Quantity does not equal the Actual Order Quantity, a warning message appears. Click Yes to continue, or No to return to the Split Supplier page and correct the order quantity. -
Appointments
Appointments define the quantity of goods that are expected to ship from one location to another. The appointments are created in the warehouse management system and sent to Merchandising. When a shipment is received, the warehouse management system sends a message to Merchandising Receiving and completes the following actions:
-
The appointment status changes to Closed
-
Quantity Received and Receipt Number fields are updated
-
Merchandising attempts to close the document associated with the appointment (a purchase order, transfer, or allocation)
A purchase order, transfer, or allocation cannot be closed if an associated appointment does not have a status of Closed. Also, the line item order quantity (canceled quantity) cannot fall below the total expected quantity for all of the shipments and appointments that are attached to the order for that line item.
Viewing Appointments
The Appointments page allows you to search for any appointment linked with a specific order or ASN and view its details such as the receiving location and current status.
The Appointments page can be accessed by any of the following ways:
-
From the Tasks menu, select Inventory > Shipments and Receipts > Appointments. The Appointment page opens.
-
From the More Actions menu of the following pages:
-
Order
For more information about orders, see the Create a Purchase Order chapter, section "Define/Enter a Purchase Order".
-
Transfer
For more information about transfers, see Transfer Page in the Oracle® Retail Merchandising Foundation Cloud Service Inventory User Guide.
-
Transfer Details
For more information about transfer details, see Transfer Details in the Oracle® Retail Merchandising Foundation Cloud Service Inventory User Guide.
-
-
In the Order Details page, select Actions > Appointments in the Items section.
For more information about order details, see the Create a Purchase Order chapter, section "Order Details".
-
In the Shipment page, select the Appointment button in the toolbar.
For more information about shipments, see Shipment in the Oracle® Retail Merchandising Foundation Cloud Service Inventory User Guide.
The Appointments page includes the following sections:
-
Search
For more information about how to search for appointments, see the Searching for an Appointment section.

Searching for an Appointment
You can search for appointments by providing search criteria in the search section.
-
You can search for an appointment using basic or advanced search criteria, depending on the requirement. The basic mode is the default search mode.
-
Click Advanced to access the search section in advanced mode.
-
Click Basic to return to the basic mode.
-
Searching for an Appointment Through the Basic Search Criteria
To search for an appointment through the basic search criteria:
-
Enter or select one or all of the following basic search criteria.
Table 4-2 Appointment Search - Basic Search Criteria
Search Field Description Match option
Check radio button All or Any.
All - only appointments matching all entered search criteria are shown.
Any - appointments matching each entered search criteria are shown.
Appointment
Enter, select or search for the appointment ID.
Status
Select the status of the appointment. The options are: Scheduled, Modified, Arrived, and Closed.
Order No.
Enter, select or search for the order number.
Transfer
Enter, select or search for a transfer.
Allocation
Enter, select or search for an allocation number.
Store
Enter, select or search for the store.
Warehouse
Enter, select or search for the warehouse.
Internal Finisher
Enter, select or search for the internal finisher..
External Finisher
Enter, select or search for the external finisher.
ASN
Enter, select or search for an ASN number.
-
You can also click the Saved Search drop down to select one of the saved sets of search criteria. Selecting a saved search will populate the criteria section with saved criteria. If the saved search is selected to run automatically then the search will be executed too.
You can also choose to manage and personalize the saved searches by clicking Personalize in the list. The Personalize Saved Searches page appears.
For more information about the Personalized Saved Search, see Personalize Saved Search in the Oracle® Retail Merchandising Foundation Cloud Service Do the Basics User Guide.
-
Click Search. The appointments that match the search criteria are displayed in the Results section.
-
Click Reset to execute the saved search.
-
Click the Save.. button to save the current sets of search criteria as a Saved Search. The Create Saved Search page appears.
For more information on the Create Saved Search, see Create Saved Search in the Oracle® Retail Merchandising Foundation Cloud Service Do the Basics User Guide.
-
Click Done to close the page.
Searching for an Appointment Through the Advanced Search Criteria
To search for an appointment through the advanced search criteria:
-
Enter or select one or all of the advanced search criteria.
-
To narrow down the search, use the list next to the search fields. For example, determine if the entered value should equal or not equal the search result.
-
Click on the Saved Search list to select one of the saved search criteria. Selecting a saved search populates the search section with the saved search criteria. If the run automatically function is enabled for the search, the search is executed immediately.
You can also personalize your saved searches by selecting Personalize. The Personalize Saved Searches page appears.
For more information about the Personalized Saved Search, see Personalize Saved Search in the Oracle® Retail Merchandising Foundation Cloud Service Do the Basics User Guide.
-
Click Search. The appointments that match the search criteria are displayed in the Results section.
-
Click Reset to clear the search section and results.
-
Click Save As... to save the current search criteria. The Create Saved Search page appears.
For more information about how to save your search criteria, see Create Saved Search in the Oracle® Retail Merchandising Foundation Cloud Service Do the Basics User Guide.
-
Click Add Fields to add more fields for the advanced search. To remove the field from the search, click the x right next to the field.
-
Click Reorder to change the order of the available search fields. The Reorder Search Fields page appears.
-
Select the desired search field and use the up and down arrows to rearrange the order of the fields.
-
Click OK to confirm the new order of the fields and close the page.
-
Click Cancel to reject any changes and close the page.
-
-
Click Done to close the page.
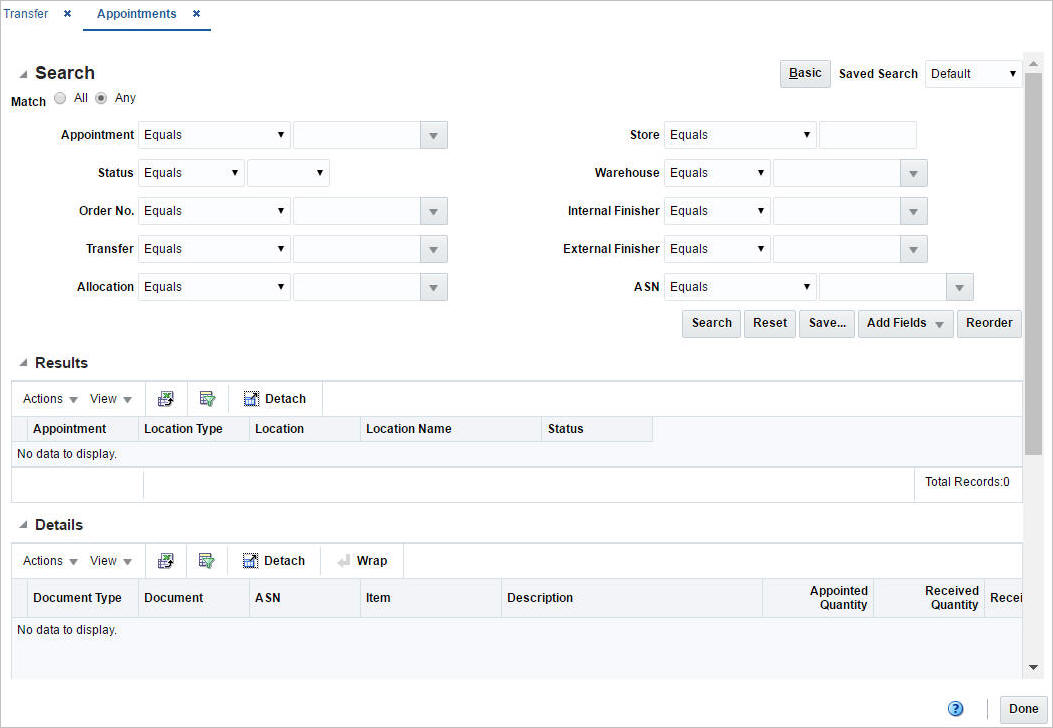
Results
The Results section lists the appointments that match the entered search criteria. Select an appointment to view the details.
Details
In the Details section you can view the item on this appointment along with the appointed and received quantities based on the related document, purchase order or ASN.
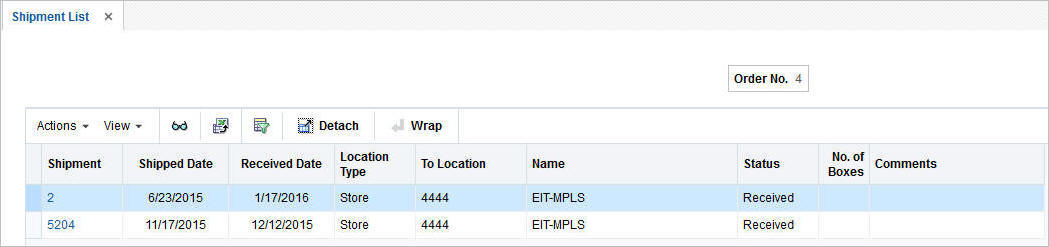
Order Shipments
The Shipment List page displays shipping details for purchase order shipments and franchise shipments, when accessed through the order pages. Three different ways to access the Shipment List are available.
-
From the Tasks menu, select Orders > Manage Orders (Search for the order)> More Actions > Shipments. The Shipment List opens.
You can also access the Shipment List for vendor sourced franchise orders.
-
From the Tasks menu, select Inventory > Franchise Orders > Manage Franchise Orders. The Franchise Order Search page appears. Search for the franchise order.
-
In the Results section click the franchise order link, or mark a record and select Actions > Edit/View. The Franchise Order page appears.
-
Then select More Actions > Shipments. The Shipment List page opens.
Additionally, you can access the Shipment List for franchise returns.
-
From the Tasks menu, select Inventory > Franchise Orders > Manage Franchise Returns. The Franchise Return Search page appears. Search for the franchise return.
-
In the Results section click the RMA (Return Merchandise Authorization) link, or mark a record and select Actions > Edit/View. The Franchise Return page appears.
-
Then select More Actions > Shipments. The Shipment List page opens.
The Shipment List contains the following information:
-
Shipment number
-
Shipped Date
-
Received Date
-
Location Type, for example, Store or Warehouse
-
To Location
-
Name, name of the location
-
Status, for example, Submitted.
-
No. of Boxes
-
Comments
To open the Shipment page and view further shipment details follow one of the options below.
-
In the Shipment List page, go to column Shipment and click the shipment number link. The Shipment page opens. For more information about shipment details, see Shipment in the Oracle® Retail Merchandising Foundation Cloud Service Inventory User Guide.
-
In the Shipment List page, select Actions > View or use the View icon. The Shipment page opens. For more information about shipment details, see Shipment in the Oracle® Retail Merchandising Foundation Cloud Service Inventory User Guide.
-
-
-
Click Done to exit the Shipment List.
Work Orders for Purchase Orders
Work Orders are requests for certain activities to be done to an item in a warehouse before the delivery of an item to the final locations.
The Work Order page allows you to view or maintain one or more work orders for the purchase order. Next you assign work in progress codes (WIP) and indicate in which sequence the task must be completed.
The Work Orders page contains the following sections.
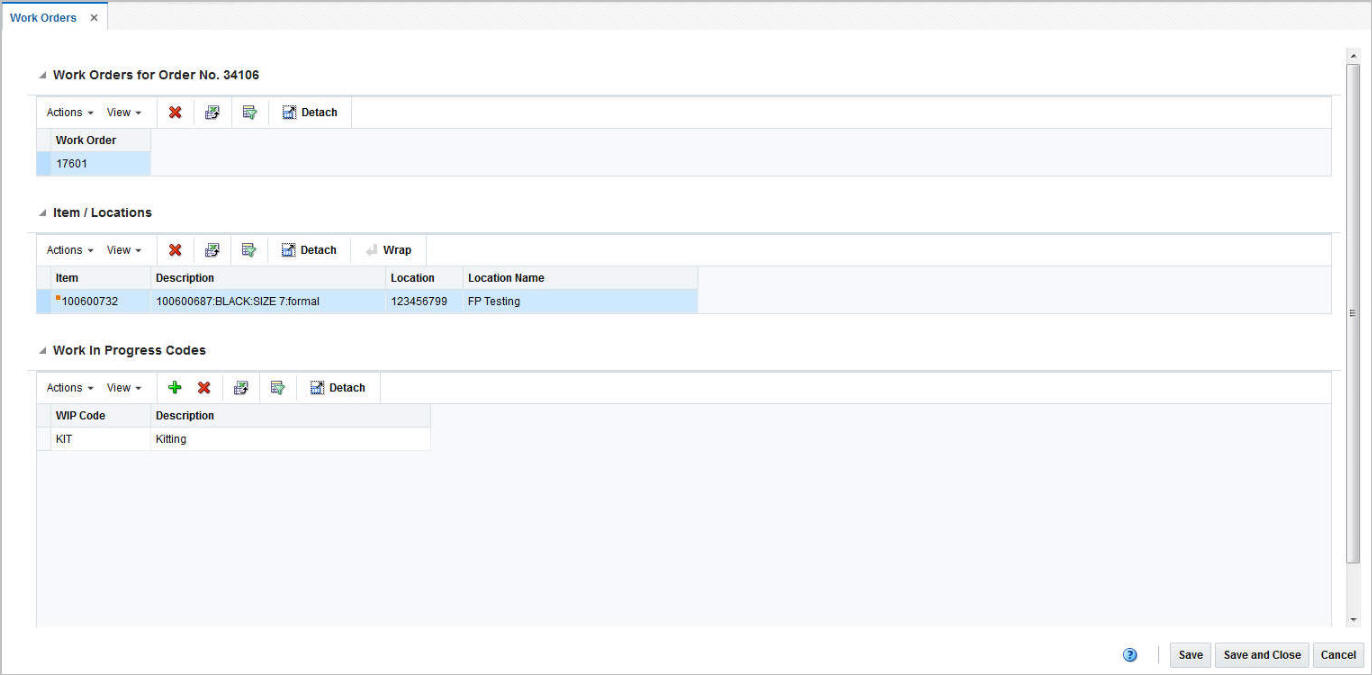
Work Orders for Order No. Table
The Work Orders for the Order No. table displays all work orders associated with the current purchase order.
Item/Locations Table
The Item/Locations table displays items and locations associated with the work order. The items and locations are populated automatically.
Work In Progress Codes Table
The Work In Progress (WIP) Codes Table holds the WIP codes assigned to the item locations on the work order.
Creating Work Orders
To create a work order, follow the steps below.
Note:
The system displays already existing work orders, if you add a new work order. However, you can not modify existing work orders during the creation of a new work order.-
From the Tasks menu, select Orders > Manage Orders. The Order Search page opens.
-
Enter or select search criteria as desired to make the search more restrictive.
-
Click Search. The orders that match the search criteria are displayed in the Results section.
-
In the Order No. column, click the order number link, or mark a record and select Actions > Edit, or use the Edit icon . The Order page opens.
-
Select More Actions > Work Order > Create. The Order Distribution page opens.
-
In the table click Actions > Work Orders or use the Work Orders button. The Work Orders page opens.
-
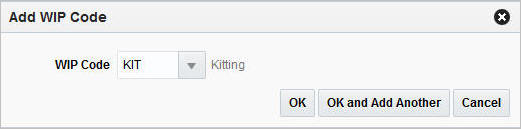
In the Work in Progress Codes table, select Actions > Add WIP Code, or use the Add icon . The Add WIP Code page opens.
-
Select, enter or search for the WIP code, for example, quality control.
-
Click OK to add the selected WIP code to the Work In Progress Code section.
-
Click OK and Add Another to add the current WIP code and create another.
-
Click Cancel to reject the WIP entry and exit the Add WIP page.
-
-
To save or reject the created work order, choose one of the following options.
-
Click Save to save the created work order.
-
Click Save and Close to save the created work order and exit the Work Orders page. The Order Distribution page is displayed without the item/locations that were associated to the new work order.
-
Click Cancel to reject all entries and close the Work Orders page.
-
Managing Work Orders
To edit a work order, follow the steps below.
-
From the Tasks menu, select Orders > Manage Orders. The Order Search page opens.
-
Enter or select search criteria as desired to make the search more restrictive.
-
Click Search. The orders that match the search criteria are displayed in the Results section.
-
In the Order No. column, click the order number link or select Actions > Edit, or use the Edit icon . The Order page opens.
-
Select More Actions > Work Order > Manage. The Work Orders page opens. The work orders for the selected purchase order are displayed. Choose one of the following options.
Deleting a Work Order
To delete a work order, follow the steps below.
-
In the Work Orders for Orders No. table, select a record.
-
Then select Actions > Delete or use the Delete icon to delete a work order from a purchase order.
-
A confirmation prompt is displayed. Select Yes to confirm the prompt. The work order is deleted from the purchase order.
Note:
The Work Orders page will close automatically, after you select Yes to confirm the deletion of the last work order for the purchase order. -
To save or reject your changes, choose one of the following options.
-
Click Save to save your changes.
-
Click Save and Close to save your changes and exit the Work Orders page.
-
Click Cancel to reject all entries and close the Work Orders page.
-
Deleting an Item/Locations Combination
To delete an item/locations combination from the work order, follow the steps below.
-
In the Item/Locations table, select a record.
-
Then select Actions > Delete or use the Delete icon to delete the item/locations combination from the purchase order.
-
A confirmation prompt is displayed. Select Yes to confirm he prompt. The item/locations combination is deleted from the purchase order.
Note:
You are not allowed to delete the last item/locations combination of a work order. You have to delete the whole work order instead. For more information about how to delete a work order, see the Deleting a Work Order section. -
To save or reject your changes, choose one of the following options.
-
Click Save to save your changes.
-
Click Save and Close to save your changes and exit the Work Orders page.
-
Click Cancel to reject all entries and close the Work Orders page.
-
Adding a WIP Code
To add a WIP code to the work order, follow the steps below.
-
In the Work in Progress Codes section, select Actions > Add WIP Code, or use the Add icon . The Add WIP Code page opens.
-
Select, enter or search for the WIP code, for example, quality control.
-
Click OK to add the selected WIP code to the Work In Progress Code section.
-
Click OK and Add Another to add the current WIP code and create another.
-
Click Cancel to reject the WIP entry and exit the Add WIP page.
-
-
To save or reject your changes, choose one of the following options.
-
Click Save to save your changes.
-
Click Save and Close to save your changes and exit the Work Orders page.
-
Click Cancel to reject all entries and close the Work Orders page.
-
Viewing Work Orders
To view a work order, follow the steps below.
-
From the Tasks menu, select Orders > Manage Orders. The Order Search page opens.
-
Enter or select search criteria as desired to make the search more restrictive.
-
Click Search. The orders that match the search criteria are displayed in the Results section.
-
In the Results section, select a record.
-
Next select Actions > View or use the View icon . The Order page opens.
-
Select More Actions > Work Order > Manage. The Work Orders page opens. All work orders associated with the selected purchase order are displayed.
-
Click Done to exit the Work Orders page.
Deleting a WIP Code
To delete a WIP code from the work order, follow the steps below.
-
In the WIP Codes table, select a record.
-
Then select Actions > Delete or use the Delete icon to delete the WIP code from the purchase order.
-
A confirmation prompt is displayed. Select Yes to confirm the prompt. The WIP code is deleted from the purchase order.
-
To save or reject your changes, choose one of the following options.
-
Click Save to save your changes.
-
Click Save and Close to save your changes and exit the Work Orders page.
-
Click Cancel to reject all entries and close the Work Orders page.
-
Deal Summary
In the Deal Summary page you can to view deals with transaction level discounts that apply to a purchase order. The screen provides details on the order discount, item/location discount and the total discount.
To view a deal summary follow the steps below.
-
From the Tasks menu, select Orders > Manage Orders. The Order Search page opens.
-
Enter or select search criteria as desired to make the search more restrictive.
-
Click Search. The orders that match the search criteria are displayed in the Results section.
-
In the Order No. column, click the order number link or select Actions > Edit/View, or use the corresponding icons. The Order page opens.
-
In the Toolbar, select More Actions > Deal Summary.
-
The Deal Summary page opens. The header section displays the selected order number, the total discount amount and the currency. The bottom section contains deal details, such as deal component, discounts on item/location level as well as on the order level.
Note:
If the selected order has a different currency than the system's primary currency, Merchandising also displays the field Total Discount Primary. This field displays the total discount amount in the system's primary currency.If the currency of the selected order has the same currency than the system's primary currency, only the Total Discount field is displayed.
-
Click OK to exit the Deal Summary page and return to the Order page.
Order Discounts
The Order Discounts page displays deal information that apply to an item on a purchase order.
-
From the Tasks menu, select Orders > Manage Orders. The Order Search page opens.
-
Search for and retrieve a purchase order. Enter or select the corresponding search criteria and click Search. The search results are displayed.
-
In the Results section, go to column Order No. and click the order number link. The Order page opens.
-
In the Toolbar click the Details button. The Order Details page opens.
-
In the Location section, select Actions > Discounts. The Order Discount page opens. The header section shows the item location information for the selected order, such as order number, Unit of purchase (UOP), currency, item, location, supplier site cost, total discount and order cost. The bottom section displays deal details, such as deal components (discounts or rebates), deal class, discount type and graduated order cost.
Note:
Use the More Actions button to toggle from one currency to another. -
Click Done to exit the Order Discounts page.
View Replenishment Orders
Inventory Management
The Order Inventory Maintenance page allows you to maintain and view inventory management information for purchase orders, for items on a purchase order, and for locations on a purchase order.
You can view the following inventory management information:
-
Purchase order quantities before and after scaling
-
Net cost of the purchase order before and after scaling
-
Due order processing parameters for replenishment orders
You can edit the following inventory management information:
-
Purchase order scaling
-
Minimum constraints
-
Truck splitting
-
Supplier Pooling
-
Order Quantity
The Order Inventory Management page contains the following sections.
-
Order Header
The header displays the order number, item, location and order costs.
Note:
The fields Item and Location are only displayed if you enter the Order Inventory Management page through Order Details. -
Scaling Constraints
For more information about the scaling constraints, see the Maintaining Scaling Constraints section.
-
Minimum Constraints
For more information about the minimum constraints, see the Maintaining Minimum Constraints section.
-
Truck Splitting Constraints
For more information about the truck splitting constraints, see the Maintain Truck Splitting Constraints section.
-
Supplier Pooling
For more information about the supplier pooling, see the Maintaining Supplier Pooling section.
Maintaining Order Inventory Information for a PO at the Order, Item, or Location Level
To maintain inventory information of a purchase order follow the steps below.
-
From the Tasks menu, select Orders > Manage Orders. The Order Search page appears.
-
Restrict the search to purchase order in Worksheet status.
-
Click Search. The orders that match the search criteria are displayed in the Results section.
-
In the Order No. column, click the order number link or select Actions > Edit, or use the Edit icon
 . The Order page appears.
-
To apply inventory management details to the entire purchase order:
In the Toolbar select More Actions > Inventory Management. The Order Inventory Management page appears.
-
To apply inventory management details to an item on the purchase order:
-
In the Toolbar select Details. The Order Details page appears.
-
In the Items section, select an item. Then select Actions > Inventory Management. The Order Inventory Management page appears.
-
-
To apply inventory management details to an item and location on the purchase order:
-
In the Toolbar select Details. The Order Details page appears.
-
In the Locations section, select an location. Then select Actions > Inventory Management. The Order Inventory Management page appears.
-
-
Maintaining Scaling Constraints
To maintain the scaling constraints, follow the steps below.
-
In the Scaling Constraints area, select the Scale Order to Constraints check box. The Scaling Constraints area is enabled.
-
In the Objective field, select whether purchase orders are scaled to the minimum or maximum values of the scaling constraints.
-
In the Maximum Iterations field, enter the maximum number of times that the scaling process is performed for the purchase order.
-
In the Level field, select the level at which the scaling is performed. For example, select order or location level.
-
In the Scaling Constraints Primary column, edit the following fields:
-
Type: Enter or select the primary type of constraint to use when scaling orders. For example, Amount or Each.
-
UOM: If you select, Mass or Volume as the primary type, edit the unit of measure (UOM) code. Enter, select or search for the UOM.
-
Maximum Value: Edit the maximum value of the constraint. If you select Amount as the primary type, the currency is displayed next to this field.
-
Tolerance: Edit the percentage tolerance for the minimum value of the constraint.
-
Minimum Value: Edit the minimum value of the constraint. If you select Amount as the primary type, the currency is displayed next to this field.
-
Tolerance: Edit the percentage tolerance for the maximum value of the constraint.
-
-
In the Scaling Constraints Secondary column, edit the following fields:
-
Type: Select the secondary type of constraint to use when scaling orders.
Note:
The Secondary Type cannot be the same as the Primary Type. -
UOM: If you select, Mass or Volume as the secondary type, edit the UOM code. Enter, select or search for the UOM.
-
Maximum Value: Edit the maximum value of the constraint. If you select Amount as the secondary type, the currency is displayed next to this field.
-
Tolerance: Edit the percentage tolerance for the minimum value of the constraint.
-
Minimum Value: Edit the minimum value of the constraint. If you select Amount as the secondary type, the currency is displayed next to this field.
-
Tolerance: Edit the percentage tolerance for the maximum value of the constraint.
-
-
Quantities: Displays the primary and secondary pre-scaled and scaled quantities.
-
Vehicle Information:
-
The Multiple Trucks checkbox determines if an order should be scaled to one or multiple trucks. Select the checkbox to inidcate that the order should be scaled to multiple trucks.
-
The Number of Trucks fields contains the number of trucks required for the order.
-
-
Issues: Displays any issues that were encountered during the order scaling process.
Maintaining Minimum Constraints
To maintain the minimum constraints, follow the steps below.
-
In the Level field, select the level at which the minimum order requirements of the supplier must be met.
-
When you define two minimum order requirements, select the relationship between the requirements in the Conjunction field.
-
In the Minimum 1 column, complete the following fields:
-
Type: Select how the first minimum order requirement is expressed.
-
UOM: If you select Mass or Volume as the primary type, edit the UOM code. Enter, select or search for the UOM.
-
Value: Edit the value of the first minimum order requirement of the supplier. If you select Amount as the first minimum, the currency is displayed next to the field.
-
-
In the Minimum 2 column, complete the following fields:
-
Type: Select how the second minimum order requirement is expressed.
Note:
The Minimum 2 Type cannot be the same as the Minimum 1 Type. -
UOM: If you select Mass or Volume as the secondary type, edit the UOM code. Enter, select or search for the UOM.
-
Value: Edit the value of the first minimum order requirement of the supplier. If you select Amount as the second minimum, the currency is displayed next to the field.
-
-
Quantities: Displays the primary and secondary pre-scaled and scaled quantities.
Maintain Truck Splitting Constraints
To maintain truck splitting constraints, follow the steps below.
-
In the Truck Splitting Constraints section, select the Split Order into Truckloads check box. The Truck Splitting Constraints area is enabled.
-
In the Truck Split Method field, select the desired method from the list.
-
In the Constraint 1 column, complete the following fields:
-
Type: Select the primary type of constraint to use when splitting orders into truckloads.
-
UOM: If you select Mass or Volume as the primary type, edit the UOM code. Enter, select or search for the UOM.
-
Value: Edit the value of the constraint.
-
Tolerance: Edit the percentage tolerance for the maximum value of the constraint.
-
-
In the Constraint 2 column, complete the following fields:
-
Type: select the primary type of constraint to use when splitting orders into truckloads.
Note:
The Constraint 2 Type cannot be the same as the Constraint 1 Type. -
UOM: If you select Mass or Volume as the secondary type, edit the UOM. Enter, select or search for the UOM.
-
Value: Edit the value of the constraint.
-
Tolerance: Edit the percentage tolerance for the maximum value of the constraint.
-
-
Quantities: Displays the primary and secondary pre-scaled and scaled quantities as well as the number of trucks.
-
Issues: Displays any issues that were encountered during the split order process.
Order Due Status
This section displays the following fields.
-
Order Due checkbox
This checkbox determines if the Due Order Processing will be used when creating orders for the supplier or supplier/department. The checkbox is only used for replenishment orders.
-
Estimated Stock Out
-
Accepted Stock Out
-
Service Basis
-
Due Order Processing checkbox
This checkbox determines if the Due Order Processing will be used when building the order. It is only used for replenishment orders.
-
Item Locations Due
-
Due Order Level
Maintaining Supplier Pooling
To maintain the supplier pooling, follow the steps below.
-
In the Supplier Site field, enter, select or search for the supplier site.
-
In the File ID field, enter, select or search for the file ID.
Recalculating Quantities
After you have entered all constraints, follow the steps below:
-
Click the Recalculate icon
 to recalculate the quantities.
Note:
When an order must be recalculated, a corresponding message is displayed. -
Then choose one of saving options from the Order Inventory Management Toolbar.
Viewing Order Inventory Management Information
To view inventory management information follow the steps below.
-
From the Tasks menu, select Orders > Manage Orders. The Order Search page appears.
-
Restrict the search to purchase order in Worksheet status.
-
Click Search. The orders that match the search criteria are displayed in the Results section.
-
In the Results section, select a record.
-
Next select Actions > View. The Order page appears.
-
To view inventory management details to the entire purchase order:
In the Toolbar select More Actions > Inventory Management. The Order Inventory Management page appears.
-
To view inventory management details to an item on the purchase order:
-
In the Toolbar select Details. The Order Details page appears.
-
In the Items section, select an item. Then select Actions > Inventory Management. The Order Inventory Management page appears.
-
-
To view inventory management details to an item and location on the purchase order:
-
In the Toolbar select Details. The Order Details page appears.
-
In the Locations section, select an location. Then select Actions > Inventory Management. The Order Inventory Management page appears.
-
-
-
The inventory management information for the selected purchase order is displayed.
-
Click Done to close the Order Inventory Management page.
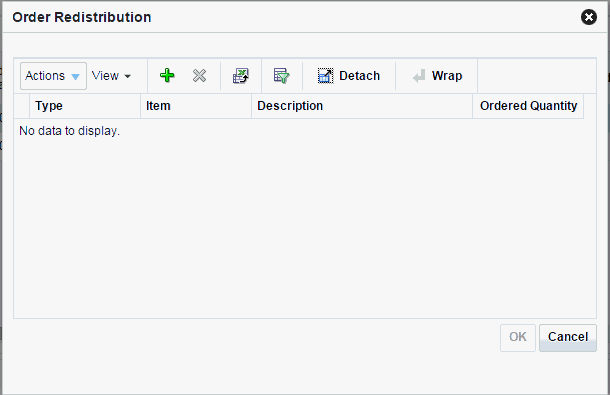
Redistribute Items on a Purchase Order
In the Order Redistribution page you can select the items on a purchase order which you want to redistribute. You can redistribute items on a purchase order as long as the purchase order is in the Worksheet or Approved status, the items have not been received, there are no associated contracts, no advance shipment notifications (ASN) have been received, and none of the items have an associated appointment or allocation.
To redistribute items on a purchase order follow the steps below.
-
From the Tasks menu, select Orders > Manage Orders. The Order Search page opens.
-
Enter or select search criteria as desired to make the search more restrictive.
-
Click Search. The orders that match the search criteria are displayed in the Results section.
-
In the Order No. column, click the order number link or select Actions > View. The Order page opens in a new tab.
-
In the Toolbar, click Details. The Order Details page opens in a new tab.
-
Click Redistribute. The Order Redistribution page opens.
-
Select Actions > Add or use the Add icon
 to add an item to the redistribution list. The Add Items page opens.
 -
In the Item type field, select the type of item.
-
Enter or search for the item/item parent.
-
After you have selected the item/item parent, choose one of the following options.
-
Click OK to exit the Add Item page and add the current item to the Order Redistribution page.
-
Click OK and Add Another to add the current item Order Redistribution page and add further items.
-
Click Cancel to reject the item and exit the Add Item page.
-
-
In the Order Redistribution page select OK.
-
A confirmation prompt to re-apply the following entries for the selected item after the redistribution is shown.
-
Expenses
-
Deals
-
Order scaling
-
Work orders
-
-
Confirm the prompt with Yes. The system opens the Order Distribution page.
-
If you select No, the system returns to the Order Redistribution page.
-
-
Go to the Distribute By section. Open the Redistribution list.
-
Select if you want to redistribute the selected item/item parent by Location or by Store Grade.
If you choose by Location, the Distribute by Location page opens. For further details, see the Distributing Items by Location section.
If you choose by Store Grade, the Distribute by Store Grade page opens. For further details, see the Distributing Items by Store Grade section.
After you have entered all necessary information, you will return to the Order Distribution page.
-
Click Save and Close to save your changes and close the Order Distribution page. The system returns to the Order Details page. Verify, if the items/item parent were added to the Items section with the appropriate quantity.
Manage Open To Buy Budgets
Open to Buy (OTB) is a budgetary number that indicates how much money is open to spend on purchasing new merchandise from a supplier in a period. Merchandising supports holding OTB at the subclass/week level and can support splitting this budget into three types of orders - Non-Basic (N/B), Buyer Basic (BRB) and Auto Basic (ARB) orders. When purchase orders are approved they will draw down on this budget based on the order type associated with the order. For example, manually created orders default to using the N/B order type; whereas replenishment generated orders use the ARB type.
OTB is typically determined in planning and integrated to Merchandising via integration. However, for visibility in Merchandising or for situations where the planning solution doesn't support integration or where planning generates open to buy figures at a level different than is used in Merchandising, the spreadsheet download and upload processes can be used. This functionality is accessed from the main Merchandising task list under Foundation Data > Download Foundation Data and Foundation Data > Upload Foundation Data.
To add or update OTB budgets, select the template type of Budgets from the Download Data screen and then the template Open to Buy. Optionally you can also select a department to download just that department's budgets. Click the Download button and when prompted, choose to either open the .ods file that is generated or save the file and open it separately in the spreadsheet application of your choice. Note: OTB budgets cannot be deleted using this functionality.
To add a new budget entry, select the action type of Create on the OTB Budget tab. Next enter the department, class, and subclass IDs in the appropriate columns. All budgets are held by week in Merchandising, so the next column holds the last day of the week for which the budget applies. The date must be entered in the 'DD-MON-YYYY' format. Lastly, enter the budget details for one or all three of the budget columns - Non Basic Allocations, Auto Basic Allocations, and Buyer Basic Allocations. These values should be entered in terms of either cost or retail, depending on the OTB setting for the indicated department.
If you would like to update the budget information for a subclass/week, then a similar process will be followed to that described above for entering new budgets. First, download the spreadsheet, and then find the subclass/week combination that you want to update. In that row select the action type of Update, and then update the one or more of the budgets in the spreadsheet.
For all actions defined above, once all the updates have been made to the data in the spreadsheet, save the file and close it. Then, return to the Merchandising screens and select Foundation Data > Upload Foundation Data from the main task list. In this screen, you'll again select the template type Budgets and the template Open to Buy. This will generate a process description automatically, but this can be updated if desired. Lastly, select the Browse button and navigate to the directory where you saved the updated spreadsheet.
To review the status of the upload and check whether any errors occurred, select the Foundation Data > Review Status task from the main task list.
See also Download/Upload Data from Spreadsheets and View Data Loading Status.