| Oracle® Retail Xstore Office Cloud Service 18.1 User Guide Release 18.1 F18648-05 |
|

 Previous |
 Next |
| Oracle® Retail Xstore Office Cloud Service 18.1 User Guide Release 18.1 F18648-05 |
|
Previous |
Next |
The Configurator component of Configuration Manager is used to create, maintain, and deploy configuration changes selectively, or globally across the entire organization. See About this Chapter below for a list of the configuration areas described in this chapter.
|
Note: The Profile Management component of Configuration Manager is used to define "store personalities" in order to create configuration paths. Refer to Chapter 4, "Profile Management" for more information about managing profiles and config paths. |
The logged-in user is assumed to represent some tier of the organization. For this reason, the user's assigned org node hierarchy will determine the information he/she has access to. See Chapter 2, "Roles, Users, and Security Access" for more information about users and security access.
The following areas can be configured in Configurator:
Codes - Add, edit, and delete configurable codes. See Configuring Codes.
Discounts - Configure different types of discounts that may be manually applied during a sale transaction. See Configuring Discounts.
Reason Codes - Configure common reason codes. See Configuring Reason Codes.
Menu Configuration - Add, remove and edit options on Oracle Retail Xstore Point- of-Service menus and tabs. See Configuring Menus and Tabs.
Receipt Configuration - Configure common text, such as headers and footers, and change the logo for your sales receipts. See Configuring Receipts.
System Configuration - Configure behaviors/business rules for Oracle Retail Xstore Point of Service. See Configuring Xstore Point-of-Service System Config Options.
Security - Configure Oracle Retail Xstore Point-of-Service security groups and the privileges that are associated with those groups. This option applies to Global configurations only. See Configuring Oracle Retail Xstore Point-of-Service Security.
Tenders - Configure the settings and data related to tenders. See Configuring Tenders.
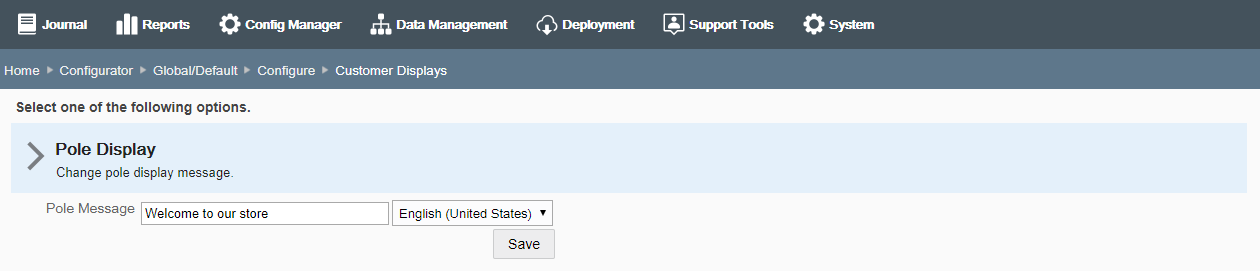
Customer Displays - Manage the text used on customer-facing displays. See Configuring Customer Displays.
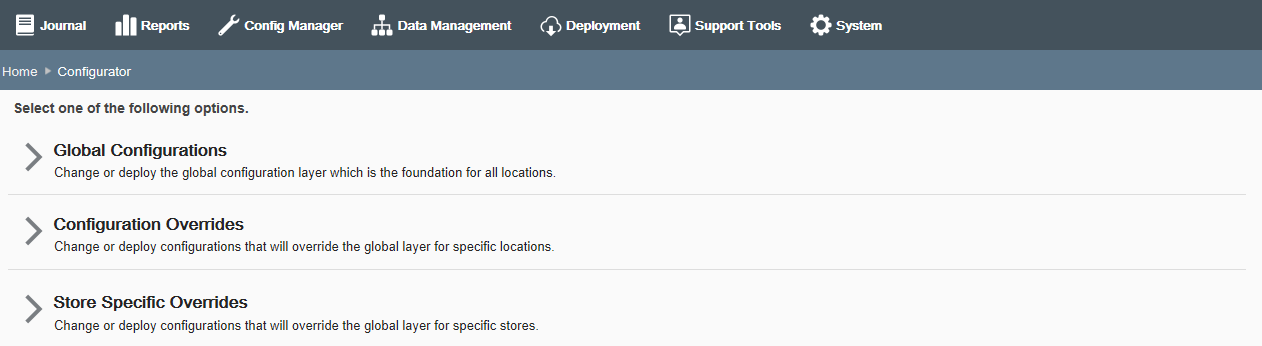
Configurator is used to create, maintain, and deploy Oracle Retail Xstore Point-of. Service configuration changes selectively, or globally across the entire organization. Not all configuration options are available for all scopes. The following configuration scopes are available:
Global Configurations - Change or deploy the global configuration layer which is the foundation for all locations.
Configuration Overrides - Change or deploy configurations that will override the global layer for specific locations (Profile Groups).
Store Specific Overrides - Change or deploy configurations that will override the global layer for specific stores.
Table 5-1 Configuration Options
| Configuration Options | Scope Availability |
|---|---|
|
Configure |
|
|
Deploy |
|
|
View Configuration Changes |
|
|
Delete Profile Configuration Changes |
|
|
Copy Store Configurations |
|
Oracle Retail Xstore Office Cloud Service creates and tracks version numbers for each set of configurations deployed via a profile group and element, globally, or a store specific group.
When you create a new configuration set, it is given a version number of 1 (one) to start. The next version number will be increased by one for that specific profile group to be used on the next set of configurations.
When a deployment is scheduled for a profile group and element, the ProfileGroupId, ProfileElementId and ConfigVersion are recorded in the manifest of the jar file that is produced. This manifest is then used by Oracle Retail Xstore Point of Service to log the version information.
When Oracle Retail Xstore Point of Service starts up, it reads the ProfileGroupId, ProfileElementId and ConfigVersion from the manifest of the jar file, and logs it in the ctl_event_log table with the following information:
From the Oracle Retail Xstore Office Cloud Service menu, select Config Manager - Configurator, or click the Configurator link in the Configuration Manager panel.
Select the Configuration Scope:
Select Global Configurations to change the global configuration layer which affects all locations. Continue with step 3 on page 4.
<OR>
Select Configuration Overrides to change configurations that will override the global layer for specific locations. The Profile Groups available here are defined in the Profile Maintenance component of Profile Management. See Chapter 4, "Profile Management" for more information about setting up Profile Groups.
Select a Profile Group from the list.
Select an Element from the list.
Click Next.
Continue with step 3 on page 4.
<OR>
Select Store Specific Overrides to change configurations that will override the global layer for a specific store based on the user's scope.
|
Note: Store Specific Overrides scope is only available, if Oracle Retail Xstore Office Cloud Service configuration "Enable the Option to Create Store-Specific Configurations?" is set to Yes. |
Type the store number or begin typing a store number or name in the Store # field.
Select the store from the store list.
Click Next.
Continue with step 3 below.
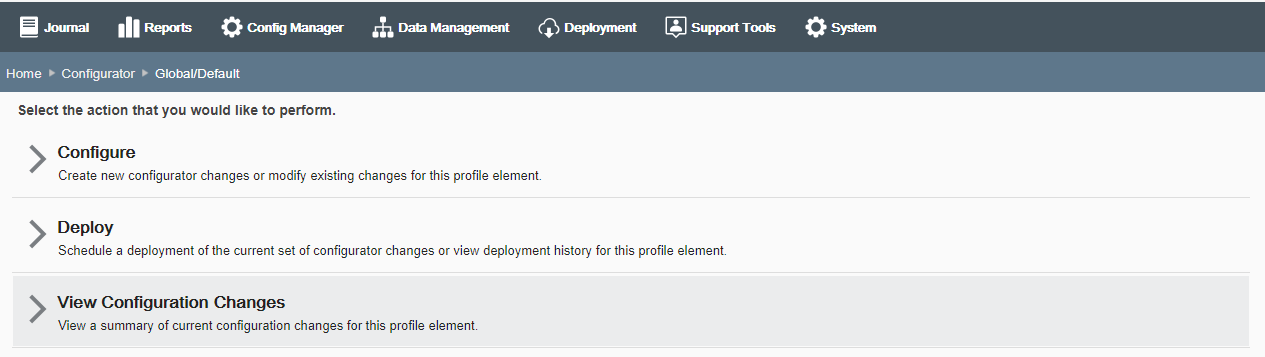
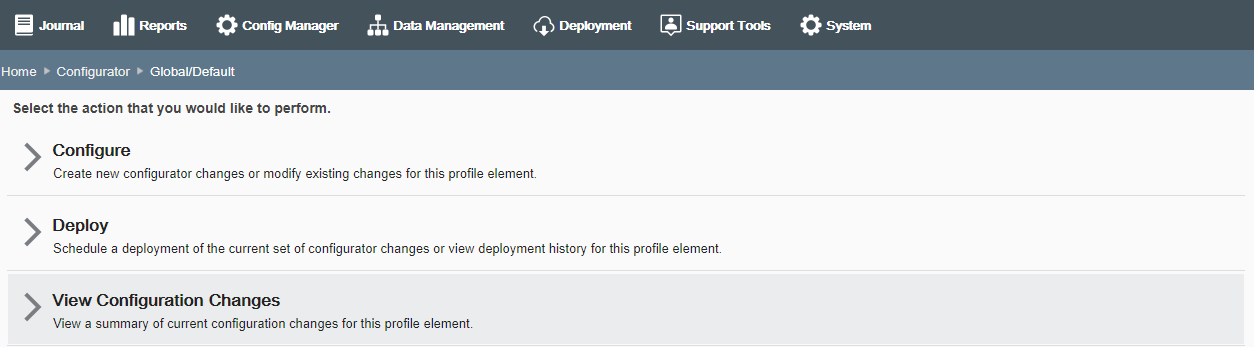
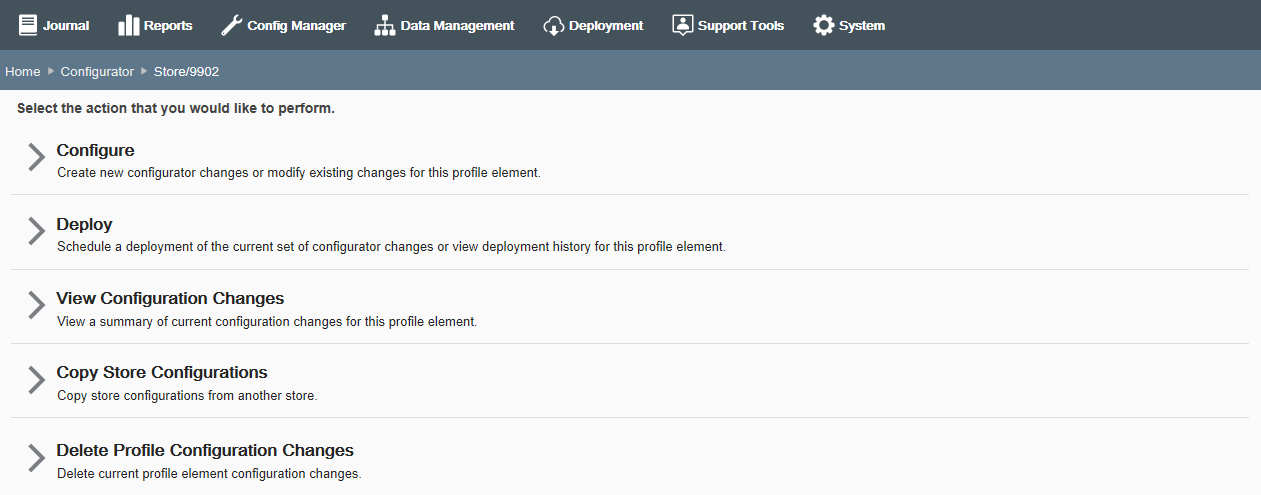
At the Configuration Action page, select the Configure option.
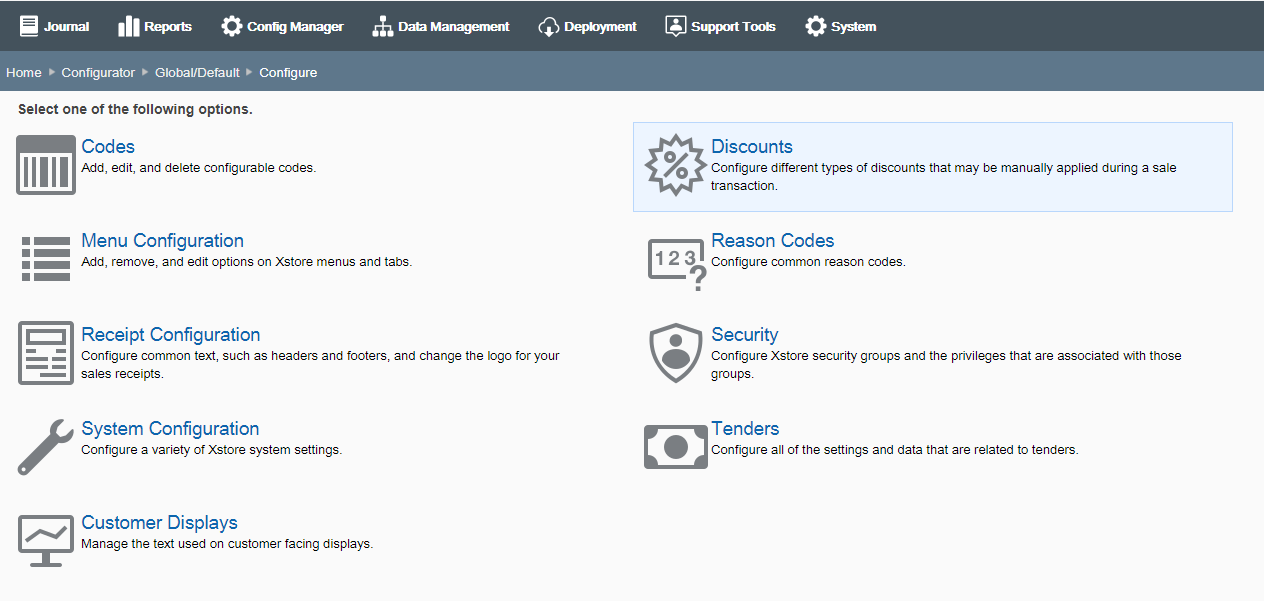
At the Configure Options page, select the area you want to configure:
If you selected Codes, see Configuring Codes.
If you selected Discounts, see Configuring Discounts.
If you selected Reason Codes, see Configuring Reason Codes.
If you selected Menu Configuration, see Configuring Menus and Tabs.
If you selected Receipt Configuration, see Configuring Receipts.
If you selected System Configuration, see Configuring Xstore Point-of-Service System Config Options.
If you selected Security, see Configuring Oracle Retail Xstore Point-of-Service Security. This option is only available for the Global scope.
If you selected Tenders, see Configuring Tenders.
If you selected Customer Displays, see Configuring Customer Displays.
|
Note: Use the breadcrumbs, for example Home, Configurator at the top of the page for navigation. |
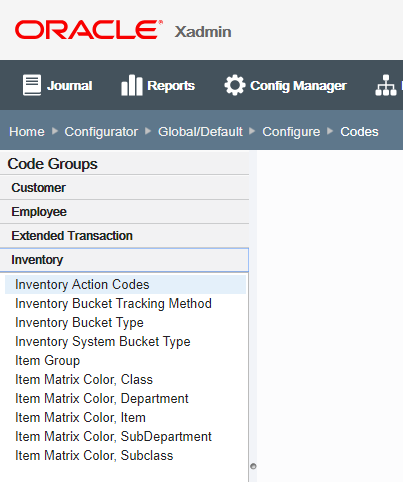
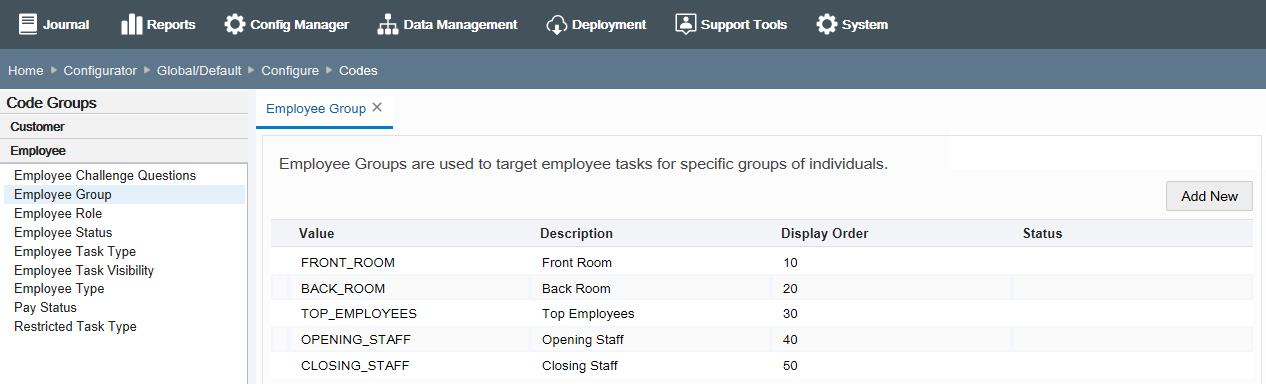
...continued from step 4
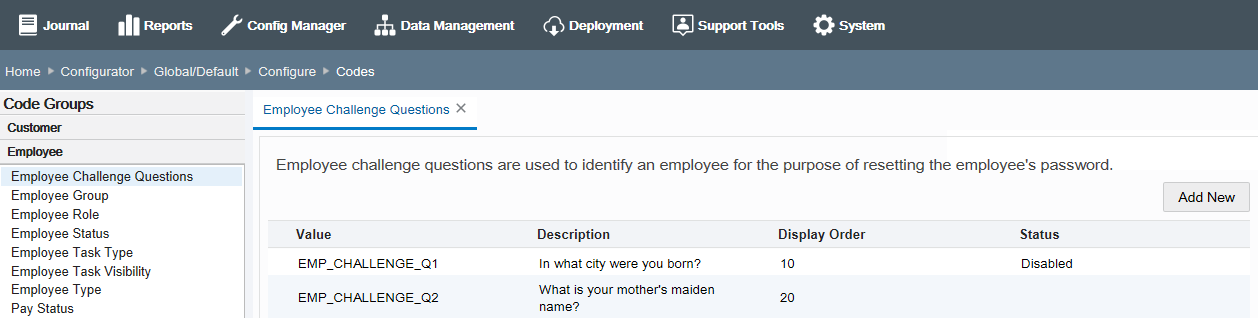
The Oracle Retail Xstore Point-of-Service codes have been organized by groups. Select a Code Group to view the codes in the group.
Select a code from the expanded Code Groups list to modify.
Add a new code or edit an existing code:
If adding a new code:
Click Add New.
Complete the fields as required, then click Save. See Code Configuration Options.
If editing an existing code:
|
Note: You can only edit global records if you are in a global configuration. |
Select the code in the list.
Edit the fields as required, then click Save. See Code Configuration Options.
After completing code setup, you have the following options:
To deploy your changes, see Deploying Configuration Changes
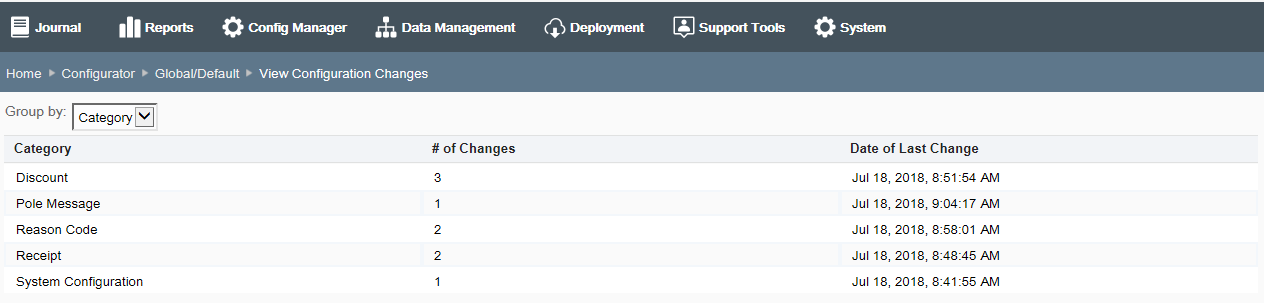
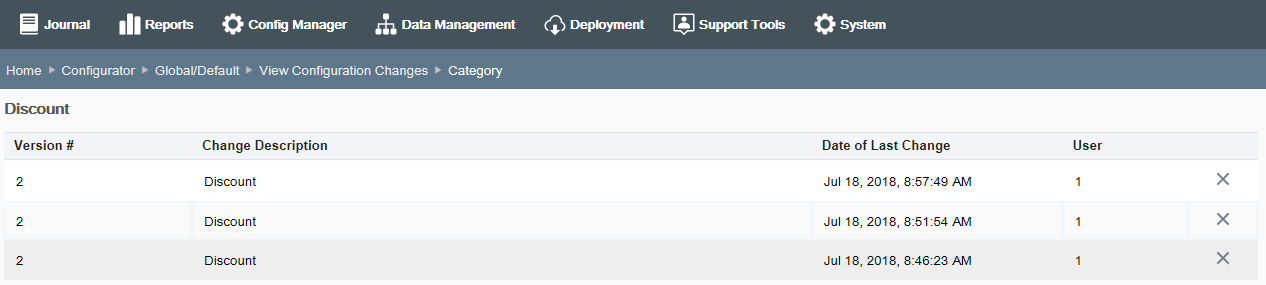
To view a summary list of a profile element's configuration changes to identify how it differs from the global configuration, see Viewing Configuration Changes.
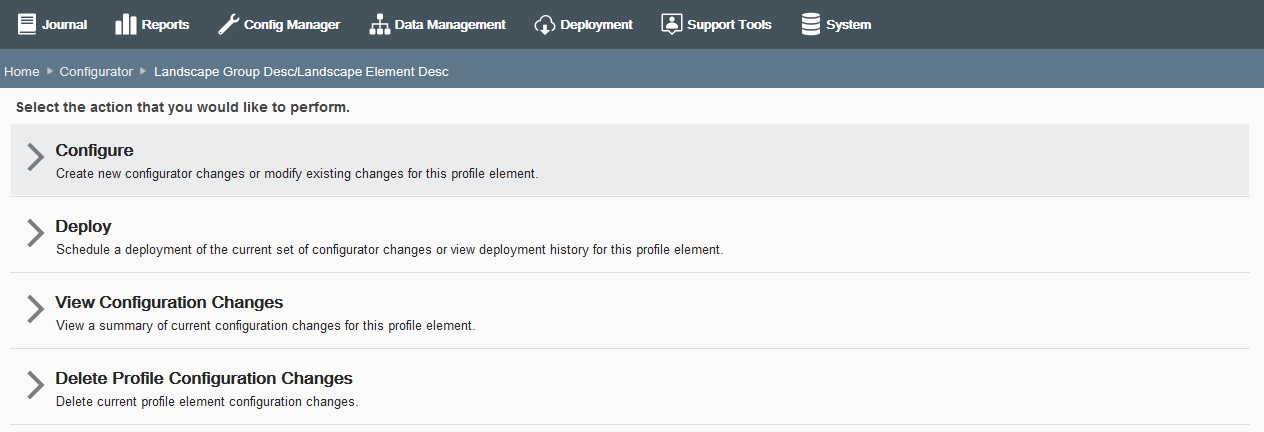
[CONFIGURATION OVERRIDES & STORE SPECIFIC OVERRIDES ONLY] - To delete the current profile element configuration changes, see Delete Profile Configuration Overrides.
[STORE SPECIFIC OVERRIDES ONLY] - To copy store configurations from another store, see Copy Store Configurations.
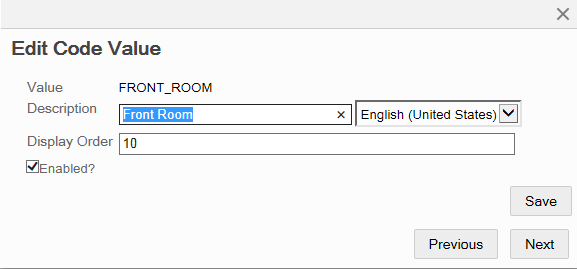
Value - The name of the code: required, alphanumeric field. In edit mode, this value cannot be changed.
Description - A description of the code: not required, alphanumeric field.
Display Order - Determines the sort order of the code value as compared to other code values for this group.
Locale - If needed, select a translation locale and enter the description for the locale.
Image URL - If applicable, specify the URL of the image file. If this does not apply to the selected code, this option is not displayed.
Rank - If applicable, specify the rank value for this code. If this does not apply to the selected code, this option is not displayed.
Enabled? - Determines whether this code is available for use. A check mark indicates the code is enabled. The Disabled label in the Status column indicates a code is not available for use.
Maintain discounts or set up system configuration options:
To maintain discounts, select Discount Maintenance and continue with step 2.
To set up system configuration options, select Discount System Configuration and skip to Discounts System Configuration.
Select the type of discount to configure or set up system configuration options:
Line Item Discounts - Discounts that apply to an individual line item in a sale transaction.
Transaction Discounts - Discounts that apply to all line items in a sale transaction.
Group Discounts - Discounts that apply to a selected group of line items in a sale transaction.
Add a new discount or edit an existing discount:
If adding a new discount:
Click Add New.
Complete the fields as required, then click Next. See Discount Configuration Options for a list of discount configuration options.
If editing an existing discount:
Skip to step 4 on page 9 to review your selections.
|
Note: You can only edit global records if you are in a global configuration.If you are editing configurations in a specific location (Profile Group or Store), the Edit button in the Discount Detail window will only be available if you have the proper privileges. |
Select the discount in the list.
At the Discount Detail window, click Edit.
Complete the fields as required, then click Next. See Discount Configuration Options for a list of discount configuration options.
Continue with step 4 on page 9 to review your selections.
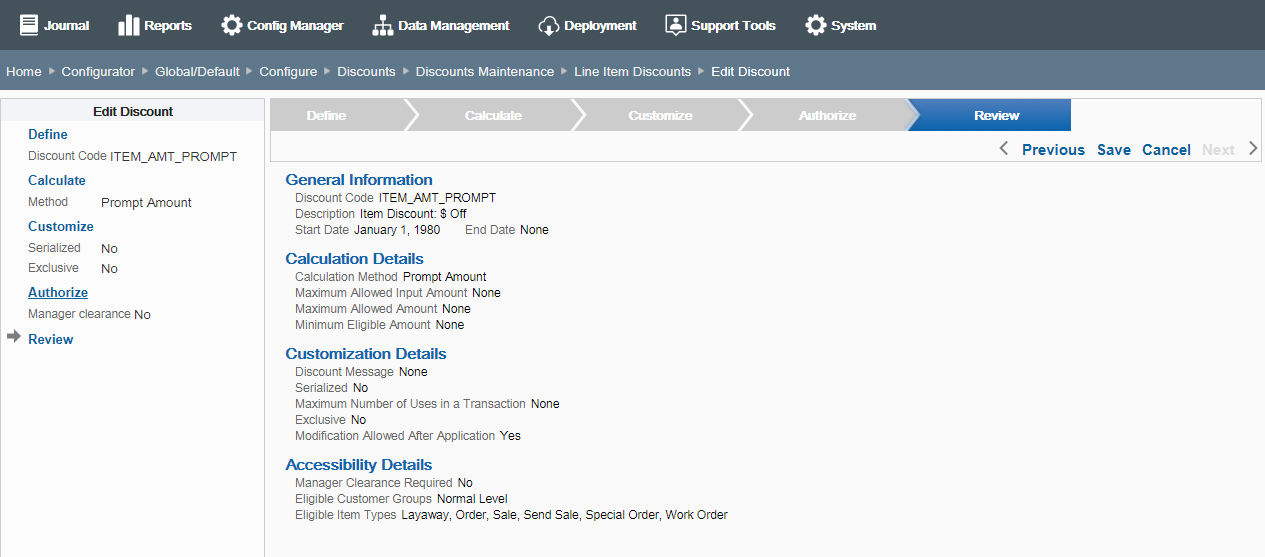
Review the discount options you selected:
To save the discount, click Save. The discount is added to the Discount list.
To edit the discount:
Click Previous to go back one page.
<OR>
Select a configuration option in the Edit Discount section in the left panel of the window.
After making your changes, click Save. The new discount is added to the Discount list.
To discard the discount, click Cancel. When prompted, click Yes to confirm you want to cancel discount setup.
After completing discount setup, Oracle Retail Xstore Office Cloud Service returns to the Discount list page.
To deploy your changes, see Deploying Configuration Changes.
To view a summary list of a profile element's configuration changes to identify how it differs from the global configuration, see Viewing Configuration Changes.
[CONFIGURATION OVERRIDES & STORE SPECIFIC OVERRIDES ONLY] - To delete the current profile element configuration changes, see Delete Profile Configuration Overrides.
[STORE SPECIFIC OVERRIDES ONLY] - To copy store configurations from another store, see Copy Store Configurations.
This section describes the available discount configuration options.
Define the basic information for the discount, then click Next.
Discount Code - The code must be unique, and cannot be changed when editing an existing discount.
Description - Enter a text description for the discount.
Locale for translation - If needed, select a translation locale and enter the description for the locale.
Start Date - Enter or select a starting date.
End Date - If needed, enter or select an ending date.
Discount enabled status check box (enabled by default).
|
Note: Discounts cannot be deleted. Disable any discounts you do not want to use. |
Specify how the discount is calculated, then click Next.
Method - Select a calculation method from the drop-down list.
Amount/Percent - If applicable, enter the amount off or percent off. (This field is not active for discounts without a defined amount or percent off).
For Prompt Amount discounts, select the "Is there a maximum allowed input amount" option if there is a limit on the free-format discount amount that can be entered in Oracle Retail Xstore Point of Service and enter the amount when prompted.
For Prompt Percent discounts, select the "Is there a maximum allowed input percentage" option if there is a limit on the free-format discount percentage that can be entered in Oracle Retail Xstore Point of Service and enter the percent when prompted.
Is there a maximum allowed amount? Select this option if true, and enter the amount when prompted.
Is there a minimum amount to make this discount eligible? Select this option if true, and enter the amount when prompted.
Customize the discount features, then click Next.
Is there a custom message for this discount? - Select this option if true, and enter the custom message when prompted. If needed, select a translation locale and enter the custom message for the locale.
Is it serialized? - Select this option if the discount has an associated serial number. For example, it may be used with coupon discounts.
Is there a maximum number of times it can be applied in a transaction? - Select this option if true, and enter the maximum number of times it can be applied in a transaction when prompted.
Is it exclusive? - Select this option if the discount cannot be used with any other discounts.
Can it be modified once it has been applied? - Select this option if the discount can be changed. This option is selected by default (true).
Configure discount accessibility, then click Next.
Is manager clearance required to apply this discount? - Select this option if manager override is required to use this discount.
Eligible Customer Groups - Select all options that apply. For example:
Elite Program Member
Employee
Employee Family
Normal Level
Eligible Item Types - Select all options that apply. For example:
Layaway
Order
Sale
Send Sale
Special Order
Work Order
|
Note: The system configuration options for discounts in this feature are simply a subset of the system configuration options available from Oracle Retail Xstore Point-of-Service System Config Options. See Configuring Xstore Point-of-Service System Config Options for more information. |
The following configurations apply specifically to discounts. The categories have been set up as follows:
Discount Options
Returns
Enable Discount Threshold Validation? - Determines whether the system validates the total discount amount or percentage against a configured threshold.
|
Note: The thresholds establish maximum allowable amounts or percentages used for discounting; beyond these thresholds, the DISCOUNT_EXCEED_MAX_THRESHOLD privilege is activated. |
How Should Price Be Rounded After Discount Applied? - The local currency amount rounding method used for determining the price after a discount is applied:
Half Up - Round to the nearest neighbor unless equidistant, then round up.
Half Down - Round to the nearest neighbor unless equidistant, then round down.
Half Even - Round to the nearest neighbor unless equidistant, then round to even neighbor. Example: 2.5 rounds to 2 while 3.5 rounds to 4.
Ceiling - Round toward positive infinity. Note: This is the opposite of FLOOR and never decreases the calculated value.
Down - Round to the next digit; closer to zero.
Floor - Round down toward negative infinity. Note: This is the opposite of CEILING and never increases the calculated value.
Up - Round to the next digit; away from zero.
Unnecessary - Rounding is not necessary.
Minimum # of Items That Can Participate In Group Discount - The minimum number of items required in order to allow application of a group discount.
Minimum Threshold For You Saved Amount? - The minimum amount of customer savings required for the system to print the customer savings information on the sales receipt.
Precision Decimal Places For Calculating Line Item Discounts - If LineDiscountUseConfiguredScale is true, the system uses this scale instead of the local currency scale to round the line item discount amount.
Print You Saved Amount On Receipts? - Determines whether the system prints customer savings information on the sales receipt.
Prompt Confirmation On Item Deletion Participating In Group Discount? - Determines whether the system prompts for confirmation if the associate wants to remove an item with a group discount. The group discount will be removed from other items as well.
Threshold Amount To Measure Line Item Discounts Against - If DiscountThreshold Enabled is true, the system validates the total line item discount amount against the threshold amount specified here.
Threshold Percent To Measure Line Item Discounts Against - If DiscountThreshold Enabled is true, the system validates the total line item discount percent against the threshold percent specified here.
Use Special Precision For Calculating Line Item Discount Amounts? - Determines whether the system uses LineDiscountPrecision scale instead of the local currency scale to round the line item discount amount.
Allow Return Items To Be Discounted On Blind Returns? - Determines whether the system allows applying a discount on a blind return (Customer does not present the original sales receipt.) This configuration applies only to line item and group discounts. This configuration does not apply to transaction discounts.
Allow Return Items To Be Discounted On Unverified Returns? - Determines whether the system allows applying a discount on an unverified return. (Customer presents the original sales receipt but the system is not able to retrieve the original sales transaction.) This configuration applies only to line item and group discounts. This configuration does not apply to transaction discounts.
Allow Return Items To Be Discounted On Verified Returns? - Determines whether the system allows applying a discount on a verified return. (Customer presents the original sales receipt and the system is able to retrieve the original sales transaction.) This configuration applies only to line item and group discounts. This configuration does not apply to transaction discounts.
Disable Pro-rated Discounts On Returns? - When this setting is enabled, Oracle Retail Xstore Point of Service will turn off the proration of discounts for returns.
...continued from step 4
At the Reason Code Search page, select the Reason Code Type from the list, then click Next.
The configuration page for the selected reason code type displays. Add a new reason code or edit an existing reason code.
If adding a new reason code:
Click Add New.
Complete the fields as required, then click Next. See Reason Code Configuration Options for a list of reason code fields.
Skip to step 3 on page 14.
If editing an existing reason code:
|
Note: You can only edit global records if you are editing records in a global configuration.If you are editing configurations in a specific location (Profile Group or Store), the Edit button in the Reason Code Detail window will only be available if you have the proper privileges. |
Select the reason code in the list.
At the Reason Code Detail window, select Edit.
Complete the fields as required, then click Next. See Reason Code Configuration Options for a list of reason code fields.
Continue with step 3 below.
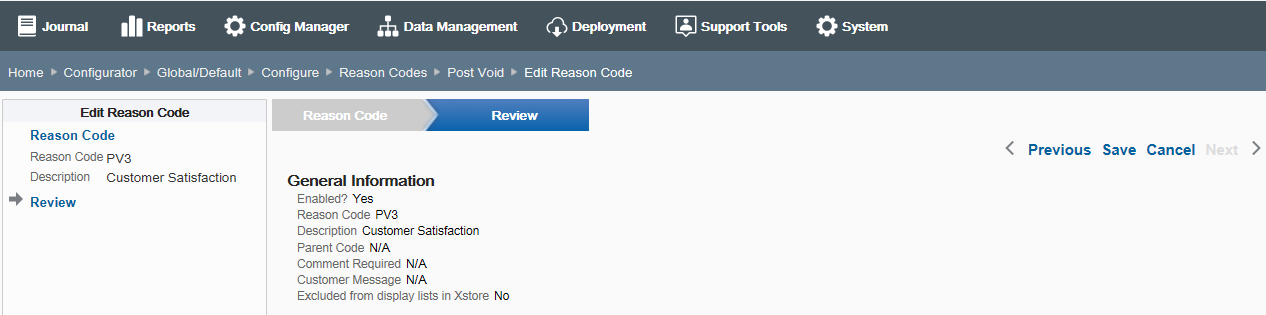
Review the reason code options you selected:
To save the new reason code, click save. The reason code is added to the Reason Codes list.
To edit the reason code:
Click previous to go back one screen.
<OR>
Select a configuration option in the Edit Reason Code section in the left panel of the window.
After making your changes, click save. The new reason code is added to the Reason Codes list.
To discard the reason code, click cancel. Click Yes to confirm you want to cancel reason code setup.
After completing reason code setup, Oracle Retail Xstore Office Cloud Service returns to the Reason Codes list page.
To deploy your changes, see Deploying Configuration Changes.
To view a summary list of a profile element's configuration changes to identify how it differs from the global configuration, see Viewing Configuration Changes
[CONFIGURATION OVERRIDES & STORE SPECIFIC OVERRIDES ONLY] - To delete the current profile element configuration changes, see Delete Profile Configuration Overrides.
[STORE SPECIFIC OVERRIDES ONLY] - To copy store configurations from another store, see Copy Store Configurations.
The set of configuration options will vary with the Reason Code Type. This section defines the basic options available for setting up reason codes.
Enabled? - Reason Code enabled status check box. This option is enabled by default. Remove the check mark to disable the reason code.
Reason Code - The reason code value associated with the reason type code. This value must be unique, and cannot be changed when editing an existing reason code.
Description - Text description for the reason code.
Locale for translation - If needed, select a translation locale and enter the description for the locale.
Does this reason code have a parent code? - If true, select the parent reason code (hierarchy level) upon which the nested reason code is based.
Does this reason code require that a comment be added? - If true, the POS user will be prompted to add a comment. Specify whether the comment is optional (Prompt to add comment), or if the comment is required (Comment is required).
Does this reason code need to display a customer message? - If true, enter the customer message to be displayed when the reason code is selected in the POS system. If needed, select a translation locale and enter the customer message for the locale.
Should this reason code be excluded from reason code lists displayed in Xstore? - Select this option if this reason code will not be available to the Oracle Retail Xstore Point-of-Service POS user.
What is the inventory action code for this reason code? - If this reason code has an inventory action code, select the code from the list to specify the inventory action (add or subtract from inventory) to be taken based on the reason code.
Does the reason code have a General Ledger Account Number? - If this reason code is associated with a General Ledger account, enter the General Ledger account number to be recorded when the reason code is selected in Oracle Retail Xstore Point of Service.
Does the reason code require a minimum amount? - If true, enter the minimum monetary amount allowed for this reason code.
Does the reason code require a maximum amount? - If true, enter the maximum monetary amount allowed for this reason code.
What inventory location ID is affected by this reason code? - Select the inventory location ID to which the item will be returned.
What inventory bucket ID is affected by this reason code? - Select the inventory bucket ID within the location to which the item will be returned.
For the country pack Italy you can associate the Tax Exemption reason code to the country specific exemption code in the Properties tab.
|
Note: This feature is only available for country packs. For more information on country packs, see the Xstore Suite Configuration Accelerator Guide. |
|
Important: Use of the Menu Configuration and Tab Configuration tools assumes some knowledge of the Oracle Retail Xstore Point-of- Service menus and tabs and how they are used in the Oracle Retail Xstore Point-of-Service application. |
...continued from step 4
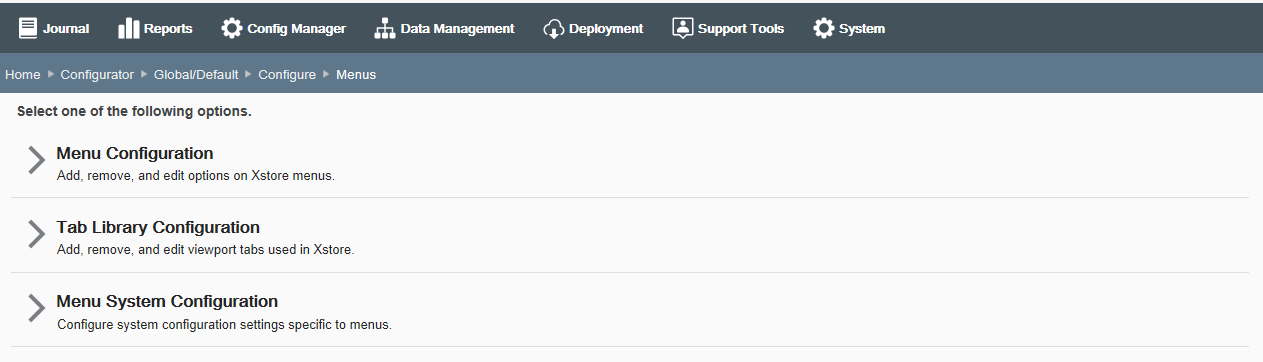
Select a menu option:
Select Menu Configuration to add, remove, and edit options on Oracle Retail Xstore Point-of-Service menus. Continue with Oracle Retail Xstore Point-of-Service Menu Configuration below.
Select Tab Library Configuration to add or remove message area tabs used in Oracle Retail Xstore Point of Service. Skip to Oracle Retail Xstore Point-of- Service Ta b Configuration.
Select Menu System Configuration to configure the system configuration settings that are specific to menus. Skip to Menu System Configuration.
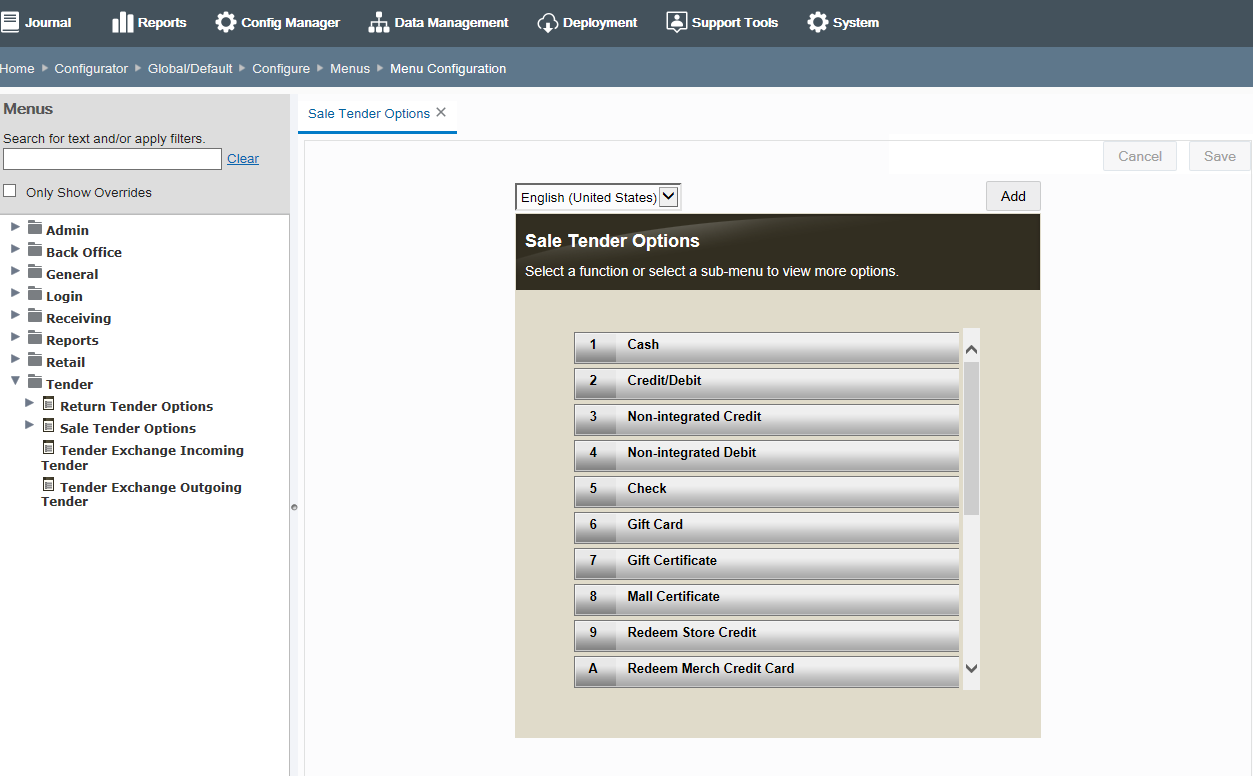
This section describes the Xstore POS Menu configuration.
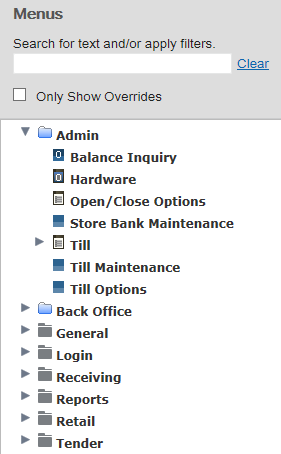
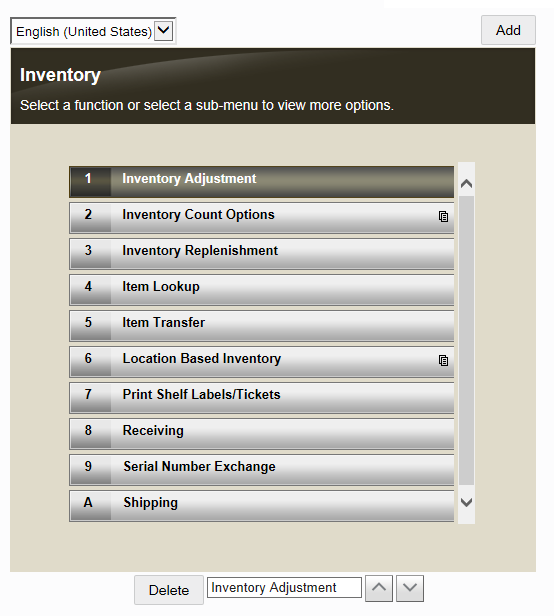
The Oracle Retail Xstore Point-of-Service menus have been organized by categories. For example, all menus with a category of Back Office will be grouped together under the Back Office category name and all menus with the category Tender will be grouped together under the Tender category name.
 This is a Menu Category folder. All menus belonging to this category are located in this folder.
 A blue Menu Category folder indicates a menu within the folder has been modified.
![]() This icon indicates there are additional menus nested below this list menu type.
This icon indicates there are additional menus nested below this list menu type.
![]() This icon indicates there are additional menus nested below this button menu type.
This icon indicates there are additional menus nested below this button menu type.
 This icon indicates this is the lowest level for this list menu type. There are no menus nested below this menu.
 This icon indicates this is the lowest level for this button menu type. There are no menus nested below this menu.
![]() This icon indicates this list menu type has been modified.
This icon indicates this list menu type has been modified.
![]() This icon indicates this button menu type has been modified.
This icon indicates this button menu type has been modified.
![]() This icon indicates that this menu also appears in other Categories. Any changes made to this menu in one category will also be applied to the menu in all the categories where it appears.
This icon indicates that this menu also appears in other Categories. Any changes made to this menu in one category will also be applied to the menu in all the categories where it appears.
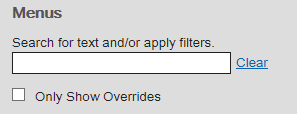
To find menus containing specific text, enter the search text in the input box, then press [Enter]. The results are shown in the left panel (folder tree). Only those menus containing the specified text are displayed. If needed, click Clear to remove the search criteria and return to the default Menu Configuration page.
Click the Only Show Overrides check box to view only the Menu Categories and menus that have been changed.
Perform the following steps to configure Oracle Retail Xstore Point-of-Service menus.
After selecting Menu Configuration at the Menu Options page (Figure 5-10), click the menu category from the Menus tree that you want to configure.
With the category expanded, click the menu you want to configure.
You have the following configuration options:
Edit existing menu options:
To change the menu text, see Changing the Menu Text.
To remove a menu option, see Removing a menu option.
To change a menu option location, see Changing a Menu Option Location.
Add a new menu option. See Adding a New Menu Option.
After completing menu setup, you can perform the following options
To deploy your changes, see Deploying Configuration Changes.
To view a summary list of a profile element's configuration changes to identify how it differs from the global configuration, see Viewing Configuration Changes.
[CONFIGURATION OVERRIDES & STORE SPECIFIC OVERRIDES ONLY] - To delete the current profile element configuration changes, see Delete Profile Configuration Overrides.
[STORE SPECIFIC OVERRIDES ONLY] - To copy store configurations from another store, see Copy Store Configurations.
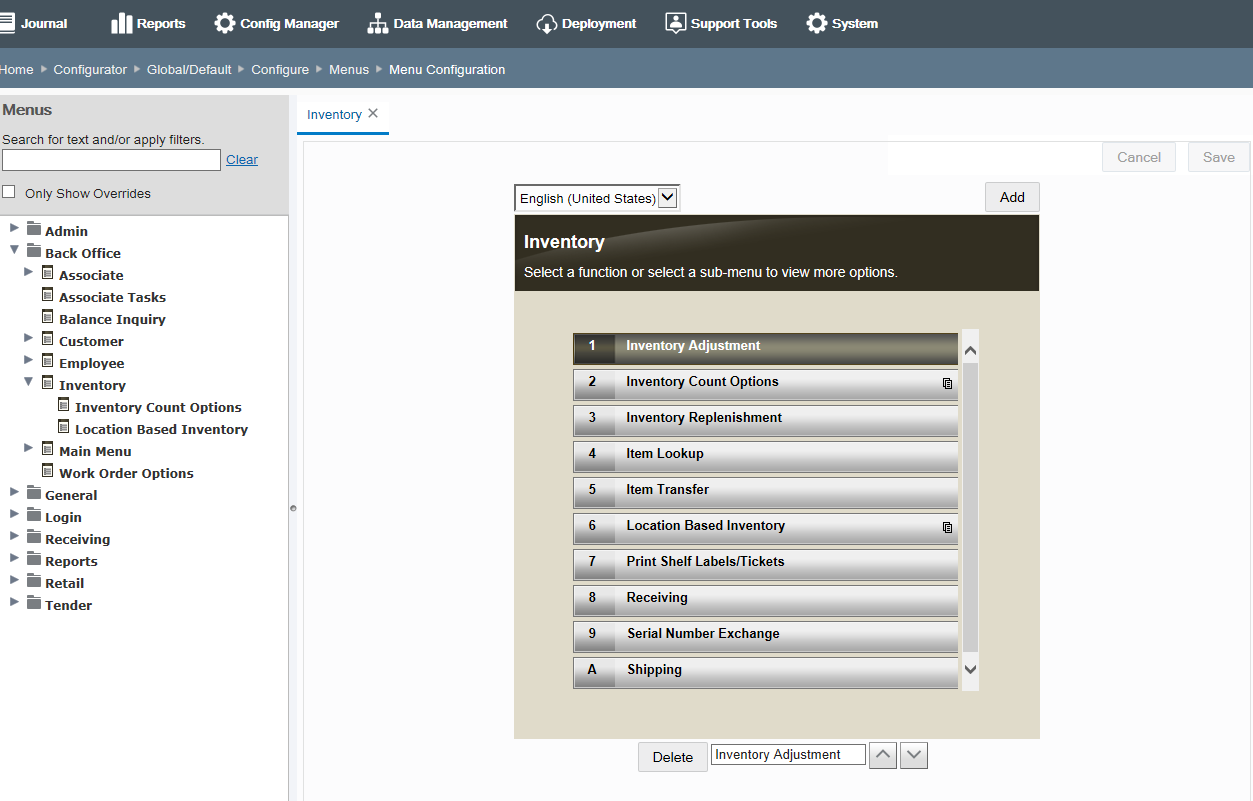
With the menu displayed, edit the menu as needed.
Refer to the following sections for procedural information.
Select the menu option to be changed and type the new menu name in the text field below the menu. The old text is replaced by the new text you typed.
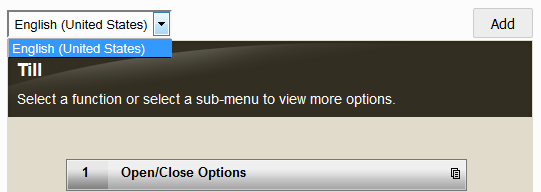
[OPTIONAL] Select a locale to view the menu as it will be displayed in a different locale. This option will only show the locales set up for you organization.
Click Save.
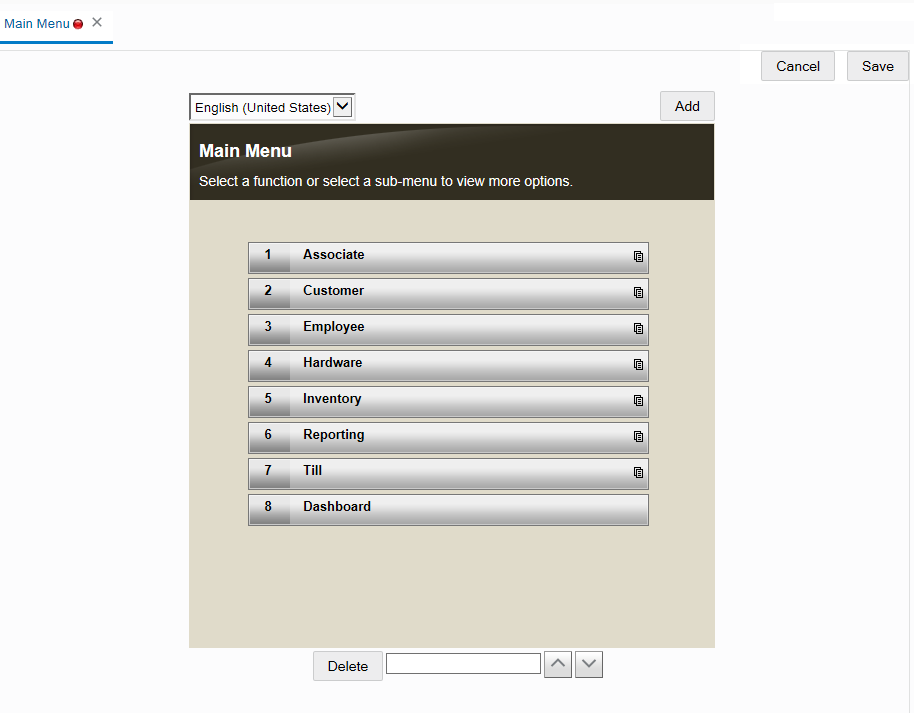
The ![]() red icon in the tab indicates this configuration change has not been saved
red icon in the tab indicates this configuration change has not been saved
To close the tab, click the Close icon. You will be prompted if there are un-unsaved changes.
Click Cancel to discard your changes.
Select the menu option to be removed and click the Delete button. The menu option will be removed from the menu. The other menus will be shifted accordingly.
|
Note: If needed, click Cancel if you want to discard your changes before saving. |
Click Save.
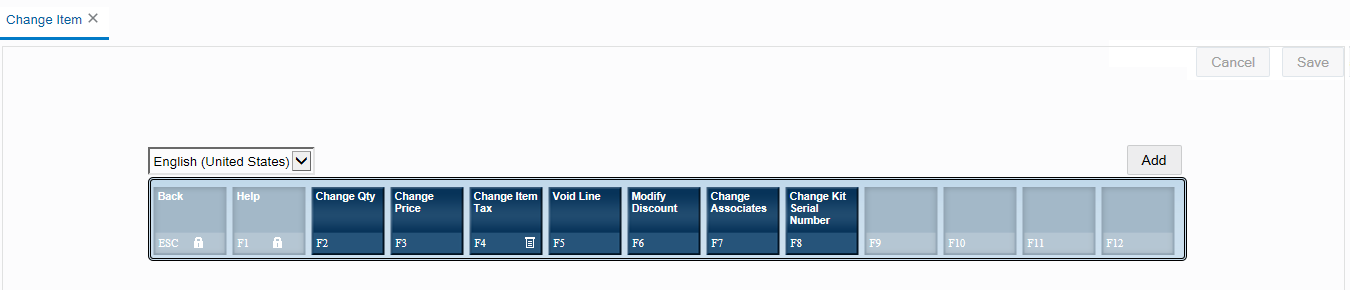
For Menu Buttons:
Select the menu button to be moved and click the Left and Right arrows to change the menu button location within the menu. The other menu buttons will be shifted accordingly.
|
Note: The Locked icon |
|
Note: Click Cancel, if you want to discard your changes before saving. |
Click Save.
For Menu Lists:
Select the menu option to be moved and click the Up and Down arrows to change the menu option location within the menu. The other menus will be shifted accordingly.
|
Note: Click Cancel, if you want to discard your changes before saving. |
Click Save.
|
Note: Adding new options to menus assumes you have a working knowledge of how and where the menus are used in the Oracle Retail Xstore Point-of-Service application. |
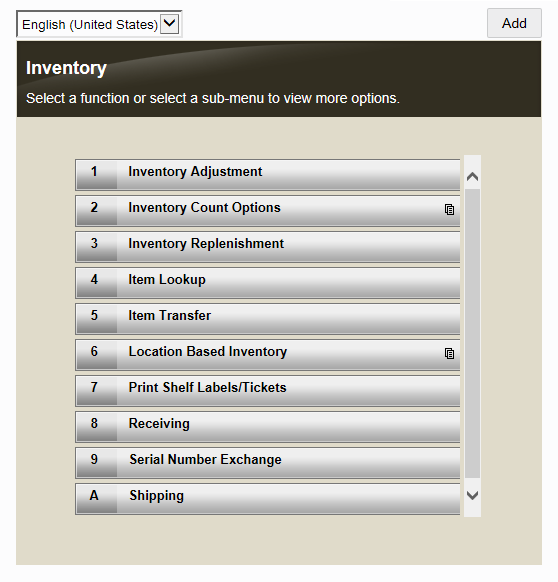
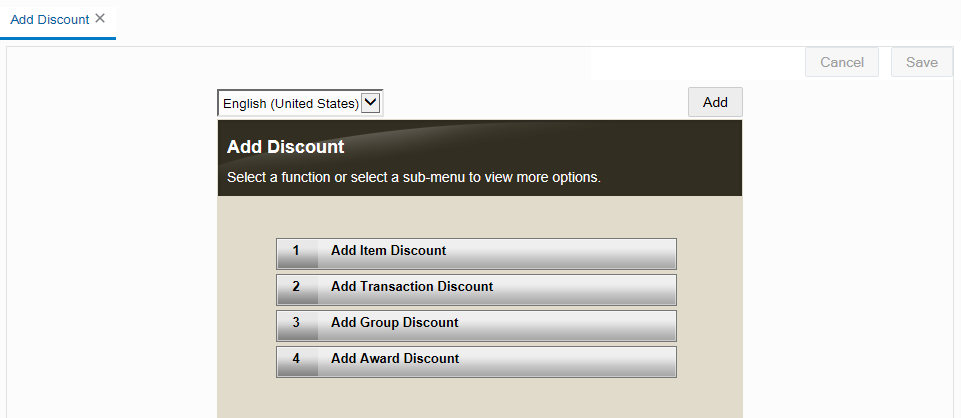
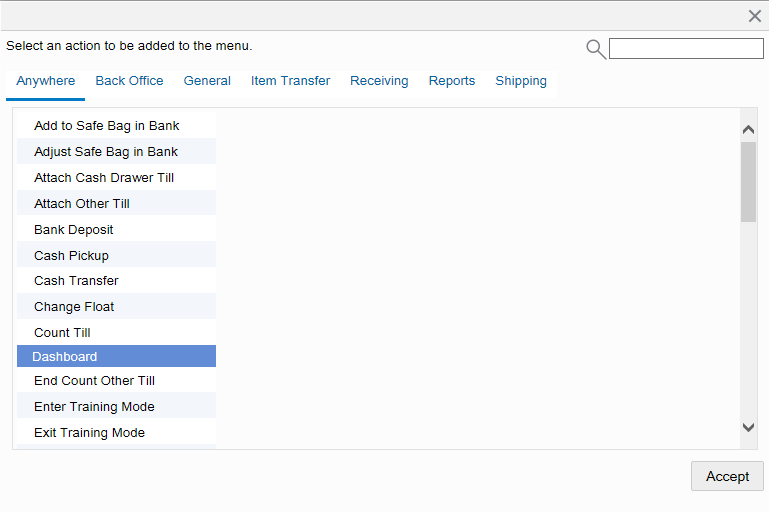
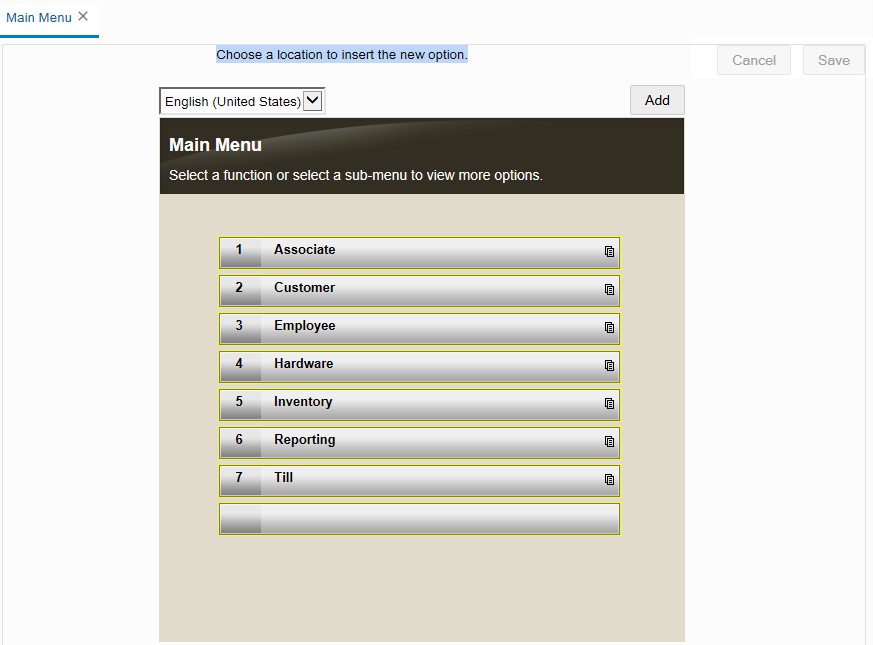
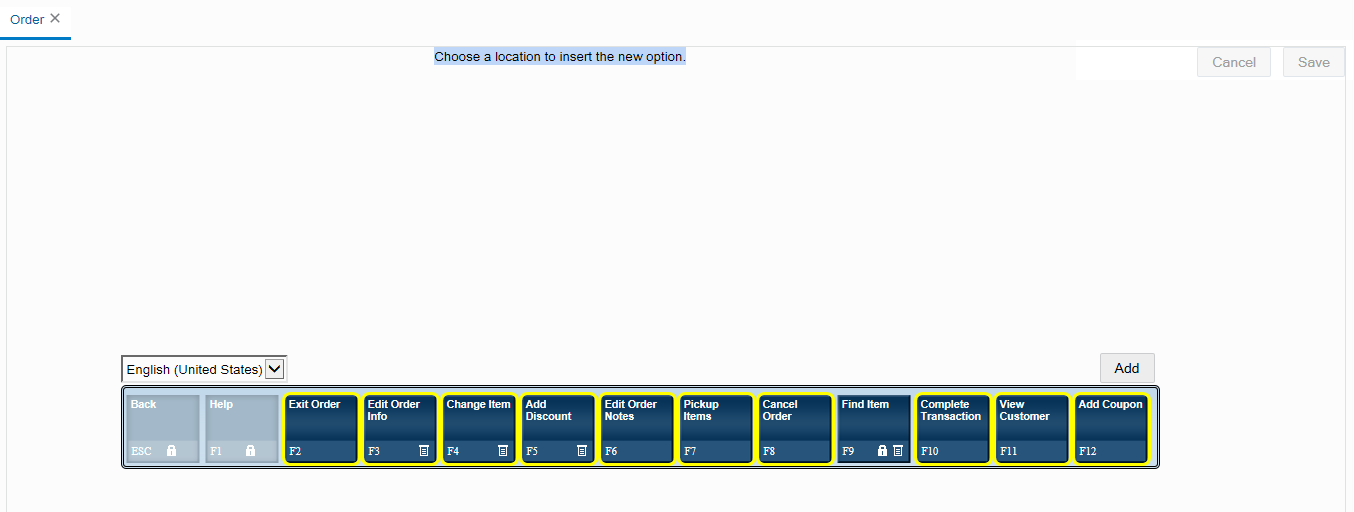
With the menu displayed, click Add.
At the Add Action window, select a menu option to be added to the selected menu and click Accept.
|
Note: To find a menu option quickly, type the name in the search field. Clicking Cancel will return to the menu without making any changes. |
When prompted, click the location for the new menu option. The other menu options will be adjusted accordingly if needed.
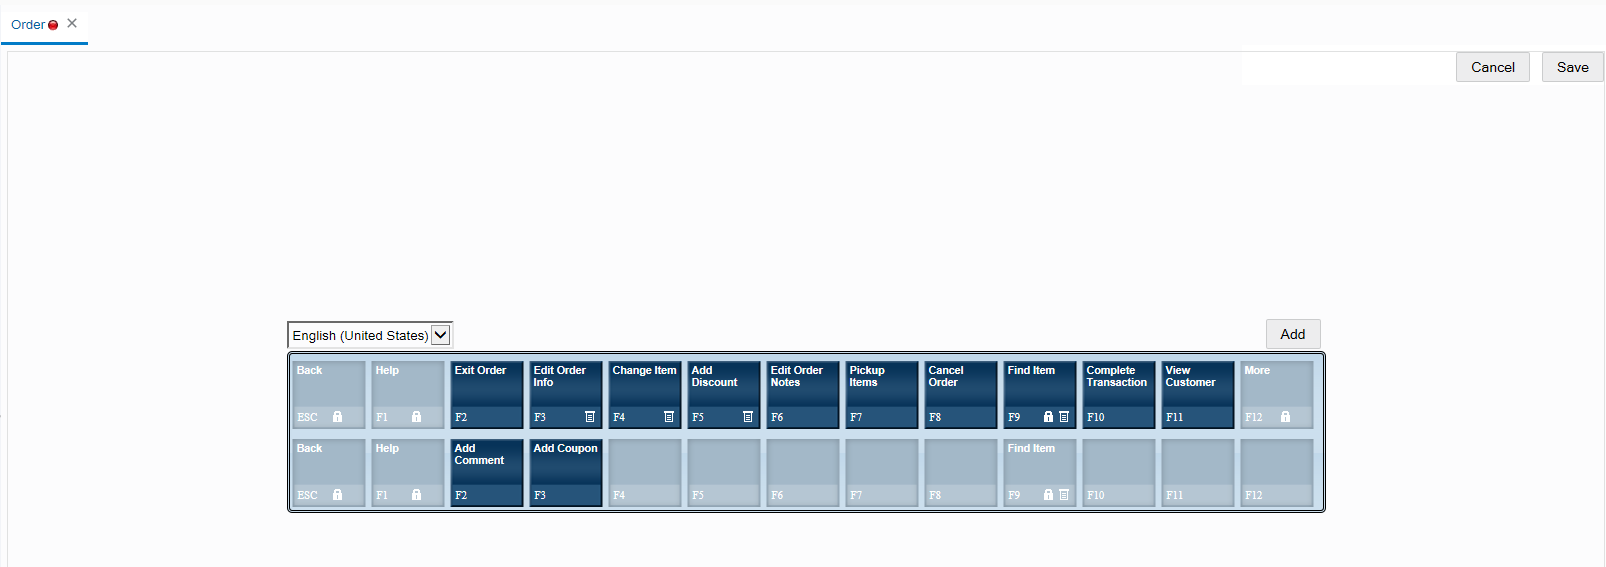
|
Note: In the menu button example shown above, the More button was added automatically to accommodate the new menu option. |
Click Save.
The Oracle Retail Xstore Point-of-Service Tab Library contains a set of ready-to- implement tabs and widgets that can be easily incorporated into Oracle Retail Xstore Point of Service to enhance the user experience. The Tab Library provides multiple options for information tabs and web widgets, beyond the five standard tabs traditionally provided in the Information area with base Oracle Retail Xstore Point of Service. You can select from an array of pre-defined widgets and tabs in the library to be displayed in Oracle Retail Xstore Point of Service.
In addition, these tabs can be configured to work in different contexts. For example, tabs that display login mode may not be the same tabs that are available during transaction mode.
|
Important: Additional configuration may be required to set up the information found on the various tabs. The tab configuration feature described here is used to manage which pre-defined tabs are used in Oracle Retail Xstore Point of Service and where they will appear. |
Security privileges are required to use this feature:
Table 5-3 Security Privileges
| Security Privilege | Description |
|---|---|
|
Configurator |
This privilege allows the user to access the menu config option form the configurator lading page. |
|
Menu Configuration |
This privilege allows the user to access the actual menu config feature |
|
Tab Configuration |
This privilege allows the user to access the tab library config feature. |
The base implementation of Oracle Retail Xstore Point of Service displays five information tabs: Info, Tasks, (Sales) Goals, Messages, and Keypad. The tabs and widgets in the library can be used in place of-or in addition to-the tabs provided with base Oracle Retail Xstore Point of Service.
|
Note: It is possible to add more or less than the standard five tabs delivered in base Oracle Retail Xstore Point of Service; however, for best results a limit of five tabs per context is recommended. |
Perform the following steps to configure which tabs will be in use, and where they will be displayed.
After selecting Tab Library Configuration at the Menu Options page (Figure 5-10), the Tab Library Configuration page displays.
|
Note: This page shows the current tab layout for the selected context (Default or Transaction). Any text located within the tab area will appear blurred and is simply shown to illustrate the tab's content. |
At the Tab Library Configuration page, choose the tab context from the drop-down list:
Tabbed Pane Default - The tabs that are available when not in a transaction.
Tabbed Pane Transaction - The tabs that are available during a transaction.
[OPTIONAL] Select a locale to view the tab as it will be displayed in a different locale. This option will only show the locales set up for you organization.
Choose from the following options for the selected tab context:
To add a new tab, see Adding a New Tab.
To remove a tab, see Adding a New Tab.
To move a tab, see Moving a Tab Position.
To change the tab name, see Changing a Tab Name.
After saving the tab configuration, you can perform the following options:
To deploy your changes, see Deploying Configuration Changes.
To view a summary list of a profile element's configuration changes to identify how it differs from the global configuration, see Viewing Configuration Changes.
[CONFIGURATION OVERRIDES & STORE SPECIFIC OVERRIDES ONLY] - To delete the current profile element configuration changes, see Delete Profile Configuration Overrides.
[STORE SPECIFIC OVERRIDES ONLY] - To copy store configurations from another store, see Copy Store Configurations.
At the Tab Library Configuration page, click the Click here to add a tab to the viewport link.
Select a tab from the list and click the Add button. The tab is added to the information area image.
|
Note: To close the Add Tab window without making any changes, click the Close button. |
If needed, override the default field(s).
|
Note: For the URL tab, the POS Terminal must have rights to view the URL website through security and fire wall settings maintained by the corporate office. |
Click Save to save your changes.
At the Tab Library Configuration page, click the tab you want to remove.
With the tab selected, click the Remove button.
When prompted, click Yes to confirm you want to remove the selected tab. The tab is removed from the information area image.
Click Save to save your changes.
At the Tab Library Configuration page, click the tab you want to move.
With the tab selected, click the navigation buttons to move the selected tab's position left or right.
Click Save to save your changes.
At the Tab Library Configuration page, click the tab you want to rename.
With the tab selected, type a new name for the tab.
Click Save to save your changes.
|
Note: Although the tab name is not a required field in Oracle Retail Xstore Office Cloud Service, Oracle Retail Xstore Point of Service expects a name and will display a translation error if the name is not specified here. |
|
Note: The system configuration options for menus in this feature are simply a subset of the system configuration options available from Oracle Retail Xstore Point-of-Service System Config Options. See Configuring Xstore Point-of-Service System Config Optionsfor more information. |
The following configurations apply specifically to menus. The categories have been set up as follows:
Name Of Help Menu - The menu to be displayed when the Help button is selected. The set of actions to be run for the menu are defined in MenuConfig.xml.
The Number Of Buttons On A Menu - This determines the number of buttons on a menu. Users are required to make a corresponding change to UIConfig.xml. These settings will not impact the menu layout of the Oracle Retail Xstore Point-of-Service Software Mobile which will remain fixed at a 3 x 2 grid.
Hide Menu Options From Users That Lack Access - This is used to hide menu options the user does not have security privileges to use. Answer yes to hide the menu option completely. Answer no to display the option as disabled.
|
Important: Receipt configuration is limited to certain receipts, and to specific areas within those receipts. |
...continued from step 4
Select a receipt option:
Find Receipt By Transaction - Select this option if you want to make your edits based on a specific receipt from a known transaction. See Finding the Receipt by Transaction.
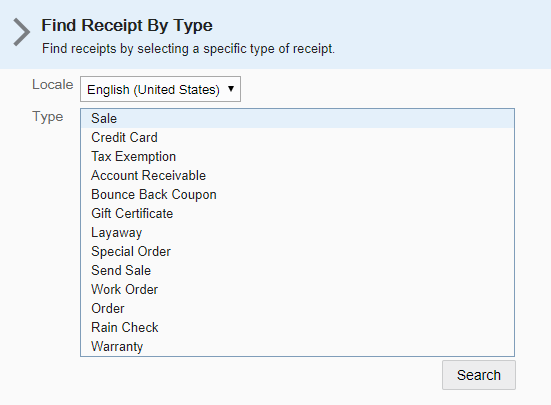
Find Receipt By Type - Select this option if you want to make your edits based on a specific type of receipt. See Finding the Receipt by Type.
Change Receipt Logo - Select this option to change the logo that displays on your sales receipts. See Changing the Receipt Logo.
Receipt System Configuration - Select this option to configure system configuration settings specific to receipts. See Receipt Configuration: System Configuration Options.
After completing receipt setup, you can perform the following options:
To deploy your changes, see Deploying Configuration Changes.
To view a summary list of a profile element's configuration changes to identify how it differs from the global configuration, see Viewing Configuration Changes.
[CONFIGURATION OVERRIDES & STORE SPECIFIC OVERRIDES ONLY] - To delete the current profile element configuration changes, see Delete Profile Configuration Overrides.
[STORE SPECIFIC OVERRIDES ONLY] - To copy store configurations from another store, see Copy Store Configurations.
|
Note: For a receipt type to be available here, an actual transaction must exist that uses the receipt type. |
Select a receipt type (and a locale if applicable) from the list and click Search.
|
Note: Searching For Receipts By TypeThe Locale drop-down field defaults to the locale of the current user. Locale is used to find the selected receipt types that match to the selected locale. For example, if Espanol is selected from the Locale list, only those receipts that are assigned to the Espanol locale will be displayed. If the search yields no results, a message is shown below the receipt list. |
At the Receipt Configuration page, select a receipt from the Receipt Options drop- down list. The Receipt Options drop-down list contains the various receipts available for the selected receipt type.
The Edit Receipts page displays.
|
Note: The initial view of the Edit Receipts page automatically displays the first receipt type in the drop-down list. |
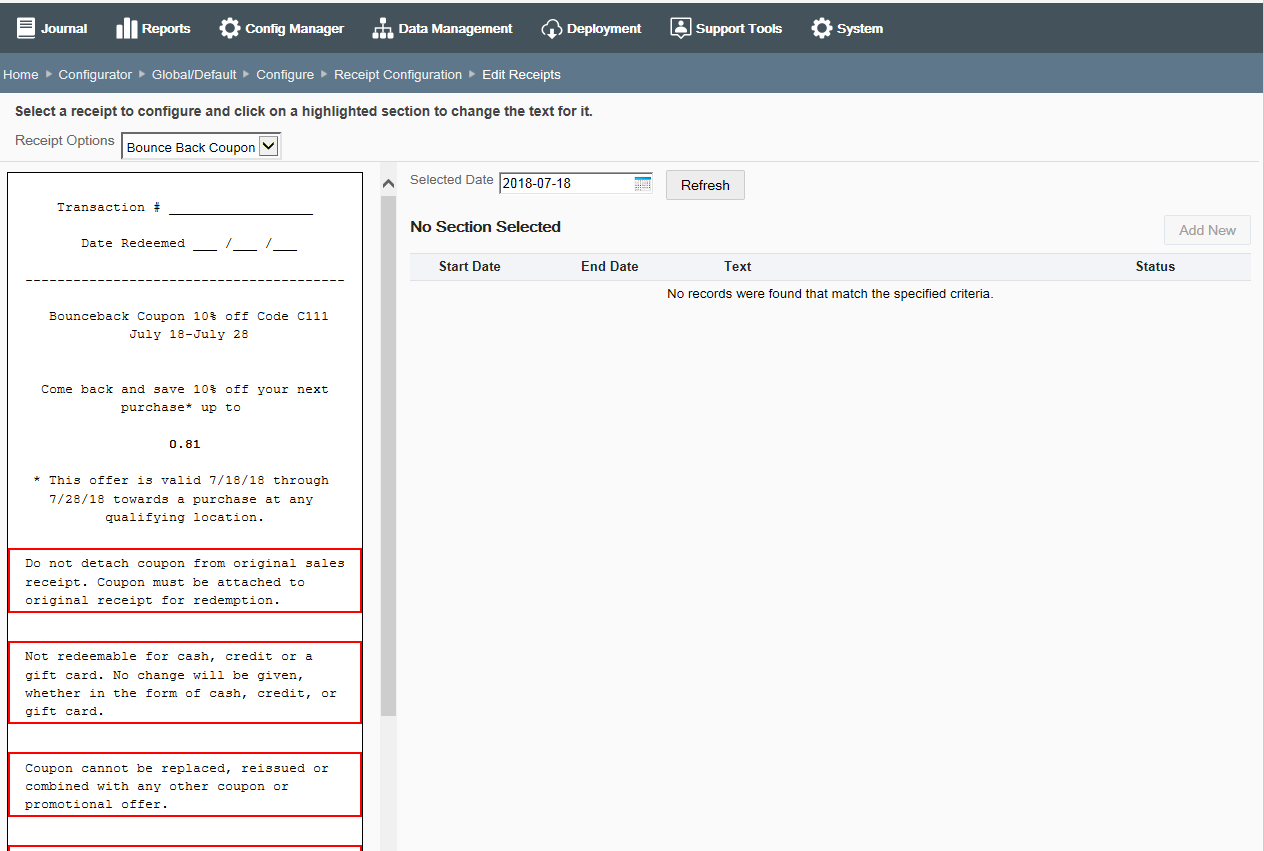
About the Edit Receipts Page
The calendar date and receipt view default to the current day. If applicable, use the calendar to select another date to view the receipt with the text entries for that specific date. Click the Refresh button to update the receipt for the new date.
If the receipt you selected cannot be edited, you will see this message and the receipt will appear as a gray image. You can select another receipt from the list, or use the navigation breadcrumbs to return to the previous screen.
Only receipt sections highlighted in red can be edited.
If a receipt section is not enabled for the current receipt, the section is shown as a watermark with a white background and gray text, but can be edited.

Click on an area of a receipt that is highlighted in red to change it. The selected section will be highlighted in green to indicate it is the active section. The text area on the Edit Receipts page shows all existing entries for the selected section and the effective dates if applicable.
At the Edit Receipts page, add new text or edit existing text:
To edit an existing line of text, click the text line to open the Edit Receipt Text window and make your receipt changes as needed.
To add new text, click the Add New button to open the Edit Receipt Text window and add new text as needed.
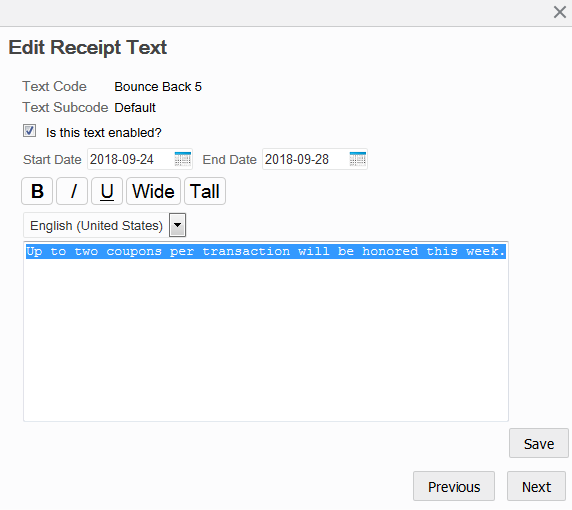
Edit Receipt Text Window
Receipt Text - Type the text as it should appear on the selected section of the receipt.
Dates - [OPTIONAL] Date fields are not required. If there are no dates for a row, the text will always be displayed for the selected section. To create date-defined text for the selected section of the receipt, enter a Start Date and End Date for the length of time the text will be printed on the receipt. This provides the ability to set up future text for each section in a receipt without affecting the current receipt. Leave the End Date field blank if there is no ending date. Leave both date fields blank if there are no date restrictions. To view the receipt changes for a specific date, select the date and click Refresh.
Locale - [OPTIONAL] To add or edit receipt text for a different locale, select a locale from the locale drop-down list and enter translated text. This option is only available if multiple locales have been set up for your organization.
Text Format - [OPTIONAL] Use the following icons to format the text on the receipt. When an icon is selected, the format will be applied to all of the text in the box, even if only part of the text was selected at the time. When a format option is selected, the icon changes to a blue background. If you need to remove a format from the text, click the blue icon to remove the formatting. The icon will now be white, indicating the format is not applied.
Table 5-4 Icons
| Icon | Description |
|---|---|
|
Bold icon |
Click this icon to make the text bold. |
|
Italic icon |
Click this icon to italicize the text. |
|
Underline icon |
Click this icon to underline the text. When choosing to underline text, most receipt printers will underline the entire row whether there is text there or not. For example: Thanks for shopping! Oracle Retail Xstore Office Cloud Service displays the full underline on the Receipt view; however, it is not shown in the text area of the page. |
|
Wide icon |
Click this icon to make the text double wide. Oracle Retail Xstore Office Cloud Service displays the double-wide text spacing on the Receipt view; however, it is not shown in the text area of the page. |
|
Tall icon |
Click this icon to make the text double high. Oracle Retail Xstore Office Cloud Service cannot display the double-high text on the Receipt view or in the text area of the page. |
Disabled/Enabled - The receipt text is enabled by default. To disable the receipt text, click the Is this text enabled? check box to remove the check mark. Disabled text is not shown in the receipt view.
Click Save.
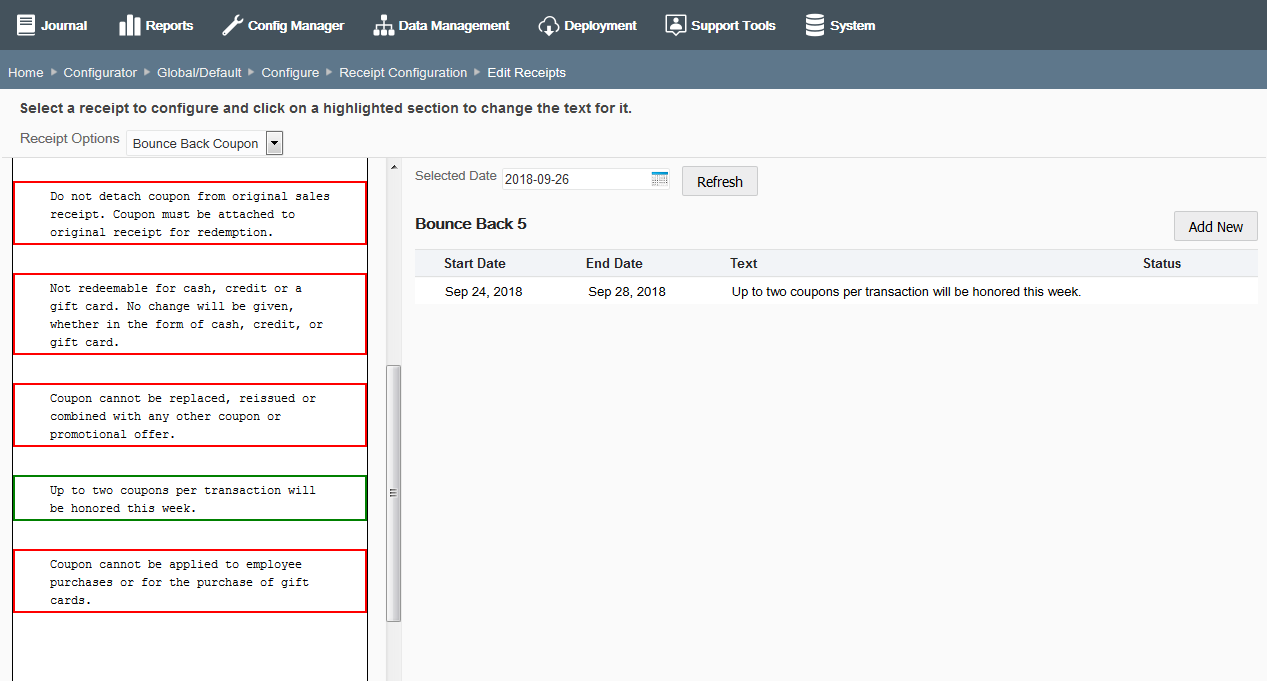
The receipt view displays and shows your changes using the updated Start date.
|
Note: If there are multiple entries with the same or overlapping dates, the entries will all display on the receipt. Order will be determined by when the row was added. The order on the receipt will match the order in the text area of the Edit Receipts page. |
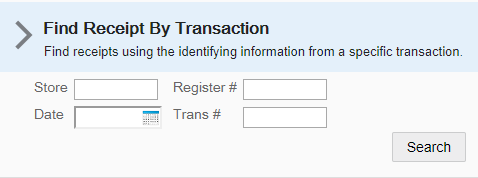
Complete all the fields to locate the receipts from a specific transaction: Store number, Date the transaction was completed, Register identifier where the transaction was rung, and the Transaction number.
Click Search to return a list of the receipts for the transaction.
Continue with step 3 on page 31. The process for modifying receipts either by transaction receipt or by receipt type is the same from this point forward.
About the logo file format
Only black and white images may be used.
Only bitmap (.bmp) format is supported.
File size cannot exceed 100KB.
Image width cannot exceed 400 pixels.
To change the current logo follow the steps below:
With your current logo displayed, click the Change button.
Click Browse to browse for the new logo file for the receipt.
After locating the correct file, click Upload to import the file.
If this is not the logo you want to use, click Browse to find a different logo.
If the file format for the new logo you selected is not supported, you will received a corresponding message. Click Browse to find a different logo.
With the new logo displayed, click Save.
The new logo is now shown in the Current Logo section of the page.
The following configurations apply specifically to receipts. The categories have been set up as follows:
|
Note: The system configuration options for receipts in this feature are simply a subset of the system configuration options available from Oracle Retail Xstore Point-of-Service System Config Options. See Configuring Xstore Point-of-Service System Config Options for more information. |
Enable Printing Charitable Contribution Line Item On The Receipts? - Enable/ Disable the donation line item being printed on the receipts.
Enable Printing Charity Footer Message On The Receipts? - Enable/Disable the charity footer message being printed on the receipts.
Print Sales Associate First Name On Receipts? - Determines whether the system prints the first name of the current transaction's commissioned associates on the sales receipts.
Print Sales Associate Last Name On Receipts? - Determines whether the system prints the last name of the current transaction's commissioned associates on the sales receipts.
Print Sales Associates Using Multiple Lines On Receipt? - Determines whether the system prints each commissioned associate on a new line (Yes) or all commissioned associates on one line (No) on the sales receipts.
Minimum Threshold For You Saved Amount. - Enter the minimum amount of customer savings required for the system to print the customer savings information on the sales receipt.
Print You Saved Amount On Receipts? - Determines whether the system prints customer savings information on the sales receipt.
Default Email Host? - Specify the default email host name used for emailing customer receipts.
Default Receipt Email Subject. - Specify the default subject for an emailed receipt. The value is specified in translations_en.properties.
Font Settings For The Email Text Used When Sending Receipts. - Specify the font family and size for email receipt text.
Prompt To Email Receipts? - Determines whether users are always prompted with the option to email receipts to customers.
Select Yes to always prompt to ask the customer if they want receipts emailed.
Select No and the system will check the email permissions for the customer and will only email if the permission is set to yes.
Save Updated Email Address To Customer Record? - Determines whether customer email addresses are updated and saved to the customer record during the process of emailing a transaction receipt.
Send Receipts Via Email? - This is the global on/off switch for sending email receipts. Select Yes to enable the functionality. Receipts are emailed to customers if the receipt is configured as an email receipt.
Translation Key For The Sender Name Of Emailed Receipts. - Specify the translation key for the sender name of receipt emails. The value is specified in translations_en.properties.
Allow User To Choose Gift Receipt Print Method? - Determines whether the system allows the user to choose to print a gift receipt for each item or one gift receipt for all items.
Select Yes to allow the user to choose whether to print a gift receipt for each item or one gift receipt for all items.
Select No to not allow the user to choose a gift receipt type option.
Maximum Gift Receipts That Can Be Printed. - Enter the maximum number of gift receipts allowed to be printed by the system before a manager override is required.
Print One Receipt Per Gift Item? - Used when the quantity of a line item is greater than one. Determines whether the system prints a separate gift receipt for each item (Yes), or prints one gift receipt for the total quantity (No).
Prompt User To Group Gift Receipts? - Determines if the associate is prompted to group items onto one or many gift receipts at the customer's discretion.
Automatically print gift receipts for items purchased from a gift registry? - Determines whether the system automatically adds a gift receipt to an item purchased from a gift registry. Select Yes to have the gift receipt automatically added to an item purchased from a gift registry.
Print Inventory Location Sold From On Receipt? - Determines whether the system prints the inventory location from which an item was sold on the receipt.
A List Of Non-Merchandise Item Types That Are Included In Item Count. - Select the non-merchandise item types that will be included in the total item sold count on the sales receipt. Valid Values: Voucher, Loyalty Card.
Link The Component Quantity Of A Kit To The Kit Quantity For Receipts? - Determines whether the quantity of the kit component rows on the virtual and real receipts are linked to the quantity of the kit item.
If Yes, the component item quantity displayed will be multiplied by the quantity of the parent kit line item.
If No, the component item quantity will not change, regardless of the parent kit line item's quantity.
Maximum Number Of Kit Components To Display On A Receipt. - Enter the maximum number of kit components to display on the virtual receipt for a kit item. If there are more kit components than rows available for display, the last row will be used to display a continuation string, such as an ellipsis (...).
Print Layaway Merchandise Ticket Per Item? - Determines whether the system prints a separate merchandise ticket for each layaway item at setup.
Print Layaway Merchandise Ticket With All Items? - Determines whether the system prints a merchandise ticket for a layaway account.
Print Layaway Specific Receipt? - Determines whether the system prints a layaway receipt that contains only layaway account and item information. Line items belonging to other sale types (that is, sales or returns) will not be included on this receipt.
Show Loyalty Card Expiration Date? - Determines whether to show the loyalty card expiration date in the display and on the receipt.
Print Merchandise Ticket For Send Sale Items? - Determines whether the system prints a merchandise ticket for each send sale item sold.
Print Total Cash Pickup Amounts On Closing Till Receipts? - Determines whether the system prints the total cash pickup amount on closing till count receipts.
Restrict Printing Of Receipt Confirming Training Mode Enter And Exit? - Determines whether the system prints receipts for entering and exiting training mode. (Training mode must be enabled on the register for this option to be valid.)
Restrict Receipt Printing In Training Mode? - Determines whether the system prints receipts in training mode. (Training mode must be enabled on the register for this option to be valid.)
Print Store Copy Of Receipt When Sigcap Used? - Determines whether the system prints a store copy sales receipt if the customer signature is captured by a signature capture device.
Print Suspended Transaction Receipt? - Determines whether the system prints a receipt when suspending a retail transaction.
|
Important: This option replaces the standard process of manually managing the SysConfig.xml file. If you use this Oracle Retail Xstore Office Cloud Service configuration tool, SysConfig.xml files should not be created manually and installed in any store/register (via config path).If any SysConfig.xml files are manually created and installed in any store/register (via config path), the changes they contain will work in Oracle Retail Xstore Point of Service as they always have; however, these configurations will be totally unknown to this System Config option and may possibly impair its ability to work properly. |
...continued from step 4
At the System Configuration page Search box, do one of the following:
To find system configurations containing specific text, enter the search text in the input box, then press [Enter]. The text typed here can be found anywhere within the configuration: the label, the description, the module, or the config path itself. The results are shown in the left panel (folder tree). Only those configurations containing the specified text within the label, description, module, or config path are displayed. If needed, click Clear to remove the search criteria and return to the default System Configuration page.
To view only system configuration categories and configuration options with overrides, select the Only Show Overrides check box.
A configuration marked as an override differs between scopes:
Within the Global scope, an override means that the state of the configuration varies from Oracle Retail Xstore Point of Service base configuration.
Within a Profile Group/Profile Element combination, an override means that the configuration varies from the Global configuration.
To return to the default System Configuration page, deselect the check box.
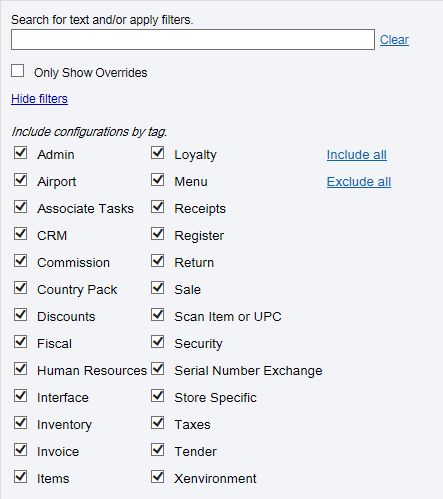
To display additional filtering options, click Show more filters.
Additional filter options display:
This option provides an extra level of organization for the various configuration options, and also provides the ability to filter on just one or many tags. By default, all tags are selected. Select one or more tags to view only the related category folders. To select all tags at once, click Include all. To clear all selected tags, click Exclude all. When finished with the filter options, click Hide filters.
Continue with Viewing/Editing System Configurations.ntinue with Viewing/Editing System Configurations.ontinue with Viewing/Editing System Configurations.
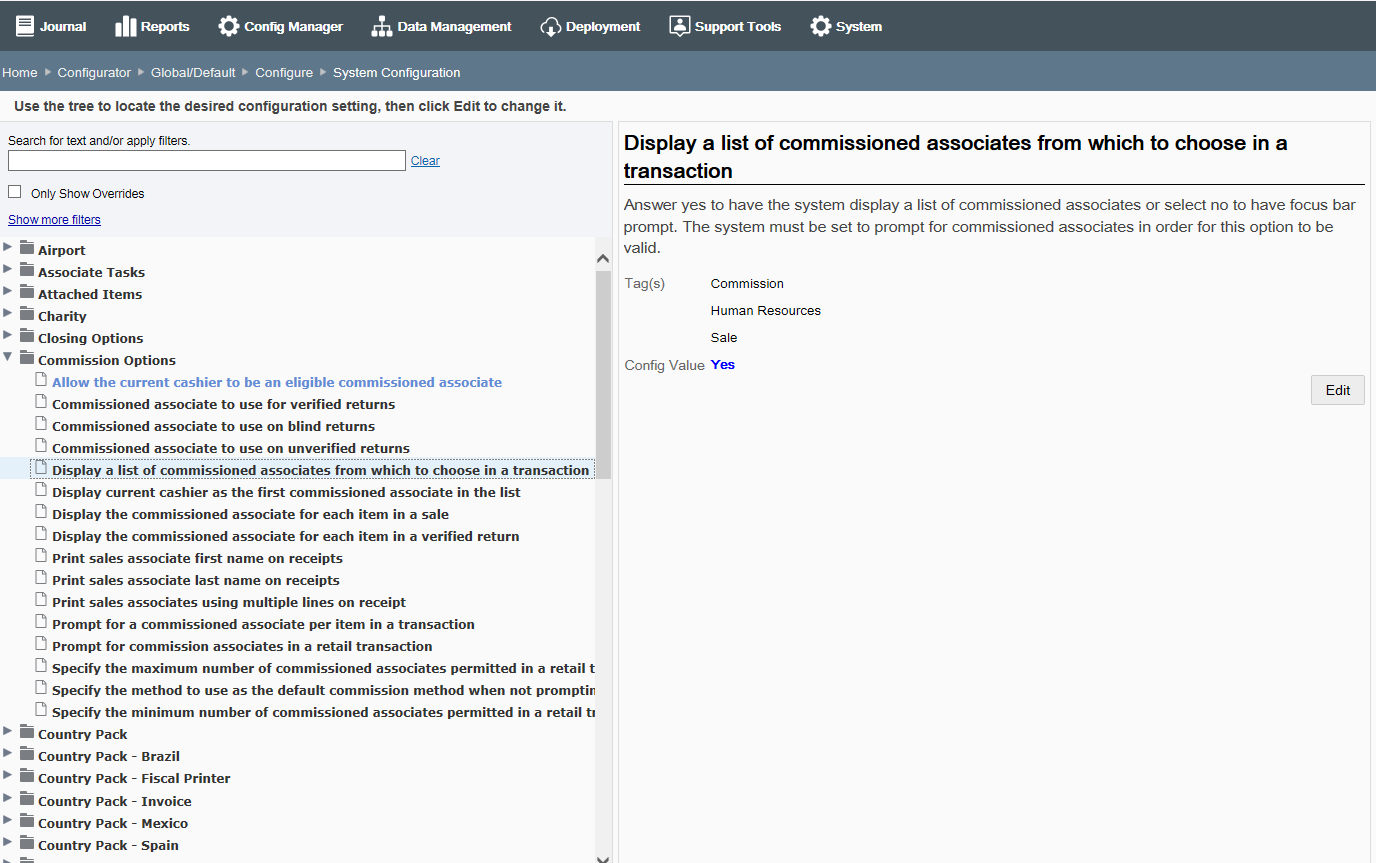
On the left side of the System Configuration page, click the arrow associated with a system configuration category to open the folder and show the configuration options within the selected category.
If a category contains at least one configuration option that has been overridden, the color of the folder is blue.
The overridden configuration option within the category is indicated by an override icon.
See About Configuration Overrides for more information about configuration overrides.
Select a configuration option within the selected category to view the configuration details in the right side of the System Configuration page.
The following detailed information displays:
The configuration name (label).
The configuration description.
The tag or tags associated with the selected configuration. This information can be used to filter or search for configurations.
Valid values when applicable.
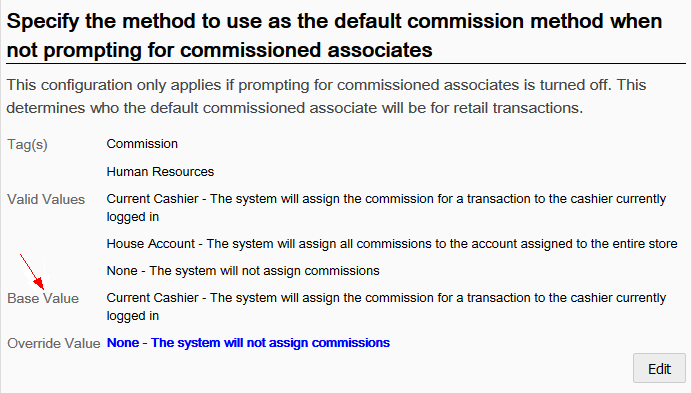
Base Value or Global Value if the Configuration has been overridden. See Figure 5-38 below.
The current value setting of the configuration.
|
Note: If this setting is different than its original value (Base for Global scope as shown here, and Global for configuration overrides) the original value is also shown in this section. See About Configuration Overrides. |
The path in SysConfig.xml (at the bottom of the page).
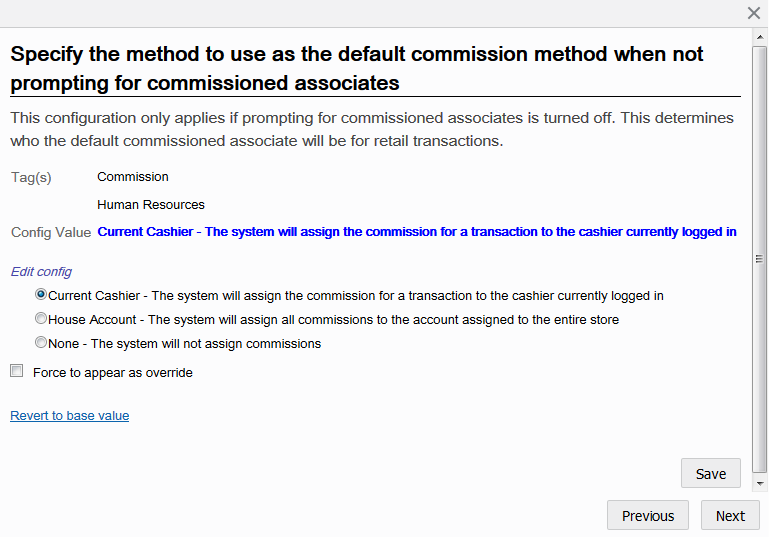
Click Edit to make any changes.
At the editing window you have the following options:
Edit Config - Select an option or enter information as needed for the configuration.
Force to appear as override check box - Select this option to label the configuration as an override.
Overrides differ between scopes. Within the Global scope, an override means that the state of the configuration varies from Oracle Retail Xstore Point-of-Service base configuration. Within the Profile Group/Profile Element combination scope, an override means that the configuration varies from the Global configuration.
This setting is more than an arbitrary flag. For example, if a Profile Group/ Profile Element is using the same config values as the global configuration, that means that when you change the config values for the global configuration, you are also effectively changing the config values for the profile group/profile element. Using this check box, config values marked as overrides for a Profile Group/Profile Element will not change.
Revert to base value1 or Revert to global value link - Click this link to revert the configuration back to the base value (or global value for Profile Group/Profile Element combination scope).
Edit Form Navigation Options:
To close the form without saving your changes, click the Close icon.
To view the previous/next configurations in the category, click Previous/Next button.
Click Save to save your changes and return to the System Configuration Page.
After completing System Configuration setup, you can perform the following options:
To deploy your changes, see Deploying Configuration Changes.
To view a summary list of a profile element's configuration changes to identify how it differs from the global configuration, see Viewing Configuration Changes.
[CONFIGURATION OVERRIDES & STORE SPECIFIC OVERRIDES ONLY] - To delete the current profile element configuration changes, see Delete Profile Configuration Overrides.
[STORE SPECIFIC OVERRIDES ONLY] - To copy store configurations from another store, see Copy Store Configurations.
...continued from step 4
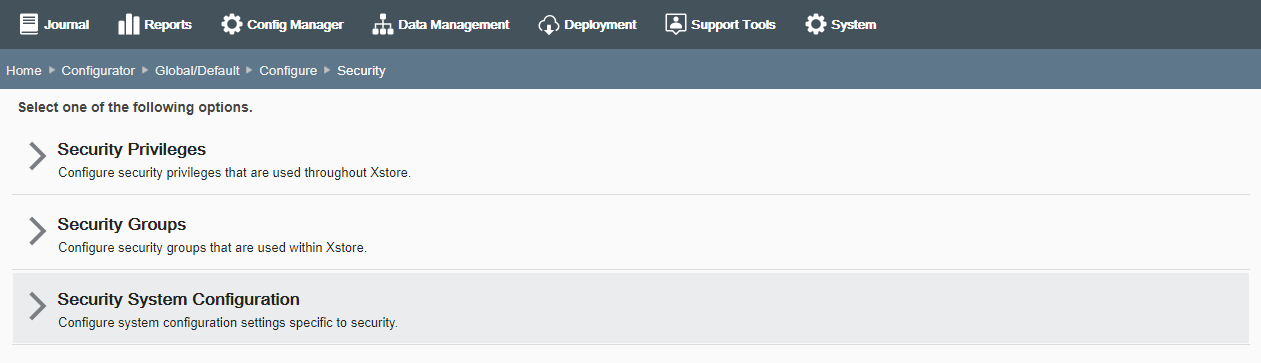
This option is only available for the Global scope.
Select an option from the Security Configuration page:
Select Security Privileges to set up Oracle Retail Xstore Point-of-Service security privileges. Continue with step 2 below.
Select Security Groups to add or edit existing Oracle Retail Xstore Point-of- Service security groups. Skip to Security Groups Setup.
Select Security System Configuration to configure system configuration settings specific to security. Skip to Security System Configuration.
At the Security Privileges page, select a privilege to edit.
|
Note: To find a security privilege in the list, type any text that may be part of the privilege in the "Find a Privilege" text box at the top of the page. |
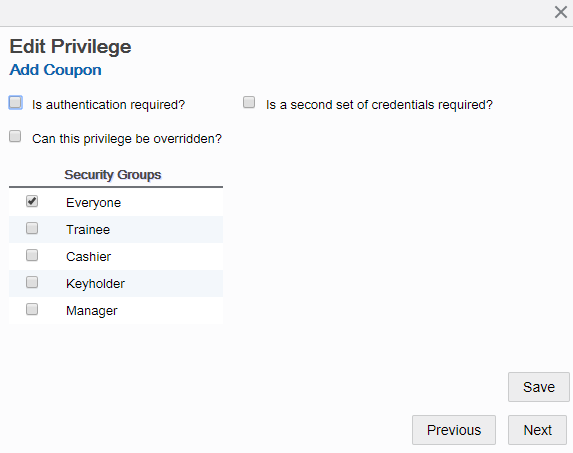
Edit the Security Privilege as needed:
Edit Form Navigation Options:
To close the form without saving your changes, click the close icon.
To view the previous/next configurations in the category, click the Previous/Next button.
Is authentication required? - Determines if the POS system should either always prompt for authentication, or authenticate against the current POS user. If selected, indicates that authentication is required for this privilege type.
Can this privilege be overridden? - If selected, the privilege can be overridden.
Security Groups - Select all groups that apply. For example:
Everyone
Trainee
Cashier
Keyholder
Manager
Is a second set of credentials required? - Determines whether a second authorization is required.
If selected, complete additional information as needed:
Do they have to be different than the first set? - If selected, then the same Employee ID cannot be used in both prompts.
Second Security Groups - Select all groups that apply.
Click Save to return to the Security Configuration page.
After completing Security Privilege setup, you can perform the following options:
To deploy your changes, see Deploying Configuration Changes.
To view a summary list of a profile element's configuration changes to identify how it differs from the global configuration, see Viewing Configuration Changes.
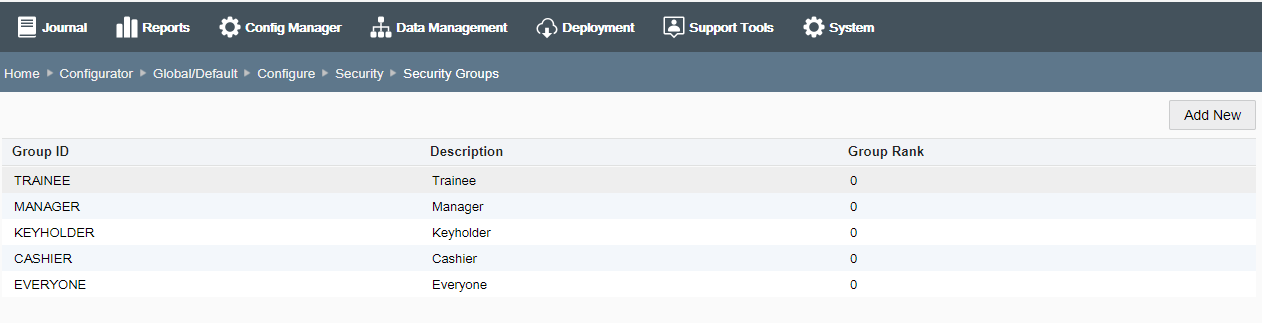
Select Security Groups from the Security Configuration page.
You have the following options at the Security Groups Page:
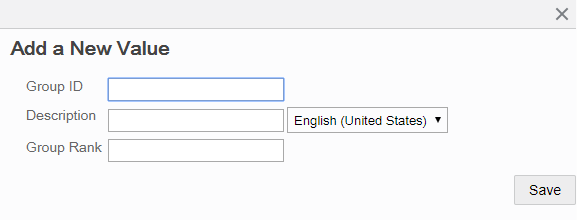
To add a new Security Group, click the Add a new security group link.
Enter the information in the Add Security Group window. All fields are required.
Click Save. The new group is added to the Security Groups list.
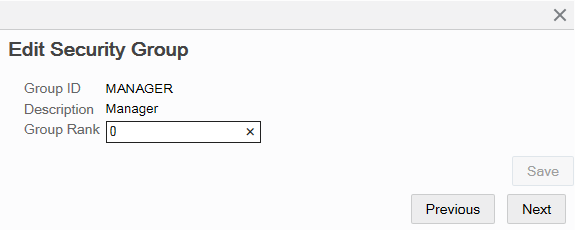
To edit an existing Security Group, select it in the Security Groups list, then click Edit.
Enter the information in the Edit Security Group window. Only the rank can be changed.
Click Save.
After completing Security Groups setup, you can perform the following options:
To deploy your changes, see Deploying Configuration Changes.
To view a summary list of a profile element's configuration changes to identify how it differs from the global configuration, see Viewing Configuration Changes.
|
Note: The system configuration options for security in this feature are simply a subset of the system configuration options available from Oracle Retail Xstore Point-of-Service System Config Options. See Configuring Xstore Point-of-Service System Config Options for more information. |
The following configurations apply specifically to security. The categories have been set up as follows:
Manager override when tender amount exceeds house account balance? - Determines whether the system prompts for manager override if the tender amount exceeds the remaining balance of the house account. If Yes, and a manager-level user is logged in, the system displays the credit limit and prompts the user to proceed. If a user lower than the manager privilege is logged in, and the user chooses to proceed with exceeding the credit limit, the manager security login displays for approval.
Allow user to ring his/her own sale? - Determines whether the system allows employees to ring retail transactions for themselves.
Account lockout allowable retry attempts. - If Account Lockout functionality is enabled, the system locks out the associate's account after this number of failed login retries. Default: Enabled, set to 3 attempts.
Allowable retry attempts per challenge question. - If Account Lockout functionality is enabled, the system locks out the associate's account after this number of failed challenge question retries.
Enable Lockout Feature For Failed Login Attempts? - Turns on/off the Account Lockout functionality where the system locks out the associate's account after a configured number of failed login retries. Default: Enabled
Enable password expiration? - Turns on/off Password Expiration functionality to expire an employee login password after a specified number of days. Default: Enabled
Identify the ID to use for employee logon - Determines the type of identification the associates will use to log into the system; Employee ID or Login ID.
Login with employee card does not require password entry - If enabled, the login to Xstore POS with an MSR-based employee card does not require entering a password. If disabled, the employee card will be used to provide the user ID, but password entry will be required to complete login.
Password expiration days. - If Password Expiration functionality is enabled, the system expires an employee login password after this number of days. Default: 90 days
Password re-use restriction count. - Associates are not allowed to reuse the same password within this number of password resets.
Specify the number of minutes to wait before unlocking the previously locked users. - The system automatically unlocks the previously locked users after this number of minutes from their locked out time stamp.
The interval between attempts to unlock previously locked users. - The interval, in seconds, between attempts to unlock previously locked users.
The number of challenge questions required for employee identification. - This setting provides the ability to dictate how many challenge questions employees must answer before being allowed to reset their password.
|
Note: There are ten challenge questions stored within the database, therefore no more than ten questions can be asked. |
Relate default user ID. - The default user ID that has access to Oracle Retail Customer Engagement Cloud Services. This user ID must be set up in both Oracle Retail Xstore Point of Service and Oracle Retail Customer Engagement Cloud Services for WSDL version 2.
Relate user security type. - Determines how user data security should be pulled from Oracle Retail Customer Engagement Cloud Services. This will tell whether the security is based on the individual user, the user's role, or a default user.
Treat security groups as 'Greater-Than' or 'Greater-Than Or Equal-To'. - When creating/editing employees, this determines whether higher-ranked in sec_groups.group_rank means greater than or greater than or equal.
Answer Yes to allow a logged in user to edit associates with a rank that is equal to or lower than the logged in associate.
Answer No if the logged in user can only edit associates with a lower rank than themselves. If set to No, the highest ranking employee in the store will be unable to create or edit an employee of equal rank. In this scenario, the information must be downloaded from the home office rather than created in the store. (For example, if Manager is the highest rank in the store, new managers must be downloaded from the home office rather than created in the store).
Use challenge questions for employee password reset? - Turning this setting on will enable the use of challenge questions to identify an employee for the purpose of resetting the employee's password.
|
Note: Once this is turned on, any employee that has yet to select and answer challenge questions will be forced to do so upon successfully logging into back office or register mode. |
Default the type of ID required for tenders requiring customer identification. - The default identification type used for certain tenders that require customer identification information. Valid Values: Drivers License, Social Security, Military Id, Credit Card, Employee Id, Customer Card, Any identification type
Hide menu options from users that do not have appropriate security levels? - This is used to hide menu options the user does not have security privileges to use. Answer yes to hide the menu option completely. Answer no to display the option as disabled.
Authorization method code for BinSmart lookups for Merchant Warehouse. - This is the authorization method code used to perform the lookup. Valid only for Merchant Warehouse.
Display rounded cash total? - Only applicable for currency rounding, this indicates whether the rounded cash total is displayed below the transaction total in the viewport.
Enable merchant Warehouse's BinSmart lookups? - This determines whether Merchant Warehouse's BinSmart lookups are used for Credit/Debit authorizations.
Export hashed account number? - Determines whether or not to include the hashed account number in PosLog.xml.
Inform users with a message that no signature is required? - This option controls turning off/on the information message displayed when processing a transaction below a configured value.
Preferred payment recommendation when errors occur. - This is the preferred payment recommendation when an error occurs or a failed response is returned; credit or debit.
Require pin pad entry for debit tender? - Determines whether a pin pad device is required for tendering with a debit card.
Specify the rounding method to use for local currency. - The local currency amount rounding method.
Half Up - Round to the nearest neighbor unless equidistant, then round up.
Half Down - Round to the nearest neighbor unless equidistant, then round down.
Half Even - Round to the nearest neighbor unless equidistant, then round to even neighbor. Example: 2.5 rounds to 2 while 3.5 rounds to 4.
Ceiling - Round toward positive infinity. This is the opposite of FLOOR and never decreases the calculated value.
Down - Round to the next digit; closer to zero.
Floor - Round down toward negative infinity. This is the opposite of CEILING and never increases the calculated value
Up - Round to the next digit; away from zero.
Unnecessary - Rounding is not necessary.
Adjust store bank balance by deposit discrepancies? - Determines whether the system automatically adjusts the store bank balance based on the bank deposit discrepancy.
Count method used for cash pickup - The cash count entry method for a cash pickup.
Count method used for opening store bank - The cash count entry method used for counting the store bank.
Count method used for store bank deposit - The store bank deposit till count method. This configuration is only valid if the store requires an end count of the store bank at store close.
Count method used for opening a till - The cash count entry method for a till opening count.
Count method used for store bank - The cash count entry method for a store bank deposit.
Display count balance info on till close count? - Determines whether the system displays the till count balance and discrepancy information after the associate completes the till close count.
Display options for cash pickup summary. - The cash pickup count summary screen display type.
Minimum - Declared amount
Simple - Declared amount, system amount
Detailed - Declared amount, system amount, over/under amount
Full - Currently, same as Detailed
Display options for mid-day deposit till count summary. - The mid-day deposit till count summary screen display type.
Minimum - Declared amount
Simple - Declared amount, system amount
Detailed - Declared amount, system amount, over/under amount
Full - Currently, same as Detailed
Display options for till end count summary. - The till end count summary screen display type.
Minimum - Declared amount
Simple - Declared amount, system amount
Detailed - Declared amount, system amount, over/under amount
Full - Currently, same as Detailed
Display options for till reconciliation summary. - The till reconcile count summary screen display type.
Minimum - Declared amount
Simple - Declared amount, system amount
Detailed - Declared amount, system amount, over/under amount
Full - Currently, same as Detailed
Display options for till start count. - The cash count entry method used for the start count.
Minimum - Declared amount
Simple - Declared amount, system amount
Detailed - Declared amount, system amount, over/under amount
Full - Currently, same as Detailed
Force re-count of till with discrepancies over threshold? - Determines whether the system forces a till recount if the till close count discrepancy exceeds the threshold.
Method Of Counting Cash Deposit. - The cash count entry method for a store bank deposit.
Total Short - User enters total cash amount only.
Denomination - User enters denominated cash amounts.
Method Of Counting For Start Till. - The cash count entry method for a till opening count.
Total Short - User enters total cash amount only.
Denomination - User enters denominated cash amounts.
Method Of Counting For Store Bank Opening. - The cash count entry method used for counting the store bank.
Total Short - User enters total cash amount only.
Denomination - User enters denominated cash amounts.
Method Of Counting For Till Cash Transfer. - The cash count entry method for a cash transfer.
Total Short - User enters total cash amount only.
Denomination - User enters denominated cash amounts.
Method Of Counting For Till Pickup. - The cash count entry method for a cash pickup.
Total Short - User enters total cash amount only.
Denomination - User enters denominated cash amounts.
Method To Count Store Bank Deposit. - The store bank deposit till count method. This configuration is only valid if the store requires an end count of the store bank at store close.
Storebank Complete - Brings up the entire store bank end count screen for all tenders.
Remaining Cash - Prompt the user to enter the total cash NOT to be deposited to the bank institution.
Complete Deposit - Deposit all tenders from the store bank to the bank institution.
Notify at end of a transaction when cash in drawer is below this threshold. - When the cash amount in the drawer drops below this amount after a retail transaction is completed, an acknowledge-only prompt will appear and notify the user.
Print total cash pickup amounts on closing till receipts? - Determines whether the system prints the total cash pickup amount on closing till count receipts.
Prompt user to open store bank during store open? - Determines whether the system automatically prompts the user asking if they wish to open the store bank when the store is opened.
Require store bank deposit count at close? - Determines whether the system requires a store bank deposit count at store close.
Skip initial count summary - When initiating a count, determines whether the system displays the tender summary list or the first tender to be counted.
Threshold amount used for suggested cash pickup. - When the cash amount exceeds this configured maximum amount, the system will prompt the associate to perform a cash pickup with the amount that is the current cash total minus this amount. This is a positive floating point number indicating the minimum amount of cash that should be left in the till following a pickup.
Validate cash refund amounts against the current till count? - Determines whether the system validates refund cash amounts to ensure the current till cash amount is greater than the refund cash amount.
Validate store bank deposit amount against system? - Determines whether the system validates the store bank deposit amount and prompts the associate to accept or recount if there is any discrepancy.
Allow warranties not on file? - Per each context (return or work order), when enabled, the system will allow the user to apply existing warranties that cannot be verified (given appropriate security clearance). When disabled, the application of unverifiable warranties will always be prohibited. Valid Values: Return, Work Order
|
Note: Only tenders of type Miscellaneous, Currency, and Credit Card can be created through Oracle Retail Xstore Office Cloud Service. Tender type codes (tnd_tndr_typcode) must be pre-defined in the Xcenter (part of Oracle Retail Xstore Office Cloud Service) database to create tenders.Base Oracle Retail Xstore Point of Service only supports USD (US Dollar), CAD (Canadian Dollar), EUR (Euro), GBP (British Pound), and JPY (Japanese Yen) without additional Oracle Retail Xstore Point of Service changes. If support for other currencies is required, contact your Oracle representative for more information. |
...continued from step 4
Select an option from the Tender Configuration page:
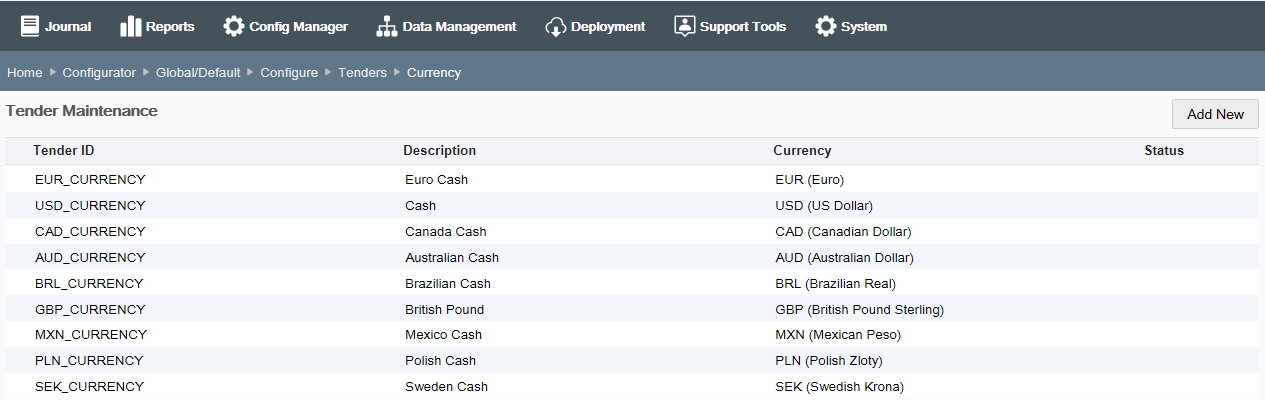
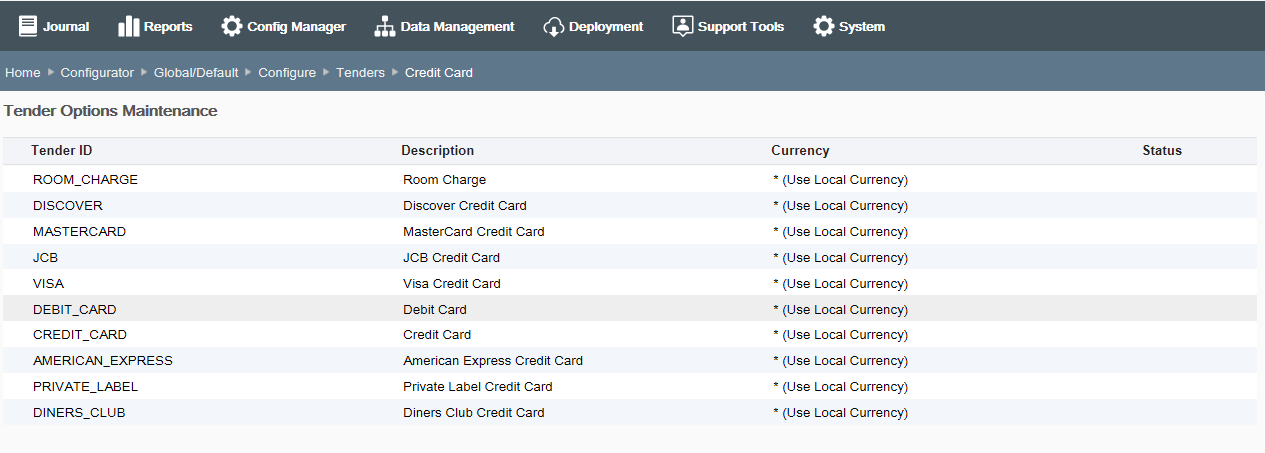
Select Tender Maintenance to view and edit data for tenders that are used in Oracle Retail Xstore Point of Service. Continue with step 2 below.
|
Important: The Tender Maintenance option is only available at the global level. |
Select Tender Options Maintenance to view and edit data for tender options that are used in Oracle Retail Xstore Point of Service. Skip to Tender Options Maintenance.
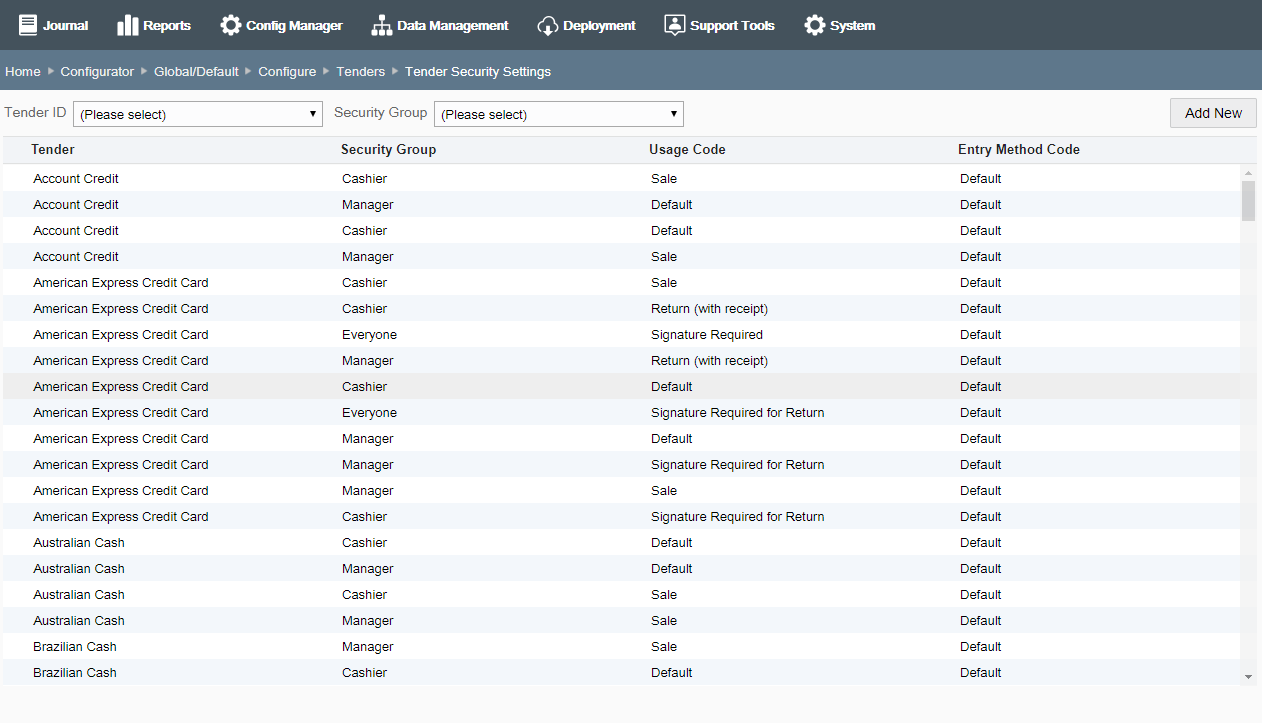
Select Tender Security Settings to configure tender limitations in Oracle Retail Xstore Point of Service. Skip to Tender Security Settings.
Select Tender System Configurations to configure the system configuration settings that apply specifically to tenders. Skip to Tender Configuration: System Configuration Options.
Select a Tender Type from the list, then click Next.
At the Tender Maintenance page, add a new tender or edit an existing tender:
If adding a new tender:
Click Add New.
|
Important: Only tenders of type Miscellaneous, Currency, and Credit Card can be created through Oracle Retail Xstore Office Cloud Service. |
Complete the fields as required, then click Next. See Tender Configurations for a list of tender configuration options.
Skip to step 4 on page 54 to review your selections.
If editing an existing tender:
Select the tender in the list.
At the Tender Detail window, click Edit.
Complete the fields as required, then click Next. See Tender Configurations for a list of tender configuration options.
Continue with step 4 below to review your selections.
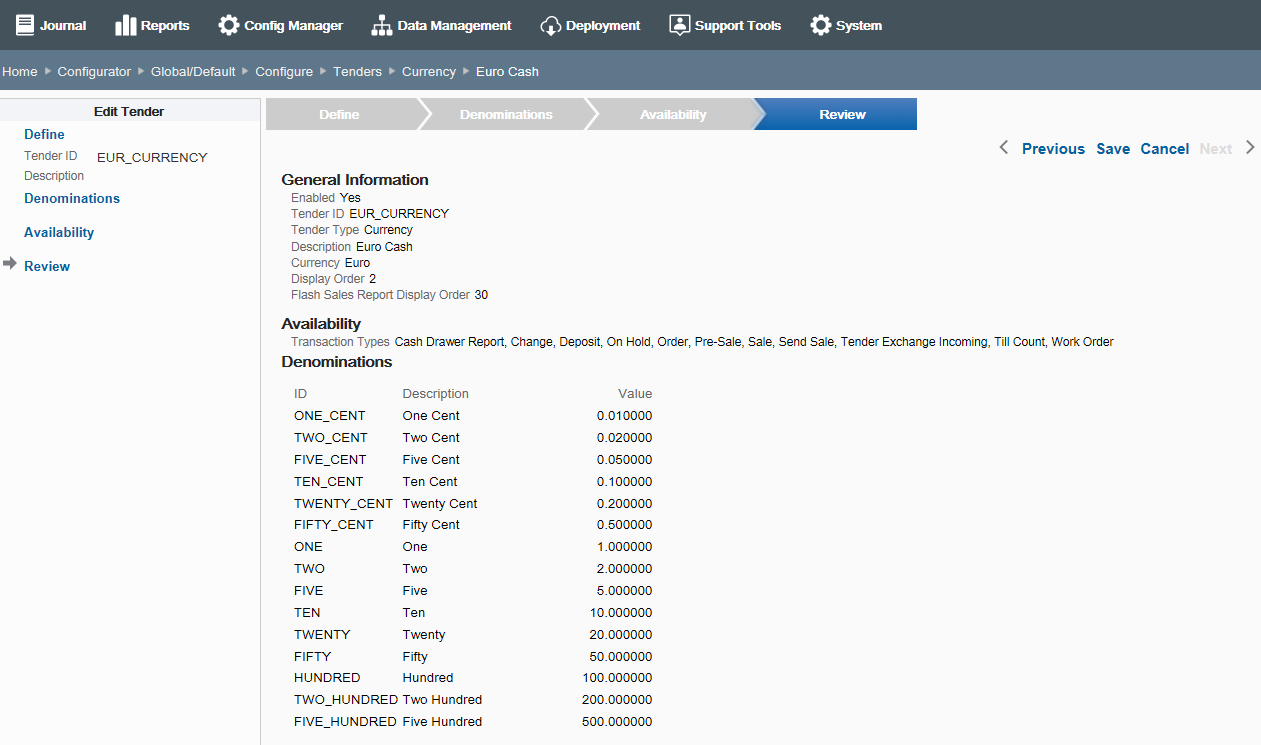
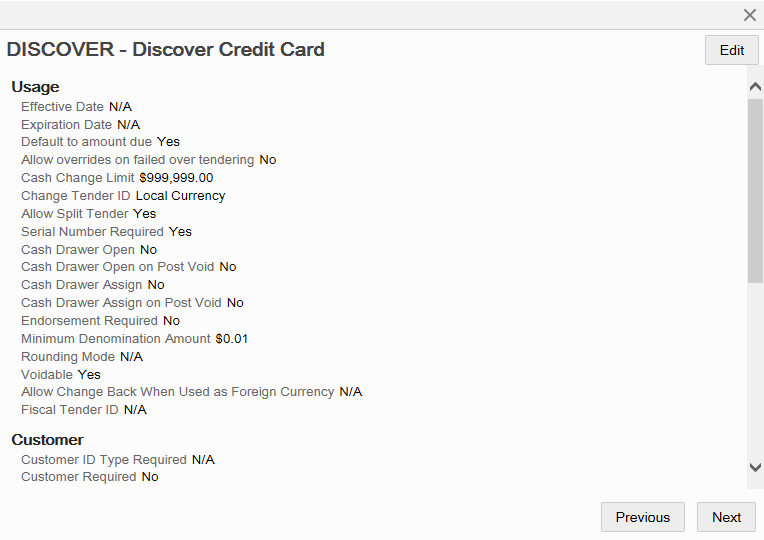
Review the tender information you selected:
To save the tender, click Save. The tender is added to the Tender list.
To edit the tender:
Click Previous to go back one page, or select a configuration option in the Edit Tender section in the left panel of the window.
After making your changes, click Save. The new tender is added to the Tender list.
To discard the tender changes, click cancel. When prompted, click Yes to confirm you want to cancel tender setup.
After completing tender setup, Oracle Retail Xstore Office Cloud Service returns to the Tender Maintenance page.
To deploy your changes, see Deploying Configuration Changes.
To view a summary list of a profile element's configuration changes to identify how it differs from the global configuration, see Viewing Configuration Changes.
[CONFIGURATION OVERRIDES & STORE SPECIFIC OVERRIDES ONLY] - To delete the current profile element configuration changes, see Delete Profile Configuration Overrides.
[STORE SPECIFIC OVERRIDES ONLY] - To copy store configurations from another store, see Copy Store Configurations
This section describes the available tender configurations.
Define the basic information for the tender, then click Next.
Tender ID - Enter the tender identifier. This value can only be edited in Add mode.
Description - Enter a text description of the tender.
Locale - If needed, select a translation locale and enter the description for the locale.
Currency - Set up the Currency ID:
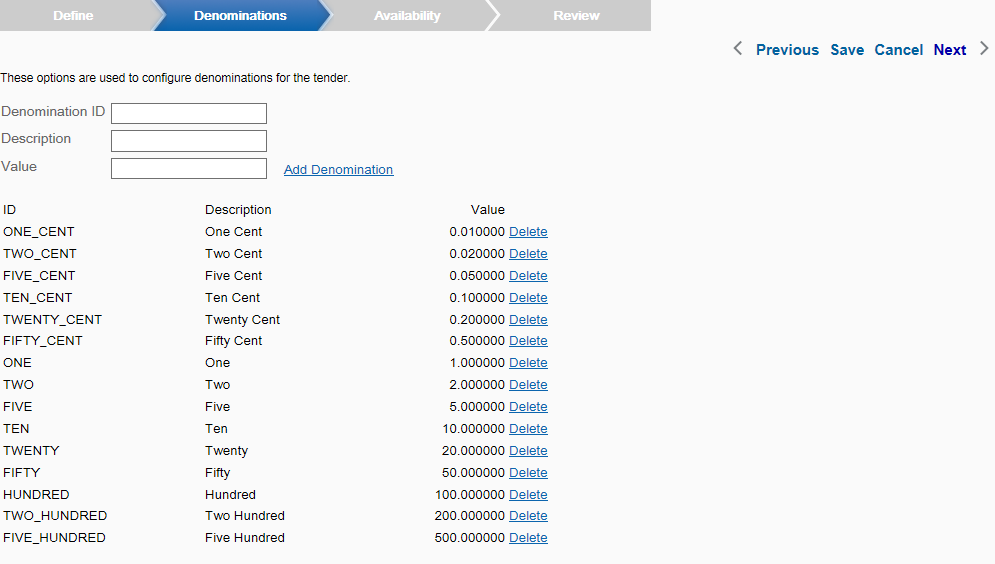
|
Note: This option allows you to set the Currency ID on any tender to a keyword "*" that represents the local currency. For any tenders that have this keyword "*" set as the currency ID, Oracle Retail Xstore Point of Service will retrieve the local currency ID from SysConfig.xml.This makes it easier to set up tender types to always use the local currency of the store rather than needing to explicitly define each tender with a specific currency ID. For example, rather than setting up Visa/USD, Visa/CAD, Visa/AUD, and so on., it is possible to simply use the "*" keyword for the Visa tender to instruct Oracle Retail Xstore Point of Service to retrieve the store's local currency ID automatically for Visa. |
To set the Currency ID to Xstore's local currency, disable the "Does this tender use a specific Currency?" check box. This automatically sets the currency ID to "*". In Oracle Retail Xstore Point of Service, this "*" value is recognized as a directive to use the local currency for the tender.
To set the Currency ID to a specific value, enable the "Does this tender use a specific Currency?" check box. When prompted, select a Currency ID from the list of available currencies. Oracle Retail Xstore Point of Service will use the selected Currency ID for the tender.
Include in Flash Sales Report? - If selected, the tender will be included on the Flash Sales Report. When prompted enter the order in which it should appear on the report in the Flash Sales Report Display Order field.
Display Order - Determines the order in which tenders display on the count page during closing.
Enabled check box - When selected, the tender is available for use.
Configure denominations for the tender.
To add a new denomination, enter the following denomination detail, then click Add Denomination:
Denomination ID - The denomination identifier.
Description - The denomination description
Value - The denomination value
|
Note: A Delete option is available after adding a denomination. |
Select Tender Options Maintenance from the Tender Configuration page (Figure 5-47).
Select a Tender Type from the list, then click Next.
At the Tender Options Maintenance page, select a tender from the list.
At the Tender Options Detail window, click Edit.
Complete the fields as required, then click Next. See Tender Options Configuration for a list of configuration options.
Review your selections and skip to step 4 on page 54 to complete tender options setup.
This section describes the tender options.
Define how the tender will be used.
Effective Date - [OPTIONAL] Enter the effective date. Allows entry using the calendar component.
Expiration Date - [OPTIONAL] Enter the expiration date. Allows entry using the calendar component.
Does this tender default the tender amount to the amount due? - If selected, the amount due from the customer is shown as a default value in the focus bar at tendering.
Is a failed over tendering attempt allowed to be overridden for this tender? - If selected, the over tender limit can be overridden.
Is there a limit to the amount of cash change? - If selected, enter the maximum amount of cash that can be given as change when this tender is used as payment.
Is there a required tender to give as change when the cash change limit has been exceeded? - If selected, choose the tender to be used as change after the cash change limit has been reached.
Are split tenders allowed? - When selected (default), this tender can be used if there are tenders in the current transaction. If this option is not selected, the tender amount entered cannot be less than what is due on the transaction.
Is a serial number required? - If selected, the serial number of the tender type must be captured as part of the tender process.
Open cash drawer? - If selected, the cash drawer opens when the tender type is offered by the customer.
Open cash drawer on Post Void? - If selected, open the cash drawer each time a post void is performed using this tender.
Assign cash drawer? (Networked cash drawers only)
Assign cash drawer on Post Void? (Networked cash drawers only)
Is endorsement/franking required? - If selected, an endorsement or franking is required before this tender can be accepted.
Is this tender able to be voided? - If selected, this tender can be voided.
Is there a minimum denomination amount used for currency rounding for this tender? - If selected, enter the minimum denomination value when prompted.
When used as foreign currency, is change allowed back on this tender? - If selected, giving change in foreign cash currency is allowed. If not selected, any change due is given in the local currency.
Is there a required fiscal tender ID?
Define how the customer will use the tender.
Is customer identification required? - If selected, choose the type of customer identification required.
Is customer association required? - If selected, a customer must be associated with this tender.
Is customer signature required? - If selected, a customer signature is required before this tender can be accepted.
Are there a minimum and maximum days for a return with this tender? - If selected, enter the minimum number of days and maximum number of days allowed for return of an item to use this tender for refund.
Configure authorization rules for the tender.
Is a swipe on a magnetic stripe reader (MSR) required? - If selected, the tender must be inserted into the magnetic card reader.
Is authorization required? - If selected, authorization is required before the tender can be accepted.
Enter/select authorization information when prompted:
Authorization Method - Select the authorization method from the list.
Is postal code entry required? - If selected, a postal code must be associated with this tender.
Is expiration date entry required? - If selected, this type of tender requires an authorization expiration date and it must be recorded at the time of settlement. (Used to enable expiration date prompting for a major credit tender.)
Is CID entry required when swiped? - If selected, the card ID is required when this card is swiped.
Is CID entry required when keyed? - If selected, the card ID is required when this card is keyed into the system manually.
Is PIN entry required? - If selected, the customer must enter a personal identification number (PIN) to validate the method of payment.
Specify the options used to configure counting and reporting rules for the tender.
Is this tender counted independently from tender type? - If selected, the tender will be counted separately. When prompted, choose the Till Count Method to be used from the list. If not selected, the tender will be counted as part of its tender category grouping.
|
Note: This option is automatically selected for cash currency and cannot be deselected. |
Is a recount required if tender does not balance? - If selected, enter the Close Count Discrepancy Threshold value when prompted.
Reporting Group - Select the reporting group for the tender:
Tender Summary group
Foreign Currency group
Is a suggested deposit amount required? - If selected, enter the Suggested Deposit Threshold value when prompted.
Are the counts and amounts pre-populated? - If selected, the system counts the tender automatically to populate the system tender.
|
Note: The combination of Tender ID, Security Group, Usage Code, and Entry Method must be unique. |
Select Tender Security Settings from the Tender Configuration page (see Figure 5-42).
At the Tender Security Settings page, you can add a new security setting or edit an existing one.
|
Note: Use the Tender ID and Security Group filters to locate a tender/ security group in the list. |
If adding a new tender security setting:
Click Add New.
At the Security Setting Detail window, complete the fields as required, then click Save. See Tender Security Settings Configuration Options for a list of configuration options.
If editing an existing tender security setting:
Select the tender security setting in the list.
At the Security Setting Detail window, complete the fields as required, then click Save. See Tender Security Settings Configuration Options for a list of tender configuration options.
After completing tender security setting setup, Oracle Retail Xstore Office Cloud Service returns to the Tender Security Settings list page.
To deploy your changes, see Deploying Configuration Changes.
To view a summary list of a profile element's configuration changes to identify how it differs from the global configuration, see Viewing Configuration Changes.
[CONFIGURATION OVERRIDES & STORE SPECIFIC OVERRIDES ONLY] - To delete the current profile element configuration changes, see Delete Profile Configuration Overrides.
[STORE SPECIFIC OVERRIDES ONLY] - To copy store configurations from another store, see Copy Store Configurations.
The available configuration options depend upon the selected Tender and Usage Code.
|
Note: The following fields cannot be changed in edit mode. |
Tender ID - Select the tender identifier from the list.
Security Group - Select the security group from the list.
Usage Code - Select the usage code from the list.
Entry Method Code - Select the entry method code from the list.
Maximum amount allowed to over tender - Enter the maximum amount allowed to over tender.
Minimum amount Accepted - Enter the minimum amount that can be accepted.
Maximum amount Accepted - Enter the maximum amount that can be accepted.
[only shown for tenders that require authorization]
Authorization needed when amount is above - Enter the maximum value that can be accepted without authorization.
Maximum amount allowed to authorize - Enter the maximum value of an individual tender type that can be authorized either in-house or by a third party. This especially applies to checks where the check authorization company sets a ceiling by retailer.
[only shown for tenders that require authorization]
Authorization needed when amount is above - Enter the maximum value that can be accepted without authorization when in offline mode.
Maximum amount allowed to authorize - Enter the maximum value of an individual tender that the system accepts without authorization when in offline mode.
|
Note: The system configuration options for tenders in this feature are simply a subset of the system configuration options available from Oracle Retail Xstore Point-of-Service System Config Options. See Configuring Xstore Point-of-Service System Config Options for more information. |
The following configurations apply specifically to tenders. The categories have been set up as follows:
Charity
Closing Options
Discount Options
House Accounts
Opening Options
PayPal
Returns
Store Specific
Tender
Tender Options
Till Accountability
Enable Prompting User When Voiding Charity Line Item? - Determines whether the system displays the notification message when a charity item is voided if tendering is canceled.
Perform Till Count During Close? - Determines whether the system prompts the associates to perform a till closing count at register close.
How Should Price Be Rounded After Discount Applied? - Select the local currency amount rounding method used for determining the price after a discount is applied. Valid Values:
Half Up - Round to the nearest neighbor unless equidistant, then round up.
Half Down - Round to the nearest neighbor unless equidistant, then round down.
Half Even - Round to the nearest neighbor unless equidistant, then round to even neighbor. Example: 2.5 rounds to 2 while 3.5 rounds to 4.
Ceiling - Round toward positive infinity. Note: This is the opposite of FLOOR and never decreases the calculated value.
Down - Round to the next digit; closer to zero.
Floor - Round down toward negative infinity. Note: This is the opposite of CEILING and never increases the calculated value.
Up - Round to the next digit; away from zero.
Unnecessary - Rounding is not necessary.
AR Manual Auth Phone Number. - Enter the phone number for the associates to call for authorization when the accounts receivable tender amount exceeds the account credit limit and the exceeded amount is below the threshold amount.
AR Over Tender Amount Allowed Over Credit Limit. - Enter the threshold amount the system allows when the accounts receivable tender amount exceeds the account credit limit.
Manager Override When Tender Amount Exceeds House Account Balance? - Determines whether the system prompts for manager override if the tender amount exceeds the remaining balance of the house account.
If set to Yes, and a manager-level user is logged in, the system displays the credit limit and prompts the user to proceed.
If set to Yes, and a user lower than the manager privilege is logged in, and the user chooses to proceed with exceeding the credit limit, the manager security login displays for approval.
If set to No, the system does not prompt for manager override.
Prompt For User Information On AR Transaction? - Determines whether the system prompts for the AR account user information when performing tender/ refund/payment on an accounts receivable account.
Require Customer To Be AR Account Owner To Use AR Functions? - Determines whether the system requires the associated customer of the retail transaction to be the AR account owner in order to access the accounts receivable retail functionality (tender, payment).
Skip Till Count Since Workstation Doesn't Have Cash Drawer? - This applies to Register Accountability Only. Used for registers that do not have a cash drawer or do not handle cash. Select Yes to prevent the system from prompting for begin or end count during the register open or close. The system automatically moves all tender amounts from the register/handheld to the store bank.
Enable PayPal Mobile Payments Polling Service? - Used to enable/disable PayPal Mobile Payments polling service. When enabled, Oracle Retail Xstore Point of Service will automatically update the list of currently checked-in customers based on a configurable interval.
PayPal Point Of Sale Service API Version. - Enter the current version of the PayPal POS service API.
PayPal Polling Interval (in Seconds). - Enter the interval for the PayPal Mobile Payments polling service in seconds.
PayPal Preferred Image Size. - Select the size of the photo image that Oracle Retail Xstore Point of Service will use on the confirmation page for the PayPal Mobile Payments.
PayPal Tab Height. - Enter the number of rows for the PayPal tab.
PayPal Tab Width. - Enter the number of columns for the PayPal tab.
Prompt For Tender On Credit Card Returns? - Determines whether the system prompts for refund tender amount to be credited back to the original sale credit card.
If Yes, the system prompts for the amount to credit back to the original card.
If No, the entire refund amount will be credited back to the selected original credit card.
Default Id Type For Tenders Requiring Customer Identification. - Select the default identification type used for certain tenders that require customer identification information. Valid Values: Drivers License, Social Security, Military ID, Credit Card, Employee ID, Customer Card, Any identification type.
Allow Multiple Incoming Tenders In One Transaction? - Determines whether the system allows multiple incoming (exchange from) tenders in a tender exchange transaction.
Allow Multiple Outgoing Tenders In One Transaction? - Determines whether the system allows multiple outgoing (exchange to) tenders in a tender exchange transaction.
Default Tender Id To Use For Change If Not Specifically Configured. - Select the change tender ID the system will use by default if the system cannot find the valid change tender based on the sale tenders. Valid Values: Issue Store Credit, Issue Gift Card.
Prompt User To Imprint Credit Card For Manual Cards? - Determines whether the system prompts the associate to imprint the credit card when there is a manually entered credit card tender in the completed sale transaction.
Quick Cash Button Increment Display. - The Quick Cash Buttons will display in increments based on this entry for the minimum denomination factor.
Use Quick Cash Buttons? - Determines whether the Quick Cash Button functionality is enabled.
Authorization Method Code For BinSmart Lookups. - Enter the authorization method code used to perform the lookup. Valid only for Merchant Warehouse.
Cash Payment Threshold To Invoke Additional Info Collection For IRS. - If the amount of cash paid by a customer exceeds this threshold amount, the system will display the IRS form to gather additional customer information.
Display Cash Total? - Only applicable for currency rounding; indicates whether the rounded cash total is displayed below the transaction total in the viewport.
Enable Merchant Warehouse's BinSmart Lookups? - Determines whether Merchant Warehouse's BinSmart lookups are used for Credit/Debit authorizations.
Inform Users With A Message That No Signature Is Required? - This option controls turning off/on the information message displayed when processing a transaction below a configured value.
Local Currency Id. - Select the currency for the current locale.
Method To Mask Vouchers/Gift Cards. - Enter the voucher number masking method.
CREDITCARD - Mask all but the last 4-digits of the Account Number.
MASK_LAST_4 - Mask (****) the last 4-digits of the Account Number.
Minimum Check Number. - Enter the lowest check number the system will accept when the customer pays with a check.
Preferred Payment Recommendation When Errors Occur. - Select the preferred payment recommendation when an error occurs or a failed response is returned. Valid Values: Credit, Debit.
Prompt For Birth Date On Check Tender? - Determines whether the system prompts for the customer's birthdate when the customer pays with a check.
Require Pin Pad Entry For Debit Tender? - Determines whether a pin pad device is required for tendering with a debit card.
Rounding Method To Use For Local Currency. - Select the local currency amount rounding method.
Half Up - Round to the nearest neighbor unless equidistant, then round up.
Half Down - Round to the nearest neighbor unless equidistant, then round down.
Half Even - Round to the nearest neighbor unless equidistant, then round to even neighbor. Example: 2.5 rounds to 2 while 3.5 rounds to 4.
Ceiling - Round toward positive infinity. Note: This is the opposite of FLOOR and never decreases the calculated value.
Down - Round to the next digit; closer to zero.
Floor - Round down toward negative infinity. Note: This is the opposite of CEILING and never increases the calculated value.
Up - Round to the next digit; away from zero.
Unnecessary - Rounding is not necessary.
Method To Count Store Bank Deposit. - The store bank deposit till count method. This configuration is only valid if the store requires an end count of the store bank at store close. Valid Values:
Storebank Complete - Brings up the entire store bank end count screen for all tenders.
Remaining Cash - Prompt the user to enter the total cash NOT to be deposited to the bank institution.
Complete Deposit - Deposit all tenders from the store bank to the bank institution.
Skip Initial Count Summary? - When initiating a count, determines whether the system displays the tender summary list or the first tender to be counted.
Validate Cash Refund Amounts Against The Current Till Count? - Determines whether the system validates refund cash amounts to ensure the current till cash amount is greater than the refund cash amount.
...continued from step 4
|
Note: Pole Display is the only Customer Display type supported at this time. |
At the Customer Display page, click Pole Display.
The current pole display message is shown in the Pole Message field. Edit the pole display message as needed:
Pole Message - To edit the message text, type the new message. The maximum length is 40 characters.
Locale - If needed, select a translation locale and enter the message text for the locale.
|
Note: A pole message is required for the default locale. A pole message is not required for other locales you may have set up. |
Click Save.
To begin the deployment process, from the Oracle Retail Xstore Office Cloud Service menu, select Config Manager - Configurator, or click the Configurator link in the Configuration Manager panel.
Select the configuration scope for the deployment:
Select Global Configurations to deploy the global configuration layer which affects all locations. Continue with step 3 below.
<OR>
Select Configuration Overrides to deploy configurations that will override the global layer for specific locations.
Select a Profile Group from the list.
Select an Element from the list.
Click Next.
Continue with step 3 below.
<OR>
Select Store Specific Overrides to change configurations that will override the global layer for a specific store based on the user's scope.
Type the store number or begin typing a store number or name in the Store # field.
Select the store from the store list.
Click Next.
Continue with step 3 below.
At the Configuration Action page, select the Deploy option.
If you try to schedule a deployment for a profile element that has no changes, you will see the following message:
There are no changes to deploy for this profile element.
If you see this message, return to the Configure screen and make your changes before scheduling a deployment.
At the Schedule Deployment page, select a deployment type:
Select Schedule a Planned Deployment to roll out the updates in pre-defined waves. Continue with Scheduling a Planned Deployment.
|
Note: The Planned Deployment option is not available for Store Specific Overrides. |
<OR>
Select Schedule a Single Deployment to set up a one-time rollout. Continue with Scheduling a Single Deployment.
To view deployment history for this profile element and organization node, select Deployment History. See Deployment History for more information about this option.
To view the deployed configuration versions for this profile element by store, select Deployed Versions. See Deployed Versions.
|
Note: You must create deployment plans before using this option. Refer to Chapter 7, "Deployment Management", Creating a Deployment Plan for more information about setting up deployment plans. |
Complete the following fields to roll out the updates in pre-defined waves:
Deployment Name -Accept the default name or enter a name for this deployment.
Deployment Plan - Select a deployment plan from the list.
Target Date - Select the date the changes will be sent to the store.
Click Next.
Review the deployment schedule.
Verify the Email Notification List is correct. If needed, click the View List link to see more detail about the email recipients.
Review the deployment information:
The "v.x" value in the Deployment Name is the configuration version for this deployment.
If the deployment information is correct, click Deploy.
If a deployment has already been scheduled with an earlier version of configurations, you will be prompted to change the deployment date. Use the breadcrumbs to return to the Schedule Deployment page and change the date for deployment.
If the deployment information is not correct, use the breadcrumbs to navigate back to the previous page where you can make changes, and go to step 1 on page 67.
When prompted, click Yes to confirm you want to schedule deployment.
Click OK to close the Deployment was scheduled successfully window. The configuration version is now "locked" for this set of configurations.
Complete the following fields for a one-time rollout:
Deployment Name - Accept the default name or enter a name for this deployment.
Organization Node - Select the organization target for the configuration changes.
Target Date - Select the date the changes will be sent to the store.
Download Priority - Select the download priority:
Immediate - Download the configuration changes now.
Store Close - Download the configuration changes at end-of-day.
Click Next.
Review the deployment schedule.
Review the deployment information:
The "v.x" value in the Deployment Name is the configuration version for this deployment.
If the deployment information is correct, click Deploy.
If a deployment has already been scheduled with an earlier version of configurations, you will be prompted to change the deployment date. Use the breadcrumbs to return to the Schedule Deployment page and change the date for deployment.
If the deployment information is not correct, use the breadcrumbs to navigate back to the previous page where you can make changes, and go to step 1 on page 67.
When prompted, click Yes to confirm you want to schedule the deployment.
Click OK to close the Deployment was scheduled successfully window. The configuration version is now "locked" for this set of configurations.
A Configuration Change is recorded when a configurable object has been altered. Multiple alterations of a configurable object does not equate to multiple changes being recorded.
For example, if you change the same reason code three separate times, it counts as one change for the time period that it differs from the global configuration. If you change three different reason codes, that would count as three changes.
This feature provides a summary list of configuration changes, who made them, and when they were made. This list is only a "snapshot" of time in which it is called up. When viewing configuration changes, you can delete configuration changes that have not been deployed. See Delete Configuration Changes for more information.
From the Oracle Retail Xstore Office Cloud Service menu, select Config Manager - Configurator, or click the Configurator link in the Configuration Manager panel.
Select the configuration scope for the deployment. The process varies with the scope selected on the Configuration Scope Options page (Figure 5-36):
Global Configurations - continue with step 3 below.
Configuration Overrides:
Select a Profile Group from the list.
Select an Element from the list.
Click Next.
Continue with step 3 below.
Store Specific Overrides:
Type the store number or begin typing a store number or name in the Store # field.
Select the store from the store list.
Click Next.
Continue with step 3 below.
At the Configuration Scope Actions page, select View Configuration Changes.
View the configuration changes by Category or by Version:
|
Note: Click the sort component to sort the columns as needed. |
Group By Category:
Category - The configuration category. Select the Category row to view more information: Version Number, Change Description, Date of Last Change, and User.
# of Changes - The number of changes per category.
Date of Last Change - The date the last configuration change was made for this category.
Group By Version:
Version # - The configuration version number. Select the Version # row to view the configuration changes made to that version: Category, Change Description, Date of Last Change, and User.
# of Changes - The number of changes in this version.
Date Created - The date the version was created.
When viewing configuration changes, you can remove a configuration change (or several changes if applicable) from a configuration update as long as that configuration update has not been deployed.
From the Oracle Retail Xstore Office Cloud Service menu, select Config Manager - Configurator, or click the Configurator link in the Configuration Manager panel.
Select the configuration scope for the deployment.
At the Configuration Scope Actions page, select View Configuration Changes.
View the configuration changes by Category or by Version.
Click the Delete icon associated with the configuration change you want to remove.
When prompted to confirm you want to delete this change, click Yes to remove the configuration change from the configuration update.
Use this option to delete group/element level configuration overrides for a specified group/element configurations.
|
Note: To use this feature, "Enable the Option to Delete Configurations?" must be set to true in Oracle Retail Xstore Office Cloud Service Settings. |
|
Note: When you delete store level or profile group/element level configurations, a deployment is scheduled for those locations to be sent immediately.If there are any pending configuration deployments for the same location at a future date, the location will receive this delete deployment immediately, and then at a later time the scheduled configurations will be deployed. If this scenario occurs, Oracle Retail Xstore Point of Service and Oracle Retail Xstore Office Cloud Service will have different configurations for that location. |
At the Configuration Scope Options page, select Configuration Overrides.
Select the profile group and element, then click Next.
At the Configuration Action page, click Delete Profile Configuration Changes.
When prompted, click Yes to confirm the deletion.
After the deployment has been scheduled successfully, click OK to close the Schedule Delete Configurations Deployment prompt.
When prompted, click OK to acknowledge all the changes have been removed.
Use this option to delete store-specific configuration overrides. Oracle Retail Xstore Office Cloud Service deletes configurations that have not been deployed and marks the deployed profile configuration changes as inactive in the Oracle Retail Xstore Office Cloud Service database. This action retains the history of completed deployments for auditing purposes.
|
Important: To use this feature, "Enable the Option to Delete Configurations?" must be set to true in Xadmin Settings. |
|
Note: When you delete store level or profile group/element level configurations, a deployment is scheduled for those locations to be sent immediately.If a scheduled deployment for configuration changes is found, you will not be able to delete a profile configuration change. |
At the Configuration Scope Options page (Figure 5-58), select Store Specific Overrides.
Select the store number, then click Next.
At the Configuration Action page, click Delete Profile Configuration Changes.
When prompted, click Yes to confirm the deletion.
After the deployment has been scheduled successfully, click OK to close the Schedule Delete Configurations Deployment prompt.
When prompted, click OK to acknowledge all the changes have been removed.
|
Important: To use this feature, "Enable the Option to Create Store? Specific Configurations?" must be set to true in Xadmin Settings. |
Use this option to copy configuration information from one store to another. You must have access privileges to both the copy-from store and the copy-to (destination) store in order to use this process. Only stores are valid for the copy-from and destination locations, no other hierarchy or store collections are supported. The target store's previous configurations are retained (but tagged as inactive) for auditing purposes.
|
Note: This option is not allowed when a scheduled deployment is pending. |
At the Configuration Scope Options page (Figure 5-58), select Store Specific Overrides.
Enter the target store number in the Store # field and click Next.
At the Configuration Action page, click Copy Store Configurations (Figure 5?62) and enter the store number you want to copy configurations from in the Copy From Store # field.
Click Next. This action tags any previously implemented changes as inactive in the database.
When prompted, click Yes to confirm the copy instructions.
The configurations are copied to the destination store:
If the destination store is new, then all the configurations from the copy-from store are now available.
If the destination store previously existed, then the system will overwrite the previous data with the new data from the copy-from store.
When prompted, click OK to view the configuration changes.
Review configuration changes by Category or by Version.
Continue with Deploying Configuration Changes to deploy the changes.
Use Deployment History to view a summary of current configuration deployments for the profile element and organization node.
From the Oracle Retail Xstore Office Cloud Service menu, select Config Manager - Configurator, or click the Configurator link in the Configuration Manager panel.
Select the configuration scope for the deployment. The process varies with the scope selected on the Configuration Scope Options page (Figure 5-36):
Global Configurations - continue with step 3 below.
Configuration Overrides:
Select a Profile Group from the list.
Select an Element from the list.
Click Next.
Continue with step 3 below.
Store Specific Overrides:
Type the store number or begin typing a store number or name in the Store # field.
Select the store from the store list.
Click Next.
Continue with step 3 below.
At the Configuration Scope Actions page, select Deploy.
At the Schedule Deployment Page, select Deployment History:
The Deployment History search results list shows the other configurator deployments of the same Org Node/Element, along with the status for each.
Select a deployment to view additional detail. If needed, a deployment can be edited. See Chapter 7, "Deployment Management", section Viewing Deployments for more information about Deployment History and editing deployments.
Use Deployed Versions to view the number of stores, and the version numbers deployed to those stores, in a pie chart format. This version information is reported to Oracle Retail Xstore Office Cloud Service by the primary register at the store.
From the Oracle Retail Xstore Office Cloud Service menu, select Config Manager - Configurator, or click the Configurator link in the Configuration Manager panel.
Select the configuration scope for the deployment. The process varies with the scope selected on the Configuration Scope Options page (Figure 5-36):
Global Configurations - continue with step 3 below.
Configuration Overrides:
Select a Profile Group from the list.
Select an Element from the list.
Click Next.
Continue with step 3 below.
Store Specific Overrides:
Type the store number or begin typing a store number or name in the Store # field.
Select the store from the store list.
Click Next.
Continue with step 3 below.
At the Configuration Scope Actions page, select Deploy.
At the Schedule Deployment Page, select Deployed Versions:
With the pie chart displayed, click on a section to display a list of the stores to which the version number was deployed.
The pie chart represents the number of stores, and the version numbers deployed to those stores, based on the version reported from the primary register in the store.
The list includes the Store Name, Store ID, Phone Number, and Address.