| Oracle® Retail Xstore Office Cloud Service 18.1 User Guide Release 18.1 F18648-05 |
|

 Previous |
 Next |
| Oracle® Retail Xstore Office Cloud Service 18.1 User Guide Release 18.1 F18648-05 |
|
Previous |
Next |
Deployment Manager is used to upload files for deployment, create deployment plans for scheduling updates, and track the status of configuration and file deployments.For additional technical information about Deployments, see Appendix A, "Appendix: About Deployments".
Oracle Retail Xenvironment contacts Xcenter (a part of Oracle Retail Xstore Office Cloud Service) at a pre-defined interval, asking for any updates.
If updates are available, Oracle Retail Xstore Office Cloud Service downloads the files specified by the manifest either immediately or at the daily maintenance.
Oracle Retail Xenvironment then applies the files per the instructions in the manifest either immediately or at the daily maintenance.
The File Upload feature provides the ability to upload files from your local PC into Oracle Retail Xstore Office Cloud Service so the files can be deployed to stores. A deployment is automatically scheduled based on the targeting information in the file header. Oracle Retail Xstore Point-of-Service software updates, standard DataLoader files (.dat, .mnt,
.reo, .rep), Oracle Retail Xstore Point-of-Service .cip files, .zip files for JRE/JCE, .tar.gz files, and Oracle Retail Xstore Point-of-Service debit.txt files are supported for upload. See Uploading Files below.
The View Deployments feature provides both the ability to view detailed information about a deployment and the ability to cancel a deployment before it has been deployed if it meets the eligibility criteria. The current status of all deployments made from Oracle Retail Xstore Office Cloud Service can be tracked down to the store level. You can view summary level data for each deployment, down to the status of delivering and loading each update at each target store. See Viewing Deployments.
The Deployment Plans feature provides the ability to define phased Deployment Plans (such as templates) that can be used to schedule Configurator updates or File Uploads to save time when scheduling roll-outs. See Deployment: Using a Deployment Plan.
The Automatic External File Delivery feature provides the ability to have any standard DataLoader files (.dat, .mnt, .reo, .rep) left by any external system in a file drop directory so the files can be deployed to stores. See Automatic External File Delivery.
|
Note: Only the uploaded files that fall within the current user's org node are shown on the File Upload page. Files must have been uploaded by a user with the same, or lower, org node as the current user. |
|
Note: In Oracle Retail Xstore Office Cloud Service certain privileges are available which control the users who have the ability to access the file upload feature and who can upload files which are to be deployed.Additionally, it is possible to control the ability to deploy one or more of the uploaded files. The 'File Deploy' privilege should not be assigned to a user who has either the 'File Upload' or the 'Upload File to Deploy' privilege. One user should be restricted to have only the right to upload files for deployment, while another user is required to deploy the uploaded files. As a result critical deployments need to be independently approved, before they are made available to other systems. |
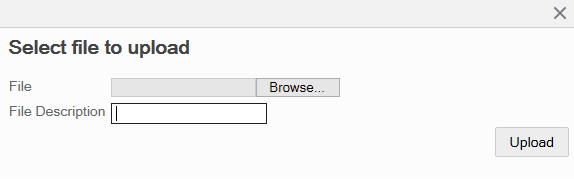
From the Oracle Retail Xstore Office Cloud Service menu, select Deployment - File Upload, or click the File Upload link in the Deployment Manager panel.
At the File Upload page, click Add File to browse for the file you want to upload.
|
Note: Only files with the following valid extensions can be uploaded: .cip, .jar, .mnt, .rep, .reo, .dat, debit.txt (bin file), .tar.gz, and .zip. All uploaded files are compressed when a deployment is scheduled and are decompresses once they are deployed. |
When prompted, click Browse to search for the file.
[OPTIONAL] Type a description for the file.
Click Upload. Uploaded file records are stored in the cfg_upload_record table.
|
Note: If you try to upload a file that has been previously uploaded, you are prompted that this new upload will overwrite the previous one. Click Overwrite to overwrite the previous file or Cancel to return to the File Upload page without uploading the file. |
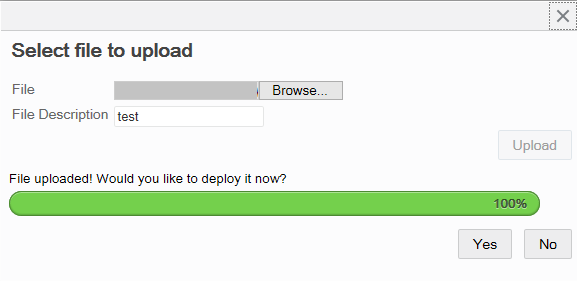
At the Upload Successful progress bar, choose whether to deploy the file now or deploy the file later:
Click Yes to deploy the file now. Skip to File Upload: Deploying a File or Files, step 3.
Click No to return to the File Upload page without deploying the file.
Perform actions as needed:
To upload additional files, repeat steps 2 through 6.
To deploy an uploaded file, see File Upload: Deploying a File or Files.
To remove a file from the Upload File list, see File Upload: Removing an Uploaded File From the List.
Follow the instructions in this section if you need to remove an uploaded file from the list.
At the File Upload page, click the Delete icon to remove the selected file from the list.
At the confirmation prompt, click Yes to remove the selected file.
Follow the instructions in this section to deploy a file or multiple files.
At the File Upload page, select the file, or files, you want to deploy.
Click Deploy.
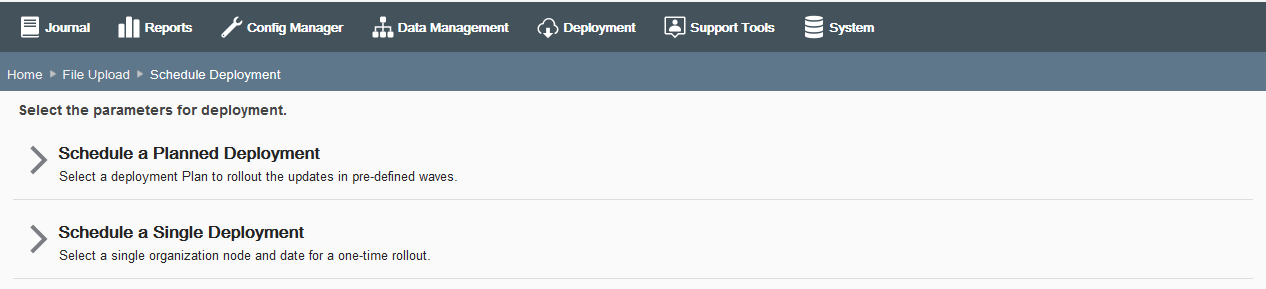
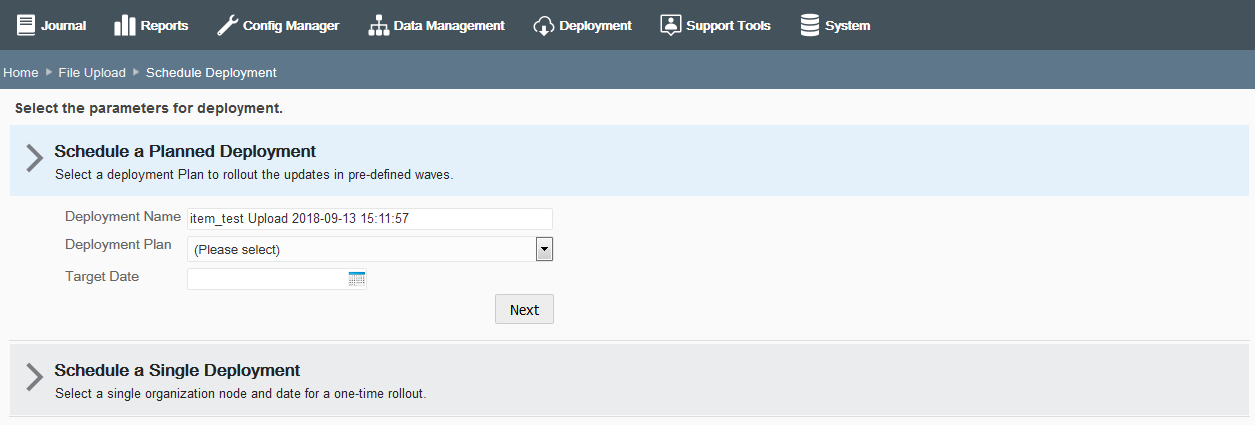
At the Schedule Deployment page, select a deployment option:
Schedule a Planned Deployment -Select this option to use a pre-defined Deployment Plan to roll out the updates in waves. Skip to Deployment: Using a Deployment Plan.
|
Note: This option assumes at least one Deployment Plan has been defined. See Creating a Deployment Plan for more information about setting up a Deployment Plan. |
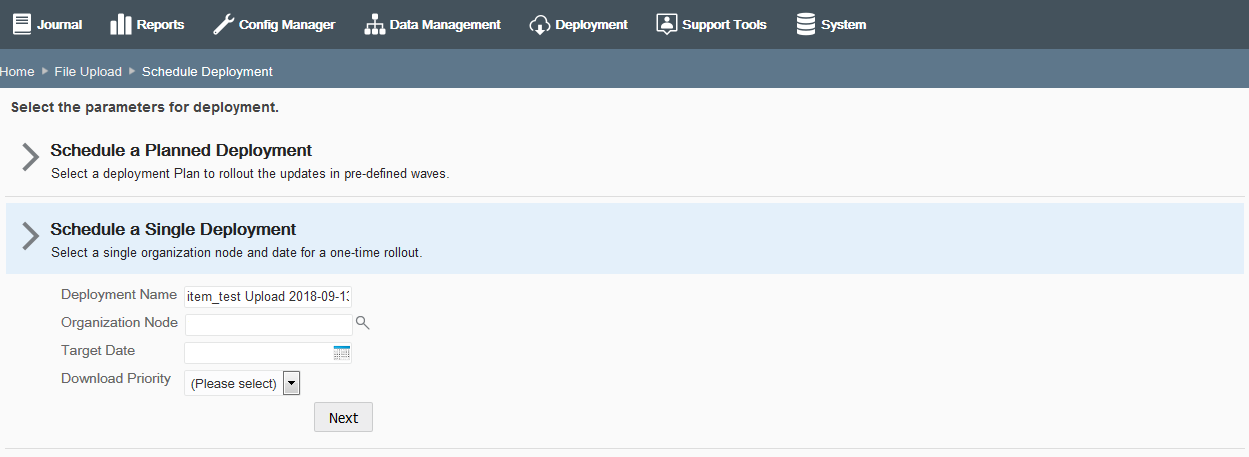
Schedule a Single Deployment - Select this option for a one-time rollout to a single organization node and date. Continue with Deployment: Using a Single Deployment.
If you selected Schedule a Single Deployment in step 3 on page 4, the Single Deployment section of the screen expands to show the required fields.
Complete the following fields, then click Next. All fields are required.
Table 7-1 Single Deployment Fields
| Field | Description |
|---|---|
|
Deployment Name |
This field defaults to the file name and date it was uploaded. Accept this default or enter a name to identify this deployment. |
|
Organization Node |
Select the organization target for the configuration changes. |
|
Target Date |
Select the date the changes will be sent to the store. |
|
Download Priority |
Select the download priority to be specified in the manifest: Immediate - Download the files now. End of Day - Download the files at end-of-day. |
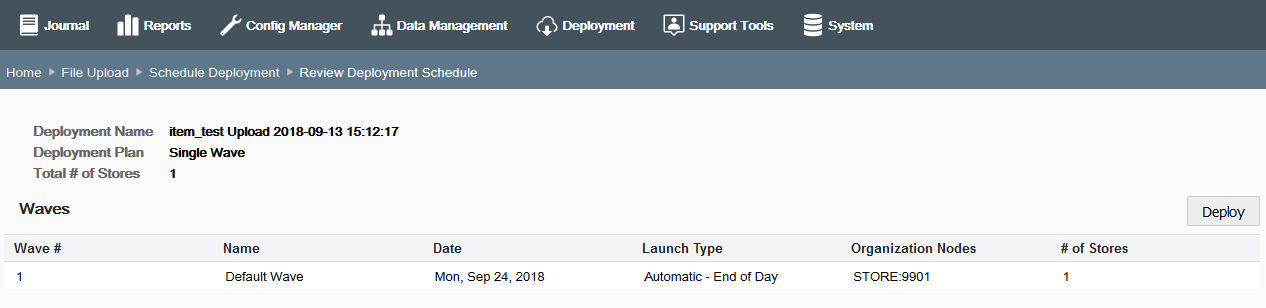
Review the deployment information:
|
Note: Waves Section - For Single Deployments, the Wave Name defaults to Default Wave and the Launch Type defaults to Automatic. These values cannot be changed. |
The following Wave information is shown on the Review Deployment Schedule page:
Table 7-2 Review Deployment Schedule Fields
| Field | Description |
|---|---|
|
Wave # |
The wave identifier. |
|
Name |
For Single Deployments, the Wave Name defaults to Default Wave and cannot be changed. |
|
Date |
The date the changes will be sent to the store. |
|
Launch Type |
The launch type, defaults to Automatic. |
|
Organization Nodes |
The targeted org node or nodes. |
|
# of Stores |
The number of stores affected by this single deployment. |
If all information is correct, go to step 6 below.
If you need to change the launch date, select the wave and enter the new date at the Edit Wave window, then click OK.
If you need to make any other changes, click the Schedule Deployment breadcrumb to return to the previous page where you can edit the information. Go to step 4 on page 5.
Click Deploy.
When prompted, click Yes to confirm you want to schedule the deployment.
Click OK to close the Deployment Scheduler status bar window.
The deployment file is placed in Xstore Office Cloud Service with a file name of
{org}_{deployment id}_!!_{filename} and a record is written to the dpl_deployment table.
See Viewing Deployments for more information about the deployed file.
Templates, known as Deployment Plans, can be set up in advance and then reused whenever needed. These Deployment Plans are used to distribute changes to stores for configuration and file uploads. See Creating a Deployment Plan.
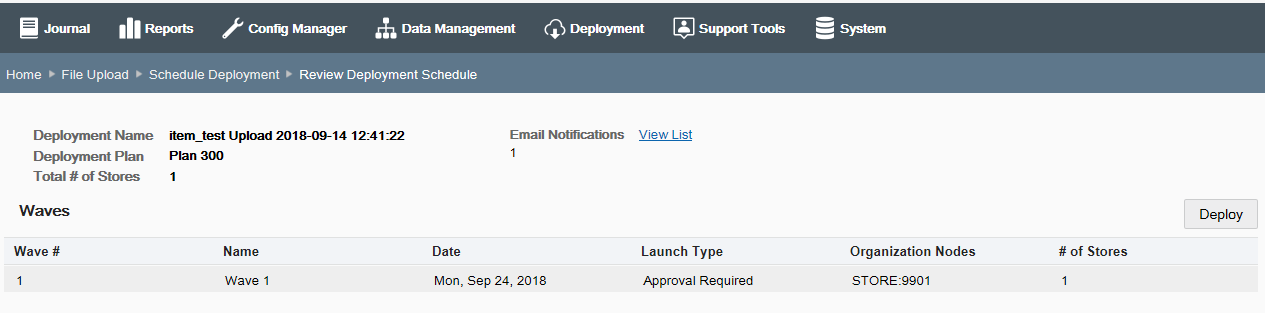
If you selected Schedule a Planned Deployment in File Upload: Deploying a File or Files, the Deployment Plan section of the screen expands to show the required fields.
Complete the following fields.
Table 7-3 Planned Deployment Fields
| Field | Description |
|---|---|
|
Deployment Name |
This field defaults to the file name and date it was uploaded. Accept this default or enter a name to identify this deployment. |
|
Deployment Plan |
Select the deployment plan from the list. |
|
Target Date |
Select the date the changes will be sent to the store. |
Click Next.
|
Note: All deployments using a Plan will start at the Daily Maintenance. |
Review the deployment schedule and Email Notification list, then click Deploy.
|
Note: If you are not ready to deploy, use the breadcrumbs at the top of the page to navigate to a previous page. |
When prompted, click Yes to confirm you want to schedule the deployment.
Click OK to close the Deployment Scheduler status bar window.
See also Viewing Deployments for more information about tracking the current status of all deployments.
Use a Deployment Plan to roll out updates on a pre-defined schedule when setting up a Configurator or File Upload deployment. Scheduled roll-outs are created by defining phased plans (that is templates) containing Waves. The plans created here will be available when you schedule a deployment. See Deployment: Using a Deployment Plan.
From the Oracle Retail Xstore Office Cloud Service menu, select Deployment - Deployment Plans, or click the Deployment Plans link in the Deployment Manager panel.
At the Deployment Plans page, click Add New to create a new Deployment Plan.
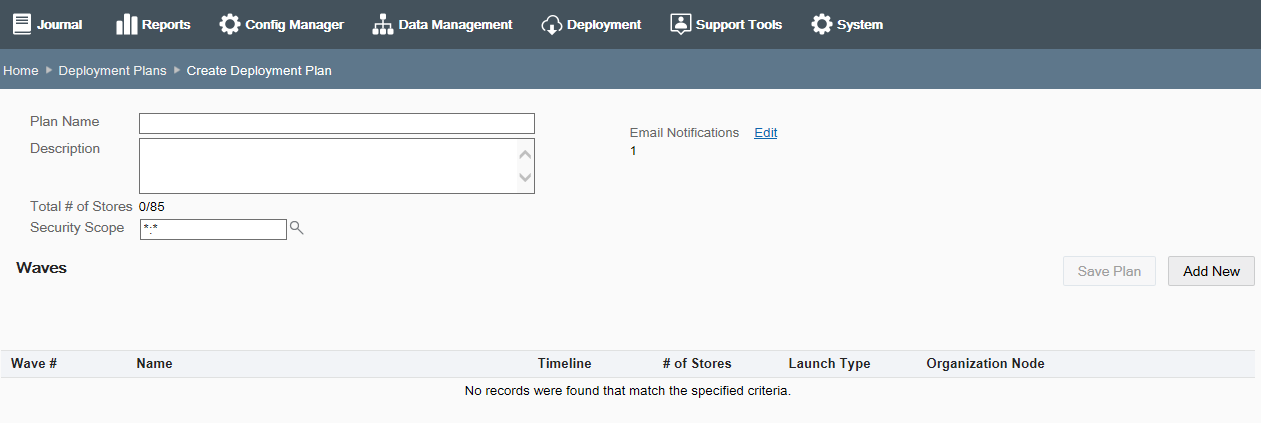
At the Create Deployment Plan page, complete the fields as required to identify this plan and to define the scope:
Table 7-4 Creating a Deployment Pan Fields
| Field | Description |
|---|---|
|
Plan Name |
Enter a name for the plan, up to 60 characters. |
|
Description |
Enter a description for the plan, up to 255 characters. This name can be changed after the plan has been created and saved. |
|
Security Scope |
Select the target level (store or org node) for this plan. This value defaults to the highest level of the logged-on user. If a user has more than one hierarchy node assigned, there is no default. |
|
Email Notifications |
Review/edit the email addresses for emails to be sent for Wave Approval reminders and Wave Approval waiting notifications. See Email Notifications for more information about this feature. |
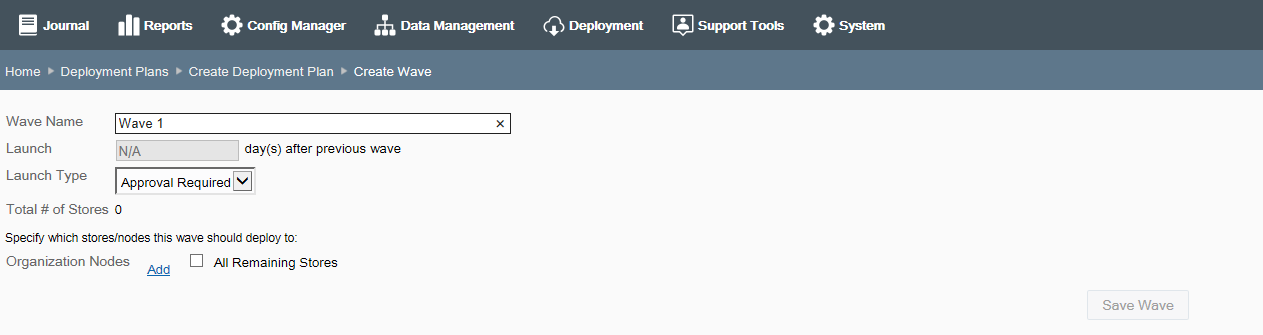
Click Add New to define the Waves for this plan at the Create Wave page:
|
Note: To be valid, a Deployment Plan must have a minimum of one Wave. You can add any number of Waves to the Deployment Plan. For global scope only, you can select the All Remaining Stores check box to quickly add all stores in the node that have not been included in any previous waves. This can be used to make sure there are no missing stores in the Deployment Plan. |
Table 7-5 Create Waves Fields
| Field | Description |
|---|---|
|
Wave Name |
Enter the Wave name or accept the default name. By default, each Wave is numbered automatically to track the number of waves in the plan. You can append additional text to the wave number (for example, Wave 1: Reg1) or change the text (for example, First Wave - Reg1), up to 60 characters. |
|
Launch (day(s) after previous wave) |
For Wave 1, this will default to NA since the first wave is the baseline date used to calculate all subsequent days. For Waves 2 and above, enter the interval between waves, up to 4 digits maximum. Note: Zero (0) is a valid entry for the number of days after the previous wave. This allows multiple waves to start on the same day, possibly with different launch types. |
|
Launch Type |
Approval Required [DEFAULT] - User approval is needed before the Wave launches. Automatic - The Wave launches automatically on the set number of days after the previous wave completes. |
To specify which stores/nodes this Wave should deploy to:
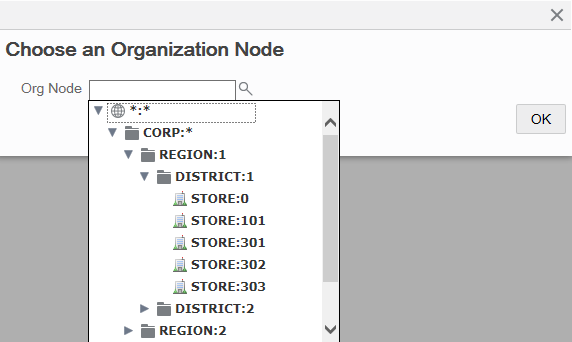
Click Add Organization Nodes.
Expand the org hierarchy node tree as needed to select the stores/nodes for this Wave.
|
Note: The nodes returned in this list are filtered based on the Scope you selected for the Plan. Store collections are not included in this list. |
Click OK.
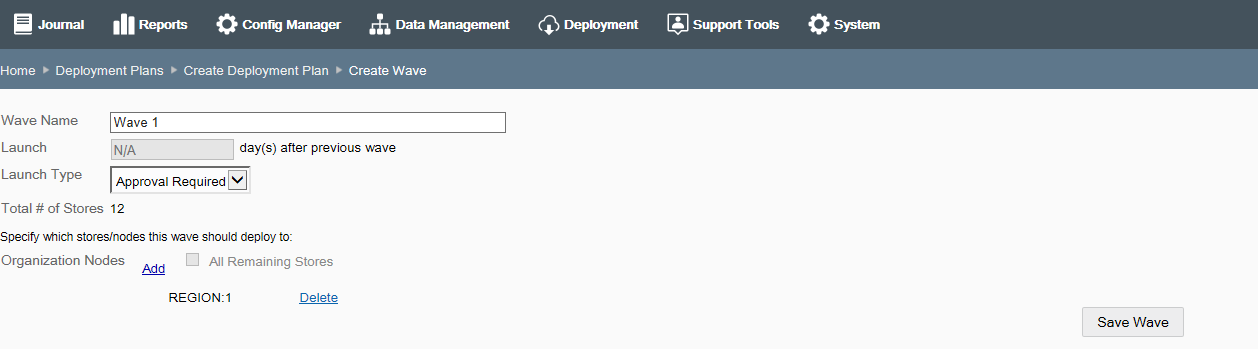
The selected store/node is listed on the Create Wave page along with a Delete link. If needed, you can click Delete to remove the store/node from the Wave.
[OPTIONAL] Repeat step 5 to add additional stores/nodes to this Wave.
After adding all stores/nodes to this Wave, click Save Wave. The Wave is added to the Deployment Plan and you are returned to the Create Deployment Plan page.
About Wave Validation:
The same node cannot be selected in multiple Waves (for example, District 1 in Wave 1 and District 1 in Wave 2). If you try to add an org node in multiple Waves, a message displays. Click OK to close the message box and then click Delete to remove the duplicate Organization Node from the Wave.
Overlap within a Wave or between Waves is not allowed. If you try to add overlapping stores/nodes between two waves, a message displays. Click Yes to continue. Click No to return to the Create Wave page and then click Delete to remove the duplicate store from the Wave.
[OPTIONAL] To create additional Waves for the Deployment Plan, return to step 4 on page 10. Repeat as often as needed.
The next wave defaults to the next higher number, for example, Wave 2 follows Wave 1.
Enter the number of days this wave should be launched after the previous wave. For example, schedule Wave 2 to launch 7 days after Wave 1 is launched, and schedule Wave 3 to launch 5 days after Wave 2 is launched, and so on.
Select the launch type, Approval Required or Automatic.
When all Waves have been added to the Deployment Plan, click Save Plan to save all plan changes and return to the Deployment Plans page.
About Deployment Plan Validation:
If the Deployment Plan does not cover all stores within the selected scope, a message displays. Click Yes to save the plan even though not all stores in the selected scope are included. Click No to return to the Create Deployment Plan where you can make changes as needed.
The Deployment Plans page displays information about each plan.
Table 7-6 Deployment Plans Fields
| Field | Description |
|---|---|
|
Plan ID |
The auto-generated plan Identifier. |
|
Plan Name |
The name of the plan. |
|
Security Scope |
The target level (store or org node) for this plan. |
|
# of Waves |
The number of waves in the Deployment Plan. |
|
Created On |
The date the plan was created. |
|
Description |
The plan description. |
|
Delete Icon |
See Deleting an Deployment Plan and Waves below. |
From the Oracle Retail Xstore Office Cloud Service menu, select Deployment - Deployment Plans, or click the Deployment Plans link in the Deployment Manager panel.
At the Deployment Plans page, click the Delete icon to delete a plan.
When prompted, click Yes to delete the selected plan and all of its waves.
From the Oracle Retail Xstore Office Cloud Service menu, select Deployment - Deployment Plans, or click the Deployment Plans link in the Deployment Manager panel.
At the Deployment Plans page, select a Deployment Plan from the list of plans.
With the Waves page displayed, click the Delete icon to delete a selected Wave.
When prompted, click Yes to delete the selected wave.
Editing a Deployment Wave and Plan is similar to the process used to create a new Deployment Wave and Plan.
See Creating a Deployment Plan for more information about the fields on the Create Deployment Plan and Create Wave page.
From the Oracle Retail Xstore Office Cloud Service menu, select Deployment - Deployment Plans, or click the Deployment Plans link in the Deployment Manager panel.
At the Deployment Plans page, select a plan from the list.
Edit the Wave information as needed:
Select a Wave from the list and edit the fields as needed.
To add a Wave, select Add New to add a new Wave to the Plan.
|
Note: If all stores are covered in this plan, the Add New option will not be available. |
Click Save Wave to save your changes.
If needed, edit the Plan information.
Click Save Plan to save all plan changes and return to the Deployment Plans page.
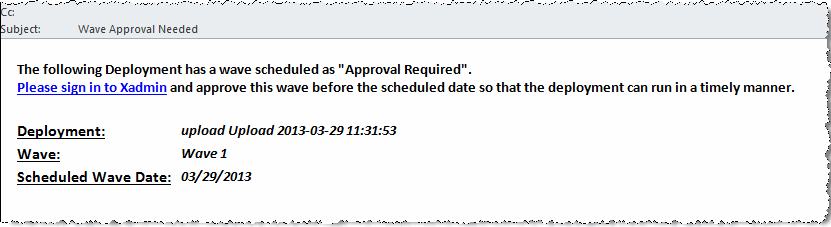
Set up an email notification list for emails to be sent for Wave Approval reminders and Wave Approval waiting notifications. The Approval Needed email notification will be sent out a configurable number of days before the projected launch date of a wave that is launch type Approval Required
The number of days is set up in Oracle Retail Xstore Office Cloud Service Configuration (Number of Days Before Deployment Wave to Send Notification). See Chapter 3, "System Settings", Oracle Retail Xstore Office Cloud Service Configuration Options.
A Wave On Hold email notification will be sent out when the projected launch date has passed and a wave is still waiting to be approved.
The email includes a link that will direct the recipient to the Deployment Summary page for the deployment that needs approval. See Approval Needed Email Notification Example for a sample email message.
Perform the following steps to add and remove users from the Email Notification list of a Deployment Plan.
From the Oracle Retail Xstore Office Cloud Service menu, select Deployment - Deployment Plans, or click the Deployment Plans link in the Deployment Manager panel.
At the Deployment Plans page, click Add New to create a new Deployment Plan or select a Deployment Plan from the list.
At the Create Deployment Plan page (Figure 7-11), click the Email Notifications Edit link.
At the Email Notifications page, add or remove email information as needed:
|
Note: Email addresses listed in the search results are set up in System - Xadmin Users - Users and Security Access. See Chapter 2, "Roles, Users, and Security Access", Admin Users - Using Roles to Grant Access to Oracle Retail Xstore Office Cloud Service for more information. |
To add a new user email to the Deployment Plan:
Enter search information (ID, Name or Email) in the Search field to find the user's email.
Select the email from the list, then click Add.
To remove a user email from the Deployment Plan, click the Delete icon associated with the email you want to remove.
Click Save.
Click Save Plan to save changes to the plan.
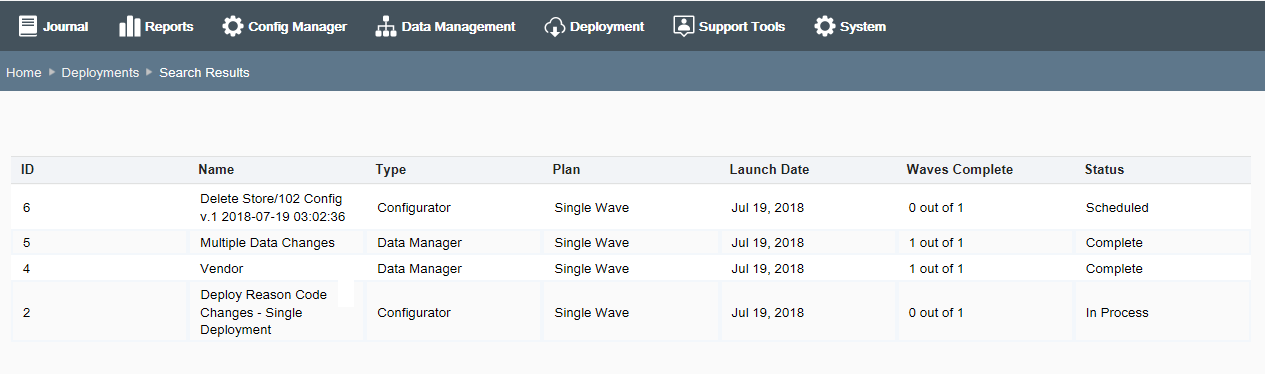
The current status of all deployments made from Oracle Retail Xstore Office Cloud Service can be tracked down to the store level. A drill-down style interface is provided to view summary level data for each deployment, down to the status of delivering and loading each update at each target store.
From the Oracle Retail Xstore Office Cloud Service menu, select Deployment - View Deployments, or click the View Deployments link in the Deployment Manager panel.
At the Deployments page, enter criteria for the Deployment you are searching for and then click Search.
|
Note: To return a list of all deployments, leave the fields blank and click Search. To view additional deployments, select a date range from the View More Deployments drop-down list. |
The Deployments page shows the summary list of deployments. By default, this list is sorted with the latest deployment shown at the top. Click on a field heading ( ) to re-sort the list as needed.
|
Note: Deployment information is stored in thedpl_deployment database table.
The "v.x" designation in the deployment name indicates the config version for this set of configurations. |
Deployment ID - The auto-assigned deployment identifier.
Name - The deployment name.
Type - The deployment type; Configurator, Data Manager, File Upload, or Auto Deploy.
Plan - The deployment plan name.
Launch Date - The deployment launch date.
Waves Complete - The number of waves completed compared to the total number scheduled.
Status - The deployment status; Approval Required, Complete, In Process, Cancelled, Scheduled, Error
Select a row in the Deployments page summary list (Figure 7-17) to view additional information about the selected deployment.
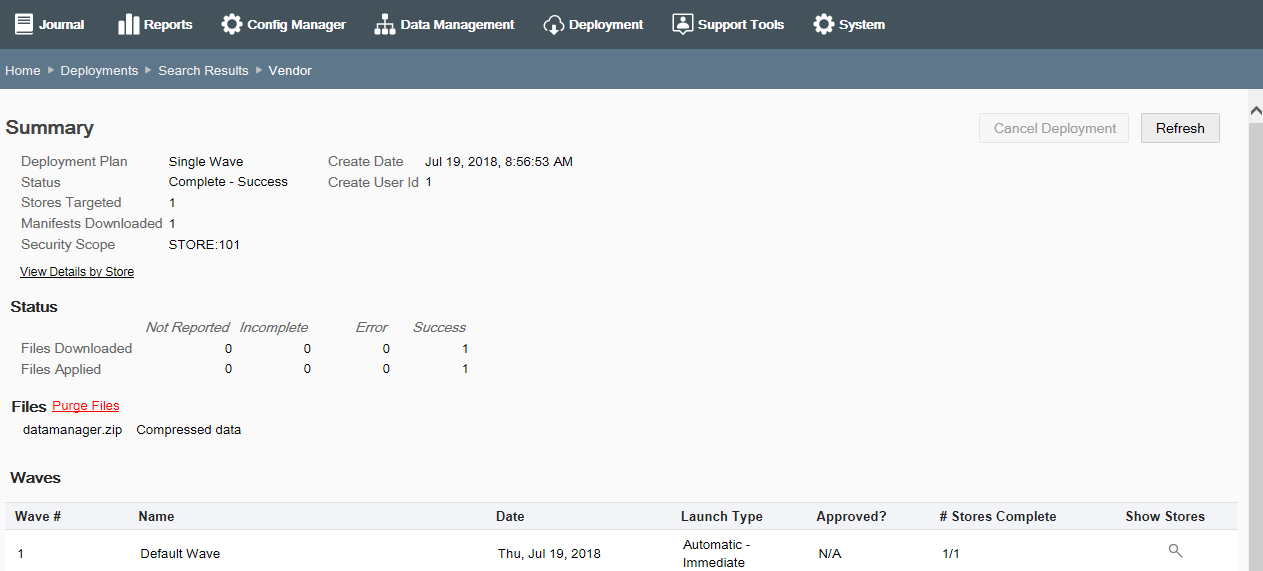
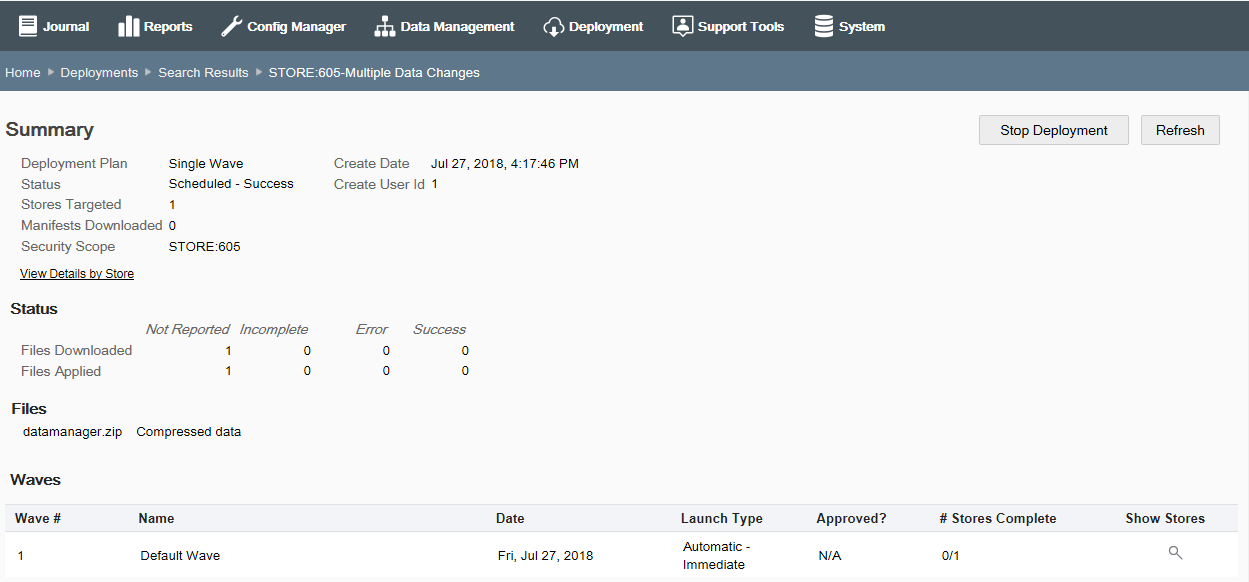
The Deployment Summary page displays and shows the current status of the selected deployment as reported by all of the stores via Oracle Retail Xenvironment.
The information shown here is a collection of aggregate counts for all of the possible deployment statuses; such as the number of stores that have downloaded the manifest, the number of stores that have downloaded the deployment's files (successfully or in error), and the number of stores that have applied the deployment's files (successfully or in error). If needed, click Refresh at any time to update the page and see current changes.
Perform the following functions as needed:
Approve Waves - If approval is required before a Wave can begin, an authorized user must review and approve the Wave. See Approving a Wave.
View store details - This page also provides a link to a per-store list of status data (View Details By Store). See Viewing Detail By Store for more information.
Stop or cancel a deployment
A Stop Deployment button on this page is available once the deployment is under way or as soon as the first wave's date is today. Stop Deployment will cancel the deployment before the next wave begins. See To Stop a Deployment.
A Cancel Deployment button on this page is only available if you are viewing a deployment before the deployment has started. Once the deployment is under way it cannot be cancelled. See Cancelling a Deployment for more information about cancelling a deployment.
Purge Files - If applicable, a Purge Files link is available to delete the files. See Purging Files.
Table 7-7 Deployment Summary Section - Fields
| Field | Description |
|---|---|
|
Deployment Plan |
The name of the plan that used in this deployment, It will contain Single Wave if the Single Wave option was selected. |
|
Status |
The deployment status: Error, Complete, In process, Approval Required, Scheduled, Cancelled |
|
Stores Targeted |
The total number of stores targeted in all waves. |
|
Manifests Downloaded |
The number of stores that have downloaded the manifest. There will be one manifest per store. |
|
Security Scope |
The hierarchy node level of the deployment. |
|
Create Date |
The date the deployment was created. |
|
Create User ID |
The user who created this deployment. |
|
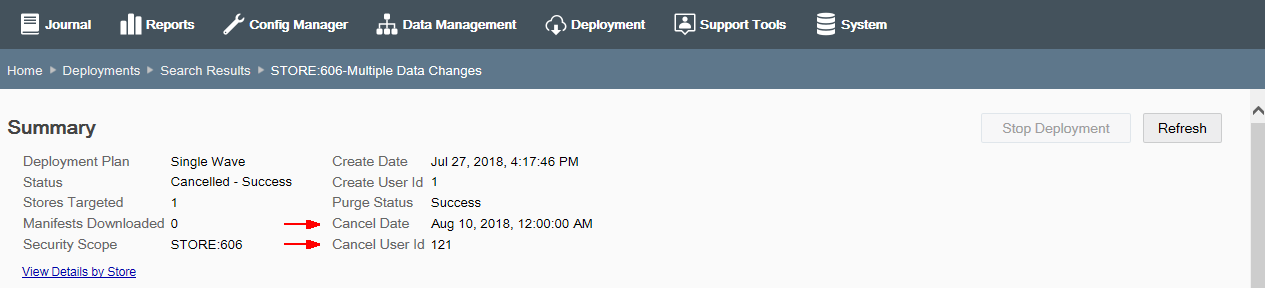
Cancel Date |
The date the deployment was cancelled. This field is only displayed if the deployment was stopped or cancelled. See Cancelling a Deployment and To Stop a Deployment. |
|
Cancel User ID |
The user who cancelled the deployment. This field is only displayed if the deployment was stopped or cancelled. SeeCancelling a Deployment and To Stop a Deployment. |
|
View Details By Store link |
Opens a window showing a per-store list of status data. See Viewing Detail By Store. |
Table 7-8 Status Section - File Status Code
| File Status Code | Description |
|---|---|
|
Files Downloaded |
|
|
Not Reported |
No status available yet. |
|
Incomplete |
Only occurs if multiple files are downloaded and the files currently have different statuses during the download process. |
|
Error |
File download errors. |
|
Success |
File download successful. |
|
Files Applied |
|
|
Not Reported |
No status available yet. |
|
Incomplete |
Only occurs if multiple files are downloaded and the files currently have different statuses during the application process. |
|
Error |
File application process has errors. |
|
Success |
Files applied successfully. |
Table 7-9 Files Section - File Categories and File Types
| File Category | File Type | Description |
|---|---|---|
|
Config |
configurator.zip |
The zip file contains the manifest and configuration information. |
|
Compressed data |
datamanager.zip |
The zip file contains the manifest and data manager information. |
|
Data |
.mnt, .reo, .dat, .rep |
The standard Dataloader files. |
|
App update |
updater.jar |
The executable jar file contains software update information. |
|
debit.txt |
debit.txt |
The debit bin file containing BIN range values for authorized card tenders. |
|
CIP |
.cip |
Contains cipher keys information. |
|
JRE/JCE |
XST-jre-windows.zip XST-jce-windows.zip |
Contains the JRE/JCE file types. |
|
Purge Files link |
See Purging Files. |
NA |
Table 7-10 Wave Section - Fields
| Field | Description |
|---|---|
|
Wave # |
The Wave number. |
|
Name |
The Wave name. |
|
Date |
The launch date. |
|
Launch Type |
The launch type; Approval Required or Automatic. |
|
Approved? |
For Automatic launch type, this does not apply. For Approval Required launch type, indicates whether or not the wave has been approved. See Approving a Wave for more information about approving a wave. |
|
# Stores Complete |
The number of complete stores. |
|
Show Stores icon |
Click the Show Stores icon to view detailed information about the files downloaded and files applied to the targeted stores for the Wave. |
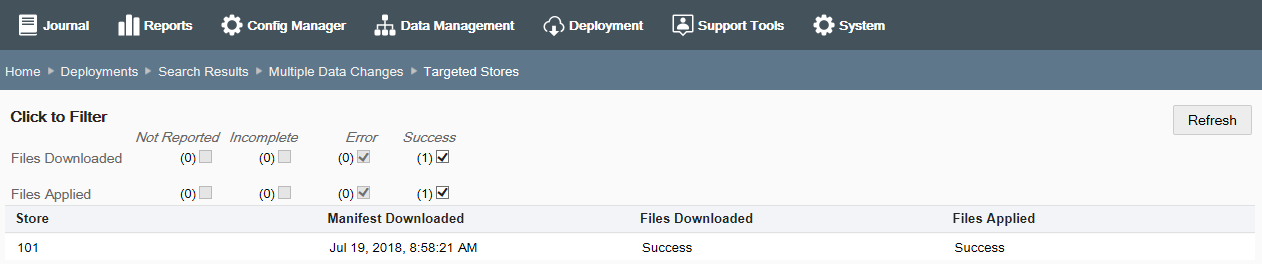
The Detail by Store page is accessed from the Deployment Summary page and displays a per-store list of status data.
To view store details, click the View Details By Store link in the Deployment Summary page.
|
Important: By default, the initial page filter is set to show any errors. Use the filter selections to filter the records based on the status code values. If a value of 0 (zero) is associated with a status, the option to enable or disable it is not available since there are no records to filter. |
These status codes show each individual store's deployment statuses and are an aggregation of all the statuses across all the files defined in the deployment.
Manifest Downloaded - If the manifest was downloaded, the date and time will be shown in this column. If the manifest has not been downloaded, this column will show Not Reported.
Files Downloaded - If the file(s) were downloaded successfully, Success will be shown in this column. If the file(s) were downloaded with an error, Error will be shown in this column. If the file(s) have not been downloaded, Not Reported will be shown in this column. If multiple files are currently being downloaded and the files have different statuses at this moment, Incomplete will be shown in this column.
Files Applied - If the file(s) were applied successfully, Success will be shown in this column. If the file(s) were applied with an error, Error will be shown in this column. If the file(s) have not been applied, Not Reported will be shown in this column. If multiple files are currently being applied and the files have different statuses at this moment, Incomplete will be shown in this column.
Use the filters to view data as needed.
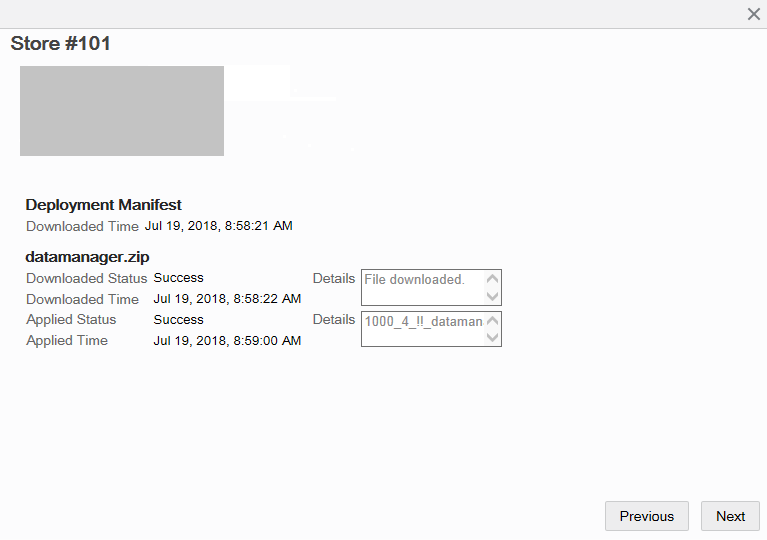
Select a row in the list to view additional information about a specific store.
|
Note: If an error is reported, detailed information about the error is provided in the Details section of the Store Detail window. |
If needed, use the Previous and Next buttons to view detail for other stores in the list.
Click the Close icon to close the window and return to the Detail by Store page.
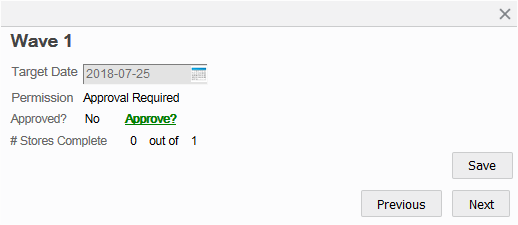
For Approval Required waves, perform the following steps to approve a wave.
At the Deployment Summary page (Figure 7-19), select the row of the Wave that needs to be approved.
At the Wave Approval window, click the Approve link to change the approval status to approved.
Click Save. The Wave Approval Window closes and the system returns to the Deployment Summary page where the Wave now shows it has been approved.
|
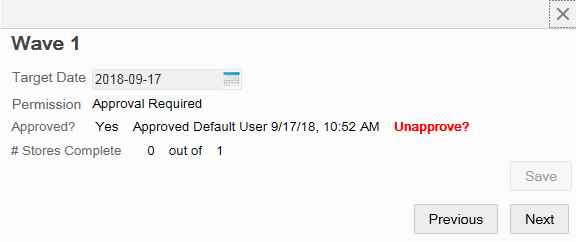
Note: You cannot unapprove a Wave if the wave has started, for example, if the target date is today's date. Only a wave that has not started yet can be unapproved. |
At the Deployment Summary page (Figure 7-19), select the row of the Wave that needs to be unapproved.
At the Wave Approval window, click the Unapprove link to change the approval status to unapproved.
Click Save. The Wave Approval Window closes and the system returns to the Deployment Summary page where the Wave now shows it has not been approved.
Once a wave has been unapproved, the date can be changed and then the wave can be approved again.
Use this option to purge old deployment files from Xstore Office Cloud Service. This option is only available for Deployments that have a status of Complete or Cancelled.
At the Deployment Summary page, click the Purge Files link.
When prompted, click Yes to confirm you want to delete the files from Xstore Office Cloud Service.
Click OK to close the Successful Purge window and the Purge Status is updated to Success.
At the Deployments page, the status indicates the deployment file has been purged.
Follow the instructions in this section if you need to stop a deployment that is under way. The Stop Deployment process will cancel the deployment before the next wave begins.
|
Note: There is no way to determine where within a wave (for example, which store it is on) the deployment will be stopped. Once the Stop Deployment button is selected, the wave is stopped immediately and the remaining stores will not be updated.Once a deployment has been stopped it cannot be restarted. It must be re-created to run again. |
From the Oracle Retail Xstore Office Cloud Service menu, select Deployment - View Deployments or click the View Deployments link in the Deployment Manager panel.
At the Deployments page select the deployment you want to stop from the summary list of deployments.
At the Deployment Summary page, click Stop Deployment.
When prompted, select Yes to stop the deployment, and click OK when prompted to acknowledge the deployment has been stopped.
If you decide not to stop the deployment by clicking No, you are returned to the Deployment Summary page without making any changes.
|
Note: Once a deployment has been cancelled it cannot be restarted. It must be re-created to run again. |
Follow the instructions in this section if you need to cancel a deployment. You can only cancel a deployment if no manifests have been downloaded, and all statuses are unreported.
From the Oracle Retail Xstore Office Cloud Service menu, select Deployment - View Deployments or click the View Deployments link in the Deployment Manager panel.
At the Deployments page select the deployment you want to cancel from the summary list of deployments.
At the Deployment Summary page, click Cancel Deployment.
|
Note: The Cancel Deployment button will only be available if no manifests have been downloaded and all statuses are unreported for the deployment. Once the Deployment is under way, the Stop Deployment button will be available here. The Stop Deployment option cancels the deployment before the next wave begins. |
When prompted, select Yes to cancel the deployment, and click OK when prompted to acknowledge the deployment has been cancelled.
If you decide not to cancel the deployment by clicking No, you are returned to the Deployment Summary page without making any changes.
The date the deployment was cancelled and the user who cancelled the deployment are shown on the Deployment Summary page.
The Automatic External File Delivery feature provides the ability to have any standard DataLoader files (.dat, .mnt, .reo, .rep) left by any external system in a file drop directory so the files can be deployed to stores.
Oracle Retail Xstore Office Cloud Service monitors a specific directory for files. This directory is configured in [ON-PREMISES ONLY] System - Xadmin Settings - Directory for Automatically Deployed Data Files (AutoFileTransferDirectory).
The interval at which the directory is checked is also configured in System - Oracle Retail Xstore Office Cloud Service Settings - Detection Interval for Automatically Deployed Data Files (AutoFileTransferSchedulerInterval). See Chapter 3, "System Settings", Oracle Retail Xstore Office Cloud Service Configuration Options.
Any files placed in the auto directory, in the appropriate org directory, (/ filetransfer/auto/org${organizationId}/) will be picked up and a deployment will be created for that file. No user intervention is required to move the files to the stores.
The order in which files are consumed by Oracle Retail Xstore Office Cloud Service is not guaranteed. If a specific ordering of records across multiple files is required, Oracle recommends that those files be combined in a single file, in the appropriate order, before dropping them off in this directory.
Each file must contain an XML header line that will dictate when and where the file is delivered.
<Header line_count="3" download_id="configurator::7::72::0" application_date="2013-05-26" target_org_node="STORE:102" deployment_name="specified_name" download_time="IMMEDIATE" apply_immediately="true" />
The line_count attribute is used to indicate how many lines of data are in the file (not including the header). If it is not present, the DataLoader will not validate total line count when loading the file, but will still load the file.
The application_date attribute is used to determine the date on which the file will be deployed. If the application date attribute is not present, the date that the file is picked up will be used which means the file will be deployed on the same day.
The target_org_node attribute is used to determine to what org node or store collection the file will be deployed. Its format is <org code>:<org value> (for example, STORE:102) or <CollectionName> (for example, My Collection). If the target org node attribute is not present, *:* will be used which means the file will be delivered to all stores in the organization.
If the deployment_name field is populated, the value will be used as the name for the deployment, otherwise the auto-suggestion name will be used.
The download_time attribute is used to indicate when the file will be downloaded. Possible values are IMMEDIATE and STORE_CLOSE.
If a deployment is scheduled for immediate download, Oracle Retail Xenvironment will begin to download the file immediately. If a deployment is scheduled for download during the daily maintenance, Oracle Retail Xenvironment will wait until the nightly closing process is initiated to begin downloading the file.
If download_time is not present, the deployment will be scheduled with STORE_CLOSE.
The apply_immediately attribute is used to indicate when the file will be applied. Possible values are true and false. If set to true, the file is loaded immediately. If set to false, the file is scheduled to be applied during the closing process.If apply_immediately is not present, the deployment will be scheduled with false. See Appendix A, "Appendix: About Deployments" for more information.