| Oracle® Retail Xstore Office Cloud Service 18.1 User Guide Release 18.1 F18648-05 |
|

 Previous |
 Next |
| Oracle® Retail Xstore Office Cloud Service 18.1 User Guide Release 18.1 F18648-05 |
|
Previous |
Next |
The System component has many features used to manage the Oracle Retail Xstore Office Cloud Service application itself, including setting up the system configuration rules and paths, setting up the available locales within Oracle Retail Xstore Office Cloud Service, viewing Oracle Retail Xstore Office Cloud Service version information, and setting up Oracle Retail Xstore Office Cloud Service users and user roles.
For information about the Oracle Retail Xstore Office Cloud Service system configuration feature, see Oracle Retail Xstore Office Cloud Service Configuration. This section provides detailed information about setting configuration parameters for the Oracle Retail Xstore Office Cloud Service application itself.
For information about controlling the available locales within the Oracle Retail Xstore Office Cloud Service application itself, see Available Locales. These changes are not sent down to Oracle Retail Xstore Point of Service.
For information about the Oracle Retail Xstore Office Cloud Service version the system is currently running on, see Version Display.
For information about the Users and Security Access component, see Chapter 2, "Roles, Users, and Security Access". This component provides the ability to grant privileges to users for one or more areas of Oracle Retail Xstore Office Cloud Service as needed based on security Roles.
For information about the User Roles component, see Chapter 2, "Roles, Users, and Security Access". This component provides the ability to create the security roles that are used to control access to the various areas of Oracle Retail Xstore Office Cloud Service.
Oracle Retail Xstore Office Cloud Service Configuration provides the ability to set up the configuration options that govern how Oracle Retail Xstore Office Cloud Service works. You cannot add or delete Oracle Retail Xstore Office Cloud Service configuration options.
From the Oracle Retail Xstore Office Cloud Service menu, select System, then Xadmin Settings, or click the Xadmin Settings link in the System panel.
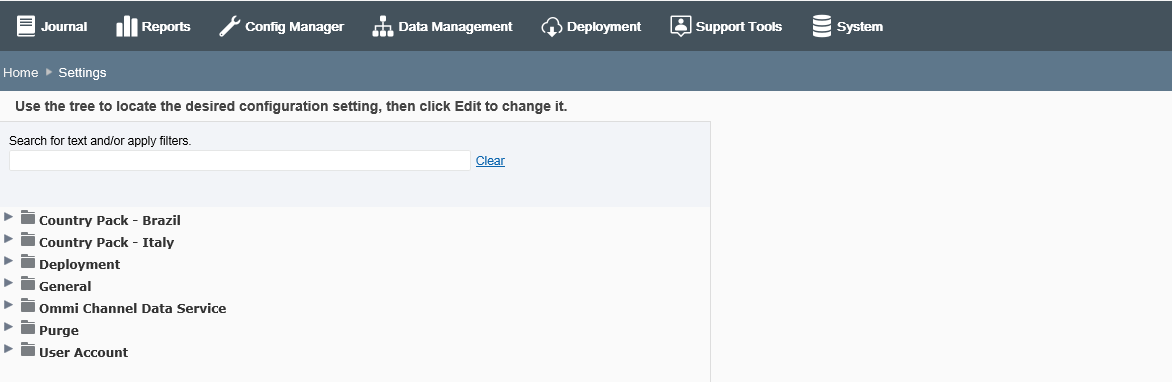
The Settings page displays, showing the configuration options available for Oracle Retail Xstore Office Cloud Service. The configuration options are arranged by category, in a tree view. Edit the values as needed, then click the Save button to save the changes.
To find configurations containing specific text, enter the search text in the input box, then press [Enter]. The text typed here can be found anywhere within the configuration label or description. The results are shown in the left panel (folder tree). Only those configurations containing the specified text within the label and/or description are displayed. If needed, click Clear to remove the search criteria and return to the Oracle Retail Xstore Office Cloud Service Configuration page.
See Oracle Retail Xstore Office Cloud Service Configuration below for detailed information about the Oracle Retail Xstore Office Cloud Service configuration options.
This section describes the Oracle Retail Xstore Office Cloud Service Configuration Options.
Enable NFe
When this setting is set to "Yes", jobs are scheduled as specified in the Xadmin Settings - Interval for Pushing.
When this setting is set to "No", Brazil Country Pack jobs are not scheduled and will never be triggered.
Push Data Job Execution Time
The time of the day to start the Push Data Job to run. This configuration establishes the UTC time at which the job will occur. Enter this value in HH:MM format.
Days Back for SPED Export
The SPED (Sistema Público de Escrituração Digital) export process creates the Brazilian SPED report for a single day. To allow for any delays in replication, the report is generated on a delay. This configuration specifies the number of days to wait before generating the report for a specific date. The task creates a daily XML file for each shop. Each XML file is made available for download through the File ReSTful resource. For more details on the File resource, see Xstore Office Services in the Oracle Retail Xstore Suite Services Guide.
Enable Italy Electronic Invoice
When this setting is set to "Yes", jobs are scheduled as specified in the Xadmin Settings - Generate Invoice Interval.
When this setting is set to "No", Italy Country Pack Jobs are not scheduled and will never be triggered.
Generate Invoice Job Execution Time
The time of the day to start the Generate Invoice Job to run. This configuration establishes the UTC time at which the job will occur. Enter this value in HH:MM format.
Automatically Deploy Data Manager Changes?
If set to true, Oracle Retail Xstore Office Cloud Service automatically deploys pending Data Manager changes at a specified time each day. The time of day is determined by the Data Manager Automatic Deployment Time setting.
Data Manager Automatic Deployment Time
The time of the day to start the auto deployment of undeployed Data Manager changes. The time should be in the format of HH:MM using the 24 hr clock. This setting is only relevant when the Automatically Deploy Data Manager Changes? setting is enabled.
Deployment Download Connection Timeout
The amount of time, in seconds, that Oracle Retail Xenvironment will spend attempting to connect to Xcenter (part of Oracle Retail Xstore Office Cloud Service) to download a deployment. Once the time has elapsed with no connection detected, the attempt will be considered a failure. This setting is used by Oracle Retail Xenvironment at the store.
Deployment Download Retries
The number of times Oracle Retail Xenvironment will attempt to download updates from Oracle Retail Xstore Office Cloud Service before failing. The default value is 10 attempts. A setting of zero (0) means never retry, which is not recommended. This setting is used by Oracle Retail Xenvironment at the store.
Deployment Download Retry Interval
The time interval, in seconds, that Oracle Retail Xenvironment will wait after a failed deployment download attempt before it tries to download the deployment again.
This setting is used by Oracle Retail Xenvironment at the store.
Detection Interval for Automatically Deployed Data Files
The interval, in minutes, between times that Xadmin checks the Directory for Automatically Deployed Data Files for files to deploy.
Interval for Checking for Deployment Waves That Require Approval
The time interval, in minutes, for running the Wave Approval email service. The default value is 60 minutes. For example, if set to 60 minutes, the service will run every hour to scan for new waves and send emails. An email will be sent for waves that meet the Number of Days Before Deployment Wave to Send Notification requirement.
Number of Days Before Deployment Wave to Send Notification
The number of days prior to the projected launch date of a wave with a launch type of Approval Required that an email notification goes out. Valid values are from 1 to 365. The default value is 3 days.
Number of Records in Deployment Viewer
The maximum number of Deployment records to display per page in the Deployment Viewer.
Beginning Time of the Business Day
To support alert reporting, this is the time-in hours from 00:00 UTC, that denotes the corporate start time of the business day. (For example, 5 is 05:00 UTC.)
Default Country Code
The default country code for use in Xadmin.
Default Currency Code
The default currency code for use in Xadmin. All monetary values entered and displayed across Xadmin are assumed to be of the default currency.
Default Deposit Bank Account Number
When creating a new store, this is the default deposit bank account number.
Default Deposit Bank Name
When creating a new store, this is the default deposit bank name.
Delete FIFO data after report generation?
When enabled (true), FIFO data is deleted after a FIFO report is generated.
Enable the Option to Create Store-Specific Configurations?
When enabled (true), users have the ability to create or override configurations for a specific store in Configurator. See Chapter 5, "Configurator", section Managing Configurations.
Enable the Option to Delete Configurations?
When enabled (true), configurations for profile or store-specific overrides can be deleted in Configurator. If set to false, all access to this functionality is disabled within Oracle Retail Xstore Office Cloud Service, regardless of the privileges.
Interval for Checking for Missing Registers
How frequently Xcenter checks for missing registers, in minutes. The default value is 15 minutes. The value of this setting should be less than the Time Before Register Is Considered Missing setting.
Number of Records in POSLog Publisher Result Page
The maximum number of POSLog records displayed per page on the POSLog publisher result page. The minimum value allowed is 1.
POSLog Publish Max Search Results
The maximum number of POSLog records returned from the database for republishing.
Time Before Missing Register Is Ignored
Once a device has been missing for the amount of time specified here (in hours), it is no longer reported as a problem. The default value is 72 hours.
Time Before Register Is Considered Missing
The amount of time-in minutes- that must elapse since a register's last check-in before it is considered missing. The default value is 61 minutes.
Use Till Based Accountability?
When creating a new store, this option determines whether Till Accountability mode or Register Accountability mode is used as the default setting.
Organization OCDS Chain Mapping
Specifies a comma separated Xstore organization and OCDS chain mappings. For example, "1000:1,2000:2" maps organization 1000 to chain 1, and organization 2000 to chain 2.
OCDS Scheduled Job Interval Minutes
Frequency with which Xadmin requests data from OCDS, value should be greater than or equal to 30 minutes.
OCDS On Demand Job Interval Minutes
Maximum amount of time that will elapse between the time when an On-Demand job is created and when it is executed.The value should be greater than or equal to 5 minutes.
OCDS Orphan Data Protection Offset Seconds
Minimum amount of time the data must age in OCDS before it can be visible to Xcenter. The offset helps to prevent related-data from orphaned due to system latency. The value should be greater than or equal to 30 seconds.
OCDS Records Per Request Limit
Specifies the number of records to request in calls to OCDS. If no limit is defined then OCDS will determine the maximum number of records.
OCDS Retail Location: Till Accountability
Specifies, if the Retail Locations created from OCDS data use Till Accountability or not.
OCDS Retail Location: Default Locale
Specifies the Locale to use in Retail Locations created from OCDS data when a LANG_ISO_CODE is not defined for a location.
OCDS Item: Tax Group ID for non-taxable Items
Specifies the Tax Group Id assigned to non-taxable items created from OCDS data.
OCDS Item: Include future date to determine VAT code with the greatest active date?
Specifies if a future date should be included to determine the VAT code with the greatest active date.
Enable Data Purge?
Enable to purge old data and files per the additional settings in this category.
Data Purge Execution Time
The time of day to start the automatic purge of data. Sets UTC time at which the job will occur. Enter this value in HH:MM format.
Number of Days to Keep Transactions
The age in days that all transaction data (including line items, tenders, and so on), Order Broker order data, and inventory control documents that are part of end of year processing is kept in the Xcenter database when the purge process runs.
The number of days specified here should be greater than the number of days to keep customers and customer accounts.
This setting does not affect data kept in stores. If set to 0 all of this data is deleted. If set to -1 the data is kept indefinitely.
The purge setting for transactions must not be more aggressive than the possible period for customer accounts like layaways and special orders to be completed. If one of the transactions related to a customer account is purged before the customer account is closed AND the in-store database is replaced (for example, as part of a hardware refresh) the customer account will not be serviceable. Specifically, the items on the account cannot be picked up, nor can the payments be refunded.
Number of Days to Keep Customers and Customer Accounts
The age in days that all identifying customer data, loyalty data, and customer relationship data is kept in the Xcenter database when the purge process runs. This setting does not affect data kept in stores. If set to 0 all of this data is deleted. If set to -1 the data is kept indefinitely.
Number of Days to Keep Event Logs
The age in days that all sourcing and targeting information for application updates to be delivered to/installed on clients is kept in the Xcenter database when the purge process runs. This setting does not affect data kept in stores. If set to 0 all of this data is deleted. If set to -1 the data is kept indefinitely.
Number of Days to Keep Cycle Questions
The age in days that location data involving open/close process questions and answers, business date, workstation status, and retail location status are kept in the Xcenter database when the purge process runs. This setting does not affect data kept in stores. If set to 0 all of this data is deleted. If set to -1 the data is kept indefinitely.
Number of Days to Keep Discounts and Deals
The age in days that discount and deal data, including concurrent discount compatibility data, customer group discount mapping data, item exclusion/inclusion data, eligibility data, deal definition data, customer group deal mapping data, item-based deal rules, matching rules, deal triggers, and time-based deal rules is kept in the Xcenter database when the purge process runs. This setting does not affect data kept in stores. If set to 0 all of this data is deleted. If set to -1 the data is kept indefinitely.
Number of Days to Keep Email
The age in days that all emails associated with transactions is kept in the Xcenter database when the purge process runs. This purge setting does not affect data kept in stores. If set to 0 all of this data is deleted. If set to -1 the data is kept indefinitely.
Number of Days to Keep Employee Hours and Payroll
The age in days that all employee data in the Xcenter database concerning employment dates, pay, vacation, tasks, schedule, and timeclock entries is kept in the Xcenter database when the purge process runs. This setting does not affect data kept in stores. If set to 0 all of this data is deleted. If set to -1 the data is kept indefinitely.
Number of Days to Keep Inventory
The age in days that all inventory data in the Xcenter database concerning inventory buckets, cartons, counts, count sheets, and count snapshots is kept in the Xcenter database when the purge process runs. This setting does not affect data kept in stores. If set to 0 all of this data is deleted. If set to -1 the data is kept indefinitely.
Number of Days to Keep Invoices and Documents
The age in days that all invoice and document data, including country pack related invoices and documents, is kept in the Xcenter database when the purge process runs. This setting does not affect data kept in stores. If set to 0 all of this data is deleted. If set to -1 the data is kept indefinitely.
Number of Days to Keep Items
The age in days that all item data in the Xcenter database such as attached items, item messages, prices, deal properties, restrictions, refund schedule, and warranty information is kept in the Xcenter database when the purge process runs. This purge setting does not affect data kept in stores. If set to 0 all of this data is deleted. If set to -1 the data is kept indefinitely.
Number of Days to Keep Orders
The age in days that all cancelled and completed order data, including customer data associated with the order, fulfillment details, sourcing details, payment information, and balance data is kept in the Xcenter database when the purge process runs. This purge setting does not affect data kept in stores. If set to 0 all of this data is deleted. If set to -1 the data is kept indefinitely.
Number of Days to Keep Report and Receipt Output
The age in days that all report data, including country pack related, and common data such as receipt text, work order service locations, vendor addresses, airport zones, and reason codes is kept in the Xcenter database when the purge process runs. This purge setting does not affect data kept in stores. If set to 0 all of this data is deleted. If set to -1 the data is kept indefinitely.
Number of Days to Keep Tax
The age in days that all tax data in the Xcenter database including exemptions, rules, and rule overrides is kept in the Xcenter database, when the purge process runs. This purge setting does not affect data kept in stores. If set to 0 all of this data is deleted. If set to -1 the data is kept indefinitely.
Number of Days to Keep Tender, Voucher and Session Info
The age in days that all tender, voucher, and session data from the Xcenter database including denominations, availability, user settings, and options is kept in the Xcenter database when the purge process runs. This purge setting does not affect data, kept in stores. If set to 0 all of this data is deleted. If set to -1 the data is kept indefinitely.
Number of Days to Keep Flight Info
The age in days that all flight data is kept in the Xcenter database when the purge process runs. This purge setting does not affect data kept in stores. If set to 0 all of this data is deleted. If set to -1 the data is kept indefinitely.
Number of Days to Keep Completed Deployments
The age in days that completed or canceled deployment files, transferred to the file server, will be kept when the purge process runs. If set to 0 all of these files are deleted. If set to -1 the files are kept indefinitely.
Number of Days to Keep File Transfer Archives
The age in days that archive folders from the AutoFileTransferDirectory will be kept when the purge process runs. If set to 0 all of these files are deleted. If set to -1 the files are kept indefinitely.
Number of Days to Keep File Uploads
The age in days that files uploaded via Xadmin will be kept when the purge process runs. If set to 0 all of these files are deleted. If set to -1 the files are kept indefinitely.
Number of Days to Keep POSPoll Files
The age in days that old files from Xcenter's POSPoll File Directory will be kept when the purge process runs. If set to 0 all of these files are deleted. If set to -1 the files are kept indefinitely.
Number of Days to Keep Republished POSLogs
The age in days that old POSLogs from the POSLog Publisher Remote File Directory will be kept when the purge process runs. If set to 0 all of these files are deleted. If set to -1 the files are kept indefinitely.
Default Report Output Format.
The report output format to be used as the default type when running reports. Valid values include:
PDF (Portable Document Format)
HTML (Hyper Text Markup Language)
XLS (Spreadsheet file format created by Microsoft for use with MS Excel)
XLSX (MS Excel 2007 or newer)
PPTX (MS PowerPoint)
RTF (Rich Text Format)
DOCX (Microsoft Office Open XML Format Document)
Enable DOCX (MS Word) as a Report Output Format?
If true, reports can be produced in DOCX format.
Enable HTML (Hyper Text Markup Language) as a Report Output Format?
If true, reports can be produced in HTML format.
Enable PDF (Portable Document Format) as a Report Output Format?
If true, reports can be produced in PDF format.
Enable PPTX (MS PowerPoint) as a Report Output Format?
If true, reports can be produced in PPTX format.
Enable RTF (Rich Text Format) as a Report Output Format?
If true, reports can be produced in RTF format.
Enable XLS (MS Excel) as a Report Output Format?
If true, reports can be produced in XLS format.
Enable XLSX (MS Excel 2007 or Newer) as a Report Output Format?
If true, reports can be produced in XLSX format.
The Broadcaster Management function allows you to transmit PosLog data to other systems.
From the Oracle Retail Xstore Office Cloud Service menu, select System, then Broadcaster Management.
The Broadcaster Management page displays list of broadcasters, once broadcasters have been saved to the database.
|
Note: You can sort the list by selecting each column. |
To add a broadcaster, follow the steps below:
At the Broadcaster Management page, click Add New. The Edit Broadcaster page opens.
In the Define tab, add the following:
Service ID - The Service ID must be unique for all other broadcasters.
Broadcaster Type - Select a broadcaster type from the drop-down list.
Enable check box - Select the Enable check box to enable the broadcaster.
Click Next to navigate to the Connect tab.
|
Note: If you selected REST Service as Broadcaster Type the Connect tab is not available. |
In the Connect tab, set the connection configuration for the broadcaster:
Endpoint URL
This field is a required field.
Authentication Mode
This field is a required field.
|
Note: If you select None or OAuth no username and password credentials are collected. If you select any other type username and password credentials are required. |
Username
Not displayed, if you selected None or OAuth as Broadcaster Type.
Password
Not displayed, if you selected None or OAuth as Broadcaster Type.
Confirm Password
Not displayed, if you selected None or OAuth as Broadcaster Type.
ORCE Org Code
Only available, if the Broadcaster Type is Oracle Retail Customer Engagement.
Connect Timeout (ms)
Displays 30000 (30 seconds) as suggested value.
Request Timeout (ms)
Displays 30000 (30 seconds) as suggested value.
Click Next to navigate to the Configure tab.
|
Note: If you selected REST Service as Broadcaster Type on the Define tab, the Configure tab is not available. |
In the Configure tab, edit the following fields as necessary:
Retry Sleep (ms)
Displays the default value 5000 (5 seconds). This field is optional.
Batch Size
Displays the default value 100. This field is optional
Polling interval (ms)
Displays the default value 10000 (100 seconds). This field is optional.
Thread Count
Displays the default value 1. This field is optional.
Server Requires Gzip? check box
Click Next to navigate to the Filter tab.
|
Note: If you selected Oracle Retail Customer Engagement (ORCE), Oracle Retail XBR Loss Prevention, or Oracle Retail Sales Audit (ReSA) as Broadcaster Type on the Define tab, the Filter tab is not available. |
In the Filter tab, choose any transaction type of the PosLogs that should be excluded from this broadcaster. Use the arrows to exclude or include the selected transaction type.
Click Next to navigate to the Modify tab.
In the Modify tab, you can choose any elements that should be removed from the PosLog. By default Xstore Office Cloud Service UI only displays three options for removal but more can be added through the BROADCASTER_OTPION dataloader record. To remove an option, select the check box of the corresponding element.
Click Next to navigate to the Review tab.
In the Review tab, review your entries.
Click Save. Xcenter's BroadcasterManager detects the new configuration and updates itself and the Xcenter cluster. The system returns to the Broadcaster Management screen, with the newly configured Broadcaster displayed on the list.
To edit a broadcaster, follow the steps below:
At the Broadcaster Management page, select an entry. The Broadcast Summary window opens.
Click Edit. The Edit Broadcaster page opens.
Edit the fields as desired in the corresponding tabs. For more information on each tab, see the Adding A Broadcaster section.
Click Save to save your changes. The Broadcaster Management screen with the newly updated Broadcaster is displayed.
The Customization Management page allows you to make customizations, for example, to the Xadmin menu structure, or the Xcenter data model.
From the Oracle Retail Xstore Office Cloud Service menu, select System, then Customization Management.
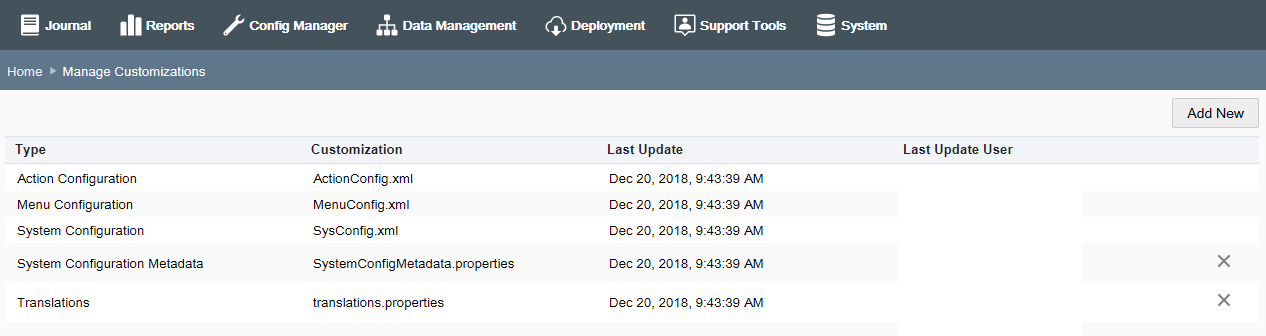
The Manage Customizations page displays, showing a list of uploaded configuration files.
To upload a configuration file:
Click Add New. The window appears.
Click Browse.
Select a file and click OK.
Click Upload to upload the selected file.
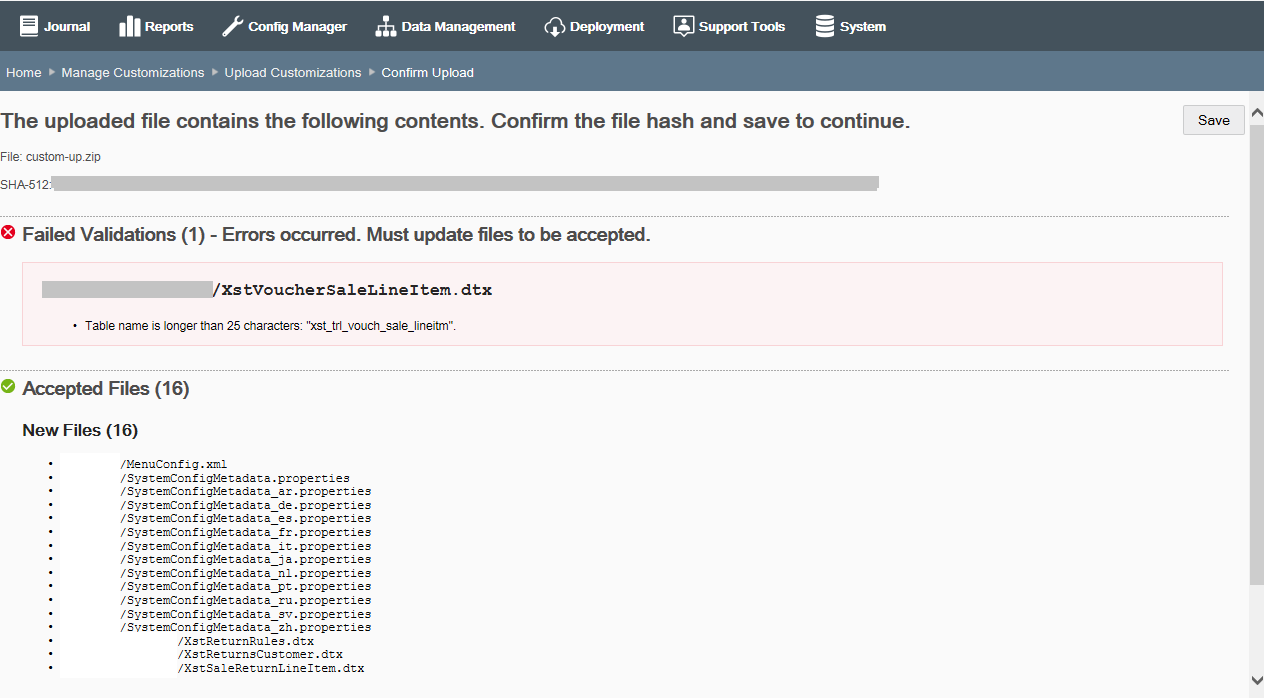
The system displays the Confirm Upload page.
The Confirm Upload page shows the following sections:
SHA Signature
The SHA signature is a hash of the file that was uploaded so the user can confirm that the server received what the user uploaded.
Failed Validations
This section shows files with validation errors.
The total number of failed files, the file name and a short description of the error are displayed. The files must be updated and re-uploaded to be accepted.
Accepted Files
This section shows the accepted uploaded files. The total number of accepted files, the file name, along with the information that this file will replace the existing one, are displayed.
Unacceptable Files
This section shows files containing an unsupported file type or location. The total number of unacceptable files and the file name are displayed.
Click Save.
Your are prompted to confirm the upload. Click Yes.
The system saves the configurations to the database. On the Customization Management page the accepted files are listed.
To delete a configuration file:
On the Customization Management page, select a file from the list of configuration files.
Select the Delete icon next to the file.
|
Note: Only properties files can be deleted from the list of configurations. |
When prompted, click Yes to confirm the deletion. The file is deleted from the list.
The Integration Management screen allows you to integrate Xstore Office Cloud Service with the following applications.
Omnichannel Data Service (OCDS) REST
Order Broker REST/SFTP
Customer Engagement SFTP
From the Oracle Retail Xstore Office Cloud Service menu, select System, then Integration Management.
The Integration Management page displays list of integrations, once the integrations have been completed.
|
Note: You can sort the list by selecting each column. |
To add a new integration, follow the steps below:
At the Integration Management page, click Add New. The Edit Integration page opens.
In the Define tab, add the following:
Integration System - Select one of the following integration systems:
Customer Engagement (CE)
Order Broker (OROB)
Omnichannel Data Service (OCDS)
Implementation - Select if you want to integrate an on-premises or a cloud system.
Connection Type - Select the connect type SFTP or REST.
Click Next to navigate to the Connect tab.
In the Connect tab, set the connection configuration for the integration:
|
Note: Depending on your selected integration system in the Define tab, the fields and options may vary. |
Endpoint URL or Hostname (for Customer Engagement)
This field is a required field.
Service Path Prefix - only available for OCDS REST integration
This is a required field.
Working Directory - available for OROB SFTP and CE SFTP integrations
This field is a required field.
Organization ID
Authentication Mode
This field is a required field.
Username
Password
Confirm Password
SFTP File Poll Delay (ms) - Only available for Customer Engagement SFTP integration. The suggested value is 900000 (15 minutes).
For Order Broker integrations REST/SFTP integrations, continue with the next step.
For Omnichannel Data Service REST integrations, continue with the Review tab in step 11.
For Customer Engagement SFTP integrations, continue with the Generate tab in step 10.
Click Next to navigate to the Mapping tab.
In the Mapping tab you can identify the mapping between the Xstore Office and Order Broker organizations.
Xstore Office Organization - Select an organization from the menu.
Order Broker Organization - Select Add to enter the corresponding Order Broker organization.
Repeat these steps, if necessary. The mapped Xstore Office and Order Broker organizations are displayed in the table on the tab.
To remove mapped organizations, select the Delete icon on each row. At least one mapping is required to continue.
Click Next to navigate to the Configure tab.
In the Configure tab, follow the steps below:
For Order Broker REST integrations, enter the Timeout for the connection in seconds. The suggested value is 30 seconds.
For Order Broker REST integrations, enter the Timeout for reading in seconds. The suggested value is 30 seconds.
For Order Broker REST integrations, the Compress checkbox is selected.
Enable Push Items checkbox as necessary - Select the checkbox to enable the Push Items job.
Enable Push Inventory checkbox as necessary - Select the checkbox to enable the Push Inventory job.
|
Note: At least one job is required to proceed. |
Then select the desired schedule for each enabled job. In the Push Inventory Schedule Type or Push Items Schedule Type field, select one of the following options:
Start Time (HH:MM)
Repeat Interval (minutes)
Depending on the selected option, you must enter the following values:
Start time option: If you select the Start Time option, enter the desired start time.
Repeat Interval option: If you select the Repeat Interval option, enter the desired number of minutes for the interval to run.
Numbers of Days Back field: This field is only visible if at least one job is enabled. This field is a required field.
For Order Broker SFTP and Customer Engagement SFTP integrations, continue with the next step.
For Order Broker REST and Omnichannel Data Service REST integrations, continue with the Review tab in step 11.
Click Next to navigate to the Generate tab.
In the Generate tab, you can generate and download the public key.
|
Note: The Generate tab is only available when you selected the connection type SFTP. Depending on the integration, on-premises or Cloud, the tab varies. |
If you integrate an on-premises system, follow the steps below:
Select Generate to create the private and public key.
After generating the key, select Download to download the file.
Then load the key pair to the SFTP server.
|
Note: The SFTP server is not within the Xstore Office Cloud Service application. |
If you integrate a cloud service, follow the steps below:
Alternatively, if you integrate a cloud service, the screen will instruct you to file a service request (SR) for AMS to load and store the public key on the service SFTP server. This step is required to complete the integration set up.
In the Review tab, review your entries.
Click Save. The integration, the integration status, the user, as well as the time and date stamp is logged in the audit log. The system returns to the Integration Management screen, with the newly configured integration displayed on the list.
To edit an integration, follow the steps below:
At the Integration Management page, select an entry. The Integration Summary window opens.
Click Edit. The Edit Integration page opens.
Edit the fields as desired in the corresponding tabs. For more information on each tab, see the Adding An Integration section.
In Edit mode the Define tab displays the Pause Integration checkbox.
Enable the Pause Integration checkbox to pause an integration that has been previously created. A confirmation message is displayed. The status of the integration is set to Paused on the Integration Management screen.
To resume an integration again, uncheck the Pause Integration checkbox. A confirmation message is displayed. The integration resumes its previous status. You are returned to the Integration Management screen.
Click Save to save your changes. The Integration Management screen with the newly updated integrations is displayed.
To enable an integration, follow the steps below:
At the Integration Management page, select the Enable button in the respective row. You can enable integrations with the status New.
The applications tests the connection with the integrated system. If the test is successful, the integration status changes to Active. If the test fails, an error message is displayed.
|
Note: This feature is only available from the Oracle Retail Xstore Office Cloud Service System menu, not from the Home Page panel. |
This feature controls the available locales within the Oracle Retail Xstore Office Cloud Service application itself.
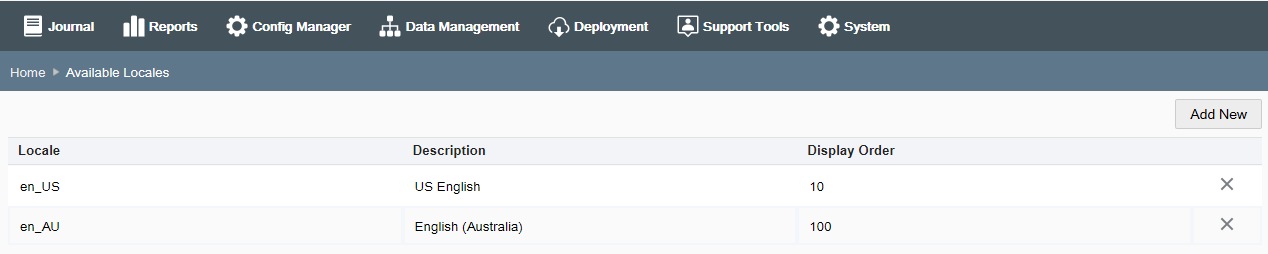
From the Oracle Retail Xstore Office Cloud Service menu, select System, then select Available Locales.
The Available Locales page displays. Add a new locale, make changes to an existing locale, or delete a locale:
To add a new locale, click the Add New button.
To make changes to an existing locale, click on an existing locale from the list.
To delete a locale, click the Delete icon associated with the locale. If selected, you will be prompted to confirm the locale should be deleted. Any locale currently assigned to a user record cannot be deleted.
|
Note: A sorting component is available for columns, when applicable. |
Complete the fields as required when adding or editing a locale:
Locale - Select a locale from the drop-down list. The locale cannot be changed in edit mode.
Display Order - Enter the display order for the locale.
Click the Save button.
If more than one available locale has been defined in Oracle Retail Xstore Office Cloud Service, certain fields in Configuration Manager and Data Management will allow the user to enter a translation for any language. This action creates com_translations records that will be sent down to stores, along with the configuration data.
|
Note: This feature is only available from the Oracle Retail Xstore Office Cloud Service System menu, not from the Home Page panel. |
Use this feature to view the Oracle Retail Xstore Office Cloud Service version the system is currently running on. This is a view-only window.
|
Note: To view the versions of Oracle Retail Xstore Point of Service running in the field, see Chapter 10, "Support Tools". |
From the Oracle Retail Xstore Office Cloud Service menu, select System - About Xadmin.
The About window displays:
The following information is shown on this window:
The application version number
Copyright information
Oracle license information
Click the Close icon to close the window.