| Oracle® Retail Xstore Office Cloud Service 18.1 User Guide Release 18.1 F18648-05 |
|

 Previous |
 Next |
| Oracle® Retail Xstore Office Cloud Service 18.1 User Guide Release 18.1 F18648-05 |
|
Previous |
Next |
Data Management is used to create, maintain, and deploy Oracle Retail Xstore Office Cloud Service data selectively, or globally across the entire organization. Data Management is also used to set up and maintain your organization hierarchy and store collections, and to initiate the end-of-year process to post the required roll-up data for stock valuation for all items and stores.The logged-in user is assumed to represent some tier of the organization. For this reason, the user's assigned org node hierarchy will determine the data he/she has access to. See Chapter 2, "Roles, Users, and Security Access" for more information about users and security access.The following data can be configured in Data Management:
In Data Manager
Merchandise & Non Merchandise Items
Vendors
Employee Records
Exchange Rates
Store Information
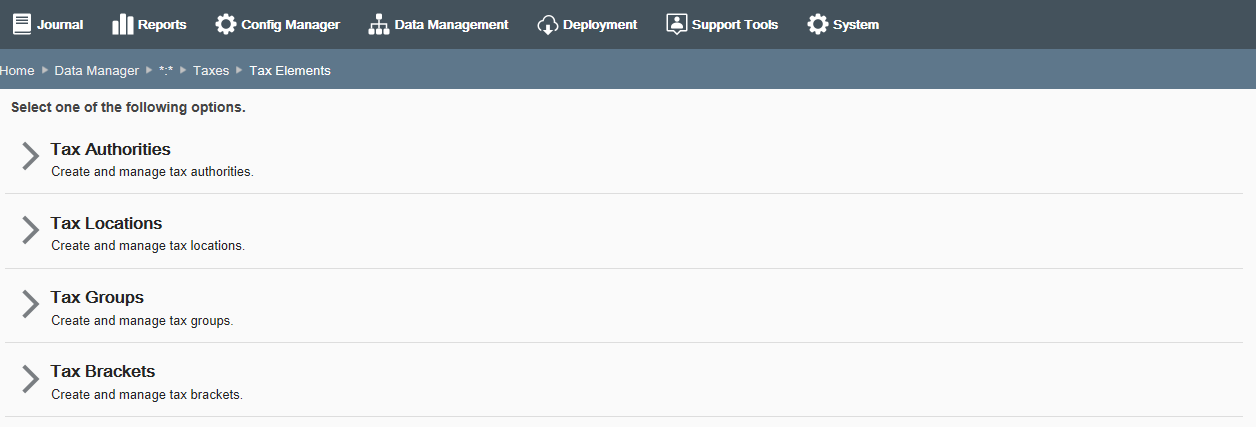
Taxes
Store Messages
Employee Tasks
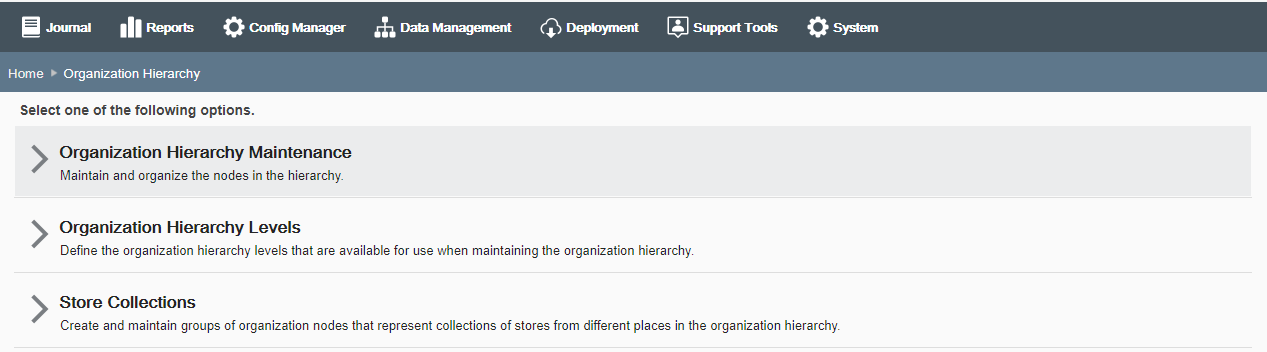
In Organization Hierarchy
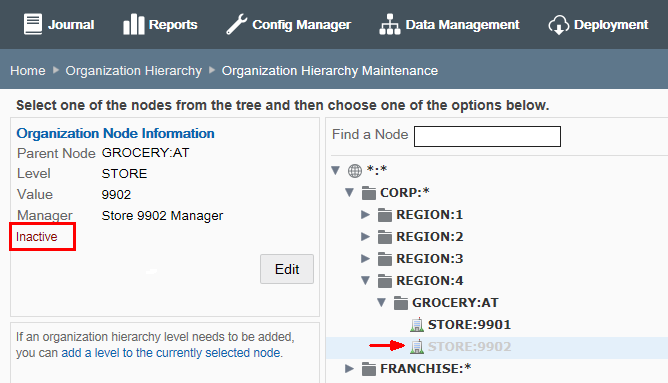
Organization Hierarchy Maintenance
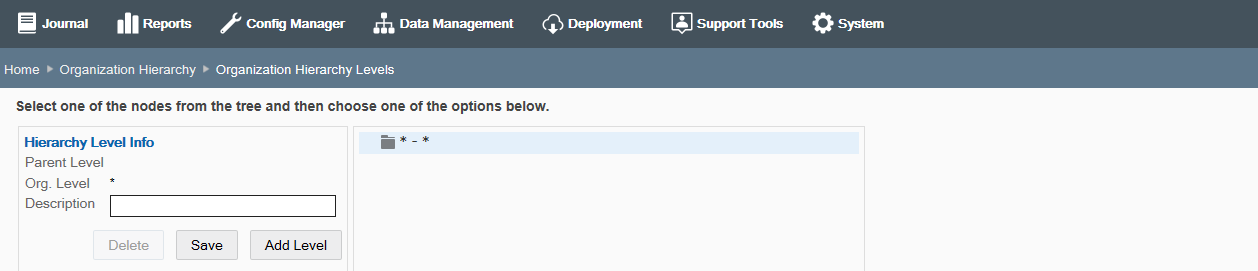
Organization Hierarchy Levels
Store Collections
In Roll-up Stock Valuation
Stock Valuation Year End Roll-up
Data Management allows you to:
Change or create data for your organization. See Managing Data.
View or deploy pending data changes for your organization. See Viewing and Deploying the Data Changes.
Redeploy data from one org node to another. See Data Publisher - Redeploying Data.
Set up or edit your organization hierarchy, including Store Collections. See Managing the Organization Hierarchy.
Initiate the end-of-year process to post the required roll-up data for stock valuation for all items and stores. See Stock Valuation Year End Roll-Up.
Oracle Retail Xstore Point of Service Database Dictionary - The Oracle Retail Xstore Point of Service Database Dictionary Guide provides Oracle Retail Xstore Point of Service database detail and schema information. This dictionary provides a description of each table as well as a listing of all of the columns in each table.
Oracle Retail Xstore Office Cloud Service Database Dictionary - The Oracle Retail Xstore Office Cloud Service Database Dictionary Guide provides Xcenter (a part of Oracle Retail Xstore Office Cloud Service) database detail and schema information. This dictionary provides a description of each table as well as a listing of all of the columns in each table.
Oracle Retail Xstore Point-of-Service Host Interface Guide - The Oracle Retail Xstore Point-of-Service Host Interface guide provides information about the files accepted for processing updates to Oracle Retail Xstore Point of Service operating tables. In addition, this guide also provides information about the DataLoader application that is responsible for translating flat data files into database data that can be used by Oracle Retail Xstore Point of Service.
Data Manager changes are collected into "data bundles" containing all of the changes made within a particular org level during a given day. The changes collected in the data bundle will be deployed to their targeted stores automatically at the end of the day, or can be deployed immediately if needed. When you make changes in Data Manager and deploy them, they automatically update the Xcenter database; there is no DataLoader file created and no DataLoader processing necessary. If anything fails, it can be found in the Xcenter or Oracle Retail Xstore Office Cloud Service log file.
Use the Pending Modifications feature of Data Manager to delete or view the details of the data bundles before they are deployed.
Use the Data Publisher feature to deploy data from Xcenter to an org node. Deployed data will include all the data available to the targeted org node (within the categories selected by the user) and comes from Xcenter.
From the Oracle Retail Xstore Office Cloud Service menu, select Data Management - Data Manager, or click the Data Manager link in the Data Management panel.
At the Data Manager page, you have the following options:
To change or create data for your organization, click Data Management.
Continue with step 3 below.
To view or deploy pending data changes for your organization, click Pending Modifications and skip to Viewing and Deploying the Data Changes.
To transfer data from one org node to another, click Data Publisher and skip to Data Publisher - Redeploying Data, step 3.
Select the Organization Node for the Data change, then click Next.
|
Note: Only the Organization Nodes the logged-in user has privileges to use will be listed here. |
Select a Data option.
At the page for the selected Data option you can add a new record or modify an existing record:
To add a new record for the Data option using the wizard format, click Add New.
|
Note: For Data options that do not use a wizard format, information is added and edited in a Data window. After completing the required fields, click Save.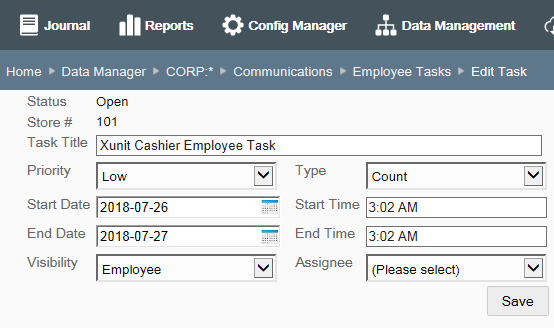 |
When adding a new record to a Data option, all fields will be blank.
To edit an existing record for the Data option, click the record to open the editing window. When editing a Data option record, some fields cannot be changed.
Follow the prompts to manage the data for the selected option:
After completing a page, click Next when applicable to navigate to the next page until setup is complete.
You can click Previous to return to the previous page when applicable.
The breadcrumbs displayed at the top of each page can be used to navigate through the various pages of the activity.
In addition to the breadcrumbs at the top of each page, the side panel on each page shows where you are in the process and can also be used to navigate the various steps of the process as needed.
To exit without saving any changes, click Cancel. When prompted, click Yes to confirm you do not want to save any changes.
When setup is complete, and you have reviewed your changes, click Save.
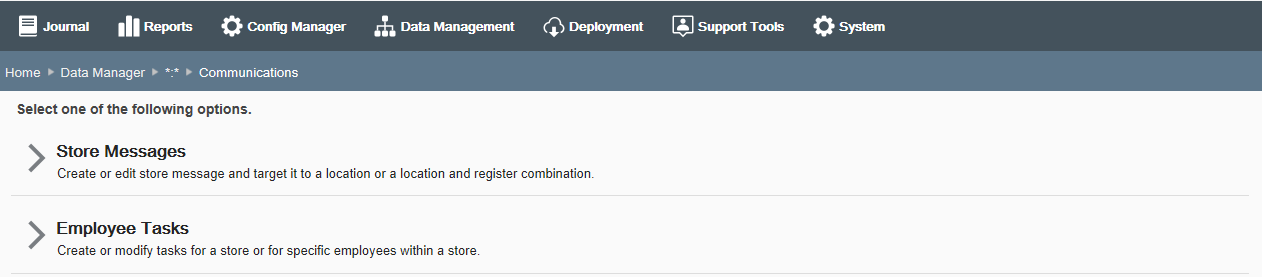
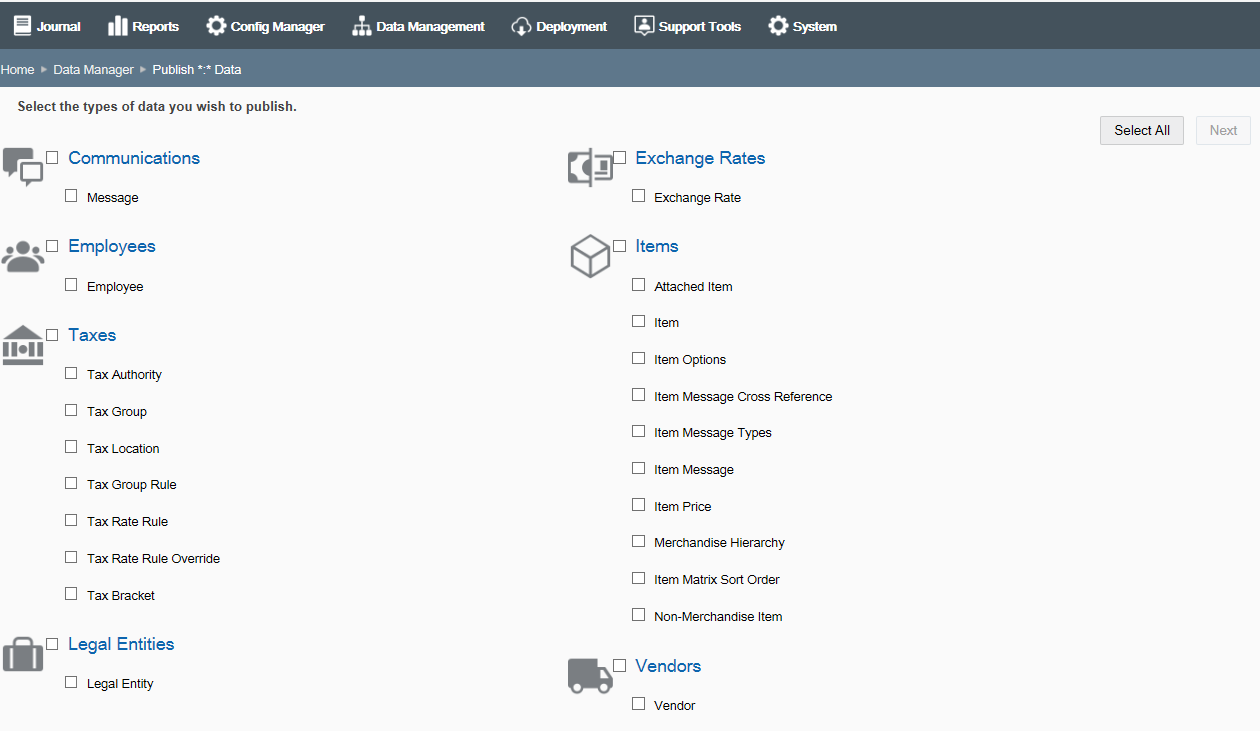
Communications - Use this feature to create and modify store messages and employee tasks.
Employees - Use this feature to create and modify employee records for your organization.
Stores - Use this feature to search for and modify store information.
|
Note: This Data Manager Stores option allows you to search for and modify store information for an existing store only. To set up a new store, see Managing the Organization Hierarchy. |
Vendors - Use this feature to create and modify vendors for your organization.
Exchange Rates - Use this feature to create and modify currency exchange rates for your organization.
Items - Use this feature to manage different types of items, non-merchandise items, and item matrix features for your organization and to manage the merchandise hierarchy.
Taxes - Use this feature to manage tax configurations for your organization.
Legal Entities [Country Pack ONLY] - Use this feature to create and modify legal entities for your organization.
Use this feature to manage different types of items and item features for your organization.
To manage the merchandise hierarchy, click Merchandise Hierarchy. See Merchandise Hierarchy.
To create and manage merchandise items (including prices and attached items), click Merchandise Items. See Merchandise Items.
To create and manage non-merchandise items (including prices), click Non-Merchandise Items. See Non-Merchandise Items.
To manage the item matrix settings, click Item Matrix Manager. See Item Matrix Manager.
To create and maintain item messages, click Item Message Maintenance. See Item Message Maintenance.
To create and maintain item restrictions, click Item Restrictions. See Item Restrictions.
To create and maintain item restrictions, click Item Restriction Types. See Item Restriction Types.
...continued from Items
If adding a new item:
At the Item Maintenance page, click Add New to create a new item.
If editing an existing item:
At the Item Maintenance page, enter search criteria and click Search to find/edit an existing item in your organization. If you do not enter any criteria before selecting Search, all items in your organization will be returned in the search. To edit information for an existing item, select the row from the search results list and click Edit at the Item Information window (Figure 6-5).
See step 6 for additional procedural information.
The following Item Maintenance fields are available:
Table 6-1 Basic Merchandise Information
| Field | Description |
|---|---|
|
Item ID [REQUIRED] |
Enter the item identifier. This field cannot be edited for existing items. |
|
Description [REQUIRED] |
Enter the item description. |
|
Prompt for Description check box |
Select this check box if the item description must be manually entered when this item is sold. |
|
Tax Group [REQUIRED] |
Select the item's tax group from the drop-down list. Possible values are from the Tax Group table (tax_tax_group). |
|
Availability |
Select the product availability to determine whether or not an item is available for sale: Available, Not Sellable at POS, or Recalled. |
|
Stock Status check box |
If applicable, select this option and type the item's status based on its stock availability when prompted for a value. For example, RESTRICTED_QTY, DISCONTINUED, CLEARANCE, and so on. |
|
Commission check box |
If applicable, select this option if the item qualifies for commission. |
|
Attached Items check box |
Select this option if the item has attached items. (See Attached Items for more information about setting up attached items.) |
|
Serial Number check box |
Select this option if a serial number is required. |
|
Selling Group ID |
If you assign an item to a selling group, the item can not be sold in any transaction containing items from a different selling group. |
Table 6-2 Merchandise Attributes
| Field | Description |
|---|---|
|
Department |
Select the item's department from the drop-down list. Possible values are from the itm_merch_hierarchy table where level code is DEPARTMENT. |
|
Subdepartment |
Select the item's subdepartment from the drop-down list. Possible values are from the itm_merch_hierarchy table where level code is SUBDEPARTMENT. |
|
Class |
Select the item's class from the drop-down list. Possible values are from the itm_merch_hierarchy table where level code is CLASS. |
|
Subclass |
Select the item's subclass from the drop-down list. Possible values are from the itm_merch_hierarchy table where level code is SUBCLASS. |
|
Style check box |
Select this option if the item is associated with a style, then enter the style ID when prompted. |
|
Season check box |
Select this option if the item is associated with a season, then enter the season code when prompted. |
|
Vendor check box |
Select this option if the item is associated with a vendor, then select the vendor from the drop-down list when prompted. |
|
Item UPCs |
Enter the UPC for the item and click Add. You can enter as many UPCs as needed. After adding at least one UPC, a Delete option will be available to remove a UPC if needed. |
Table 6-3 Quantity Attributes
| Field | Description |
|---|---|
|
Sale Quantity check box |
Select this option if the item quantity cannot be changed from 1. Note: This option will disable all other item quantity options listed here. |
|
Quantity Prompt check box |
Select this option if the item quantity must be manually entered when this item is sold. |
|
Weight Prompt check box |
Select this option if the item weight must be manually entered when this item is sold. |
|
Initial Sale Quantity check box |
Select this option if the item is sold in a quantity other than one. If selected, enter the initial quantity at which this item must be sold. |
|
Minimum Sale Quantity check box |
Select this option if the item has a minimum sale quantity. If selected, enter the minimum quantity of this item that may be sold in a single transaction. |
|
Maximum Sale Quantity check box |
Select this option if the item has a maximum sale quantity. If selected, enter the maximum quantity of this item that may be sold in a single transaction. If a value is not specified, the system configuration for maximum quantity per sale item is used. If a value is specified here and it is greater than the system configuration value, the maximum sale quantity is used. |
Table 6-4 Customer Related Attributes
| Field | Description |
|---|---|
|
Customer Information Required check box |
Select this option if the system prompts for customer information when the item is sold. If selected, a prompt for information will be displayed. Select whether the information is required or optional: Prompt, entry is required Prompt, entry is optional |
|
Purchaser Minimum Age Required check box |
Select this option if a minimum age is required to purchase the item. If selected, enter the minimum age (in years) required to purchase the item. |
Table 6-5 Item Restriction Attributes
| Field | Description |
|---|---|
|
Inventoried check box |
Select this option if inventory levels are tracked for this item. |
|
Item Type Restrictions: |
|
|
Disallow Layaway check box |
Select this option if this item cannot be added to a layaway transaction type. |
|
Disallow Order check box |
Select this option if this item cannot be ordered via Oracle Retail Order Broker Cloud Service Order functionality. |
|
Disallow Rain Check check box |
Select this option if this item is not eligible for rain check functionality. |
|
Disallow Returns check box |
Select this option if this item cannot be added to a return transaction type. |
|
Disallow Send Sale check box |
Select this option if this item cannot be added to a send sale transaction type. |
|
Disallow Special Order check box |
Select this option if this item cannot be added to a special order transaction type. |
|
Disallow Work Order check box |
Select this option if this item cannot be added to a work order transaction type. |
|
Price Change Restrictions: |
|
|
Disallow Deal check box |
Select this option if this item does not qualify for deals. |
|
Disallow Discount check box |
Select this option if this item cannot be discounted. |
|
Disallow Price Change check box |
Select this option if this item price cannot be changed. |
Table 6-6 Values Attributes
| Field | Description |
|---|---|
|
Unit Cost |
Enter the cost for each retail sale unit of this item. |
|
Initial List Price |
Enter the retail price per sale unit of the item. |
|
Prompt for Price check box |
Select this option if the retail price must be manually entered when this item is sold. |
When viewing item information, and if the selected item record is within your targeted org node, there is an option available to view and edit item pricing information. You can edit prices for your org node level only. However, you can view prices set above your org node level.
At the Item Maintenance page (Figure 6-4), enter search criteria and select Search to find/edit an existing item in your organization.
At the Item search results list, select the item row from the list.
Click Prices at the Item Information window.
At the Item Prices page you can calculate the price of an item based on specified parameters, add a new price, or edit an existing price as needed.
|
Note: To quickly find an item price in the list at the Item Prices page, select the type of price from the Price Type filter list.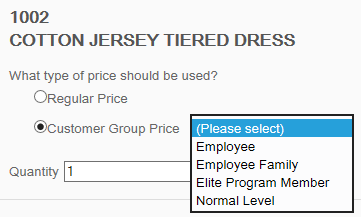 |
Use this procedure to identify the exact price that exists for an item based on the type of price (regular price or a customer group), the pricing quantity, and date.
At the Item Prices page, enter the required information:
Price Type [REQUIRED] - What type of price should be used?
Regular Price
Customer Group Price - Select from the list of available price types for the organization. For example, Employee Family, Employee, Elite Program Member, Normal Level
Pricing Quantity [REQUIRED] - Enter the quantity of the item you are pricing.
Start Date [REQUIRED] when the price is in effect - Use the calendar to select the date for the item you are pricing.
Click Calculate. The system retrieves the pricing information:
If pricing information is found, the price for the item-based on the criteria you entered-is displayed.
If no pricing information is found, the "No Price Found" message displays. If you want to add pricing information, click the "No Price Found" link to open the Add Item Price window.
At the Add Item Price window, the parameters you
entered in the pricing search (Price Type, Pricing Qty, and Start Date) are populated automatically. See Adding or Editing a Price below for more information about adding/editing prices.
At the Item Prices page, do one of the following:
To add a new price, click Add New and complete the fields as required.
To edit an existing price, click a row in list and edit the fields as needed.
Table 6-7 Add Item Price Fields
| Field | Description |
|---|---|
|
Ord Node |
This value cannot be changed. |
|
Price Type [REQUIRED] |
Select a price type from the drop-down list of available price types. This value cannot be changed in Edit mode. |
|
Pricing Qty [REQUIRED] |
Enter the pricing quantity for this item. This value cannot be changed in Edit mode. |
|
Start Date [REQUIRED] |
Enter/select the starting date for this price to be in effect. This value cannot be changed in Edit mode. |
|
End Date |
Enter/select the ending date when this price is no longer in effect. |
|
Price [REQUIRED] |
Enter the item price. |
Click Save.
When viewing item information, if the selected item record is within your targeted org node and enabled for attached items, there is an option available to view and edit attached item information. You can edit attached items for your org node level only. See Basic Merchandise Information for attached item setup information.
At the Item Maintenance page (Figure 6-4), enter search criteria and select Search to find/edit an existing item in your organization.
At the Item search results list, select the item row from the list.
Click Attached Items at the Item Information window to open the Attached Items page.
The Attached Items page lists the existing attached items for the selected merchandise item.
To add an attached item to the sold item:
If you know the attached item ID, enter the item ID in the "Enter an item ID" field and click Add. Continue with step 2 on page 14.
If you do not know the item ID, enter search criteria and then click Search to find an item to attach to the merchandise item. Continue with To Add an Attached Item.
To edit an attached item, select the row you want to edit. Continue with To Edit an Attached Item.
To delete the relationship between the attached item and the sold item, click the Delete icon associated with the attached item and click Yes when prompted to confirm the deletion.
At the Add Attached Item window, select the item and click Add.
Enter the attached item information.
Sold Item - The merchandise item. [CANNOT BE CHANGED]
Attached Item - The item attached to the merchandise item. [CANNOT BE CHANGED]
Org Node - The org node that was targeted when the attached item relationship was originally made. [CANNOT BE CHANGED]
Quantity to Add - [REQUIRED] The quantity of the item that is to be attached.
Start Date - [REQUIRED] The starting date for this attached item.
End Date - The ending date for this attached item.
Do you want to prompt users before adding this item check box - Select to enable prompting.
Do you want to prompt users when returning this item check box - Select to enable prompting.
Click Save. The system returns to the Attached Items page.
After selecting the row you want to change, edit the attached item information.
Sold Item - The merchandise item. [CANNOT BE CHANGED]
Attached Item - The item attached to the merchandise item. [CANNOT BE CHANGED]
Org Node - The org node that was targeted when the attached item relationship was originally made. [CANNOT BE CHANGED]
Quantity to Add - [REQUIRED] The quantity of the item that is to be attached.
Start Date - [REQUIRED] The starting date for this attached item.
End Date - The ending date for this attached item.
Do you want to prompt users before adding this item check box - Select to enable prompting.
Do you want to prompt users when returning this item check box - Select to enable prompting.
Click Save. The system returns to the Attached Items page.
...continued from Items
Select the Merchandise Hierarchy option (Figure 6-3) to view and configure the merchandise hierarchy for your organization.
The following information is shown on this page:
Merchandise Level Information - This area shows information about the selected level of the merchandise hierarchy, including the Parent Level and Value and the Item Level and Value.
If a level is inactive, it will be indicated as ”Hidden”.
Use the merchandise hierarchy tree to navigate and understand the hierarchy itself. (By default, the tree displays the Department level). When you select a merchandise hierarchy level in the tree view, the details of the level are displayed in the Merchandise Level Information panel.
Click Edit to update the merchandise level information displayed in the panel. See Editing a Merchandise Hierarchy Level below.
Action Panel - This area contains the link to add to an organization's organization hierarchy. The color legend shown here corresponds to the colors in the tree view for the merchandise hierarchy levels. To add new areas of a merchandise hierarchy, see Adding to a Merchandise Hierarchy Level.
|
Note: You cannot add a new merchandise hierarchy level. Levels are restricted to what currently exists in your organization: Department, Subdepartment, Class, and so on. |
In the tree view, select the parent hierarchy level for the planned edit to the merchandise hierarchy.
|
Note: Use the "Find a Node" search box to quickly locate a node in the merchandise hierarchy tree. |
With the node selected, click Edit.
Edit the information as needed:
Parent Level - The parent merchandise hierarchy level. [CANNOT BE CHANGED]
Parent Value - The parent merchandise hierarchy value. [CANNOT BE CHANGED]
Level - The level type. (For example, if the parent level is a Department, then this level is Subdepartment based on the Merchandise Hierarchy setup shown here). [CANNOT BE CHANGED]
Hierarchy ID - The identifier for the merchandise hierarchy level. [CANNOT BE CHANGED]
Description - The description for the merchandise hierarchy level.
Display Order - The display order for the merchandise hierarchy level.
Is this merchandise level visible? check box - When selected, the merchandise level is active and visible. To deactivate the merchandise hierarchy level, remove the check mark from the check box. The deactivated level and all sublevels are grayed out on the page and a message displays in the Merchandise Level Information panel indicating that the level is hidden.
|
Note: If needed, click the Close icon to close the window without saving your changes. If prompted, click Yes to confirm you do not want to save any changes. |
Click Save to close the window. The merchandise hierarchy level is updated as specified.
In the tree view, select the parent hierarchy level for the planned addition to the merchandise hierarchy.
|
Note: Use the "Find a Node" search box to quickly locate a node in the merchandise hierarchy tree. |
With the node selected, click the link - add a level to the currently selected node.
Enter the information for the new level:
Parent Level - The parent merchandise hierarchy level. [CANNOT BE CHANGED]
Parent Value - The parent merchandise hierarchy value. [CANNOT BE CHANGED]
Level - The level type to be created. (For example, if the parent level is a Department, then this level is Subdepartment based on the Merchandise Hierarchy setup shown here). [CANNOT BE CHANGED]
Hierarchy ID - The identifier for the new merchandise hierarchy level. [REQUIRED]
Description - The description for the new merchandise hierarchy level. [REQUIRED]
Display Order - The display order for the new merchandise hierarchy level.
Is this merchandise level visible? check box - When selected, the merchandise level is active and visible. To deactivate the merchandise hierarchy level, remove the check mark from the check box. The deactivated level and all sublevels are grayed out on the page and a message displays in the Merchandise Level Information panel indicating that the level is hidden.
|
Note: If needed, click the Close icon to close the window without saving your changes. When prompted, click Yes to confirm you do not want to save any changes. |
Click Save to close the window. The new merchandise hierarchy level is added to the tree.
...continued from Items
Select the Non-Merchandise Items option (Figure 6-3) to view and configure the merchandise hierarchy for your organization. The Non-Merchandise Items Maintenance page displays all non-merchandise items available to the targeted org node.
|
Note: Use the Subtype Code filter to find non-merchandise items within the list of non-merchandise items. |
If adding a new non-merchandise item:
At the Non-Merchandise Items Maintenance page, click Add New to create a new item.
If editing an existing item:
At the Non-Merchandise Items Maintenance page, select the row from the non- merchandise items list and click Edit at the item information window.
See step 6 for additional procedural information.
The following Non-Merchandise Item Maintenance fields are available:
Table 6-8 Basic Non-Merchandise Information
| Field | Description |
|---|---|
|
Item ID [REQUIRED] |
Enter the item identifier. This field cannot be edited for existing items. |
|
Description [REQUIRED] |
Enter the item description. |
|
Prompt for Description check box |
Select this check box if the item description must be manually entered when this item is sold. |
|
Tax Group [REQUIRED] |
Select the item's tax group from the drop- down list. Possible values are from the Tax Group table (tax_tax_group). |
|
Availability |
Select the product availability to determine whether or not an item is available for sale: Available, Not Sellable at POS, or Recalled. |
|
Commission check box |
If applicable, select this option if the item qualifies for commission. |
|
Serial Number check box |
Select this option if a serial number is required. |
Table 6-9 Quantity Attributes
| Field | Description |
|---|---|
|
Sale Quantity check box |
Select this option if the item quantity cannot be changed from 1. Note: This option will disable all other item quantity options listed here. |
|
Quantity Prompt check box |
Select this option if the item quantity must be manually entered when this item is sold. |
|
Initial Sale Quantity check box |
Select this option if the item is sold in a quantity other than one. If selected, enter the initial quantity at which this item must be sold. |
|
Maximum Sale Quantity check box |
Select this option if the item has a maximum sale quantity. If selected, enter the maximum quantity of this item that may be sold in a single transaction. |
|
Customer Information Required check box |
Select this option if the system prompts for customer information when the item is sold. If selected, a prompt for information will be displayed. Select whether the information is required or optional: Prompt, entry is required Prompt, entry is optional |
|
Purchaser Minimum Age Required check box |
Select this option if a minimum age is required to purchase the item. If selected, enter the minimum age (in years) required to purchase the item. |
Table 6-10 Item Restriction Attributes
| Field | Description |
|---|---|
|
Inventoried check box |
Select this option if inventory levels are tracked for this item. |
|
Item Type Restrictions: |
|
|
Disallow Layaway check box |
Select this option if this item cannot be added to a layaway transaction type. |
|
Disallow Order check box |
Select this option if item cannot be ordered via Oracle Retail Order Broker Cloud Service Order functionality. |
|
Disallow Returns check box |
Select this option if this item cannot be added to a return transaction type. |
|
Disallow Send Sale check box |
Select this option if this item cannot be added to a send sale transaction type. |
|
Disallow Special Order check box |
Select this option if this item cannot be added to a special order transaction type. |
|
Disallow Work Order check box |
Select this option if this item cannot be added to a work order transaction type. |
|
Price Change Restrictions: |
|
|
Disallow Deal check box |
Select this option if this item does not qualify for deals. |
|
Disallow Discount check box |
Select this option if this item cannot be discounted. |
|
Disallow Price Change check box |
Select this option if this item price cannot be changed. |
Table 6-11 Specific Non-Merchandise Item Attributes
| Field | Description |
|---|---|
|
Type Code [REQUIRED] |
Select the type code for the non-merchandise item. If needed, select Other to create a new type code and enter new type code in the Type Code field. Note: A new type code created here will only be for this non-merchandise item and will not be available for any other items. |
|
Subtype Code [REQUIRED] |
Select the subtype code for the non-merchandise item. |
|
Exclude From Net Sales check box |
Select this option if the non-merchandise item will not be attributed as revenue. |
|
Prompt for Price check box |
Select this option if the retail price must be manually entered when this item is sold. |
...continued from Items
Select the Item Matrix Manager option (Figure 6-3) to manage the item matrix information for your organization.
At the Item Matrix Manager page, manage the look and feel of the item matrix in Oracle Retail Xstore Point of Service. Use this feature to assign matrix colors to merchandise hierarchy and/or item records, mark merchandise hierarchy and/or item records as hidden (items labeled as hidden will not show in the item matrix in Oracle Retail Xstore Point of Service), and change the sort order of merchandise hierarchy and/or item records to specify how they will display within the item matrix in Oracle Retail Xstore Point of Service.
Table 6-12 Fields on the Item Matrix Screen
| Field | Description |
|---|---|
|
|
Shows the color currently associated with the merchandise hierarchy or item and is used to drag and drop the selection to another location in the list. |
|
ID |
The merchandise hierarchy or item identifier. |
|
Description |
The merchandise hierarchy or item description. |
|
Color |
The color associated with the merchandise hierarchy or item for display in the item matrix in Oracle Retail Xstore Point of Service. |
|
Hidden |
If the check box is selected, the merchandise hierarchy or item will not show in the item matrix in Oracle Retail Xstore Point of Service. |
Table 6-13 Links and Buttons the Item Matrix Screen
| Link | Description |
|---|---|
|
Color Legend |
Opens a window showing the available color palette. The link is not available for screen readers. |
|
Next Level |
Opens a new page showing the items in next merchandise hierarchy level. |
|
Move Up and Move Down Arrow buttons |
Change the sort order of the displayed list. |
Select a color from the Color drop-down list for the merchandise hierarchy or item record you want to change.
The color in the Color Area associated with the item is changed to the selected color.
|
Note: To view the available colors, click the Color Legend link.The color Gray shown in the legend is not available from the drop-down list of available colors. Gray is used to denote "Hidden" buttons only. 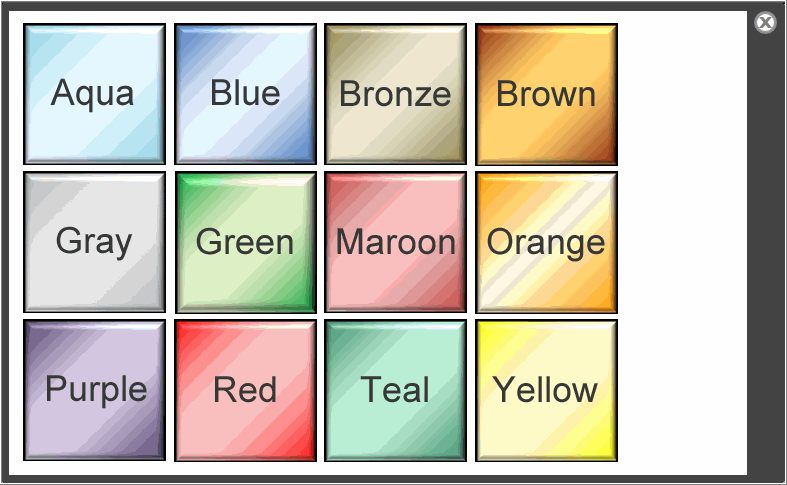 |
Click Save to save your changes.
There are two ways to change the sort order of the items:
Drag and Drop:
Hover over the shaded area of the row you want to move.
With the move icon showing for the selected item row, drag and drop the item to a new location in the list to change the sort order.
Click Save to save your changes.
Move Up and Down Arrow buttons:
Select the row you want to move.
Use the Move Up and Move Down Arrow buttons of the selected row to change the sort order in the list.
Click Save to save your changes.
Click the Hidden check box for the merchandise hierarchy or item record.
When the Hidden check box is selected, the color drop-down list and the Next Level link are no longer available for selection. In addition, the color in the shaded area associated with the item is changed to gray.
Click Save to save your changes.
...continued from Items
The Item Message Maintenance option (Figure 6-3) allows you to add, edit or delete a message to/from a number of items. The message is then displayed in the Info tab in the Xstore POS during a sale transaction.
|
Important: Only one message per item is displayed in the Info tab int the Xstore POS. If you want to display multiple messages per item you need to enable the DisplayMessageAsNotify configuration in the database.To add messages for a large number of items, use the DataLoader. For more information about the DataLoader, see the Oracle Retail Xstore Point of Service Host Interface Guide. |
There are four message types that can be displayed the Xstore POS Info tab:
Text messages
HTML messages - HTML messages may include graphics and text.
Titled image messages - Titled image messages contain an image along with a title.
Composite messages - Composite messages include graphics and text. The image and text message are displayed together in the Info tab.
To add an item message:
Click Add New. The Edit Item Message page appears.
Select one of the following message types from the list:
Text
HTML
Composite
Titled Image
|
Note: If an item has more than one message type, the message types are display in the following order:
|
Depending on the selected message type, enter the following fields:
Table 6-14 Item Messages Fields
| Field | Description |
|---|---|
|
Message ID [REQUIRED] |
Enter a message ID. |
|
Message Text [REQUIRED] |
Enter a message text. |
|
Message Title |
Enter a message title. |
|
Message HTML File |
Only available for message type HTML To upload a file:
Note: You can only upload one HTML file per message. |
|
Message HTML |
Only available for message type HTML Enter the message in HTML format. ? |
|
Image |
Only available for message type Composite and Titled Image You can upload the following file formats.png, .jpg, and .gif To upload an image file:
Note: You can only upload one image file per message. |
|
Effective Date |
Enter or use the Calendar icon to select an effective date for the message. |
|
Expiry Date |
Enter or use the Calendar icon to select an expiry Date for the message. |
|
Item ID |
To add an item to the message:
To delete the item form the message:
|
Click Save to save the message for the selected items.
To edit an item message:
Enter search criteria and click Search to find/edit an item message. If you do not enter any criteria before selecting Search, all item messages will be displayed in the Search Results page.
To edit information for an existing message, select the row from the search results list and edit the information as needed. You can also create a new message by clicking Add New at the Search Results page.
Complete the fields as required, then click Save.
|
Note: To delete an existing message, click the Delete icon associated with the record at the search results list. When prompted, click Yes to confirm the deletion. |
See step 6 for additional procedural information.
...continued from Items
Select the Item Restrictions option (Figure 6-3) to add and/or edit item restrictions.
|
Note: You need to create at least one item restriction, before you can define item restrictions types. For more information on item restriction types, see the Item Restriction Types section. |
To add an item restriction:
Click Add New. The Edit Restriction page appears.
In the Define tab, enter the following information:
Restriction ID [REQUIRED]- Enter the ID for the item restriction.
Description [REQUIRED] - Enter a short description for the item restriction.
Then click Next to open the Associate tab.
In the Associate tab, select or enter the merchandise hierarchy information for the item restriction.
Select the desired merchandise level from the list:
Table 6-15 Merchandise Level Fields - Associate Tab
| Field | Description |
|---|---|
|
Department |
Select the item's department from the drop-down list. |
|
Subdepartment |
Select the item's subdepartment from the drop-down list. |
|
Class |
Select the item's class from the drop-down list. |
|
Subclass |
Select the item's subclass from the drop-down list. |
Then click the Add link, to add the merchandise hierarchy level to the list below the entry fields.
and/or go to the Item ID field and enter the item ID for the restriction.
Then select the Add link, to add the item to the list.
|
Note: To delete a merchandise hierarchy or item from the restriction, click the Delete (X) icon associated with the record at the list. When prompted, click Yes to confirm the deletion. |
Click Next to open the Review tab.
Review your entries and click Save to save the item restriction.
To edit an item restriction:
Enter search criteria and click Search to find/edit an item restriction. If you do not enter any criteria before selecting Search, all item restrictions will be displayed in the Search Results page.
To edit information for an existing restriction, select the row from the search results list. The Item Restriction window appears.
|
Note: You can also create a new item restriction by clicking Add New at the Search Results page. |
Click Edit. The Edit Item Restriction page opens.
Complete the fields in the tabs as required, then click Save.
|
Note: To delete an existing restriction, click the Delete (X) icon associated with the record at the search results list. When prompted, click Yes to confirm the deletion. |
See step 6 for additional procedural information.
...continued from Items
|
Note: You need to create at least one item restriction, before you can define item restrictions types. For more information on item restriction types, see the Item Restriction Types section. |
Select the Item Restrictions Types option (Figure 6-3) to create item restrictions for the days and time frame in which certain items are sold. You can also configure the minimum required customer age to purchase an item, and the minimum required cashier age to sell an item.
To search for an item restriction type:
In the Item Restriction Type section, select the Restriction from the list.
Then click Next. The Item Restriction Type Search Results are displayed.
In the Search Results page you can:
Add an item restriction type. For more information, see Adding Item Restriction Types.
Edit an item restriction type. For more information, see Editing an Item Restriction
To add an item restriction type:
Click Add New. The Edit Restriction Type page appears.
In the Define tab, enter the following information:
Table 6-16 Item Restriction Type - Define Tab
| Field | Description |
|---|---|
|
Restriction [REQUIRED] |
Select the restriction. |
|
Restriction ID [REQUIRED] |
Select restriction ID. |
|
Effective Date [REQUIRED] |
Enter an effective date or use the Calendar icon to select a date. |
|
Expiration Date [REQUIRED] |
Enter an expiration date or use the Calendar icon to select a date. |
|
Is this restriction type excluded during returns? check box |
If you want to exclude this restriction types for returns, select the check box. |
Then click Next to open the Restriction Type tab.
Depending on the selected Restriction Type in the Define tab, complete the fields as following:
If you selected Minimum Customer Age, enter the minimum required customer age to purchase the item(s).
If you selected Minimum Cashier Age, enter the minimum required cashier age to sell the item(s).
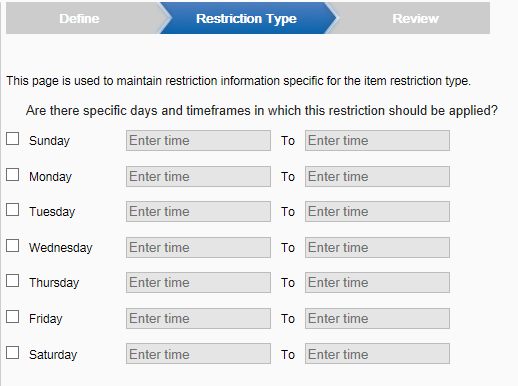
If you selected Day Restriction, select a day check box. Then enter a start and end time to define the restriction period.
Click Next to open the Review tab.
Review your entries and click Save to save the item restriction type.
To edit an item restriction type:
To edit information for an existing restriction type, select the row from the search results list. The Item Restriction Types window opens.
Click Edit. The Edit Item Restriction Types page opens.
Complete the fields in the tabs as required, then click Save.
|
Note: To delete an existing restriction type, click the Delete (X) icon associated with the record at the search results list. When prompted, click Yes to confirm the deletion. |
See step 6 for additional procedural information.
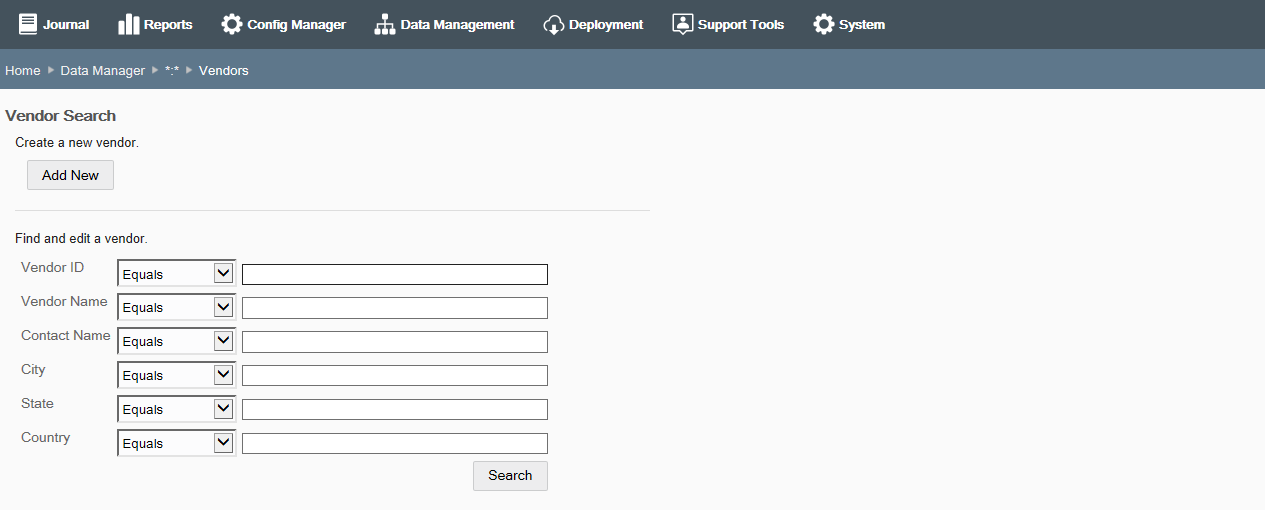
Use this feature to create and modify vendors for your organization.
If adding a new vendor:
At the Vendor Maintenance page, click Add New to create a new vendor.
If editing an existing vendor:
Enter search criteria and click Search to find/edit a vendor in your organization. If you do not enter any criteria before selecting Search, all vendors in your organization will be returned in the search. To edit information for an existing vendor, select the row from the search results list and click Edit at the vendor information screen.
|
Note: To delete an existing vendor, click the Delete icon associated with the record at the search results list. |
See step 6 for additional procedural information.
Complete the following Vendor Maintenance fields, then click Save.
Table 6-17 Basic Vendor Attributes
| Field | Description |
|---|---|
|
Vendor ID [REQUIRED] |
Enter a unique identifier assigned to a vendor. This value cannot be changed in Edit mode. |
|
Vendor Name [REQUIRED] |
Enter the name of the vendor. |
|
Contact Name |
Enter the primary contact person for the vendor. |
|
Contact Telephone |
Enter the primary telephone number of the primary contact. |
|
Buyer Name |
Enter the name of the buyer associated with the vendor. |
Table 6-18 Vendor Address Attributes
| Field | Description |
|---|---|
|
Address 1 |
Enter the first line of the mailing address. |
|
Address 2 |
Enter the second line of the mailing address. |
|
City |
Enter the city component of the mailing address. |
|
State |
Enter the State/Province component of the mailing address. |
|
Postal Code |
Enter the Postal or ZIP code component of the mailing address. |
|
Country |
Enter the country component of the address. |
|
Vendor Telephone |
Enter the primary telephone number. |
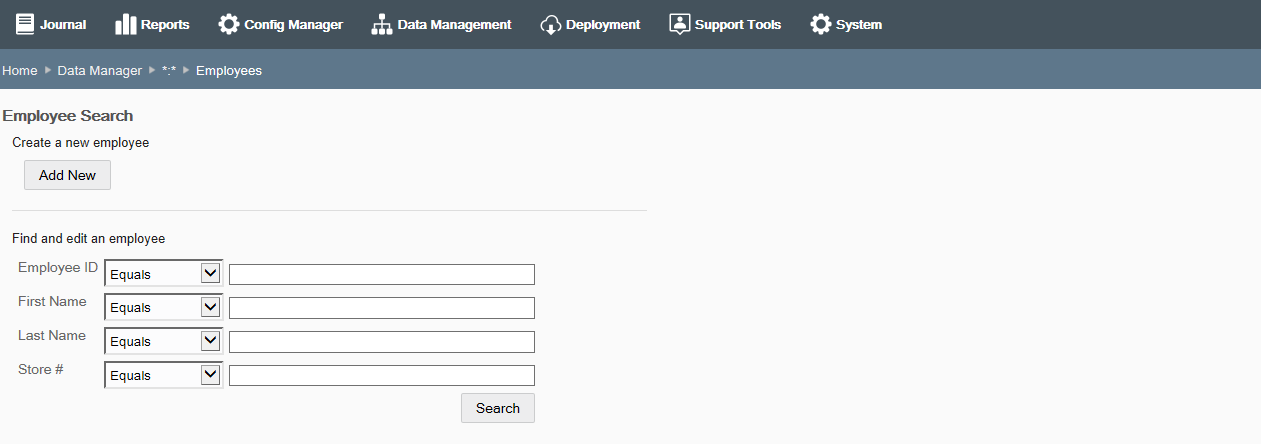
Use this feature to create and modify employee records for your organization.
If adding a new employee record:
At the Employee Maintenance page, click Add New to create a new employee record.
If editing an existing employee record:
Enter search criteria and click Search to find/edit an existing employee record in your organization. If you do not enter any criteria before selecting Search, all employee records in your organization will be returned in the search. To edit information for an existing employee record, select the row from the search results list and click Edit at the employee information screen.
|
Note: To delete an existing employee record, click the Delete icon associated with the record at the search results list. |
See step 6 for additional procedural information.
The following Employee Record Maintenance fields are available:
Table 6-19 Basic Employee Attributes
| Field | Description |
|---|---|
|
Employee ID [REQUIRED] |
Enter the unique number used to identify a store employee. This field cannot be changed in edit mode. |
|
Login ID |
If used, enter the employee's user ID for logging in to the system. (Only displayed if Oracle Retail Xstore Point of Service is configured to use a Login ID.) |
|
First Name [REQUIRED] |
Enter the employee's first name. |
|
Middle Name |
Enter the employee's middle name. |
|
Last Name [REQUIRED] |
Enter the employee's last name. Note: Select a suffix from the drop-down list if applicable. |
|
Language |
Select the employee's preferred language. |
|
Gender |
Select the employee's gender, Male or Female. |
|
Employment Status |
Select the employee's status: Active, Inactive, Terminated. Note: If Terminated status is selected, the termination date is required. Enter the termination date in the Termination Date field. |
|
Activation Date |
Enter the date on which the employee became active. |
Table 6-20 Detailed HR Information Attributes
| Field | Description |
|---|---|
|
Job Title |
Enter the employee's job title. |
|
Birth Date |
Enter the employee's date of birth. |
|
Base Pay |
Enter the employee's base pay. |
|
Pay Status |
Select the employee's pay status; hourly or salaried. |
|
Hire Date |
Enter the date the employee was hired. |
|
Last Review |
Enter the date of the employee's last review. |
|
Next Review |
Enter the date of the employee's next review. |
|
Extra Withholding check box |
Select this option if the employee wants to have extra money withheld from his/her pay. Type the dollar amount to be withheld in the Amount field. |
|
Overtime Eligible check box |
Select this option if the employee is eligible for overtime. |
|
Clock In Required check box |
Select this option if the employee is required to clock in and out. |
Table 6-21 Contact Information
| Field | Description |
|---|---|
|
Address 1 |
Enter the first line of the mailing address. |
|
Address 2 |
Enter the second line of the mailing address. |
|
City |
Enter the city component of the mailing address. |
|
State |
Enter the State/Province component of the mailing address. |
|
Postal Code |
Enter the Postal or ZIP code component of the mailing address. |
|
Country |
Enter the country component of the address. |
|
Primary Phone |
Enter the employee's primary phone number. |
|
Other Phone |
Enter the employee's alternate phone number. |
|
|
Enter the employee's email address. |
|
Emergency Contact |
Enter the name of an emergency contact for the employee. |
|
Emergency Phone |
Enter the phone number of the emergency contact for the employee. |
Table 6-22 Oracle Retail Xstore Point of Service Security Attributes
| Field | Description |
|---|---|
|
Primary Security Group [REQUIRED] |
Select the fundamental security group to which this employee belongs. |
|
Security Groups check box |
Select any other security groups to which this employee belongs: Trainee, Cashier, Keyholder, Manager. Select all that apply. By default, the "Everyone" security group is required for all employees. This value cannot be changed. |
|
Customer Groups check box |
Select the customer groups to which this employee belongs. Select all that apply. |
Table 6-23 Assigned Stores Attributes
| Field | Description |
|---|---|
|
Store # |
Enter the specific retail store within the organization the employee is assigned to. |
|
Start Date |
Enter the date the employee assignment begins at the store. Click Add Store to assign the employee to this store on the start date. Add as many stores/start dates as needed. Note: Click Add All Stores to assign the employee to all stores in the organization. The store information is added to the screen. Repeat until all stores where the employee works are listed. If needed, click Delete to remove an assigned store.. |
|
Temporary Assignment check box |
Select this option if the assignment is temporary. Enter the ending date for this temporary assignment. |
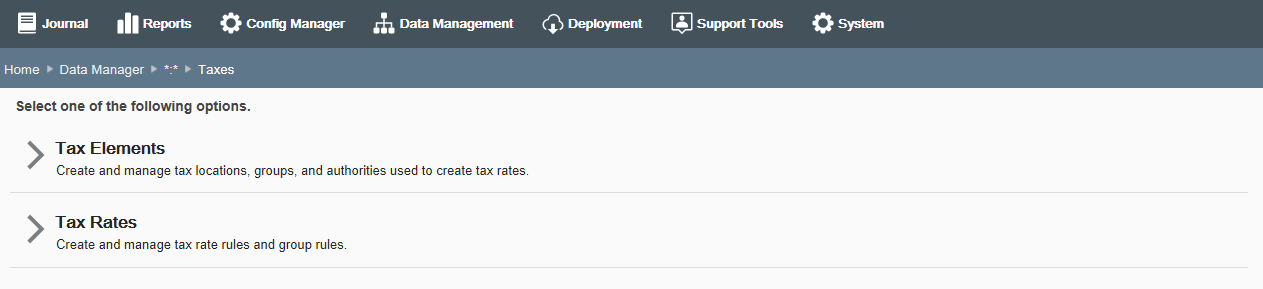
Use this feature to manage tax configurations for your organization.
To set up and manage Tax Authorities, Tax Locations, Tax Brackets, and Tax Groups used to create the tax rates, click Tax Elements. See Tax Elements below.
To set up and manage Tax Rates, click Tax Rates. See Tax Rates.
|
Note: The Tax Elements must be set up before you can set up the Tax Rates. |
Set up the basic tax elements here before setting up the tax rate rules.
Tax Authorities - Identifies the name of the authority that imposes the tax, and also supplies the rounding rules that are used in the calculation. See Tax Authorities.
Tax Locations - Defines the tax locations that can be assigned to individual stores. See Tax Locations
Tax Groups - Defines tax groups for items that are taxed according to the same rules. For example, certain food products may belong to the same tax group. After defining the tax groups, they may be assigned to individual items. See Tax Groups.
Tax Brackets - Defines the tax brackets used to calculate the sales tax for an item or transaction. See Tax Brackets.
If adding a new tax authority:
At the Tax Authorities Maintenance page, click Add New to create a new tax authority.
Complete the fields as required, then click Save.
If editing an existing tax authority:
At the Tax Authorities Maintenance page, select a tax authority from the list of tax authorities that are currently available for the targeted org node.
Edit the fields as required, then click Save. The following Tax Authority fields are available:
Table 6-24 Tax Authorities Fields
| Field | Description |
|---|---|
|
ID [REQUIRED] |
Enter a unique identifier of a tax authority. The ID cannot be changed in edit mode. |
|
Name [REQUIRED] |
Enter the name of the tax authority. |
|
Rounding Code |
Select from the drop-down list of rounding codes. Codes indicate how tax is to be rounded when calculated. The list is populated using Values: Always round down Always round up Round ceiling Round floor Round half down Round half even Round half up |
|
Rounding Digits |
Enter the number of digits to which rounding is to be calculated. |
If adding a new tax location:
At the Tax Locations Maintenance page, click Add New to create a new tax location.
Complete the fields as required, then click Save.
If editing an existing tax location:
At the Tax Locations Maintenance page, select a tax location from the list.
Edit the fields as required, then click Save.
|
Note: To search for a specific tax location, begin typing the tax location description in the Find a Tax Location field.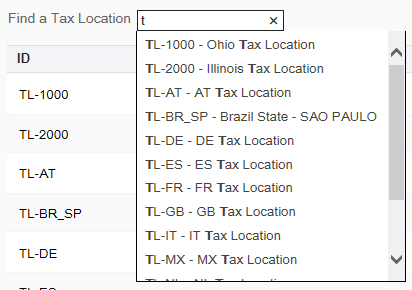 |
The following Tax Location fields are available:
Table 6-25 Tax Location Fields
| Field | Description |
|---|---|
|
ID [REQUIRED] |
Enter a unique identifier of a tax location. The ID cannot be changed in edit mode. |
|
Name [REQUIRED] |
Enter the name of the tax location. |
|
Description |
Enter a text description of the tax location. |
|
Note: Any Tax Locations created here will be "pending deployment"; however, these locations will be available for use within the other areas of the Taxes feature. |
If adding a new tax group:
At the Tax Groups Maintenance page, click Add New to create a new tax group.
Complete the fields as required, then click Save.
If editing an existing tax group:
At the Tax Groups Maintenance page, select a tax group from the list.
Edit the fields as required, then click Save. The following Tax Group fields are available:
Table 6-26 Tax Group Fields
| Field | Description |
|---|---|
|
ID [REQUIRED] |
Enter a unique identifier of a tax group. The ID cannot be changed in edit mode. |
|
Name [REQUIRED] |
Enter the name of the tax group. |
|
Description |
Enter a text description of the tax group. |
|
Note: Any Tax Groups created here will be "pending deployment"; however, these groups will be available for use within the other areas of the Taxes feature. |
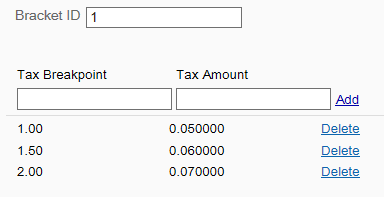
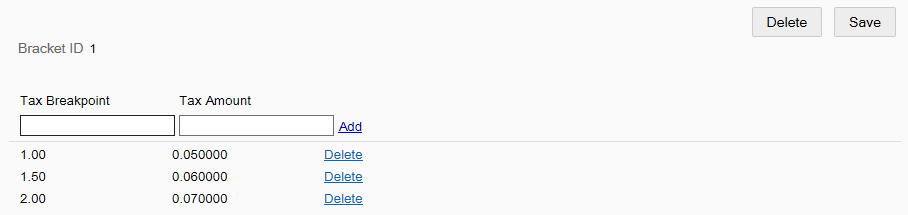
If adding a new tax bracket:
At the Tax Brackets Maintenance page, click Add to create a new tax bracket.
Complete the fields as required in step 3 below.
If editing an existing tax bracket:
At the Tax Brackets Maintenance page, select a tax bracket from the list.
Edit the fields as required in step 3 below.
Complete the following Tax Bracket fields:
Click Add to add the tax breakpoint and tax amount to the Tax Bracket.
Continue adding all tax breakpoints and tax amounts for the Tax Bracket, and click Add after each addition to add the values to the Tax Bracket. The entered values are sorted in ascending order based on the breakpoint as they are added.
Click Save to save the Tax Bracket.
|
Note: Any Tax Brackets created here will be "pending deployment"; however, these brackets will be available for use within the other areas of the Taxes feature. |
After setting up the basic tax elements (see Tax Elements), perform the following steps to set up and manage tax rate rules and group rules.
Select Tax Rates at the Taxes page (Figure 6-27), then enter/select a Tax Location and click Next.
Add a new tax rate, or edit an existing tax rate for the selected tax location:
If adding a new Tax Group Rule:
At the Tax Location Group Rules page, click Add New to create a new Tax Group Rule for the selected tax location.
Complete the fields as required, then click Save.
If editing an existing Tax Group Rule:
At the Tax Location Group Rules page, select a Tax Location Group Rule from the list.
Edit the fields as required, then click Save. The following Tax Group Rule fields are available:
Table 6-28 Tax Group Rule Fields
| Field | Description |
|---|---|
|
Tax Group [REQUIRED] |
Select the ID assigned to the tax group. The ID cannot be changed in edit mode. |
|
Name [REQUIRED] |
Enter the name assigned to the tax group. |
|
Tax Authority [REQUIRED] |
Select the Tax Authority. |
|
Tax Type [REQUIRED] |
Select the Tax Type. |
|
Transaction Level check box |
Select this check box to use this group rule at the transaction level. |
|
Compound Tax check box |
Select this check box to compound this group rule. A compound tax is a special kind of tax that is calculated by applying it to a previously taxed item. The value of the compound tax is based on the sum of an item's price plus the tax that was previously applied to it. |
|
Fiscal Tax ID [Country Pack ONLY] |
Add the tax authority specific fiscal tax ID to the selected tax group rule. Note: This field is only available for country packs. For more information on country packs, see the Xstore Suite Configuration Accelerator Guide. |
If adding or editing a Tax Rate Rule:
At the Tax Location Group Rules page, click Edit Rates.
Do one of the following:
To create a new Tax Rate Rule, click Add New.
To edit an existing Tax Rate Rule, select it in the list.
Complete the following Tax Rate Rules fields:
Table 6-29 Tax Rate Rules Fields
| Field | Description |
|---|---|
|
Minimum Taxable Amt |
Specify the starting value amount at which the tax rate rule is first applied if the tax rate rule is applied at different thresholds. |
|
Maximum Taxable Amt |
Specify the highest value amount at which the tax rate rule is applied if the tax rate rule is applied at different thresholds. |
|
Tax Rate [REQUIRED] |
Select the tax rate and enter the amount, percent, or select a tax bracket. |
|
Effective Date |
Enter the date on which the tax rate rule becomes operative. |
|
Expiration Date |
Enter the date on which the tax rate rule is no longer operative. |
|
Breakpoint |
Select the breakpoint from the list. This value determines if the tax rate rule is applied to the entire value of the transaction or only to a portion of it, if the rule has threshold values defined. |
|
Note: The Seq. Number determines the order in which a tax is applied in a transaction. The rule with sequence number "1" is first, "2" is second, and so on. |
Click Save.
To delete a Tax Rate Rule:
Click the Delete icon associated with the Tax Rate Rule.
When prompted, click Yes to confirm the deletion.
If adding or editing a Tax Rate Rule Override:
See If adding or editing a Tax Rate Rule. The process for Tax Rate Rule Overrides is the same as the process for Tax Rate Rules.
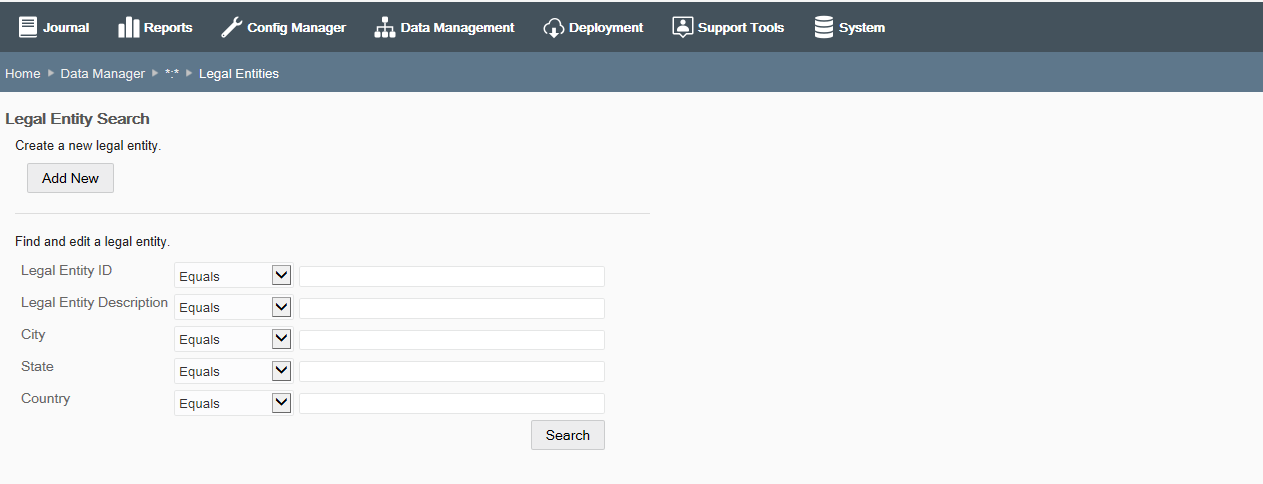
Use this feature to search, create and modify legal entities.
|
Note: This feature is only available for country packs. For more information on country packs, see the Xstore Suite Configuration Accelerator Guide. |
If adding a new legal entity:
At the Legal Entity Maintenance page, click Add New to create a new legal entity.
If editing an existing legal entity:
Enter search criteria and click Search to find/edit a legal entity in your organization. If you do not enter any criteria before selecting Search, all legal entities in your organization will be returned in the search. To edit information for an existing legal entity, select the row from the search results list and click Edit at the legal entity information screen.
See step 6 for additional procedural information.
Complete the following Legal Entity Maintenance fields, then click Save.
Table 6-30 Basic Legal Entity Attributes
| Field | Description |
|---|---|
|
Legal Entity ID [REQUIRED] |
Enter the ID of the Legal Entity. |
|
Legal Entity Description [REQUIRED] |
Enter a short description of the Legal Entity. |
|
Address 1 and Address 2 |
Enter the address information of the Legal Entity. |
|
City |
Enter the city. |
|
State |
Enter the state. |
|
Postal Code |
Enter the postal code. |
|
Country [REQUIRED] |
Enter the country. |
|
Tax ID |
Enter the Tax ID of the Legal Entity. |
|
Fiscal Code |
Enter the Fiscal Code of the Legal Entity. |
|
Taxation Regime |
Enter the invoice issuer fiscal regime, defined by the government. |
|
Employer ID |
Enter the ID with which the company is known by the Chamber of Commerce. |
|
Activity Code |
Enter the business activity code for a business in a determined country. For example, used in France where every business is classified under an activity code entitled APE (Activite Principale de l'Entreprise). |
Use this feature to create and modify store messages and employee tasks.
To create or edit a store message and target it to a location, or a location and register combination, click Store Messages. See Store Messages below.
To create or modify tasks for a store or for specific employees within a store, click Employee Tasks. See Employee Tasks.
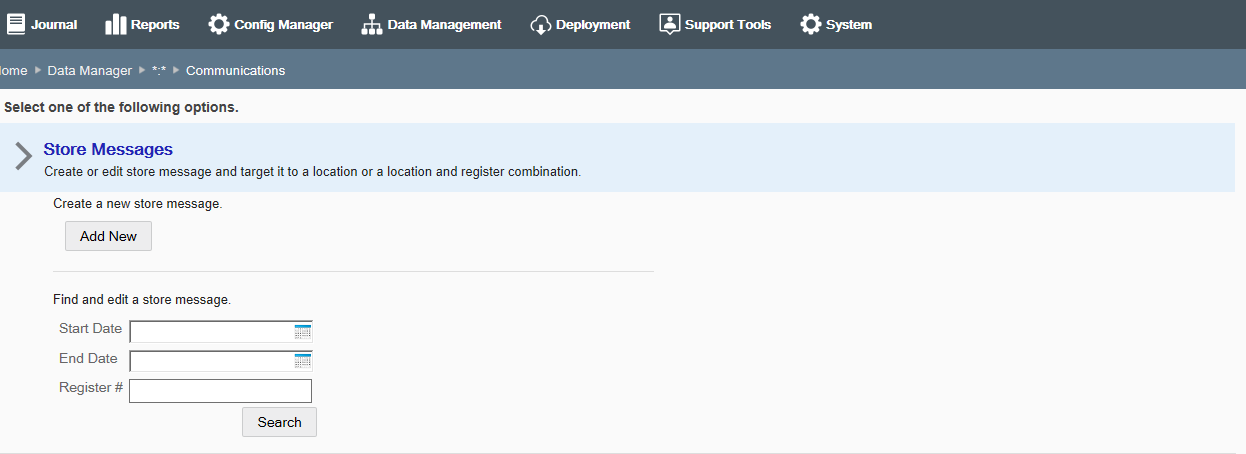
Use this feature to create or edit a store message and target it to a location, or a location and register combination.
If adding a new message:
At the Store Messages page, click Add New to create a new message.
Complete the fields as required, then click Save.
If editing an existing message:
Enter search criteria and click Search to find/edit a store message in your organization. If you do not enter any criteria before selecting Search, all messages in your organization will be returned in the search.
To edit information for an existing message, select the row from the search results list and edit the information as needed. You also have the option here to create a new message by clicking Add New at the search results page.
Complete the fields as required, then click Save.
|
Note: To delete an existing message, click the Delete icon associated with the record at the search results list. When prompted, click Yes to confirm the deletion. |
See step 6 for additional procedural information.
The following Store Messages fields are available:
Table 6-31 Store Messages Attributes
| Field | Description |
|---|---|
|
Message Scope |
Identifies the scope and number of stores that will be receiving this message. The message scope is the node selected for the Data Manager session and cannot be changed here. |
|
Register Specific check box |
Select this option if the message is targeted to a specific register and enter the register number in the Register # field when prompted. Note: If you select this option, the message displays on only the specified workstation. If you do not select this option, the message displays on all workstations. |
|
URL check box |
Select this option if there is a URL associated with this message and enter the URL when prompted. The hyperlink will display with the message in Oracle Retail Xstore Point of Service. |
|
Priority [REQUIRED] |
Select the message priority: High, Medium, Low. |
|
Start Date [REQUIRED] |
Enter the date the message is to be displayed. |
|
End Date [REQUIRED] |
Enter the date the message is no longer displayed. |
|
Message [REQUIRED] |
Enter the message text. |
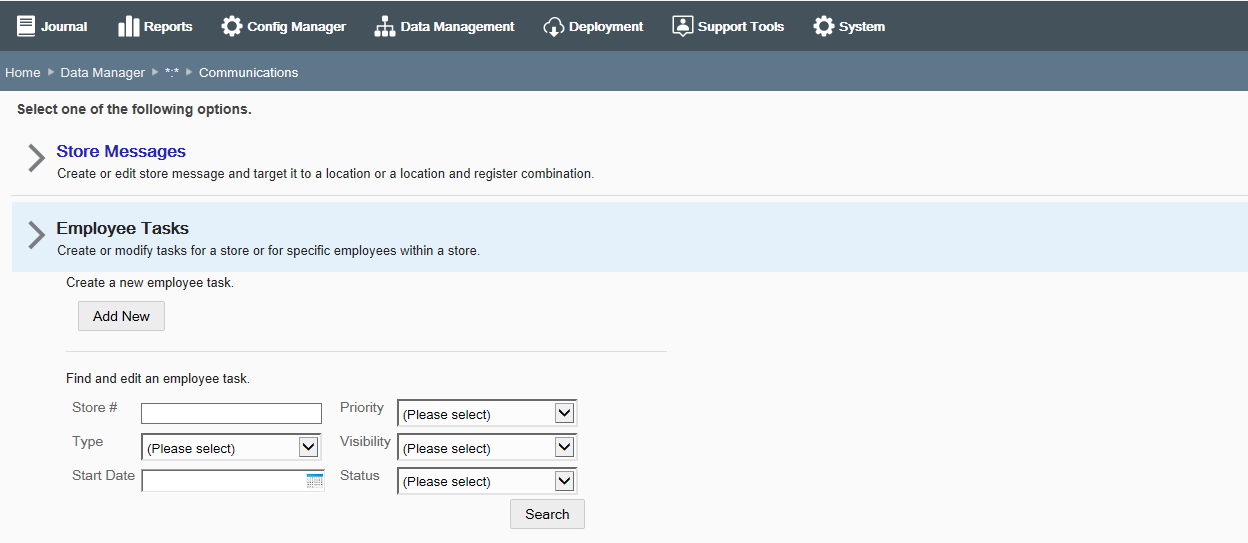
Use this feature to create or modify tasks for a store, or for specific employees within a store.
|
Note: If the store is integrated with Customer Engagement, it becomes the system of record for Employee Tasks. Therefore, Employee Tasks should be assigned from Customer Engagement, not using Xstore Office Employee Tasks functionality. If changes are completed in Xstore Office, they will be disregarded. |
If adding a new employee task:
At the Employee Tasks page, click Add New to create a new employee task.
Complete the fields as required, then click Save.
If editing an existing employee task:
Enter search criteria and click Search to find/edit an existing employee task in your organization. If you do not enter any criteria before selecting Search, all employee tasks in your organization will be returned in the search.
To edit information for an existing employee task, select the row from the search results list and edit the information as needed. You also have the option here to create a new task by clicking Add New at the search results page.
|
Note: To delete an existing employee task, click the Delete icon associated with the record at the search results list. When prompted, click Yes to confirm the deletion. |
Complete the fields as required, then click Save.
See step 6 for additional procedural information.
The following Employee Tasks fields are available:
Table 6-32 Employee Tasks Attributes
| Field | Description |
|---|---|
|
Status |
This field cannot be changed. Indicates the status of the task (Open, In Process, Cancelled, and Closed). |
|
Store # [Required] |
Enter the store number. This value can only be edited in Add mode. |
|
Task Title [Required] |
Enter a short summary description of the task. |
|
Priority [Required] |
Select the task priority: High, Medium, Low. |
|
Type [Required] |
Select the type that best fits the task (General, Mailing, Display, Housekeeping, Receiving, Shipping, or Count). |
|
Start Date [Required] |
Enter the date the task should be started. |
|
End Date [Required] |
Enter the date the task should be completed. |
|
Start Time [Required] |
Enter the time the task should begin. |
|
End Time [Required] |
Enter the time the task should end. |
|
Visibility [Required] |
Select who can view this task: Store, Employee Group, or Employee. |
|
Assignee |
If the visibility selection is Employee Group or Employee, select the target assignee from the drop-down list. [REQUIRED] Note: The visibility field determines the drop-down list for the Assignee field. If you select Store for visibility this field will not be available. |
|
Description [Required] |
Enter a detailed description of the task. |
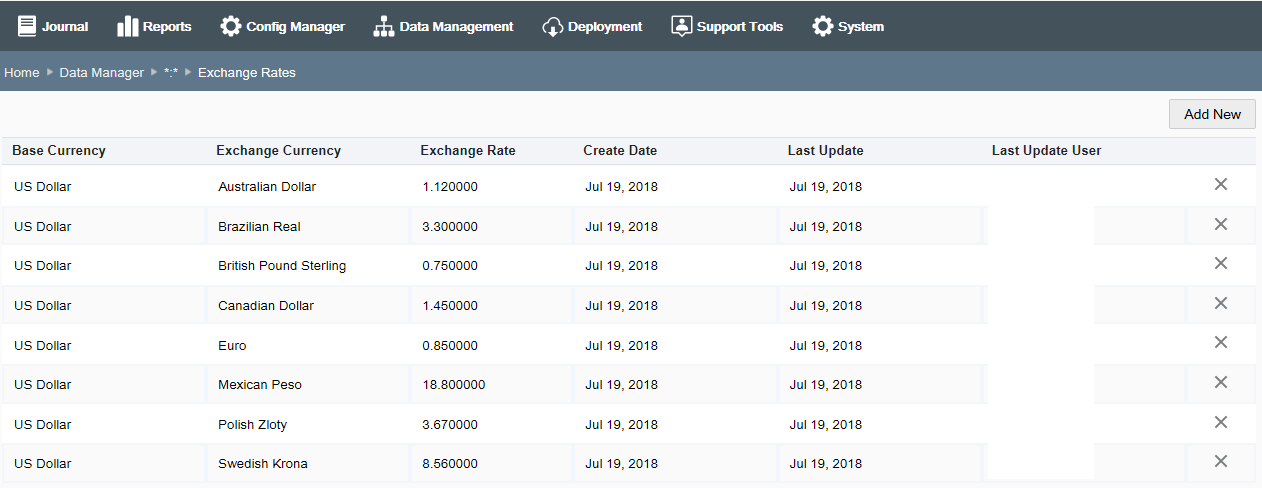
Use this feature to create and modify currency exchange rates for your organization.
If adding a new currency exchange rate record:
At the Exchange Rates maintenance page, click Add New.
Enter information required to create a new currency exchange rate record.
Click Save.
If editing an existing currency exchange rate record:
Select the record from the list to open the Edit window.
Make your changes, then click Save.
|
Note: To delete a currency exchange rate record, click the Delete icon associated with the record. When prompted, click Yes to confirm the deletion. |
The following Currency Exchange Rates fields are available:
Table 6-33 Currency Exchange Rate Attributes
| Field | Description |
|---|---|
|
Base Currency |
Select the local/home currency. This value can only be edited in Add mode. |
|
Exchange Currency |
Select the non-local currency used in the exchange of tenders. This value can only be edited in Add mode. |
|
Exchange Rate |
Enter the quantitative conversion factor between the base currency and the exchange currency. |
|
Note: This Data Manager Stores option allows you to search for and modify store information for an existing store only. To set up a new store, see Managing the Organization Hierarchy. |
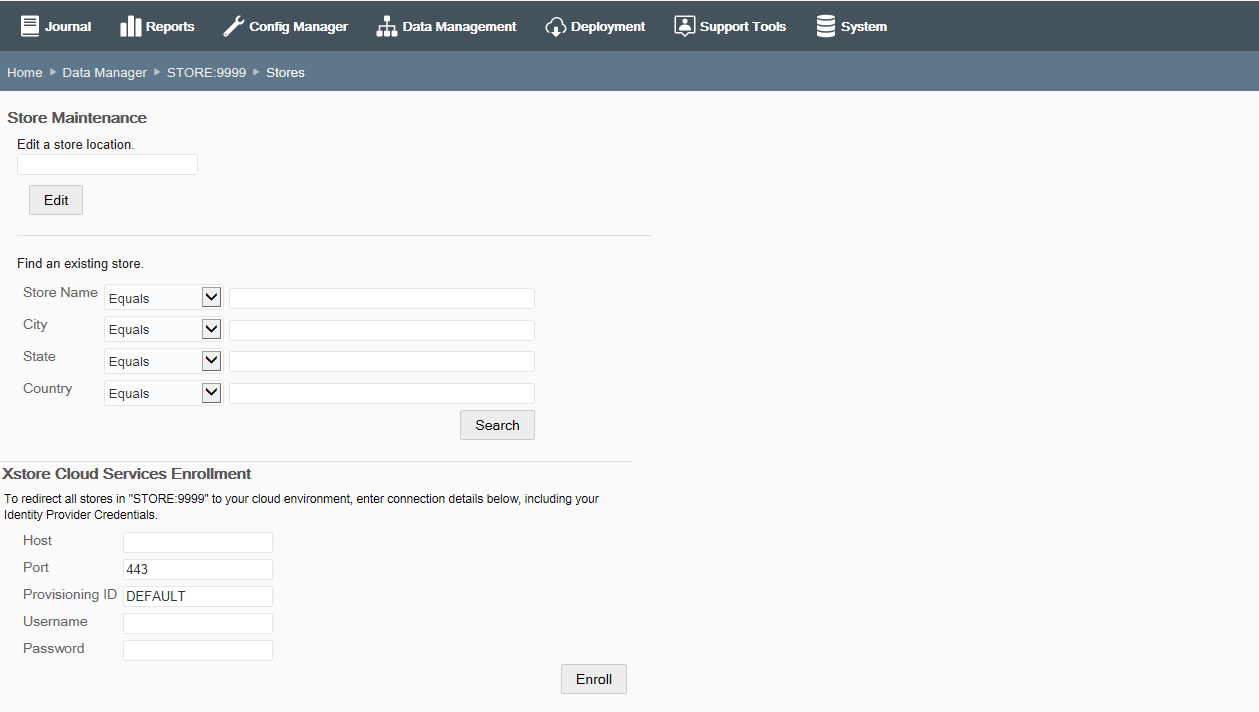
Use this feature to search for and modify store information.
To edit an existing store:
Find the store to be edited:
If you know the store ID, enter the store ID in the Edit a Store Location field at the Stores Maintenance page.
To search for a store, enter search criteria and click Search to find/edit an existing store in your organization. If you do not enter any criteria before selecting Search, all stores in your organization will be returned in the search. To edit information for an existing store, select the row from the search results list.
Click Edit at the Store Information screen.
Complete the fields as required, then click Save.
See step 6 on page 4 for additional procedural information. The following Stores fields are available:
Table 6-34 Store Location Attributes
| Field | Description |
|---|---|
|
Store # |
The store identifier. This value cannot be changed. |
|
Store Name [Required] |
Edit the store name. |
|
Alternate Store # |
Enter the Shop ID (alternate store number) assigned to a store number as a reference to an outside/downstream integration. |
|
Airport code |
Select the airport code (IATA) assigned to a store number as a reference to calculate the TAX_FREE, TAX_NORMAL, and PRICE_SPECIAL amounts for transactions in an Airside location. Valid values are derived from data from the com_airport table in the Xcenter database. |
|
Store Description check box |
Select this option to enter a text description for the store. Type the description in the description field when prompted. |
|
Address 1 |
Enter the first line of the mailing address. |
|
Address 2 |
Enter the second line of the mailing address. |
|
City |
Enter the city component of the mailing address. |
|
State |
Enter the State/Province component of the mailing address. |
|
Postal Code |
Enter the Postal or ZIP code component of the mailing address. |
|
Country |
Enter/select the country component of the address. |
|
Geographic Parameters check box |
Select this option to enter the latitude and longitude values for this location. |
Table 6-35 Store Detail Attributes
| Field | Description |
|---|---|
|
Tax Location |
Select the identifier of the tax location. |
|
Currency |
Select the base currency used in the store. |
|
Locale |
Select the base locale for the store. |
|
Organization Hierarchy Position |
View only. This shows the store's position in the organizational hierarchy. |
|
Legal Entity |
Select a legal entity associated to the country of the store. Note: This field is only available for country packs. Additionally, |
The table below describes Store Detail fields, which are only available for country packs. The Store Detail fields may differ depending on your local fiscal requirements.
Table 6-36 Store Detail Attributes [Country Pack ONLY]
| Field | Description |
|---|---|
|
Legal Entity |
Select a legal entity associated to the country of the store. |
|
State Tax ID |
Enter the Tax ID. Note: Only available for country pack Brazil.For more information on country packs, see the Xstore Suite Configuration Accelerator Guide. |
|
City Tax ID |
Enter the Tax ID of the city. Note: Only available for country pack Brazil.For more information on country packs, see the Xstore Suite Configuration Accelerator Guide. |
|
Official Name |
Enter the official name of the store. Note: Only available for country pack Brazil. For more information on country packs, see the Xstore Suite Configuration Accelerator Guide. |
|
NFe Fiscal Regime Code |
Enter the Nota Fiscal Eletrônica regime code. Note: Only available for country pack Brazil. For more information on country packs, see the Xstore Suite Configuration Accelerator Guide. |
|
SIRET number |
Enter the SIRET number. The SIRET number identifies the store and must be used in the invoices. Note: Only available for country pack France. For more information on country packs, see the Xstore Suite Configuration Accelerator Guide |
Table 6-37 Registers/Tills Attributes
| Field | Description |
|---|---|
|
Deposit Bank Name |
Enter the deposit bank name to be printed when franking. The default value here is from Xadmin Settings. |
|
Deposit Bank Account Number |
Enter the deposit bank account number to be printed when franking. The default value here is from Xadmin Settings. |
|
Number of Registers in the Store |
Enter the number of registers in the store. |
|
Use Till Accountability check box |
IMPORTANT] If this setting is changed, you must deploy the changes at the end of the day, during the store close. Downloading this change during the day, while the store is open, will cause problems in Oracle Retail Xstore Point of Service. This setting determines whether the store uses Till Accountability mode or Register mode. Select the check box to use Till Accountability mode. The default value here is from Oracle Retail Xstore Office Cloud Service System Settings. |
|
Default Float Amount check box |
In Register Mode:
Note: In Register Mode, the number of tills cannot be greater than the number of registers. In Till Accountability Mode: 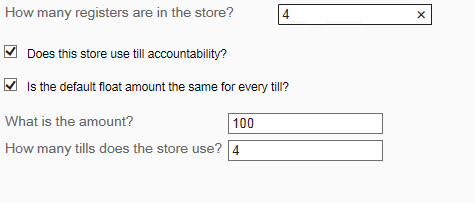
Note: The store bank float amount is auto-calculated as the sum of all till float amounts. |
|
Store Manager |
Enter the store manager's name. |
|
Telephone 1 through 4 |
Enter the telephone numbers for the store. Telephone 1 is the primary telephone number for the store. |
|
Store Email |
Enter the store's email address. |
Data Manager changes are collected into "data bundles" containing all of the changes made within a particular org level during a given day. The changes collected in the data bundle will be deployed to their targeted stores automatically at the end of the day (as configured), or can be deployed immediately using the Pending Modifications option described here if needed.
|
Note: Any changes made after the configured time of day will collect and deploy during the next day (and the next configured time) unless the change(s) are deployed manually. |
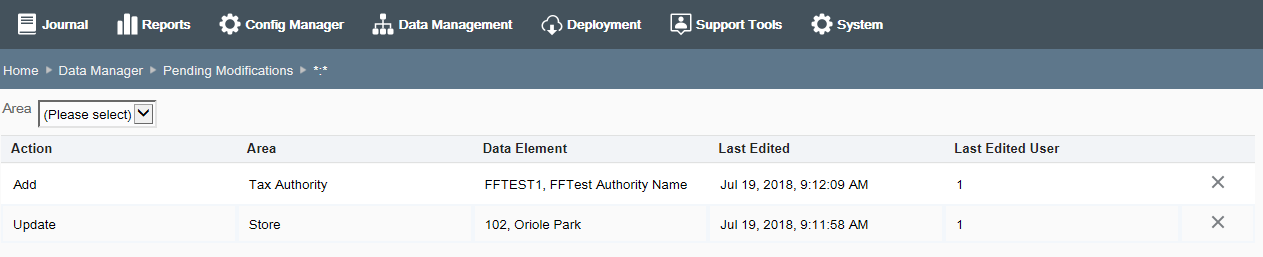
Click Pending Modifications at the Data Manager page to view and/or deploy data changes.
The Pending Modifications page shows the data bundles within the logged on user's org hierarchy level that have not been deployed. There is one row per target.
Options at the Pending Modifications page include the ability to view, deploy, or delete the changes as a whole (data bundle) including all the individual data changes that they contain.
|
Note: To delete only an individual data change or changes within a data bundle, see Viewing the Individual Changes in the Data Bundle in the Data Bundle. |
|
Important: If you choose to deploy the changes here, the deployment will happen immediately. Once deployed, it is no longer possible to view or edit the data changes, (that is the group of changes will not be available to be deployed again). If an error was deployed, you must create a new data change and deploy it to fix the error.Any deployments manually initiated from the Pending Modifications page will be shown on the Deployments page. See Chapter 7, "Deployment Management" for more information. |
The following information is shown on the Pending Modifications page:
Table 6-38 Pending Modifications Page Fields
| Field | Description |
|---|---|
|
Target |
The org node targeted for the data bundle. |
|
Last Edited |
The date the data bundle was most recently edited. |
|
Last Edited User |
The user who last edited the data bundle. |
|
# of Changes |
The number of individual changes in this data bundle for the targeted org node. |
|
Deploy Icon |
|
|
Delete Icon |
|
To view the individual changes in the data bundle, click the row in the search results list at the Pending Modifications page (Figure 6-38). The Pending Modifications Detail page lists the individual data changes that have been made within the selected group of undeployed data changes. Options here include the ability to view or delete the individual changes.
|
Note: To filter the list based on an Area within the group of undeployed data changes, select the Area from the drop-down list. |
Table 6-39 Pending Modifications Details Fields
| Field | Description |
|---|---|
|
Action |
The action that will be taken when sent to Oracle Retail Xstore Point of Service; Add, Update, or Delete. |
|
Area |
The type of data manager change. |
|
Data Element |
A description of the data manager change. |
|
Last Edited |
The date the modification was most recently edited. |
|
Last Edited User |
The user who last edited the modification. |
|
Delete Icon |
To delete the individual Data change within the data bundle, click the Delete icon associated with the row. When prompted, click Yes to confirm you want to delete the selected Data change and the row is removed from the data bundle. |
This feature provides the ability to deploy data from Xcenter (a part of Oracle Retail Xstore Office Cloud Service) to an org node so that all data within the selected org node's scope is transferred to the selected org node.
For example, when opening a new store, use this feature to send Xcenter data to the new store.
|
Note: The intended use of this feature is for franchise retailers that have a need to republish small amounts of data to the store. Retailers with thousands of items will likely use a merchandising system to republish items. Using this feature for a large number of items could perform slowly and could encounter out-of-memory errors. |
Valid data for redeployment includes: Items, Exchange Rates, Store Messages, Taxes, Employees, and Vendors.
|
Note: Tasks and Stores data cannot be redeployed. |
Data intended for the selected node will be deployed as follows:
A transfer to a single store may require data from a store-level, district-level, and corporate-level. In this example, all of this data will be included in the deployment.
A transfer to a region or district may result in multiple deployments to accommodate the multiple stores within the node. For example, if transferring to a district, the district may contain a total of 10 stores, and the stores may all receive different data which will result in 10 deployments.
Depending on your security privileges, this feature also allows you to create an Omnichannel Data Service (OCDS) on demand job. On demand jobs generate .mnt files, containing instructions and data, necessary to refresh the Xstore and Xcenter database tables. On demand jobs are for one-time-only execution.
|
Note: OCDS on demand jobs are only available, if the OCDS is integrated with Xstore Office, for more information see Integration Management. |
From the Oracle Retail Xstore Office Cloud Service menu, select Data Management, then Data Manager, or click the Data Manager link in the Data Management panel.
Click Data Publisher.
Select the Target Organization Node.
|
Note: Only the Organization Nodes the logged-in user has privileges to use will be listed here. |
Select the Data Source option. Available options are Xstore Office or OCDS.
|
Note: The Data Source option is only available, if you hold the necessary security privileges and if OCDS is integrated with Xstore Office, for more information see Integration Management. |
Then click Next.
At the Publish Data page, select the types of data to be transferred from Xcenter (a part of Oracle Retail Xstore Office Cloud Service) to the targeted org node:
To transfer all data listed here to the targeted org node, click the Select All button.
|
Note: When all categories are selected, the button toggles to "Select None". If selected, all check marks will be removed. |
To transfer all data in a category, select the check box next to the category name.
To transfer specific data within a category, select the check box next to the data item.
Click Next.
At the Target Node Information window, review your changes and select a download priority option - Immediate or Store Close - from the drop-down list.
Click Deploy.
When prompted that the deployment was scheduled successfully, click OK to close the window.
|
Note: bout Deployment If the deployment of data should fail for one (or more) nodes within the target, the entire deployment will not fail. In this case, the progress bar turns red, indicating an error. At the end of the transfer, a failure count is shown above the progress bar (that is 5/250), and you can click a provided link to see more information at the "View Deployments" page. |
Organization Hierarchy management includes both defining the hierarchy levels in your organization, as well as organizing and maintaining the nodes in the hierarchy.
From the Oracle Retail Xstore Office Cloud Service menu, select Data Management, then Organization Hierarchy, or click the Organization Hierarchy link in the Data Management panel.
At the Organization Hierarchy page, you have the following options:.
To define organization hierarchy levels, click Organization Hierarchy Levels.
Refer to Defining Organization Hierarchy Levels below for procedural information.
To maintain and organize the nodes in the hierarchy, click Organization Hierarchy Maintenance. Refer to Managing the Organization Hierarchy for procedural information.
To create and maintain store collections, click Store Collections. Refer to Creating and Maintaining Store Collections.
Use this feature to define the Organization Hierarchy levels in your organization. Once set up, these levels will be available for use in Organization Hierarchy Maintenance.
The Parent (root) Level field cannot be edited, and only one root level (*) is allowed.
|
Note: STORE is a reserved word within organization hierarchy maintenance and cannot be added as an organization level. |
Select an org node within the org hierarchy tree.
With the node selected, click Add Level to add an org level to the selected node.
Complete the fields as required and click Save.
Select an org node within the org hierarchy tree.
With the node selected, enter the description in the Description field.
Click Save. The tree view description is updated with the new description.
Select an org node within the org hierarchy tree.
With the node selected, click Delete.
|
Note: Levels that are currently being used, that is, levels with children, cannot be deleted. |
When prompted, click Yes to confirm you want to delete the selected hierarchy level.
The Organization Hierarchy Maintenance feature provides the ability to add an organization hierarchy level to a node, create a new store and add it to an org node, add an existing, unassigned store to an org node, temporarily deactivate an org node, and deploy the changes.
|
Note: To search for a specific node, begin typing the node description in the Find a Node field. |
|
Note: Organization Hierarchy levels must be defined before they can be used in Organization Hierarchy Maintenance. See Defining Organization Hierarchy Levels for more information about setting up Organization Hierarchy levels for your organization. |
Perform the following steps to add an organization hierarchy level to a node.
From the Organization Hierarchy Maintenance page, select an org node within the org hierarchy tree.
With the node selected, click the add a level to the currently selected node link.
In the Add Hierarchy Level Node window, complete the fields as required:
Table 6-41 Add Hierarchy Level Node Window
| Field | Description |
|---|---|
|
Parent Node |
Defaults to the currently selected node. |
|
Level [Required] |
Select the new level from the drop-down list. Organization Hierarchy levels must be defined before they can be used in Organization Hierarchy Maintenance. See Defining Organization Hierarchy Levels for more information about setting up Organization Hierarchy levels for your organization. |
|
Value [Required] |
Enter a value for the new level. |
|
Manager |
Enter the manager for the new level. This is a level manager or an org node manager (for example, district manager). The value is stored in the org hierarchy table along with the node info. |
|
Active Node check box |
Selected by default, indicating the organization hierarchy level is active and available. To deactivate the org node, deselect the Is this node active? check box. Refer to Deactivating an Org Node for more information. |
Click Save.
Perform the following steps to edit an organization hierarchy level value and/or manager.
Select an org node within the org hierarchy tree.
With the node selected, click Edit.
Make changes to the level Value and/or Manager as needed.
Click Save.
|
Note: To deactivate the org node, deselect the Is this node active? check box. Refer to Deactivating an Org Node for more information. |
Perform the following steps to add any unassigned stores to the organization hierarchy. This process does not create new stores, it is used to add existing stores to the Organization Hierarchy tree.
Select an org node within the org hierarchy tree.
With the node selected, click the Add the stores to the currently selected node link to display a list of all unassigned stores.
Select the check box for one (or more) stores from the list, then click Add to add the selected stores to the selected org node.
The stores are added to the selected org node and the system returns to the Organization Hierarchy Maintenance page.
Perform the following steps to create a new store and place it within the organization hierarchy. This process is not used to add existing stores to an org hierarchy node.
Select the node where the new store will be placed.
With the node selected, click the Create a new store record link.
Complete the required fields in the Store wizard, then click Save.
This is the same wizard used to edit stores within Data Manager; see Stores for detailed information about the fields.
When prompted, click OK to close the "Store created successfully" prompt. A deployment of this record to all stores will now be scheduled.
When prompted, click OK to close the "Deployment was scheduled successfully" prompt.
The system returns to the Organization Hierarchy Maintenance page. The new store is added to the selected org node.
Perform the following steps to deactivate an org node. Deactivated org nodes will not appear in drop-down pick lists throughout Oracle Retail Xstore Office Cloud Service. Making an org node inactive does not stop the stores within that node from functioning. This inactive setting simply prevents users from making data changes and deployments to the node. For example, this feature may be used when creating new districts or reorganizing the hierarchy. Deactivating an org node ensures that other users cannot make data changes or deployments to the stores that fall within that node.
Perform the following steps to deactivate an org node.
Select an org node within the org hierarchy tree.
With the node selected, click Edit.
Deselect the Is this node active? check box.
Click Save.
The org node information shows the node is Inactive and the org node is grayed-out in the tree view.
|
Note: To activate an inactive org node, select the Is this node active? check box. |
Perform the following steps to move org nodes throughout the org hierarchy. For example, this feature can be used if redistricting actions are needed within the organization. This type of movement may be as simple as: Move STORE:101 from DISTRICT:2 to DISTRICT:3, or it may be more complicated and involve multiple moves. In either case, the process is the same.
Select an org node (other than the root node) within the org hierarchy tree.
With the node selected, click Edit.
To change the selected node's parent level, begin typing the node identifier in the Parent Node field. The suggested parent nodes are displayed in a list.
Select the new parent level, then click Save.
The previously selected node is now shown under its new parent level.
Use Store Collections to create and maintain groups of organization nodes that represent collections of stores from different places in the organization hierarchy.
Store Collections are user-defined store groups. Once defined and set up, these Store Collections are made available to be used as target areas for configuration and data changes.
The Store Collections page shows your current Store Collections and the number of stores in each collection. In the example below, two store collections have been defined. If no collections have been defined this page will be blank. Click a column header to sort the column as needed.
At the Store Collections page, click Add New to create a new store collection.
Complete the fields as required:
ID - Enter the collection identifier. This field can only be edited when adding a new Store Collection. A store collection ID must be letters or numbers only and cannot include a colon (:), underscore (_), or comma (,) in the name.
Description - Enter the collection description. This field can be changed when adding a new Store Collection, and when editing an existing Store Collection.
Organization Nodes - Specify the node belonging to this store collection, then click Add. Repeat this step for each node that is part of this collection.
Click Save.
Oracle Retail Xstore Office Cloud Service returns to the Store Collections page.
At the Store Collections page, select a Store Collection from the list.
|
Note: To delete a store collection, at the Store Collections page, select the Delete icon associated with the Store collection. When prompted, click Yes to confirm the deletion |
Complete the fields as required:
ID - This field cannot be changed.
Description - Edit the collection description.
Organization Nodes
To add a node, specify the node belonging to this store collection, then click Add. Repeat this step for each node to be added to this collection.
To remove a node from the collection, click the Delete link associated with the node.
Click Save.
Oracle Retail Xstore Office Cloud Service returns to the Store Collections page.
The end-of-year process is used to post the required rollup data for stock valuation for all items and stores. This closes the item's quantity and value for the specified fiscal year. The consolidated inventory totals are used for the stock valuation (PWAC) reports.
|
Note: The inv_cst_item_yearend table must be populated with data for the previous year. For new retailers with no previous years' data, a record must be added for the previous year with quantity zero (0). |
Stock Valuation is a process that allows you to track the item stock value for receivables at the store for both corporate-created receiving documents and store-created receiving documents. This inventory valuation allows you to determine a monetary value for items that make up your inventory, and is dependent on a year-end process for the company. Stock valuation is based on the fiscal calendar.
All receiving documents must contain the items' cost to be used to calculate the stock valuation. The cost is the amount charged to the franchisee/store. When merchandise is received from the warehouse, the cost on the ASN/receiving document must be accepted or adjusted by the store in order to receive merchandise into inventory.
To access Stock Valuation Year End Roll-up, select Roll-up Stock Valuation from the Data Management menu.
Perform the following steps to post the required rollup data for stock valuation for all items and stores.
Enter the Fiscal year that is being closed.
Click Roll-up Data.
The system will perform the following validation checks on the Fiscal Year entered:
Must be less than the current fiscal year.
Cannot be greater than the last consolidated year + 1. (The sequence must be respected; if 2011 has been consolidated, you can only consolidate 2012.)
Cannot be less than the last consolidated year. (If 2012 has been consolidated you cannot select 2010, but you can select 2012.)
If there are no previous consolidations, the system can accept any value less than the current year. (In this case, if there are any documents in the database for the year before the selected year, all documents will be consolidated in the selected year.)
Example:
Current year=2014
Documents exist in the database for 2009, 2010, 2011, 2012, and 2013
No consolidations have been done to date
If 2012 is selected as the closing year, the system will prompt to close previous years (2009, 2010, 2011) first before continuing.
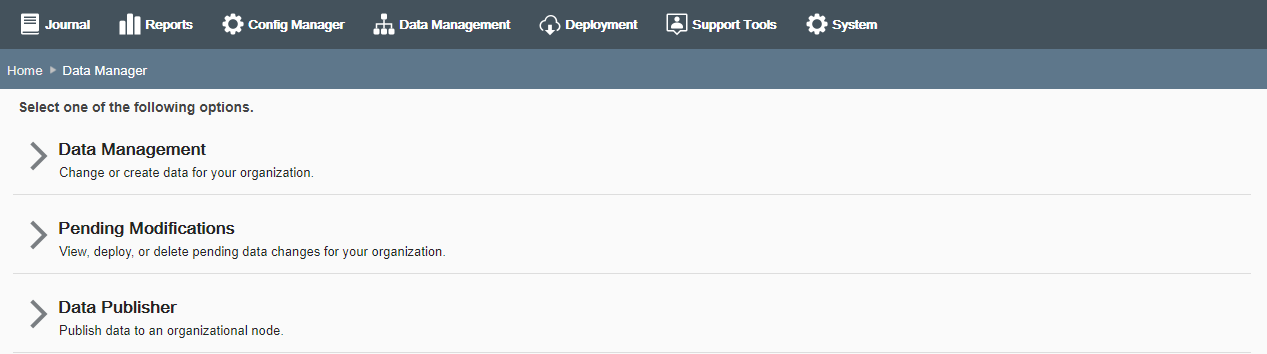
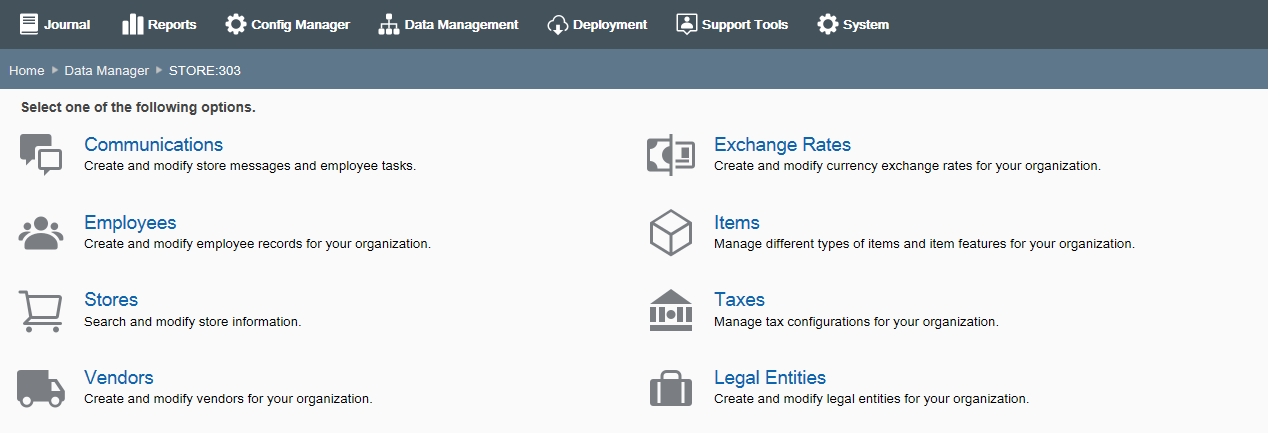

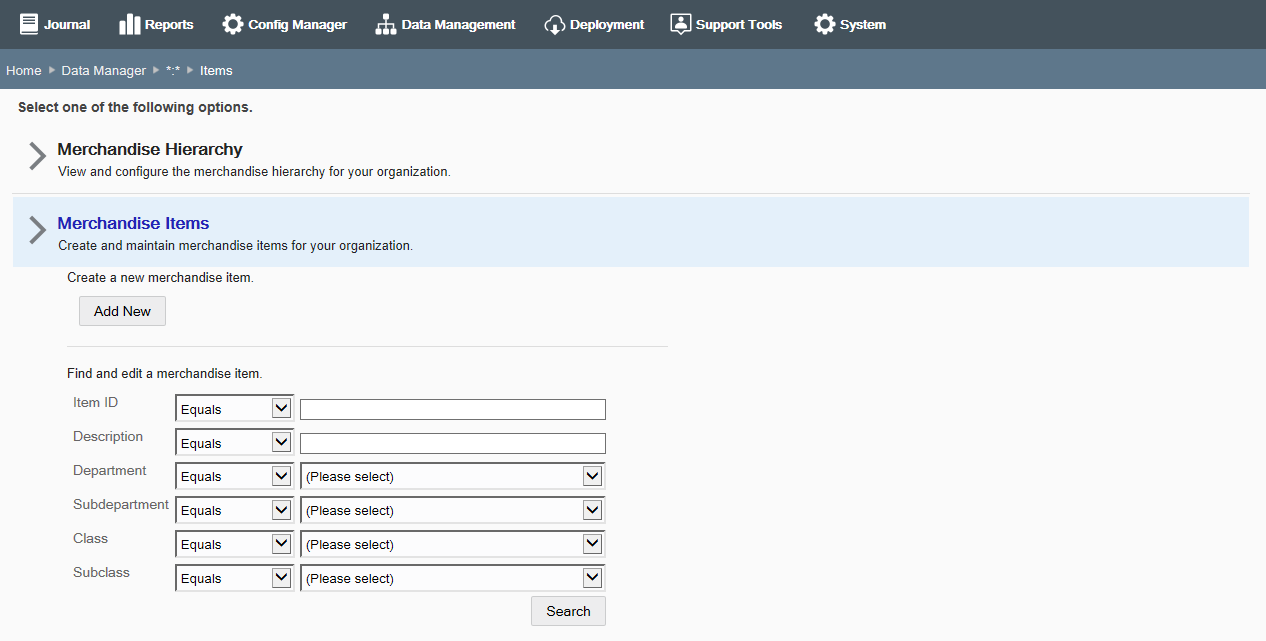
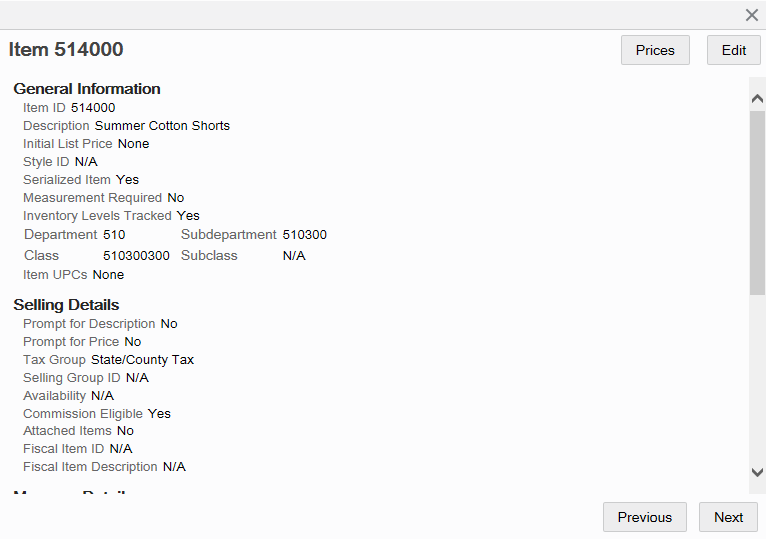

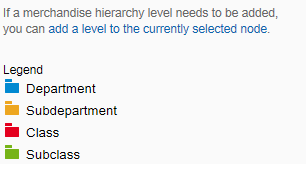
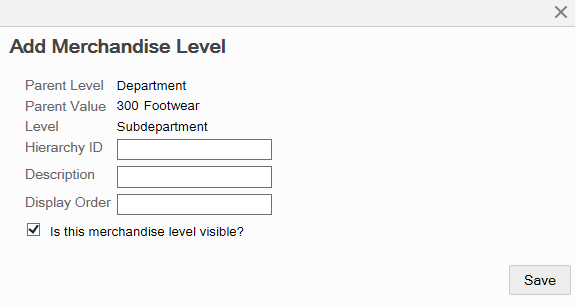
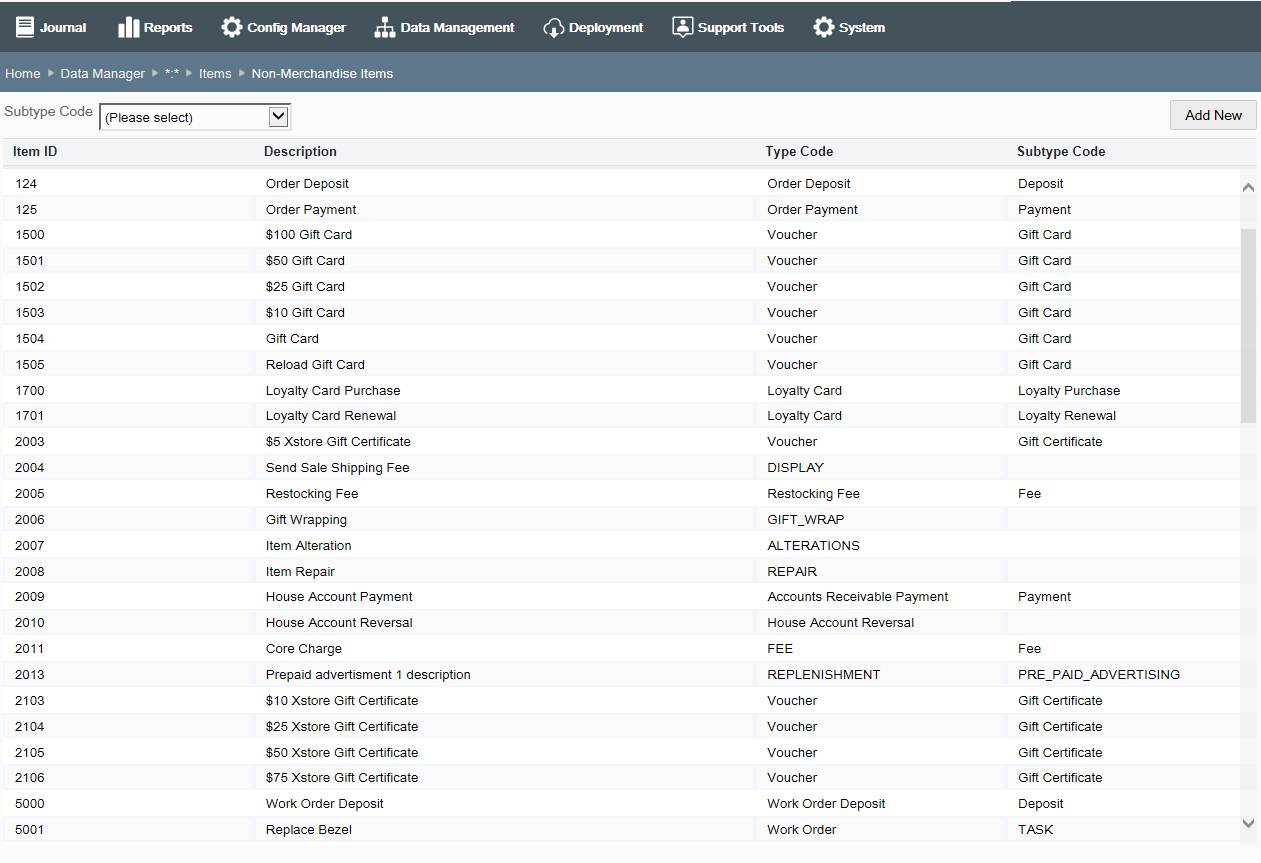
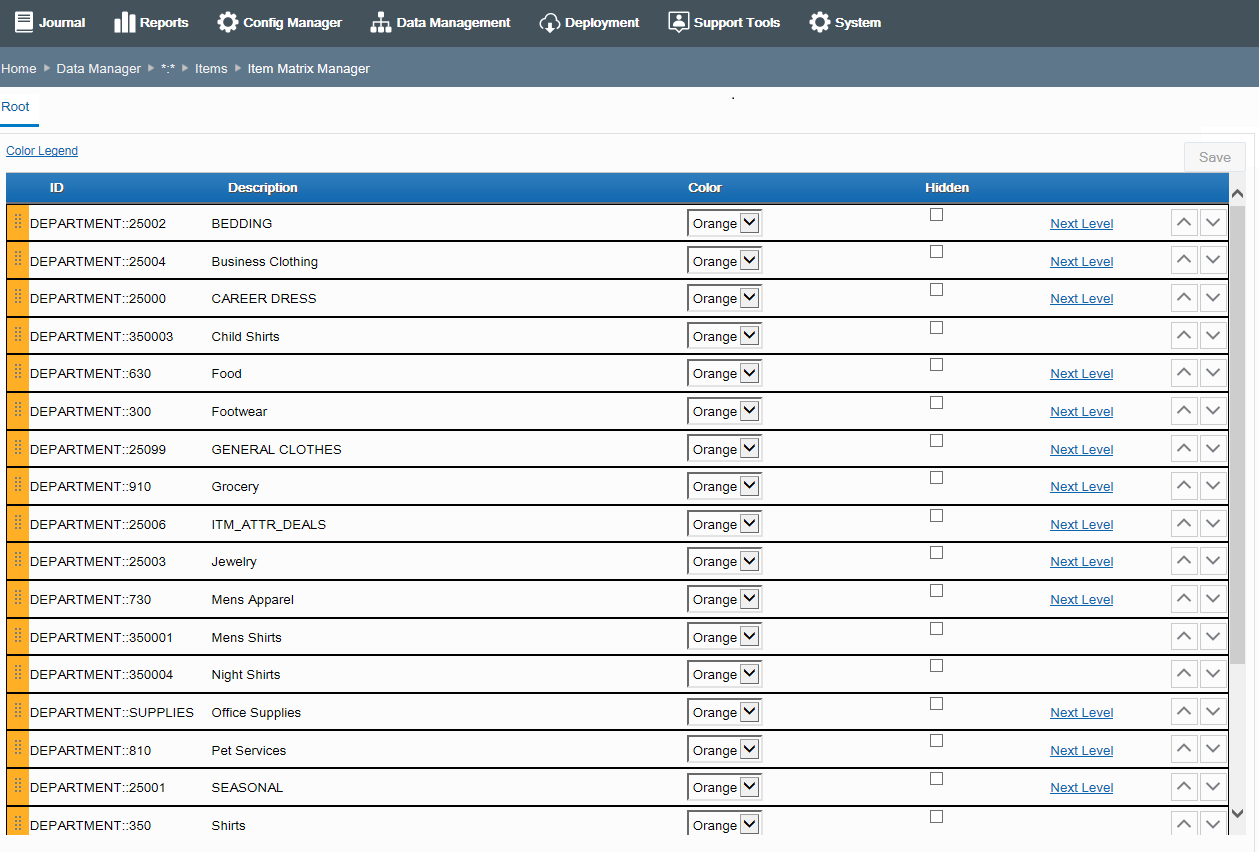
 Color Area