Using the PeopleSoft Fluid User Interface to Enter Life Events
This topic discusses how employees use the PeopleSoft Fluid User Interface to enter life event changes.
For general information about Fluid pages in PeopleSoft HCM, see Understanding PeopleSoft Fluid User Interface Home Pages
These pages are available for all life event transactions unless otherwise noted.
|
Page Name |
Definition Name |
Usage |
|---|---|---|
|
HC_EBEN_SS_NAVCOLL_FL (cref for the tile) |
Access benefits-related self-service transactions. |
|
|
W3EB_SEL_EVNT_FLU |
Initiate processing for a life event that affects benefits. |
|
|
The Activity Guide Composer Framework for Life Events (common elements on pages used to apply for jobs) |
N/A |
In the Life Events fluid pages, the application appears within the context of the Activity Guide Composer framework. The Activity Guide Composer shows the steps in the Life Events transactional process and provides navigation buttons for proceeding through the steps. |
|
AGC_INFO_FL |
Read the instructions on the Welcome page to initiate your life event. |
|
|
HR_EE_MARITAL_FL |
(Marriage and Divorce events) Enter the new marital status and as of date. |
|
|
W3EB_BRTH_ADPT_DT |
(Birth and Adoption events) Enter the date of child birth or the date of adoption and submit. |
|
|
HR_ATT_DD_HDR |
Upload a proof document, for example, marriage certificate for the life event, or enter a note relevant to the event. When document approval is required on the Life Event Rules Page, the system uses the Approval Workflow Engine to notify the appropriate parties that you have uploaded a document. |
|
|
W3EB_GRID_FLU |
Review current benefit enrollments. |
|
|
Personal Information - Name (Summary) Page |
HR_EE_NAME_FL |
(Marriage and Divorce events) View your current name, any pending name change submissions, and initiate a name change. |
|
NAME_EDIT_SCF |
(Marriage and Divorce events) Enter name change information. |
|
|
Personal Information - Home and mailing Addresses Page (see Addresses (Summary) Page) |
HR_EE_ADDR_FL |
(Marriage and Divorce events) View your home address and mailing address, or initiate updates to an address. |
|
ADDRESS_DFT_SCF |
(Marriage and Divorce events) Update address information. |
|
|
Personal Information - Contact Information page (see Contact Details Page) |
HR_EE_CONTACTS_FL |
(Marriage and Divorce events) Review your phone numbers, email addresses, and instant messaging IDs and initiate a change to your contact information. |
|
HR_CNCT_PHONE_SCF |
(Marriage and Divorce events) Add, update, or delete a phone number. |
|
|
HR_EMAIL_ADDRS_SCF |
(Marriage and Divorce events) Add, update, or delete an email address. |
|
|
HR_IM_CHAT_SCF |
(Marriage and Divorce events) Add, update, or delete an instant messaging ID. |
|
|
Personal Information - Emergency Contacts (Summary) Page |
HR_EMERG_CNTCT_FL |
(Marriage and Divorce events) View a list of your emergency contacts. |
|
HR_EMERG_CNTCT_SCF |
(Marriage and Divorce events) Add, update, or delete an emergency contact. |
|
|
W3EB_DEPBEN_SUM |
(Birth and Adoption events) Review dependent/beneficiary summary coverage information. |
|
|
W3EB_DEPBEN_RVW |
Review a summary of dependent/beneficiary information or add new dependents or beneficiaries. |
|
|
W3EB_DEPBEN_DETAIL |
Review and update detailed dependent and beneficiary personal information. |
|
|
Pay and Compensation - Tax Withholding Page |
PY_W4_MAIN_FL |
Review and change tax information. View a list of the tax withholding information and access their Tax Withholding Forms page for a jurisdiction. |
|
PY_W4_MAIN_FED_SCF |
View a list of updateable federal tax forms and additional agency links, if any, and access the form or URL. |
|
|
PY_W4_MAIN_ST_SCF |
View a list of updateable state tax forms for that jurisdiction and additional agency links, if any, and access the form or URL. |
|
|
PY_IC_DD_LIST |
Review and update direct deposit information. |
|
|
W3EB_LE_ENROLL |
Start the benefits enrollment process and enroll for available benefits. Note: A dependency relationship exists between either the marital status, adoption date, or birth date and the benefit enrollment, depending upon the transaction you are performing. Hence, Benefit Enrollment will be available only if you have updated and submitted the martial status, adoption or birth date for the life event you are entering. |
|
|
W3EB_LE_CONFIRM |
Review benefits elections.. |
|
|
AGC_SUMMARY_FL |
Complete and exit the life event. |
See product documentation for PeopleTools: Workflow Technology for related information.
In the Life Events fluid pages, the application appears within the context of an Activity Guide Composer framework to display the steps a user has to perform.
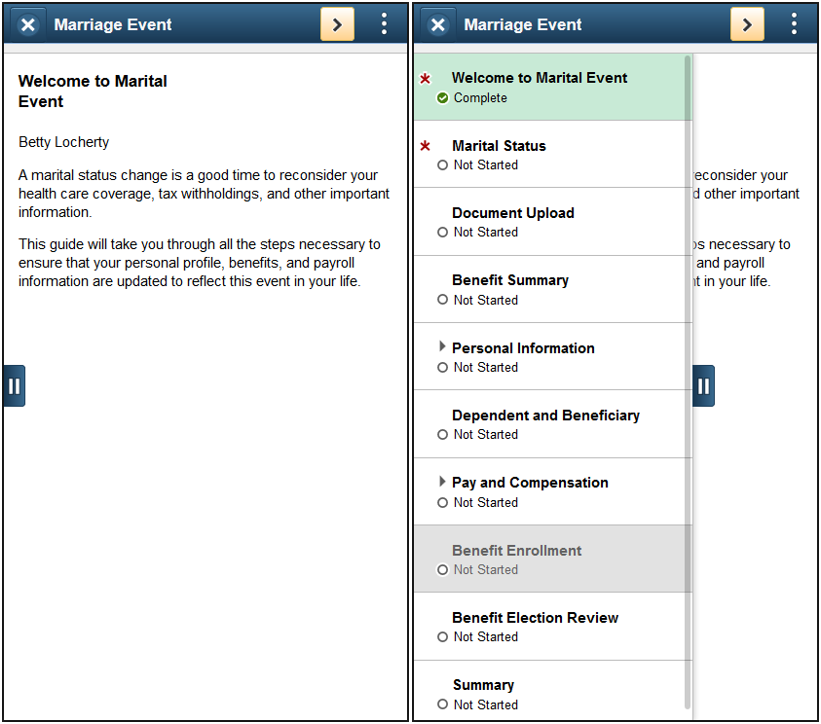
The Activity Guide Composer framework shows a list of application steps in the left panel and the page that corresponds to the current step in the right panel. The Activity Guide also provides navigation buttons in the page banner.
To set up templates using the Activity Guide Composer, see the Understanding the Activity Guide Composer documentation.
Image: (Tablet) Life Events Page Layout
This example illustrates the layout of the Life Events pages for a large form factor device.

Image: (Smartphone) Life Events Page Layout
This example illustrates the layout for the Life Events page on a small form factor device. In the first image, the left panel is hidden. In the second image, the left panel is exposed.
Note: Throughout this topic, the page illustrations show the page sections of the Life Events process without the context of the Activity Guide Composer step list. Even though the Activity Guide Composer framework is not illustrated, remember that all steps appear within that framework.
Page Banner
The top of PeopleSoft pages is called the page banner. In other PeopleSoft applications, the banner displays several standard icon buttons. The banner will display the name of the life event transaction you are performing.
On most pages, users see the standard set of banner icon buttons.
|
Field or Control |
Definition |
|---|---|
 or or  Exit button Exit button |
Click this button to exit the Life Events data entry and summary pages. If you have not clicked the Complete button on the Summary page before exiting, you can resume this life event data entry at a later time. You cannot start another life event transaction until you have either completed this life event transaction or you cancelled this transaction by selecting the Cancel menu list option from the Actions Menu, which will delete this enter life events transaction and everything you have entered. |
 or or  Previous button Previous button |
Click this button to save changes to the current step and navigate to the previous step or substep. The button is not visible on the first step in the request. |
 or or  Next button Next button |
Click this button to save changes to a current step or substep and navigate to the next step or substep. On the last step of the request (the Summary step), the Next button does not appear. The page displays a Complete button on the Summary page to complete and submit the life event transaction request. |
 Complete button Complete button |
This button appears only on the Summary step page. This button will not appear until all required steps are completed. Click this button to submit the life event details to Benefits. You cannot make any further changes to a life event that has been submitted. |
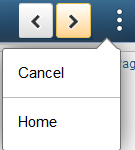 Cancel menu
item from the Actions Menu list Cancel menu
item from the Actions Menu list |
Select the Cancel menu item to delete all items you have entered on these pages thus far and cancel this life event transaction. |
List of Steps
The Activity Guide Composer framework includes a left panel that lists the steps in the life event process. This panel appears on the left of larger devices. On a small form factor such as phone, the panel is initially hidden. Click the Item/Sub-Item Section tab to expand and view the steps and navigate to other step pages.
|
Field or Control |
Definition |
|---|---|
| <Step or Substep Name> |
The left panel has individual steps that are labeled. The delivered life event templates do not require a sequential order to completing steps, however, your organization may define life event templates that require the user to follow a prescribed order. In this case, the steps are numbered and labeled. To define sequential or non-sequential steps, see the Activity Guide Composer - Activity Guide Type Page documentation. Some steps will have substeps. Steps with substeps are indicated by an expand/collapse icon before to the step name. The step is automatically expanded when you reach it. You can also click the parent step at any time to expand or collapse it. The page will highlight the current step or substep. When a step is grayed out and unavailable for selection, you need to complete a required step prior to accessing this step page. Click the step to receive a message stating the required step or steps you need to complete first to access this page. |
 Required icon Required icon |
This icon represents that the step is required. You cannot complete and submit a life event transaction until all required steps are completed. |
| <Step Status> |
Each step and substep has a status. These statuses include:
Users can return to steps and substeps by clicking the step. |
For more information on how to display steps and selecting and organizing steps, see the Activity Guide Composer - Activity Guide Type Page, Activity Guide Composer - Select Steps Page, and Activity Guide Composer - Organize and Configure Steps Page.
<Transaction Name> Pages
Within the Activity Guide Composer framework, the right main panel displays the page for the current step in the life event transaction.
|
Field or Control |
Definition |
|---|---|
| <Title Text> |
Displays a page title that includes the step name. For substeps, the page title includes both the step and substep name, separated by a hyphen. For example, Pay and Compensation - Direct Deposit indicates that the step title is Pay and Compensation and the substep title is Direct Deposit. |
Use the Welcome to <Transaction Name> Event page (AGC_INFO_FL) to read the instructions on the Welcome page to initiate your life event.
Navigation
Click the Benefit Details Tile from the Employee Self Service home page in fluid. Select the Life Events tab category from the left panel of the Benefits Details page. Then select the appropriate life event., enter an as of date, and click Continue Life Event.
From the <Transaction Name> Event pages, click the Welcome to <Transaction Name> Event step from the left panel, or use the Previous button, as needed.
Image: Welcome to <Transaction Name> Event page
This example illustrates the Welcome to <Transaction Name> Event page.
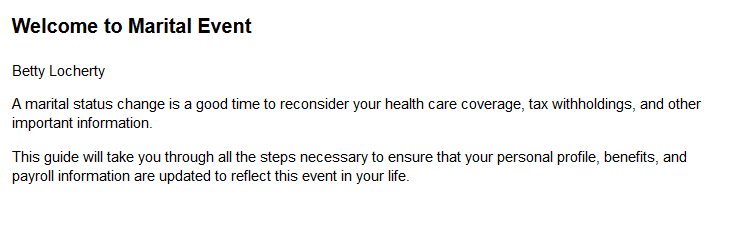
This page contains custom information about the specific life event.
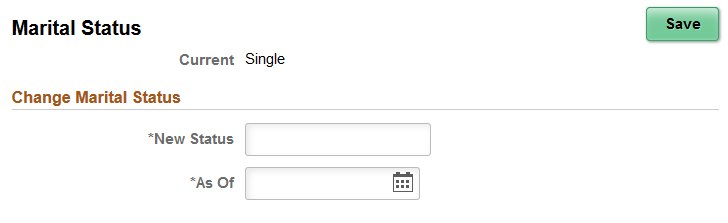
Use the Marital Status page (HR_EE_MARITAL_FL) to enter the new marital status and as of date.
Note: The delivered Martial and Divorce events will display this step.
Navigation
Select the Marital Status or Divorce Status step from the left panel or use the Next and Previous buttons to navigate to the page.
Image: Marital Status Page
This example illustrates the Marital Status page.
Note: The Marital Status and Divorce Status pages display the same information. The Marital Status page is depicted in the previous example.
|
Field or Control |
Definition |
|---|---|
| New Status |
Enter marital status change information, such as married or divorce, and submit the changes directly from this page. |
| As Of |
Enter the event date in the As Of field and click the Save button. If another step is contingent only upon this step, when you save this page that step will become available. |
| Save |
Click this button to submit your new marital status. Note: By clicking the Save button on this page, you are updating your marital status in the system, even if you do not submit this life event transaction. |
For information about the pages used to for the two delivered marital status change events, see the following topics:
Use the Birth Date or Adoption Date page (W3EB_BRTH_ADPT_DT) to enter the date of child birth or the date of adoption and submit..
Note: The delivered Birth and Adoption events will display this step.
Navigation
Select the Birth Date or Adoption Date step from the left panel or use the Next and Previous buttons to navigate to the page.
Image: Adoption Date page
This example illustrates the Adoption Date page..
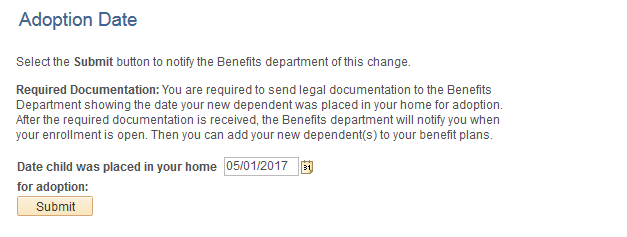
Note: The Birth Date and Adoption Date pages display the same information. The Adoption Date page is depicted in the previous example.
Enter the event date, such as the birth date of your child or the date the child was placed in your home for adoption, in the date field and click the Submit button.
For information about the pages used to for the two delivered marital status change events, see the following topics:
Use the Benefit Summary page (W3EB_GRID_FLU) to review current benefit enrollments.
Navigation
Select the Benefit Summary step from the left panel or use the Next and Previous buttons to navigate to the page.
Image: Benefit Summary page
This example illustrates the fields and controls on the Benefit Summary page.
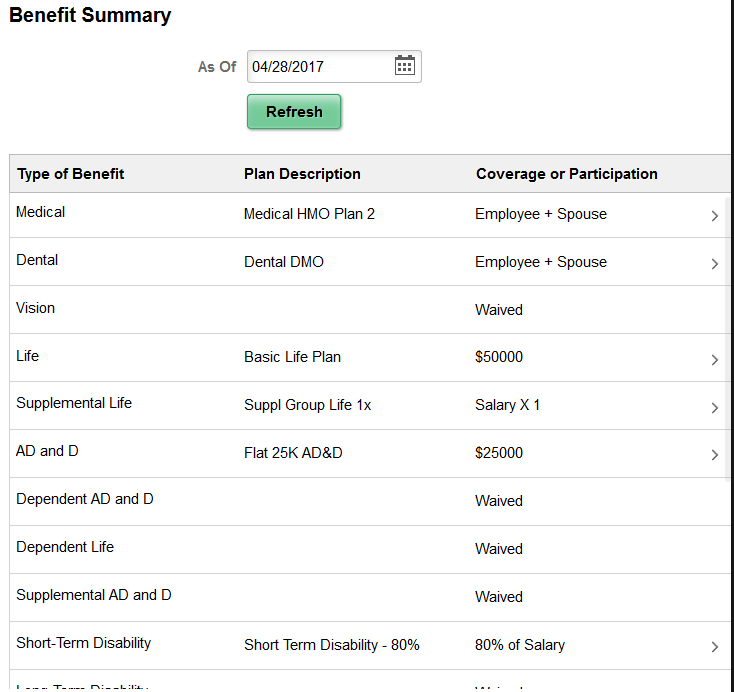
View a summary of current employee benefit data.
|
Field or Control |
Definition |
|---|---|
| As Of Date |
Initially, the page displays benefits as of the current date. To view benefits as of a different date, choose a new date and click the Refresh button. |
The grid that summarizes the employee’s benefits shows the type of benefit, a description of the benefit, and the employee’s coverage or participation. Click a row that has a right facing arrow to access the classic self-service pages that show more details about this benefits selection.
Use the Dependent and Beneficiary Coverage Summary page (W3EB_DEPBEN_SUM) to review dependent/beneficiary summary coverage information.
Note: The delivered Adoption and Birth events will display this step.
Navigation
Select the Dependent and Beneficiary Coverage Summary step from the left panel, or use the Next and Previous buttons to navigate to the page.
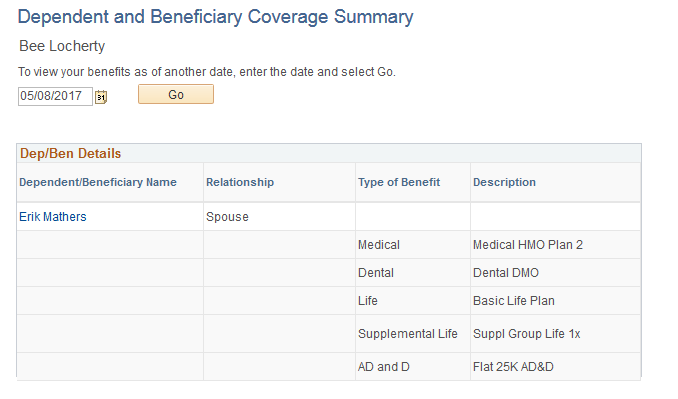
Image: Dependent and Beneficiary Coverage Summary page
This example illustrates the Dependent and Beneficiary Coverage Summary page.
|
Field or Control |
Definition |
|---|---|
| As Of Date |
Initially, the page displays benefits as of the current date. To view dependent and beneficiary coverage as of a different date, choose a new as of date and click the Go button. |
The grid that summarizes the employee’s dependent and beneficiary benefit coverage shows the type of benefit and a description of the benefit.
Click an existing dependent or beneficiary name link to access the Dependent/Beneficiary Personal Information Page and view and update the person’s information.
To add a dependent or beneficiary, access the Add/Review Dependent/Beneficiary Page step.
Use the Add/Review Dependent/Beneficiary page (W3EB_DEPBEN_RVW) to review a summary of dependent/beneficiary information or add new dependents or beneficiaries.
Navigation
Select the Dependent and Beneficiary step from the left panel, or use the Next and Previous buttons to navigate to the page.
Image: Add/Review Dependent/Beneficiary page
This example illustrates the Add/Review Dependent/Beneficiary page.
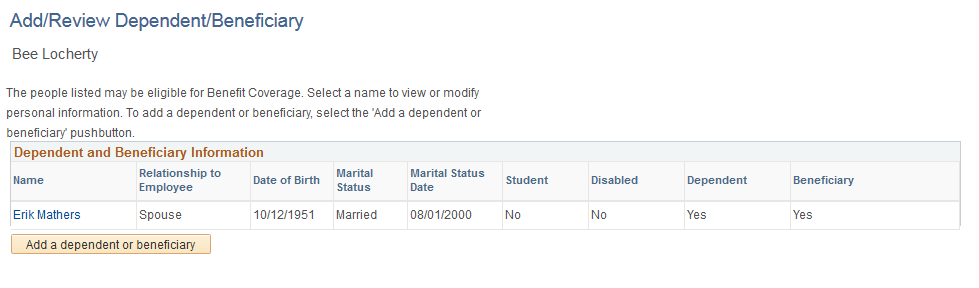
Click an existing dependent or beneficiary name link to access the Dependent/Beneficiary Personal Information Page and view and update the person’s information, or click the Add a dependent or beneficiary button to access the same page and enter a new dependent or beneficiary.
Use the Dependent/Beneficiary Personal Information page (W3EB_DEPBEN_DETAIL) to review and update detailed dependent and beneficiary personal information.
Navigation
Select a name link or click the Add a dependent or beneficiary button from the Add/Review Dependent/Beneficiary Page.
Select a name link from the Dependent and Beneficiary Coverage Summary Page.
Image: Dependent/Beneficiary Personal Information page
This example illustrates the Dependent/Beneficiary Personal Information page.
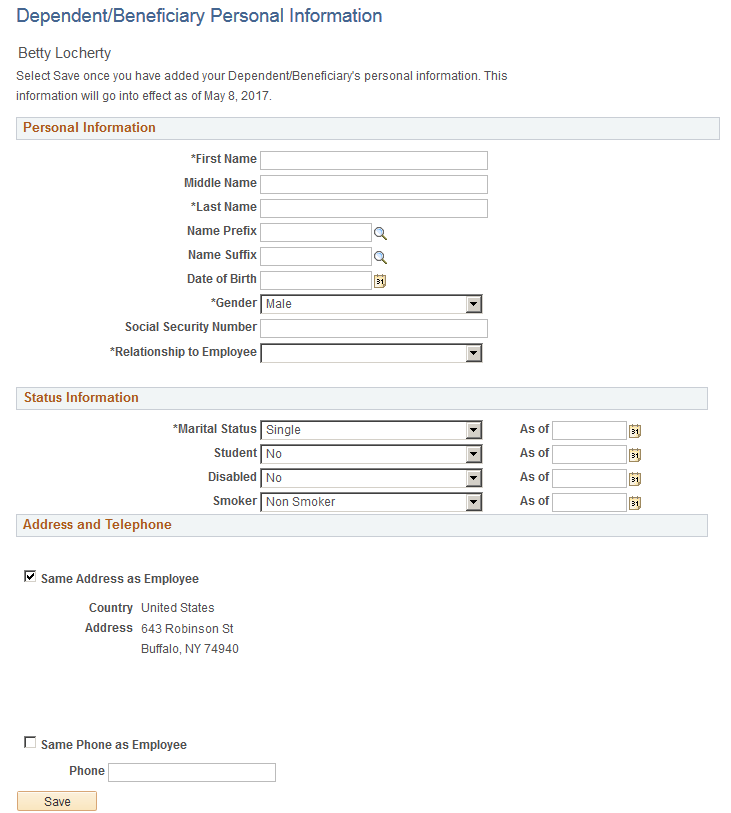
Use this page to enter personal details, status information, and contact information for a dependent or beneficiary.
Use the Pay and Compensation - Direct Deposit page (PY_IC_DD_LIST) to view current direct deposit information.
Navigation
Select the Pay and Compensation step, then the Direct Deposit substep from the left panel, or use the Next and Previous buttons to navigate to the page.
Image: Pay and Compensation - Direct Deposit page
This example illustrates the Pay and Compensation - Direct Deposit page.
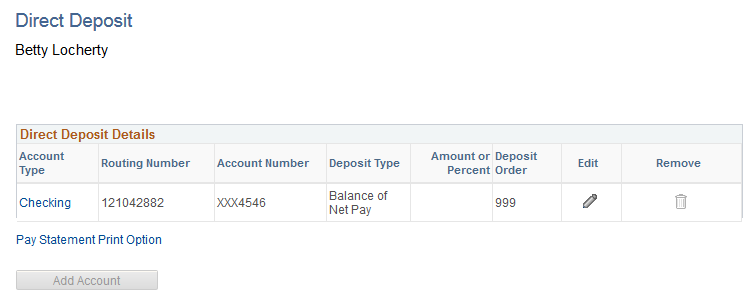
Use this page to view your direct deposit elections or add new direct deposit information.
Select the account type link to access the Direct Deposit Details Page and view details about and item. Select the Edit (pencil) icon to update information for an existing entry.
Click the Add Account button to add a new direct deposit.
Multiple direct deposit changes are not allowed in the same day.
Employees use the Benefit Enrollment page (W3EB_LE_ENROLL) to start the benefits enrollment process and enroll for available benefits.
Note: A dependency relationship exists between the benefit enrollment and either the marital status, adoption date, or birth date, depending upon the transaction you are performing. Hence, the Benefit Enrollment page will be available only if you have updated and submitted the martial status, adoption or birth date for the life event you are entering on the Marital Status or Divorce Status Page or Birth Date or Adoption Date Page.
For more information on setting up dependencies, see the Activity Guide Composer - Organize and Configure Steps Page documentation.
Navigation
Select the Benefit Enrollment step from the left panel, or use the Next and Previous buttons to navigate to the page after you have completed the dependency step for this life event.
Image: Benefit Enrollment page
This example illustrates the Benefit Enrollment page.
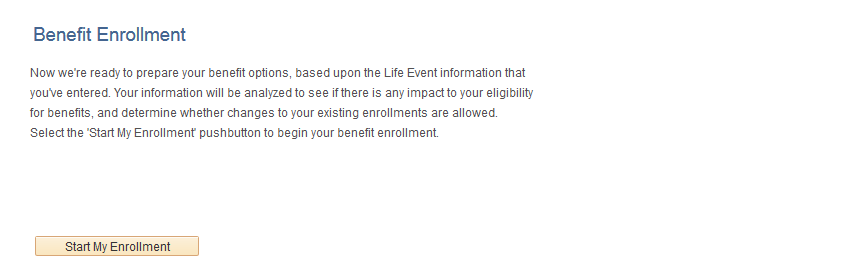
The Benefit Enrollment step in the fluid Life Events page provides access to the classic pages for selecting benefits during a life event change. Click the Start My Enrollment button to start the process.
Note: If an employee cancels a life event after completing the Benefit Enrollment step, an email alert is sent to the benefits administrator.
Use the Benefits Election Review page (W3EB_LE_CONFIRM) to review benefits elections.
Navigation
Select the Benefits Election Review step from the left panel, or use the Next and Previous buttons to navigate to the page.
Image: Benefits Election Review page (1 of 2)
This example illustrates the Benefits Election Review page (1 of 2).
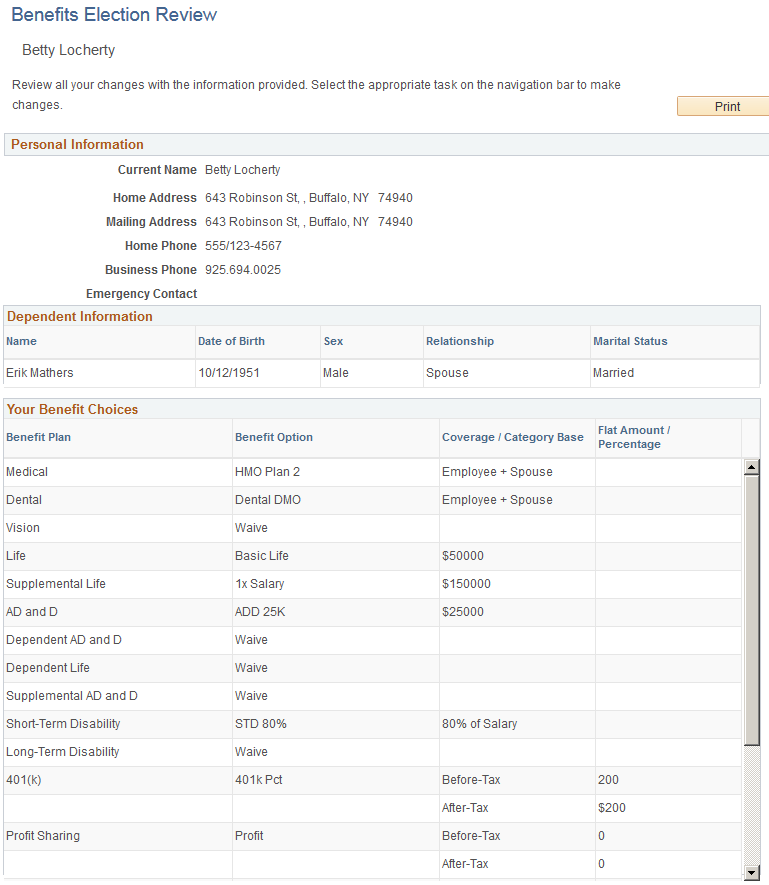
Image: Benefits Election Review page (2 of 2)
This example illustrates the Benefits Election Review page (2 of 2).
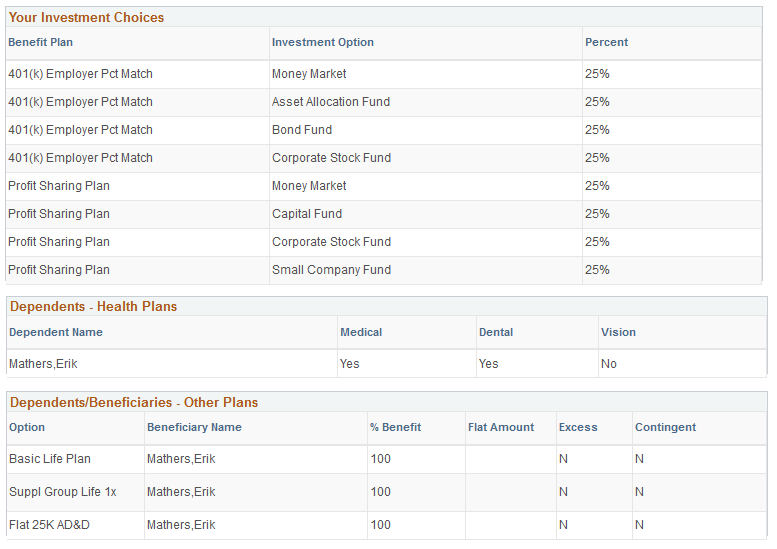
Click Print to generate a preliminary Benefits Enrollment Summary Statement containing your personal information and information about dependent/beneficiary enrollment, benefits elections, and investment choices.
If you need to make edits, go back to any previous steps and make additional changes before completing the benefits enrollment.
Use the Summary page (AGC_SUMMARY_FL) to complete and exit the life event.
Navigation
Select the Summary step from the left panel, or use the Next button to navigate to the page.
Image: Summary page
This example illustrates the Summary page.
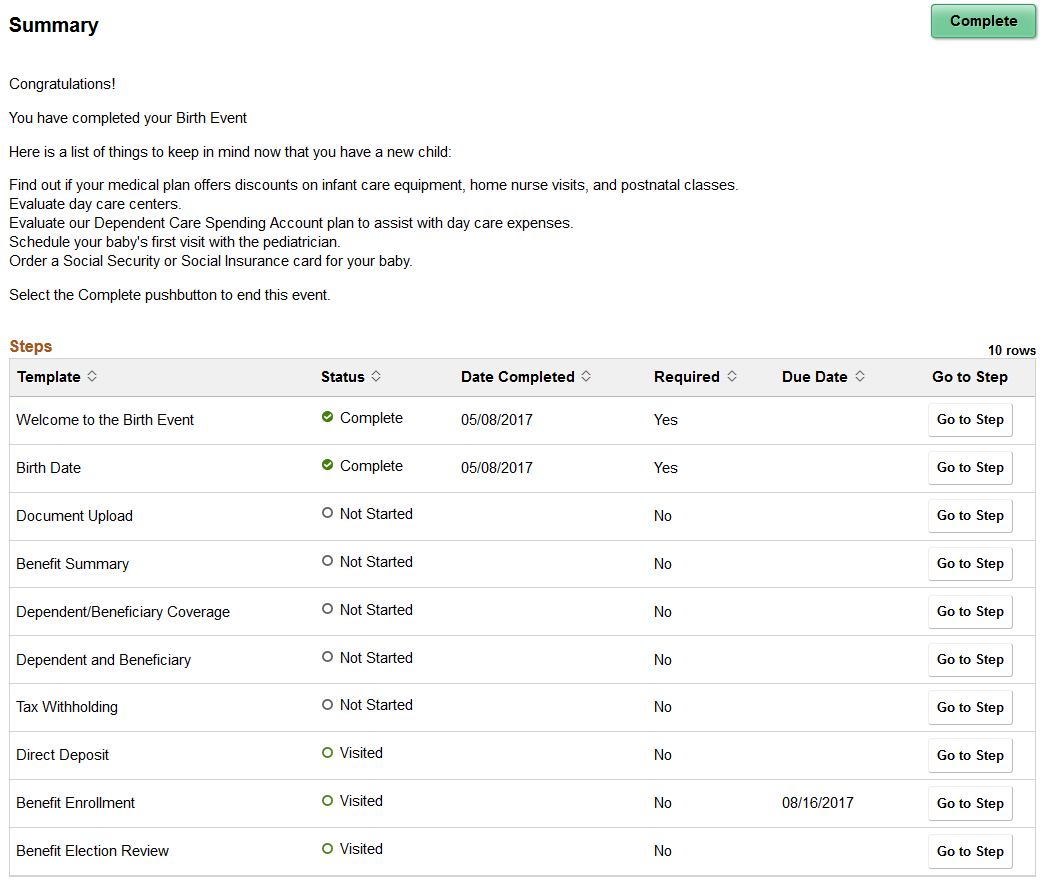
View confirmation of the life event process completion. Additionally, view custom information about any additional tasks that you need to do related to this life event.
Use the Steps section to view a summary of the statuses of each step in this life event process and what is required and when.
|
Field or Control |
Definition |
|---|---|
| Mark Complete |
When available, click this button to indicate that a step is complete. |
| Go to Step |
Easily navigate back to a step by clicking this button. If you select to go to a step that’s due date has passed, the system will issue the message that the task is overdue. |
| Complete |
When you click this button, the system verifies whether all the required action items have been completed and displays a message if any are incomplete. This closes the life event transaction. |