Managing Activity Guide Templates
The Activity Guide Composer (AGC) feature enable you to use fluid to create activity guide templates that identify the steps a user should take to perform a transaction or process. You can use AGC templates for a variety of purposes, such as identifying the steps that a new employee would complete through the OnBoarding feature, or the items that should be updated in the system using the fluid pages when a person encounters a life event change.
The enhancement provide the ability to define an activity guide category to support single component. The required pages are added to activity guide template so that we can save the PeopleSoft component. Here for the functional analyst who defines an activity guide template, there will be a set of additional instructions and validations. These validations ensure a Submit action for the activity guide category and template.
The activity guide template administrator determines the following aspects of each transaction template:
The type, or layout format of the template, where you determine if the steps should be presenting in a vertical or horizontal layout.
The activity guide category of the template, which determines available steps, images, and actions for the user.
Administrator and end user security roles.
Actions that should be available to the user from the Actions Menu list in the banner.
Content that should appear in the fluid sub banner of the activity guide.
The steps, the order in which they appear in the activity guide, and configuration options and rules for each step.
If a template should be available in the My Activity guides pages.
Note: When you create an activity guide template, the system also creates a PeopleTools activity guide template using the PeopleTools Activity Guide application process integration (API). This combines the technical data from the activity guide category and the functional data from the activity guide template to save a PeopleTools activity guide template.
Note: The PeopleSoft application delivers these OnBoarding activity guide templates: OnBoarding for Canada, OnBoarding for USA, and Standard OnBoarding. It also delivers these Life Event activity guide templates: Adoption Event, Birth Event, Divorce Event, and Marriage Event. Your Activity Guide Composer administrator, someone who is very familiar with your organization's HR transaction processes, can configure and maintain additional activity guides and rules needed for users to complete personal and business transactions.
To add, update, clone, or delete activity guide templates, use the Templates component (AGC_TMPL_SRCH_FL).
These topics discuss managing activity guide templates.
|
Page Name |
Definition Name |
Usage |
|---|---|---|
|
AGC_TMPL_SRCH_FL |
View a list of existing activity guide templates or initiate the action to add, update, delete, or clone a template. |
|
|
AGC_TMPL_ADD_SCF |
Identify the template ID and effective date for a new template. |
|
|
AGC_TMPL_UPDT_FL |
Manage effective dated rows for an activity guide template. |
|
|
AGC_TMPL_CLONE_SCF |
Clone an activity guide template |
|
|
N/A |
The Activity Guide Composer guided template process is itself an activity guide process. It shows a list of application steps in the left panel that take you to pages displayed in the content area to define and configure your activity guide template. The Activity Guide Composer also provides navigation buttons in the page banner for navigating through the steps. |
|
|
AGC_TMPL_INTRO_FL |
Review an introduction to the Activity Guide Composer. |
|
|
AGC_TMPL_TYPE_FL |
Select or view the activity guide type—either horizontal sequential, vertical non sequential, or vertical sequential. |
|
|
AGC_TMPL_TYPE1_SCF |
View examples of the horizontal, vertical non sequential, and vertical sequential activity guide types. |
|
|
AGC_TMPL_GNRL_FL |
Enter or view the template description and category. |
|
|
AGC_TMPL_SCRTY_FL |
Identify the security roles for administrator and end user. |
|
|
AGC_TMPL_BTNS_FL |
Select which action buttons will be available in the activity guide for a template |
|
|
AGC_TMPL_SBNR_FL |
Identify the type of sub banner you wish to display at the top of the activity guide, if any. |
|
|
AGC_TMPL_SBNR1_SCF |
identify the image and fields that should appear in the sub banner |
|
|
AGC_TMPL_SBNR2_SCF |
View examples of sub banners. |
|
|
AGC_TMPL_STEP1_FL |
Select the steps that should be part of this activity guide. |
|
|
AGC_TMPL_STEP2_FL |
Organize, configure, or delete a step from the activity guide template. |
|
|
AGC_TMPL_STPAG_SCF |
Define the label for the group of steps. |
|
|
AGC_TMPL_STPEG_SCF |
select which steps should be a sub step within this group. |
|
|
AGC_TMPL_STPEA_SCF |
Configure the rules for a step. |
|
|
AGC_TMPL_STPDP_SCF |
Identify steps that must be completed prior to completing this step. |
|
|
AGC_TMPL_PGTEXT |
Enter page text when a step is page text enabled. |
|
|
AGC_TMPL_STPED_SCF |
View configuration details for a step. |
|
|
AGC_TMPL_PRCS_FL |
Configure an activity guide template for use in My Activity Guides. |
|
|
AGC_TMPL_ACTIVE_FL |
Activate or deactivate an activity guide template. |
Use the Activity Guide Templates page (AGC_TMPL_SRCH_FL) to view a list of existing activity guide templates or initiate the action to add, update, delete, or clone a template.
Note: You will only see templates you have administrator access to or where no security has been defined for the template.
Navigation
Image: Activity Guide Templates Page
This example illustrates the fields and controls on the Activity Guide Templates page.

The page displays all templates in template ID order to which you have administrator security access. Click the column headings to sort the template rows by that category.
The PeopleSoft application delivers the following templates, which you cannot modify but you can insert a new effective dated row or clone the template:
OnBoarding Templates
OnBoarding for Canada
OnBoarding for USA
Standard OnBoarding
Life Event Templates
Life Event: Adoption Event
Life Event: Birth Event
Life Event: Divorce Event
Life Event: Marriage Event
|
Field or Control |
Definition |
|---|---|
 (Filter icon button) (Filter icon button) |
Click to open the Filter page and select criteria to narrow the list of activity guide templates. |
| Add Activity Guide Template button |
Click this button to access the Add Activity Guide Template Page and identify the name and effective date of a new activity guide template. |
| Active |
Indicates if the template is active (Yes) or inactive (No). |
 Update Template button Update Template button |
Click the button for a template row to access the Update Template Page for the template you have chosen. |
 Clone Template button Clone Template button |
Click this button for a template row to access the Clone Template Page where you can initiate the process to clone this template. |
 Delete Template button Delete Template button |
Click this button to delete all effective dated versions of this template. This button is not available for delivered templates. However, if an effective dated row has been inserted for a delivered template, the user can access Update Template Page to delete the specific effective dated row added for the template. Note: If more than one effective dated row exists for this template, the system will delete all rows. Use the Update Template button to access the Update Template Page to see all effective dated rows and delete individual rows, if necessary. |
Use the Add Activity Guide Template page (AGC_TMPL_ADD_SCF) to identify the template ID and effective date for a new template.
Navigation
Click the Add Activity Guide Template button from the Activity Guide Templates Page.
Image: Add Activity Guide Template Page
This example illustrates the fields and controls on the Add Activity Guide Template page.
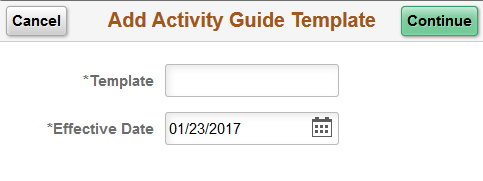
Enter the ID for the new template and an effective date. Template IDs must be seven characters in length.
|
Field or Control |
Definition |
|---|---|
 |
Click this button to exit the page and return the Activity Guide Templates Page without saving the new template. |
 |
After entering a template ID and effective date, click this button to access the Activity Guide Composer - Introduction Page and start the template creation process. |
| Template |
Enter a seven (7) character template code. Important! Some applications may require a unique naming convention. For example, the first four characters of a Life Events template must use a unique convention to ensure that Life Event activity guides are processed correctly. For more information on setting up fluid Life Events using the Activity Guide Composer, see the Fluid Setup Steps section of the Understanding Life Event Templates (Including Action Items / Steps) topic. |
Use the Update Template page (AGC_TMPL_UPDT_FL) to manage effective dated rows for an activity guide template.
Navigation
Click the Update Template button from the Activity Guide Templates Page.
Image: Update Template Page
This example illustrates the fields and controls on the Update Activity Guide Template page.

Use this page to view, select to update, insert a new row, or delete an effective dated rows for a template.
|
Field or Control |
Definition |
|---|---|
| Cancel |
Click this button to return to the Activity Guide Templates Page. If you have not clicked the Apply button, the data you entered on the page will not be saved. |
| Apply or Done |
Click either of these buttons to apply and save your changes. Click the Apply button to save you data and remain on this page. If you added a new row, the Update Template button becomes active for that row and you can now update the template as necessary. Click the Done button to save your changes and return to the Activity Guide Composer - Activity Guide Templates Page. |
|
Click this button to access the Activity Guide Template pages to make updates to the template. The system will display the last activity guide step page you accessed in this component. When you click this button for a delivered template, the system will issues a warning that it is delivered data and cannot be deleted or modified. However, you can click OK to view the template setup. |
 |
Click the Add a Row button to insert a new effective dated row for this template. When you select the most current row, the system will insert a new row with today’s date. When you insert a row from an historical row, the template will copy over the same data from that row, including the effective date. Overwrite this date as needed so the rows do not share the same effective date. In order to proceed with updating a new row, click the Apply button to save the row and activate the Update Template button, where you can access and update the setup parameters for the new template row. |
 |
Click this button to delete the row. Important! You must click the Apply or Done button to save this deletion. If you cancel out of the Update Template Page without saving, the delete action will not take place and the row will remain. |
Use the Clone Template page (AGC_TMPL_CLONE_SCF) to clone an activity guide template.
Navigation
Click the Clone Template button on the Activity Guide Templates Page.
Image: Clone Template Page
This example illustrates the fields and controls on the Clone Template page.
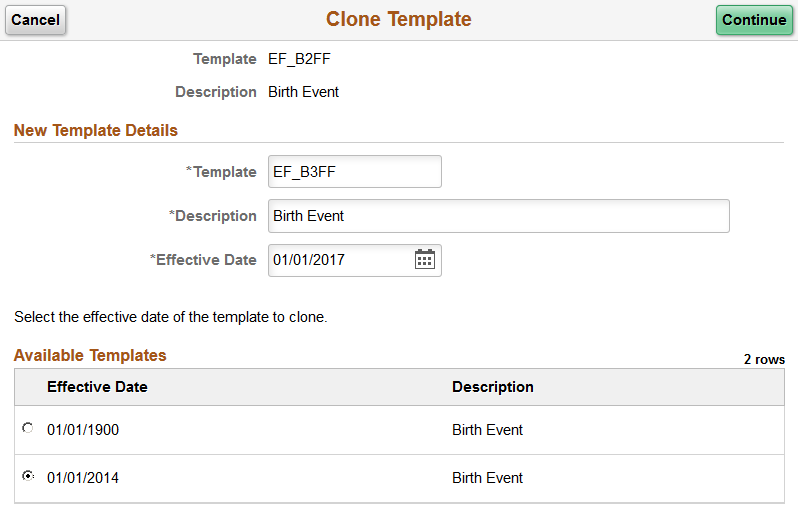
Enter the seven character template ID, description, and effective date for the new template.
Note: Some delivered activity guide templates have specific naming conventions. For example, Life Event templates must begin with either EF_A (for Adoption) , EF_B (for Birth), EF_D (for Divorce), or EF_M (for Marriage) , to ensure correct processing of the Life Event transactions.
The page displays all effective dated rows for the template you are cloning, oldest to newest. Select the effective dated row you want to copy and click Continue. The system will return you to the Activity Guide Templates Page where you can click the Update Template button to make any changes to this newly cloned template.
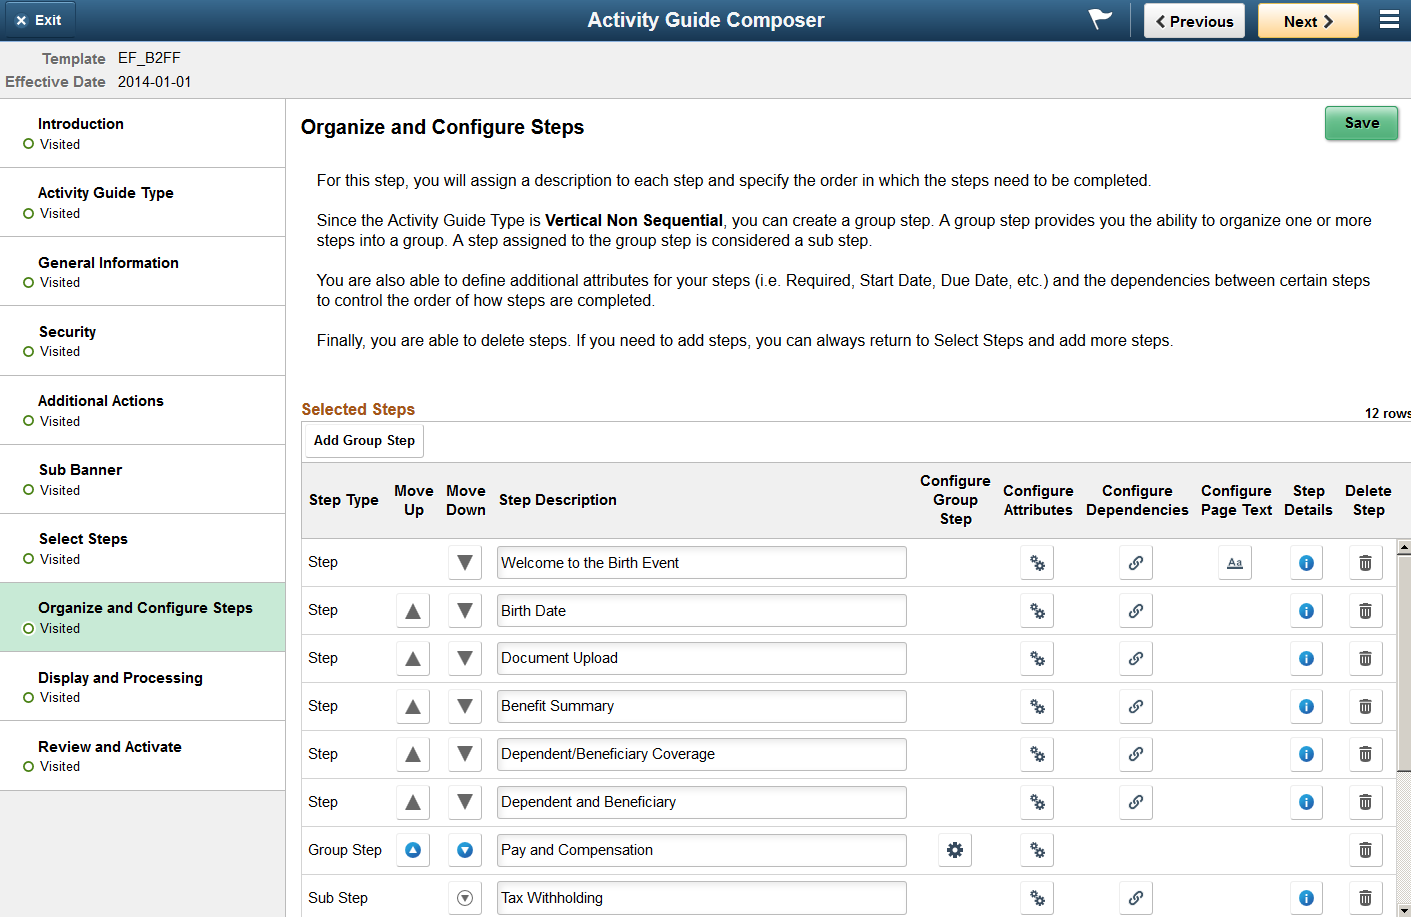
The Activity Guide Composer guided template process is itself an activity guide process. It shows a list of application steps in the left panel that take you to pages displayed in the content area to define and configure your activity guide template. The Activity Guide Composer also provides navigation buttons in the page banner for navigating through the steps.
Image: Activity Guide Composer Layout
This example illustrates the layout for the Activity Guide Composer pages showing an example of the Activity Guide Composer - Organize and Configure Steps page.
Fluid Activity Guide Banner
The top of PeopleSoft pages is called the page banner. The banner displays several standard activity guide icon buttons.
On most pages, users see the standard set of banner icon buttons.
|
Field or Control |
Definition |
|---|---|
 or or  Exit button Exit button |
Click this button to exit the Activity Guide Composer guided template process. You can return at a later time to modify and update your activity guide template. |
 or or  Previous button Previous button |
Click this button to navigate to the previous step or substep. If you have not saved the page, the system prompt you to save your changes. The button is not visible on the first step in the activity guide. |
 or or  Next button Next button |
Click this button to navigate to the next step. If you have not saved the page, the system prompt you to save your changes. On the last step of the activity guide (the Review and Activate step), the Next button does not appear. The page displays an Activate Activity Guide or Deactivate Activity Guide button on the page to activity or inactivate this template. |
 Save button Save button |
Though this button does not appear in the banner, it does appears on the page of each step, with the exception of the first and last pages. Click this button to save the changes to a specific step configuration prior to navigating to another page. |
 Actions List icon Actions List icon |
Select the Actions List icon to exit the Activity Guide Composer pages and navigate back to your home page. If you have not saved the page, the system prompt you to save your changes. |
Activity Guide Sub Banner
The section under the banner of the PeopleSoft pages is called the page sub banner. The sub banner will display the name of the template ID and effective date for the template in which you are working.
Pages and Step List Format
This Activity Guide Composer will display vertical steps. The steps will also display a status indicating if you have or have not visited the page.
|
Field or Control |
Definition |
|---|---|
| <Step Status> |
Each page step has a status. These statuses include:
You can return to steps by clicking the step or using the navigation buttons in the banner. |
The transaction content area displays the page for the current step you have selected for this template configuration.
Use the Activity Guide Composer - Introduction page (AGC_TMPL_INTRO_FL) to review an introduction to the Activity Guide Composer.
Navigation
Click the Add Activity Guide Template button from the Activity Guide Templates Page, enter the template ID and effective date on the Add Activity Guide Template Page, and click Continue.
Click the Update Template button from the Update Template Page.
From within the Activity Guide Composer, select the Introduction tab from the left panel list or click the Previous button to navigate to the page.
Image: Activity Guide Composer - Introduction Page
This example illustrates the fields and controls on the Activity Guide Composer - Introduction page.

Note: This example shows a delivered template with a new effective dated row inserted. The fields for the original effective dated row of a delivered template are not available for edit. You must insert a new row or clone a delivered template to make changes.
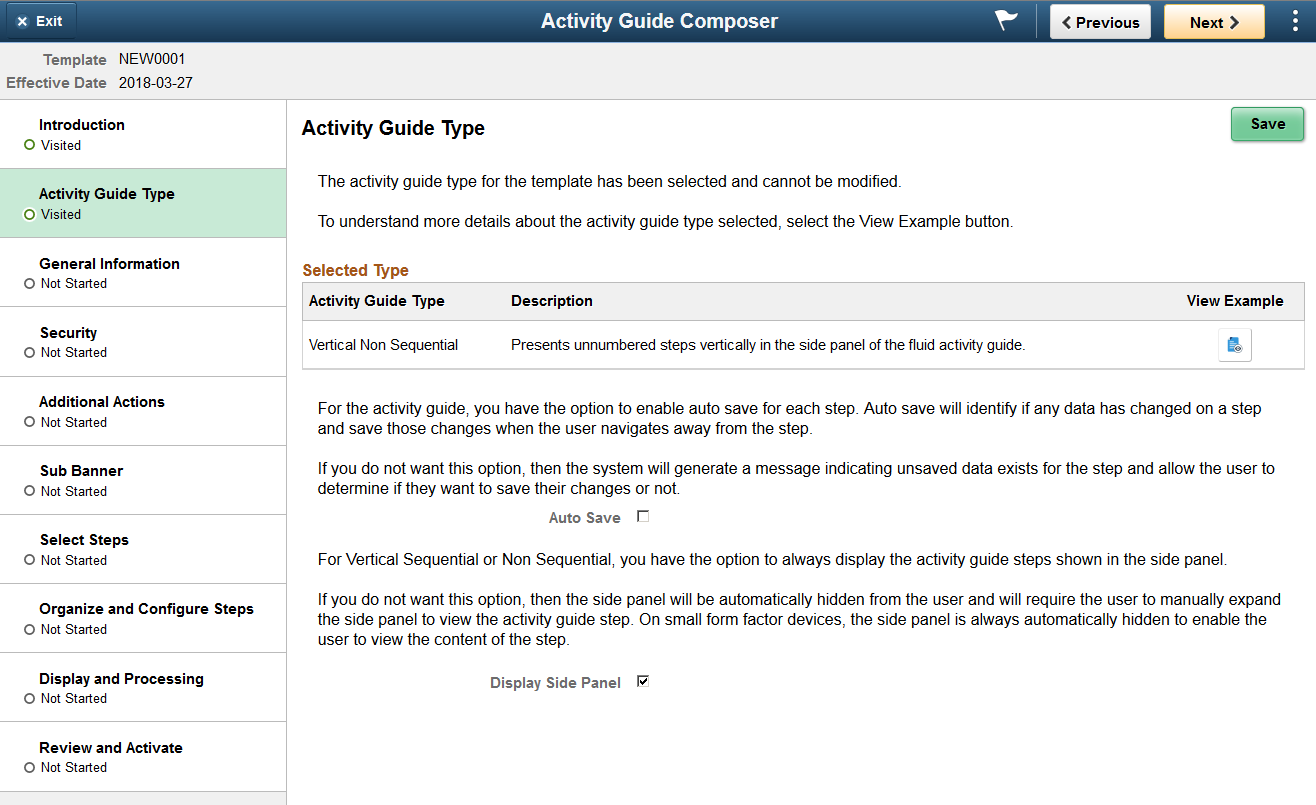
Use the Activity Guide Composer - Activity Guide Type page (AGC_TMPL_TYPE_FL) to select or view the activity guide type—either horizontal sequential, vertical non sequential, or vertical sequential.
Navigation
Click the Add Activity Guide Template button from the Activity Guide Templates Page, enter the template ID and effective date on the Add Activity Guide Template Page, and click Continue.
Click the Update Template button from the Update Template Page.
From within the Activity Guide Composer, select the Activity Guide Type tab from the left panel list, or click the Next or Previous buttons to navigate to the page.
Image: Activity Guide Composer - Activity Guide Type Page for a New Template
This example illustrates the fields and controls on the Activity Guide Composer - Activity Guide Type page for a new template.
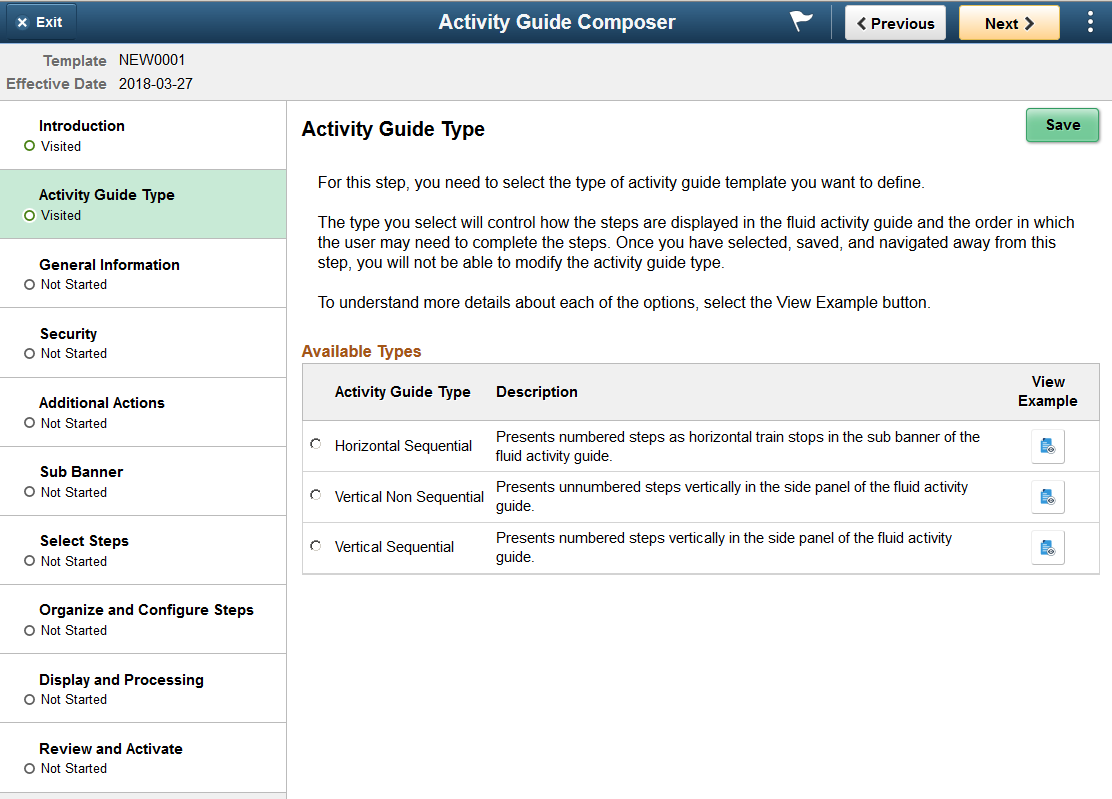
Use this page to select an activity guide type or view the type that is selected for this template. You can view static examples of the different types by clicking the View Example button.
Note: When you clone an existing template, the system copies the same activity guide type over and you cannot select a different activity guide type for the newly cloned template.
|
Field or Control |
Definition |
|---|---|
| Activity Guide Type |
Select from one of the following activity guide type:
Note: You cannot change the activity guide type for this template after you have saved this page. Or If you have cloned or inserted a new row for an existing template, you cannot change the activity guide type. |
| View Example |
Click this button to access the View Example (Activity Guide Types) Page and see examples of this type of activity guide. Note: These are examples only and do not reflect the template you are creating. |
Image: Activity Guide Composer - Activity Guide Type Page for a Template Where the Type is Already Saved or Defined
This example illustrates the fields and controls on the Activity Guide Composer - Activity Guide Type page after you have saved the type.
When you save the page, the activity guide type option you selected is now read-only. The page may also display other fields, which are based on the activity guide type you selected.
|
Field or Control |
Definition |
|---|---|
| Auto Save |
This option is available for Vertical Non-Sequential types. Click this check box to enable the auto save feature. When enabled, the system will automatically save the page when a user moves from one step to another. Deselect to have the system warn the user that unsaved data exist have allows the user to determine whether to save the changes to the activity guide. The system does not display this option for the sequential activity guide types because PeopleTools auto save is automatically turned on for these types and cannot be overridden. |
| Display Side Panel |
This option is available for Vertical Non-Sequential and Vertical Sequential types. Select this option to have the left panel expanded when the user accesses a vertical activity guide on a large form factor device. The panel will always be hidden on small form factor devices and the user will need to manually expand the panel to view the vertical activity steps. |
The delivered activity guide composer templates use the Vertical Non Sequential type with the left panel that lists the steps in the process. For this configuration, the panel appears on the left of larger devices. On a small form factor such as phone, the panel is initially hidden. Users would click the left panel tab to manually expand and view the steps.
Use the View Example (Activity Guide Types) page (AGC_TMPL_TYPE1_SCF) to view examples of the horizontal, vertical non sequential, and vertical sequential activity guide types.
Navigation
Click a View Example button on the Activity Guide Composer - Activity Guide Type Page.
Image: View Example Page: Showing an Example of the Horizontal Sequential Type
This example illustrates the View Example page showing a horizontal sequential example.
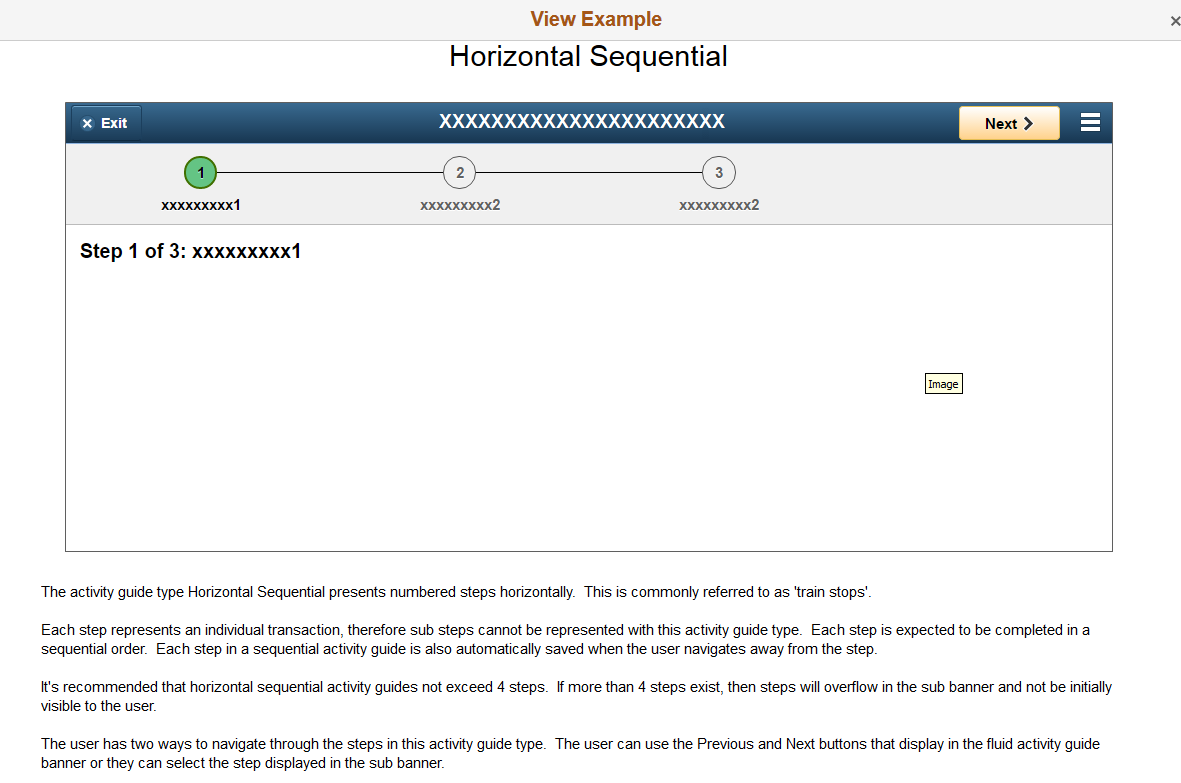
Note: These are static examples only and do not reflect the current template you are creating.
Use the Activity Guide Composer - General Information page (AGC_TMPL_GNRL_FL>) to enter or view the template description and category.
Navigation
Click the Add Activity Guide Template button from the Activity Guide Templates Page, enter the template ID and effective date on the Add Activity Guide Template Page, and click Continue.
Click the Update Template button from the Update Template Page.
From within the Activity Guide Composer, select the General Information tab from the left panel category list, or click the Next or Previous buttons to navigate to the page.
Image: Activity Guide Composer - General Information Page
This example illustrates the fields and controls on the Activity Guide Composer - General Information page.
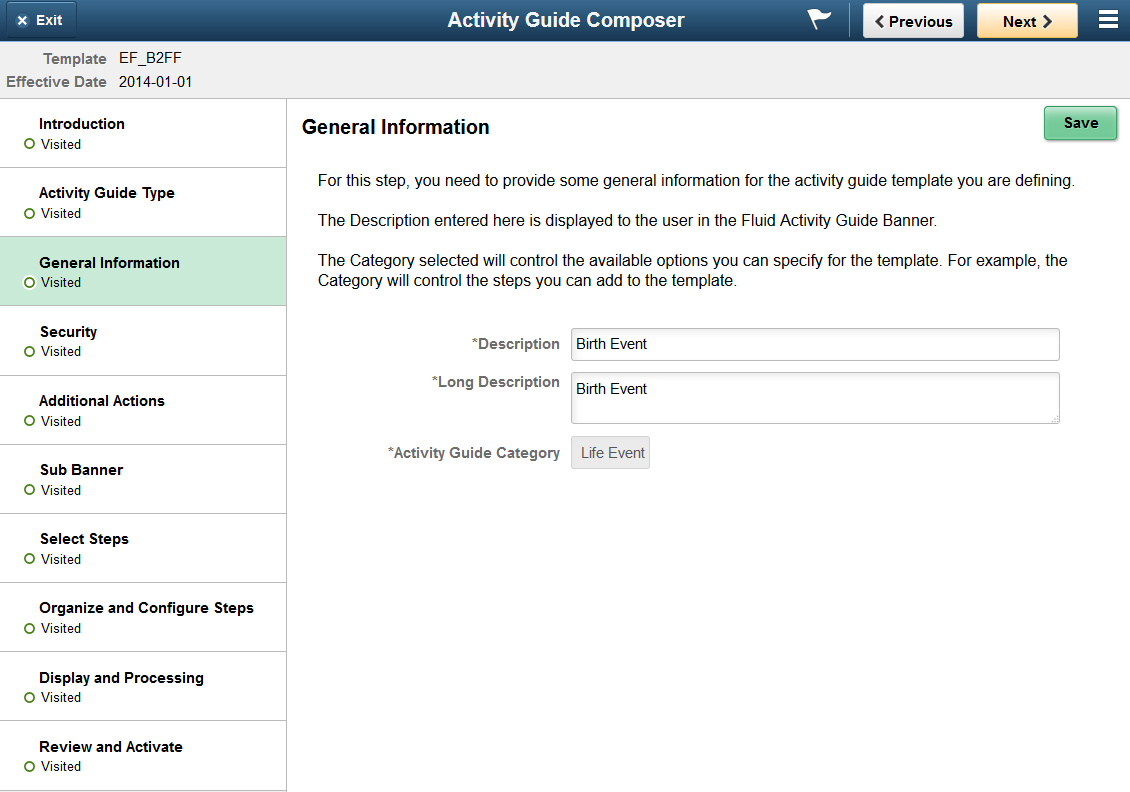
Note: This example shows a delivered template with a new effective dated row inserted. The fields for the original effective dated row of a delivered template are not available for edit. You must insert a new row or clone a delivered template to make changes to the description, but you cannot change the Activity Guide Category value.
|
Field or Control |
Definition |
|---|---|
| Description |
Enter the description that should appear on the fluid activity guide banner. The description is displayed in Activity Guide Templates. If the activity guide template is configured for My Activity Guides, then the template description is displayed in the left panel of the My Activity Guides page. |
| Long Description |
Enter a longer description that explains the purpose of the template, if needed. |
| Activity Guide Category |
Select the category that contains the record structure, actions, and step that apply to this template. Delivered options include Life Events and OnBoarding, however you can create new categories using the Activity Guide Composer - Categories component (see Setting Up Activity Guide Categories). Note: You cannot change the category for this template after you have saved this page. If you have cloned or inserted a new row for an existing template, you cannot change the category. |
Use the Activity Guide Composer - Security page (AGC_TMPL_SCRTY_FL) to identify the security roles for administrator and end user.
Navigation
Click the Add Activity Guide Template button from the Activity Guide Templates Page, enter the template ID and effective date on the Add Activity Guide Template Page, and click Continue.
Click the Update Template button from the Update Template Page.
From within the Activity Guide Composer, select the Security tab from the left panel category list, or click the Next or Previous buttons to navigate to the page.
Image: Activity Guide Composer - Security Page
This example illustrates the fields and controls on the Activity Guide Composer - Security page.
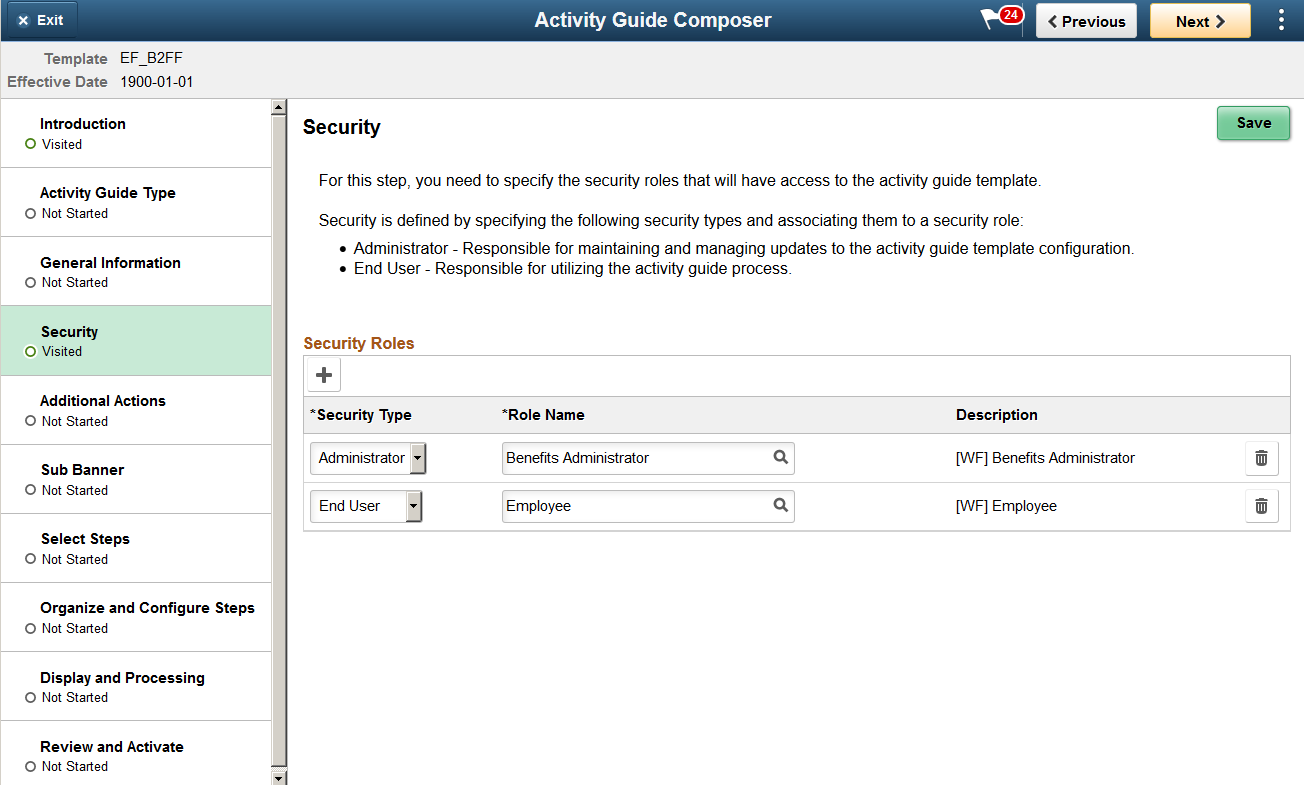
Note: You must first enter an activity guide type and category in order to define the security for an activity guide template. This step is also required before you can complete many of the other steps, or pages, for this template.
|
Field or Control |
Definition |
|---|---|
 Add button Add button |
Click this button to insert an additional security row. |
| Security Type |
Select a security user type. Valid values are Administrator for maintaining the template and End User for user accessing the template to enter transactional data. Note: You must enter at least one Administrator and one End User role. |
| Role Name |
Select the role that will either maintaining the template configuration (Administrator) or that will be the user for the template (End User). Important! The role name that is assigned to the user profile must match the role name that is specified for the End User security type defined here. |
| Delete button |
Click to remove a security row from this template. |
Use the Activity Guide Composer - Additional Actions page (AGC_TMPL_BTNS_FL) to select which action buttons will be available in the activity guide for a template.
Navigation
Click the Add Activity Guide Template button from the Activity Guide Templates Page, enter the template ID and effective date on the Add Activity Guide Template Page, and click Continue.
Click the Update Template button from the Update Template Page.
From within the Activity Guide Composer, select the Additional Actions tab from the left panel list, or click the Next or Previous buttons to navigate to the page.
Note: If the activity guide category specified for the template has a Step Definition Rule of Steps from single component saved as single transaction, then the user should select an Action that allows the user to submit or complete the activity guide.
Image: Activity Guide Composer - Additional Actions Page
This example illustrates the fields and controls on the Activity Guide Composer - Additional Actions page.
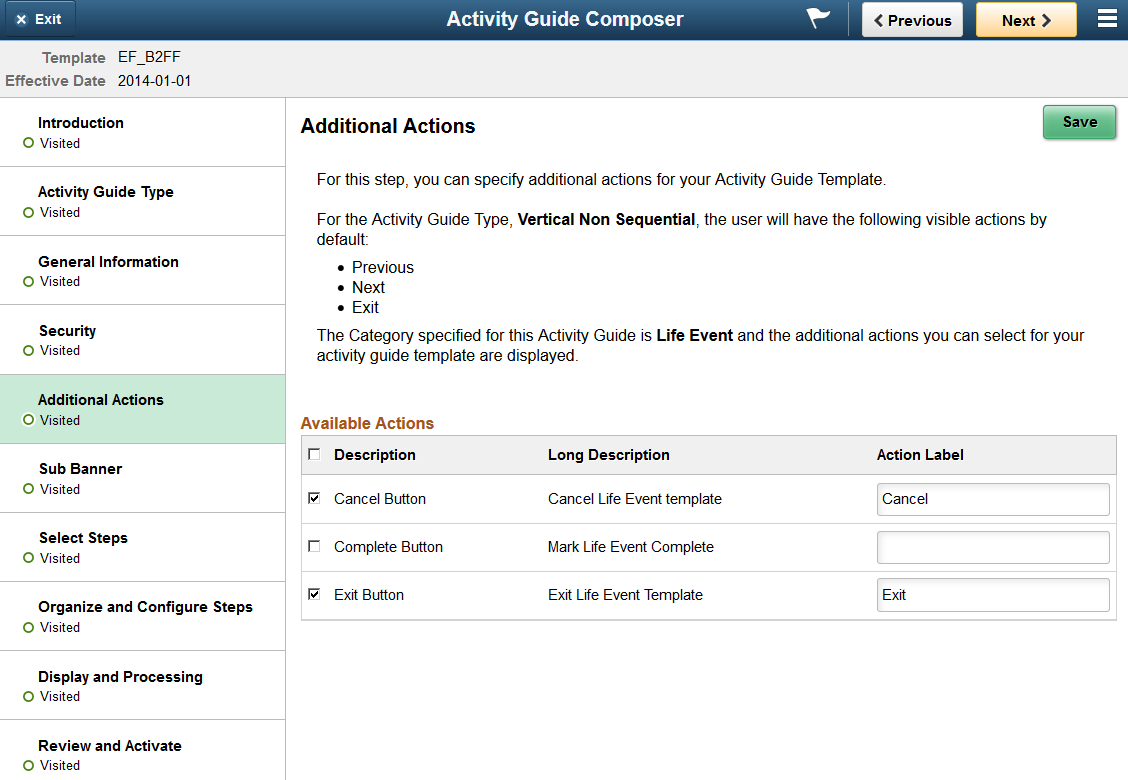
Note: You must first identify the security roles for this template before you can configure actions.
Use this page to identify the actions a user can take when using this template. Actions are those list items that are available to the user from the Actions List menu in the banner of the activity guide.
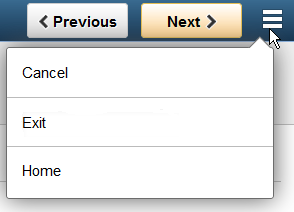
Image: Example of Actions in the Activity Guide Actions List Menu
This example illustrates the action items available from the activity guide Actions List menu.
|
Field or Control |
Definition |
|---|---|
| Check box |
Select those items you want to include in the Actions List mention. To select all actions, select the check box next to the Description column in the header, or select action buttons individually. |
| Action Label |
Enter the text that should appear in the Actions List menu. If you save the page before entering a label, the page will automatically populate the fields you have selected with the Description label. You can overwrite this value and save your changes. If you deselect an action type and save, the page will remove the label you have entered. |
The activity guide category defines which actions are available on this page. To manage actions for a category, use the Categories - Actions Page.
Use the Activity Guide Composer - Sub Banner page (AGC_TMPL_SBNR_FL) to identify the type of sub banner you wish to display at the top of the activity guide, if any.
Navigation
Click the Add Activity Guide Template button from the Activity Guide Templates Page, enter the template ID and effective date on the Add Activity Guide Template Page, and click Continue.
Click the Update Template button from the Update Template Page.
From within the Activity Guide Composer, select the Sub Banner tab from the left panel category list, or click the Next or Previous buttons to navigate to the page.
Image: Activity Guide Composer - Sub Banner Page
This example illustrates the fields and controls on the Activity Guide Composer - Sub Banner page.
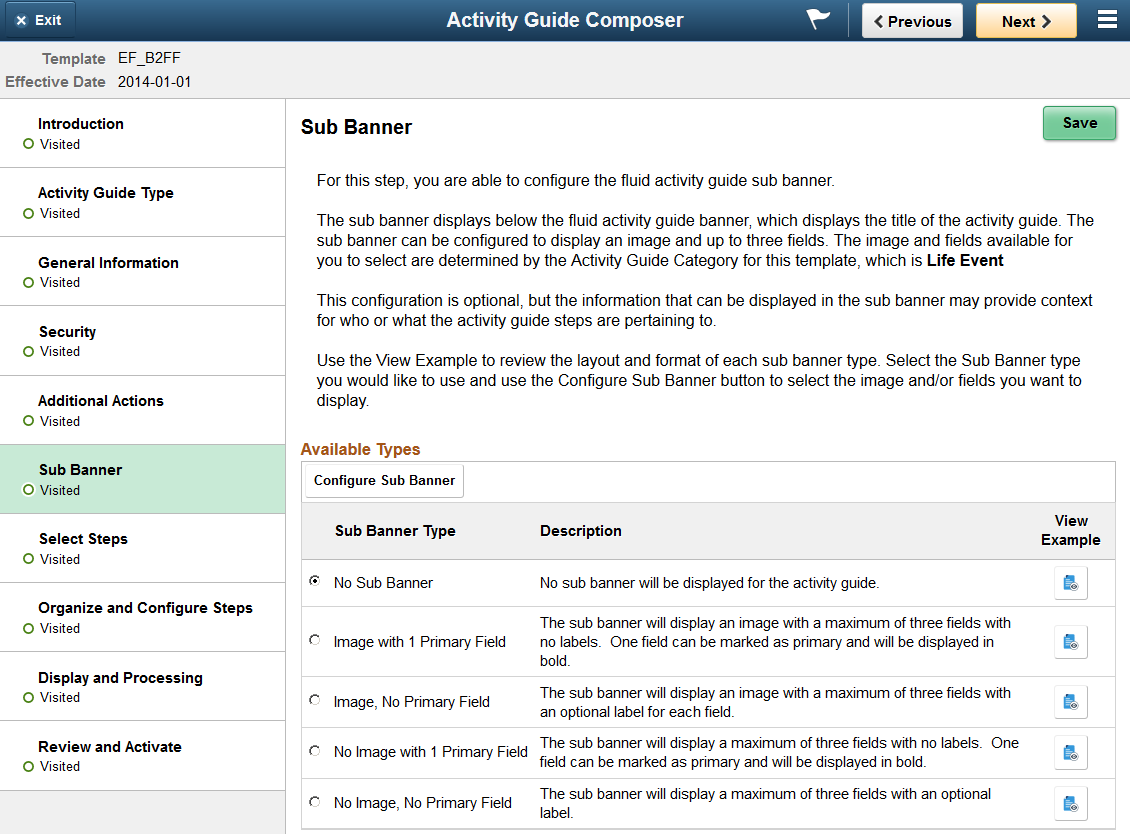
Note: This example shows a delivered template with a new effective dated row inserted. The fields for the original effective dated row of a delivered template are not available for edit. You must insert a new row or clone a delivered template to make changes.
Note: You must first identify the security roles for this template before you can select a sub banner.
|
Field or Control |
Definition |
|---|---|
| Configure Sub Banner |
Click this button to access the Configure Sub Banner Page and identify which image and fields should display in the sub banner. When No Sub Banner is selected, the system will not allow you to access the Configure Sub Banner page when you click this button. |
| Sub Banner Type |
Select from one of the following sub banner types:
|
| View Example |
Click this button to access the View Example (Sub Banner) Page and view an example of the different sub banner types. Note: These are examples only and do not reflect the current template you are creating. |
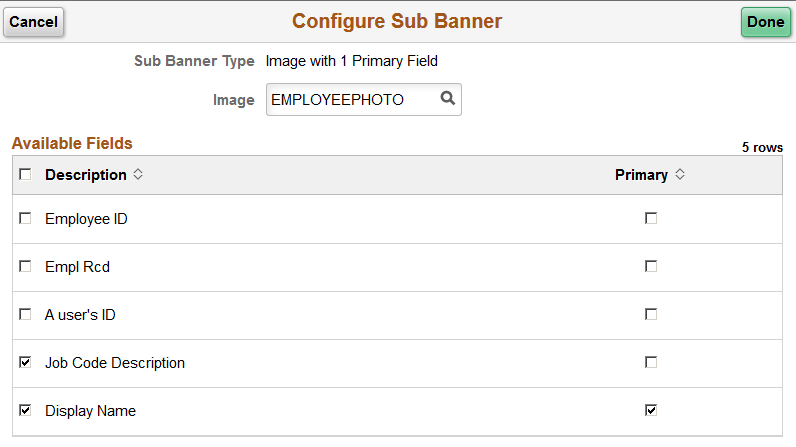
Use the Configure Sub Banner page (AGC_TMPL_SBNR1_SCF) to identify the image and fields that should appear in the sub banner.
Navigation
Click the Configure Sub Banner button from the Activity Guide Composer - Sub Banner Page.
Image: Configure Sub Banner Page
This example illustrates the fields and controls on the Configure Sub Banner page.
|
Field or Control |
Definition |
|---|---|
| Sub Banner Type |
Display the sub banner type you selected on the Activity Guide Composer - Sub Banner Page. |
| Image |
This option is available only when you have selected one of the sub banner types that includes an image. Enter which image should display in the sub banner. Valid images are defined on the Categories - Images Page. |
| Description |
Select up to three available fields. These fields come from the category associated with this template and are defined on the Categories - Context Page. Available fields for selection are those defined as Context Record and Fields values and derived Contextual Data fields where you have selected the Use in Sub Banner option. |
| Display Label |
This option is available when you have selected one of the sub banner types that has no primary Field. Indicate whether a label should be displayed for the field. |
| Primary |
This option is available only when you have selected one of the sub banner types that include a primary field. Select which field should serve as the primary field. This item will appear at the top of the list in bold. |
| Done |
Click to save your options and return to the Activity Guide Composer - Sub Banner Page. |
| Cancel |
Click this button to return to the Activity Guide Composer - Sub Banner Page without saving your changes. |
Use the View Example (Sub Banner page (AGC_TMPL_SBNR2_SCF) to view examples of sub banners.
Navigation
Click a View Example button on the Activity Guide Composer - Sub Banner Page.
Image: View Example (Sub Banner) Page
This example illustrates the View Example page showing a sub banner example.
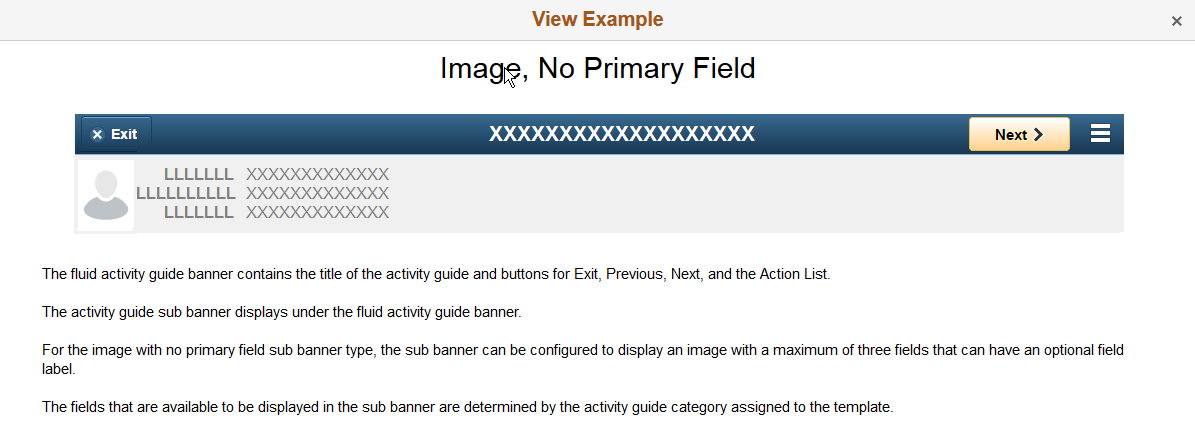
Note: These are static examples only and do not reflect the template you are creating.
Use the Activity Guide Composer - Select Steps page (AGC_TMPL_STEP1_FL) to select the steps that should be part of this activity guide.
Navigation
Click the Add Activity Guide Template button from the Activity Guide Templates Page, enter the template ID and effective date on the Add Activity Guide Template Page, and click Continue.
Click the Update Template button from the Update Template Page.
From within the Activity Guide Composer, select the Select Steps tab from the left panel category list, or click the Next or Previous buttons to navigate to the page.
Image: Activity Guide Composer - Select Steps Page
This example illustrates the fields and controls on the Activity Guide Composer - Select Steps page.
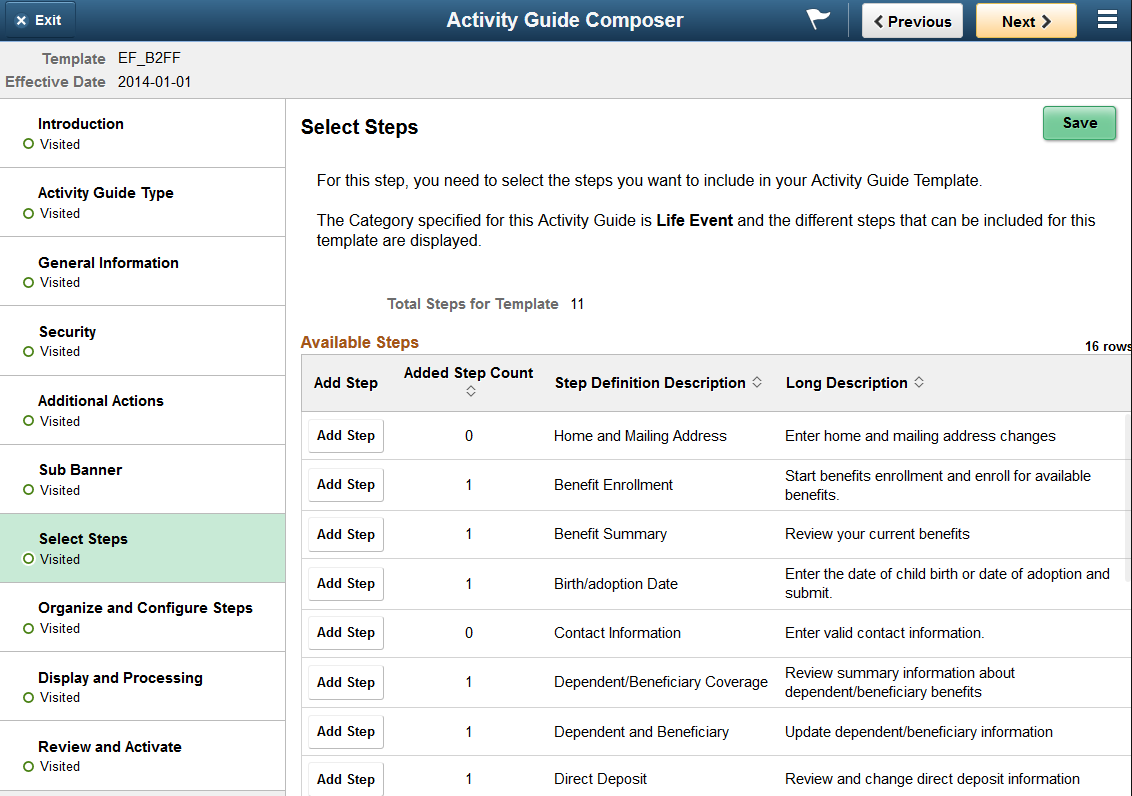
Image: Activity Guide Composer - Select Steps Page for single component
This example illustrates the fields and controls on the Activity Guide Composer - Select Steps page for single component.
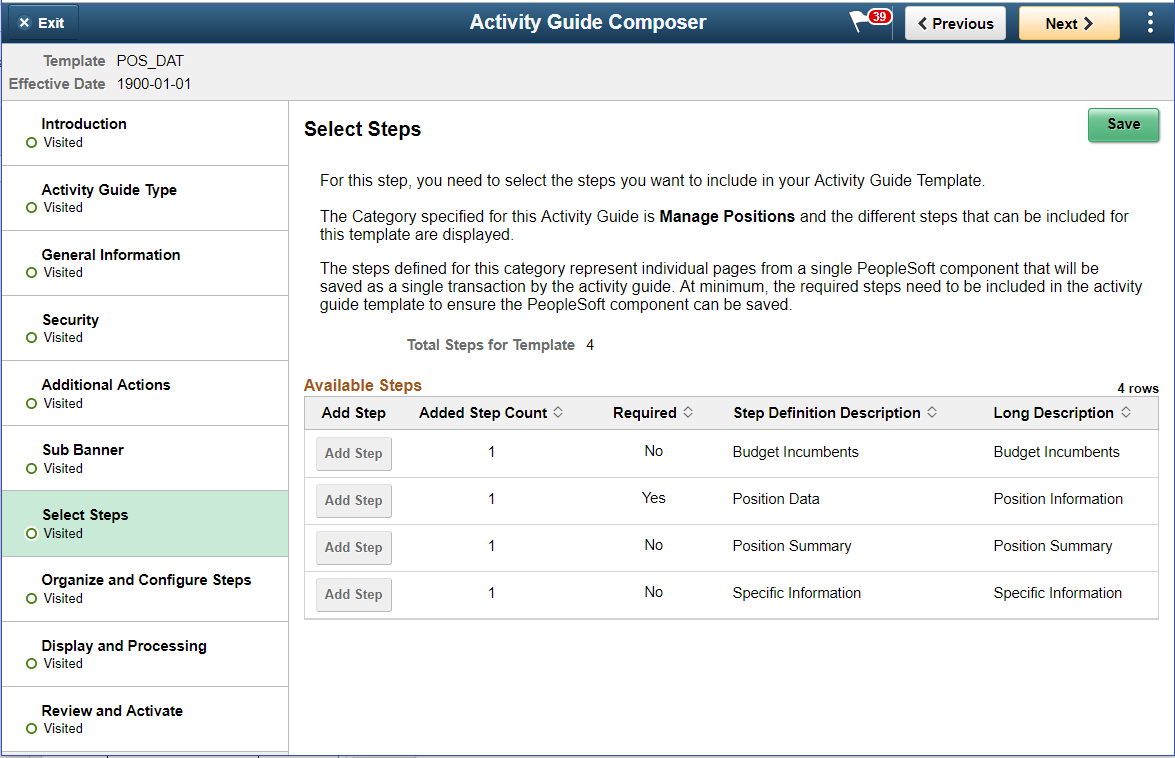
The Select Step displays additional instruction if the Step Definition Rule on the category is defined as Steps from a single component saved as a single transaction.
Note: You must first identify the security roles for this template before you can select steps.
The top of this page displays the category associated with this template. The activity guide category defines the valid steps that are available for the activity guide template. To manage steps for a category, use the Categories - Steps Page.
|
Field or Control |
Definition |
|---|---|
| Total Steps for Template |
Displays the number of steps that have been added to this template. |
| Add Step |
Click this button to add the step to a template. The Added Step Count field identifies if you have already added this step to your template and how many times it will be listed as a step. To organize, configure, or delete a step, use the Activity Guide Composer - Organize and Configure Steps Page. Note: If Step Definition Rule on the category is defined as Steps from a single component saves as single transaction, then the user is only able to add the step once to the activity guide template and Add Step will be disabled after the step is added. |
| Added Step Count |
Identifies how many times you have added this step to your template. If you have added a step by accident, you can delete it from the Activity Guide Composer - Organize and Configure Steps Page. |
| Required |
If Step Definition Rule on the category is defined as Steps from a single component saves as single transaction, then display the steps that are required will be shown. Note: This will generate an error if required steps are not added and allow a step to be added once. |
Use the Activity Guide Composer - Organize and Configure Steps page (AGC_TMPL_STEP2_FL) to organize, configure, or delete a step from the activity guide template.
Navigation
Click the Add Activity Guide Template button from the Activity Guide Templates Page, enter the template ID and effective date on the Add Activity Guide Template Page, and click Continue.
Click the Update Template button from the Update Template Page.
From within the Activity Guide Composer, select the Organize and Configure Steps tab from the left panel category list, or click the Next or Previous buttons to navigate to the page.
Image: Activity Guide Composer - Organize and Configure Steps Page
This example illustrates the fields and controls on the Activity Guide Composer - Organize and Configure Steps page.
Note: You must first identify the security roles and select step for this template before you can configure steps.
This page displays the steps you added on the Activity Guide Composer - Select Steps Page. Determine the step order by moving them up and down in the list. If the activity guide type is vertical, you can group steps into like categories by adding group steps and selecting which steps should be a sub step within the group. For example, you can create a group called Payroll and select all those steps related to payroll as sub steps to this group. This page also enables you to configure step attributes.
The following columns will display to manage your steps. If none of the steps are associated with that type of configuration, that column will not display. For example, if none of your steps are page text enabled, that column and button will not be available.
|
Field or Control |
Definition |
|---|---|
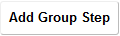 Add
Group Step button Add
Group Step button |
Click this button to access the Add Group Step Page and enter a group step description. Note: This button is not available for templates made using the Horizontal activity guide types. |
| Step Type |
Displays if this is an individual Step, the Group Step label, or a Sub Step that is part of a group step. |
 Move
Step Up and Move
Step Up and Move
Step Down icon buttons Move
Step Down icon buttons |
Click the solid up arrow to move the step up one position in the list or click the solid down arrow to move the step down one position in the list of steps. If the next step consists of a group step, then this step will be moved above or below the group step with all it’s sub steps. |
 Move Group Step Up and Move Group Step Up and  Move Group Step Down icon buttons Move Group Step Down icon buttons |
Click the solid circled up arrow to move the group step with all its sub steps up one position in the list or click the solid circled down arrow to move the step and all it’s sub steps down one position in the list of steps. |
 Move
Sub Step Up and Move
Sub Step Up and  Move Sub Step Down icon buttons Move Sub Step Down icon buttons |
Click the open circled up arrow to move the sub step up one position within the group of steps or click the open circled down arrow to move the sub step down one position within the group of steps. When you reach the top (or bottom) of the group step, you will no longer be given the option to move the sub step up (or down) in that group step. |
| Step Description |
The step description defaults from the Description field on the Categories - Steps Page. You can modify this description as needed. This description will be the name of the step in the left panel, or horizontal step across the top for a horizontal activity guide type. It will also appear as the page name. |
 Configure Group Step button Configure Group Step button |
This button is available for group steps. Click this button to access the Configure Group Step Page and select which steps should be a sub step within this group. |
 Configure Attributes button Configure Attributes button |
Click this button to access the Configure Attributes Page to define step attributes, such as whether the step is required or if it must be completed by a specific due date. |
 Configure Dependencies icon button Configure Dependencies icon button |
Click this button to access the Configure Dependencies Page to identify steps that must be completed prior to completing this step. |
 Configure Page Text icon button Configure Page Text icon button |
This button is available when a step is page text enabled, such as the Welcome or Summary page. Click this button to access the Configure Page Text Page to enter any text that you want the page to display for this step. |
 Step
Details icon button Step
Details icon button |
Click this button to access the Step Details Page to view the configuration for this step. Step configuration is defined on the Categories - Steps Page, with the exception of the Step Description value, which comes from the Step Description value you entered on this page. |
 Delete
Step icon button Delete
Step icon button |
Click this button to remove this step from the template. You can return to the Activity Guide Composer - Select Steps Page to add the step back into this template. Note: If the Step Definition Rule on the category is defined as Steps from a single component saves as single transaction, then that user will not be able to delete the step if it has been defined as a Required step in the activity guide category. |
Use the Add Group Step page (AGC_TMPL_STPAG_SCF) to define the label for the group of steps.
Navigation
Click the Add Group Step button from the Activity Guide Composer - Organize and Configure Steps Page.
Image: Add Group Step Page
This example illustrates the fields and controls on the Add Group Step page.
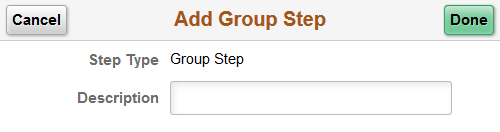
A group step does not display a transactional page to the end user. Rather, it serves as a header for a group of steps. For example, you can create a group step called Personal Data and then associate it to other steps that prompt the user to enter contact information, addresses, dependent data, and emergency contacts. When a user selects a group step from the left panel of the page, the panel will expand to show the sub steps within that group.
Use the Configure Group Step Page to associate sub steps to a group.
Note: Group steps are not allowed for horizontal activity guides.
Use the Configure Group Step page (AGC_TMPL_STPEG_SCF) to select which steps should be a sub step within this group.
Navigation
Click the Configure Group Step button from the Activity Guide Composer - Organize and Configure Steps Page.
Image: Configure Group Step Page
This example illustrates the fields and controls on the Configure Group Step page.
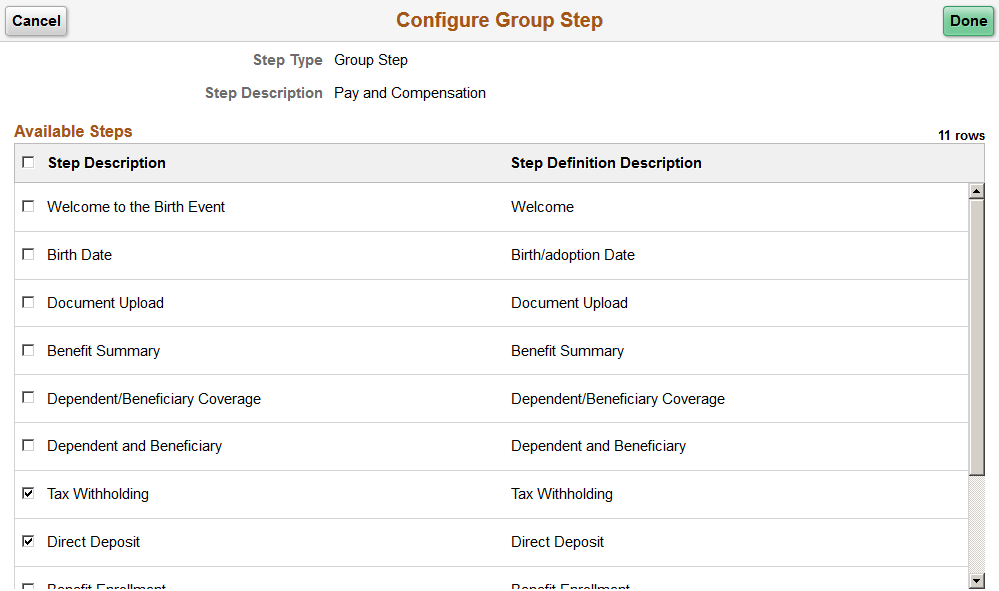
The page displays those steps that have been added to this template that have not already been associated with another group step. To add the same step to different groups, you will need to add the step multiple times from the Activity Guide Composer - Select Steps Page.
Select those steps that should be part of this group. To remove a step from a group, deselect the check box for that step row.
Use the Configure Attributes page (AGC_TMPL_STPEA_SCF) to configure the rules for a step.
Navigation
Click the Configure Attributes button from the Activity Guide Composer - Organize and Configure Steps Page.
Image: Configure Attributes Page
This example illustrates the fields and controls on the Configure Attributes page.

Step Controls
|
Field or Control |
Definition |
|---|---|
| Required |
Swipe to Yes to make this a required step for the end user. When required, the step tab in the left panel will display an asterisk to the left to the step label. |
| Disable AWE Status Update |
This field is enabled when the AWE integration configuration is set up on the Categories - Steps Page for this step. Swipe to Yes to override and turn off the AWE Integration that updates the status of this template step. |
| Lock Step After Complete |
Swipe to Yes to disable end user updates to this step after the step has been completed. When step reaches a Complete status, the step is locked. Therefore, further updates or changes cannot be made to this step once complete. |
Start Date
Use this section to identify the start date of a step.
|
Field or Control |
Definition |
|---|---|
| Start Date Option |
Indicate the start date for this step, if any. Options include: Current Date, Date Field, and None. |
| Start Date Field |
This field becomes available when you select Date Field in the Start Date Option field. Valid options for this field are defined on the Categories - Context Page when you select the Use in Start/Due Date Option check box for a derived contextual date field. |
Due Date
Use this section to identify when a step must be completed.
|
Field or Control |
Definition |
|---|---|
| Due Date Option |
Indicate a due date for this step, if any. Options include: Date Field, None, and Start Date. |
| Due Date Field |
This field becomes available when you select Date Field in the Due Date Option field. Valid options for this field are defined on the Categories - Context Page when you select the Use in Start/Due Date Option check box for a contextual date field. |
| Add Days to Due Date |
Enter the number of days after the date you have entered (start date or the date field) the user must be complete the step. For example, if proof of identification is due within three (3) days of the worker’s hire date, you would select Date Field in the Due Date Option field, EE Job Data : Hire Date in the Due Date Field, and enter 3 in the Add Days to Due Date field. |
| Inactivate Step After Due Date |
Swipe to Yes if you want to inactivate and lock this step for the end user after the due date has passed. |
Step Question
Enter a simple yes or no question if you want the user to decide if the step should be included or excluded from the activity guide.
If the user answers Yes to the question, then the step will appear in the activity guide.
If the user answers No to the question, then the step will be cancelled and not displayed to the user.
Use the Configure Dependencies page (AGC_TMPL_STPDP_SCF) to identify steps that must be completed prior to completing this step.
Navigation
Click the Configure Dependencies button from the Activity Guide Composer - Organize and Configure Steps Page.
Image: Configure Dependencies Page
This example illustrates the fields and controls on the Configure Dependencies page.
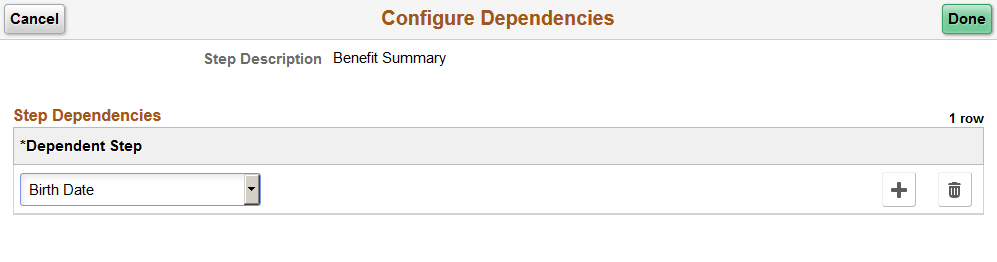
|
Field or Control |
Definition |
|---|---|
| Dependent Step |
Select a step or steps that must be completed before an end user can perform this step. Valid values are all the steps that have been added to this template. Group steps are not part of the step selection options: you would need to select each sub step within a group step if the entire group step should be completed prior to completing this step. Note: You cannot make a step dependent upon itself. |
Use the Configure Page Text page (AGC_TMPL_PGTEXT) to enter page text when a step is page text enabled, such as the Welcome, Video, and Summary page steps.
As delivered, page text is only enabled for the following related content services: HC_AGC_INFO_FL, HC_AGC_VIDEO_FL, and HC_AGC_SUMMARY_FL.
Navigation
Click the Configure Page Text button from the Activity Guide Composer - Organize and Configure Steps Page.
Image: Configure Page Text Page
This example illustrates the fields and controls on the Configure Page Text page.
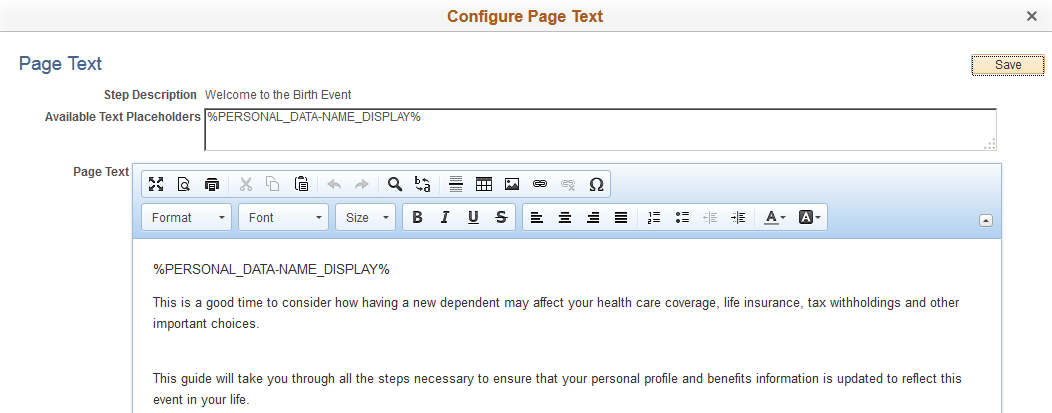
Use the Rich Text editor to enter additional information for the step. For example, you can enter a personalized welcome message for your workers or remind them of other things they may need to consider.
|
Field or Control |
Definition |
|---|---|
| Step Description |
Displays the Step Description field value for the step from the Activity Guide Composer - Organize and Configure Steps Page. This will appear as the navigation and page name in the activity guide for this step. |
| Available Text Placeholders |
Contextual data fields will be available as text placeholders when the Use in Page Text option is selected for the derived contextual data field on the Categories - Context Page. |
Use the Step Details page (AGC_TMPL_STPED_SCF) to view configuration details for a step.
Navigation
Click the Step Details button from the Activity Guide Composer - Organize and Configure Steps Page.
Image: Step Details Page
This example illustrates the fields and controls on the Step Details page.
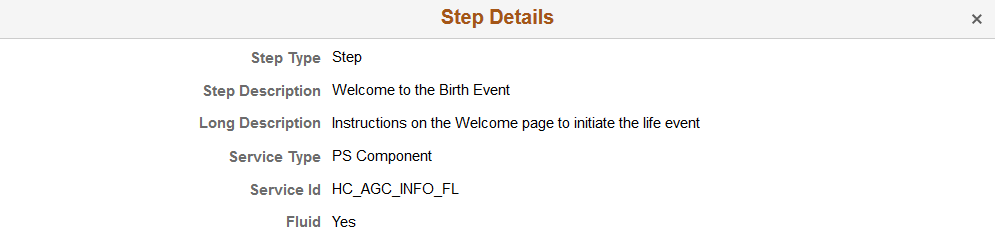
|
Field or Control |
Definition |
|---|---|
| Step Type |
Displays whether this is a step or substep of a group of steps. This information is defined on the Activity Guide Composer - Organize and Configure Steps Page. |
| Step Description |
Displays the step description that will appear for the user as a navigation step and as the page name. This comes from the Step Description field on the Activity Guide Composer - Organize and Configure Steps Page. |
| Long Description, Service Type, Service Id, and Fluid |
These values come from the configuration defined on the Categories - Steps Page for this step. The service type and ID indicate the related content service that is associated with the step. The Fluid field will display a Yes value if this step is performed using a fluid page. |
Use the Activity Guide Composer - Display and Processing page (AGC_TMPL_PRCS_FL) to configure a template for use in My Activity Guides.
Navigation
Click the Add Activity Guide Template button from the Activity Guide Templates Page, enter the template ID and effective date on the Add Activity Guide Template Page, and click Continue.
Click the Update Template button from the Update Template Page.
From within the Activity Guide Composer, select the Display and Processing tab from the left panel category list, or click the Next or Previous buttons to navigate to the page.
Image: Activity Guide Composer - Display and Processing Page
This example illustrates the fields and controls on the Activity Guide Composer - Display and Processing page.
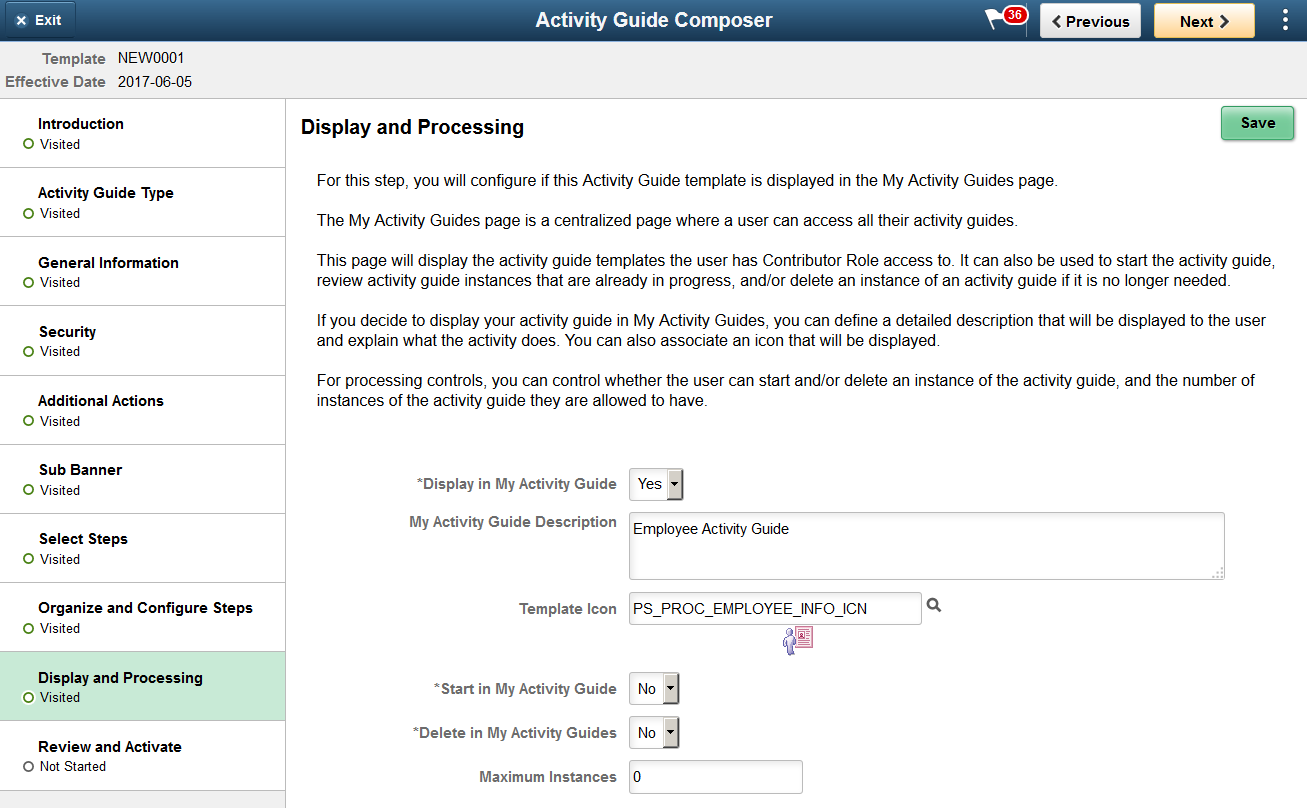
Use this page to identify which template activity guides should be available from the My Activity Guides page and the rules that apply for each activity guide.
Note: For users to access an activity guide from My Activity Guides page, they must have a security role equal to one of the end user security roles specified for the activity guide template.
|
Field or Control |
Definition |
|---|---|
| Display in May Activity Guide |
Select Yes to include this activity guide template in the My Activity Guides pages. This will also open up the remaining fields on this page. Note: The template must also be active to be available from the My Activity Guides page. |
| My Activity Guide Description |
Enter a long description that introduces the user to the activity guide template. This long description displays on the content area of My Activity Guides after the user has selected an activity guide template from the left panel. This will be defaulted to the long description of the activity guide, but it can be modified. |
| Template Icon |
(Optional) Select the icon, if any, that should appear next to the template name in the left panel of the My Activity Guides page. The image will display below the field after it is selected. |
| Start in My Activity Guide |
Select Yes to enable the user to initiate an activity guide instance from the My Activity Guides page. Note: If you create your own Activity Guide Composer fluid Life Event templates, it is recommend that you do not opt to display the templates on the My Activity Guides Page, which is a centralized location where you can deploy various activity guide templates to your users. Instead, have your users access it only through the Benefit Details Tile. |
| Delete in My Activity Guides |
Select Yes to enable the user to delete an instance of an activity guide that is no longer needed. |
| Maximum Instances |
Indicate the maximum number of activity guide instances a user can have in progress for this activity guide template. The page provides 0 as the default value, which is used to indicate that there is no limit on the number of instances the user can have in progress for this activity guide. |
Use the Activity Guide Composer - Review and Activate page (AGC_TMPL_ACTIVE_FL) to activate or deactivate an activity guide template.
Navigation
Click the Add Activity Guide Template button from the Activity Guide Templates Page, enter the template ID and effective date on the Add Activity Guide Template Page, and click Continue.
Click the Update Template button from the Update Template Page.
From within the Activity Guide Composer, select the Review and Activate tab from the left panel category list, or click the Next button to navigate to the page.
Image: Activity Guide Composer - Review and Activate Page
This example illustrates the fields and controls on the Activity Guide Composer - Review and Activate page.
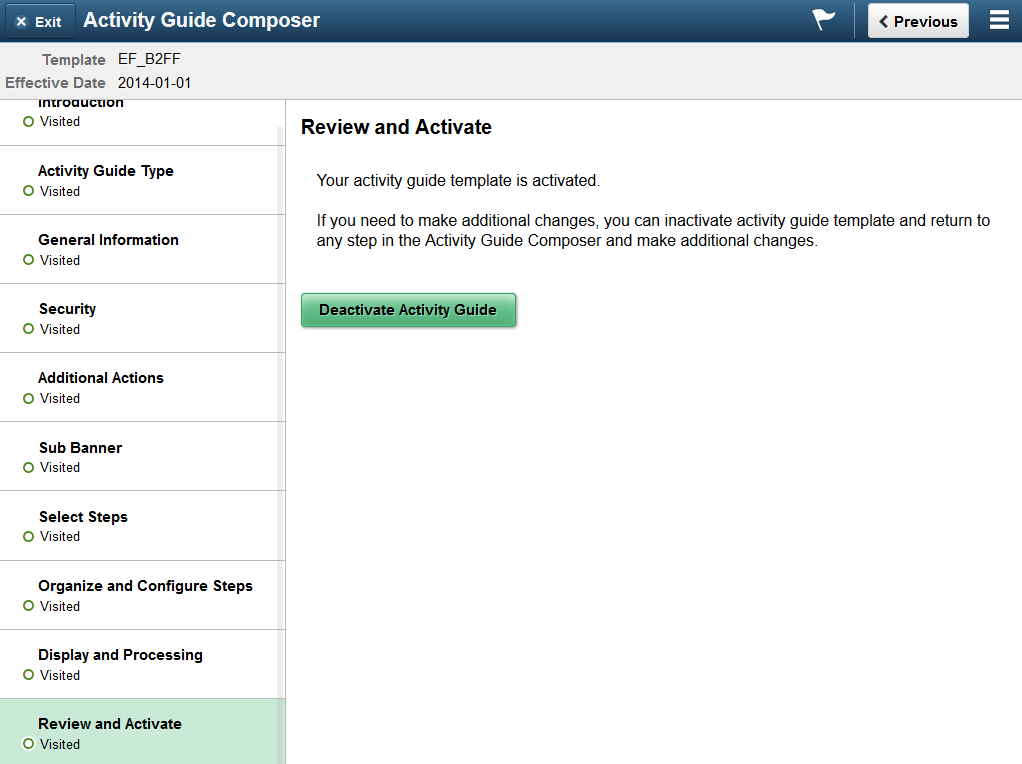
|
Field or Control |
Definition |
|---|---|
| Activate Activity Guide or Deactivate Activity Guide buttons |
These buttons are not active for the initial row of delivered templates. When an activity guide is Active, the text at the top of the page informs you that your activity guide is active and will display the Deactivate Activity Guide button. If an activity guide is Inactive, the text at the top of the page reminds you to activate your activity guide after you have completed all changes. It will also display the Activate Activity Guide button for you to change the status. When you create a new activity guide template, the default value is inactive and the page will present you with the Activate Activity Guide button. If you insert a new effective dated row or clone an existing activity guide template, the system will copy the same active status of that template. For example, if you insert a new effective dated row or clone an activity guide template with a status of Inactive (deactivated), the new row or cloned activity guide template will also be Inactive. However, if you insert a row or clone an activity guide template that has a status of Active, the new row or cloned activity guide template will be Active. Note: If Step Definition Rule on the category is defined as Steps from a single component saves as single transaction, then the user will not be able to activate the template until an Action has been defined for the template that enables the end user to submit or complete the activity guide process. |