Defining Compensation Cycles
This topic discusses how to define compensation cycles.
|
Page Name |
Definition Name |
Usage |
|---|---|---|
|
WCS_ECM_CYC_DEF |
Enter general parameters for the compensation cycle. |
|
|
WCS_ECM_CYC_SAL |
Enter parameters that control the calculations of one or more compensation rate related increases. |
|
|
WCS_ECM_CYC_AWD |
Enter parameters for including variable compensation bonus plans in the cycle. |
|
|
WCS_ECM_CYC_MSS |
Configure behaviors for the self-service components. |
Here are the prerequisites that you need to complete before you define your compensation cycles:
Define group IDs.
To generate documents for a group of employees, HR administrators or managers must specify the ID of the group that contains the employees they want to process.
Define trees.
Define ePerformance document types (optional if the cycle is applying ePerformance integration).
Define a configurable matrix (optional).
Define variable compensation plans (optional).
Define rounding rules.
Define proration rules.
Use the Define Compensation Cycles - General page (WCS_ECM_CYC_DEF) to enter general parameters for the compensation cycle.
Navigation
(Classic)
(Fluid) Select the Workforce Administrator home page and click the Compensation Administration tile. On the left navigation, select
Image: Define Compensation Cycles - General page
This example illustrates the fields and controls on the Define Compensation Cycles - General page.
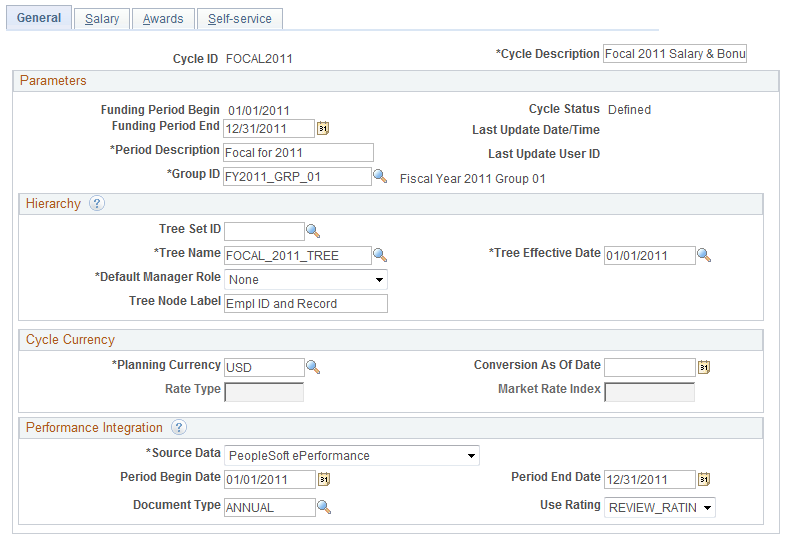
Parameters entered on this page are not specific to any one salary plan or bonus plan. They include funding period begin and end dates, currency conversion settings, employee group parameter, performance integration settings, help URLs and other settings that control manager self-service.
Performance integration settings could impact funding calculation for a salary plan using a configurable matrix.
|
Field or Control |
Definition |
|---|---|
| Cycle ID |
Before you access this page enter a short phrase or abbreviation that uniquely identifies the cycle. Typically, you create this identifier when you are adding a new cycle. Note: Do not use spaces when you create a cycle ID as this can cause problems when embedding a link into an email where this field is used as a key. |
| Cycle Description |
Enter a term that best describes the cycle. |
Parameters
|
Field or Control |
Definition |
|---|---|
| Funding Period Begin and Funding Period End |
Enter the beginning and ending dates of the funding cycle. The Funding Period Begin date must be greater than the Funding Period End date. Typically funding periods are a year in length. |
| Period Description |
Enter a description for the funding period. |
| Cycle Status, Last Update Date/Time, and Last Update User ID |
These fields display the status of the cycle, the date that the cycle was last updated, and the user ID of the person who last updated the cycle. |
| Group ID |
Select the group that defines the population of employees for which the cycle applies. Note: The Compensation Administrator must have access to the group through standard group security. In addition, this component must be included in the Group Component list. The Cycle Definition component should also be added to the default set within group definition. |
Hierarchy
|
Field or Control |
Definition |
|---|---|
| Tree Set ID |
If the tree name is based on a setID (for example department, location, and so on) select one using the Lookup button. If the tree is not based on a setID, this field is not required. |
| Tree Name |
Select the tree that is used as the basis for structuring the organizational hierarchy within the Manager Self-Service component. |
| Tree Effective Date |
Select the effective date of the tree you selected in the Tree Name field. |
| Default Manager Role |
Select one of the values from the drop-down list menu to indicate the hierarchy that you want the cycle to be based on. Values include:
Note: If you do use this field, the Calculation and Build process populates the Cycle Access table with the appropriate employee ID and sets the role to Manager. The Cycle Build process only defaults to the Cycle Access table with Submitter role access, which is based on the Default Manager Role setting. The compensation administrator can enter additional cycle role access. |
| Tree Node Label |
Enter a description for the tree node associated with the compensation cycle. |
Cycle Currency
|
Field or Control |
Definition |
|---|---|
| Planning Currency |
Select the currency code that you want to use from the currency code table. |
| Conversion As Of Date |
Enter the date that you want the system to convert the currency that you are using for this cycle. The underlying market rate tables must be fixed from the point that compensation is calculated within the cycle. |
| Rate Type |
Select the rate type that you want to use for the cycle. |
| Market Rate Index |
Select a value from the Rate Index table to indicate the index you want the system to use to calculate the conversion of the currency. |
Performance Integration
|
Field or Control |
Definition |
|---|---|
| Source Data |
If you are integrating information from eCompensation Manager Desktop with a Performance application, select the appropriate application: Values include:
Note: If you select Other, it is the your responsibility to populate the PS_WCS_EP_APPR table. |
| Period Begin Date and Period End Date |
Enter the date range for performance documents. |
| Document Type |
Select the appropriate performance document type. |
| Use Rating |
Select the use rating that you are using in your ePerformance application. |
Note: The system makes the Period Begin Date, Period End Date, Document Type, and Use Rating fields unavailable for entry unless you select ePerformance as the value in the Source Data field.
Talent Links
This section is displayed if the Talent Links option is enabled on the Installed Integration Products Page for Talent Integration Management.
Talent Integration Management is a licensed solution that integrates two HCM instances on different releases, allowing you to take advantage of Talent Management features that are offered in the newer instance without having to perform a full upgrade. To implement this solution, you must set up full and incremental sync integration between the two HCM environments in order to keep them in sync. The older HCM environment is always the source database for employee data.
|
Field or Control |
Definition |
|---|---|
| Publish Update Transaction |
Select to indicate that salary and award update transactions need to be published, rather than updated directly in employees’ job and award data within the newer HCM environment. When selected, update transactions are loaded into a staging table and are published to the older HCM environment by running a process. From within the older system, another process runs to update employees’ job and award data information. Updates in the older system trigger sync transactions to the newer system and keep the two in sync. |
Use the Define Compensation Cycles - Salary page (WCS_ECM_CYC_SAL) to enter parameters that control the calculations of one or more compensation rate related increases.
Navigation
Image: Define Compensation Cycles - Salary page
This example illustrates the fields and controls on the Define Compensation Cycles - Salary page.
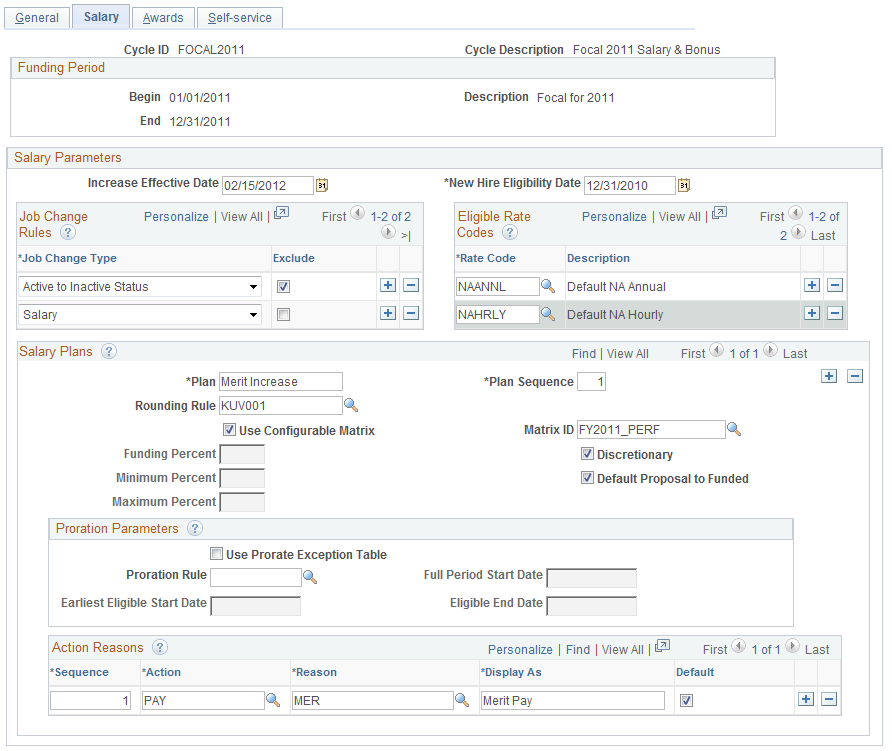
Parameters entered on this page include increases based on merit, pay adjustment, promotions, and so on. These parameters may include relevant salary rate codes, calculation rule matrixes, prorated and rounding rules, and applicable action and reason codes.
Salary Parameters
|
Field or Control |
Definition |
|---|---|
| Increase Effective Date |
Enter the date when you want any proposed compensation changes to be effective. This date must be on or after the Funding Period Begin Date. |
| New Hire Eligibility Date |
Enter the date when new hires are eligible for compensation changes. This date must be before the Funding Period Begin Date. The system is designed to allow customers to filter out employees that have not worked for a minimum period of time prior to the funding period to be considered eligible. For example, you might have a business policy that employees must be employed for at least 6 months to be considered eligible for any form of an increase. |
Job Change Rules
|
Field or Control |
Definition |
|---|---|
| Job Change Type |
Select the type or types of employee job change you want the system to track after the snapshot process has run and the cycle is in the Open status. Available values are: Active to Inactive Status - HR status of employee is changed to inactive, for example, employee is terminated. Currency Code - employee’s salary currency code is changed. Salary - employee’s salary is changed. |
| Exclude |
Select this option for a job change type if you want the Job Change process to zero out funded and proposed amounts for employees who had that job change recorded during the open cycle. If this option is not selected, the Job Change process doesn’t do anything to the funded and proposed amounts for employees who had that job change during the open cycle. The manager, after receiving the alert, can then decide what to do with the amounts, for example, reallocate them to other direct reports. |
Eligible Rate Codes
|
Field or Control |
Definition |
|---|---|
| Rate Code and Description |
Select the rate code that you want to use for changes to compensation. The system automatically fills in the description after you select the rate code. Note: The system allows you to add rows to enable you to add multiple rate codes. However, an employee can only have one compensation rate code adjusted during the Compensation Cycle process. |
Salary Plans
|
Field or Control |
Definition |
|---|---|
| Plan |
Enter a description for the salary plan that you want managers to see on the Manager Self-Service pages. |
| Plan Sequence |
Enter a number to indicate the order in which you want the system to display salary plans within the self service pages for the compensation cycle. |
| Rounding Rule |
Select the rounding method that you want to use for the salary plan. |
| Use Configurable Matrix |
Select this check box if you plan to use a configurable matrix to calculate funding information. If you select this check box, the system makes the Funding Percent, Minimum Percent, and Maximum Percent fields unavailable for entry. |
| Matrix ID |
Select a configurable matrix that you want to use to drive the funding calculation. Only matrices of the BASECOMP type are available for selection. See Defining Salary Increase Guidelines Using a Configurable Matrix. |
| Funding Percent |
Enter the total funding percent by which you would allow a manager to adjust salaries in their department. |
| Minimum Percent |
Enter the minimum percent by which you would allow a manager to adjust an employee's salary. |
| Maximum Percent |
Enter the maximum percent by which you would allow a manager to adjust an employee's salary. |
| Discretionary |
Select this check box if you want to enable managers to override the calculated funding amount. |
| Default Proposal to Funded |
Select this check box to set the default proposal to the calculated funded amount. |
Proration Parameters
|
Field or Control |
Definition |
|---|---|
| Use Prorate Exception Table |
Select this check box if you want to use information from the Prorate Exception (WCS_PRO_EXC_TBL) table in the build process. If there is no entry in the Prorate Exception Table, the build process sets the prorate factor to 1. Note: If you select this check box, the system makes the Proration Rule, Earliest Eligible Start Date, Full Period Start Date, and Eligible End Date fields unavailable for entry. |
| Proration Rule |
Select the proration rule that you want to use for salary increases or adjustments. The values that you are able to select come from the Prorate ID table (WCS_PRORATE_ID). |
| Earliest Eligible Start Date, Full Period Start Date, and Eligible End Date |
Enter the begin and end dates to which the proration period applies. These fields are required if you specify a proration rule. Typically, this period is for the year prior to the funding period. |
Action Reasons
|
Field or Control |
Definition |
|---|---|
| Sequence |
Enter a number to control the order that you want the system to load the action reason for the plan when updates are run. |
| Action |
Select an action from the Action table. |
| Reason |
Select a reason from the Action Reason table. |
| Display As |
Enter a description for the action that you want managers to see when they access the Manager Self-Service page. |
| Default |
Select the action that you want to use as a default on the Manager Self-Service page. You must select only one action for the plan. |
Use the Define Compensation Cycles - Awards page (WCS_ECM_CYC_AWD) to enter parameters for including variable compensation bonus plans in the cycle.
Navigation
Image: Define Compensation Cycles - Awards page
This example illustrates the fields and controls on the Define Compensation Cycles - Awards page.
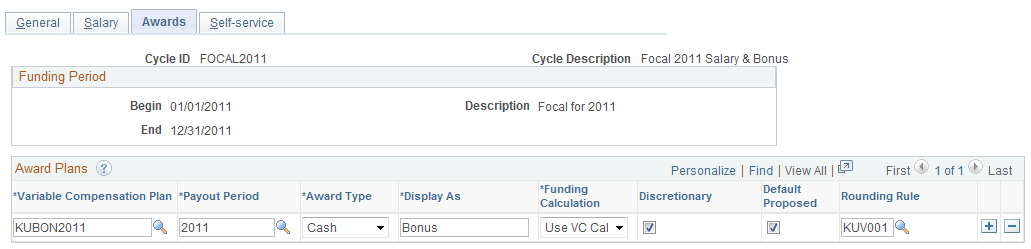
Parameters entered on this page include variable compensation plan and payout period, plan type, and budget calculation type.
Bonus awards are always calculated in Variable Compensation. When the compensation cycle build process is run, the system retrieves these calculated awards for the variable compensation plans that are specified on this page, and displays them for employees on the Allocate Compensation page.
Award Plans
|
Field or Control |
Definition |
|---|---|
| Variable Compensation Plan |
Select a plan from the Variable Compensation Plan table. |
| Payout Period |
Select a payout period from the Variable Compensation Payout Period table. Note: The payout period has to be within the start and end date of the cycle period to be added to the definition. |
| Award Type |
Select an award type. Values include:
The system derives these default values from the variable compensation plan types:
|
| Display As |
Enter a description for the award plan that you want managers to see on the Manager Self Service page. |
| Funding Calculation |
Select the type of funding calculation that you want the system to use for the variable compensation plan. Values are VC Calc and Manual. Note: If you select VC Calc the funding is defaulted to the award amounts that are calculated by variable compensation at the employee level. If you select Manual the compensation administrator will have to manually allocate a funding amount for each group node for the variable compensation plan. |
| Discretionary |
Select this check box if you want to enable managers to override the calculated funding amount. If you selected Manual as the Funding Calculation method for the VC plan, you must select this check box. |
| Default Proposed |
Select this check box if you want the system to default the plan to the proposed amount to the calculated variable compensation amount or the manually funded amount for each employee. If you do not select this check box, the system displays 0.00 as the proposed amount. |
| Rounding Rule |
Select the rounding rule that you want the system to use to calculate award amounts. If you do not specify a rounding rule, the system sets all rounding of the funded and proposed amounts to 2 decimals. |
Use the Define Compensation Cycles - Self-service page (WCS_ECM_CYC_MSS) to configure behaviors for the self-service components.
Navigation
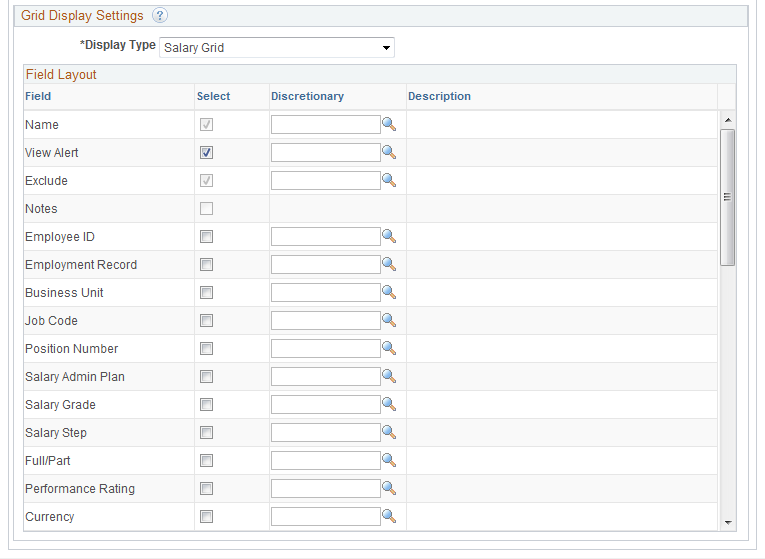
Image: Define Compensation Cycles - Self-service page (1 of 2)
This example illustrates the fields and controls on the Define Compensation Cycles - Self-service page (1 of 2).
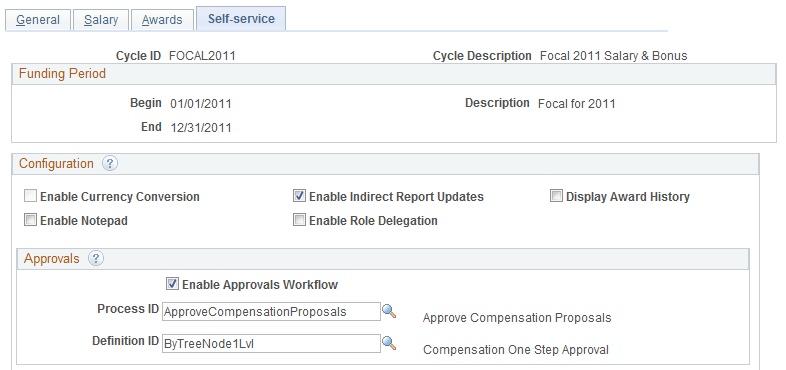
Image: Define Compensation Cycles - Self-service page (2 of 2)
This example illustrates the fields and controls on the Define Compensation Cycles - Self-service page (2 of 2).
Options on this page include the ability to view or hide some of the columns that will be displayed on the Manager Self-Service direct reports grid.
Configuration
|
Field or Control |
Definition |
|---|---|
| Enable Currency Conversion |
Select to enable currency conversion on the Manager Self-Service Direct Reports Detail page. |
| Enable Indirect Report Updates |
Select to enable updates to information for indirect reports on the Manager Self-Service Direct Reports Detail page. When this check box is selected, the system provides updates to employee information that is one level down from the node to which the manager has Submitter role access. |
| Display Award History |
Select to display award history on the Manager Self-Service Direct Reports Detail page. |
| Enable Notepad |
Select to enable the notepad on the Manager Self-Service Direct Reports Detail page. The notepad is used primarily for manager comments. |
| Enable Role Delegation |
Select to enable a manager to delegate their compensation role responsibilities to another manager or employee. |
Approvals
|
Field or Control |
Definition |
|---|---|
| Enable Approvals Workflow |
Select to process compensation proposal approvals using the Approval Framework. If this option is enabled, approvers approve, deny, or push back compensation proposals on the Approve Compensation Proposals page (WCS_ECM_AWE_HOME). Approval transactions are created and handled by the Approval Framework. When a proposal is approved or denied, only the group node status is updated to CNF for Confirmed or PSB for Pushed Back, and notifications will be sent out by the approvals workflow engine for the proposal. When this form of approval is used, an approver’s approval action is independent of all other transactions. The action does not cascade down to other lower-level proposals. With this option, the Confirmer role is not available in the Access Type drop down list box on the Administer Cycle Roles page. If this option is not enabled, confirmers approve, deny or push back proposals by clicking the Confirm or Push Back buttons on the Allocate Compensation page. PeopleCode is triggered to update the group node status and generate a compensation alert that can be viewed on Manager Dashboard (if configured). When this form of approval is used, a Confirmer role is typically assigned to a high-level user (for example, a department head) because the system cascades the confirmer’s approval action of a transaction down to all its lower-level compensation proposals. |
| Process ID and Definition ID |
Select the process ID and definition ID that you want to use to generate approval workflow. These IDs are entered on the Setup Process Definitions page (select Set Up HCM, Common Definitions, Approvals, Approvals Setup Center, Setup Process Definitions). |
Grid Display Settings
|
Field or Control |
Definition |
|---|---|
| Display Type |
Select the type of grid that you want the system to display on the Manager Self-Service page. The system displays the fields associated with the grid you selected. Values include:
|
Field Layout
This grid is pre-populated with a fixed set of fields. Select the check boxes to indicate that fields you want to appear within the Individual Proposals grid on the Manager Self-Service - Direct Reports Detail page for a particular section (Salary, Awards, or Worker). Some of the check boxes within the grid may be read-only indicating that there are no field values for the particular field or they may be disabled based on another setting for the compensation cycle. The system also does not allow users to add or delete rows.
|
Field or Control |
Definition |
|---|---|
| Field |
Displays the name of the field associated with the grid you selected. |
| Select |
Select the check boxes associated with the fields that you want to appear within the information grid on the Manager Self-Service - Direct Reports Detail page. |
| Discretionary and Description |
Select the text that you want to appear for the field on the Manager Self-Service pages. The system displays the description to the right of the Discretionary field. If you populate the Discretionary field, the system overrides the Manager Self-Service component with the field label from the corresponding value found in the text catalog. Note: You will need to provide the discretionary label values by setting them up in the HR Text Catalog in order to see them listed as part of the prompt. We provide a structure within the HR Text Catalog where you can create these values. |