Setting Up Sites
To set up sites, use the Setup Site ID (HRS_SITE_ID) component.
This topic provides an overview of Candidate Gateway sites, lists prerequisites, and discusses how to set up Candidate Gateway Sites.
This video provides a demonstration of a subset of site configuration options:
PeopleSoft HCM 9.2 Image 22 Highlights: Fluid Enhancements for Candidate Gateway Recruiting
|
Page Name |
Definition Name |
Usage |
|---|---|---|
|
HRS_SITE_ID |
Set up site definitions. |
|
|
HRS_WELCOME_ED |
Create content for the Classic Candidate Gateway welcome page. |
You can set up an unlimited number of applicant-facing career sites for your organization. For example, you can set up separate sites for different business units or for different countries, and you can then post job openings to the appropriate sites.
Posting Jobs to Candidate Gateway Sites
Job postings are applicant-facing job listings. When you create postings, you specify posting destinations where the listing will appear.
Posting destinations are simply another name for recruitment sources. To set up a posting destination for a particular Candidate Gateway site, create a recruitment source with the source type Company and use the Recruitment Sources - Company Page to associate the recruitment source with one or more Candidate Gateway sites. A job posting that is sent to this destination/source then appears on the specified sites.
Image: Posting jobs to sites
This diagram illustrates the relationships that cause a job to be posted to a particular site.
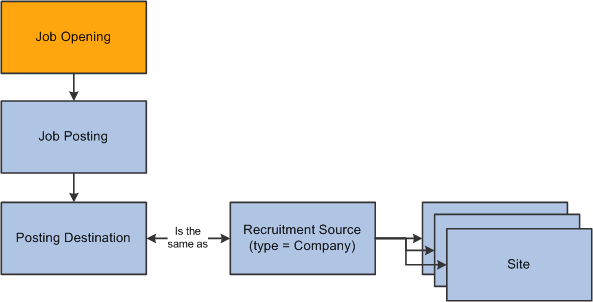
Note: Recruiting Solutions does not assign postings to sites based on specific data (such as the job opening’s country or business unit).
Site-Specific Configuration Options
You can manage the look and feel of each site through settings such as:
Configuration options on the Site Setup Page.
Use the Site Setup page to configure a variety options such as job searching and certain elements of the online application process.
Site-specific text labels for various page objects.
Candidate Gateway uses HCM Text Catalog entries to define the labels for page elements such page titles, group box titles, field labels, instructional text, and error or warning messages. The architecture of the Text Catalog enables you to specify different text for different sites and for different applicant types (internal and external).
Classic Candidate Gateway and Fluid Candidate Gateway and use different text catalog entries because the different look and feel of the pages sometimes requires different labels or instructional text.
Internal and External Sites
Candidate Gateway presents slightly different functionality to internal and external applicants. For example, external applicants must register before applying for jobs, while internal applicants are identified through their PeopleSoft user ID and do not need to register. However, the system does not use site definitions to differentiate the behavior of internal and external sites. Rather, the link that the applicant uses to access the site controls whether the site appears in its internal applicant or external applicant mode.
You can access and test your sites in both internal and external mode using the following delivered navigation:
Internal applicant mode: navigate to
External applicant mode: select Careers under the main menu.
A single site definition is associated with both the internal and external navigation paths. To choose the site definition that is associated with these navigation paths, use the site ID field on the Recruiting Installation - Applicants Page.
Before you can complete site setup, you must:
Set up a default resume template.
(Optional) Set up a default resume extractor vendor.
Use the Site Setup page (HRS_SITE_ID) to set up site definitions.
Navigation
Image: Site Setup page (1 of 2)
This image is the first of two examples illustrating the Site Setup page.
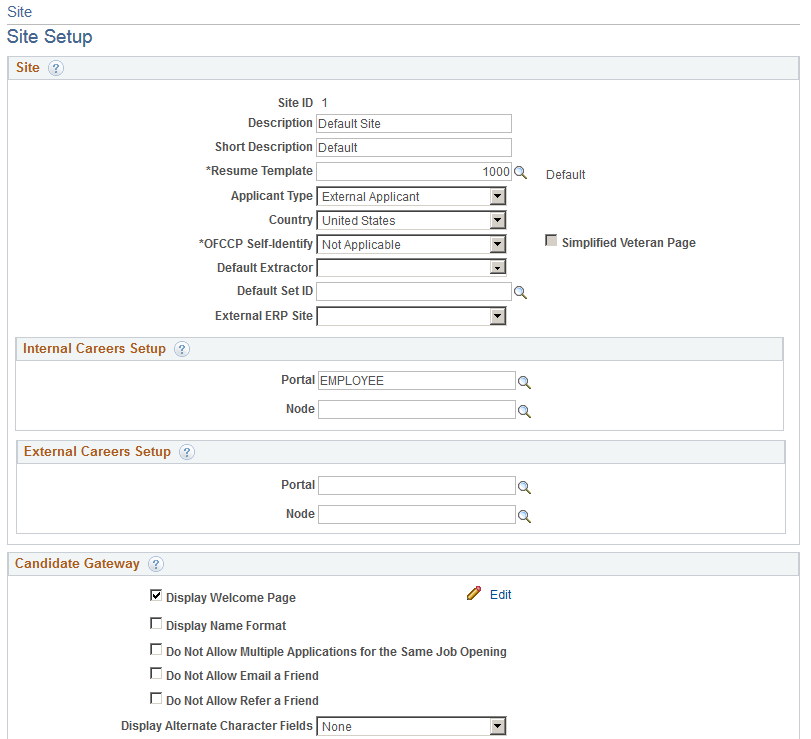
Image: Site page (2 of 2)
This image is the second of two examples illustrating the Site Setup page.
Site
|
Field or Control |
Definition |
|---|---|
| Site ID |
Displays the unique identifier for the site definition. This is used as a parameter on the URL to direct users to the correct site. |
| Resume Template |
Select the default resume template for the site. If an applicant applies without a job opening, or if an applicant applies for a job opening that is not associated with a resume template, the system uses the default resume template to control the application process. |
| Applicant Type |
This field is informational only. Select Employee, External Applicant, or Non-Employee to indicate which type of applicant uses this site. This setting does not control the applicant type that is assigned to applicants who submit applications on this site; that value is determined by the navigation used by the applicant. For example, if an applicant accesses the site using an external link, the applicant is created as an external applicant. |
| Country |
Select the default country for the site. The selected country controls the following:
The default country is also supplied to your resume extractor if the resume extractor requires country information for formatting names and addresses. |
| OFCCP Self-Identify (Office of Federal Contract Compliance Programs Self-Identify) |
Choose which types of OFCCP self-identification information to request from applicants during the Candidate Gateway application process. Because the self-identification pages are intended for federal contractors, not federal agencies, this field is not visible in a federalized system. The options are Disability and Veteran, Disability, Veteran, and Not Applicable. Any value other than Not Applicable causes the relevant self-identification pages to appear in applications for external applicants. Even if the site is configured to request disability information, the Disability and Veteran pages appear only if the job is in the United States or, if the applicant is applying without a job, if the applicant’s address is in the United States. For internal applicants, disability and veteran status information is based on the data provided in the Human Resources system, so Candidate Gateway does not collect this information during the application process. Instead, an informational message (Text Catalog ID HRAM_CE_DIS_INSTR4) appears on the Start page for internal applicants. As delivered, this text provides internal applicants with information about using the Human Resources pages to review and update their disability and veteran information. Configuring a site to collect self-identification information causes the Start step to appear in all internal applications even if it has no other content and would not otherwise appear. |
| Simplified Veteran Page |
Select this check box to present applicants with a simplified version of the Veteran page. The simplified version enables applicants to self-identify as protected veterans, but it does not ask applicants to indicate specific classifications of protected veterans. The simplified page also does not provide a field for the applicant’s military discharge date. This check box is disabled if the site is not configured to request veteran information. |
| Default Extractor |
Select a default resume extractor. The system uses the resume extractor that you specify here to extract information from applicant's resumes. If you do not select a value, applicants can attach resumes but the system cannot extract information from the resumes. |
| Default SetID |
Select the setID that controls the values for the Location field in the Preferences section of an application without a job opening. (Applications with a job opening use the business unit of the job opening to determine the appropriate setID.) |
| External ERP Site (external employee referral program site) |
Use this field to match internal and external sites so that Email to Friend and Refer a Friend notifications that are triggered in the current site have the correct links for both internal and external applicants. These notifications include two links because the system cannot know whether the recipient is internal or external. To build the external link for a notification that is triggered by an internal applicant:
To build the internal link for a notification that is triggered by an external applicant: , the system checks whether the current site is the External ERP Site for any other sites:
Notice that this field is not used to build the external link in notifications triggered by external applicants, nor is it used for the internal link in notifications triggered by internal applicants. Instead:
|
Internal Careers Setup and External Careers Setup
Use these fields to ensure that links within applicant notifications are correctly constructed for access to internal and external sites.
Note: Notifications sent by the Email to Friend and Refer a Friend processes use the External ERP Site field to determine which site’s link configuration settings are used to build internal and external links.
|
Field or Control |
Definition |
|---|---|
| Internal Careers Setup |
The system uses the portal and node that you specify here to build links to this site for internal applicants. If you do not specify a portal and node, then the user’s current portal and node are used. |
| External Careers Setup |
The system uses the portal and node that you specify here to build links to this site for external applicants. If you do not specify a portal and node, then the user’s current portal and node are used. |
Candidate Gateway
|
Field or Control |
Definition |
|---|---|
| Display Welcome Page |
Select this check box to have Classic Candidate Gateway display a welcome page when external users navigate to the site. The welcome page includes an area for your own custom content along with a button that applicants click to continue to the Job Search page. Click the Edit icon or link to access the Edit Welcome Page page, where you can configure the content of the welcome page. Note: Fluid Candidate Gateway does not display the welcome page, regardless of how the site is configured. |
| Display Name Format |
Select this check box if you want the Name Format field to appear on the pages where applicants register and where they maintain account information (external applicants) or view contact information (internal applicants). Displaying the Name Format field enables external applicants to choose a name format other than the default format for the site. |
| Do Not Allow Multiple Applications for the Same Job Opening |
Select this check box to prevent applicants from creating more than one application for a job opening. If this option is active, applicants who attempt to start an additional application for a job opening see a message that an application already exists. The message tells the applicant to go to the My Activities page to review the existing application (or to restart it if the existing application is still unsubmitted). If this check box is not selected, applicants still see a warning when an application already exists, but they are allowed to continue with the new application. If an applicant already has multiple applications for the same job opening at the time you activate this option, the applicant will be able to continue with a draft application as long as there are no submitted applications for the same job opening. Even if this check box is selected, applicants can reapply for jobs in these situations:
Note that this setting also applies to referrals if the person who was referred has already submitted an application. More commonly, however, the person who was referred has not submitted an application and is therefore able to update and submit the draft application that was created by the referral process. |
| Do Not Allow Email a Friend |
Select this check box to hide the Email this Job option in Fluid Candidate Gateway. Note: This setting does not apply to Classic Candidate Gateway. |
| Do Not Allow Refer a Friend |
Select this check box to hide the Refer Friend option in Fluid Candidate Gateway. Note: This setting does not apply to Classic Candidate Gateway. |
| Display Alternate Character Fields |
Use this field to choose whether Candidate Gateway displays alternate character names and addresses for China, Japan, and Hong Kong. Select from these options:
If you leave this field blank, the system selects None when you save the page. Note: Candidate Gateway supports alternate character names and addresses for China, Japan, and Hong Kong. The following Classic Candidate Gateway pages can display alternate character fields: The following Fluid Candidate Gateway pages can display alternate character fields: |
Job Search
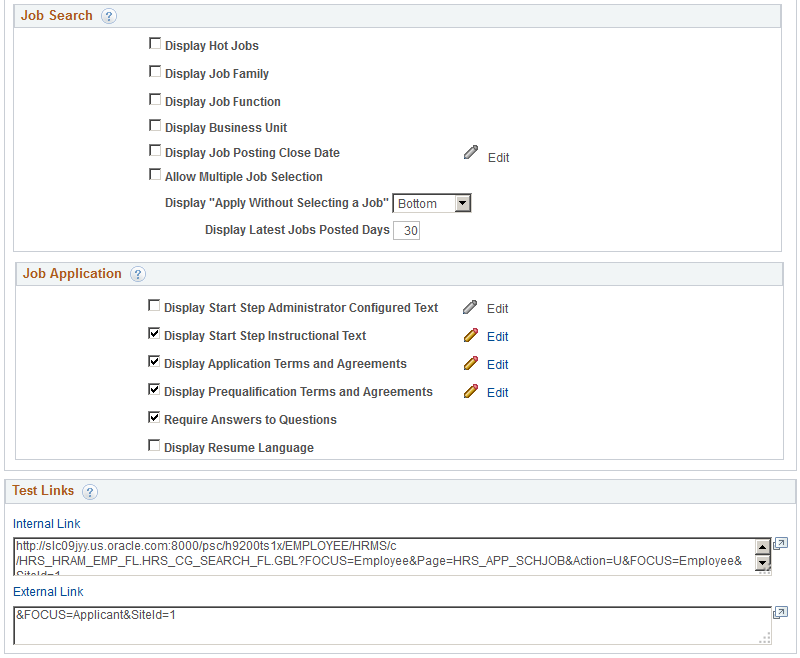
Use the following settings to configure the appearance and behavior of the page where applicants see the results of a job search
|
Field or Control |
Definition |
|---|---|
| Display Hot Jobs |
Select this check box if you want the Search Results list to display a hot job icon next to postings for hot jobs. |
| Display Job Family |
Select this check box if you want job family information to appear for each job posting. If your system is configured to segment jobs by job family, the job family is specified on the job opening pages. Otherwise, the job family for a job opening is derived from the job code. |
| Display Job Function |
Select this check box if you want job function information to appear for each job posting. The Job Function for a job opening is derived from the job code. |
| Display Business Unit |
Select this check box if you want business unit information to appear for each job posting. |
| Display Job Posting Close Date |
Select this check box if you want the job posting close date to appear for each posting. The close date is the last day that the job is posted. This is the day before the remove date that is specified on the Posting Information Page in the job opening. For example, if the remove date is June 11, 2017, then the close date is June 10, 2017. When a job posting does not have a remove date, the text catalog entry HRAM_FL_CLSDT_TXT provides text that appears in the Close Date field. The delivered text is Open Until Filled. To change this value, click the Edit icon or the Edit link next to this check box to access the text catalog entry on the Maintain Text Catalog page. If you select this check box, consider also activating a search filter based on close date. For instructions on setting up this search filter, see Configuring Recruiting Search Facets. Note: This setting applies only to Fluid Candidate Gateway. |
| Allow Multiple Job Selection |
Select this check box to allow applicants to apply for multiple jobs from the job search results and from the My Favorite Jobs page. When this check box is selected, buttons for applying for jobs appear with job search results and on the My Favorite Jobs page. Applicants can select multiple jobs using the check boxes that appear next to each job on the list, and then they can initiate a single online application that includes all selected jobs. If you do not allow multiple job selection, applicants must initiate job applications and referrals from the Job Description page, which means that applications are always limited to a single job opening. Allowing multiple job selection also enables internal applicants to initiate a referral for selected jobs on the job search page. (The My Favorite Jobs page always allows internal applicants to initiate referrals for selected jobs, regardless of the site configuration.) Note: Fluid Candidate Gateway does not allow multiple job selection on small form factor devices. On these devices, the small screen becomes would be too crowded and unusable with additional page elements for multiple job selection. |
| Display “Apply Without Selecting a Job” |
Choose whether and where to display the link that allows applicants to apply without selecting a job. Top, Bottom, and Both refer to the location of the link relative to the job search results list. You can show the link above the list , below the list, or in both places. If you select Off, then the link does not appear at all, and applicants must select a job before applying to your organization. |
| Display Latest Jobs Posted Days |
Enter a value from 1 to 99 if you want the Fluid Candidate Gateway Careers page to show the View Jobs Posted in Last <number> Days search option. For example, if you enter 30, the Careers page will include the option to View Jobs Posted in Last 30 Days. The default value is zero. When the value is zero, the Careers page does not display the View Jobs Posted in Last <number> Days search option. Note: This setting does not apply to Classic Candidate Gateway, which does not have a Careers page. |
Job Application: Start Step Configuration
In Candidate Gateway, the job application process begins with a Start step that displays relevant information, instructions, and agreements. All text comes from the HCM Text Catalog, so you can easily change the text or define different text for different sites.
Certain text elements on the Start Step page are controlled by site-level settings.
Note: In Fluid Candidate Gateway, terms and agreements text is referred to as Terms and Conditions, and it appears on a modal page that applicants access from the Start page. This is described in the topic Using Fluid Candidate Gateway to Apply for Jobs. For purposes of this discussion, however, all text elements are considered part of the Start page
Image: Site-controlled elements on the start step
This example shows the text elements on the Start step in Classic Candidate Gateway. In this example, the five site-controlled text elements are highlighted.
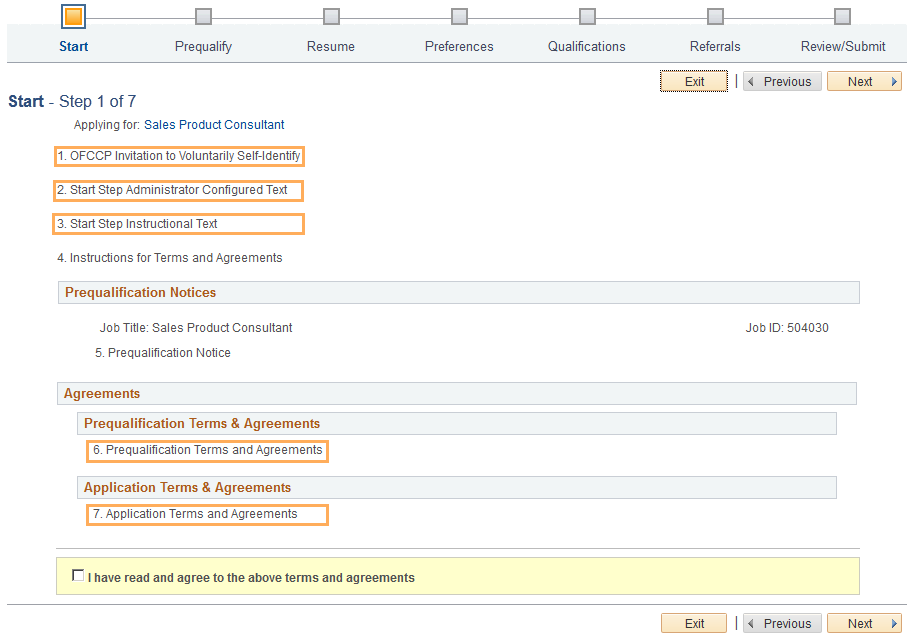
The first site-controlled element invites internal applicants to use Human Resources self-service pages to provide disability and veteran information. Only internal applicants see this text, which appears when the OFCCP Self-Identify field (described earlier in this topic) is set to any value other than Not Applicable. To change the text, modify the related text catalog entry (HRAM_CE_DIS_INSTR4).
Use the following check boxes to choose whether the remaining four site-controlled text elements appear on the Start step:
|
Field or Control |
Definition |
|---|---|
| Display Start Step Administrator Configured Text |
Select this check box to include administrator-configured text in the Start step, immediately following any OFCCP Self-Identify text. Use this text for any purpose: to introduce your organization, make announcements, and so forth. Click the adjacent Edit icon or link to view or edit the related text catalog entry on the Maintain Text Catalog page. The system prompts you to choose one of these entries:
|
| Display Start Step Instructional Text |
Select this check box to include instructional text in the Start step, immediately following any administrator-configured text. This text is intended for general instructions related to the application process. Do not use it for instructions related to terms and agreements. If any terms and agreements appear on the Start step, separate agreement-specific instructional text appears after your Start Step Instructional Text. Click the adjacent Edit icon or link to view or edit the related text catalog entry on the Maintain Text Catalog page. The system prompts you to choose one of these entries:
|
| Display Application Terms and Agreements |
Select this check box to include application terms and agreements in the Start step. Use this text for general terms related to the submission of any job application. If you include this text, applicants must accept the terms before they can continue past the Start step. Click the adjacent Edit icon or link to view or edit the related text catalog entry on the Maintain Text Catalog page. The system prompts you to choose one of these entries:
|
| Display Prequalification Terms and Agreements |
Select this check box to include prequalification (prescreening) terms and agreements in the Start step. The prequalification terms and agreements appear only when an application includes prescreening. If you include this text, applicants must accept the terms before they can continue past the Start step. Click the adjacent Edit icon or link to view or edit the related text catalog entry on the Maintain Text Catalog page. The system prompts you to choose one of these entries:
|
Note: If you have not implemented Fluid Candidate Gateway, then clicking the Edit button for any of the start page text elements immediately open the Text Catalog entry for the classic text.
In addition to the five site-controlled text elements, the Start step also displays additional elements based on context. You cannot prevent these notices from appearing:
If prescreening is active, the explanatory text specified in the screening definition is shown.
This text comes from a text catalog entry that is specified in the job opening.
If application terms and agreements or prequalification terms and agreements are shown, instructions for terms and agreements are also shown.
This text comes from text catalog entry HRAM_CE_DINSTR_TXT.
Note: The system does not display the Start step unless at least one text section is visible. Applications with prescreening always display the Start step because prescreening always requires explanatory text.
Job Application: Additional Settings
|
Field or Control |
Definition |
|---|---|
| Require Answers to Questions |
Select this check box to require applicants to answer all questions in job applications. When this option is active, the system will prevent applicants from continuing to the next step if there are any unanswered questions on the current step. This settings applies to prescreening questions as well as to any non-prescreening questionnaire. |
| Display Resume Language |
Select this check box to display the Language field on the Resume step of the job application. The Language field is informational only. Leaving this check box deselected so that the Language field is hidden does not affect resume processing. |
Test Links
The system generates site URLs based on the site ID and the portal and node. There are separate URLs for internal applicant mode and external applicant mode.
Use the Internal Link and External Link test links to preview the site with your current settings. Conditional navigation does not apply when you use these links.
You can also copy and paste the URLs into browser windows. If you do this, conditional navigation opens either a Classic or Fluid page depending on the user’s security configuration. If you set up a public access user ID for external applicants, you can use the external applicant URL to test public access
Use the Edit Welcome Page page (HRS_WELCOME_ED) to create content for the Classic Candidate Gateway welcome page.
Navigation
On the Site Setup page, click the Edit button next to the Display Welcome Page check box.
Image: Edit Welcome Page page
This example illustrates the Edit Welcome Page page.
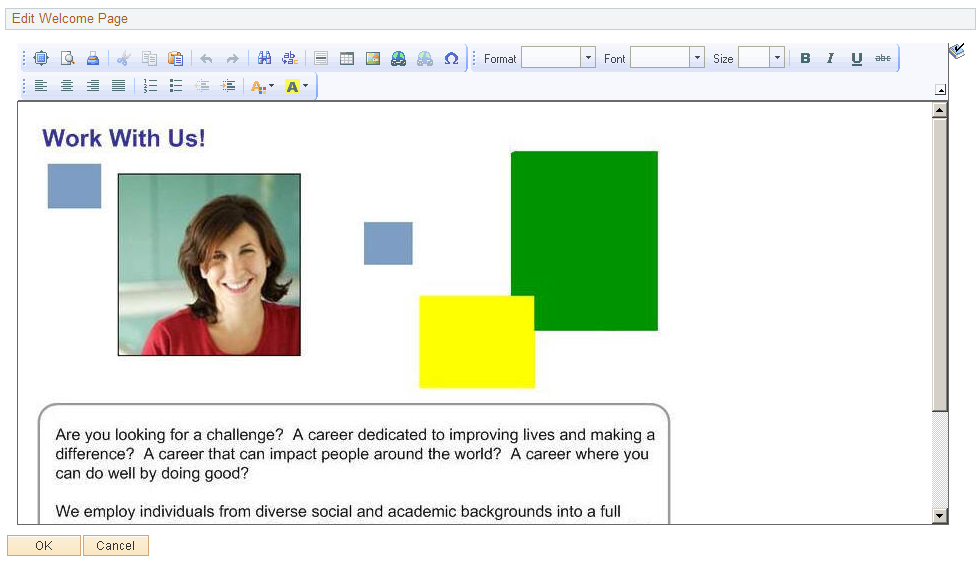
This page contains a single rich text field where you create and format your welcome page content. Your welcome page can include images, text, and links.
Use the OK or Cancel button to return to the Site Setup page.
Note: If you add images to your welcome page, use the Image Properties dialog box to enter alternative text for the image. Alternative text describes the image to users who employ a screen reader.