Using the PeopleSoft Fluid User Interface for the Company Directory
Use the Fluid Company Directory to view employee personal and job data within the context of your organization's various hierarchical reporting structures.
These topics provide an overview of directs, dotted line, and matrix team reporting, company directory Actions List options, and discusses how employees and managers use the PeopleSoft Fluid User Interface to view the Company Directory.
For setup considerations, see Setting Up the Org Chart Viewer and Company Directory.
To see the direct line reports in a PeopleSoft Fluid User Interface, see the My Team feature documented in the Using the PeopleSoft Fluid User Interface to Perform Manager Tasks topic.
For general information about fluid pages and Company Directory pages in PeopleSoft HCM, see Understanding PeopleSoft Fluid User Interface Home Pages.
These videos provide overviews of Company Directory enhancements:
Image Highlights, PeopleSoft HCM Update Image 17: Fluid Company Directory Usability Improvements
Image Highlights, PeopleSoft HCM Update Image 24: Company Directory Setup Enhancement
Image Highlights, PeopleSoft HCM Update Image 27: Company Directory–Org Chart Actions
Image Highlights, PeopleSoft HCM Update Image 28: Company Directory-Display Empty Positions
|
Page Name |
Definition Name |
Usage |
|---|---|---|
|
HC_HR_SRCH_CD_GBL (this is the cref for the tile) |
Access the Company Directory pages. |
|
|
HRCD_CO_DIRECT_FL |
Search for individuals within your organization. |
|
|
HRCD_SEARCH_FL |
View a list of employees that meet your search criteria. |
|
|
N/A |
The Company Directory - Profile pages appear within the context of a multi-panel layout. When using a medium to large form factor device, the application displays a left panel navigation, which consists of page category tabs from which you select to view contextual data in the main panel. When using a small form factor device, there is no left panel navigation but contextual data appears directly on the page. Click rows within the page to view additional information about an item. |
|
|
N/A |
Access general heading features such as employee information, the Related Actions icon button, adding and removing items from your favorites list, and access a graphical representation of the organization. |
|
|
Supplementary Panel for the Company Directory - Profile Pages |
N/A |
Access a supplementary panel that provides access to related information and simplified analytics. |
|
HRCD_PROFILE1_FL |
View or access details about a person such as contact information, organizational information, job details, a personal statement, or links this person has added to his or her profile. |
|
|
HRCD_PROFILE1_FL HRCD_PROFILE4_FL |
View contact information such as phone numbers, emails, and location details. |
|
|
HR_ADDR_MAP_FL |
View the employee’s location on a map. |
|
|
HRCD_PROFILE1_SCF |
Add, update, or delete additional contact information on your personal profile, such as home phone number, mobile, or email addresses. |
|
|
HRCD_PROFILE1_FL HRCD_PROFILE4_FL HRCD_PROFILE2_FL |
View the reporting structure for the person whose profile you are accessing. |
|
|
HRCD_DOT_LINE_SCF |
View the dotted line managers for a person. |
|
|
HRCD_PROFILE1_FL HRCD_PROFILE5_FL |
Create or remove dotted line reporting relationships for a person. |
|
|
HR_PSEL_FLU |
Search for and select a person as a dotted line report or dotted line report manager for this person. |
|
|
HR_PSEL_SCF |
View additional information about an employee. |
|
|
HRCD_PROFILE1_FL HRCD_PROFILE4_FL HRCD_PROFILE3_FL |
View direct or dotted line reports of the person profile that you have accessed. |
|
|
HRCD_PROFILE1_FL HRCD_PROFILE4_FL HRCD_PROFILE3_FL |
View your peers, or the peers of the person profile that you have accessed in the content area, sorted by display name. |
|
|
HRCD_PROFILE1_FL HRCD_PROFILE4_FL HRCD_PROFILE3_FL |
View a list containing the matrix team’s members. |
|
|
HRCD_PROFILE1_FL HRCD_PROFILE4_FL |
View company and job details about a person. |
|
|
HRCD_PROFILE1_FL HRCD_PROFILE4_FL |
View a personal statement or links this person has added to his or her profile. |
|
|
HRCD_PROFILE3S_SCF |
Add, update, or delete a personal statement or comment on your profile. |
|
|
HRCD_PROFILE3L_SCF |
Add, update, or delete website links to your own personal profile. |
|
|
HRCD_ORG_CHART_FL |
View the hierarchical reporting structure of a person. |
|
|
HRCD_ORG_CHRT_SCF |
Print the three-tiered hierarchical structure for a person. |
In addition to viewing contact and personal information, the PeopleSoft Fluid Company Directory enables you to view the reporting structures of individuals within the organization. An intuitive visualization of such relationships in the Company Directory and Org Chart Viewer will help employees easily view and understand them. The organizational chart displays the following reporting relationships:
|
Field or Control |
Definition |
|---|---|
| Directs |
Represents the organizational reporting structure as defined on the Tree Builder Run Control Page for the COMPANY_DIRECTORY tree structure ID. |
| Dotted- Line |
These relationships are typically between two individuals, where one individual is a dotted line report to another individual, for purposes such as mentoring, providing a service or function due to a specialized role, or cross team collaboration. |
| Teams (Matrix Teams) |
Represents groups of individuals that are team or project based. Team leads may be able to assign some tasks or view data for the employee as defined on the Matrix Types Page for the team matrix type. |
Use the Actions List menu from the Company Directory pages to perform additional Company Directory-related actions.
Image: Actions List options for the Company Directory
This example illustrates the Actions List options for the Company Directory.
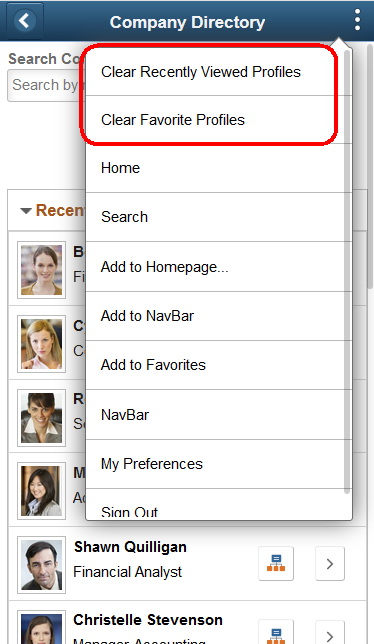
When you access the Company Directory in fluid, the banner displays the Actions List icon button in the top right corner. The first two items in the Actions List menu are specific to the Company Directory and allow you to clear the contents in the Recently Viewed or Favorites sections of your Company Directory Landing Page.
The remaining Actions List options are general to the PeopleSoft Fluid User Interface and application.
Image: Actions List options for the Company Directory from the Profile pages
This example illustrates the Actions List options for the Company Directory from the Profile pages.
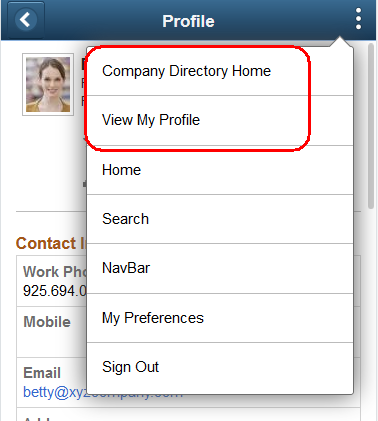
From the Profile pages, the menu items enable you to return to the Company Directory landing page, or provide access to your own Profile pages if you are not on your own profile.
Employees and managers use the Company Directory tile to access the Company Directory pages.
Navigation
The Company Directory tile is delivered as part of the fluid Employee Self Service and Manager Self Service home pages, but the location may vary if you change the delivered home pages or if employees personalize their home pages.
Image: Company Directory tile
This example illustrates the Company Directory tile.
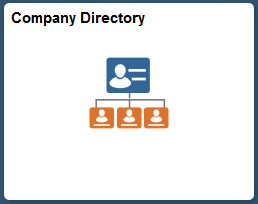
Click anywhere on this tile to access the Company Directory page, which displays information about employees and their reporting relationships within your organization.
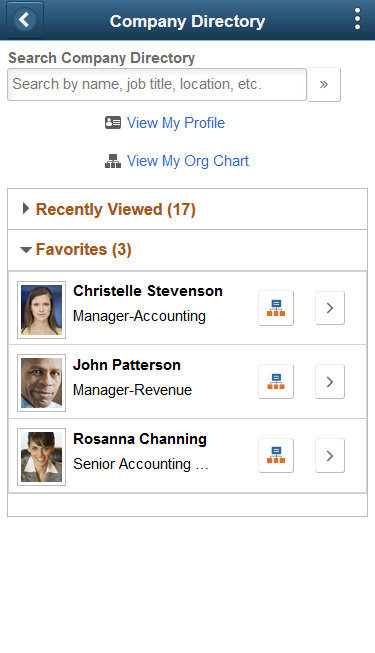
Use the Company Directory landing page (HRCD_CO_DIRECT_FL) to search for individuals within your organization. The landing page also displays two other collapsible sections: a list of employee profiles you have recently viewed and a list of individuals you have added to your Company Directory favorite’s list.
Navigation
Click the Company Directory tile on the delivered Employee Self Service or Manager Self Service fluid home page (or any other home page with the tile).
Image: (Tablet) Company Directory Landing Page
This example illustrates the Company Directory landing page for the tablet.
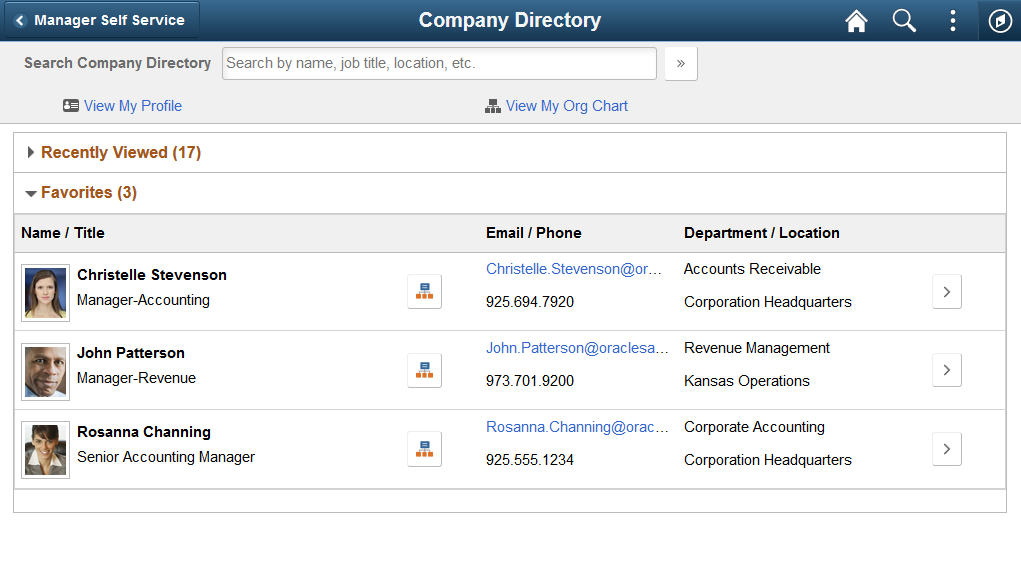
Image: (Smartphone) Company Directory Landing Page
This example illustrates the on the Company Directory landing page for the smartphone.
A standard banner appears at the top of every fluid page. For more information see Common Elements Used with PeopleSoft Fluid User Interface.
|
Field or Control |
Definition |
|---|---|
| Search Company Directory |
Enter basic search criteria in this field, such as name, department, location, or so forth and click the Run Search button to locate specific individuals. You can search for any person in the company’s organization using the PeopleTools Search Framework, based on the Company Directory tree. A person must be present in the tree to appear in the directory. Note: This framework searches for people in a company directory tree. You cannot search for positions, even if you are using a tree that includes empty positions. For information on the process to building your company trees, see Understanding the Org Chart Viewer and Company Directory Setup Steps. |
| View My Profile link |
Select this link to quickly access your own profile without entering search parameters. |
| View My Org Chart link |
Select this link to access the Organization Chart Page with you in the focus node. |
| Recently Viewed |
View and access recently viewed profiles, if any. A person appears in this list when you have viewed their profile in the past. The list displays employees in descending order of date of access. The pages displays a maximum of 20 people. When there are individuals listed in your Recently Viewed section but not listed in the Favorites section, the landing page displays this section expanded by default. Clear your Recently Viewed list by accessing the Actions List icon button in the banner and select the Clear Recently Viewed Profiles action item. See also Understanding Company Directory Actions List Options. |
| Favorites |
View and access the profiles of those you have listed in your Favorites, if any. Add or remove a person from your favorites list when viewing their profile. For more information, see the Profile Page Header topic. The favorites list displays employees in alphabetical order by display name. When there are individuals listed in your Favorites, the landing page displays this section expanded by default, unless no Favorites exist. When no favorites exist, the page displays an expanded Recently Viewed section by default, if values are present there. Clear your Favorites list by accessing the Actions List icon button in the banner and select the Clear Favorite Profiles action item. See also Understanding Company Directory Actions List Options. |
 (View Org Chart) button (View Org Chart) button |
Click this button on an employee row to access the Organization Chart Page with this person in the focus node. |
 (View Profile) button (View Profile) button |
Select the View Profile button on an employee row to access the Profile page of that person. |
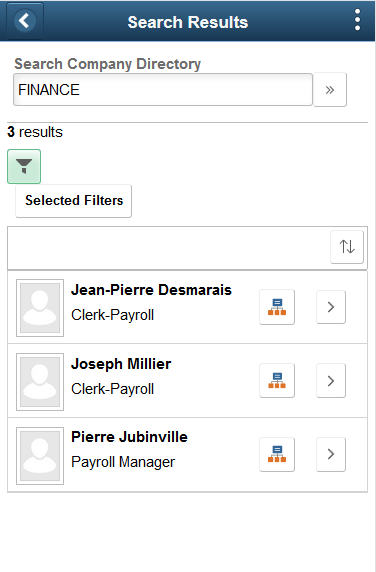
Use the Company Directory - Search Results page (HRCD_SEARCH_FL) to view a list of employees that meet your search criteria.
Navigation
Enter search criteria in the Search Company Directory field and select the Run Search (>>) button.
Image: (Tablet) Company Directory - Search Results Page
This example illustrates the Company Directory - Search Results page for the tablet.
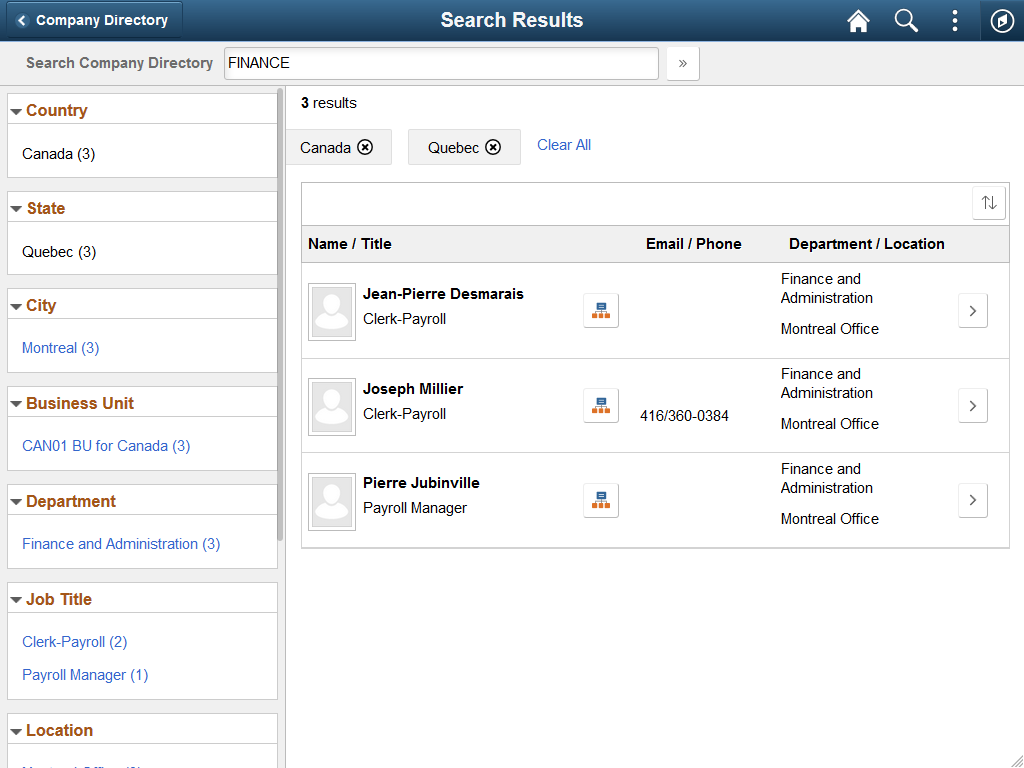
Image: (Smartphone) Company Directory - Search Results Page
This example illustrates the Company Directory - Search Results page for the smartphone.
(Tablet) When using a large form factor, like a tablet or workstation, a filter panel appears on the left side of the page, which shows facets with counts of those that match that search criteria. Select the facet links to filter results further, seeing which employee meet the additional criteria. For large form factor devices, the page will reset to show only those that meet the additional criteria. The page also displays the criteria you have selected in boxes at the top of the page. Click the X to cancel a filter item, or select the Clear All link to remove all filters.
(Smartphone) When using a small form factor, like a smartphone, the page displays a Search Filter button. Select the button to access a separate Filter page and select your facets. When you have identified all your criteria, select Done to return to the Search Results page. When filters are in place, the Filter button will be green, and a Select Filters button now appears on the page. Click this button to view the filters that are in place or to remove filters.
|
Field or Control |
Definition |
|---|---|
| (View Org Chart) button |
Click this button on an employee row to access the Organization Chart Page with this person in the focus node. |
| (View Profile) button |
Select the View Profile button on an employee row to access the Profile page of that person. |
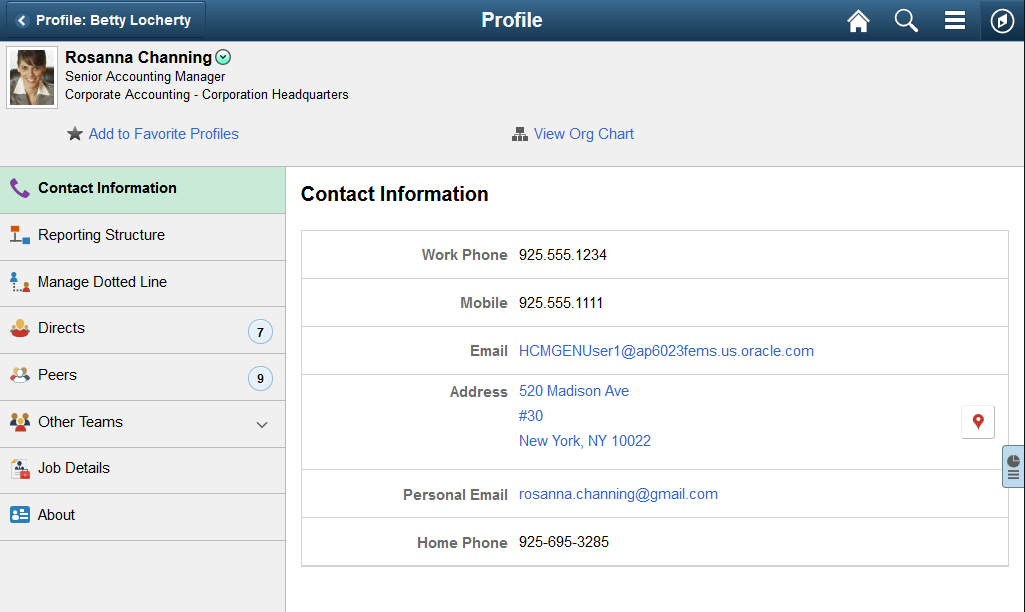
The Company Directory - Profile page appears in a multi-panel layout.
Header: The top panel displays the header and includes the employee’s name, job title, and the Related Actions menu icon, where you can access other self service transactions for this employee, if applicable. See also Profile Page Header.
(Tablet) Left panel navigation to access pages: When using a large form factor device, like a tablet or workstation, the Profile page displays a left navigation panel. This left panel lists the various page categories that make up the employee profile. Click the page name in the left panel to display the content in the right, or main panel.
Image: Company Directory - Profile Page Layout
This example illustrates the layout of the Profile page within the Company Directory for a larger device.
The left panel navigation shows a list of page category tabs and the content that corresponds to the current category appears in the right panel. These category tabs and pages may include:
Note: Throughout this topic, the page illustrations show the individual content pages of the Profile pages without the context of the left panel navigation. Even though the left navigation panel is not illustrated, remember that the navigation panel appears within the framework of the medium and large form factor pages.
(Smartphone) Organization group box for accessing pages: When using a small form factor device, like a smartphone, you will click a page category row under the Organization section, like Reporting Structure, and the system will direct you to that page. See (Smartphone) Profile Page.
Content panel: The main panel displays the employee content that corresponds to the category page you selected in the left panel on a medium or large device, and is the default display when using a small device.
Supplementary panel: While using either a small or large form factor device, the page also has a slide out panel on the right to view related information and run analytical reports.. See also Supplementary Panel for the Company Directory - Profile Pages.
The top of the Profile pages of the Company Directory displays a header that enables you to view high level information about a person and his or her job, perform related actions, add or remove the person from your favorite profiles list, and access a graphical representation of the organization.
Image: (Tablet) Profile Page Header
This example illustrates the header of the Profile page for the tablet.

Image: (Smartphone) Profile Page Header
This example illustrates the header of the Profile page for the smartphone.
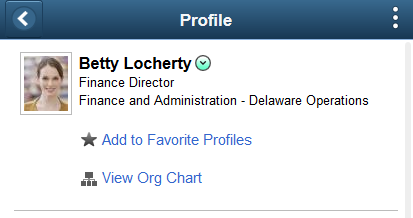
Image: (Tablet) Profile Page Header for a Person with Multiple Jobs
This example illustrates the header of the Profile page when the person you are viewing holds multiple jobs using a tablet.

Image: (Smartphone) Profile Page Header for a Person with Multiple Jobs
This example illustrates the header of the Profile page when the person you are viewing holds multiple jobs using a smartphone.

View a person’s photo, name, job title, and department in the profile page header.
|
Field or Control |
Definition |
|---|---|
 Related
Action Menu icon button Related
Action Menu icon button |
Click this icon next to the employee’s name to display a menu of self-service transactions you can access for this person. The list of options will vary based on whether you are accessing your own profile, the profile of one of your employees, the profile of other employees, and your security access. |
 View
Another Job link View
Another Job link |
Click this link to view the multiple jobs held by this employee. If the employee does not hold multiple jobs, this link is not available. The drop-down menu displays a check mark next to the job you are currently viewing. Select a job to close the menu and view the profile information related to that job. |
 or or  |
Click the star icon and link to add or remove a person from your Favorites list. To see employees in your Favorites list, access the Company Directory home and view the Favorites section. |
 |
Select the View Org Chart icon and link to access the Organization Chart Page and view a graphical representation of where the employee fits within the organizational hierarchical reporting structure. |
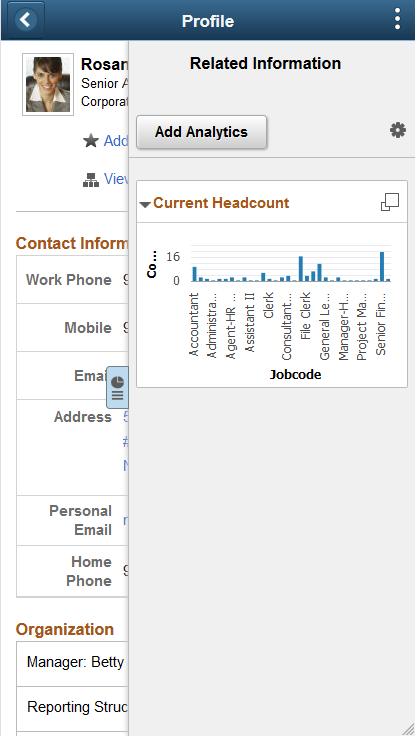
If you use PeopleTools 8.57 or later, the Company Directory - Profile pages include a supplementary panel that provides access to related information and simplified analytics.
For more information about simplified analytics, see PeopleTools: Pivot Grid.
These videos demonstrate simplified analytics:
Navigation
Click the Supplementary Panel tab button from any Company Directory - Profile page.
Image: (Tablet) Supplementary Panel for the Company Directory - Profile Page
This example illustrates the Supplementary Panel options for the Company Directory - Profile page for the tablet.
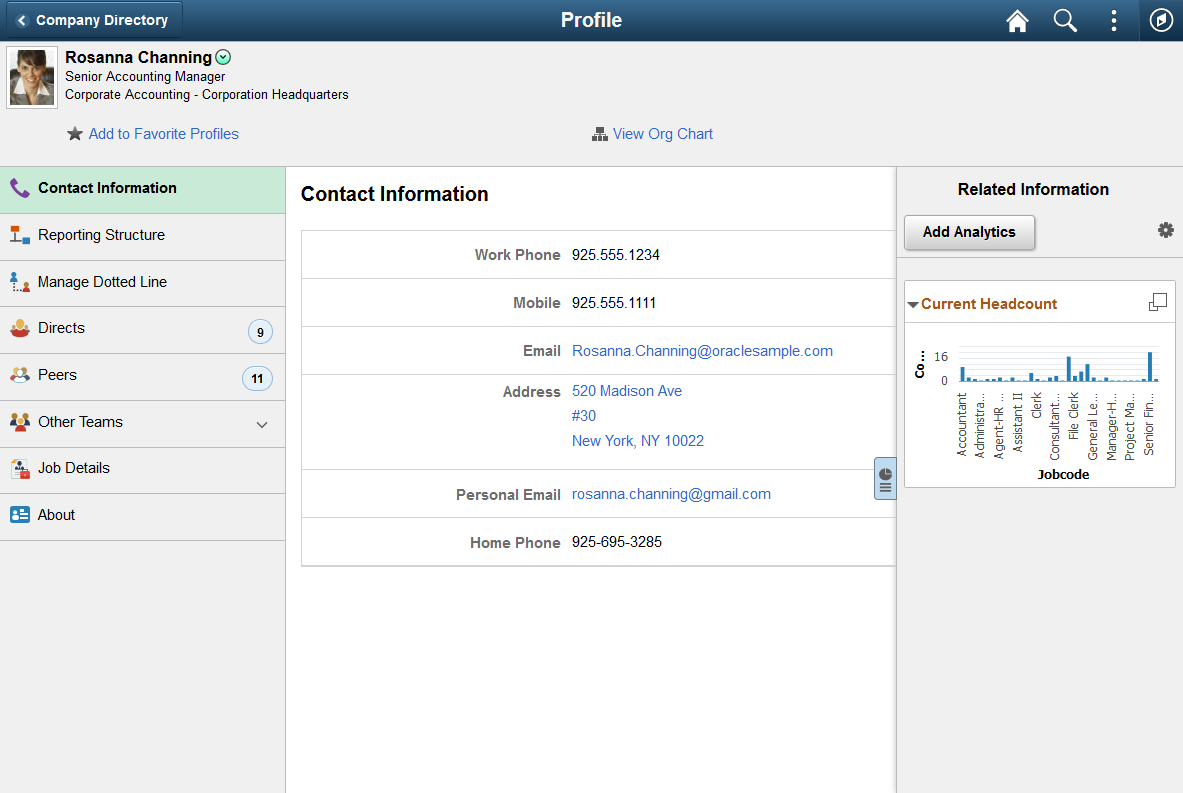
Image: (Smartphone) Supplementary Panel for the Company Directory - Profile Page
This example illustrates the Supplementary Panel options for the Company Directory - Profile page for the smartphone.
|
Field or Control |
Definition |
|---|---|
 (Supplementary Panel tab button) (Supplementary Panel tab button) |
Click this tab to open the Related Information panel and view related information. |
| Add Analytics |
Click to access the simplified analytics capabilities provided by PeopleTools 8.55 and later. Click the button to create a new chart. When you select to add a new analytic report, the system opens the Create Analytics page where you will use the Analytics Wizard to guide you through the process of creating a new report. The system uses templates based on transaction page from which you are creating the new report. The templates determine the fields and prompts in the next step of the wizard. The delivered role PivotGridSuperUser gives users the ability to create and publish reports. |
 [Personalize RC (Related Content) icon] [Personalize RC (Related Content) icon] |
This icon appears at the top of the Related Information panel. Click to open the Personalize page. This page lists the available related content so you can choose whether the Related Information panel shows or hides each item. |
 (Display Current Headcount Profile
in Modal Window icon) (Display Current Headcount Profile
in Modal Window icon) |
This icon appears at the top of each individual item in the Related Information panel. Click to expand the item to open a modal dialog with a larger interactive version of the chart. |
| Related Information |
The pane displays the Current Headcount Profile pivot grid chart. This chart is the Simplified Analytics version of the Current Headcount Pivot Grid. Image Highlights, PeopleSoft HCM Update Image 18: Simplified Analytics |
For information on how to use the Related Information panel (also known as the Unified Related Content Analytics pane), see PeopleTools: Pivot Grid, “Working with Simplified Analytics,” Accessing Simplified Analytics.
Use the Profile page (HRCD_PROFILE1_FL) from a small form factor to view or access details about a person such as contact information, organizational information, job details, a personal statement, or links this person has added to his or her profile.
Navigation
Click the Company Directory tile on the delivered Employee Self Service or Manager Self Service fluid home page (or any other home page with the tile) on your smartphone.
Select a person from your favorite profiles, your recently viewed profiles or execute a new search and select a person from the search results.
Select the View My Profile item from the Actions List icon button in the banner from your smartphone to see your own profile.
Image: (Smartphone) Profile Page (1 of 3)
This example illustrates the fields and controls on the Profile - Contact Information page (1 of 3) for the smartphone.
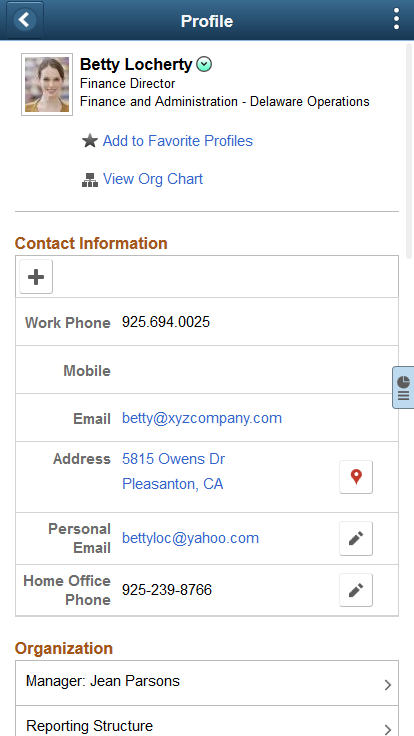
Image: (Smartphone) Profile Page (2 of 3)
This example illustrates the fields and controls on the Profile - Contact Information page (2 of 3) for the smartphone.
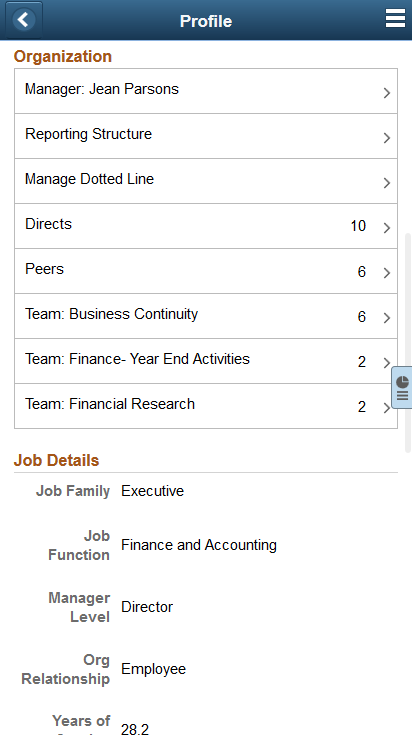
Image: (Smartphone) Profile Page (3 of 3)
This example illustrates the fields and controls on the Profile - Contact Information page (3 of 3) for the smartphone.
When you access the Company Directory from a smartphone, all the employee’s profile data is presented on this one page.
The page is set up to display the following sections:
The Organization section presents you with the option to view further details by selecting
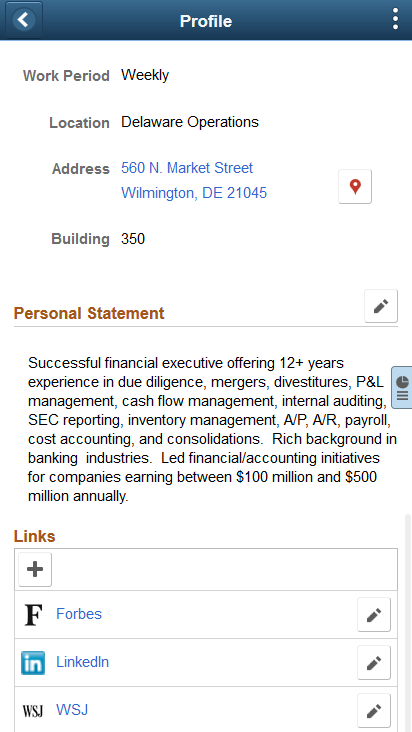
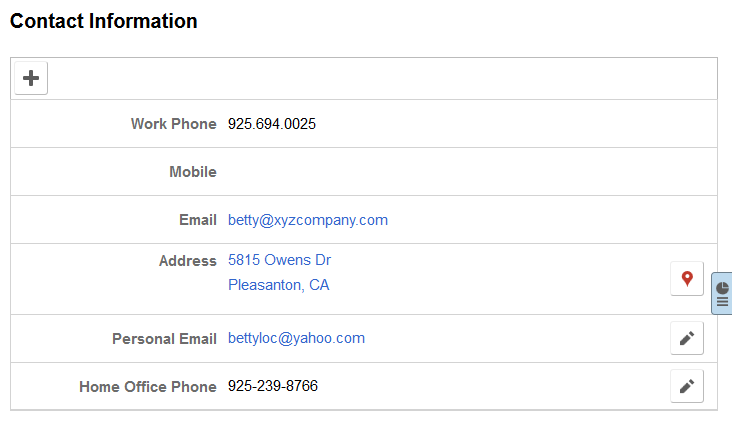
Contact Information
Use this section to view contact information such as phone numbers, emails, and location details.
See also Address Map Page.
|
Field or Control |
Definition |
|---|---|
 Add Contact Information button Add Contact Information button |
This button is available on your own profile only. Click this button to access the Additional Contact Page and enter more contact information. |
 View
Address Map button View
Address Map button |
Click this button to access the Address Map Page and view the employee’s location on a map. Note: Your organization will need to have licensed and enabled Oracle Maps Service for PeopleSoft on the Installation Table - Third Party/System Page, otherwise this button will not appear on the page.. |
 Edit button Edit button |
This button is available on your own profile only. Click this button for one of the existing contacts to access the Additional Contact Page and update or delete the contact information. |
To view similar information using a tablet, see (Tablet) Profile - Contact Information Page.
Organization
Use this section to view an employee’s manager, reporting structure, direct reports, peers, and teams to which you have access. Not all rows of data may apply to all employees.
|
Field or Control |
Definition |
|---|---|
| Manager: <manager name> |
Select this row to view the profile data of this person’s manager. Note: If the Manager position is identified as an Empty Position, you will not be able to access the profile pages. Profile pages display the information for a person. |
| Reporting Structure |
Select this row to access the Profile - Reporting Structure Page and see the reporting structure of the person you are viewing. |
| Manage Dotted Line |
Select this row to access the Profile - Manage Dotted Line Page and see, add, or removed dotted line relationships, if applicable. |
| Directs |
Select this row to access the Profile - Directs Page and see the direct reports and dotted line reports of the person you are viewing. If this person does not have direct reports but has dotted line reports, this row will still appear but only show the information of dotted line reports. However, if the person has neither direct or dotted line reports, this row will not appear. |
| Peers |
Select this row to access the Profile - Peers Page and see the peers of the person you are viewing. If this person does not have peers, this row will not appear. |
| Team: <team name> |
Select this row to access the Other Teams - <Team Name> Page and view a list of members of the specified team with which this person is associated. This row will not be available if the person you are viewing is not associated with any team to which you have been given access. |
Job Details
Use this section to view company and job details about a person.
See also (Tablet) Profile - Job Details Page.
Personal Statement
Use this section to view a personal statement a person has added to their profile. If you are on your own profile, use the Add Personal Statement or Edit buttons to access the Personal Statement Page and add, update, or delete a personal statement or comment on your profile.
See also (Tablet) Profile - About Page
Links
Use this section to view links a person has added to their profile. If you are on your own profile, use the Add or Edit buttons to access the Personal Statement Page and add, update, or delete a link on your profile.
See also (Tablet) Profile - About Page
Use the Profile - Contact Information page (HRCD_PROFILE1_FL or HRCD_PROFILE4_FL) from a large form factor to view contact information such as phone numbers, emails, and location details.
Navigation
Click the Company Directory tile on the delivered Employee Self Service or Manager Self Service fluid home page (or any other home page with the tile). Then, select a person from your favorite profiles, your recently viewed profiles or execute a new search and select a person from the search results.
Select the View My Profile item from the Actions List icon button in the banner to view your own profile.
Click the Contact Information tab in the left panel of the Profile page.
Image: (Tablet) Profile - Contact Information Page
This example illustrates the fields and controls on the Profile - Contact Information page for the tablet.
This panel displays contact information, such as phone numbers, email addresses, and the work location. The fields that appear on this page are based on the setup configurations determined on the Chart and Profile Settings - Profile Content Page setup page for the Company Directory Fluid org view type.
|
Field or Control |
Definition |
|---|---|
| Add Contact Information button |
This button is available on your own profile only. Click this button to access the Additional Contact Page and enter more contact details to your own profile. |
| View
Address Map button |
Click this button to access the Address Map Page and view the employee’s location on a map. Note: Your organization will need to have licensed and enabled Oracle Maps Service for PeopleSoft on the Installation Table - Third Party/System Page, otherwise this button will not appear on the page. |
| Edit button |
This button is available on your own profile only and if available only for those items that you have added, not the ones that are based on the setup configuration. Click this button for one of the existing contacts to access the Additional Contact Page and update the contact information. |
To view this content on a smartphone, see (Smartphone) Profile Page.
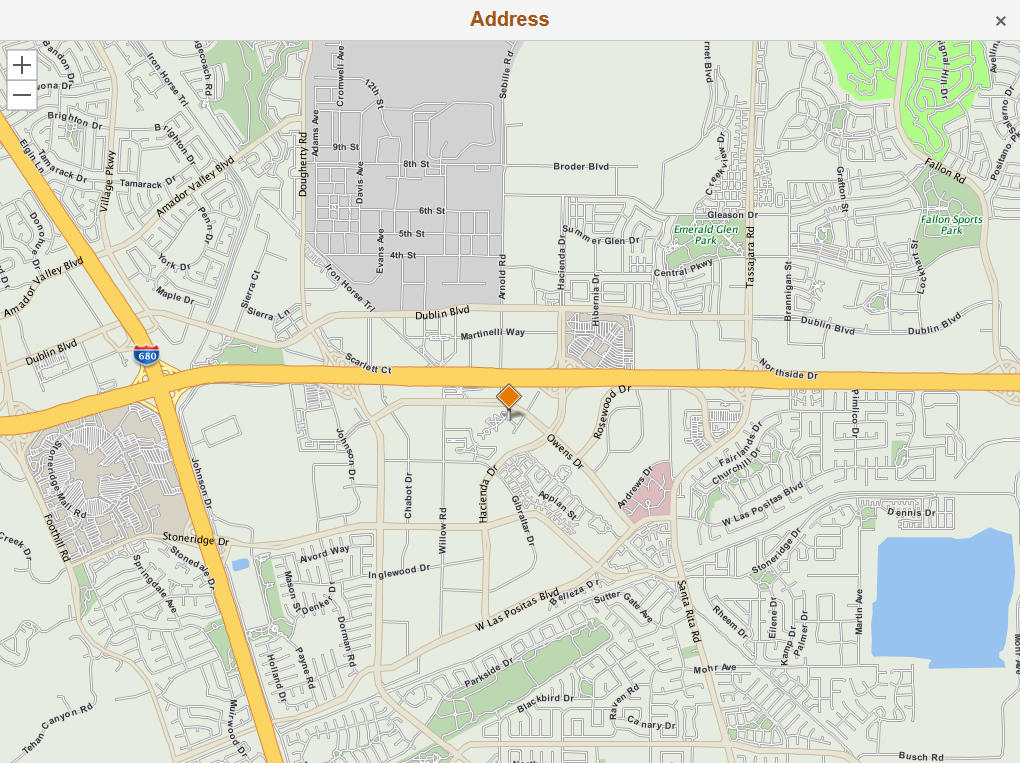
Use the Address Map page (HR_ADDR_MAP_FL) to view the employee’s location on a map.
Note: Your organization will need to have licensed and enabled Oracle Maps Service for PeopleSoft on the Installation Table - Third Party/System Page to see the button and view the map.
Navigation
Click the View Address Map button from various places on the Company Directory - Profile pages.
Image: Address Map Page
This example illustrates the Address Map page.
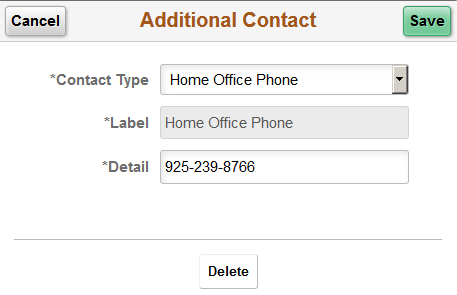
Use the Additional Contacts page (HRCD_PRFOILE1_SCF) to add, update, or delete additional contact information on your personal profile, such as home phone number, mobile, or email addresses.
Navigation
Click the Add Contact Information (+) button on the Profile - Contact Information page of your own profile.
Click the Edit (pencil) button for additional contact rows on the Profile - Contact Information page of your own profile.
Image: Additional Contact Page
This example illustrates the fields and controls on the Additional Contact page.
|
Field or Control |
Definition |
|---|---|
| Cancel |
Click to cancel any changes you have made to this contact type. |
| Contact Type and Label |
Select a contact type such as a phone number or email. Valid options are defined on the Additional Contact Types Page. The defined label for that contact type will display below. |
| Detail |
Enter the contact information, such as the exact phone number or email address. |
| Delete |
This button is available when you are updating an existing contact. Select to remove this contact from your additional contacts list. |
| Save |
Click to save your information and have it display on your Profile in the Company Directory. |
Use the Profile - Reporting Structure page (HRCD_PROFILE1_FL, HRCD_PROFILE4_FL, or HRCD_PROFILE2_FL) to view the reporting structure for the person whose profile you are accessing.
Navigation
Select the Reporting Structure tab in the left panel of the Profile page when using a large form factor device.
Select the Reporting Structure row on the Profile page when using a small form factor device.
Image: (Tablet) Profile - Reporting Structure Page
This example illustrates the fields and controls on the Profile - Reporting Structure page for the tablet.
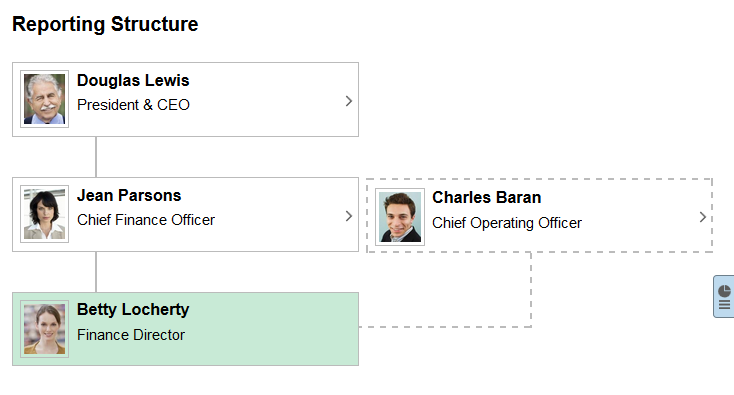
Image: (Smartphone) Profile - Reporting Structure Page
This example illustrates the Profile - Reporting Structure page for the smartphone.
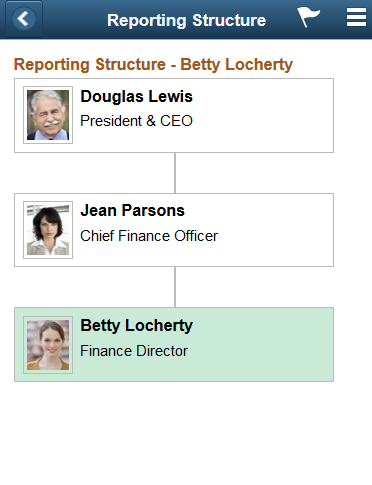
Select an employee node box to access that person’s profile.
Viewing Empty Positions
When you have enabled partial or full position management, the Company Directory tree was built with a method that uses positions, and you select to include empty position, empty positions will display in the reporting structure.
Image: Profile - Reporting Structure Page Displaying an Empty Position
This example illustrates the Profile - Reporting Structure page when the structure displays an empty position.
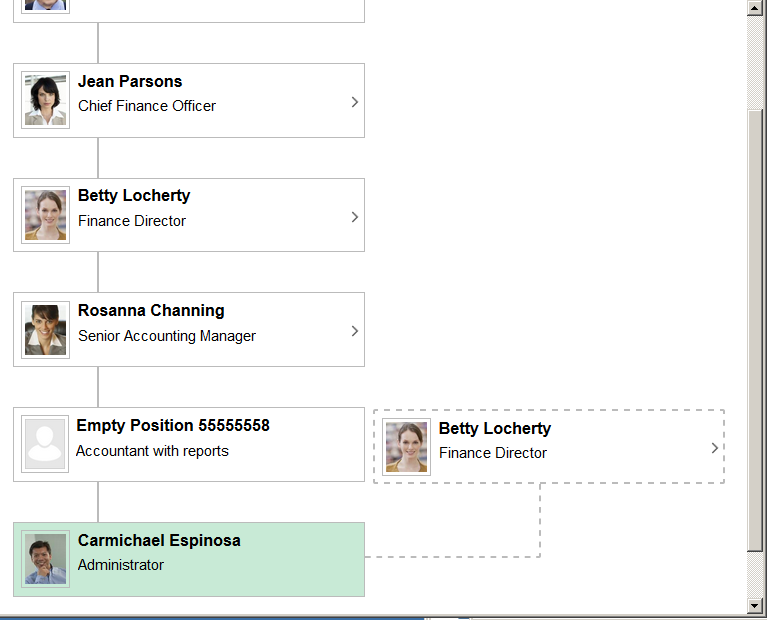
Node boxes that are vacant positions display the text Empty Position and the position title. When the Show Empty Position Number check box is selected on the Chart and Profile Settings - General Settings Page for the Company Directory Fluid org view type, the position number will also appear in the node. You cannot select and view the profile data of an empty position node since there is no person currently associated with that position.
For more information on building Company Directory trees using positions, see the Understanding the Org Chart Viewer and Company Directory Setup Steps and Tree Builder Run Control Page documentation.
Having a Dotted Line Manager
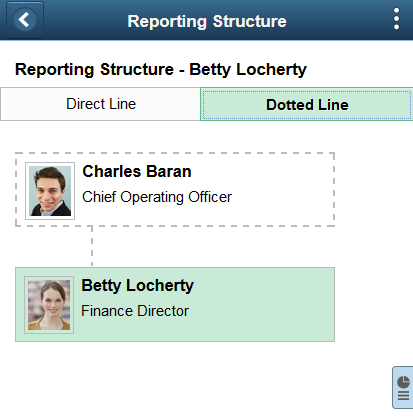
When a person reports to a dotted line manager, the pages will also show that relationship. While it displays directly on the larger screens, the small form factor devices display a Direct Line and Dotted Line tab to view the different types of reporting.
Image: (Smartphone) Reporting Structure: Direct Line Page
This example illustrates the Reporting Structure: Direct Line page for the smartphone when a person reports to one or more dotted line managers.
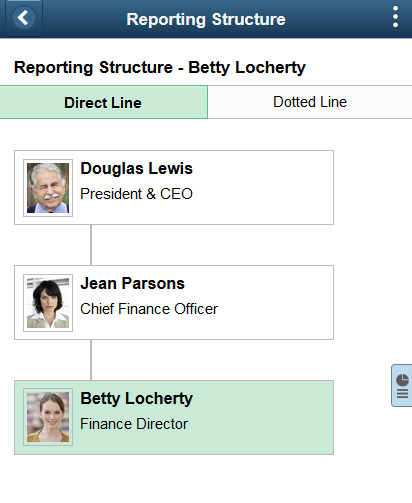
Image: (Smartphone) Reporting Structure: Dotted Line Page
This example illustrates the Reporting Structure: Dotted Line page for the smartphone when a person reports to one or more dotted line managers.
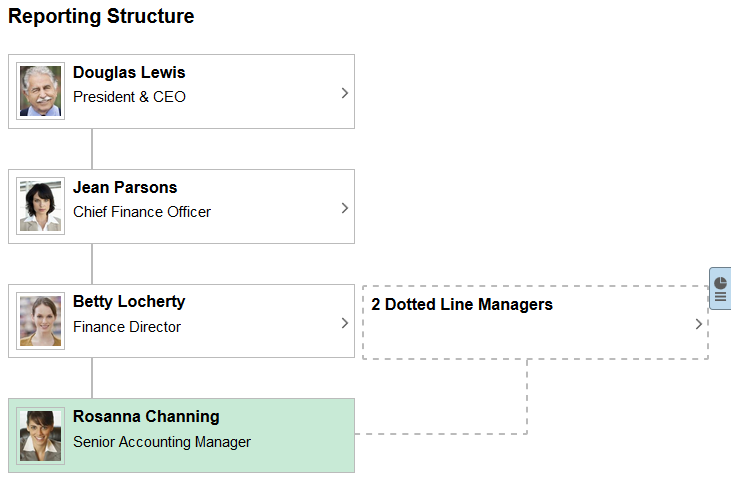
Having More than One Dotted Line Manager
When a person reports to more than one dotted line manager, the pages will also show that relationship. While it displays directly on the small form factor Reporting Structure: Dotted Line page, the large form factor displays the number of dotted line managers for that person and then a secondary page, (Tablet) <Number> Dotted Line Managers Page, to view dotted line managers.
Image: (Tablet) Profile - Reporting Structure Page (More Than One Dotted Line Manager)
This example illustrates the Reporting Structure page when a person reports to more than one dotted line manager.
|
Field or Control |
Definition |
|---|---|
| <number> Dotted Line Managers |
This box displays the number of dotted line managers for this employee. Click the box to access the (Tablet) <Number> Dotted Line Managers Page and view the dotted line managers for this person. |
Use the <Number> Dotted Line Managers page (HRCD_DOT_LINE_SCF) to view the dotted line managers for a person.
Navigation
Click the <Number> Dotted Line Managers box from the Profile - Reporting Structure Page when a person reports to more than one dotted line report.
Image: (Tablet) <Number> Dotted Line Managers Page
This example illustrates the <Number> Dotted Line Managers page.
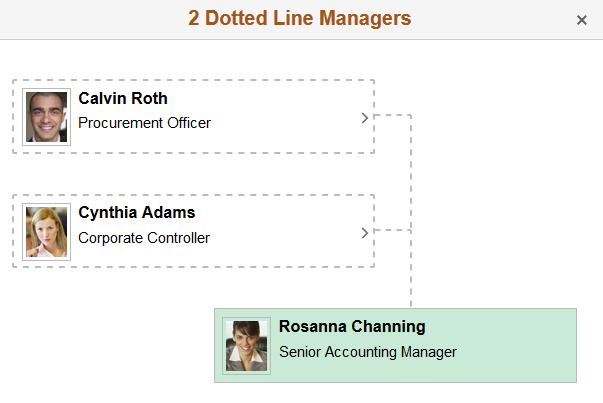
Select an employee node box to access that person’s profile or cancel out of the page to return to the Profile - Reporting Structure Page.
Use the Profile - Manage Dotted Line page (HRCD_PROFILE1_FL or HRCD_PROFILE5_FL) to create or remove dotted line reporting relationships for a person.
Navigation
Select the Manage Dotted Line tab in the left panel of the Profile page when using a large form factor device.
Select the Manage Dotted Line row on the Profile page of an employee when using a small form factor device.
Note: The Profile page will not display the Manage Dotted Line tab or row when you have not been granted the role to manage dotted line relationships for this person. Valid roles for dotted line management are specified on the Chart and Profile Settings - General Settings Page for the Company Directory Fluid org view type.
Image: (Tablet) Profile - Manage Dotted Line Page
This example illustrates the fields and controls on the Profile - Manage Dotted Line page for a tablet.
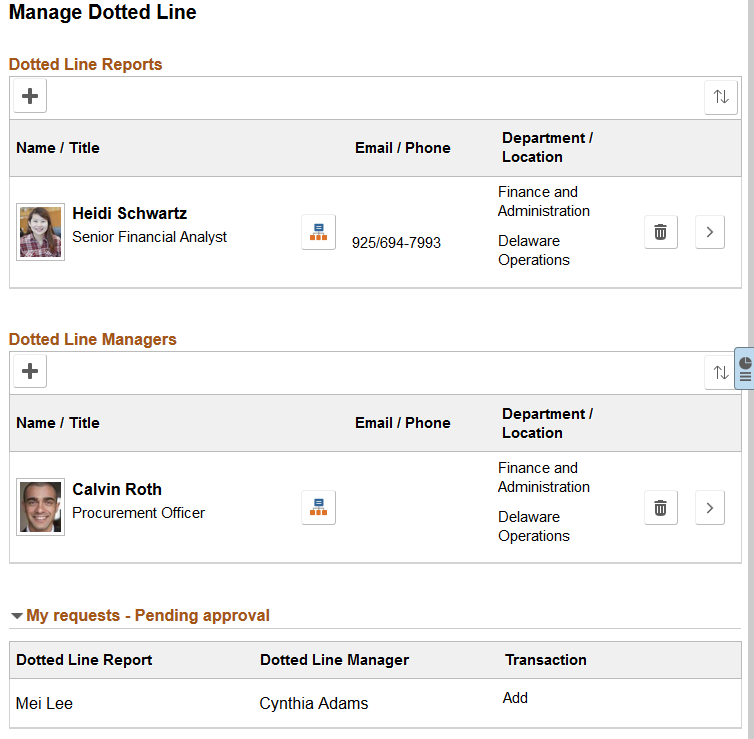
Image: (Smartphone) Profile - Manage Dotted Line Page
This example illustrates the fields and controls on the Profile -Manage Dotted Line page for a smartphone.
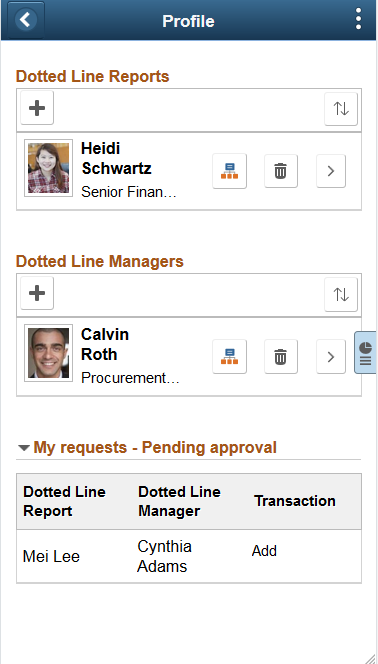
Use this page to view and manage dotted line reports and managers for the person you are viewing.
When viewing a profile for yourself or one of your direct line reports and granted the Dotted Line role, the page will display the buttons to add or remove people from this person’s dotted line reporting structure.
If you do not have access to create dotted line relations for a person, then this page will not be available.
|
Field or Control |
Definition |
|---|---|
 Add Dotted Line Report , Add Dotted Line Report ,  Add Dotted Line Manager or Add Dotted Line Manager or  add buttons add buttons |
This button is available when you have been granted the role to manage this person’s dotted line relationships. Click this button to access the Person Selector Page and add a person to as a dotted line report or manager for the person on whose profile you have accessed. The first time you add individuals as a dotted line report or manager, the page will display the add button showing the text. When individuals already exist for these categories, the page will display the plus (+) button. In order to create dotted line relationships, consider the following:
Note: When adding a dotted line relationship, the system will send an approval request to the approving manager and an email notification to the dotted line report and dotted line manager, notifying them that a dotted line relationship is being requested to be created. The system will also copy the direct line manager of these individuals on the email. |
 sort button sort button |
Click this button to access a list of field descriptions you can use to sort the individuals. This sort will remain in effect until you change the sort order or leave the Profile pages for this person. |
| (View Org Chart) button |
Click this button on an employee row to access the Organization Chart Page with this person in the focus node. |
 Remove Dotted Line Report button Remove Dotted Line Report button |
This button is available when you have been granted the role to manage this person’s dotted line relationships. Click this button to remove an individual from this person’s dotted line reporting structure. Note: When removing a dotted line relationship, the system will send an approval request to the approving manager and an email notification to the dotted line report and dotted line manager, notifying them that a dotted line relationship is being requested to be removed. The system will also copy the direct line manager of these individuals on the email. |
| ( View Profile) button |
Click the View Profile arrow button within a person’s row to access the profile for that person. |
My requests - Pending approval
Note: The My requests - Pending approval section is visible only on the page of the requester, or initiator. It does not appear on the page for the persons for whom you are making the request.
The My requests - Pending approval section also does not appear on the page if you do not have pending requests.
When you add or remove a dotted line relationship using your own direct reports, the system will automatically add the person to the Dotted Line page. However, if the person reports to another manager, it will first send an approval request to that manager. After the request has been approved, the relationship will appear on the person’s Profile - Dotted Line page. To see the requests you have submitted that have not been approved, access your own profile and expand the My requests - Pending approval section.
See also Using Fluid Approvals to Approve Dotted Line Relationships.
Adding Dotted Line Relationships as an Administrator
Administrators also have the capability to view and create dotted line relationships. For more information on this, see Managing HR Administration Tasks as an Administrator Using Fluid and Managing Dotted Line Relationships as an Administrator.
Use the Person Selector page (HR_PSEL_FLU) to search for and select a person as a dotted line report or dotted line report manager for this person.
Navigation
Select the Add Dotted Line Report or Add Dotted Line Manager buttons from the Profile - Manage Dotted Line Page.
Image: (Tablet) Select Person Page
This example illustrates the fields and controls on the Person Selector page for the tablet.
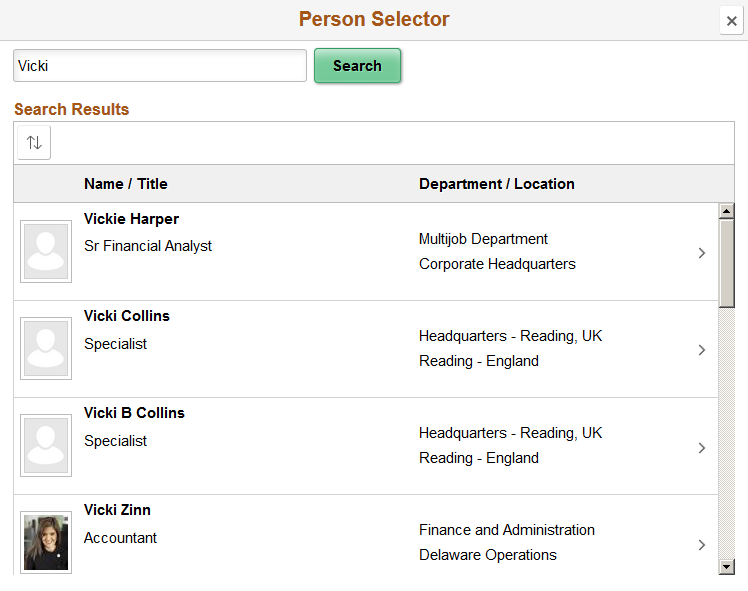
Image: (Smartphone) Select Person Page
This example illustrates the fields and controls on the Person Selector page for the smartphone.
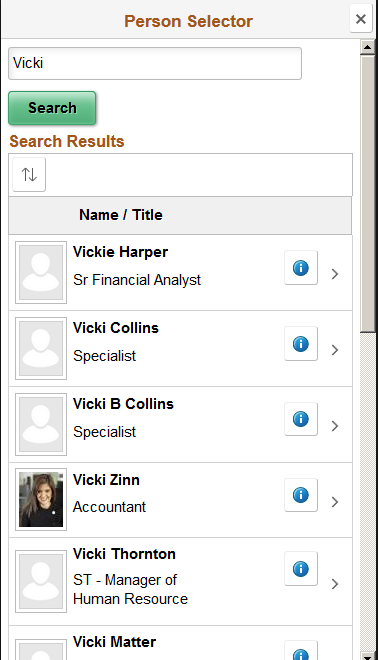
Enter a person’s name and click Search.
|
Field or Control |
Definition |
|---|---|
 More icon button More icon button |
(Smartphone) When using a small form factor, like a smartphone, click this button to access the (Smartphone) Employee Details Page to view additional information about this person, such as their department, location, and job title. |
Click a person’s row to add him or her as a dotted line report or manager. The system will ask to you confirm that you want to add this person as a dotted line report or manager for this person. When you add or remove a dotted line relationship using your own direct reports, the system will automatically add the person to the Dotted Line page. However, if the person reports to another manager, it will first send an approval request to that manager. After the request has been approved, the relationship will appear on the person’s Profile - Dotted Line page. To see the requests you have submitted that have not been approved, access your own profile and expand the My requests - Pending approval section.
To approve a dotted line request, use the Pending Approvals - Dotted Line Page.
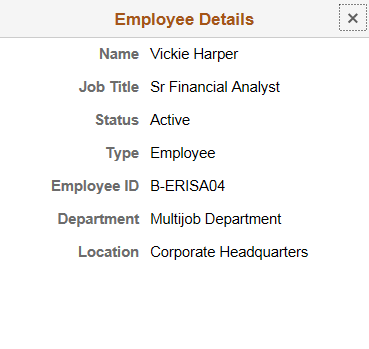
Use the Employee Details page (HR_PSEL_SCF) to view additional information about an employee.
Navigation
Click the More icon button from the Person Selector Page when using a small form factor device, like a smartphone.
Image: (Smartphone) Employee Details Page
This example illustrates the fields and controls on the Employee Details page for a smartphone.
Use the Profile - Directs page (HRCD_PROFILE1_FL, HRCD_PROFILE4_FL, or HRCD_PROFILE3_FL) to view direct or dotted line reports of the person profile that you have accessed.
Navigation
Select the Directs tab in the left panel of the Profile page when using a large form factor device.
Select the Directs row on the Profile page of an employee when using a small form factor device.
Note: The Profile page will not display the Directs tab or row if the person you are viewing is not a manager with direct reports or a dotted line report manager.
Image: (Tablet) Profile - Directs Page
This example illustrates the fields and controls on the Profile - Directs page for a tablet.
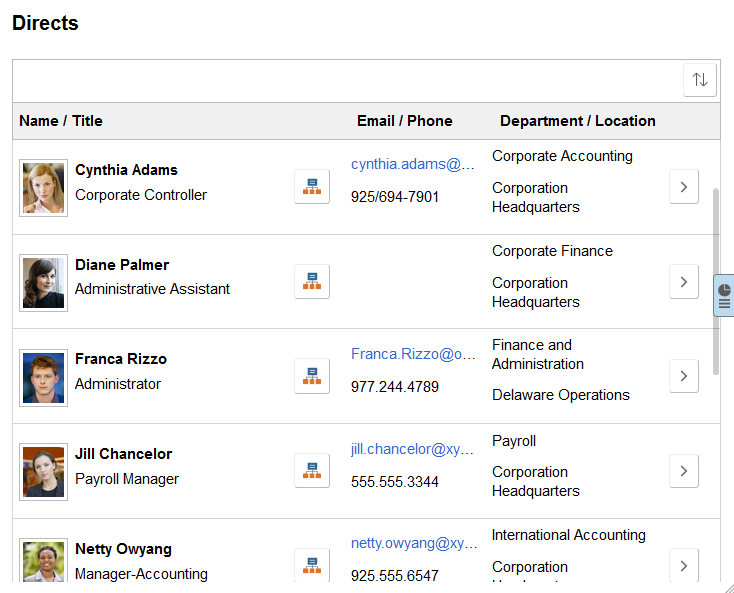
Image: (Smartphone) Directs Page
This example illustrates the fields and controls on the Directs page for a smartphone.
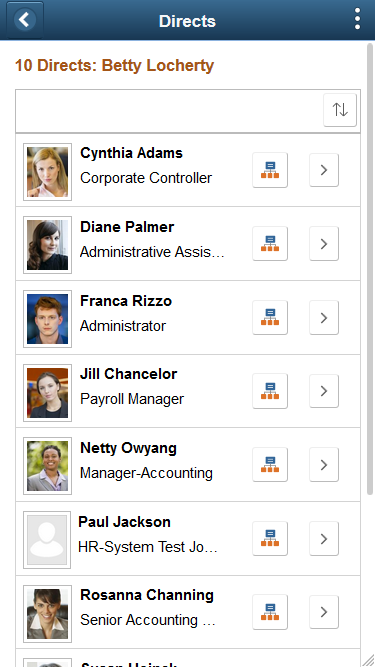
Use this page to view direct reports for the person you are viewing. The default sort order is by display name. Click the Sort button to change the order.
|
Field or Control |
Definition |
|---|---|
| (View Org Chart) button |
Click this button on an employee row to access the Organization Chart Page with this person in the focus node. |
| (View Profile) button |
Select the View Profile button on an employee row to access the Profile page of that person. |
Viewing Direct Reports that are Empty Positions
When you are using a Company Directory tree that includes empty positions, and a direct report of the manager you are viewing is a vacant position, the Directs page will include a row showing the vacant position.
and a peer of the person you are viewing is a vacant position
Image: Directs Page Displaying Empty Positions
This example illustrates the Directs page when there are empty positions displaying as direct reports.
Rows that are vacant positions display the text Empty Position and the position title. When the Show Empty Position Number check box is selected on the Chart and Profile Settings - General Settings Page for the Company Directory Fluid org view type, the position number will also appear. You cannot select and view the profile data of an empty position row since there is no person currently associated with that position.
|
Field or Control |
Definition |
|---|---|
| (View Org Chart) button |
Click this button for an empty position row to access the Organization Chart Page with this empty position in the focus node. |
| (View Profile) button |
The View Profile button is not available for selection for empty positions. You cannot view the profile data of an empty position since there is no person currently associated with that position. |
For more information on building Company Directory trees using positions, see the Understanding the Org Chart Viewer and Company Directory Setup Steps and Tree Builder Run Control Page documentation.
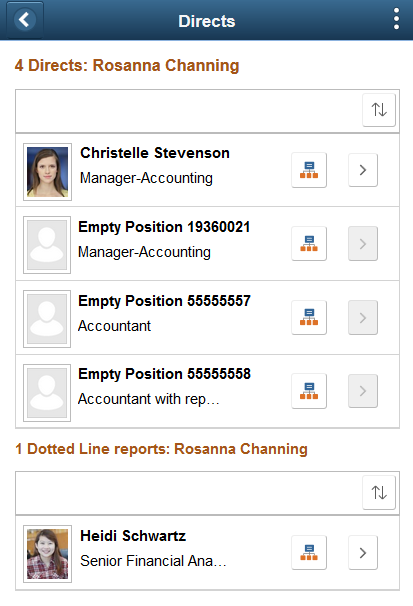
Viewing Direct Reports When The Person Has Dotted Line Reports
When a manager has a dotted line report, the Directs page will include a Dotted Line Reports section.
Image: (Tablet) Profile - Directs Page When A Person Has Dotted Line Reports
This example illustrates the fields and controls on the Profile - Directs page when the person has dotted line reports for a tablet.
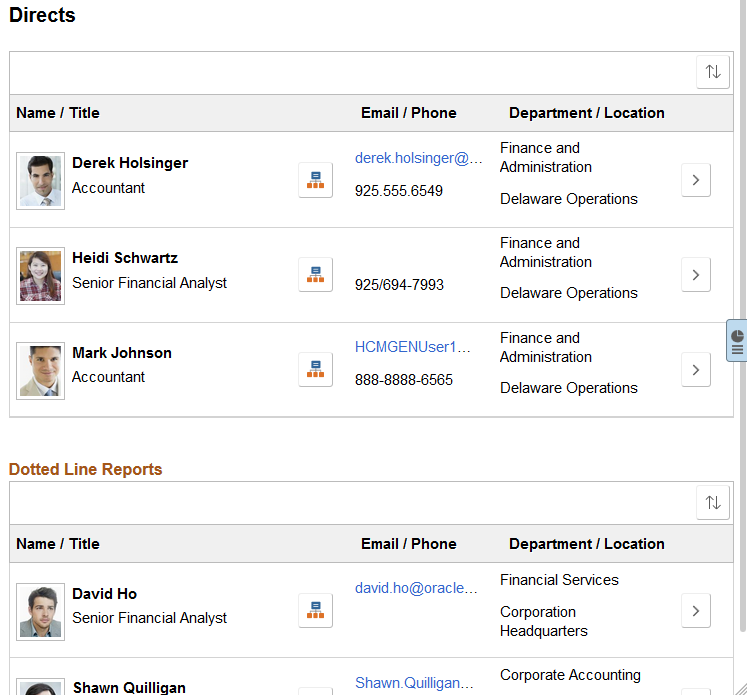
Image: (Smartphone) Profile - Directs Page When A Person Has Dotted Line Reports
This example illustrates the fields and controls on the Profile - Directs page when the person has dotted line reports for a smartphone.
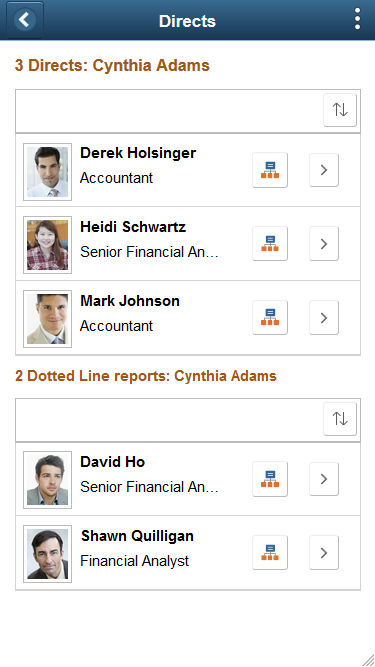
Note: The Dotted Line Reports section does not appear on the page if the person you are viewing does not have dotted line reports.
When a non-manager has dotted line reports, only the Dotted Line Reports section will appear on this page.
You cannot add or delete dotted line reports from this page. To manage dotted line reports, access the Profile - Manage Dotted Line Page.
You can also select the View Org Chart and View Profile buttons for the dotted reports to see information related to those individuals.
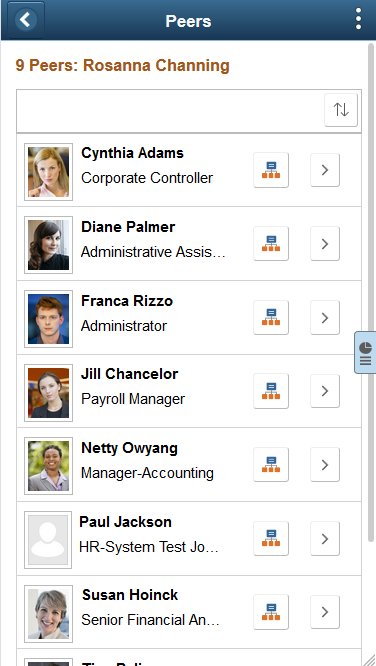
Use the Profile - Peers page (HRCD_PROFILE1_FL, HRCD_PROFILE4_FL, or HRCD_PROFILE3_FL) to view your peers, or the peers of the person profile that you have accessed in the content area, sorted by display name.
Navigation
Select the Peers tab in the left panel of the Profile page when using a large form factor device.
Select the Peers row on the Profile page of an employee when using a small form factor device.
Note: The Profile page will not display the Peers tab or row if the person you are viewing does not have any peers.
Image: (Tablet) Profile - Peers Page
This example illustrates the fields and controls on the Profile - Peers page for a tablet.
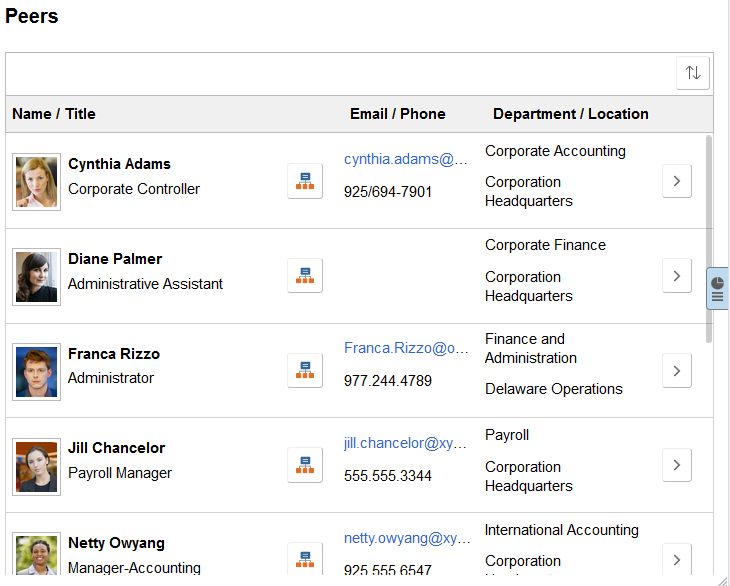
Image: (Smartphone) Peers Page
This example illustrates the fields and controls on the Peers page for a smartphone.
|
Field or Control |
Definition |
|---|---|
| (View Org Chart) button |
Click this button on an employee row to access the Organization Chart Page with this person in the focus node. |
| (View Profile) button |
Select the View Profile button on an employee row to access the Profile page of that person. |
Viewing Peers that are Empty Positions
When you are using a Company Directory tree that includes empty positions, and a peer of the person you are viewing is a vacant position, the Peers page will include a row showing the empty position.
Image: Peers Page Displaying Empty Positions
This example illustrates the Peers page when there are empty positions displaying as peers of the person.
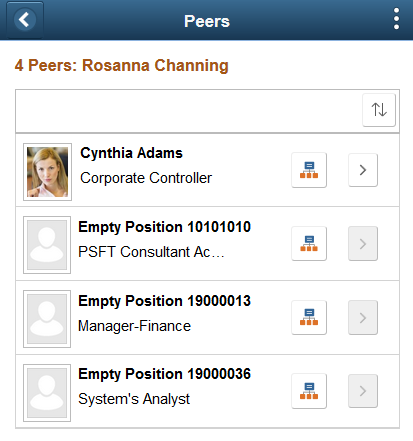
Rows that are vacant positions display the text Empty Position and the position title. When the Show Empty Position Number check box is selected on the Chart and Profile Settings - General Settings Page for the Company Directory Fluid org view type, the position number will also appear. You cannot select and view the profile data of an empty position row since there is no person currently associated with that position.
|
Field or Control |
Definition |
|---|---|
| (View Org Chart) button |
Click this button for an empty position row to access the Organization Chart Page with this empty position in the focus node. |
| (View Profile) button |
The View Profile button is not available for selection for empty positions. You cannot view the profile data of an empty position since there is no person currently associated with that position. |
For more information on building Company Directory trees using positions, see the Understanding the Org Chart Viewer and Company Directory Setup Steps and Tree Builder Run Control Page documentation.
Use the Other Teams - <Team Name> page (HRCD_PROFILE1_FL, HRCD_PROFILE4_FL, or HRCD_PROFILE3_FL) to view a list containing the matrix team’s members.
Navigation
Select the Other Teams tab in the left panel of the Profile page when using a large form factor device, and then select a team name.
Select the <Team Name> row on the Profile page of an employee when using a small form factor device.
Click the Other Teams tab to expand a list of teams, then select a <Team Name> tab in the left panel of the Company Directory page or from the Profile page of an employee.
Note: The Profile page will not display the Other Teams tab or <Team Name> rows if the person you are viewing is not associated with a team accessible to you or the public.
Image: (Tablet) Other Teams - <Team Name> Page
This example illustrates the fields and controls on the Other Teams - <Team Name> page for the tablet.
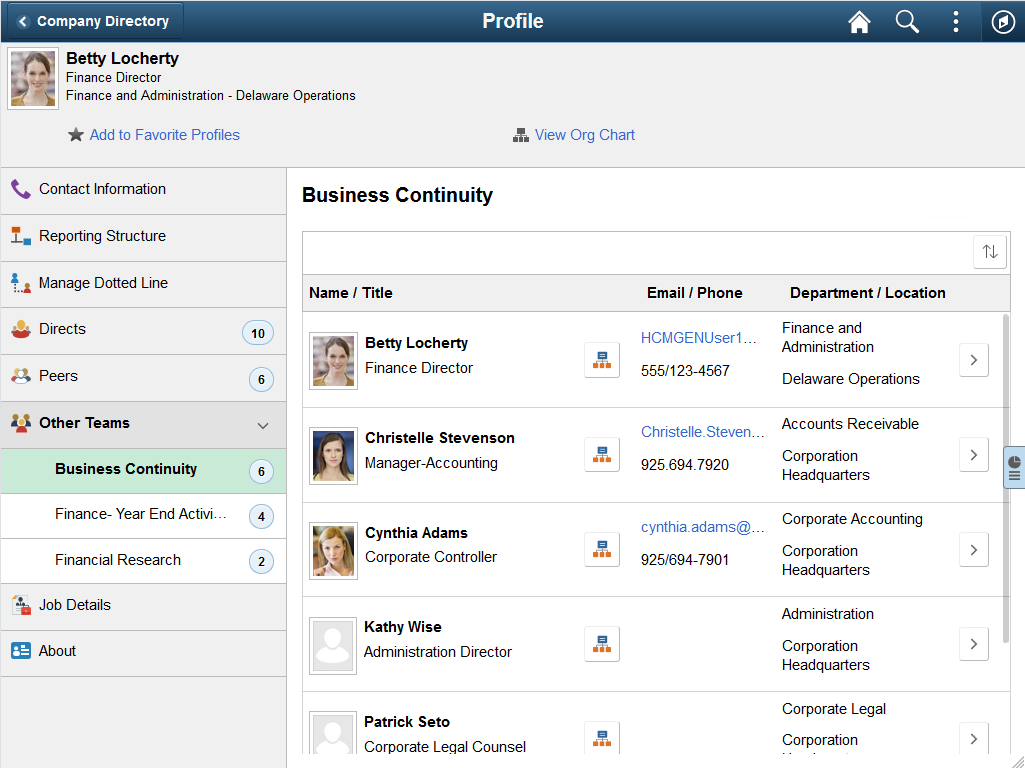
Image: (Smartphone) <Team Name> Page
This example illustrates the fields and controls on the <Team Name> page for the smartphone.
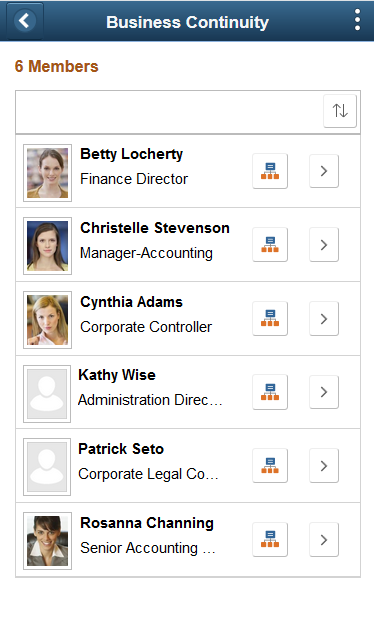
Use this page to view individuals that are part of a specific team.
(Tablet) When using a larger device, the left panel navigation will display the Other Teams parent category. Click this category tab to see sub-categories of all the teams this person is associated with to which you have access.
|
Field or Control |
Definition |
|---|---|
| (View Org Chart) button |
Click this button on an employee row to access the Organization Chart Page with this person in the focus node. |
| (View Profile) button |
Select the View Profile button on an employee row to access the Profile page of that person. |
Use the Profile - Job Details page (HRCD_PROFILE1_FL or HRCD_PROFILE4_FL) to view personal company and job details about a person.
Navigation
Select the Job Details tab in the left panel of the Profile page.
Image: (Tablet) Profile - Job Details Page
This example illustrates the fields and controls on the Profile - Job Details page for the tablet.
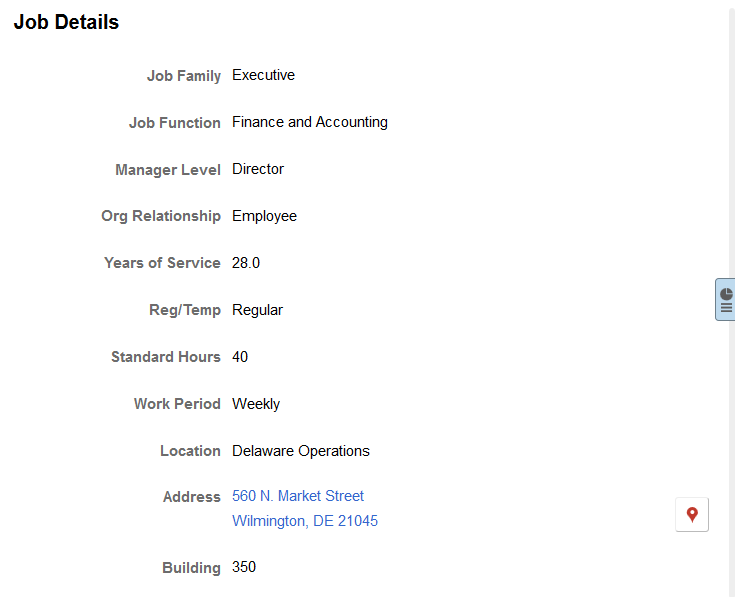
This page provides job information about an individual. The fields that appear on this page are based on the setup configurations determined on the Chart and Profile Settings - Profile Content Page for the Company Directory Fluid org view type.
To view job details for a person on a smartphone, see the (Smartphone) Profile Page.
Use the Profile - About page (HRCD_PROFILE1_FL or HRCD_PROFILE4_FL) to view a personal statement or links this person has added to his or her profile.
Navigation
Select the About tab in the left panel of the Profile page.
Image: (Tablet) Profile - About Page
This example illustrates the fields and controls on the Profile - About page for the tablet.

|
Field or Control |
Definition |
|---|---|
 |
This button is available on your own profile only. Select to access the Link Page and add a new link. |
 |
This button is available on your own profile only if you have not yet added a personal statement. Select to access the Personal Statement Page and add your own personal statement. |
|
Select the edit button to modify an existing entry. Depending on where you click the button, the application will open either the Personal Statement Page or Link Page, where you can make changes to or delete personal statement or link. You can also select individual link Link rows on your own profile to access the Links page and update or delete existing information. |
To view the personal statement or links for a person or update your own information on a smartphone, see the (Smartphone) Profile Page.
Use the Personal Statement page (HRCD_PROFILE3S_SCF) to add, update, or delete a personal statement or comment on your profile.
Navigation
Select the Edit Personal Statement button on the Profile - About page of your own profile.
Image: Personal Statement Page
This example illustrates the fields and controls on the Personal Statement page.
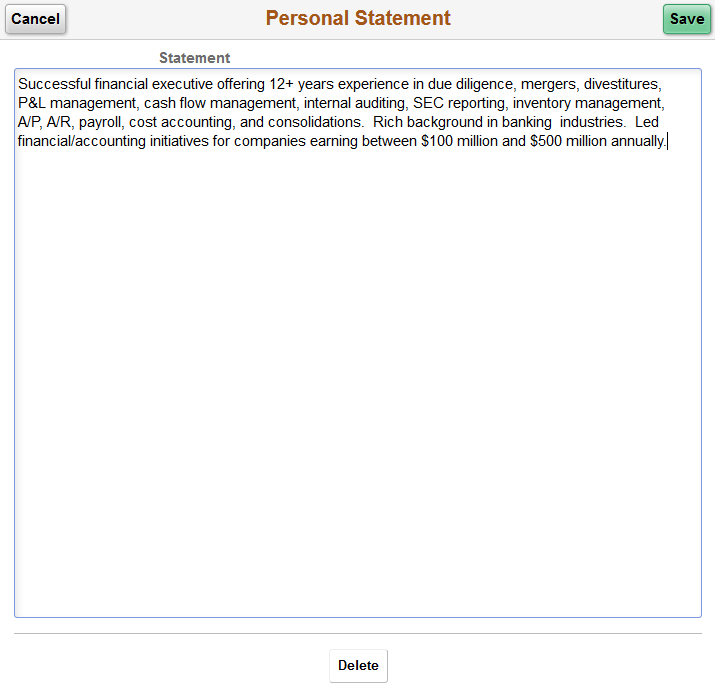
The Personal Statement page opens up in a modal, resizable window. Enter text and click Save to display the text on your Profile - About page.
|
Field or Control |
Definition |
|---|---|
| Cancel |
Click to cancel any changes you have made to your personal statement text. |
| Delete |
Select to remove all text from your personal statement on the Profile - About page. |
Use the Link page (HRCD_PROFILE3L_SCF) to add, update, or delete website links to your own personal profile.
Navigation
Select the Add Link button on the Profile - About page of your own profile.
Click an existing link row on the Profile - About page of your own profile.
Image: Link Page
This example illustrates the fields and controls on the Link page.
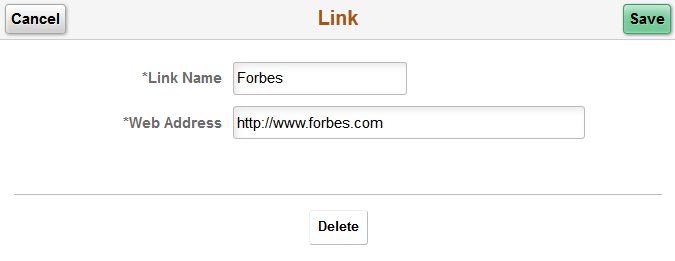
The Link page opens up in a modal, resizable window. Enter text and click Save to display the link on your Profile - About page.
|
Field or Control |
Definition |
|---|---|
| Cancel |
Click to cancel any changes you have made to this link. |
| Delete |
This button is available when you are updating an existing link. Select to remove this link from your personal statement on the Profile - About page. |
Use the Organization Chart page (HRCD_ORG_CHART_FL) to view the hierarchical reporting structure of a person.
Navigation
Click the View My Org Chart link in the Company Directory landing page header.
Click the View Org Chart link in Profile page header.
Click the View Org Chart button on an employee row.
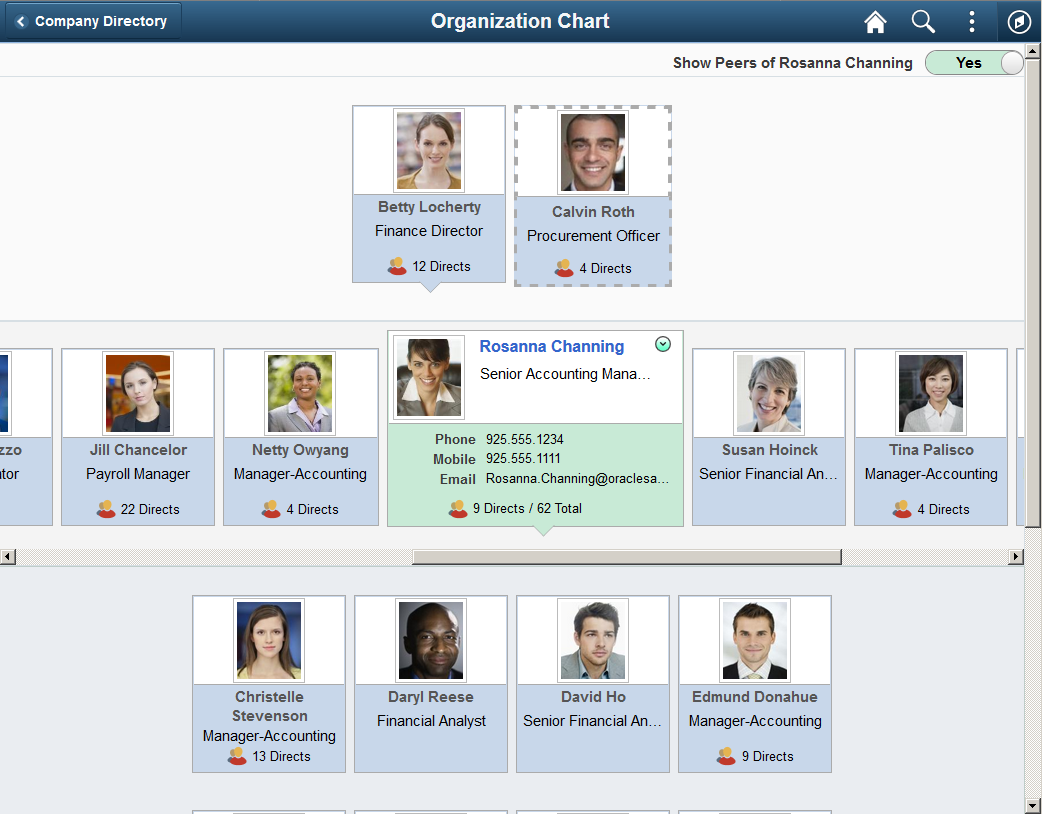
Image: (Large form factor device) Organization Chart Page (1 of 2) without Peers Showing
This example illustrates the Organization Chart page (1 of 2) for a large form factor device when you first access the page and Show Peers of <employee name> is set to No.
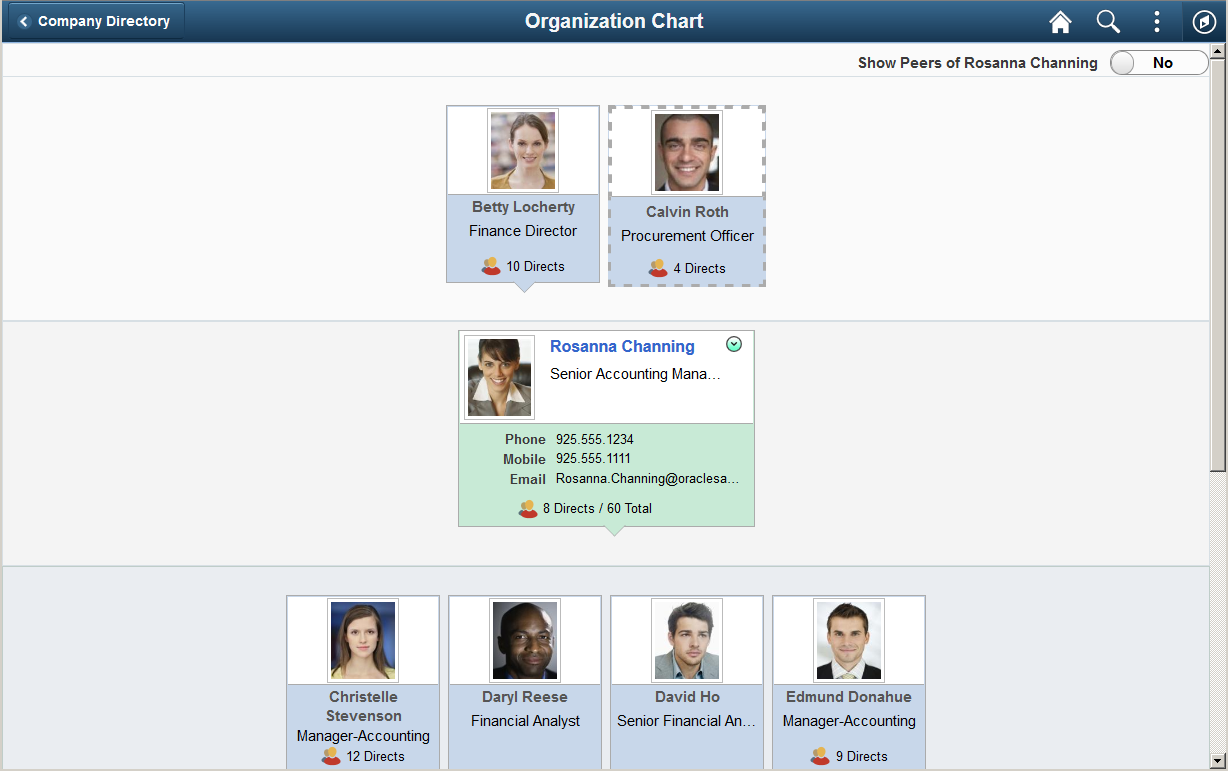
Image: (Large form factor device) Organization Chart Page (2 of 2)
This example illustrates the Organization Chart page (2 of 2) for a large form factor device when you need to use the vertical scroll to see additional direct reports.
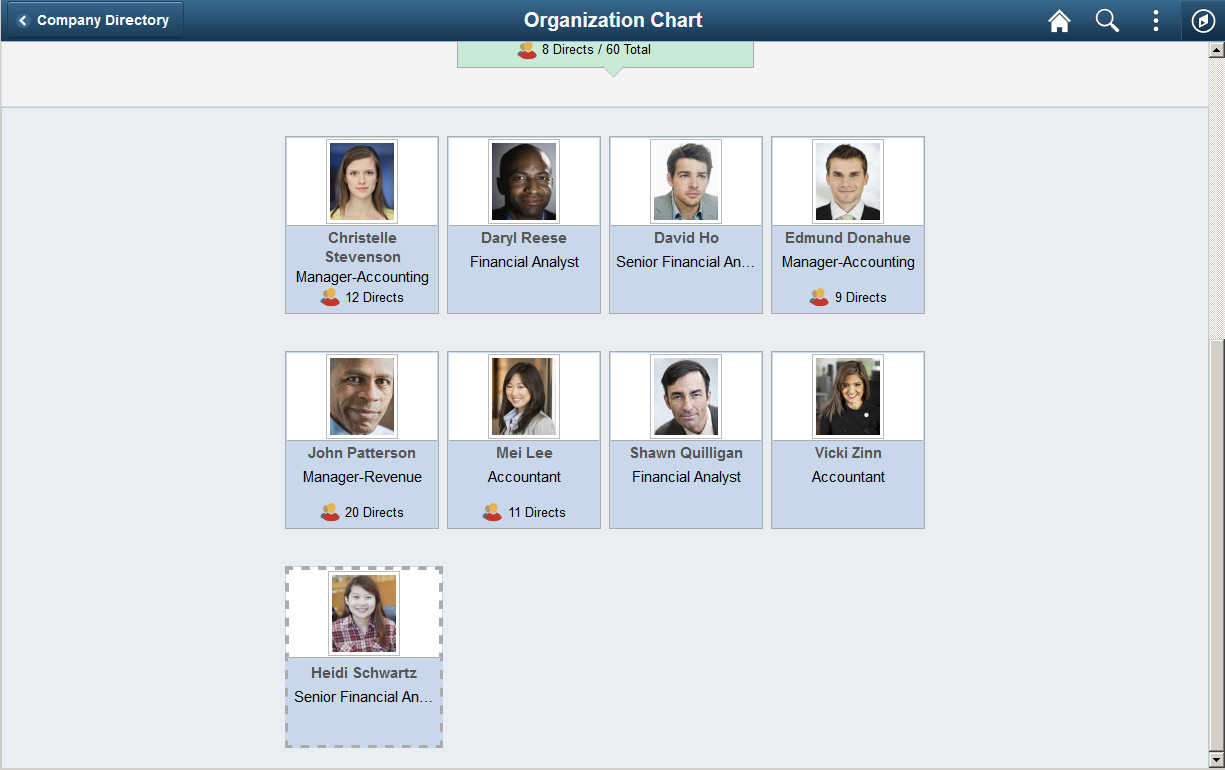
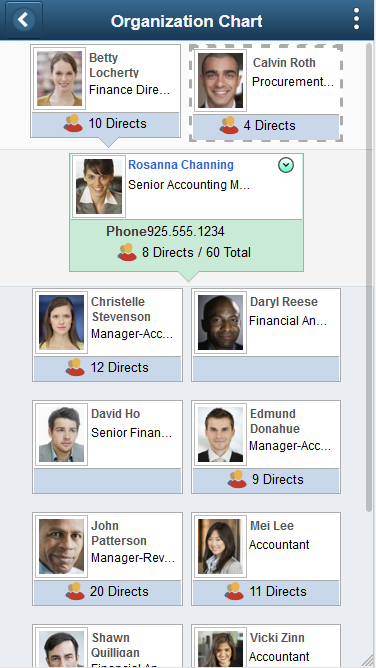
Image: (Smartphone) Organization Chart Page
This example illustrates the fields and controls on the Organization Chart page for the smartphone.
This video demonstrates the Organization Chart user interface:
Image Highlights, PeopleSoft HCM Update Image 27: Company Directory–Org Chart Actions
Use this page to view a graphical representation (up to three-tiers) of the reporting structure for a person.
|
Field or Control |
Definition |
|---|---|
| Show Peers of <employee name> |
(Desktop) When enabled, this option appears in the top right corner of the page when using a desktop. This option is not available for small form factor devices, like a smartphone. Note: This option is available when the administrator has selected the Show Peers of Focus Node check box on the Org Chart Content Page for the Company Directory Fluid org view type. Swipe to Yes to view the peers of the focus node employee in the second row. When peers are showing and exceed the width of the viewing screen, a horizontal scroll bar becomes available and you can swipe to the left or right to view all peer nodes. |
Direct managers and reports appear in a node box surrounded by a solid line. Dotted line managers and reports appear in a node box surrounded by a dotted line.
The three-tiered page levels display according to the following:
Top or First Tier: The first level displays the manager and any dotted line manager of the person you are viewing. Swipe to the left or right to view all nodes, if applicable.
Middle or Second Tier: This row displays the person you are viewing in the focus node. The focus node appears larger and in another color. Select the name link of the person in the focus node to access his or her profile data. When given permission, the focus node also displays the Related Action menu button next to an employee’s name, which you can select to display a list of self-service transactions that you can perform for this person.
(Tablet) When the Show Peers of <employee name>: option is set to Yes, the second row will also show the peers of the person in the focus node for large form factor devices. Small form factor devices, like smartphones, will only display the focus node in this row.
Image: (Tablet) Organization Chart Page when Peers are Showing
This example illustrates the Organization Chart page for the tablet when you swipe Show Peers of <employee name> to Yes.
Bottom or Third Tier: The third level displays the direct and dotted line reports of the person you are viewing. If there are no direct reports for this person, the third level will be blank. When there are several direct or dotted line reports, the page will wrap the nodes and enable you to scroll vertically to view all the people reporting to the person in the focus node. Dotted line reports display last. When you scroll horizontally on another row to where the focus node is no longer viewable, the direct reports fade from the third level of the page.
Click another person’s node to change the focus of the organization chart. Once in the focus node, click the name link of the person to access the Profile pages for that person.
Viewing Empty Positions in the Organization Chart
When you are using a Company Directory tree that uses empty positions, and there are empty positions in the manager, peer, or direct reports positions, this page will include nodes showing the empty positions.
Image: Organization Chart Page when there are Empty Positions
This example illustrates the Organization Chart page when there are empty positions displaying.
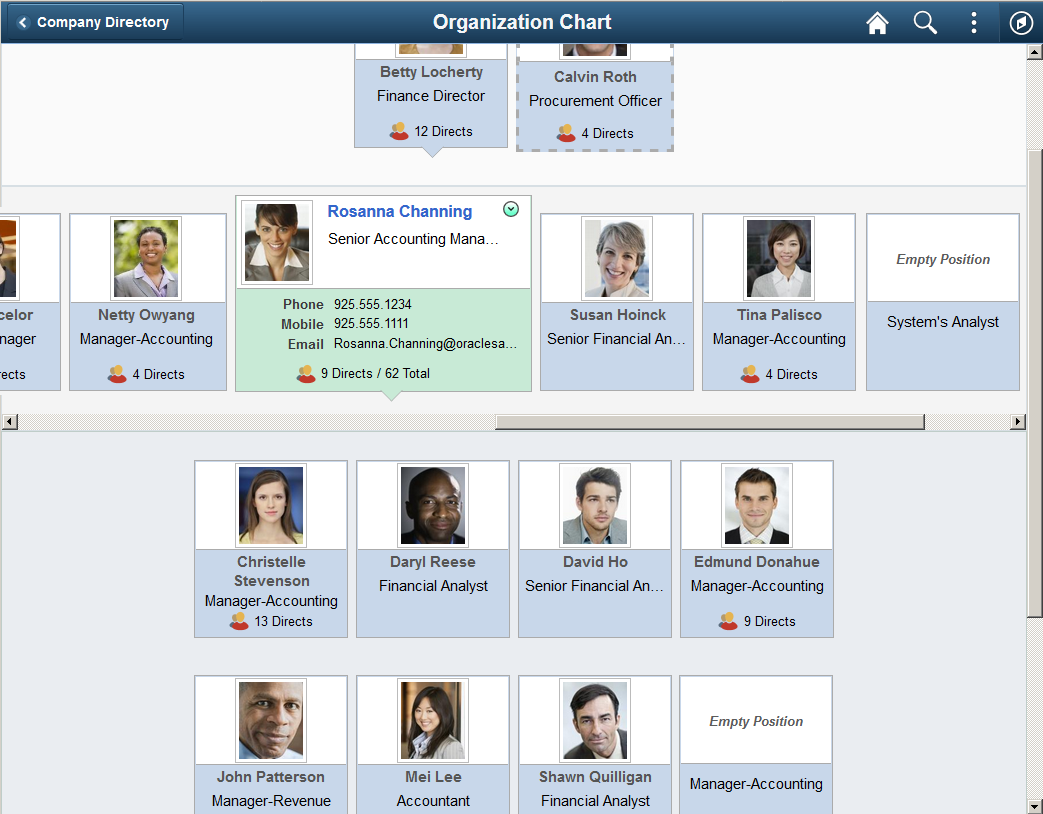
Empty positions will display the text Empty Position and position title. When the Show Empty Position Number check box is selected on the Chart and Profile Settings - General Settings Page for the Company Directory Fluid org view type, the position number will also appear. If the empty position is a manager of other employees, it will list the number of direct reports reporting to that position.
You can select an empty position node to made it the focus node, but you cannot access the profile data of an empty position since there is no person currently associated with that position.
For more information on building Company Directory trees using positions, see the Understanding the Org Chart Viewer and Company Directory Setup Steps and Tree Builder Run Control Page documentation.
(Desktop) Exporting and Printing Organization Chart Information
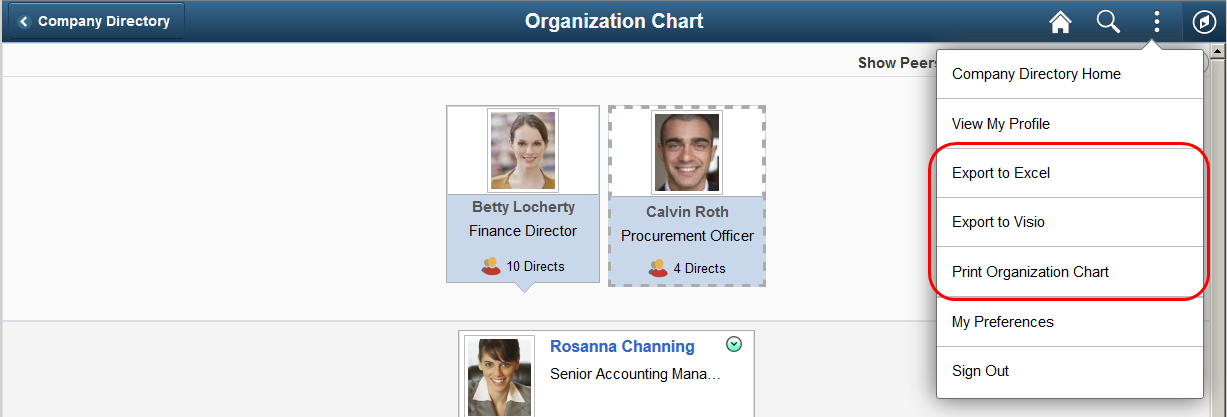
When using a desktop, the Organization Chart page enables users to export or print the organization chart.
Navigation
Select the Actions List menu button from the banner of the Organization Chart page.
Note: The list will not display the Export to Excel or Export to Visio options when you have not been granted the role to export organizational chart data. Valid roles for exporting organizational chart data are specified on the Chart and Profile Settings - General Settings Page for the Company Directory Fluid org view type.
Warning! These Actions List options are not available for smaller form factor devices, such as the tablet or smartphone.
Image: (Desktop) Actions List Options available from the Organization Chart Page
This example illustrates the exporting and printing Actions List options available from the Organization Chart page when using a desktop.
This video demonstrates the Organization Chart export and printing functionality:
Image Highlights, PeopleSoft HCM Update Image 27: Company Directory–Org Chart Actions
|
Field or Control |
Definition |
|---|---|
| Export to Excel |
Note: This Actions List item will not be available if you have not been granted the role to export organizational chart data. Valid org chart export roles are specified on the Chart and Profile Settings - General Settings Page for the Company Directory Fluid org view type. Select this option to export the organization chart information to Excel using a CSV file. The spreadsheet will show the entire hierarchy starting from the focus node, then list the peers of the person in the focus node (even if the Show Peers of <employee name> option is not selected, and then all direct and indirect employees that roll up to the person in the focus node. A row will display for each job, meaning that if a person holds multiple jobs within that hierarchical structures, a row will appear for each job held by that person. Dotted line reports and managers will show as columns at the end of the row where the last dotted line relationship exists. If you are using a Company Directory tree that includes empty positions, and there are empty positions in the hierarchy, the output will include rows showing the empty positions. The output will show the columns in the following order:
|
| Export to Visio |
Note: This Actions List item will not be available if you have not been granted the role to export organization chart data. Valid org chart export roles are specified on the Chart and Profile Settings - General Settings Page for the Company Directory Fluid org view type. Select this option to export organization chart information to a CSV file for Visio. The CSV file is a datasource that contains the entire hierarchy data starting from the focus node down. You will need to import this file from Visio manually. |
| Print Organization Chart |
Select this option to have the system display the <employee name> - Organization Chart page, where you can print the current information that displays on the screen for the Organization Chart page. |
Warning! The system will not export an organization chart that consists of more than 1000 employees. When this happens, the page will display a message informing the user to contact the system administrator if there is a need to export more data.
Note: Administrators can use the Export Org Chart Page to export organization chart data.
Use the <Employee Name> - Organization Chart page (HRCD_ORG_CHRT_SCF) to print the three-tiered hierarchical structure for a person.
Note: Rendering of the printed organization chart may vary by browser due to browser printing constraints.
Navigation
Click the Print Organization Chart menu item in the Actions List menu accessible from the Organization Chart page. .
Image: (Desktop) <Employee Name> - Organization Chart Page
This example illustrates the <Employee Name> - Organization Chart page when using a desktop.
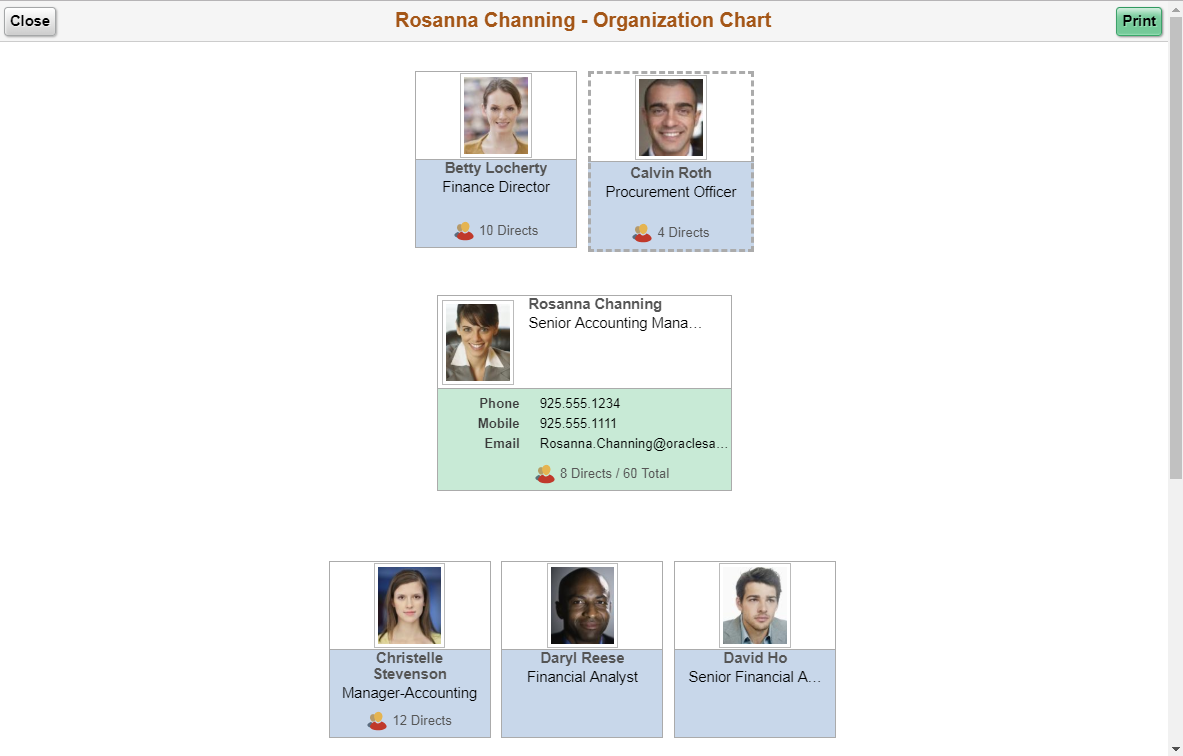
This page displays the three-tiered hierarchy for the person: the manager and dotted line managers, if any; the focus node, and the direct and dotted line reports of the person in the focus node. Note that the second level will not show the peers of the person in the focus node, even if the Show Peers of <employee name> field is swiped to Yes on the Organization Chart Page.
|
Field or Control |
Definition |
|---|---|
| Cancel |
Click this button to cancel out of the print page and return to the Organization Chart Page. |
|
Click this button to submit the organization chart for printing. |