Understanding Profile Management
Organizations typically use two types of profile:
Non-person profiles.
These describe the competencies, qualifications, and responsibilities of a certain job code, position, job family, or salary grade, or other entities in the system.
Person profiles.
These describe people's skills, competencies, other content items such as accomplishments, and performance. Manage Profiles enables you to create profiles for employees and contingent workers. Persons of interest without a JOB record are not supported.
With the Manage Profiles business process, the content catalog provides the foundation for creating all profiles.
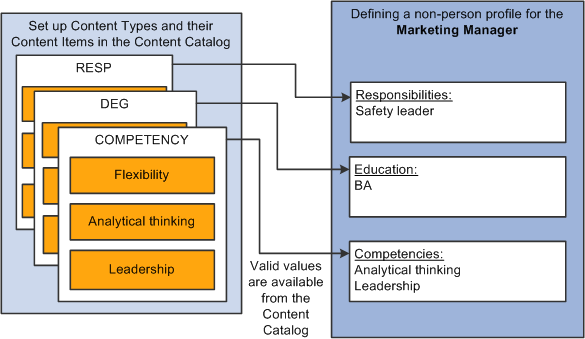
Image: Profiles include content types and content items that are selected from the content catalog
The following diagram provides an example of constructing a profile (a job profile for a marketing manager) by selecting from the content types and content items that are defined in the content catalog:
In the same way that you configure the content catalog to suit your organization, you define a set of profiles that are configured to your requirements. When employees, managers, and administrators create profiles they select the profile type that they want to use.
The profile type controls the following aspects of the new profile:
The type of entities to which users can link the profile.
The content of the profile.
Profile security (who can update the profile).
Whether approval is required for changes to the profile.
Entity Types
Profiles fall into two categories:
Non-person profiles (also known as job profiles).
These are profiles that are created for a business entity, such as a position or a job code.
Person profiles.
A person profile is created for a specific person ID.
When you define a profile type, you specify the type of entities that the user can select when creating a profile. For example, suppose that you create a profile type and specify that it can be linked to job codes and salary grades. When users create a profile based on that profile type, they can only select job codes, salary grades, or both job codes and salary grades for the new profile. A profile type cannot be linked to both business entities and people. A person profile will automatically have an identifier added that is linked to the PERSON table. No other identifiers can be defined for a person profile.
The entities to which you can link a profile type are known as profile identity options. Use the Profile Identity Options page to maintain the list of profile identity options available.
In addition to profile identities, you can also link a profile type to entities outside the Manage Profiles business process. These entities are known as profile association options. ePerformance templates are linked to profile types in this way. The Association Option is used to find the ePerformance Template during the document creation process. The ePerformance template is currently the only supported external entity.
Profile Content
Image: Content for profile types is divided into tabs and content sections
This diagram shows how the content of profile types (and profiles created from those profile types) is divided into tabs and content sections. The diagram shows both a generic architecture and an example where the tabs are responsibilities, competencies, and qualifications.
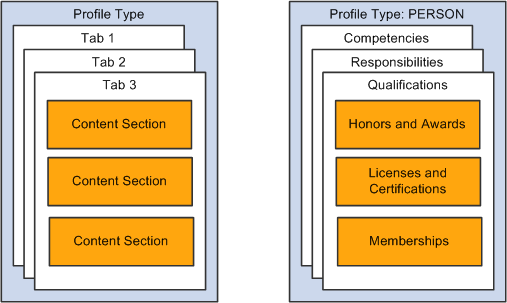
When you set up a profile type you define the name of each tab and the order in which they are displayed in the profile. You add one or more content types to each tab to create content sections. For example, the previous diagram shows a tab labelled Qualifications that has three content sections for three different content types or sections: Honors and Awards, Licenses and Certifications, and Memberships. When users create a profile using this profile type (PERSON) , they can only add content items of the type LIC (Licenses and Certifications) to the Licenses and Certifications content section. You define the order in which the content sections are listed within the tab.
Each content section is made up of supporting properties, or fields. The content section enables you to identify fields such as the content item, such as the specific degree required or earned, and other associated data, such as the school name and dates. For example, you can enter that a person received a Bachelors of Science in June of 2007.
Note: The profile type definition does not include content items. The purpose of the profile type is to provide the structure for the new profile and not the detailed content. Users select content items from a prompt list when they create a profile.
Property categories are associated with each field property, which enables you to easily retrieve the fields you want to include in a content section. Profile properties are organized into the following property categories:
|
Property Category |
Usage |
|---|---|
|
Career Properties |
Properties tied to the delivered Mobility content types: Location Preference, Geographic Preference, International Preference, and Travel Preference. (If properties are used in any custom content, then the defaulting behavior of some of these properties cannot be guaranteed.). |
|
Common Properties |
Properties used for multiple content sections. A specific set of translate values or a prompt table is tied to each property. |
|
Country Properties |
Properties tied to the delivered education content sections: School Education, Degrees, and Area of Study. These properties are organized in separate page country specific sections and most have specific translate values or prompt lists tied to them. |
|
Education Properties |
Non-country specific properties tied to the delivered education content sections: School Education, Degrees, and Area of Study. |
|
Key Properties |
Properties that are part of the record key structure and special process indicator properties. |
|
User Defined Properties |
Properties can be used for extending delivered content sections or defining new content sections. The following types are provided: Integer Decimal Percent Check box Date Text (254) Text (1325) Custom prompt (12 characters) |
See also Defining Education-Related Information.
Profile Security
When you set up a content section, you specify the Profile Management roles that can view that section of the profile. This enables you to display or hide sections to different types of users. There is an additional check box that enables you to control which roles can update the items in the section. There are three roles available:
Administrator
The administrator is any user who has access to the Profile Management menu in Workforce Development.
Manager
Managers are users that can access the self-service transactions for managing profiles, using the Manager Self Service menu.
Employee
Employees use employee self service to access the profile management self-service transactions.
The manager and employee self service transactions are delivered in PeopleSoft eDevelopment.
Profile Approvals
Approvals processing is an optional aspect of profile management. If you want to use approval workflow to control changes to profiles, you:
Set up approval processing using the standard Approvals Framework engine.
Associate the approvals definition with the profile type.
On the Profile Type - Attributes page, you define one approvals workflow transaction and one approvals definition for the profile type.
Specify whether identities require approval (non-person profile types only).
You can specify that approvals workflow is triggered when users add or change the profile identities associated with a non-person profile. To do this, select the Approval Req'd for Identities check box on the Profile Types - Identities page. This applies to non-person profile types only. The check box is not available when you are working with person profile types.
Specify which content section roles require approval.
Each content section within a profile type has an Approval Required check box per security role that controls whether changes to that content section require approval by the designated person or role. If you have set up approval processing for a content section when users add items to a profile, delete existing items, or modify existing items, this initiates the approvals process.
(Optional) Add properties to content sections to track workflow status.
You should add the workflow status property (JPM_WF_STATUS) to content sections that require approval to enable users to view the status of profile items as they are processed by the Approvals Framework. Other useful properties for tracking approval are the last updated date and time property (LASTUPDDTTM), and the last updated user ID property (LASTUPDOPRID).
See Content Section Page.
Image: Steps for setting up profile management
This diagram illustrates the optional and required steps for setting up profile management:
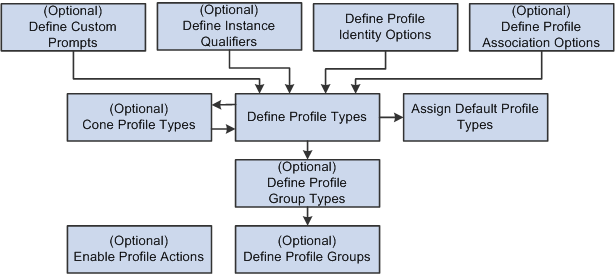
To set up profile management you define the following:
(Optional) Custom Prompts.
Custom prompts are used to define the prompt list for the JPM_PROMPT properties which allows you to customize the list of values that is permitted to be entered.
(Optional) Instance qualifiers.
Instance qualifiers are used as additional key fields for a profile item. They can prompt off of a table or the valid values can be defined within the instance qualifier. Instance qualifiers are used to identify who updated the profile or the type of evaluation. You can also use instance qualifiers to restrict the profile item rows that are visible to employees and managers using self-service transactions.
Profile Identity Options.
(Optional) Profile Association Options.
Note: You do not need to define profile association options for the Manage Profiles business process. However, if you have installed ePerformance and you want to use profile content to create performance or development documents, you must define profile association options for ePerformance.
Profile Types and Clone Profile Types.
To facilitate profile type creation, the system enables you to copy an existing profile type through the Clone Profile Types Application Engine process. You can then modify the new profile type using the Profile Types component.
Note: Profile Type configurations are delivered for CLUSTER, ROLE, JOB, and PERSON. It is strongly recommended that if changes need to be made to these types, this should be done by adding a new effective dated entry for the profile type. Caution should be used when changing ROLE and PERSON content sections since there may be existing integration requirements. Refer to the topic Manage Profiles Integrations to determine the business processes that leverage profile content. Caution must be taken in the removal of delivered properties since there may be processing tied to the property..
New properties should not be specified with an attribute of Required if profile data already exists. It is recommended that the Maximum Length value not be changed to avoid possible truncation during integration with other products.
Assign Default Profile Types.
The system uses the primary person and non-person profile types for products that need to interact with Profile Management.
(Optional) Profile Group Types and Profile Groups.
Profile group types and profile groups enable you to categorize profile types. Profile group types are defined as either person or non-person. Profile groups are used as search criteria in the search and compare profiles feature to filter the search results.
(Optional) Profile Actions
Profile actions enable administrators, managers, and employees to perform transactions directly from the non-person profile and person profile pages.
Note: Before you can use Manage Profiles, you must also set up the installation settings on the Profile Management Installation page. This is described in the next section.