Setting Up Profile Types
To set up profile types, establish the person and non-person profile types for other business modules, and assign the default person and non-person profile types, use the Profile Types (JPM_JP_TYPES), Clone Profile Types (RUNCTL_JPM_CLONE), and Assign Default Profile Types (JPM_DFLT_JP_TYPES) components.
These topics discuss how to set up profile types.
|
Page Name |
Definition Name |
Usage |
|---|---|---|
|
JPM_JP_TYPE_ATTRIB |
Set up profile type attributes. Define basic details of the profile type identifying the type of profile. If the profile type is associated with approvals workflow, specify the transaction and the approval definition on this page. |
|
|
JPM_JP_TYPE_IDENT |
Define profile type identities by selecting the identity options to which the profile type is linked. Identity options are entities such as a job code, position number, or person. When users create profiles based on a profile type, they can only create profiles for the entities that are defined on this page. Active profile types must have at least one identity option. Define the identity options enabled on the Profile Identity Options page. A Person identifier is automatically added for profile types with a Person usage. No other identifiers can be added for these. |
|
|
JPM_JP_TYPE_CONT |
Define profile type content. The content of a profile is divided into tabs and each tab comprises one or more sections. Use the Content page to set up the tabs in the profile, and add content types to each tab. |
|
|
JPM_JP_ADD_CNT_SEC |
Select content types. This page lists the content types available to add to the profile type. Select the content type you want to add and the system displays the Content Section page. |
|
|
JPM_JP_CONTENT_SEC |
Define content section properties (fields) and the attributes of those properties. You also use this page to define the Profile Management roles that can access the content section when creating or updating profiles. |
|
|
Profile Content Visualization Page |
JPM_VISUAL_DTL_SEC |
View the configuration of how the content section will render on the Add <content type> or Update <content type> pages. |
|
Copy Content from another Profile Type Page |
JPM_JP_CPY_CNT_SEC |
Copy content properties of the content type for the section in which you are working from an existing profile type into the current profile. |
|
JPM_JP_TYPE_ASSOC |
Set up profile type associations. Select the associations to which the profile type is linked. Associations are entities external to the Profile Management business process. Define the association options enabled on the Profile Association Options page. This is only available for profile types with a Non-Person usage. |
|
|
RUNCTL_JPM_CLONE |
Clone profile types. Create a new profile type by copying an existing profile type by running the Clone Profile Type process. |
|
|
JPM_DFLT_JP_TYPES |
Assign profile type default person and non-person profile types available to other product features and services. |
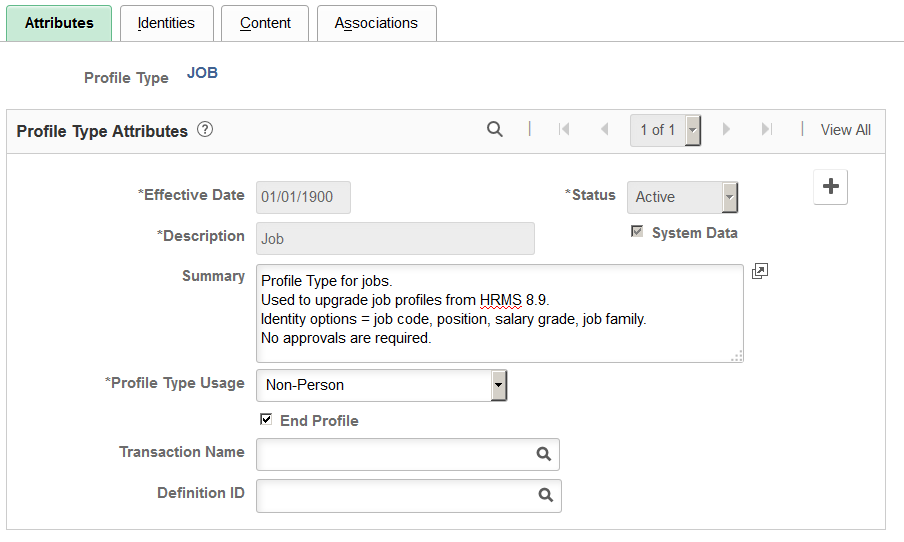
Use the Profile Types - Attributes page (JPM_JP_TYPE_ATTRIB) to set up profile type attributes.
Define basic details of the profile type. If the profile type is associated with approvals workflow, specify the transaction and the approval definition on this page.
Navigation
Image: Profile Types - Attributes page
This example illustrates the fields and controls on the Profile Types - Attributes page. You can find definitions for the fields and controls later on this page.
|
Field or Control |
Definition |
|---|---|
| Summary |
Enter a brief description of the profile type. |
| Profile Type Usage |
Select the usage value: Person or Non-Person. The usage will determine the Profile Identity Options values that can be selected on the Profile Types - Identities page. If the Profile Type Usage field is Person, then a Person identifier is automatically added and no other identifiers can be added. If the usage is Non-Person then any enabled Identity Option can be added. |
| End Profile |
Select this check box if the profile type is an end profile. The system displays end profiles in employee and manager self service and uses the end profiles in search, match, and browse. |
| Transaction Name |
Select the approvals workflow transaction associated with the profile type. You must complete this field if any of roles in the content sections in the profile type have the Approval Required check box selected or if the Approval Req'd for Identities check box on the Profile Type - Identities page is selected. See Content Section Page. |
| Definition ID |
Select the approvals definition for the profile type. If you leave this field blank, the system uses the default approval definition ID for the approval process ID specified in the Transaction Name field. If multiple approval definition IDs exist, the approval framework will decide which approval definition ID to use, based on the criteria and priority configured on the Approval Process Definition component. For the definition IDs used for Manage Profiles approvals processing, the default definition has a priority of 1 and the non-default definitions have a priority of 9. |
Use the Profile Types - Identities page (JPM_JP_TYPE_IDENT) to define profile type identities by selecting the identity options to which the profile type is linked.
Identity options are entities such as a job code, position number, or person. When users create profiles based on a profile type, they can only create profiles for the entities that are defined on this page. Active profile types must have at least one identity option. Define the identity options enabled on the Profile Identity Options page. Identifiers can only be added for profile types with the non-person usage.
A Person identifier is automatically added for profile types with a Person usage. No other identifiers can be added for these.
Navigation
Image: Profile Types - Identities page
This example illustrates the fields and controls on the Profile Types - Identities page. You can find definitions for the fields and controls later on this page.

|
Field or Control |
Definition |
|---|---|
| Approval Req'd for Identities (approval required for identities) |
Select this check box if approval is required for changes to the profile identities associated with profiles of this profile type. |
| Profile Identity Option |
Select one or more objects to which the profile type can be linked. The objects available are determined by the profile identity options enabled on the Profile Identity Options page. Profile identity options can only be added for non-person profiles. A Person identifier is automatically added for person profiles and no further identifiers can be added. The system validates that there is only one active profile per profile identity key within a given profile type. For example, if the position Human Resources Administrator is listed as the identifier for a certain active JOB profile, then another JOB profile cannot be defined with the same position identifier. |
| Add Profile Identity |
Click to add another profile identity option to the page. |
Use the Profile Types - Content page (JPM_JP_TYPE_CONT) to define profile type content.
The content of a profile is divided into tabs and each tab comprises one or more sections. Use the Content page to set up the tabs in the profile, and add content types to each tab.
Navigation
Image: Profile Types - Content page
This example illustrates the fields and controls on the Profile Types - Content page. You can find definitions for the fields and controls later on this page.
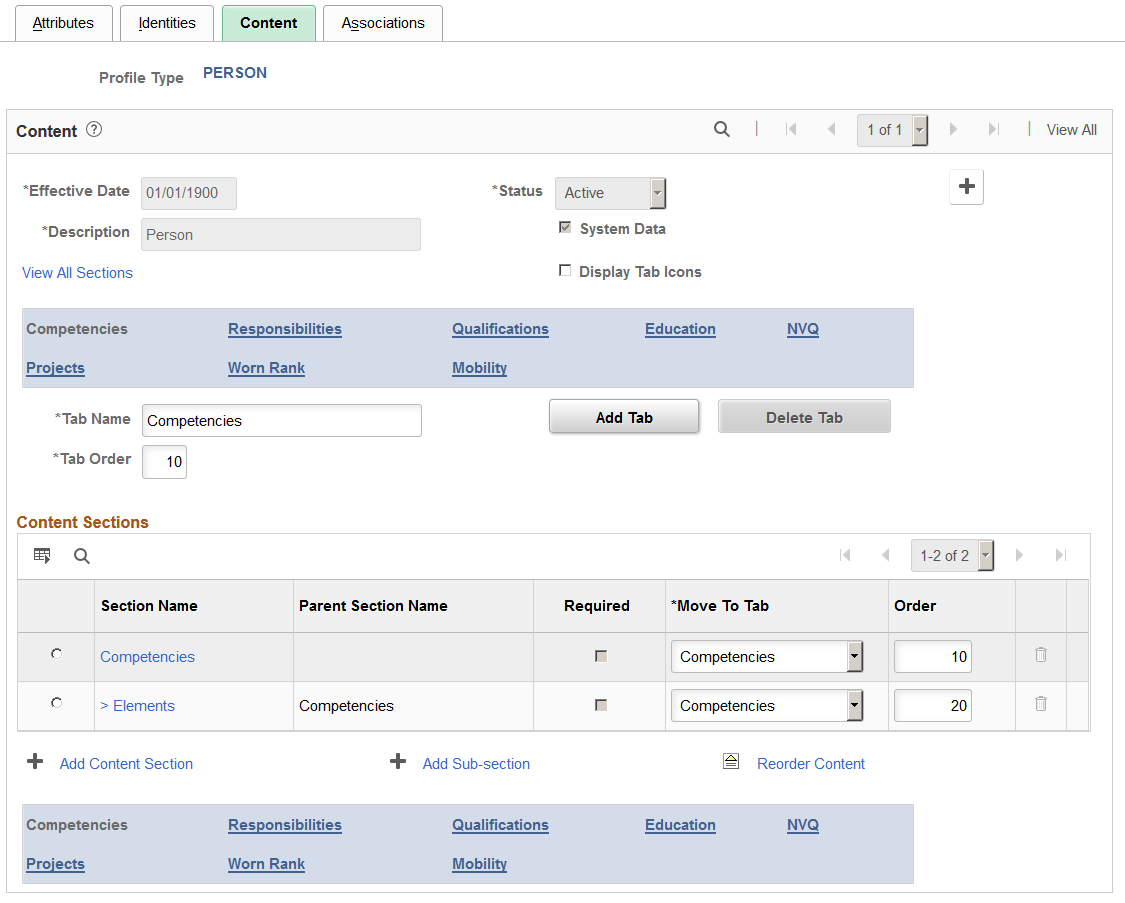
Use this page to define the content of a profile type.
Image: Example of how tab links appear on the Profile Types - Content page
The content is divided into tabs that appear as links on the page as shown in this example:

In this example, there are five tabs and the Competencies tab is the one currently selected. Click the tab name link to move to that tab.
The order in which the tabs are displayed is determined by the Tab Order field. Within each tab, you specify the content types in the Content Sections grid area. These links will appear as actual tabs to the user on the profile pages.
|
Field or Control |
Definition |
|---|---|
| View All Sections |
Click this link to display the sections for all the tabs in the profile type. The system updates the Content Sections group box to list the sections from all tabs, and hides the Tab Name and Tab Order fields. To return to viewing a specific tab, click that tab link. |
| Display Tab Icons |
Select this check box if you want to associate tabs with icons that will appear within the PeopleSoft Fluid User Interface on the Talent Profile Page (for Employees) or Team Talent Profile Page (for Managers). Employees use these self-service pages to update their own profiles. |
| Add Tab |
Click this button to add a new tab to the profile type. |
| Delete Tab |
Click this button to delete the selected tab. |
| Tab Name |
Enter a name for the tab. When users create a profile using this profile type, the tab name appears as a link in the profile. Therefore, it is important to use meaningful names and not leave the default name of Tab 1, Tab 2, and so on. |
| Tab Order |
Enter a value to specify the order in which the system should display the tab links. |
| Tab Icon |
Select the icon that represents this tab in the PeopleSoft Fluid User Interface (on the Talent Profile pages). |
Content Sections
This grid area lists the sections in the selected tab. If you click the View All Sections link, this grid area lists the content sections for all the tabs in the profile type.
|
Field or Control |
Definition |
|---|---|
| Section Name |
Click the section name to access the Content Section page and view and update details of the section or sub-section. Note: A ">" symbol preceding a section name indicates that the section is a child of the section above it. Note: Profile Type configurations are delivered for CLUSTER, ROLE, JOB, and PERSON. This can be changed by adding a new effective dated entry for the profile type. Caution should be used when changing ROLE and PERSON content sections since there may be existing integration requirements. Refer to the topic “Getting Started with Manage Profiles,” Manage Profile Integrations to determine the business processes that leverage profile content. Caution should be exercised when removing delivered properties. If profile content already exists for the property, then it should not be removed. |
| Parent Section Name |
Displays the name of the parent section for child sections. |
| Required |
Select this check box if the section is a required section of the profile. When users create a profile, the system uses this check box to validate that required sections have at least one profile item. |
| Move To Tab |
Displays the current tab name where this content section is located. Select the tab from the list and click the Reorder Content link to move a section to a different tab. |
| Order |
Enter a value to specify the order in which the content sections are displayed within the tab in the profile. |
| Add Content Section |
Click this link to add a new section to the Content Sections grid area. The system displays the Add Content Section page that lists all the content types available. Content types are defined using the Content Types component. |
| Add Sub-section |
Add sub-sections to include content types that are related to the content type of an existing section. Select the radio button for the content section for which you want to create a sub-section, and click this link. Relationships between content types are defined on the Relationship Rules page in the Content Types component For example, if you add a Competencies section to a tab, you can add the Element or Sub-Competencies content type as sub-sections because these content types are related to the competencies type. When you click this link the system displays the Add Content Section page, which lists the content types that are defined as a child of the content type of the parent section. |
| Reorder Content |
Click this link if you have changed the Tab Order or the section Order field values. The system refreshes the page to show the new ordering of tabs or content sections. |
Use the Add Content Section page (JPM_JP_ADD_CNT_SEC) to select content types.
This page lists the content types available to add to the profile type. Select the content type you want to add and the system displays the Content Section page.
Navigation
Click the Add Content Section link on the Profile Types - Content page.
Click the Add Sub-section link on the Profile Types - Content page.
Image: Add Content Section page
This example illustrates the fields and controls on the Add Content Section page. You can find definitions for the fields and controls later on this page.
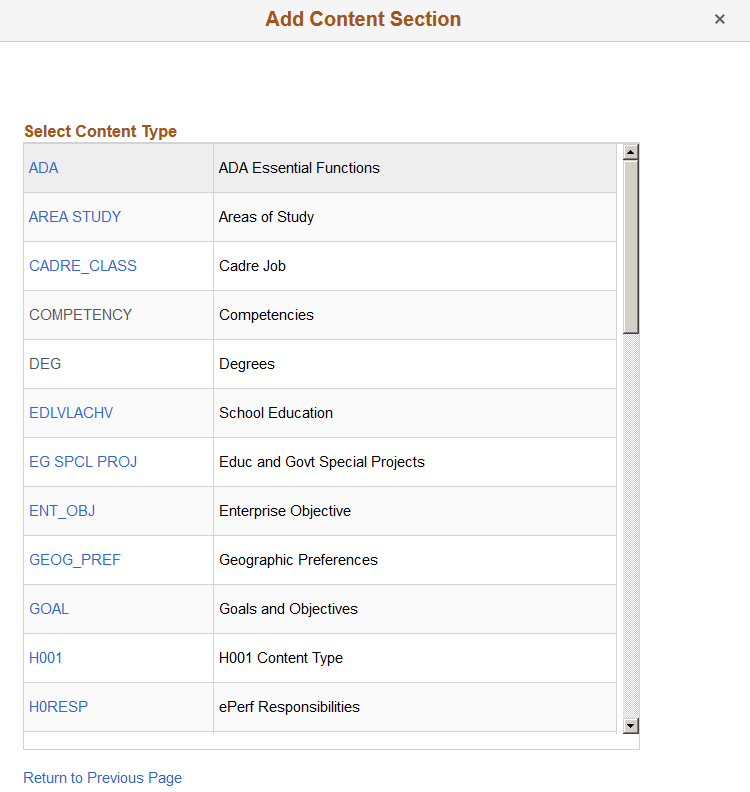
This page lists the content types that you can add to the profile type. Those content types that are already included in the profile type are shown in normal text and do not have a link.
If you are adding a sub-section, the system displays the content types that have a subordinate relationship with the content type of the parent section.
See Profile Types - Content Page.
Click the link for the content type that you want to add, or click the Return to Previous Page link to cancel the addition.
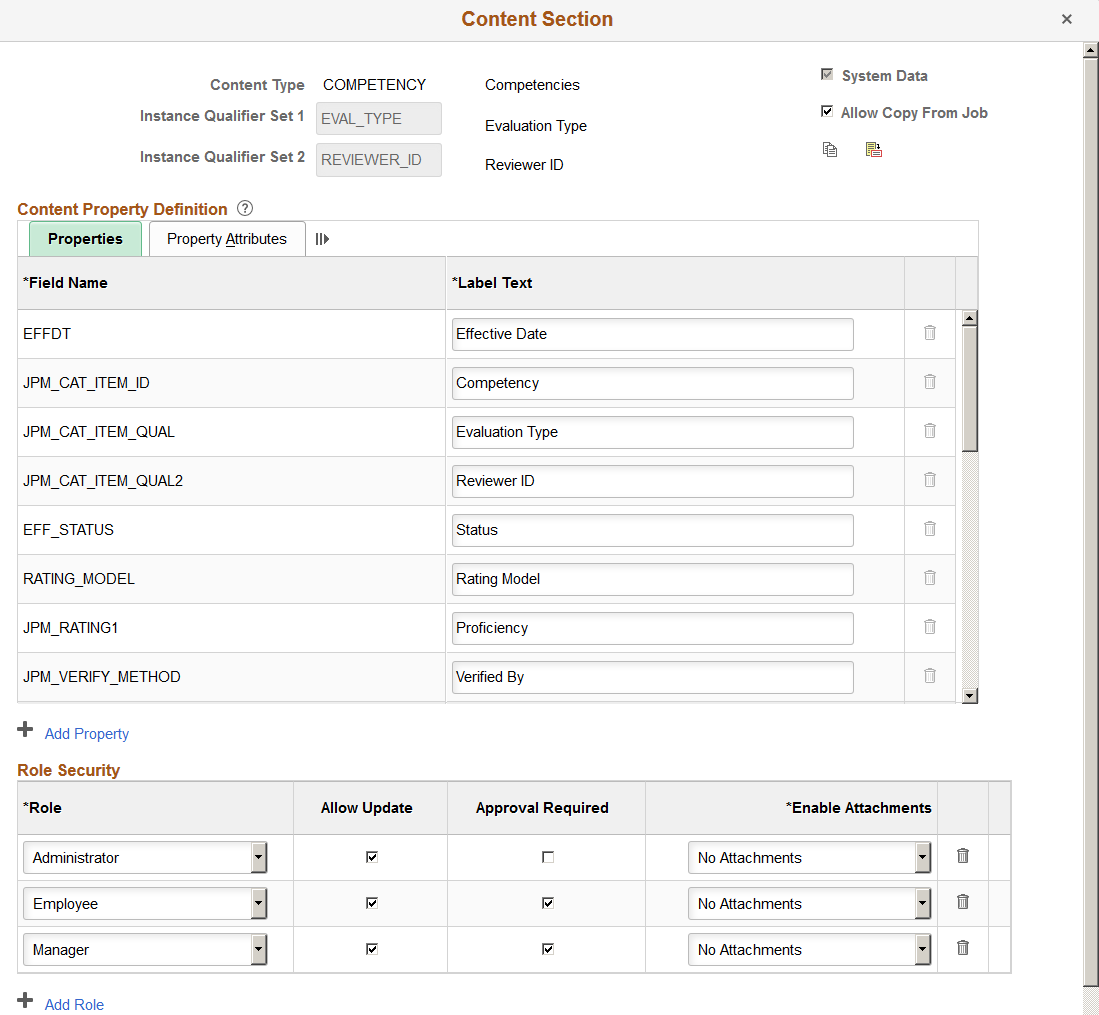
Use the Content Section page (JPM_JP_CONTENT_SEC) to define content section properties (fields) and the attributes of those properties.
You also use this page to define the users that can access the content section when creating or updating profiles.
Navigation
Select a content type on the Add Content Section page.
Click the section name link on the Content page.
Image: Content Section page showing the Properties tab
This example illustrates the fields and controls on the Content Section page showing the Properties tab. You can find definitions for the fields and controls later on this page.
Note: Profile Type configurations are delivered for CLUSTER, ROLE, JOB, and PERSON. This can be changed by adding a new effective dated entry for the profile type. Caution should be used when changing ROLE and PERSON content sections since there may be existing integration requirements.
It is not recommended that delivered properties be removed.
|
Field or Control |
Definition |
|---|---|
| Instance Qualifier Set 1 |
(Optional) Select the instance qualifier set that you want to use with this section. You can only select instance qualifiers that are associated with the content type of the section and are defined as sets of values. You cannot select instance qualifier sets that are based on prompt records for this field. Define instance qualifiers using the Instance Qualifiers page. You will be required to add the property JPM_CAT_ITEM_QUAL. |
| Instance Qualifier Set 2 |
(Optional) If you want to define an instance qualifier that is based on a prompt record, then select an Instance Qualifier Set that has a prompt definition. You will be required to add the property JPM_CAT_ITEM_QUAL2. |
| Allow Copy From Job |
This check box is available for Person profile types. Select to enable the functionality to select a non-person profile from a list of related profiles when maintaining a person's profile. The system determines which non-person profiles are related to an employee by searching the employee's job data record. If the employee has multiple jobs, the system checks all the person's active jobs for matching non-person profiles. For example, the system checks for active profiles that match the employee's job codes, positions, and salary grades. If this check box is not selected, these content types related to the person will not be copied from the non-person profile. |
Copy from another Profile
Type  |
Click this icon to identify an existing profile type from which you want to copy content properties for the content type section you have selected. When you click this icon, the system displays the Copy Content from another Profile Type page. Enter the profile type to copy and click OK to have the system insert the properties into the content section definition. |
Visualize Profile Detail  |
Click this icon to access the Profile Content Visualization page to view how the content section configuration will render on the Add <content type> or Update <content type> pages. |
Content Property Definition Group Box: Properties Tab
If you are setting up a content section, the Content Property Definition group box lists the key properties defined for the content type in the content catalog. You can add other properties as required.
Note: If the content type is a free form content type, a description field, JPM_ADHOC_DESCR, is included. You can add any other properties as required.
See Understanding Content Type Properties.
|
Field or Control |
Definition |
|---|---|
| Field Name |
Displays the name of the field for the property that is part of the content type definition. If you are adding a new property, click the Add Property link to select a field name from the available options. Enter one or more of the twenty custom field values JPM_PROMPT_1 through JPM_PROMPT_20 to present to the user a list of values defined in on the Custom Prompt Page. |
| Label Text |
Displays the label specified for the field if the property is part of the content type definition. If you are adding a new property, enter the text that you want to appear for this field on the profile pages. Note: You should choose a meaningful label for the property so that users clearly understand what kind of information to enter in the field when they create profiles. |
| Add Property |
Click this link to add a property to the section. Use the Property Category field to narrow your property search by category. You an also copy profile properties from another profile type using the Copy from another Profile Type icon. See profile content information under Understanding Profile Management. |
Content Properties Group Box: Property Attributes Tab
Access the Property Attributes tab on the Content Section page.
Image: Content Section page: Property Attributes tab
This example illustrates the fields and controls on the Content Section page: Property Attributes tab. You can find definitions for the fields and controls later on this page.
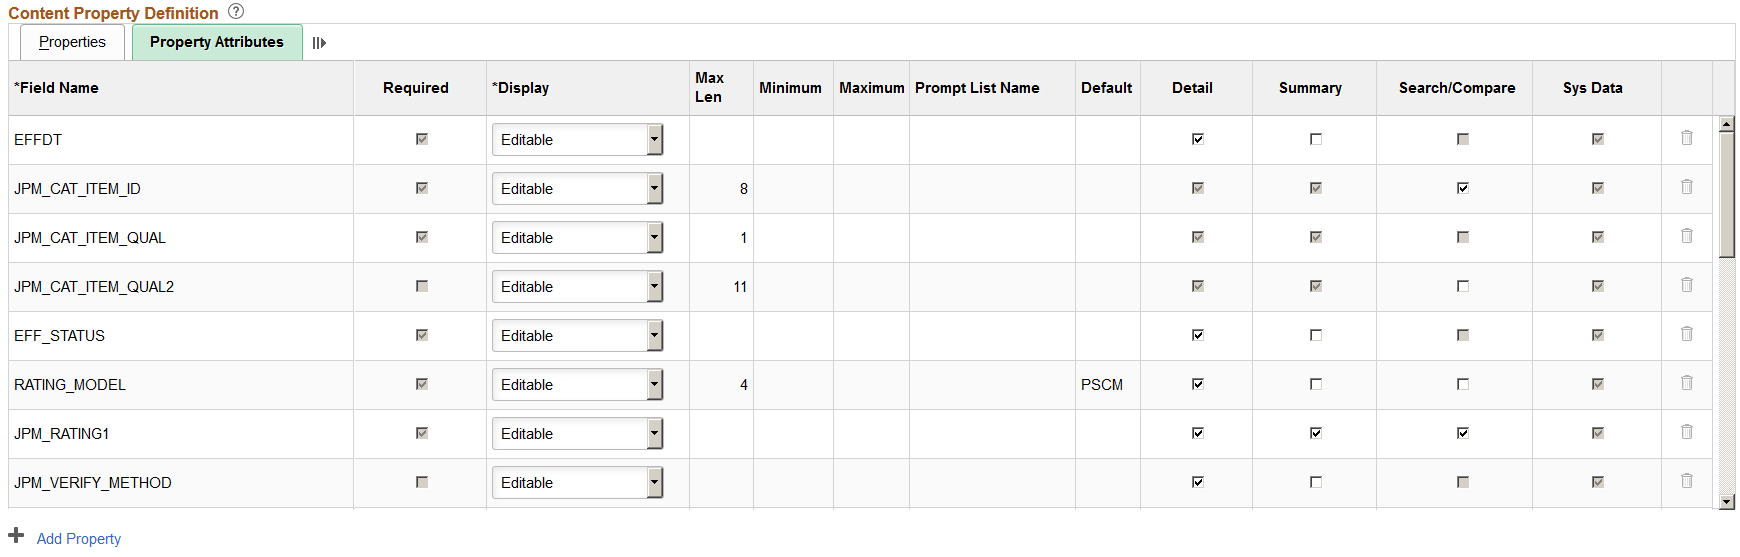
Note: New properties should not be specified with an attribute of Required if profiles already exist with that content. Caution should be used when changing the Maximum Length value. If integrations exist with other products that leverage the legacy COMPETENCIES and ACCOMPLISHMENTS data model, then truncation of data should be avoided.
See Manage Profiles Integrations.
|
Field or Control |
Definition |
|---|---|
| Required |
Select to make a property required when creating a profile using this profile type. If the check box is selected, users must complete the field when they set up a profile. |
| Display |
Select whether the property should be available for entry (Editable), unavailable for entry (Display), or hidden (Hidden) on the profile pages. The system populates the property with the value you enter in the Default Value field. If you select Editable, the system populates the default value at the profile, but users can override that value. |
| Max Len (maximum length) |
This field applies to character properties only. If you added the property to the profile type, enter a value that is less than or equal to the field length of this property. |
| Minimum and Maximum |
These fields apply to numeric properties only. If you added the property to the profile type, enter the minimum and maximum values allowed when a user adds a profile item. |
| Prompt List Name |
Select a custom list for this field property. This field is available when you have selected from the user define properties JPM_PROMPT_1 through JPM_PROMPT_20 for a field property. |
| Default |
If you added the property to the profile type, enter the default value that will be assigned to this property when a user adds a profile item. When creating a profile item that contains the RATING_MODEL property, the system attempts to populate the RATING_MODEL property default first from the content catalog. If that does not exist, the default is assigned from this value entered for the Content Section. |
| Detail |
Select this check box if you want the field to appear on the details page for the content section. |
| Summary |
Select this check box to display the field on the summary page when creating or viewing a profile. Fields that are marked as summary automatically appear on the details page. |
| Search/Compare |
Select this check box if you want to include the property in the search index that is used by the search and compare profiles feature. The check box is display-only if the property is not supported by this feature. Note: The item ID (JPM_CAT_ITEM_ID) is automatically set to searchable if you make other properties in the content section searchable. |
| Sys Data (system data) |
Displays as selected if a PeopleSoft delivered and maintained value for this profile type. System data cannot be deleted. When you manually enter another property this check box is not selected. |
Role Security
Access the Content Section page, Role Security section (select a content type on the Add Content Section page or click the section name link on the Profile Types - Content page).
Image: Role Security section of the Content Section page
This example illustrates the fields and controls on the Role Security section of the Content Section page. You can find definitions for the fields and controls later on this page.
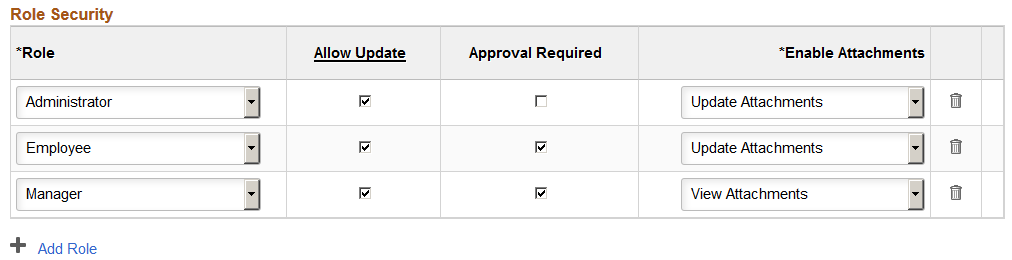
The Role Security group box lists the Profile Management roles that can access the content section when creating a profile.
Note: If you don't select a role for any content section, then users can't create profiles using this profile type.
|
Field or Control |
Definition |
|---|---|
| Role |
Select the role that you want to access the content section. There are three Profile Management roles available: Administrator: Administrators create profiles using the options in menu. Employee: Employees create their own profiles using the options available in Manager: Managers use the manager self-service transactions available in Note: These Profile Management roles should not be confused with Tools roles. |
| Allow Update |
Select this check box to enable users with the specified role to update the content section within a profile. If this check box is left deselected, users cannot add items to the content section in the profile. Note: This check box is not available for the NVQ, NVQ Units, or NVQ Elements content sections because it is not possible to update them within a profile. |
| Approval Required |
Select this check box if approval is required for a specific role to add, remove, or update profile items. |
| Enable Attachments |
Note: This option is available for Person profile types only and is not available for Non-Person profile types. Profile Management supports attachments on the fluid manager and employee self service <Content Type> Page, and on the classic administrator Add New <content type>, Update <content type>, or View <content type> Page. The attachments functionality is not delivered for the classic self service and approvals pages. Identify if a role can use attachments when accessing the profile pages. Options include:
|
| Add Role |
Click this link to add another role to the list of roles that have access to the profile type. |
Use the Profile Type - Associations page (JPM_JP_TYPE_ASSOC) to set up profile type associations.
Select the associations to which the profile type is linked. Associations are entities external to the Profile Management business process. Define the association options available on the Profile Association Options page. This is only available for profile types with a Non-Person usage.
Navigation
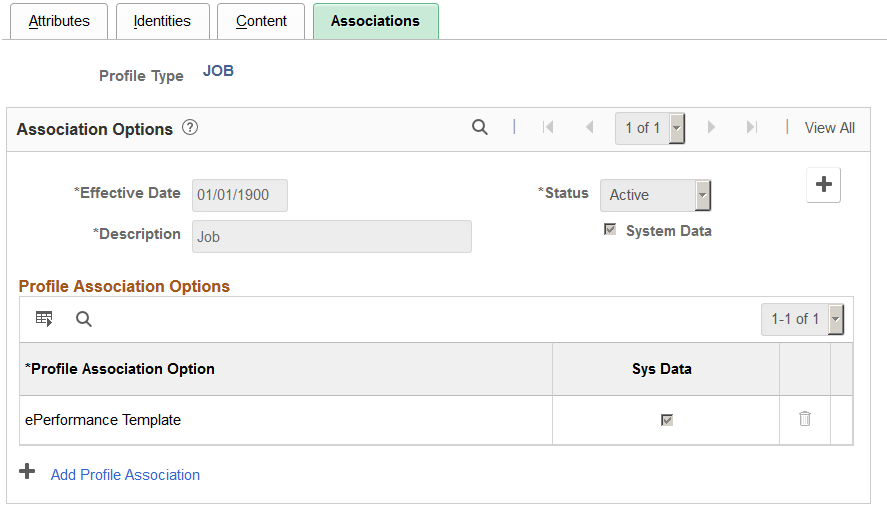
Image: Profile Types - Associations page
This example illustrates the fields and controls on the Profile Types - Associations page. You can find definitions for the fields and controls later on this page.
|
Field or Control |
Definition |
|---|---|
| Profile Association Option |
Select the object you want to link to the profile type. The objects available are determined by the profile association options enabled on the Profile Association Options page. The system allows multiple active profiles per association within a given profile type. |
| Add Profile Association |
Click this link to add another association to the profile type. |
Use the Clone Profile Types page (RUNCTL_JPM_CLONE) to clone profile types.
Create a new profile type by copying an existing profile type by running the Clone Profile Type process.
Navigation
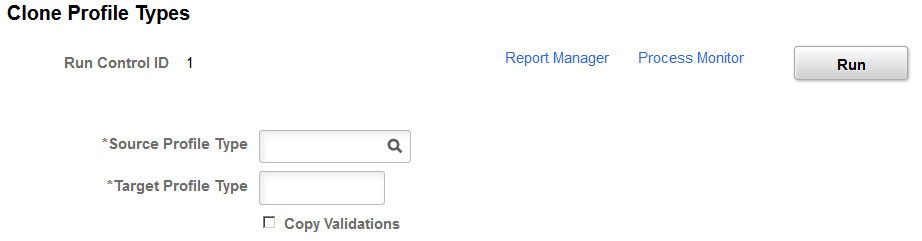
Image: Clone Profile Types page
This example illustrates the fields and controls on the Clone Profile Types page. You can find definitions for the fields and controls later on this page.
|
Field or Control |
Definition |
|---|---|
| Source Profile Type |
Enter the profile ID that you want to copy. |
| Target Profile Type |
Enter the new profile ID that you want to create. |
| Copy Validations |
Select this check box to copy the validations associated with the source profile type. Only the PERSON profile type has system delivered validations. |
Use the Assign Profile Type Defaults page (JPM_DFLT_JP_TYPES) to assign profile type default person and non-person profile types available to other product features and services.
Navigation
Image: Assign Profile Type Defaults page
This example illustrates the fields and controls on the Assign Profile Type Defaults page. You can find definitions for the fields and controls later on this page.
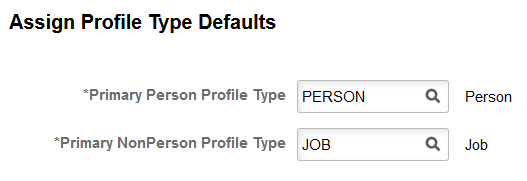
The purpose of the Assign Profile Type Defaults page is to provide a primary person and non-person profile type for business processes within Profile Management and also the products that interface with Profile Management, such as Federal Hire, Military, NVQ, Talent Acquisition Management, and so forth. If you change these profile types from the delivered profile types, be sure that the new profile types will support the interface of those workflows that you use. For instance, if you use Military Rank, make sure you have a content section that matches the Worn Rank content section in the PERSON profile type.
Important! Before making changes to this page, you must consider all integration points related to this data.
Additional setup may be required within the specific business processes to specify further interfacing options with Profile Management.
|
Field or Control |
Definition |
|---|---|
| Primary Person Profile Type |
Specify the profile type that will serve as the default person profile for other business processes in the system interfacing with Profile Management. This default value can be overwritten at the individual business process level. |
| Primary NonPerson Profile Type |
Specify the profile type that will serve as the default non-person profile for other business processes in the system interfacing with Profile Management. This default value can be overwritten at the individual business process level. |