Maintaining Profiles
These topics provide an overview of profiles and profile types, profile copy, import, and syndication, list prerequisites and common elements, and discuss how to maintain profiles.
|
Page Name |
Definition Name |
Usage |
|---|---|---|
|
JPM_PROFILE_PERS |
Create and update person profiles. |
|
|
HR_TBH_EULIST |
Select a template or person that is associated with a profile-related template to add or update a a person’s profile using the Smart HR pages. For more information on using Smart HR templates and transactions, see Using Smart HR Templates and Transactions. |
|
|
JPM_PROFILE1 |
Create and update non-person profiles. |
|
|
Search for Profiles Page |
JPM_SRCH_TRANSFER |
Lists the profile search queries that are defined for administrators. Select the search query that you want to run. |
|
JPM_UPD_GROUP_SEC |
Add and update profile groups for a profile. |
|
|
JPM_PROF_INFO_SEC |
Enter additional profile information such as comments or the owner ID for non-person profiles. |
|
|
Add New <content type>, Update <content type>, or View <content type> Page |
JPM_PROF_DTL_SEC |
Add, update, and view profile item details. |
|
Content Item Details Page |
JPM_CAT_ITEMS_DSP |
View details about a specific content item. |
|
JPM_PROF_ATTACH |
Add, view, or delete attachments associated with a specific profile content item. |
|
|
HCR_RATEMDL_POPUP |
Displays the rating model details of the selected profile item. When accessing the page from the update or add new pages, the you can modify the rating as well. |
|
|
JPM_PROF_DETAIL |
Add, update, or view profile items that are related to a selected profile item. |
|
|
JPM_PROF_HIST_SEC |
View profile item rows for different effective-dates. |
|
|
Items Awaiting Submission Page Pending Items Page Denied Items Page |
JPM_JP_PRF_VW_CHGS |
Lists the profile items that are awaiting submission for approval, pending approval, or have been denied approval. Items that have been submitted for approval can't be changed until they have been approved. Items awaiting submission can be deleted but not updated. |
|
View <content type> Page |
JPM_APR_DTL_SEC |
View details of a profile item. |
|
Copy Items from Job Profile Page |
JPM_COPY_PROFL_SEC |
View a list of job profiles from which you can copy profile items. Select the profile from which you want to copy profile items and click the Select button. The system adds the profile items to the employee's profile. If only one job profile exists, the system automatically copies the items to the profile and displays a message saying how many items were copied. |
|
Select Profile Page |
JPM_JP_REL_PRF_EMP |
View a list of the job profiles that are related to an employee's job data. Select the profile that you want to view and click the Continue button. The Non-person Profile page appears. |
|
Person Search - Simple Page |
HR_PSS_SEARCH |
Search for and select a person. |
|
JPM_PROF_SYND_SEC |
View the syndication source and target profiles. You can also add and remove syndicated content on this page. |
|
|
JPM_PROF_SRCH_SEC |
Select the profiles from which content will be imported or syndicated. |
|
|
JPM_JP_PID_SEC |
Add or edit profile identities associated with the profile. |
|
|
JPM_JP_ASSC_SEC |
Add or update profile associations for the profile. |
|
|
JPM_JP_PERSUMM_SEC |
View a list of changes that have been made to the person profile that require approval. You can also enter comments for the approver. Click the Submit button to submit the changes for approval or click Cancel to return to the Person Profile page and not submit the items for approval. These items will not be available to other processes until they have been submitted for approval and approved. |
|
|
JPM_JP_NPSUMM_SEC |
View a list of changes that have been made to the non-person profile that require approval. You can also enter comments for the approver. Click the Submit button to submit the changes for approval or click Cancel to return to the Non-person Profile page not submit the items for approval. |
|
|
Submit Confirmation Page |
JPM_JP_PROFL_APPR |
View confirmation messages of changes have been submitted. The Approval Routing group box provides a summary of the approval path. It shows the number of approvers and the sequence of approvals. |
|
JPM_JP_SYND_EXC1 |
Display the syndication exceptions for a profile. Syndication exceptions occur when an content item is syndicated from multiple source profiles but has different property values from each source profile. |
|
|
JPM_JP_SYND_EX_SEC |
Display details of profile items with exceptions. |
Image: Format of a profile page
Administrators use the Person Profile page and the Non-person Profile page to create and maintain profiles. Both pages have a similar format. This diagram and the following text identify the elements in these pages:
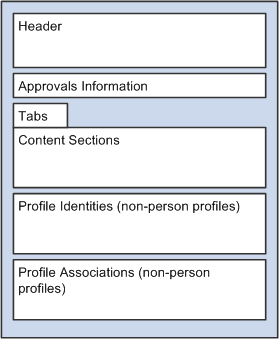
Here is a description of the parts of a profile:
Header.
The header includes general information such as the profile ID, profile type, profile status, and effective date. For a person profile, the header includes the person ID.
Approvals Information.
This section includes links that indicate how many profile items are saved (but not submitted for approval), pending approval, approved, or were denied approval.
Note: The content section on the profile pages displays approved items only. Any new profile items, changes to existing items, or deletions that have not been approved do not appear in the content sections. Use the links in this area of the profile to view the changes that are unapproved.
Tabs.
Profile are grouped together by tabs. When you select a tab, the system displays the content sections defined for that tab. The naming and order of the tabs in a profile are determined by the profile type.
Content sections.
Tabs consist of one or more content sections. The content sections are defined by the profile type. Users add profile items to the content sections.
Profile identities (non-person profiles only).
On the Non-person Profile page, the Profile Identities grid lists the entities to which the profile is linked. The type of profile identities available are controlled by the profile type selected. For example, if the profile type allows job codes to be linked to the profile, users can insert a row for a job code for the profile, but they cannot link the profile to a position number. An active profile must be linked to at least one profile identity.
Profile Associations (non-person profiles only).
On the Non-person Profile page, the Profile Associations grid lists any entities to which the profile is associated. Profile associations are entities, such as ePerformance templates, that are outside of the Manage Profiles business process. The profile type defines the profile associations available.
Image: The profile type serves as a template for the tabs and content sections in a profile
This diagram shows how the tabs and content sections of a profile are determined by the tabs and content sections of the profile type; in this example, the three tabs in the profile type automatically exist in the related profile, as do the content sections within the tabs:
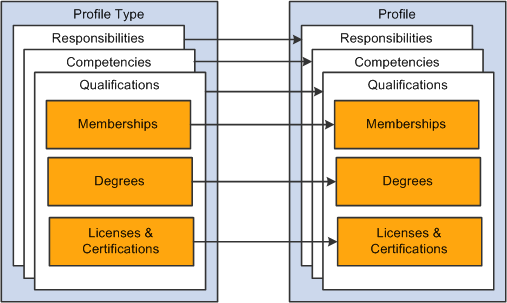
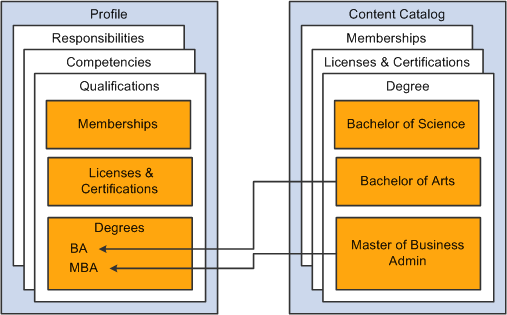
The profile type provides the structure for a profile, it does not provide the actual content. To complete the profile, users add profile items, such as competencies or education information, by selecting from the content items available in the content catalog.
Note: The structure of the content items and their data (other than the content item ID) do not have any impact on the profile item structure.
Image: Adding items to profiles by selecting from the content catalog
This diagram illustrates how you complete the Degrees content section by selecting from degrees such as Bachelor of Science, Bachelor of Arts, and Master of Business Administration, all of which are defined in the content catalog:
Note: The profile type controls whether approvals workflow is triggered when the profile is updated, and the Profile Management roles that can view and update each section of the profile.
Often the same profile items appear in related profiles. For example, employees' profiles may contain profile items that also appear in the profiles for their job code or position. Non-person profiles for similar or related jobs may have common profile items. To streamline the process of creating and maintaining profiles, Manage Profiles provides three ways to copy profile items. You can:
Load profile items into a person profile from a related non-person profile.
The Profile Actions field on the Person Profile page has an option, Copy from Job Profile, that enables you to select a non-person profile from a list of related profiles. The system determines which non-person profiles are related to an employee by searching the employee's job data record. If the employee has multiple jobs, the system checks all the person's active jobs for matching non-person profiles. For example, the system checks for active profiles that match the employee's job codes, positions, and salary grades.
Import content into a non-person profile from another profile or from the content catalog.
When you import content, the system copies the profile items from the source profile into the target profile. Any changes made to the source profile or content items after the import do not affect the target profile. Use the Import Content link on the Non-person Profile page to import content.
Syndicate content into a non-person profile from another profile.
When you syndicate content, the system copies profile items from the source profile into the target profile. However, it also sets up a relationship between the source profile and the target profile that contains the syndicated content. Whenever syndicated content is updated, the changes are incorporated into the target profiles automatically. Use the Syndicate Profile profile action on the Non-person Profile page to syndicate content.
Note: The copy from job profile, import, and syndicate actions copy profile content that is not defined as free form content. Import and syndicate copy the properties that are defined in the target profile type definition only. Additional properties in the non-person (source) profile type are not copied. If the target profile has additional properties that are not used in the source profile, the system uses the default values defined for these properties. The default values can be defined for that property in the content section of the profile type.
Setting Up Syndication
Syndication reduces maintenance by enabling administrators to set up common content once in a source profile and copy it to multiple target profiles. You can also syndicate content through a series of related profiles.
Image: Syndication propagates a job function profile through the job family, job code, and position number profiles
This diagram shows how you could set up a job function profile and syndicate the content through the hierarchy to job family, job code, and position number profiles:
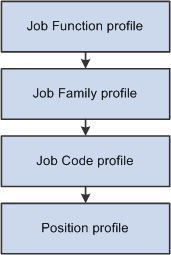
If you set up cascading syndication, we recommend that you use it in a similar hierarchical method.
When setting up syndication, you should consider what happens when the target profile already includes an item that is in the syndicate source profile. For example, if you syndicate content from more than one source profile into a target profile, it is possible for the same item to occur in the source profiles but with different values. These are known as syndication exceptions. In this situation, the system updates the target profile with the values from the source profile, effectively overriding the existing values.
View syndication exceptions using the Syndication Exceptions page.
Before you can syndicate content:
Configure the application server for publish/subscribe.
Configure the integration broker and make it active.
Ensure that the:
The EOEN_MSG_CHNL queue is running.
The service operation EOEN_MSG is active.
The associated routing definitions are active.
Set up the Event Manager.
Make the event JPMProfileItemsUpdated and the associated event handlers active. We also recommend that you enable logging for the event and handler.
See PeopleTools: Integration Broker and PeopleTools: System and Server Administration.
|
Field or Control |
Definition |
|---|---|
| Status |
Select one of these values: Active: If the profile type does not require approval, update the status to Active to make the profile available to other users. Inactive: Profiles that are inactive are not available to employees and managers in self-service. When you update the status to Inactive, the system removes the profile from the profile groups to which it belongs. When you create a non-person profile, the default status is Inactive. You can only update the status to Active when the profile is linked to one or more profile identities and approved. Employees can view active non-person profiles only. Managers can view both active and inactive non-person profiles. |
| Profile Type |
Select the profile type for the new profile. When you update an existing profile, the Profile Type field is display-only. The profile type determines the tabs that appear in the profile. |
| Profile Actions |
This field appears on the Non-person Profile and Person Profile pages. Select an action and click the Go icon if you want to do one of the following, if the action has been enabled on the Profile Actions Page:
See Profile Actions Page. |
Use the Person Profile page (JPM_PROFILE_PERS) to create and update person profiles.
Navigation
This menu navigation returns profiles only for people who already have a succession plan defined.
Image: Person Profile page
This example illustrates the fields and controls on the Person Profile page. You can find definitions for the fields and controls later on this page.
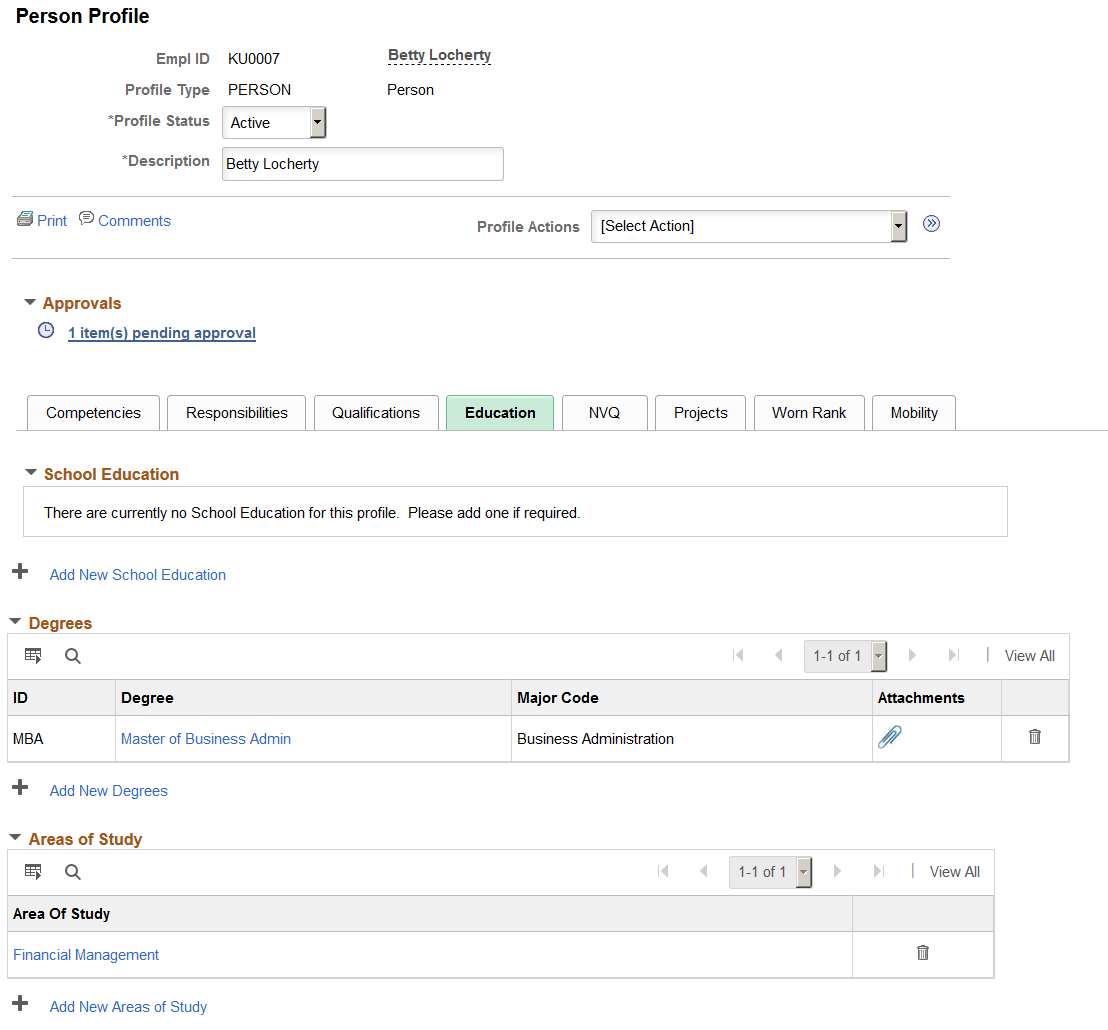
Note: A Job Data row is required to create a Person profile for an individual. Therefore, when creating a profile for a person of interest (POI), he or she must also have a Job Data record.
|
Field or Control |
Definition |
|---|---|
| Profile Status |
Select the status of the profile. Options are Active or Inactive. When a worker's job is terminated, the Event Manager event InactivatePersonProfile event is raised to determine if all the worker's job assignments are inactive. If all job assignments are inactive, then all person profiles for that employee ID are also changed to Inactive. See Events and Notifications Framework, “Setting Up Events”. |
 |
Click the Print link to display the profile in a PDF file that you can print from Adobe Acrobat. BI Publisher technology generates the printable file using the same template and layout as the Person Profile batch report. |
 |
Click the Comments link to display the Profile Comments page and enter additional comments about the profile. |
| Profile Actions |
Select an action you want to perform and click the Go icon. Values on the Person Profile page include those profile actions that are enabled on the Profile Actions Page for the administrator. Each of these actions opens a corresponding page where you can view or update information related to the action. Note: When during setup there are no action types enabled for a profile user role, the Profile Actions field is hidden on the page. |
Note: The Person Profile page displays approved items only. Any new profile items, changes to existing items, or deletions that have not been approved do not appear on the profile content sections. Instead links appear on the page that indicate how many items have been saved but not submitted, are pending approval, or denied approval. Use these links to view the changes.
|
Field or Control |
Definition |
|---|---|
 <number> item(s) awaiting
submission for approval <number> item(s) awaiting
submission for approval |
Click this link to access the Items Awaiting Submission page and view the profile items that have been saved but not submitted for approval. This includes profile items that have been added, amended, or deleted. When a profile item has been saved but not submitted, the Submit button appears after the <number> item(s) awaiting submission for approval link. When you click the Submit button, the system displays the Summary of Changes page (Person Profile - Summary of Changes Page or Non-person Profile - Summary of Changes Page), where newly added items can be submitted for approval. The system will also display the Summary of Changes page upon saving the profile page when there are items awaiting submission. If approval is not required, the system automatically changes the status of the items approved. |
| Submit |
Click this button if there are any items awaiting to be submitted for approval. The Person Profile - Summary of Changes page appears and lists the new, deleted, and changed items requiring approval. This button appears only when there are items awaiting submission for approval. |
 <number> item(s) pending approval <number> item(s) pending approval |
Click this link to access the Pending Items page and view the profile items that have been submitted for approval but are pending approval. |
| <number> item(s) approved (since <date>) |
Displays the number of items that have been approved. The date displayed is determined by the value in the Days of Approval History field on the Profile Management Installation Page. |
| <number> items denied (since <date>) |
Click this link to access the Denied Items page and view the profile items that have been submitted for approval but the approver denied. The date displayed is determined by the value in the Days of Approval History field on the Profile Management Installation page. |
<Content Section>
The system enables the administrator to group profile content sections into separate tabs. When you select a tab, the page displays content sections associated with that tab.
Note: The tabs that appear on the profile and content sections within each tab are determined by the profile type selected. Define the tabs and content sections for profile types using the Profile Type - Content page.
|
Field or Control |
Definition |
|---|---|
| Attachments |
This column will display if attachments have been enabled for the administrator role. Click this icon to access the Profile Item Attachments Page and add, view, or delete attachments. For information on how to enable attachments for profile types, see the Content Section Page. |
| Add New <content type> and <content item> |
Click these links to add or update profile items. The Add <content type> page or Update <content type> page appears. The fields on this page are determined by the profile type associated with the profile. See Add New <content type>, Update <content type>, or View <content type> Page. |
 |
Click the View History icon to display the View Profile Item History page. This icon appears only when a profile item has more than one effective-dated row. |
| Save |
Click this button to save the changes you have made. The system updates the Person Profile page to display approved items or items not requiring approval within the profile content sections. Pending items and items awaiting to be submitted do not appear in the profile content sections. If you are creating a new profile that requires approval of all it's items, no profile items will appear in the content sections upon saving. However, the system displays the item(s) awaiting submission for approval or item(s) pending approval links to enable you to view the changes you have saved but not submitted or that are pending approval. Once these items have been approved, then they will appear in the content sections. Upon saving, the system does the following:
Note: The Approval Framework is configured for automatic approval of administrators. Even if a content section is defined in the profile type configuration as requiring approval for the administrator, when you save you will see the change displayed on the Summary of Changes page; however, when the administrator clicks Submit, the system display a message that no approvals are required, and changes will be immediately reflected in the profile. |
Use the Non-person Profile page (JPM_PROFILE1) to create and update non-person profiles.
Navigation
Image: Non-person Profile page (1 of 2)
This example illustrates the fields and controls on the Non-person Profile page (1 of 2). You can find definitions for the fields and controls later on this page.
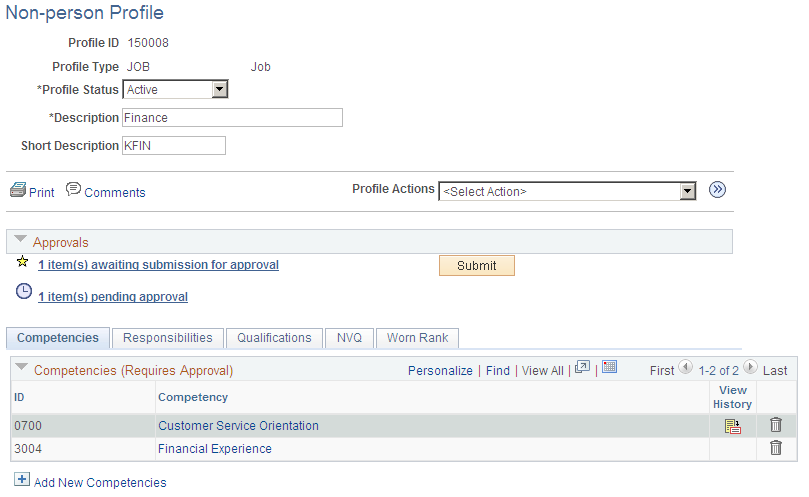
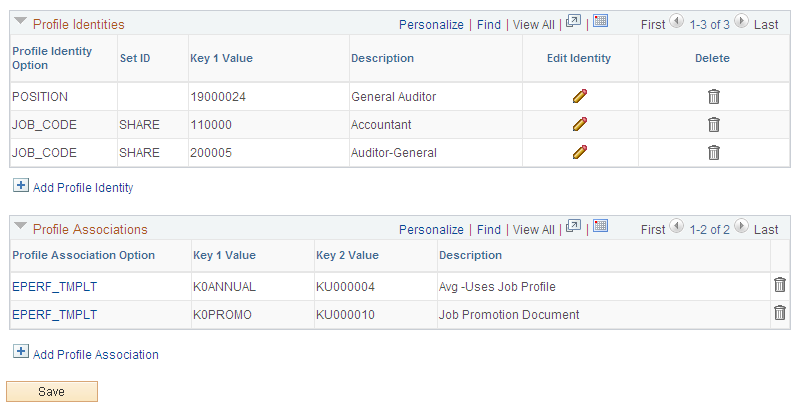
Image: Non-person Profile page (2 of 2)
This example illustrates the fields and controls on the Non-person Profile page (2 of 2). You can find definitions for the fields and controls later on this page.
|
Field or Control |
Definition |
|---|---|
 |
Select the Print icon to display the profile in a PDF file that you can print from Adobe Acrobat. BI Publisher technology generates the printable file using the same template and layout as the Non-Person Profile batch report. |
 |
Select the Comments link to display the Profile Comments page and enter the employee owner ID as well as additional comments about the profile. |
| Profile Actions |
Select an action you want to perform and click Go. Values on the Non-person Profile page include those profile actions that are enabled on the Profile Actions Page for the administrator. Each of these actions opens a corresponding page where you can view or update information related to the action. Note: When during setup there are no action types enabled for a profile user role, the Profile Actions field is hidden on the page. See Common Elements Used in Managing Profiles. See Profile Actions Page. |
Note: The Non-person Profile page displays approved items only. Any new profile items, changes to existing items, or deletions that have not been approved do not appear within the profile content sections. Instead, links appear on the page that indicate how many items are awaiting submission, are pending approval, or have been denied approval. Use these links to view the changes.
|
Field or Control |
Definition |
|---|---|
 <number> item(s) awaiting
submission for approval <number> item(s) awaiting
submission for approval |
Click this link to access the Items Awaiting Submission page and view the profile items that have been saved but not submitted for approval. This includes profile items that have been added, amended, or deleted. When a profile item has been saved but not submitted, the Submit button appears after the <number> item(s) awaiting submission for approval link. When you click the Submit button, the system displays the Non-person Profile - Summary of Changes page, where changes to items requiring approval can be submitted. The system will also display the Non-person Profile - Summary of Changes page upon saving the profile page when there are items awaiting submission for approval. |
| Submit |
Click this button if there are any items awaiting to be submitted for approval. The Non-person Profile - Summary of Changes page appears and lists the new, deleted, and changed items requiring approval. This button appears only when there are saved items awaiting submission for approval. |
 <number> item(s) pending approval <number> item(s) pending approval |
Click this link to access the Pending Items page and view the profile items that have been submitted for approval but are pending approval. |
| <number> item(s) approved (since <date>) |
Displays the number of items that have been approved. The date displayed is determined by the value in the Days of Approval History field on the Profile Management Installation page. |
| <number> items denied (since <date>) |
Click this link to access the Denied Items page and view the profile items that have been submitted for approval but the approver denied. The date displayed is determined by the value in the Days of Approval History field on the Profile Management Installation page. |
The system enables the administrator to group profile content sections into separate tabs. When you select a tab, the page displays content sections associated with that tab.
Note: The tabs that appear on the profile and content sections within each tab are determined by the profile type selected. Define the tabs and content sections for profile types using the Profile Type - Content page.
See Profile Types - Content Page.
|
Field or Control |
Definition |
|---|---|
| Add New <content type> and <content item> |
Click these links to add or update profile items. The Add <content type> page or Update <content type> page appears. If the origin of the content item is from another source profile or another product such as ePerformance, the system displays the View <content type> page. The fields on this page are determined by the profile type associated with the profile. See Add New <content type>, Update <content type>, or View <content type> Page. |
| Source Profile |
Click the source profile link to view details about the source profile from which this item was syndicated. The system displays this field only when items have been syndicated into the profile. |
 |
Click the View All Rows icon to display the View All Rows page. The system displays this icon when a profile item has more than one effective-dated row only. |
| Save |
Click this button to save the changes you have made. The system updates the Non-person Profile page to display approved items or items not requiring approval within the profile content sections. Pending items and items awaiting to be submitted do not appear in the profile content sections. If you are creating a new profile that requires approval of all it's items, no profile items will appear in the content sections upon saving until they have been approved. Upon saving, the system does the following:
Note: The Approval Framework is configured for automatic approval of administrators. Even if a content section is defined in the profile type configuration as requiring approval for the administrator, when you save you will see the change displayed on the Summary of Changes page; however, when the administrator clicks Submit, the system display a message that no approvals are required, and changes will be immediately reflected in the profile. |
Profile Identities
Expand this section to view a lists of the profile identities information to which the profile is linked.
|
Field or Control |
Definition |
|---|---|
 |
Click the Edit Identity icon to open the Profile Identity page and update an existing identity. |
| Add Profile Identity |
Click this link to add a profile identity to this profile. The system displays the Profile Identity page. |
Profile Associations
Expand this group box to view a list of the associations for the profile. Profile associations are entities outside the Manage Profiles business process. PeopleSoft ePerformance templates are linked to profiles in this way.
Note: If a non-person profile type does not have an association specified in its configuration then the page will not display the Profile Associations grid.
|
Field or Control |
Definition |
|---|---|
| Profile Association Option |
Select the profile association ID link to view association details or update the effective date or status. The options available are determined by the profile type definition. |
| Add Profile Association |
Click to add a new profile association to this profile. The system displays the Profile Association page. |
Use the Update Profile Groups page (JPM_UPD_GROUP_SEC) to add and update profile groups for a profile.
Navigation
Select the Update Profile Groups value in the field on the Person Profile page or the Non-person Profile page and click Go.
Image: Update Profile Groups page
This example illustrates the fields and controls on the Update Profile Groups page. You can find definitions for the fields and controls later on this page.
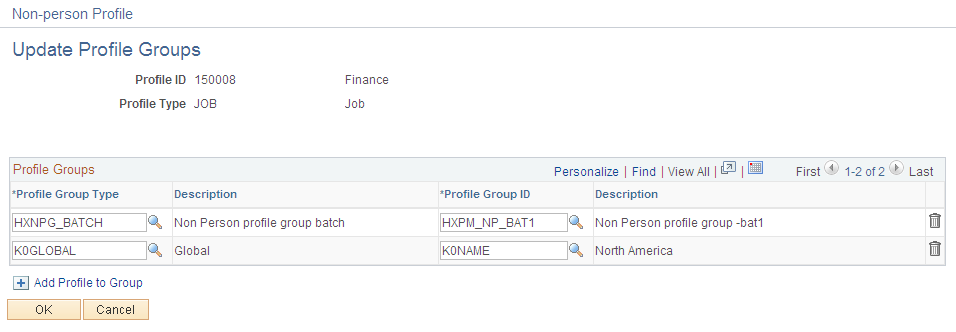
This page lists the profile groups to which the profile belongs.
|
Field or Control |
Definition |
|---|---|
| Profile Group Type |
Select the profile group type. |
| Profile Group ID |
Select the profile group you want to add to the profile. |
| Add Profile to Group |
Click this link to add another profile group to this profile. |
See Creating Profile Group Types and Profile Groups.
Note: Manually entered profiles may be deleted when this group is repopulated. This group is populated using preset group criteria. When the group is rebuilt the manually entered profiles will be deleted if they do not fit the criteria.
Use the Profile Comments page (JPM_PROF_INFO_SEC) to enter additional profile information such as comments or the owner ID for non-person profiles.
Navigation
Select the Comments link on the Person Profile page or the Non-person Profile page.
Image: Example of the Non-person Profile - Profile Comments page
This example illustrates the fields and controls on the Profile Comments page. You can find definitions for the fields and controls later on this page.
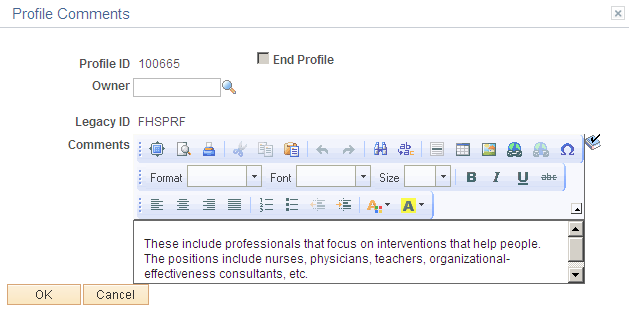
Note: The fields on the Profile Comments page for a Person Profile and a Non-person Profile vary only slightly.
|
Field or Control |
Definition |
|---|---|
| End Profile |
This field is available on the Non-Person Profile - Profile Comments page. Displays whether the profile type is used for end profiles or not. End profiles can be viewed from self service and must have a profile identity before they can be set to a status of active. |
| Legacy Profile ID |
This field is available on the Non-Person Profile - Profile Comments page. Displays the legacy profile ID assigned to the profile during upgrade. This field is displayed for some types of profiles that existed in earlier versions of PeopleSoft HR. |
| Owner |
This field is available on the Non-Person Profile - Profile Comments page. Select the employee ID of the profile owner. Use this field if you want to assign owners to profiles for reporting or other purposes. |
| Comments |
Enter additional comments about the profile. |
Use the Add New, Update, or View <content type> pages (JPM_PROF_DTL_SEC) to add, update, and view profile item details.
Navigation
Click a content item or the Add New <content type> link for a profile content item ID on the Person Profile page or the Non-person Profile page.
(When you click the profile content item ID link for an item that is from another source profile, the View or Update <content type> page appears.)
Image: Add New <content type> page for a person profile
This example illustrates the fields and controls on the Add New <content type> page for a person profile. You can find definitions for the fields and controls later on this page.
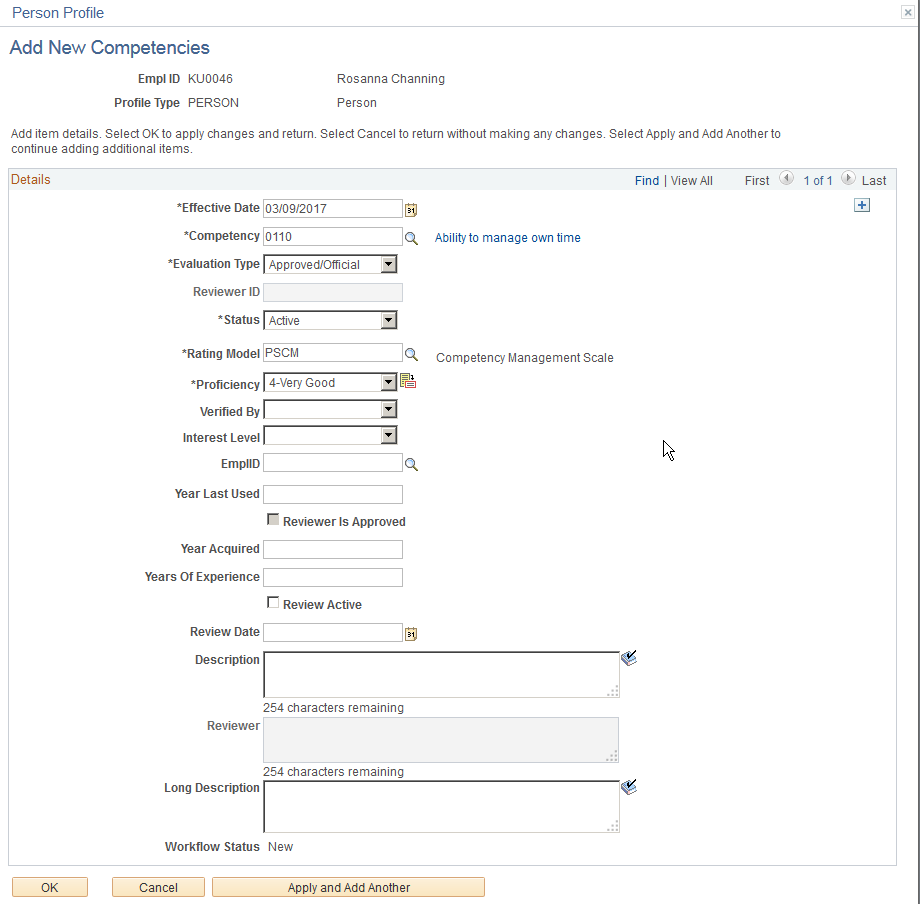
Image: Add New <content type> page for a non-person profile
This example illustrates the fields and controls on the Add New <content type> page for a non-person profile. You can find definitions for the fields and controls later on this page.
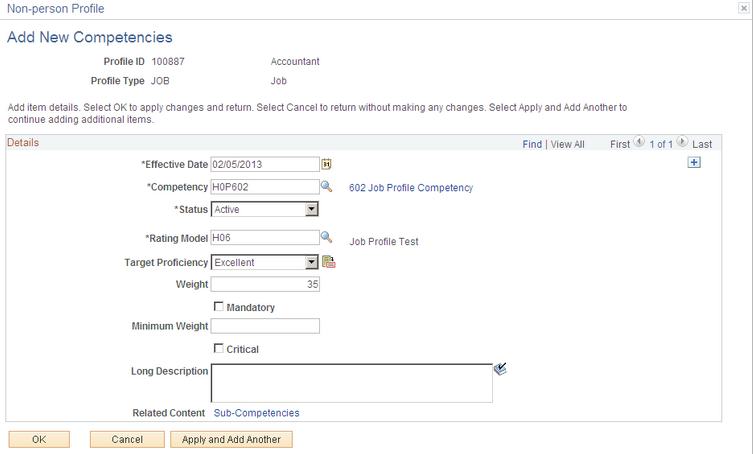
Note: The fields and field labels that appear on this page vary according to the item's content type and the content section definition in the profile type. Define content sections using the Profile Types - Content Page.
In the administer profile pages, when you look up a content item ID, the system enables you to use these items as part of the search criteria:
Content item ID
Content group type
Content group
Description
The content item name, such as the 601 Job Profile Competency shown in the previous screen shot example, appears as a link. Select this link to open the Content Item Details page to view more information about this item.
|
Field or Control |
Definition |
|---|---|
 (Rating Detail icon) (Rating Detail icon) |
Select this icon button to open the Rating Model page and view rating model details of the selected item. When accessing the page from the update or add new pages, the you can modify the rating as well. |
| Related Content |
Click the link associated with this field to access the Update <Related Content Item> Page where you can add, update, and view items that are related to the selected profile item. This link appears only for items with a child relationship in the Content Catalog where the child content section is included in the profile type definition. Note: If you are adding a parent item, the system does not automatically add related items for it unless you click the Related Content link. |
| OK |
Click to keep any updates that you make on the profile detail or on the related items pages. If you deleted a parent item row, the system deletes all of its related items. |
Use the Profile Item Attachments page (JPM_PROF_ATTACH) to add, view, or delete attachments associated with a specific profile content item.
Navigation
Click the Attachments icon from a row on the Add New <content type>, Update <content type>, or View <content type> Page.
Note: The Attachments column and icon appear when attachments have been enabled for the Administrator role on the Content Section Page.
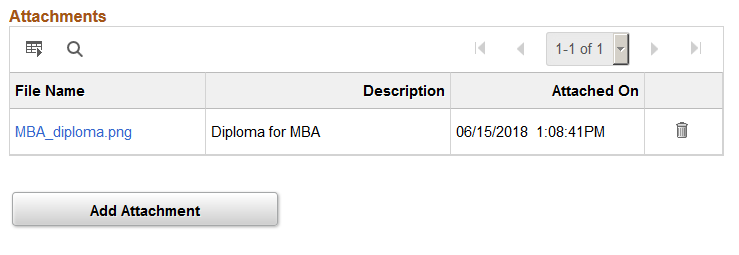
Image: Profile Item Attachments page
This example illustrates the fields and controls on the Profile Item Attachments page. You can find definitions for the fields and controls later on this page.
|
Field or Control |
Definition |
|---|---|
| File Name |
Displays the file link to the attachment. Click this link to view the file attachment. |
| Description |
Enter a short description to identify the file. If you do not enter a description when adding the file, this field will be blank. |
| Delete icon |
Click this icon button to remove the attachment from the profile content item. |
| Add Attachment |
Click this button to open the File Attachment page to upload files. |
The following video provides an overview and demonstration of the Fluid Attachment framework:
Image Highlights, PeopleSoft HCM Update Image 27: Attachment Capability Added to Profile Management
Use the Update <Related Content Item> page (JPM_PROF_DETAIL) to add, update, or view profile items that are related to a selected profile item.
Navigation
Click the related content link on the Add New <content type>, Update <content type>, or View <content type> Page.
Image: Update <Related Content Item> page
This example illustrates the fields and controls on the Update <Related Content Item> page. You can find definitions for the fields and controls later on this page.
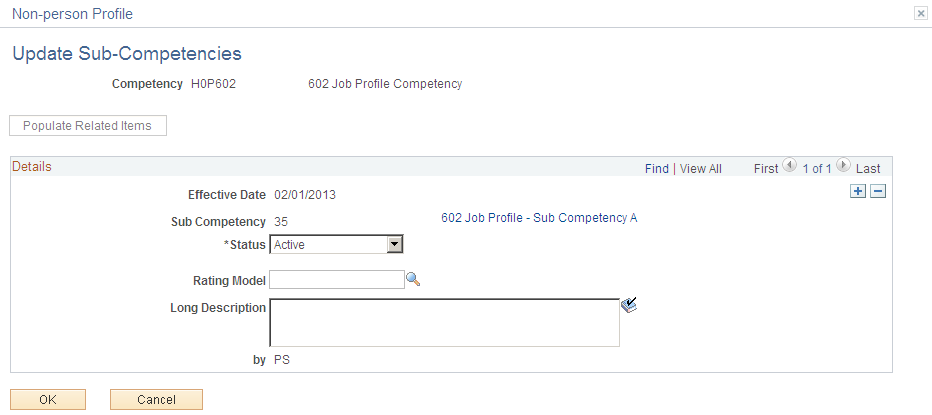
Use this page to add profile items to a profile that are related to an existing profile item. The related items that you can add to a profile are determined by the content section definitions in the profile type and the relationships defined in the content catalog.
Note: The fields and field labels that appear on this page vary according to the related item's content type and the content section definition in the profile type.
|
Field or Control |
Definition |
|---|---|
| Populate Related Items |
Clicked to have the system automatically insert all related items defined in the content catalog. It is also possible to manually select individual items from those defined in the content catalog. |
| OK |
Click to save the updates made on this page. The system does not merge the updates with the profile items until you click the OK button on the parent item page (Update <content type>or Add New <content type>). |
Use the View Profile Item History page (JPM_PROF_HIST_SEC) to view profile item rows for different effective-dates.
Navigation
Click the icon in the View History column on the Person Profile page or Non-person Profile page.
Note: Click the content type item to update historical information on the Update <content type> page by using the scroll arrows.
Image: View Profile Item History page
This example illustrates the fields and controls on the View Profile Item History page. You can find definitions for the fields and controls later on this page.

Note: The fields that appear on this page are configured in the Profile Type definition and are indicated as Summary.
This page lists the current, future, and historical rows for an item in a person or non-person profile, enabling you to track the history of a profile item. For example, you can use this page to review the changes to an employee's rating for a profile item, or the desired rating of an item in a job profile. Click the profile item link to view details of the profile item for the selected effective date.
Click Return to Profile to return to the Person Profile page or the Non-person Profile page, depending on the profile type.
Use the Profile Syndication page (JPM_PROF_SYND_SEC) to view the syndication source and target profiles.
You can also add and remove syndicated content on this page.
Navigation
Select the Profile Action Syndicate Profile from the Non-person Profile page and click the Go icon.
Image: Profile Syndication page
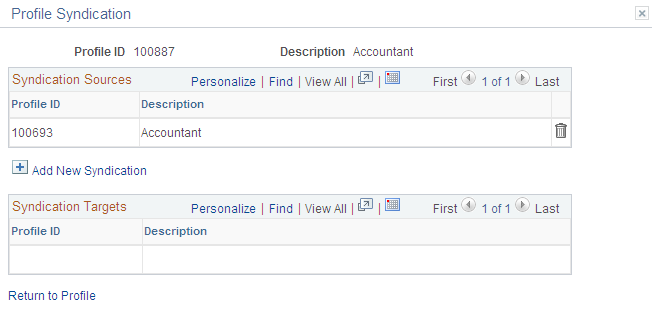
This example illustrates the fields and controls on the Profile Syndication page. You can find definitions for the fields and controls later on this page.
|
Field or Control |
Definition |
|---|---|
| Syndication Sources |
Lists the profiles that provide content for the selected profile. If you want to remove syndicated content, select the trash can icon. |
| Add New Syndication |
Click this link to open the Syndicate Profiles page to select the profiles from which content will be syndicated. |
| Syndication Targets |
Displays the profiles that are targets for syndication. These profiles contain content from the selected profile. If you make changes to the selected profile, the syndicated profiles are automatically updated. |
Use the Syndicate Profiles or Import Profile Items pages (JPM_PROF_SRCH_SEC) to select the profiles from which content will be syndicated or imported.
Navigation
Select Add New Syndication on the Non-person Profile - Profile Syndication page.
Select the Profile Action Import Profile Items from the Non-person Profile page and click the Go icon.
Image: Syndicate Profiles page
This example illustrates the fields and controls on the Syndicate Profiles page. You can find definitions for the fields and controls later on this page.
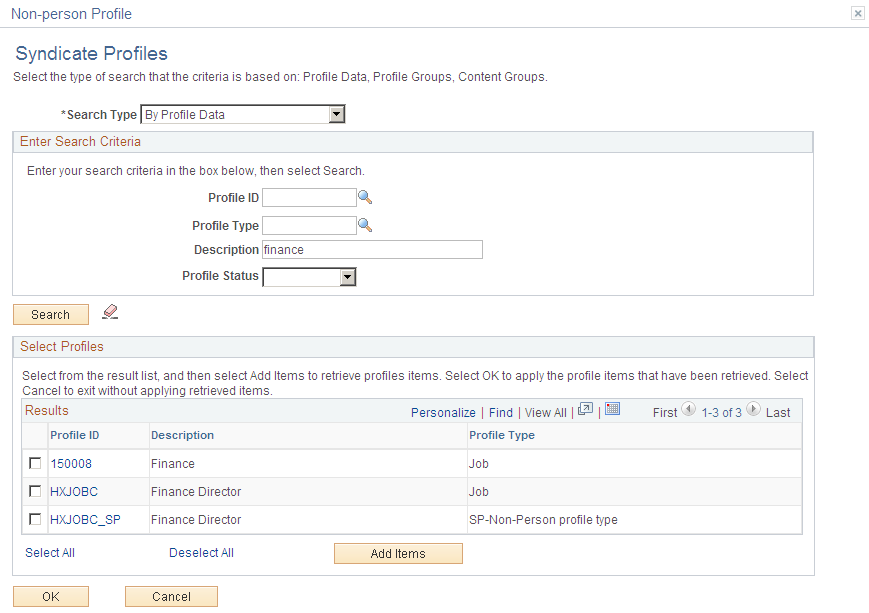
Image: Import Profile Items page
This example illustrates the fields and controls on the Import Profile Items page. You can find definitions for the fields and controls later on this page.
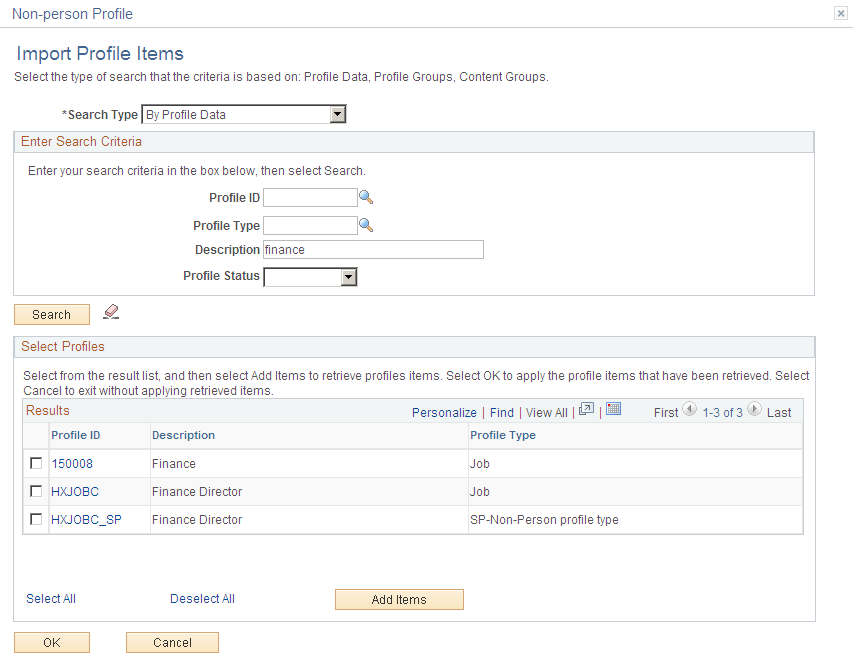
Note: The Syndicate Profiles page works the same as the Import Profile Items page where you select a search type and enter your search criteria.
The search types for the Syndicate Profiles page are By Profile Data and By Profile Groups.
The search types for the Import Profile Items page are By Content Groups, By Profile Data, and By Profile Groups.
When you syndicate content, you establish a relationship between the source profile and the target profile, such that changes to the source profile result in the same changes in the target profiles. View syndication relationships on the Profile Syndication page.
When you import profile items, the system does not establish a link between the source profile or content item and the target profile. This means that changes to the content of the source profile or item made after the import action do not affect the target profile.
Selecting a Search Type
When you first enter the page, it lists the search types available:
|
Field or Control |
Definition |
|---|---|
| By Profile Data |
Select to search for a non-person profile by profile ID, profile type, description, and status. This option is available on the Import Profile Items page and the Syndicate Profiles page. |
| By Profile Groups |
Select to search for a profile by limiting the search to a profile group type or profile group. This option is available on the Import Profile Items page and the Syndicate Profiles page. |
| By Content Groups |
Select to search for content items within a content group. This enables you to import multiple items within a content group in one step. This option is available on the Import Profile Items page. |
When you select the search type the Enter Search Criteria group box appears. When you enter search criteria and click Search, the Select Profiles and Results group boxes appear.
Enter Search Criteria
Select the search criteria and click the Search button to search for profiles that you want to use for the import or syndication. The fields in this group box vary depending on the search type you select.
Select Profiles
The Results group box lists the profiles or items that meet your search criteria. Select the profiles from which you want to import or syndicate content by selecting the check box next to the profile ID, profile group type, or catalog item.
|
Field or Control |
Definition |
|---|---|
| Profile ID or Content Item ID |
Click the profile ID or content item ID to view the profile or item. |
| Add Items |
Click to import or syndicate content from the profiles or content items you selected. A message will appear indicating how many profile items will be imported. Click OK to merge imported items in content sections of profile. The Cancel button returns to the profile without merging items. |
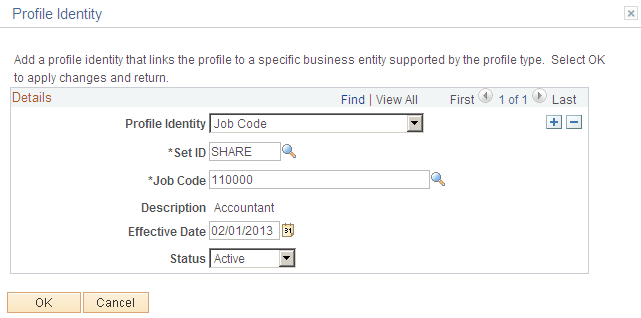
Use the Profile Identity page (JPM_JP_PID_SEC) to add or edit profile identities associated with the profile.
Navigation
Click the Add Profile Identity link or the Edit Identity icon in the Profile Identities grid area on the Non-person Profile page.
Image: Profile Identity page
This example illustrates the fields and controls on the Profile Identity page. You can find definitions for the fields and controls later on this page.
|
Field or Control |
Definition |
|---|---|
| Profile Identity |
Select the profile identity. The options available are determined by the profile type definition. |
| Set ID |
Select the set ID for the profile identity you want to link to this profile. This field appears if the profile identity selected has set ID as a key field. Set ID is a key field for job codes and salary grades. |
| Job Data, Job Family, Position Number, Salary Administration Plan, and Salary Grade |
Select the profile identity you want to link to the profile. The number of fields that appear depends upon whether the profile identity has one or up to four key fields. For example, if you select Salary Grade in the Profile Identity field, you can enter a salary administration plan and grade. The system displays the Key 1 Value and Key 2 Value fields for the salary administration plan and salary grade on the Non-person Profile page. |
Use the Profile Association pages (JPM_JP_ASSC_SEC) to add or update profile associations for the profile.
Navigation
Click the Add Profile Association link or the Profile Association Option name link in the Profile Associations grid area on the Non-person Profile page.
Image: Profile Association page
This example illustrates the fields and controls on the Profile Association page. You can find definitions for the fields and controls later on this page.
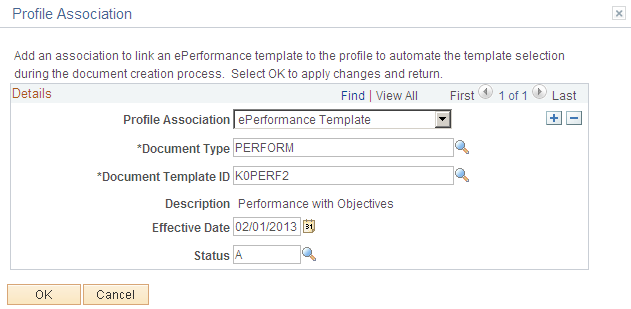
Profile associations are entities outside the Manage Profiles business process. PeopleSoft ePerformance templates are linked to profiles in this way.
|
Field or Control |
Definition |
|---|---|
| Profile Association |
Select the profile association that you want to link to the profile. |
| Document Type and Document Template ID |
Enter the document type and template ID that you want to link to the profile. The system displays these fields as the Key <number> Value fields on the Non-person Profile page. You can have up to four key fields. For example, if you select ePerformance in the field, the Key 1 Value field is for the Document Type and the Key 2 Value field is for document template ID. |
Use the Person Profile - Summary of Changes page (JPM_JP_PERSUMM_SEC) to view a list of changes that have been made to the person profile that require approval.
You can also enter comments for the approver. Click the Submit button to submit the changes for approval or click Cancel to return to the Person Profile page and not submit the items for approval. These items will not be available to other processes until they have been submitted for approval and approved.
Navigation
Click the Save button or the Submit button on the Person Profile page when there are items that need to be submitted for approval.
Image: Person Profile - Summary of Changes page
This example illustrates the fields and controls on the Person Profile - Summary of Changes page. You can find definitions for the fields and controls later on this page.
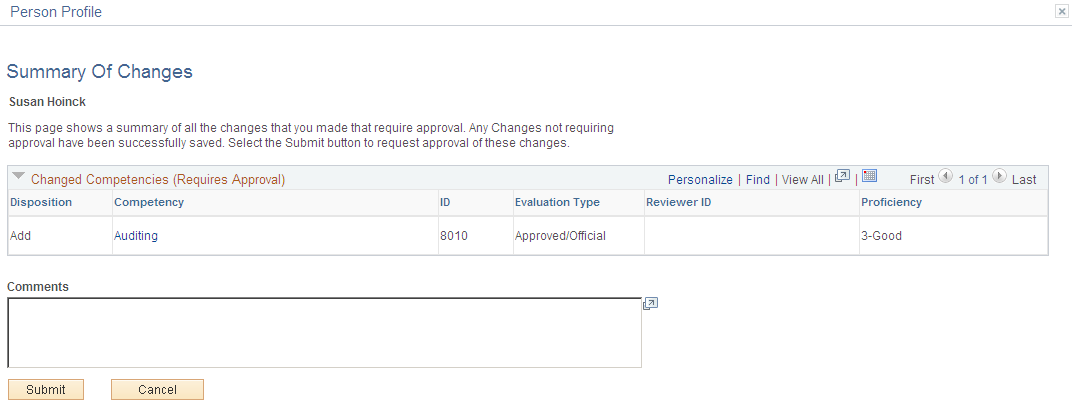
This page lists the changes that have been made to the person profile that require approval. The title of the scroll areas indicate that content sections that require approval. The fields displayed on this page are determined by the definition of the content section in the profile type. The properties in the content section with the Approval Required check box selected are displayed on this page only.
See Content Section Page.
|
Field or Control |
Definition |
|---|---|
| Profile Type |
Displays the profile type for the profile. |
| Disposition |
Displays the type of change made: Add: If it is a new profile item Change: If you have made any changes to the item properties. Delete: If you have deleted a profile item. |
| Comments |
Enter comments for the approver, if applicable. |
| Submit |
Click this button to submit the changes for approval. The system then displays the Submit Confirmation page. The Submit Confirmation page displays the approval routing. When the system needs to route items to an approver, the item's status is changed to pending. If the items do not require approval, the approval routing specifies that no approvals are required. Note: The Approval Framework is configured for automatic approval of administrators. Even if a content section is defined in the profile type configuration as requiring approval for the administrator, when you save you will see the change displayed on the Summary of Changes page; however, when the administrator clicks Submit, the system display a message that no approvals are required, and changes will be immediately reflected in the profile. |
| Cancel |
Click this button to return to the Person Profile page without submitting the items for approval. |
Use the Non-person Profile - Summary of Changes page (JPM_JP_NPSUMM_SEC) to view a list of changes that have been made to the non-person profile that require approval.
You can also enter comments for the approver. Click the Submit button to submit the changes for approval or click Cancel to return to the Non-person Profile page not submit the items for approval.
Navigation
Click the Save button or the Submit button on the Non-person Profile page when there are items that need to be submitted for approval.
Image: Non-person Profile - Summary of Changes page
This example illustrates the fields and controls on the Non-person Profile - Summary of Changes page. You can find definitions for the fields and controls later on this page.
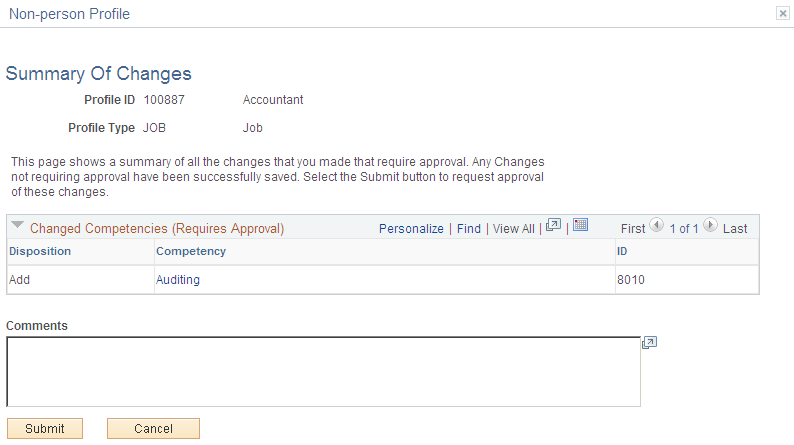
This page lists the changes to the non-person profile shown in the Profile ID field. The fields on this page are similar to the Person Profile - Summary of Changes Page.
Use the Syndication Exceptions page (JPM_JP_SYJPM_JP_SYND_EXC1ND_EXC1) to display the syndication exceptions for a profile.
Syndication exceptions occur when an content item is syndicated from multiple source profiles but has different property values from each source profile.
Navigation
Image: Syndication Exceptions page
This example illustrates the fields and controls on the Syndication Exceptions page. You can find definitions for the fields and controls later on this page.
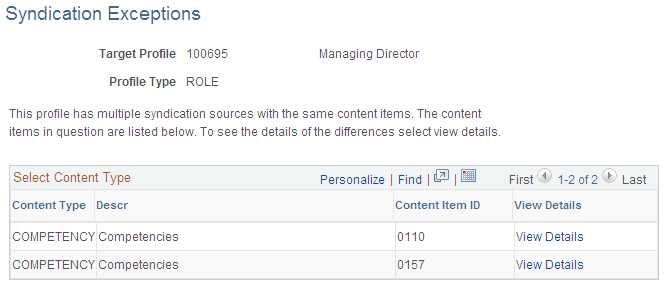
This page lists the content types that include syndication exceptions. Click the View Details link to access the Exception Details page that lists the profile items with syndication exceptions.
Use the Exception Details page (JPM_JP_SYND_EX_SEC) to display details of profile items with exceptions.
Navigation
Click the View Details link on the Syndication Exceptions page.
Image: Exception Details page
This example illustrates the fields and controls on the Exception Details page. You can find definitions for the fields and controls later on this page.
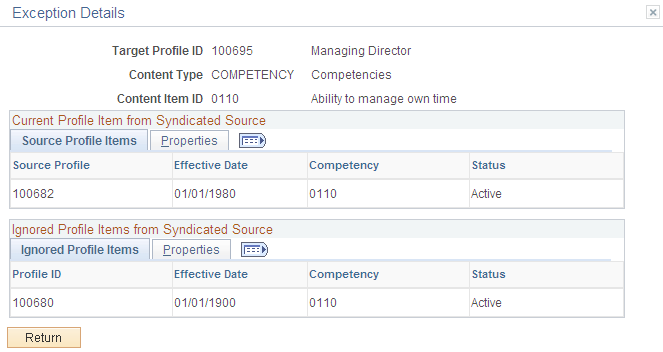
Current Profile Item from Syndicated Source
This tab displays the details of the source profile and profile items that have been syndicated into the target profile.
Ignored Profile Items from Syndicated Source
This tab displays the details of the source profile that conflicts with the syndicated profile items specified in the Source Profile Items tab.
Properties
Access the Properties tab.
Image: Exception Details: Properties tabs
This example illustrates the fields and controls on the Exception Details: Properties tabs. You can find definitions for the fields and controls later on this page.

The Properties tabs display the field values in the syndicate source profiles. In the example shown, the Target Proficiency field has different values in the two source profiles. The values shown for the Source Profile Items are those inserted into the target profile.